
5.6. Analyzing the View Layer
So far you have analyzed the model and the controller, now let's complete the MVC triad. The files constituting the view layer are all enclosed within folders located in appviews as shown in Figure 5-9.
Figure 5.9. Figure 5-9
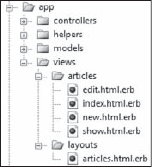
As you can see, inside appviews are two folders, articles and layouts. The articles folder is there to contain all the view templates and partials that are associated with the Articles controller.
Notice how each of the view files generated by the scaffold generator has the format name.html.erb. This indicates that ERb should be used as a template engine to produce HTML.
The layouts folder hosts, as the name implies, layouts. Rails knows by convention that the ArticlesController should render the layout appviewslayoutsarticles.html.erb. This convention can of course be overwritten and you could, for example, decide to reuse the same layout for multiple controllers.
5.6.1. Rails' Layouts vs. ASP.NET's Master Pages
There is a striking similarity between ASP.NET's master pages and Rails' layouts. Both are aimed at sharing the same layout, structure, and style among pages that should have a similar look and feel. The first benefit in both cases is therefore the ability to automatically obtain a consistent style and structure for all the pages that are supposed to have a specific theme.
Both Rails' layout and ASP.NET's master pages help to guarantee that the code is DRY and that you don't have to repeat, for example, the same header and footer for each view template (in Rails' case) or .aspx page (in ASP.NET's case).
Layouts in Rails are contained in the appviewslayouts folder, but their extensions are no different than those of a normal view template. They are, in fact, a view template themselves and as such can embed Ruby code and define the presentation logic in them. Master pages use the ContentPlaceHolder control to indicate the place where the content (the .aspx page) should be wrapped at runtime. Rails' layouts work in a similar fashion, but the yield keyword is used instead.
In ASP.NET, you would have to set the MasterPageFile property to indicate the name of the master page file associated with a page. Unlike ASP.NET, in Rails each view template doesn't need to be aware of the existence of a layout. They get "included into the layout" dynamically at runtime and there is no need to specify anything.
Rails' layouts can be specific to one or more controllers as mentioned before, but it's also possible to define an application-wide controller. If you add an application.html.erb layout, by default it will apply to all of the application's controllers. If a controller specifies otherwise in its code (for example, layout "my_layout") or there's already a layout for a specific controller (for example, articles.html.erb), these take precedence over application.html.erb and will instead be rendered when rendering an action of that controller.
Rails 2 also introduces the concept of partial layouts, as explained in Chapter 9.
5.6.2. The articles.html.erb Layout
This is the code of the articles.html.erb layout:
<!DOCTYPE html PUBLIC "-//W3C//DTD XHTML 1.0 Transitional//EN"
       "http://www.w3.org/TR/xhtml1/DTD/xhtml1-transitional.dtd">

<html xmlns="http://www.w3.org/1999/xhtml" xml:lang="en" lang="en">
<head>
<meta http-equiv="content-type" content="text/html;charset=UTF-8" />
<title>Articles: <%= controller.action_name %></title>
<%= stylesheet_link_tag 'scaffold' %>
</head>
<body>

<p style="color: green"><%= flash[:notice] %></p>

<%= yield  %>

</booy>
</html>
Applications that are based on the output of the scaffold generator are by default XHTML Transitional, but this can easily be changed by specifying something else in each layout.
I've highlighted the interesting bits so as to analyze them line by line. The following code uses the controller.action_name to retrieve the name of the action that's being rendered:
<title>Articles: <%= controller.action_name %></title>
Notice how the tags for embedded Ruby code are <% %>, which should be familiar to you. Whenever you want the calculated expression to be rendered in the page, as opposed to just being interpreted, you place an equal sign after the opening tag (for example, <%= 2 + 2 %>).
Sometimes you'll see a closing tag with a minus sign (that is, -%>), which removes any unnecessary empty lines in the output.
The second highlighted line uses the stylesheet_link_tag helper to include the scaffold stylesheet file, which is located in publicstylesheetsscaffold.css. As always with helpers, they are there to make your life easier, but you could have skipped the helper and written HTML to link to the stylesheet if you were so inclined.
The third highlighted line is interesting because it shows how the flash[:notice] you set in a few actions gets retrieved in the view. And now you also know why the confirmation messages from scaffolding are green:
<p style="color: green"><%= flash[:notice] %></p>
The fact that the flash notice is retrieved from within the article's layout implies that it will be available in every action of that controller (unless you specify otherwise in the controller).
Finally, the most important line of all is: <%= yield %>. This tells Rails to enclose any view template rendered inside the layout.
For example, if you visit /articles/1 you should obtain the following HTML code:
<!DOCTYPE html PUBLIC "-//W3C//DTD XHTML 1.0 Transitional//EN"
       "http://www.w3.org/TR/xhtml1/DTD/xhtml1-transitional.dtd">

<html xmlns="http://www.w3.org/1999/xhtml" xml:lang="en" lang="en">
<head>
<meta http-equiv="content-type" content="text/html;charset=UTF-8" />
<title>Articles: show</title>
<link href="/stylesheets/scaffold.css?1215730002" media="screen" rel="stylesheet"
type="text/css" />
</head>
<body>

<p style="color: green"></p>

<p>
<b>Title:</b>
  Hello, Rails!
</p>

<p>
<b>Body:</b>
  Hi from the body of an article. :)
</p>

<para>
<b>Published:</b>
  true
</p>

<p>
<b>Published at:</b> 2008-07-11 09:24:00 UTC </p> <a href="/articles/1/edit">Edit</a> | <a href="/articles">Back</a> </book> </html>
The final document combines the rendering of the outer layout discussed earlier, with the view template, which in this case is show.html.erb.
As was shown in Figure 5-9, the articles folder contains four templates: index.html.erb, new.html.erb, edit.html.erb, and show.html.erb. Each of these is automatically rendered when the corresponding action is invoked and the requested format is HTML. There are three actions that don't have an associated template and these are create, update, and destroy.
5.6.3. The index.html.erb Template
The index.html.erb template contains the following code:
<h1>Listing articles</h1>

<table>
<tr>
<th>Title</th>
<th>Body</th>
<th>Published</th>
<th>Published at</th>
</tr>

<% for article in @articles %>
<tr>
<td><%=h article.title %></td>
<td><%=h article.body %></td>
<td><%=h article.published %></td>
<td><%=h article.published_at %></td>
<td><%= link_to 'Show', article %></td>
<td><%= link_to 'Edit', edit_article_path(article) %></td>
<td><%= link_to 'Destroy', article, :confirm => 'Are you sure?', :method => :delete
%></td>
</tr>
<% end %>
</table>

<br />

<%= link_to 'New article', new_article_path %>
The instance variable @articles defined in the index action is used here to loop through all the articles. Inside the loop, several attributes of the article object are rendered (one per column). article.title is a string containing the title of the given article object, article.body is a string containing the text, and so on.
You'll notice that there is an h after the equal sign. That's a special helper that is an alias for the ERB::Util method html_escape. This escapes HTML tags transforming the less than and greater than signs into their HTML characters. For example, h("<p>hi</p>") will return "<p>hi</p>." This helper is used whenever you need to display potentially unsafe content (the rule of thumb is that any content provided by the user cannot be trusted).
The scaffold generator tries to be security conscious and strips any tags by employing the h helper. That said, in this specific case, you're the only one who is entering articles (once the app has an authentication system), so there isn't a concrete need to sanitize your own input. There's no harm in leaving them in there though.
link_to is a helper for producing HTML links. To provide a link to the show action for a given article you can use:
<%= link_to 'Show', article %>
The link_to method — like redirect_to(@article) did in the controller — understands that if you pass the article object to the helper as its second argument, you intend to obtain the URL for the show action. This is equivalent to passing article_path(article), but is easier to remember and more concise.
The named route helpers mentioned before still come in handy though. For example, for the Edit link, you would use:
<%= link_to 'Edit', edit_article_path(article) %>
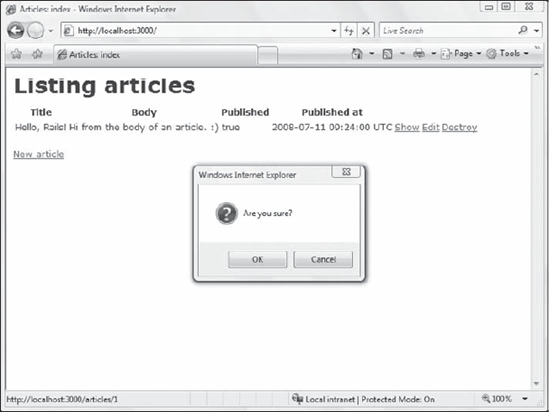
The Destroy link is rather different given that you need to perform a request through the DELETE HTTP method. As mentioned before, Rails emulates this by inserting a hidden form field _method. To make this happen then, the third argument (a hash) needs to have a :method key whose value is set to :delete. Given that you're deleting a record, you want to provide a confirmation step too, as shown in Figure 5-10. All this is accomplished by the following line:
<%= link_to 'Destroy', article, :confirm => 'Are you sure?', :method => :delete %>
The fact that a DELETE HTTP verb is required to delete a record ensures that a record is never accidentally deleted by simply sending a GET request to a given URL from your browser. Adding a confirmation message box makes accidental deletion even less likely.
It's also worth pointing out that the :comfirm and :method keys are part of the same hash, which is the third parameter you pass to the link_to method.
The last link that was generated takes advantage of the new_article_path route helper:
<%= link_to 'New article', new_article_path %>
Figure 5.10. Figure 5-10
5.6.4. The new.html.erb Template
The template for the new action is very straightforward:
<h1>New article</h1>

<% form_for(@article) do |f| %>
<%= f.error_messages %>

<p>
<%= f.label :title %><br />
<%= f.text_field :title %>
</p>
<p>
<%= f.label :body %><br />
<%= f.text_area :body %>
</p>
<p>
<%= f.label :published %><br />
<%= f.check_box :published %>
</p>
<p>
<%= f.label :published_at %><br />
<%= f.datetime_select :published_at %>
</p>
<p>
<%= f.submit "Create" %>
</p>
<% end %>

<%= link_to 'Back', articles_path %>
The form_for helper is a method that is able to create a form for a given model object. In this case the model object is @article, which was set in the new action of the Articles controller, to be a brand new Article object. The form_for helper understands that the object it's creating the form for is a new object, so it generates an empty input form.
Notice that the action that needs to process the form is not explicitly specified; this is because the helper is aware of REST and can yield a RESTful form automatically for you.
Inside the associated block, the f block argument is used to give scope to each of the fields that correspond to the attributes of the given object (except for its id). This allows you to write a very concise line, such as:
<%= f.text_field :title %>
This is equivalent to using the following, less succinct method:
<%= text_field :article, :title %>
During runtime, both translate into this XHTML code:
<input id="article_title" name="article[title]" size="30" type="text" />
If you visit http://localhost:3000/articles/new and view the source code that's been generated, you'll see how each of the fields is transformed from the DSL (Domain Specific Language) methods provided by ActionView to XHTML. You'll quickly notice how these methods are very convenient.
The form_for line gets translated into:
<form action="/articles" class="new_article" id="new_article" method="post">
A POST /articles request will be handled by the create action, which is exactly what you want when the Submit button is clicked.
form_for in a non-RESTful ContextIf config outes.rb didn't identify the articles as a resource with map.resources :articles, you would be doing "traditional" development in a non-RESTful way. In that case the form_for arguments would have to be more verbose and explicit as follows: <% form_for :article, :url => { :action => "create" } do |f| %> |
The syntax for the Submit button is just as succinct:
<%= f.submit "Create" %>
The scope around @article that's provided by the block enables that generic line to be rendered in XHTML as follows:
<input id="article_submit" name="commit" type="submit" value="Create" />
You'll notice that this is a very different approach than using special controls, as ASP.NET does, but it's just as convenient.
In this form, the scaffold generator uses the label, text_field, text_area, check_box, datetime_select, and submit methods inside the block associated with the form_for helper. Other methods are available as well though, such as file_field, hidden_field, password_field, and radio_button.
On the first line inside the block there is a mysterious <%= f.error_messages %>. This is used to display any possible errors for the model object. The requirement for this will become clear as validations are introduced later on.
Finally, the new.html.erb template provides a "Back" link to a list of all the articles. As usual, the link_to URL helper is used, this time in conjunction with the named route helper articles_path.
5.6.5. The edit.html.erb Template
The edit.html.erb file contains the following code:
<h1>Editing article</h1>

<% form_for(@article) do |f| %>
<%= f.error_messages %>

<p>
<%= f.label :title %><br />
<%= f.text_field :title %>
</p>
<p>
<%= f.label :body %><br />
<%= f.text_area :body %>
</p>
<p>
<%= f.label :published %><br />
<%= f.check_box :published %>
</p>
<p>
<%= f.label :published_at %><br />
<%= f.datetime_select :published_at %>
</p>
<p>
<%= f.submit "Update" %>
</p>
<% end %>

<%= link_to 'Show', @article %> |
<%= link_to 'Back', articles_path %>
If you exclude the h1 tag and a "Show" link at the bottom, this is identical to new.html.erb. The reason for this is that as a matter of fact, the new and edit forms have the same fields. On top of that, the form_for method is smart enough to figure out that this time around the Article object — assigned to @article in the controller — is not empty and that it should pre-fill the fields for the existing attributes of the object as shown in Figure 5-11.
Figure 5.11. Figure 5-11

If you think that all this repetition directly violates the DRY principle, you're absolutely correct. You are definitely repeating yourself in the new.html.erb and edit.html.erb templates. To fix this you'll need to use partials, as explained in a subsequent section.
5.6.6. The show.html.erb Template
The template for the show action is defined as follows:
<p>
<b>Title:</b>
<%=h @article.title %>
</p>

<p>
<b>Body:</b>
<%=h @article.body %>
</p>

<p>
<b>Published:</b>
<%=h @article.published %>
</p>

<p>
<b>Published at:</b>
<%=h @article.published_at %>
</p>


<%= link_to 'Edit', edit_article_path(@article) %> |
<%= link_to 'Back', articles_path %>
You don't need a form_for helper because you are just displaying data. The @article instance variable was set in the show action, so you can now display its attributes (highlighted in the preceding code).