Chapter 4. Rails-flavored Ruby
Grounded in examples from Chapter 3, this chapter explores some elements of the Ruby programming language that are important for Rails. Ruby is a big language, but fortunately the subset needed to be productive as a Rails developer is relatively small. It also differs somewhat from the usual material covered in an introduction to Ruby. This chapter is designed to give you a solid foundation in Rails-flavored Ruby, whether or not you have prior experience in the language. It covers a lot of material, and it’s OK not to get it all on the first pass. We’ll refer back to it frequently in future chapters.1
1 For a more systematic introduction to Ruby, see Learn Enough Ruby to Be Dangerous.
4.1 Motivation
As we saw in the last chapter, it’s possible to develop the skeleton of a Rails application, and even start testing it, with essentially no knowledge of the underlying Ruby language. We did this by relying on the test code provided by the tutorial and addressing each error message until the test suite was passing. This situation can’t last forever, though, and we’ll open this chapter with an addition to the site that brings us face-to-face with our Ruby limitations.
As in Section 3.2, we’ll use a separate topic branch to keep our changes self-contained:
$ git checkout -b rails-flavored-ruby
We’ll merge our changes into master in Section 4.5.
4.1.1 Built-in helpers
When we last saw our new application, we had just updated our mostly static pages to use Rails layouts to eliminate duplication in our views, as shown in Listing 4.1 (which is the same as Listing 3.37).
Listing 4.1: The sample application site layout.
app/views/layouts/application.html.erb
<!DOCTYPE html>
<html>
  <head>
    <title>
    <%= yield(:title) %> | Ruby on Rails Tutorial Sample App</title>
    <%= csrf_meta_tags %>
    <%= csp_meta_tag %>

    <%= stylesheet_link_tag 'application', media: 'all',
                                           'data-turbolinks-track': 'reload' %>
    <%= javascript_pack_tag 'application', 'data-turbolinks-track': 'reload' %>
  </head>

  <body>
    <%= yield %>
  </body>
</html>
Let’s focus on one particular line in Listing 4.1:
<%= stylesheet_link_tag 'application', media: 'all',
                                       'data-turbolinks-track': 'reload' %>
This uses the built-in Rails function stylesheet_link_tag (which you can read more about at the Rails API)2 to include application.css for all media types (including computer screens and printers). To an experienced Rails developer, this line looks simple, but there are at least four potentially confusing Ruby ideas: built-in Rails methods, method invocation with missing parentheses, symbols, and hashes. We’ll cover all of these ideas in this chapter.
2An “API” is an Application Programming Interface, which is a set of methods and other conventions that serves as an abstraction layer for interacting with a software system. The practical effect is that we as developers don’t need to understand the program internals; we need only be famliar with the public-facing API. In the present case, this means that, rather than be concerned with how stylesheet_link_tag is implemented, we need only know how it behaves.
4.1.2 Custom helpers
In addition to coming equipped with a large number of built-in functions for use in the views, Rails also allows the creation of new ones. Such functions are called helpers; to see how to make a custom helper, let’s start by examining the title line from Listing 4.1:
<%= yield(:title) %> | Ruby on Rails Tutorial Sample App
This relies on the definition of a page title (using provide) in each view, as in
<% provide(:title, "Home") %>
<h1>Sample App</h1>
<p>
  This is the home page for the
  <a href="https://www.railstutorial.org/">Ruby on Rails Tutorial</a>
  sample application.
</p>
But what if we don’t provide a title? It’s a good convention to have a base title we use on every page, with an optional page title if we want to be more specific. We’ve almost achieved that with our current layout, with one wrinkle: as you can see if you delete the provide call in one of the views, in the absence of a page-specific title the full title appears as follows:
| Ruby on Rails Tutorial Sample App
In other words, there’s a suitable base title, but there’s also a leading vertical bar character | at the beginning.
To solve the problem of a missing page title, we’ll define a custom helper called full_title. The full_title helper returns a base title, “Ruby on Rails Tutorial Sample App”, if no page title is defined, and adds a vertical bar preceded by the page title if one is defined (Listing 4.2).3
3 If a helper is specific to a particular controller, you should put it in the corresponding helper file; for example, helpers for the Static Pages controller generally go in app/helpers/static_pages_helper.rb. In our case, we expect the full_title helper to be used on all the site’s pages, and Rails has a special helper file for this case: app/helpers/application_helper.rb.
Listing 4.2: Defining a full_title helper.
app/helpers/application_helper.rb
module ApplicationHelper

  # Returns the full title on a per-page basis.
  def full_title(page_title = '')
    base_title = "Ruby on Rails Tutorial Sample App"
    if page_title.empty?
      base_title
    else
      page_title + " | " + base_title
    end
  end
end
Now that we have a helper, we can use it to simplify our layout by replacing
<title><%= yield(:title) %> | Ruby on Rails Tutorial Sample App</title>
with
<title><%= full_title(yield(:title)) %></title>
as seen in Listing 4.3.
Listing 4.3: The site layout with the full_title helper. green
app/views/layouts/application.html.erb
<!DOCTYPE html>
<html>
  <head>
    <title><%= full_title(yield(:title)) %></title>
    <%= csrf_meta_tags %>
    <%= csp_meta_tag %>

    <%= stylesheet_link_tag 'application', media: 'all',
                                           'data-turbolinks-track': 'reload' %>
    <%= javascript_pack_tag 'application', 'data-turbolinks-track': 'reload' %>
  </head>
  <body>
    <%= yield %>
  </body>
</html>
To put our helper to work, we can eliminate the unnecessary word “Home” from the Home page, allowing it to revert to the base title. We do this by first updating our test with the code in Listing 4.4, which updates the previous title test and adds one to test for the absence of the custom "Home" string in the title.
Listing 4.4: An updated test for the Home page’s title. red
test/controllers/static_pages_controller_test.rb
require 'test_helper'

class StaticPagesControllerTest < ActionDispatch::IntegrationTest

  test "should get home" do
    get static_pages_home_url
    assert_response :success
    assert_select "title", "Ruby on Rails Tutorial Sample App"
  end

  test "should get help" do
    get static_pages_help_url
    assert_response :success
    assert_select "title", "Help | Ruby on Rails Tutorial Sample App"
  end

  test "should get about" do
    get static_pages_about_url
    assert_response :success
    assert_select "title", "About | Ruby on Rails Tutorial Sample App"
  end
end
Let’s run the test suite to verify that one test fails:4
4 I’ll generally run the test suite explicitly for completeness, but in practice I usually just use Guard as described in Section 3.6.2.
Listing 4.5: red
$ rails test
3 tests, 6 assertions, 1 failures, 0 errors, 0 skips
To get the test suite to pass, we’ll remove the provide line from the Home page’s view, as seen in Listing 4.6.
Listing 4.6: The Home page with no custom page title. green
app/views/static_pages/home.html.erb
<h1>Sample App</h1>
<p>
  This is the home page for the
  <a href="https://www.railstutorial.org/">Ruby on Rails Tutorial</a>
   sample application.
</p>
At this point the tests should pass:
Listing 4.7: green
$ rails test
(Previous examples have included partial output of running rails test, including the number of passing and failing tests, but for brevity these will usually be omitted from now on.)
As with the line to include the application stylesheet in Section 4.1.1, the code in Listing 4.2 may look simple to the eyes of an experienced Rails developer, but it’s full of important Ruby ideas: modules, method definition, optional method arguments, comments, local variable assignment, booleans, control flow, string concatenation, and return values. This chapter will cover all of these ideas as well.
4.2 Strings and methods
Our principal tool for learning Ruby will be the Rails console, a command-line program for interacting with Rails applications first seen in Section 2.3.3. The console itself is built on top of interactive Ruby (irb), and thus has access to the full power of the Ruby language. (As we’ll see in Section 4.4.4, the console also has access to the Rails environment.)
If you’re using the cloud IDE, there are a couple of irb configuration parameters I recommend including. Using the simple nano text editor, open a file called .irbrc in the home directory:5
5 The nano editor is easier for beginners, but for this sort of short edit I would almost always use Vim instead. To learn Minimum Viable Vim™, see Learn Enough Text Editor to Be Dangerous.
$ nano ~/.irbrc
Then fill it with the contents of Listing 4.8, which arranges to simplify the irb prompt and suppress some annoying auto-indent behavior.
Listing 4.8: Adding some irb configuration.
~/.irbrc
IRB.conf[:PROMPT_MODE] = :SIMPLE
IRB.conf[:AUTO_INDENT_MODE] = false
Finally, exit nano with Ctrl-X and save ~/.irbrc by typing y to confirm.
We can now start the console at the command line as follows:
$ rails console
Loading development environment
>>
By default, the console starts in a development environment, which is one of three separate environments defined by Rails (the others are test and production). This distinction won’t be important in this chapter, but it will in the future, and we’ll learn more about environments in Section 7.1.1.
The console is a great learning tool, and you should feel free to explore. Don’t worry—you (probably) won’t break anything. When using the console, type Ctrl-C if you get stuck, or type Ctrl-D to exit the console altogether. As with a regular terminal shell, you can also use up-arrow to retrieve previous commands, which can be a significant time-saver.
Throughout the rest of this chapter, you might find it helpful to consult the Ruby API. It’s packed (perhaps even too packed) with information; for example, to learn more about Ruby strings you can look at the Ruby API entry for the String class.
During this discussion, we’ll sometimes use Ruby comments, which start with the pound sign # (also called the “hash mark” or (more poetically) the “octothorpe”) and extend to the end of the line. Ruby ignores comments, but they are useful for human readers (including, often, the original author!). In the code
# Returns the full title on a per-page basis.
def full_title(page_title = '')
  .
  .
  .
end
the first line is a comment indicating the purpose of the subsequent function definition.
You don’t ordinarily include comments in console sessions, but for instructional purposes I’ll include some comments in what follows, like this:
$ rails console
>> 17 + 42   # Integer addition
=> 59
If you follow along in this section by typing or copying-and-pasting commands into your own console, you can of course omit the comments if you like; the console will ignore them in any case.
4.2.1 Strings
Strings are probably the most important data structure for web applications, since web pages ultimately consist of strings of characters sent from the server to the browser. Let’s start exploring strings with the console:
$ rails console
>> ""          # An empty string
=> ""
>> "foo"       # A nonempty string
=> "foo"
These are string literals (also called literal strings), created using the double quote character ". The console prints the result of evaluating each line, which in the case of a string literal is just the string itself.
We can also concatenate strings with the + operator:
>> "foo" + "bar"    # String concatenation
=> "foobar"
Here the result of evaluating "foo" plus "bar" is the string "foobar".6
6 For more on the origins of “foo” and “bar”—and, in particular, the possible non-relation of “foobar” to “FUBAR”—see the Jargon File entry on “foo”.
Another way to build up strings is via interpolation using the special syntax #{}:7
7 Programmers familiar with Perl or PHP should compare this to the automatic interpolation of dollar sign variables in expressions like "foo $bar".
>> first_name = "Michael"    # Variable assignment
=> "Michael"
>> "#{first_name} Hartl"     # String interpolation
=> "Michael Hartl"
Here we’ve assigned the value "Michael" to the variable first_name and then interpolated it into the string "#{first_name} Hartl". We could also assign both strings a variable name:
>> first_name = "Michael"
=> "Michael"
>> last_name = "Hartl"
=> "Hartl"
>> first_name + " " + last_name     # Concatenation, with a space in between
=> "Michael Hartl"
>> "#{first_name} #{last_name}"     # The equivalent interpolation
=> "Michael Hartl"
Note that the final two expressions are equivalent, but I prefer the interpolated version; having to add the single space " " seems a bit awkward.
Printing
To print a string to the screen, the most commonly used Ruby function is puts (pronounced “put ess”, for “put string”, though some people do pronounce it like the word “puts” instead):
>> puts "foo"   # put string
foo
=> nil
The puts method operates as a side-effect: the expression puts "foo" prints the string to the screen and then returns literally nothing: nil is a special Ruby value for “nothing at all”. (In what follows, I’ll sometimes suppress the => nil part for simplicity.)
As seen in the examples above, using puts automatically includes a new line after the string gets printed (the same as the behavior of the echo command covered in Learn Enough Command Line to Be Dangerous). The closely related print command prints the raw string without the extra line:
>> print "foo" # print string without extra line
foo=> nil
You can see here that the output foo bumps right up against the prompt in the second line.
The technical name for an extra line of blank space is a newline, typically represented by “backslash n” . We can arrange for print to replicate the behavior of puts by including an explicit newline character in the string:
>> print "foo
"     # Same as puts "foo"
foo
=> nil
Single-quoted strings
All the examples so far have used double-quoted strings, but Ruby also supports single-quoted strings. For many uses, the two types of strings are effectively identical:
>> 'foo'       # A single-quoted string
=> "foo"
>> 'foo' + 'bar'
=> "foobar"
There’s an important difference, though; Ruby won’t interpolate into single-quoted strings:
>> '#{foo} bar'       # Single-quoted strings don't allow interpolation
=> "#{foo} bar"
Note how the console returns values using double-quoted strings, which requires a backslash to escape special character combinations such as #{.
If double-quoted strings can do everything that single-quoted strings can do, and interpolate to boot, what’s the point of single-quoted strings? They are often useful because they are truly literal, containing exactly the characters you type. For example, the “backslash” character is special on most systems, as in the literal newline . If you want a variable to contain a literal backslash, single quotes make it easier:
>> '
'    # A literal 'backslash n' combination
=> "\n"
As with the #{ combination in our previous example, Ruby needs to escape the backslash with an additional backslash; inside double-quoted strings, a literal backslash is represented with two backslashes. For a small example like this, there’s not much savings, but if there are lots of things to escape it can be a real help:
>> 'Newlines (
) and tabs (	) both use the backslash character .'
=> "Newlines (\n) and tabs (\t) both use the backslash character \."
Finally, it’s worth noting that, in the common case that both single and double quotes work just fine, you’ll often find that the source code switches between the two without any apparent pattern. There’s really nothing to be done about this, except to say, “Welcome to Ruby! You’ll get used to it soon enough.”
Exercises
Solutions to the exercises are available to all Rails Tutorial purchasers here.
To see other people’s answers and to record your own, subscribe to the Rails Tutorial course or to the Learn Enough All Access Bundle.
1. Assign variables city and state to your current city and state of residence. (If residing outside the U.S., substitute the analogous quantities.)
2. Using interpolation, print (using puts) a string consisting of the city and state separated by a comma and a space, as in “Los Angeles, CA”.
3. Repeat the previous exercise but with the city and state separated by a tab character.
4. What is the result if you replace double quotes with single quotes in the previous exercise?
4.2.2 Objects and message passing
Everything in Ruby, including strings and even nil, is an object. We’ll see the technical meaning of this in Section 4.4.2, but I don’t think anyone ever understood objects by reading the definition in a book; you have to build up your intuition for objects by seeing lots of examples.
It’s easier to describe what objects do, which is respond to messages. An object like a string, for example, can respond to the message length, which returns the number of characters in the string:
8 Apologies in advance for switching haphazardly between function and method throughout this chapter; in Ruby, they’re the same thing: all methods are functions, and all functions are methods, because everything is an object.
>> "foobar".length     # Passing the "length" message to a string
=> 6
Typically, the messages that get passed to objects are methods, which are functions defined on those objects.8 Strings also respond to the empty? method:
>> "foobar".empty?
=> false
>> "".empty?
=> true
Note the question mark at the end of the empty? method. This is a Ruby convention indicating that the return value is boolean: true or false. Booleans are especially useful for control flow:
>> s = "foobar"
>> if s.empty?
>>   "The string is empty"
>> else
>>   "The string is nonempty"
>> end
=> "The string is nonempty"
To include more than one clause, we can use elsif (else + if):
>> if s.nil?
>>   "The variable is nil"
>> elsif s.empty?
>>   "The string is empty"
>> elsif s.include?("foo")
>>   "The string includes 'foo'"
>> end
=> "The string includes 'foo'"
Booleans can also be combined using the && (“and”), || (“or”), and ! (“not”) operators:
>> x = "foo"
=> "foo"
>> y = ""
=> ""
>> puts "Both strings are empty" if x.empty? && y.empty?
=> nil
>> puts "One of the strings is empty" if x.empty? || y.empty?
"One of the strings is empty"
=> nil
>> puts "x is not empty" if !x.empty?
"x is not empty"
=> nil
Since everything in Ruby is an object, it follows that nil is an object, so it too can respond to methods. One example is the to_s method that can convert virtually any object to a string:
>> nil.to_s
=> ""
This certainly appears to be an empty string, as we can verify by passing multiple methods to nil, a technique known as method chaining:
>> nil.empty?
NoMethodError: undefined method `empty?' for nil:NilClass
>> nil.to_s.empty?      # Message chaining
=> true
We see here that the nil object doesn’t itself respond to the empty? method, but nil.to_s does.
There’s a special method for testing for nil-ness, which you might be able to guess:
>> "foo".nil?
=> false
>> "".nil?
=> false
>> nil.nil?
=> true
The code
puts "x is not empty" if !x.empty?
also shows an alternate use of the if keyword: Ruby allows you to write a statement that is evaluated only if the statement following if is true. There’s a complementary unless keyword that works the same way:
>> string = "foobar"
>> puts "The string '#{string}' is nonempty." unless string.empty?
The string 'foobar' is nonempty.
=> nil
It’s worth noting that the nil object is special, in that it is the only Ruby object that is false in a boolean context, apart from false itself. We can see this using !! (read “bang bang”), which negates an object twice, thereby coercing it to its boolean value:
>> !!nil
=> false
In particular, all other Ruby objects are true, even 0:
>> !!0
=> true
Exercises
Solutions to the exercises are available to all Rails Tutorial purchasers here.
To see other people’s answers and to record your own, subscribe to the Rails Tutorial course or to the Learn Enough All Access Bundle.
1. What is the length of the string “racecar”?
2. Confirm using the reverse method that the string in the previous exercise is the same when its letters are reversed.
3. Assign the string “racecar” to the variable s. Confirm using the comparison operator == that s and s.reverse are equal.
4. What is the result of running the code shown in Listing 4.9? How does it change if you reassign the variable s to the string “onomatopoeia”? Hint: Use up-arrow to retrieve and edit previous commands
Listing 4.9: A simple palindrome test.
>> puts "It's a palindrome!" if s == s.reverse
4.2.3 Method definitions
The console allows us to define methods the same way we did with the home action from Listing 3.9 or the full_title helper from Listing 4.2. (Defining methods in the console is a bit cumbersome, and ordinarily you would use a file, but it’s convenient for demonstration purposes.) For example, let’s define a function string_message that takes a single argument and returns a message based on whether the argument is empty or not:
>> def string_message(str = '')
>>   if str.empty?
>>     "It's an empty string!"
>>   else
>>     "The string is nonempty."
>>   end
>> end
=> :string_message
>> puts string_message("foobar")
The string is nonempty.
>> puts string_message("")
It's an empty string!
>> puts string_message
It's an empty string!
As seen in the final example, it’s possible to leave out the argument entirely (in which case we can also omit the parentheses). This is because the code
def string_message(str = '')
contains a default argument, which in this case is the empty string. This makes the str argument optional, and if we leave it off it automatically takes the given default value.
Note that Ruby functions have an implicit return, meaning they return the last statement evaluated—in this case, one of the two message strings, depending on whether the method’s argument str is empty or not. Ruby also has an explicit return option; the following function is equivalent to the one above:
>> def string_message(str = '')
>>   return "It's an empty string!" if str.empty?
>>   return "The string is nonempty."
>> end
(The alert reader might notice at this point that the second return here is actually unnecessary—being the last expression in the function, the string "The string is nonempty." will be returned regardless of the return keyword, but using return in both places has a pleasing symmetry to it.)
It’s also important to understand that the name of the function argument is irrelevant as far as the caller is concerned. In other words, the first example above could replace str with any other valid variable name, such as the_function_argument, and it would work just the same:
>> def string_message(the_function_argument = '')
>>  if the_function_argument.empty?
>>    "It's an empty string!"
>>  else
>>    "The string is nonempty."
>>  end
>> end
=> nil
>> puts string_message("")
It's an empty string!
>> puts string_message("foobar")
The string is nonempty.
Exercises
Solutions to the exercises are available to all Rails Tutorial purchasers here.
To see other people’s answers and to record your own, subscribe to the Rails Tutorial course or to the Learn Enough All Access Bundle.
1. By replacing FILL_IN with the appropriate comparison test shown in Listing 4.10, define a method for testing palindromes. Hint: Use the comparison shown in Listing 4.9.
2. By running your palindrome tester on “racecar” and “onomatopoeia”, confirm that the first is a palindrome and the second isn’t.
3. By calling the nil? method on palindrome_tester("racecar"), confirm that its return value is nil (i.e., calling nil? on the result of the method should return true). This is because the code in Listing 4.10 prints its responses instead of returning them.
Listing 4.10: A simple tester for palindromes.
>> def palindrome_tester(s)
>>  if FILL_IN
>>    puts "It's a palindrome!"
>>  else
>>    puts "It's not a palindrome."
>>  end
>> end
4.2.4 Back to the title helper
We are now in a position to understand the full_title helper from Listing 4.2,9 which appears with commented annotations in Listing 4.11.
9 Well, there will still be one thing left that we don’t understand, which is how Rails ties this all together: mapping URLs to actions, making the full_title helper available in views, etc. This is an interesting subject, and I encourage you to investigate it further, but knowing exactly how Rails works is not necessary when using Rails.
Listing 4.11: An annotated title_helper.
app/helpers/application_helper.rb
module ApplicationHelper

  # Returns the full title on a per-page basis.       # Documentation comment
  def full_title(page_title = '')                     # Method def, optional arg
    base_title = "Ruby on Rails Tutorial Sample App"  # Variable assignment
    if page_title.empty?                              # Boolean test
      base_title                                      # Implicit return
    else
      page_title + " | " + base_title                 # String concatenation
    end
  end
end
These elements—function definition (with an optional argument), variable assignment, boolean tests, control flow, and string concatenation10—come together to make a compact helper method for use in our site layout. The final element is module ApplicationHelper: modules give us a way to package together related methods, which can then be mixed in to Ruby classes using include. When writing ordinary Ruby, you often write modules and include them explicitly yourself, but in the case of a helper module Rails handles the inclusion for us. The result is that the full_title method is automagically available in all our views.
10 It’s tempting to use string interpolation instead—indeed, this was the technique used in all previous versions of the tutorial—but in fact the call to provide converts the string into a so-called SafeBuffer object instead of an ordinary string. Interpolating and inserting into a view template then over-escapes any inserted HTML, so a title such as “Help’s on the way” would be converted to “Help&#39;s on the way”. (Thanks to reader Jeremy Fleischman for pointing out this subtle issue.)
4.3 Other data structures
Although web apps are ultimately about strings, actually making those strings requires using other data structures as well. In this section, we’ll learn about some Ruby data structures important for writing Rails applications.
4.3.1 Arrays and ranges
An array is just a list of elements in a particular order. We haven’t discussed arrays yet in the Rails Tutorial, but understanding them gives a good foundation for understanding hashes (Section 4.3.3) and for aspects of Rails data modeling (such as the has_many association seen in Section 2.3.3 and covered more in Section 13.1.3).
So far we’ve spent a lot of time understanding strings, and there’s a natural way to get from strings to arrays using the split method:
>> "foo bar baz".split # Split a string into a three-element array.
=> ["foo", "bar", "baz"]
The result of this operation is an array of three strings. By default, split divides a string into an array by splitting on whitespace, but you can split on nearly anything else as well:
>> "fooxbarxbaz".split('x')
=> ["foo", "bar", "baz"]
As is conventional in most computer languages, Ruby arrays are zero-offset, which means that the first element in the array has index 0, the second has index 1, and so on:
>> a = [42, 8, 17]
=> [42, 8, 17]
>> a[0]              # Ruby uses square brackets for array access.
=> 42
>> a[1]
=> 8
>> a[2]
=> 17
>> a[-1]             # Indices can even be negative!
=> 17
We see here that Ruby uses square brackets to access array elements. In addition to this bracket notation, Ruby offers synonyms for some commonly accessed elements:11
11 The second method used here isn’t currently part of Ruby itself, but rather is added by Rails. It works in this case because the Rails console automatically includes the Rails extensions to Ruby.
>> a                   # Just a reminder of what 'a' is
=> [42, 8, 17]
>> a.first
=> 42
>> a.second
=> 8
>> a.last
=> 17
>> a.last == a[-1]     # Comparison using ==
=> true
This last line introduces the equality comparison operator ==, which Ruby shares with many other languages, along with the associated != (“not equal”), etc.:
>> x = a.length        # Like strings, arrays respond to the 'length' method.
 => 3
>> x == 3
=> true
>> x == 1
=> false
>> x != 1
=> true
>> x >= 1
=> true
>> x < 1
=> false
In addition to length (seen in the first line above), arrays respond to a wealth of other methods:
>> a
=> [42, 8, 17]
>> a.empty?
=> false
>> a.include?(42)
=> true
>> a.sort
=> [8, 17, 42]
>> a.reverse
=> [17, 8, 42]
>> a.shuffle
=> [17, 42, 8]
>> a
=> [42, 8, 17]
Note that none of the methods above changes a itself. To mutate the array, use the corresponding “bang” methods (so-called because the exclamation point is usually pronounced “bang” in this context):
>> a
=> [42, 8, 17]
>> a.sort!
=> [8, 17, 42]
>> a
=> [8, 17, 42]
You can also add to arrays with the push method or its equivalent operator, <<, called the “shovel operator”:
>> a.push(6)                   # Pushing 6 onto an array
=> [42, 8, 17, 6]
>> a << 7                      # Pushing 7 onto an array
=> [42, 8, 17, 6, 7]
>> a << "foo" << "bar"         # Chaining array pushes
=> [42, 8, 17, 6, 7, "foo", "bar"]
This last example shows that you can chain pushes together, and also that, unlike arrays in many other languages, Ruby arrays can contain a mixture of different types (in this case, integers and strings).
Before we saw split convert a string to an array. We can also go the other way with the join method:
>> a
=> [42, 8, 17, 6, 7, "foo", "bar"]
>> a.join                      # Join on nothing.
=> "4281767foobar"
>> a.join(', ')                # Join on comma-space.
=> "42, 8, 17, 6, 7, foo, bar"
Closely related to arrays are ranges, which can probably most easily be understood by converting them to arrays using the to_a method:
>> 0..9 => 0..9
>> 0..9.to_a              # Oops, call to_a on 9.
NoMethodError: undefined method `to_a' for 9:Fixnum
>> (0..9).to_a            # Use parentheses to call to_a on the range.
=> [0, 1, 2, 3, 4, 5, 6, 7, 8, 9]
Though 0..9 is a valid range, the second expression above shows that we need to add parentheses to call a method on it.
Ranges are useful for pulling out array elements:
>> a = %w[foo bar baz quux]        # Use %w to make a string array.
=> ["foo", "bar", "baz", "quux"]
>> a[0..2]
=> ["foo", "bar", "baz"]
A particularly useful trick is to use the index -1 at the end of the range to select every element from the starting point to the end of the array without explicitly having to use the array’s length:
>> a = (0..9).to_a
=> [0, 1, 2, 3, 4, 5, 6, 7, 8, 9]
>> a[2..(a.length-1)]               # Explicitly use the array's length.
=> [2, 3, 4, 5, 6, 7, 8, 9]
>> a[2..-1]                         # Use the index -1 trick.
=> [2, 3, 4, 5, 6, 7, 8, 9]
Ranges also work with characters:
>> ('a'..'e').to_a
=> ["a", "b", "c", "d", "e"]
Exercises
Solutions to the exercises are available to all Rails Tutorial purchasers here.
To see other people’s answers and to record your own, subscribe to the Rails Tutorial course or to the Learn Enough All Access Bundle.
1. Assign a to be to the result of splitting the string “A man, a plan, a canal, Panama” on comma-space.
2. Assign s to the string resulting from joining a on nothing.
3. Split s on whitespace and rejoin on nothing. Use the palindrome test from Listing 4.10 to confirm that the resulting string s is not a palindrome by the current definition. Using the downcase method, show that s.downcase is a palindrome.
4. What is the result of selecting element 7 from the range of letters a through z? What about the same range reversed? Hint: In both cases you will have to convert the range to an array.
4.3.2 Blocks
Both arrays and ranges respond to a host of methods that accept blocks, which are simultaneously one of Ruby’s most powerful and most confusing features:
>> (1..5).each { |i| puts 2 * i }
2
4
6
8
10
=> 1..5
This code calls the each method on the range (1..5) and passes it the block { |i| puts 2 * i }. The vertical bars around the variable name in |i| are Ruby syntax for a block variable, and it’s up to the method to know what to do with the block. In this case, the range’s each method can handle a block with a single local variable, which we’ve called i, and it just executes the block for each value in the range.
Curly braces are one way to indicate a block, but there is a second way as well:
>> (1..5).each do |i|
?> puts 2 * i
>> end
2
4
6
8
10
=> 1..5
Blocks can be more than one line, and often are. In the Rails Tutorial we’ll follow the common convention of using curly braces only for short one-line blocks and the do..end syntax for longer one-liners and for multi-line blocks:
>> (1..5).each do |number|
?>   puts 2 * number
>>   puts '--'
>> end
2
--
4
--
6
--
8
--
10
--
=> 1..5
Here I’ve used number in place of i just to emphasize that any variable name will do.
Unless you already have a substantial programming background, there is no shortcut to understanding blocks; you just have to see them a lot, and eventually you’ll get used to them.12 Luckily, humans are quite good at making generalizations from concrete examples; here are a few more, including a couple using the map method:
12 Programming experts, on the other hand, might benefit from knowing that blocks are closures, which are one-shot anonymous functions with data attached.
>> 3.times { puts "Betelgeuse!" }   # 3.times takes a block with no variables.
"Betelgeuse!"
"Betelgeuse!"
"Betelgeuse!"
=> 3
>> (1..5).map { |i| i**2 }          # The ** notation is for 'power'.
=> [1, 4, 9, 16, 25]
>> %w[a b c]                        # Recall that %w makes string arrays.
=> ["a", "b", "c"]
>> %w[a b c].map { |char| char.upcase }
=> ["A", "B", "C"]
>> %w[A B C].map { |char| char.downcase }
=> ["a", "b", "c"]
As you can see, the map method returns the result of applying the given block to each element in the array or range. In the final two examples, the block inside map involves calling a particular method on the block variable, and in this case there’s a commonly used shorthand called “symbol-to-proc”:
>> %w[A B C].map { |char| char.downcase }
=> ["a", "b", "c"]
>> %w[A B C].map(&:downcase)
=> ["a", "b", "c"]
(This strange-looking but compact code uses a symbol, which we’ll discuss in Section 4.3.3.) One interesting thing about this construction is that it was originally added to Ruby on Rails, and people liked it so much that it has now been incorporated into core Ruby.
As one final example of blocks, we can take a look at an individual test from the file in Listing 4.4:
test "should get home" do
  get static_pages_home_url
  assert_response :success
  assert_select "title", "Ruby on Rails Tutorial Sample App"
end
It’s not important to understand the details (and in fact I don’t know the details offhand), but we can infer from the presence of the do keyword that the body of the test is a block. The test method takes in a string argument (the description) and a block, and then executes the body of the block as part of running the test suite.
By the way, we’re now in a position to understand the line of Ruby I threw into Section 1.4.3 to generate random subdomains:13
13 As noted in Chapter 1, in this case the code ('a'..'z').to_a.sample(8).join is an even more compact way of getting the same result.
('a'..'z').to_a.shuffle[0..7].join
Let’s build it up step-by-step:
>> ('a'..'z').to_a                      # An alphabet array
=> ["a", "b", "c", "d", "e", "f", "g", "h", "i", "j", "k", "l", "m", "n", "o",
"p", "q", "r", "s", "t", "u", "v", "w", "x", "y", "z"]
>> ('a'..'z').to_a.shuffle              # Shuffle it.
=> ["c", "g", "l", "k", "h", "z", "s", "i", "n", "d", "y", "u", "t", "j", "q",
"b", "r", "o", "f", "e", "w", "v", "m", "a", "x", "p"]
>> ('a'..'z').to_a.shuffle[0..7]        # Pull out the first eight elements.
=> ["f", "w", "i", "a", "h", "p", "c", "x"]
>> ('a'..'z').to_a.shuffle[0..7].join   # Join them together to make one string.
=> "mznpybuj"
Exercises
Solutions to the exercises are available to all Rails Tutorial purchasers here.
To see other people’s answers and to record your own, subscribe to the Rails Tutorial course or to the Learn Enough All Access Bundle.
1. Using the range 0..16, print out the first 17 powers of 2.
2. Define a method called yeller that takes in an array of characters and returns a string with an ALLCAPS version of the input. Verify that yeller(['o', 'l', 'd']) returns "OLD". Hint: Combine map, upcase, and join.
3. Define a method called random_subdomain that returns a randomly generated string of eight letters.
4. By replacing the question marks in Listing 4.12 with the appropriate methods, combine split, shuffle, and join to write a function that shuffles the letters in a given string.
Listing 4.12: Skeleton for a string shuffle function.
>> def string_shuffle(s)
>>  s.?('').?.?
>> end
>> string_shuffle("foobar")
=> "oobfra"
4.3.3 Hashes and symbols
Hashes are essentially arrays that aren’t limited to integer indices. (In fact, some languages, especially Perl, sometimes call hashes associative arrays for this reason.) Instead, hash indices, or keys, can be almost any object. For example, we can use strings as keys:
>> user = {}                          # {} is an empty hash.
=> {}
>> user["first_name"] = "Michael"     # Key "first_name", value "Michael"
=> "Michael"
>> user["last_name"] = "Hartl"        # Key "last_name", value "Hartl"
=> "Hartl"
>> user["first_name"]                 # Element access is like arrays.
=> "Michael"
>> user                               # A literal representation of the hash
=> {"last_name"=>"Hartl", "first_name"=>"Michael"}
Hashes are indicated with curly braces containing key-value pairs; a pair of braces with no key-value pairs—i.e., {}—is an empty hash. It’s important to note that the curly braces for hashes have nothing to do with the curly braces for blocks. (Yes, this can be confusing.) Although hashes resemble arrays, one important difference is that hashes don’t generally guarantee keeping their elements in a particular order.14 If order matters, use an array.
14 Ruby versions 1.9 and later actually guarantee that hashes keep their elements in the same order entered, but it would be unwise ever to count on a particular ordering.
Instead of defining hashes one item at a time using square brackets, it’s easy to use a literal representation with keys and values separated by =>, called a “hashrocket”:
>> user = { "first_name" => "Michael", "last_name" => "Hartl" }
=> {"last_name"=>"Hartl", "first_name"=>"Michael"}
Here I’ve used the usual Ruby convention of putting an extra space at the two ends of the hash—a convention ignored by the console output. (Don’t ask me why the spaces are conventional; probably some early influential Ruby programmer liked the look of the extra spaces, and the convention stuck.)
So far we’ve used strings as hash keys, but in Rails it is much more common to use symbols instead. Symbols look kind of like strings, but prefixed with a colon instead of surrounded by quotes. For example, :name is a symbol. You can think of symbols as basically strings without all the extra baggage:15
15 As a result of having less baggage, symbols are easier to compare to each other; strings need to be compared character by character, while symbols can be compared all in one go. This makes them ideal for use as hash keys.
>> "name".split('')
=> ["n", "a", "m", "e"]
>> :name.split('')
NoMethodError: undefined method `split' for :name:Symbol
>> "foobar".reverse
=> "raboof"
>> :foobar.reverse
NoMethodError: undefined method `reverse' for :foobar:Symbol
Symbols are a special Ruby data type shared with very few other languages, so they may seem weird at first, but Rails uses them a lot, so you’ll get used to them fast. Unlike strings, not all characters are valid:
>> :foo-bar
NameError: undefined local variable or method `bar' for main:Object
>> :2foo
SyntaxError
As long as you start your symbols with a letter and stick to normal word characters, you should be fine.
In terms of symbols as hash keys, we can define a user hash as follows:
>> user = { :name => "Michael Hartl", :email => "[email protected]" }
=> {:name=>"Michael Hartl", :email=>"[email protected]"}
>> user[:name]              # Access the value corresponding to :name.
=> "Michael Hartl"
>> user[:password]          # Access the value of an undefined key.
=> nil
We see here from the last example that the hash value for an undefined key is simply nil.
Because it’s so common for hashes to use symbols as keys, as of version 1.9 Ruby supports a new syntax just for this special case:
>> h1 = { :name => "Michael Hartl", :email => "[email protected]" }
=> {:name=>"Michael Hartl", :email=>"[email protected]"}
>> h2 = { name: "Michael Hartl", email: "[email protected]" }
=> {:name=>"Michael Hartl", :email=>"[email protected]"}
>> h1 == h2
=> true
The second syntax replaces the symbol/hashrocket combination with the name of the key followed by a colon and a value:
{ name: "Michael Hartl", email: "[email protected]" }
This construction more closely follows the hash notation in other languages (such as JavaScript) and enjoys growing popularity in the Rails community. Because both hash syntaxes are still in common use, it’s essential to be able to recognize both of them. Unfortunately, this can be confusing, especially since :name is valid on its own (as a standalone symbol) but name: has no meaning by itself. The bottom line is that :name => and name: are effectively the same only inside literal hashes, so that
{ :name => "Michael Hartl" }
and
{ name: "Michael Hartl" }
are equivalent, but otherwise you need to use :name (with the colon coming first) to denote a symbol.
Hash values can be virtually anything, even other hashes, as seen in Listing 4.13.
Listing 4.13: Nested hashes.
>> params = {}          # Define a hash called 'params' (short for 'parameters').
=> {}
>> params[:user] = { name: "Michael Hartl", email: "[email protected]" }
=> {:name=>"Michael Hartl", :email=>"[email protected]"}
>> params
=> {:user=>{:name=>"Michael Hartl", :email=>"[email protected]"}}
>> params[:user][:email]
=> "[email protected]"
These sorts of hashes-of-hashes, or nested hashes, are heavily used by Rails, as we’ll see starting in Section 7.3.
As with arrays and ranges, hashes respond to the each method. For example, consider a hash named flash with keys for two conditions, :success and :danger:
>> flash = { success: "It worked!", danger: "It failed." }
=> {:success=>"It worked!", :danger=>"It failed."}
>> flash.each do |key, value|
?>    puts "Key #{key.inspect} has value #{value.inspect}"
>> end
Key :success has value "It worked!"
Key :danger has value "It failed."
Note that, while the each method for arrays takes a block with only one variable, each for hashes takes two, a key and a value. Thus, the each method for a hash iterates through the hash one key-value pair at a time.
The last example uses the useful inspect method, which returns a string with a literal representation of the object it’s called on:
>> puts (1..5).to_a              # Put an array as a string.
1
2
3
4
5
>> puts (1..5).to_a.inspect      # Put a literal array.
[1, 2, 3, 4, 5]
>> puts :name, :name.inspect
name
:name
>> puts "It worked!", "It worked!".inspect
It worked!
"It worked!"
By the way, using inspect to print an object is common enough that there’s a shortcut for it, the p function:16
16 There’s actually a subtle difference, which is that p returns the object being printed while puts always returns nil. (Thanks to reader Katarzyna Siwek for pointing this out.)
>> p :name        # Same output as 'puts :name.inspect'
:name
Exercises
Solutions to the exercises are available to all Rails Tutorial purchasers here.
To see other people’s answers and to record your own, subscribe to the Rails Tutorial course or to the Learn Enough All Access Bundle.
1. Define a hash with the keys 'one', 'two', and 'three', and the values 'uno', 'dos', and 'tres'. Iterate over the hash, and for each key/value pair print out "'#{key}' in Spanish is '#{value}'".
2. Create three hashes called person1, person2, and person3, with first and last names under the keys :first and :last. Then create a params h a s h s o t h a t params[:father] is person1, params[:mother] is person2, and params[:child] is person3. Verify that, for example, params[:father][:first] has the right value.
3. Define a hash with symbol keys corresponding to name, email, and a “password digest”, and values equal to your name, your email address, and a random string of 16 lower-case letters.
4. Find an online version of the Ruby API and read about the Hash method merge. What is the value of the following expression?
{ "a" => 100, "b" => 200 }.merge({ "b" => 300 })
4.3.4 CSS revisited
It’s time now to revisit the line from Listing 4.1 used in the layout to include the Cascading Style Sheets:
<%= stylesheet_link_tag 'application', media: 'all',
                                      'data-turbolinks-track': 'reload' %>
We are now nearly in a position to understand this. As mentioned briefly in Section 4.1, Rails defines a special function to include stylesheets, and
stylesheet_link_tag 'application', media: 'all',
                                  'data-turbolinks-track': 'reload'
is a call to this function. But there are several mysteries. First, where are the parentheses? In Ruby, they are optional, so these two are equivalent:
# Parentheses on function calls are optional.
# This:
stylesheet_link_tag('application', media: 'all',
                                   'data-turbolinks-track': 'reload')
# is the same as this:
stylesheet_link_tag 'application', media: 'all',
                                   'data-turbolinks-track': 'reload'
Second, the media argument sure looks like a hash, but where are the curly braces? When hashes are the last argument in a function call, the curly braces are optional, so these two are equivalent:
# Curly braces on final hash arguments are optional.
# This:
stylesheet_link_tag 'application', { media: 'all',
                                    'data-turbolinks-track': 'reload' }
# is the same as this:
stylesheet_link_tag 'application', media: 'all',
                                   'data-turbolinks-track': 'reload'
Finally, why does Ruby correctly interpret the lines
stylesheet_link_tag 'application', media: 'all',
                                   'data-turbolinks-track': 'reload'
even with a line break between the final elements? The answer is that Ruby doesn’t distinguish between newlines and other whitespace in this context.17 The reason I chose to break the code into pieces is that I prefer to keep lines of source code under 80 characters for legibility.18
17 A newline is what comes at the end of a line, thereby starting a new line. As noted in Section 4.2.1, it is typically represented by the character .
18 Constantly having to check the column number is rather inconvenient, so many text editors have a visual aid to help you. For example, if you take a look back at Figure 1.12, you may be able to make out the small vertical line on the right side of the screen, which is designed to help keep code under 80 characters. (It’s very subtle, so you may not be able to see it in the screenshot.) The cloud IDE (Section 1.1.1) includes such a line by default. In Sublime Text, you can use View > Ruler > 78 or View > Ruler > 80.
So, we see now that the line
stylesheet_link_tag 'application', media: 'all',
                                   'data-turbolinks-track': 'reload'
calls the stylesheet_link_tag function with two arguments: a string, indicating the path to the stylesheet, and a hash with two elements, indicating the media type and telling Rails to use the turbolinks feature added in Rails 4.0. Because of the <%= ... %> brackets, the results are inserted into the template by ERb, and if you view the source of the page in your browser you should see the HTML needed to include a stylesheet (Listing 4.14). (The extra stuff in Listing 4.14, like ?body=1 and the long string of hexadecimal digits are, inserted by Rails to ensure that browsers reload the CSS when it changes on the server. Because the hex string is by design unique, your exact version of Listing 4.14 will differ.)
Listing 4.14: The HTML source produced by the CSS includes.
<link rel="stylesheet" media="all" href="/assets/application.self-f0d704deea029cf000697e2c0181ec173a1b474645466ed843eb5ee7bb215794.css?body=1" data-turbolinks-track="reload" />
4.4 Ruby classes
We’ve said before that everything in Ruby is an object, and in this section we’ll finally get to define some of our own. Ruby, like many object-oriented languages, uses classes to organize methods; these classes are then instantiated to create objects. If you’re new to object-oriented programming, this may sound like gibberish, so let’s look at some concrete examples.
4.4.1 Constructors
We’ve seen lots of examples of using classes to instantiate objects, but we have yet to do so explicitly. For example, we instantiated a string using the double quote characters, which is a literal constructor for strings:
>> s = "foobar"      # A literal constructor for strings using double quotes
=> "foobar"
>> s.class
=> String
We see here that strings respond to the method class, and simply return the class they belong to.
Instead of using a literal constructor, we can use the equivalent named constructor, which involves calling the new method on the class name:19
19 These results will vary based on the version of Ruby you are using. This example assumes you are using Ruby 1.9.3 or later.
>> s = String.new("foobar")         # A named constructor for a string
=> "foobar"
>> s.class
=> String
>> s == "foobar"
=> true
This is equivalent to the literal constructor, but it’s more explicit about what we’re doing.
Arrays work the same way as strings:
>> a = Array.new([1, 3, 2])
=> [1, 3, 2]
Hashes, in contrast, are different. While the array constructor Array.new takes an initial value for the array, Hash.new takes a default value for the hash, which is the value of the hash for a nonexistent key:
>> h = Hash.new
=> {}
>> h[:foo]              # Try to access the value for the nonexistent key :foo.
=> nil
>> h = Hash.new(0)      # Arrange for nonexistent keys to return 0 instead of nil.
=> {}
>> h[:foo]
=> 0
When a method gets called on the class itself, as in the case of new, it’s called a class method. The result of calling new on a class is an object of that class, also called an instance of the class. A method called on an instance, such as length, is called an instance method.
Exercises
Solutions to the exercises are available to all Rails Tutorial purchasers here.
To see other people’s answers and to record your own, subscribe to the Rails Tutorial course or to the Learn Enough All Access Bundle.
1. What is the literal constructor for the range of integers from 1 to 10?
2. What is the constructor using the Range class and the new method? Hint: new takes two arguments in this context.
3. Confirm using the == operator that the literal and named constructors from the previous two exercises are identical.
4.4.2 Class inheritance
When learning about classes, it’s useful to find out the class hierarchy using the superclass method:
>> s = String.new("foobar")
=> "foobar"
>> s.class                          # Find the class of s.
=> String
>> s.class.superclass               # Find the superclass of String.
=> Object
>> s.class.superclass.superclass    # Ruby has a BasicObject base class as of 1.9
=> BasicObject
>> s.class.superclass.superclass.superclass
=> nil
A diagram of this inheritance hierarchy appears in Figure 4.1. We see here that the superclass of String is Object and the superclass of Object is Basic-Object, but BasicObject has no superclass. This pattern is true of every Ruby object: trace back the class hierarchy far enough and every class in Ruby ultimately inherits from BasicObject, which has no superclass itself. This is the technical meaning of “everything in Ruby is an object”.
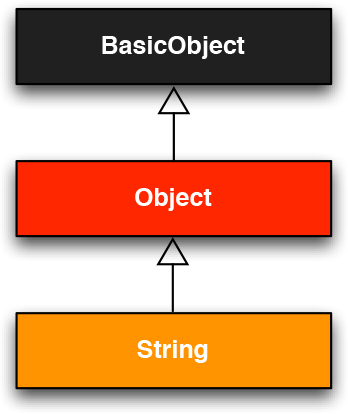
Figure 4.1: The inheritance hierarchy for the String class.
To understand classes a little more deeply, there’s no substitute for making one of our own. Let’s make a Word class with a palindrome? method that returns true if the word is the same spelled forward and backward:
>> class Word
>>  def palindrome?(string)
>>    string == string.reverse
>>  end
>> end
=> :palindrome?
We can use it as follows:
>> w = Word.new      # Make a new Word object.
=> #<Word:0x22d0b20>
>> w.palindrome?("foobar")
=> false
>> w.palindrome?("level")
=> true
If this example strikes you as a bit contrived, good—this is by design. It’s odd to create a new class just to create a method that takes a string as an argument. Since a word is a string, it’s more natural to have our Word class inherit from String, as seen in Listing 4.15. (You should exit the console and re-enter it to clear out the old definition of Word.)
Listing 4.15: Defining a Word class in the console.
>> class Word < String              # Word inherits from String.
>>    # Returns true if the string is its own reverse.
>>  def palindrome?
>>    self == self.reverse          # self is the string itself.
>>  end
>> end
=> nil
Here Word < String is the Ruby syntax for inheritance (discussed briefly in Section 3.2), which ensures that, in addition to the new palindrome? method, words also have all the same methods as strings:
>> s = Word.new("level")    # Make a new Word, initialized with "level".
=> "level"
>> s.palindrome?            # Words have the palindrome? method.
=> true
>> s.length                 # Words also inherit all the normal string methods.
=> 5
Since the Word class inherits from String, we can use the console to see the class hierarchy explicitly:
>> s.class
=> Word
>> s.class.superclass
=> String
>> s.class.superclass.superclass
=> Object
This hierarchy is illustrated in Figure 4.2.
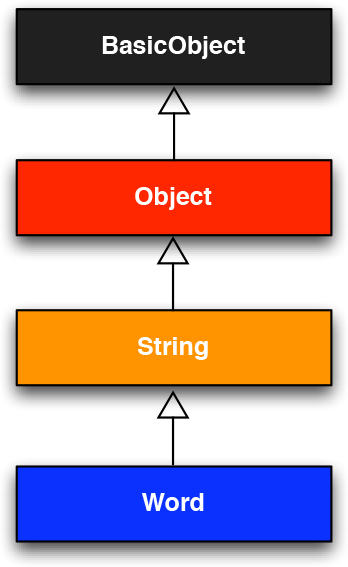
Figure 4.2: The inheritance hierarchy for the (non-built-in) Word class from Listing 4.15.
In Listing 4.15, note that checking that the word is its own reverse involves accessing the word inside the Word class. Ruby allows us to do this using the self keyword: inside the Word class, self is the object itself, which means we can use
self == self.reverse
to check if the word is a palindrome. In fact, inside the String class the use of self. is optional on a method or attribute (unless we’re making an assignment), so
self == reverse
would work as well.
Exercises
Solutions to the exercises are available to all Rails Tutorial purchasers here.
To see other people’s answers and to record your own, subscribe to the Rails Tutorial course or to the Learn Enough All Access Bundle.
1. What is the class hierarchy for a range? For a hash? For a symbol?
2. Confirm that the method shown in Listing 4.15 works even if we replace self.reverse with just reverse.
4.4.3 Modifying built-in classes
While inheritance is a powerful idea, in the case of palindromes it might be even more natural to add the palindrome? method to the String class itself, so that (among other things) we can call palindrome? on a string literal, which we currently can’t do:
>> "level".palindrome?
NoMethodError: undefined method `palindrome?' for "level":String
Amazingly, Ruby lets you do just this; Ruby classes can be opened and modified, allowing ordinary mortals such as ourselves to add methods to them:
>> class String
>>  # Returns true if the string is its own reverse.
>>  def palindrome?
>>    self == self.reverse
>>  end
>> end
=> nil
>> "deified".palindrome?
=> true
(I don’t know which is cooler: that Ruby lets you add methods to built-in classes, or that "deified" is a palindrome.)
Modifying built-in classes is a powerful technique, but with great power comes great responsibility, and it’s considered bad form to add methods to built-in classes without having a really good reason for doing so. Rails does have some good reasons; for example, in web applications we often want to prevent variables from being blank—e.g., a user’s name should be something other than spaces and other whitespace—so Rails adds a blank? method to Ruby. Since the Rails console automatically includes the Rails extensions, we can see an example here (this won’t work in plain irb):
>> "".blank?
=> true
>> "       ".empty?
=> false
>> "       ".blank?
=> true
>> nil.blank?
=> true
We see that a string of spaces is not empty, but it is blank. Note also that nil is blank; since nil isn’t a string, this is a hint that Rails actually adds blank? to String’s base class, which (as we saw at the beginning of this section) is Object itself. We’ll see some other examples of Rails additions to Ruby classes in Section 9.1.
Exercises
Solutions to the exercises are available to all Rails Tutorial purchasers here.
To see other people’s answers and to record your own, subscribe to the Rails Tutorial course or to the Learn Enough All Access Bundle.
1. Verify that “racecar” is a palindrome and “onomatopoeia” is not. What about the name of the South Indian language “Malayalam”? Hint: Down-case it first.
2. Using Listing 4.16 as a guide, add a shuffle method to the String class. Hint: Refer to Listing 4.12.
3. Verify that Listing 4.16 works even if you remove self..
Listing 4.16: Skeleton for a shuffle method attached to the String class.
>> class String
>>   def shuffle
>>    self.?('').?.?
>>  end
>> end
>> "foobar".shuffle
=> "borafo"
4.4.4 A controller class
All this talk about classes and inheritance may have triggered a flash of recognition, because we have seen both before, in the Static Pages controller (Listing 3.22):
class StaticPagesController < ApplicationController

  def home
  end

  def help
  end

  def about
  end
end
You’re now in a position to appreciate, at least vaguely, what this code means: StaticPagesController is a class that inherits from ApplicationController, and comes equipped with home, help, and about methods. Since each Rails console session loads the local Rails environment, we can even create a controller explicitly and examine its class hierarchy:20
20 You don’t have to know what each class in this hierarchy does. I don’t know what they all do, and I’ve been programming in Ruby on Rails since 2005. This means either that (a) I’m grossly incompetent or (b) you can be a skilled Rails developer without knowing all its innards. I hope for both our sakes that it’s the latter.
>> controller = StaticPagesController.new
=> #<StaticPagesController:0x22855d0>
>> controller.class
=> StaticPagesController
>> controller.class.superclass
=> ApplicationController
>> controller.class.superclass.superclass
=> ActionController::Base
>> controller.class.superclass.superclass.superclass
=> ActionController::Metal
>> controller.class.superclass.superclass.superclass.superclass
=> AbstractController::Base
>> controller.class.superclass.superclass.superclass.superclass.superclass
=> Object
A diagram of this hierarchy appears in Figure 4.3.

Figure 4.3: The inheritance hierarchy for the Static Pages.
We can even call the controller actions inside the console, which are just methods:
>> controller.home
=> nil
Here the return value is nil because the home action is blank.
But wait—actions don’t have return values, at least not ones that matter. The point of the home action, as we saw in Chapter 3, is to render a web page, not to return a value. And I sure don’t remember ever calling StaticPages-Controller.new anywhere. What’s going on?
What’s going on is that Rails is written in Ruby, but Rails isn’t Ruby. Some Rails classes are used like ordinary Ruby objects, but some are just grist for Rails’ magic mill. Rails is sui generis, and should be studied and understood separately from Ruby.
Exercises
Solutions to the exercises are available to all Rails Tutorial purchasers here.
To see other people’s answers and to record your own, subscribe to the Rails Tutorial course or to the Learn Enough All Access Bundle.
1. By running the Rails console in the toy app’s directory from Chapter 2, confirm that you can create a user object using User.new.
2. Determine the class hierarchy of the user object.
4.4.5 A user class
We end our tour of Ruby with a complete class of our own, a User class that anticipates the User model coming up in Chapter 6.
So far we’ve entered class definitions at the console, but this quickly becomes tiresome; instead, create the file example_user.rb in your application root directory and fill it with the contents of Listing 4.17.
Listing 4.17: Code for an example user.
example_user.rb
class User
  attr_accessor :name, :email

  def initialize(attributes = {})
    @name = attributes[:name]
    @email = attributes[:email]
  end

  def formatted_email
    "#{@name} <#{@email}>"
  end
end
There’s quite a bit going on here, so let’s take it step by step. The first line,
attr_accessor :name, :email
creates attribute accessors corresponding to a user’s name and email address. This creates “getter” and “setter” methods that allow us to retrieve (get) and assign (set) @name and @email instance variables, which were mentioned briefly in Section 2.2.2 and Section 3.4.2. In Rails, the principal importance of instance variables is that they are automatically available in the views, but in general they are used for variables that need to be available throughout a Ruby class. (We’ll have more to say about this in a moment.) Instance variables always begin with an @ sign, and are nil when undefined.
The first method, initialize, is special in Ruby: it’s the method called when we execute User.new. This particular initialize takes one argument, attributes:
def initialize(attributes = {})
  @name = attributes[:name]
  @email = attributes[:email]
end
Here the attributes variable has a default value equal to the empty hash, so that we can define a user with no name or email address. (Recall from Section 4.3.3 that hashes return nil for nonexistent keys, so attributes-[:name] will be nil if there is no :name key, and similarly for attributes-[:email].)
Finally, our class defines a method called formatted_email that uses the values of the assigned @name and @email variables to build up a nicely formatted version of the user’s email address using string interpolation (Section 4.2.1):
def formatted_email
  "#{@name} <#{@email}>"
end
Because @name and @email are both instance variables (as indicated with the @ sign), they are automatically available in the formatted_email method.
Let’s fire up the console, require the example user code, and take our User class out for a spin:
>> require './example_user'     # This is how you load the example_user code.
=> true
>> example = User.new
=> #<User:0x224ceec @email=nil, @name=nil>
>> example.name                 # nil since attributes[:name] is nil
=> nil
>> example.name = "Example User"          # Assign a non-nil name
=> "Example User"
>> example.email = "[email protected]"     # and a non-nil email address
 => "[email protected]"
>> example.formatted_email
=> "Example User <[email protected]>"
Here the '.' is Unix for “current directory”, and './example_user' tells Ruby to look for an example user file relative to that location. The subsequent code creates an empty example user and then fills in the name and email address by assigning directly to the corresponding attributes (assignments made possible by the attr_accessor line in Listing 4.17). When we write
example.name = "Example User"
Ruby is setting the @name variable to "Example User" (and similarly for the email attribute), which we then use in the formatted_email method.
Recalling from Section 4.3.4 we can omit the curly braces for final hash arguments, we can create another user by passing a hash to the initialize method to create a user with pre-defined attributes:
>> user = User.new(name: "Michael Hartl", email: "[email protected]")
=> #<User:0x225167c @email="[email protected]", @name="Michael Hartl">
>> user.formatted_email
=> "Michael Hartl <[email protected]>"
We will see starting in Chapter 7 that initializing objects using a hash argument, a technique known as mass assignment, is common in Rails applications.
Exercises
Solutions to the exercises are available to all Rails Tutorial purchasers here.
To see other people’s answers and to record your own, subscribe to the Rails Tutorial course or to the Learn Enough All Access Bundle.
1. In the example User class, change from name to separate first and last name attributes, and then add a method called full_name that returns the first and last names separated by a space. Use it to replace the use of name in the formatted email method.
2. Add a method called alphabetical_name that returns the last name and first name separated by comma-space.
3. Verify that full_name.split is the same as alphabetical_name.-split(', ').reverse.
4.5 Conclusion
This concludes our overview of the Ruby language. In Chapter 5, we’ll start putting it to good use in developing the sample application.
We won’t be using the example_user.rb file from Section 4.4.5, so I suggest removing it:
$ rm example_user.rb
Then commit the other changes to the main source code repository and merge into the master branch, push up to GitHub, and deploy to Heroku:
$ git commit -am "Add a full_title helper"
$ git checkout master
$ git merge rails-flavored-ruby
As a reality check, it’s a good practice to run the test suite before pushing or deploying:
$ rails test
Then push up to GitHub:
$ git push
Finally, deploy to Heroku:
$ git push heroku
4.5.1 What we learned in this chapter
• Ruby has a large number of methods for manipulating strings of characters.
• Everything in Ruby is an object.
• Ruby supports method definition via the def keyword.
• Ruby supports class definition via the class keyword.
• Rails views can contain static HTML or embedded Ruby (ERb).
• Built-in Ruby data structures include arrays, ranges, and hashes.
• Ruby blocks are a flexible construct that (among other things) allow natural iteration over enumerable data structures.
• Symbols are labels, like strings without any additional structure.
• Ruby supports object inheritance.
• It is possible to open up and modify built-in Ruby classes.
• The word “deified” is a palindrome.