
Chapter 5. Creating observables from .NET asynchronous types
- Understanding the importance of asynchronous code
- Writing asynchronous code in C#
- Bridging .NET asynchronous code to Rx
- Creating observables of periodic behaviors
If there’s one thing I really dislike, it’s standing in line, especially a long line. I always feel I’m wasting time that I could invest in other things (such as writing a book). I always love the restaurants that allow you to come in and leave your name for a seat, which then frees you to walk around, admire the view, shop, and so forth. When your seat is available, or when your time slot arrives, you’re notified by a phone call or buzzer. For me, this is customer service at its best.
Like you and me, our code sometimes needs to stand in line and wait for something; this is what we call the synchronous way. Like you and me, our code can be notified when a task is complete and can harvest the result; this is the asynchronous way. Writing asynchronous code is crucial for modern apps to be responsive (and react in a timely manner) and it’s a key trait for being reactive. In this chapter, you’ll look at patterns for executing code asynchronously in .NET and see how they relate to your observables. You’ll look at ways to create observables from asynchronous types and learn about obstacles you might face when doing so.
Note
This chapter and the rest of the book use the Task-Based Asynchronous Pattern (TAP) and async-await as the pattern for writing asynchronous code. Appendix A covers the common .NET patterns for writing asynchronous code as well as references to other sources on the subject.
5.1. Bridging .NET asynchronous types with Rx
Rx observables are wonderful when working with asynchronous sources. The observable and observer interfaces allow the separation between a producer that can run anywhere, synchronously or asynchronously, and the consumer (the observer) that can receive the notifications and handle them. This has benefits including testability and flexibility, because it’s easy to create a fake[1] observable to emulate your test scenarios, and easy to make changes in the producer side without affecting the consumer. This producer-consumer separation is shown in figure 5.1.
A fake is also known as a mock or stub; see http://mng.bz/b2b8.
Figure 5.1. From the observer standpoint, the observable can run on any thread and emit the notifications by computing them asynchronously or synchronously.

Here you can see that the observer that subscribes to an observable doesn’t know where the notifications are emitted from and whether the observable computes them in an asynchronous way. But in chapter 10 you’ll learn that sometimes it’s necessary for the observer to handle those notifications on a specific thread. For example, in WPF and WinForms applications, it’s possible to make changes to UI controls only from the UI thread, and so it’s necessary for observers that are modifying elements in the application screens to observe the notifications on the special UI thread.
Rx provides operators to support that and control the execution of the observable pipeline. You’ll learn about them in chapter 10. In the next few pages, you’ll look at an example of converting from synchronous code to asynchronous code that you consume through the observable.
5.1.1. Changing the synchronous method to asynchronous
Suppose you have a magical prime numbers generator. This class can generate as many prime numbers as you want, but the processing time to produce a number is long. Your first attempt to create a synchronous version, the MagicalPrimeNumbersGenerator, looks like this:
class MagicalPrimeGenerator
{
    public IEnumerable<int> Generate(int amount){. . .}
}
The Generate method receives an integer for the number of primes you want to generate and returns an enumerable with those numbers.
Now you can write a small program that prints the numbers:

Because it takes your magical primes generator time to generate each number (for example, 2 seconds), your main thread will block here for 5 * 2 = 10 seconds. Even if you change the primes generator to generate each item on demand with yield, it’ll still block the calling thread for 2 seconds between two numbers.
Another attempt could generate the full collection of the requested primes in an asynchronous way, which means you can change the Generate signature to this:
Task<IReadOnlyCollection<int>> GenerateAsync(int amount);
The method now returns Task<IReadOnlyCollection<int>>. I’ve used IRead-OnlyCollection<T> to make it clear that the method generates the full collection before returning.
This change doesn’t block the calling thread, but from the client perspective, it performs worse because the client will have to wait (asynchronously) a long time before processing any items in the collection. For instance, the previous program that prints the five prime numbers will now have to wait 10 seconds before printing anything. In a way, you’ve returned to the original version of the program.
The iterative model doesn’t fit here, so let’s convert it into a push model.
5.1.2. Creating the primes observable
If the pull model doesn’t work, even when making it asynchronous, you should move to the push model. This way, you won’t have to wait for the entire computation to finish to see some progress. Instead of creating an enumerable of the prime numbers, you need to create an observable that will emit every prime number when it’s ready.
This is how the method signature looks now:
public IObservable<int> GeneratePrimes(int amount)
The method still receives as a parameter the number of prime numbers to generate, but now it returns an observable of type IObservable<int>.
Now you can implement the method; here’s the first try:

To create the observable, you’re using the Create method you learned about in chapter four. The code provided to the Create method is still synchronous, so the observer will receive all the generated primes upon subscription, and the call to Subscribe won’t return until the generation is finished. You can see this in the following code. You use the operator Timestamp to also display a timestamp for every item emitted:
var generator = new MagicalPrimeGenerator();

var subscription = generator
    .GeneratePrimes(5)
    .Timestamp()
    .SubscribeConsole("primes observable");

Console.WriteLine("Generation is done");
Console.ReadLine();
When you run it you’ll see
primes observable - OnNext(2@01/08/2015 12:50:02 +00:00)
primes observable - OnNext(3@01/08/2015 12:50:04 +00:00)
primes observable - OnNext(5@01/08/2015 12:50:06 +00:00)
primes observable - OnNext(7@01/08/2015 12:50:08 +00:00)
primes observable - OnNext(11@01/08/2015 12:50:10 +00:00)
primes observable - OnCompleted()
Generation is done
The Timestamp operator wraps the observable items in an object of type System.Reactive.Timestamped<TSource> that contains two properties: Value for the inner item and Timestamp for the time in which the item was produced. It also overrides ToString to return a string in the format Value@Timestamp.
You can see that the Generation is done message is printed after all the prime numbers are generated. You can see that the numbers are received with a 2-second gap between them. Let’s fix our observable so the subscription won’t block. For this, you can run the inner generation code inside a new task.
Tip
Creating a new task for running the observable code is considered a bad practice. I’m doing it in the next example to keep things simple at this stage. In chapter 10, you’ll learn about the Rx concurrency model and how you should change the code written here.
Now that the observable code is going to run concurrently, the observer’s ability to unsubscribe becomes much more important. Until now, the emissions from all the observables you saw happened immediately when the observer subscribed (synchronously), so the observer didn’t have the opportunity to unsubscribe. Now the observer can unsubscribe at any time. To allow this, you attach the returned disposable to a CancellationToken that you’ll check in every iteration, so the new version looks like this:

In this version of GeneratePrimes, you start a new task at the point where, as before, you’re iterating on the enumerable returned from the Generate method that yields the next prime number in every iteration. Now that your code is running in the background, you can enable the cancellation of the subscription. To do this, you create a CancellationTokenSource instance that you later attach to the returned disposable by using the CancellationDisposable class. When the user disposes of it, the CancellationTokenSource will be canceled as well. Inside each iteration, you check to see whether cancellation was requested and stops the loop.
Tip
When you run code examples that introduce concurrency inside a console application (for example, with Task.Run), the main thread will exit even if the concurrent code is still running. Adding a call to Console.ReadLine (or any other Console read method) is an easy way to keep the application from exiting before the example is done.
The pattern of running code inside a task and enabling cancellation with a CancellationToken object that’s connected to the returned disposable is common, so the Rx team provides an overload of the Observable.Create method (shown in figure 5.2) that does the plumbing for you.
Figure 5.2. The asynchronous version of the Create operator

The asynchronous version of the Create operator receives a Func that’s invoked for each observer that subscribes to the returned observable—therefore, it’s called subscribeAsync. The subscribeAsync function receives two parameters: the observer that’s subscribing and a CancellationToken that’s tied to the subscription disposable. subscribeAsync returns a task, thus allowing the asynchronous code to be written inside.
Here’s how to use this method to simplify your GeneratePrimes method:

The previous code is almost similar to what you did before, only this time you don’t need to create CancellationToken and its connection to the subscription disposal.
Let’s recap what you’ve learned so far:
- The Create operator receives an asynchronous function named subscribeAsync.
- The subscribeAsync function is executed each time an observer is subscribed to the observable. The function must return a Task to represent its asynchronous operation.
- When invoked, the subscribeAsync function receives CancellationToken, which acts as a communication channel of the observer’s subscription disposal.
- Inside subscribeAsync is where you’ll write the code that emits the notifications to the subscribed observer.
Tip
If you need more control over the way the subscription disposal affects your observable logic, you should know that the Create operator also includes overloads that return a disposable from the subscribeAsync method.
Tip
In the previous chapter, you learned about using Defer to defer the creation of an observable to when the first observer subscribes. Rx also provides a version of the Defer operator that supports an asynchronous observable factory, as well as a cancellable version called DeferAsync.
Next I’ll show you how the combination of observables with async-await shows the real strength of Rx.
5.1.3. Using async-await in observable creation
The async version of Create also allows you to use async-await inside the subscribeAsync code. By combining observables and async-await, you can see the real value Rx brings. Instead of waiting for two (or more) separate asynchronous operations to complete, and only then merge their results so they can be consumed as a whole, you can start to emit elements the moment you have something meaningful.
Figure 5.3 illustrates an observable that emits search results from two search engines whose call is async.
Figure 5.3. With observables, observers can start to receive notifications even if not all the sequence sources (like search engines) have completed.

The code for this example is:

The previous code in the Search method creates an observable by using the asynchronous version of Observable.Create. The subscribeAsync I provided as a lambda expression uses async-await and therefore returns a task. The code is simple, calling to two search engines, one after the other, each time emitting the results.
What you’re missing in this code is the possibility to cancel the process if the subscription is disposed of. As an exercise, add this feature yourself and check what happens when you dispose of the subscription at different stages. You can see my solution at the book’s source code.
5.1.4. Converting tasks to observables
The preceding example that demonstrates using the Observable.Create method with the asynchronous subscribe method can be improved. You might have noticed the repetition in the code. For every search engine, you called the search method and then iterated the results.
To improve the code, you can take advantage of the fact that a natural conversion occurs between the task and the observable; a task can be looked at as an observable of potentially one item (zero if it never returns). To convert a task to an observable, all you need to use is the extension method ToObservable on the task.
Tip
Rx recognizes the deep connection between tasks and observables, and therefore allows, with certain operators, you to provide tasks in the same way you provide observables, without the need to convert to observables before.
The search method of each search engine returns Task<IEnumerable <string>>, in our case, so converting it to an observable will give IObservable<IEnumerable <string>>, still different from the observables you want—IObservable <string>. You need one more step that I’ll explain shortly.
Here’s how to change the previous code to convert the two searches from tasks to observables and then concatenate them together:

This method needs a little explanation. The first part of the method calls the search methods and converts the tasks to observables; it’s easy.
With two observables in your hands, you can do numerous things. Because you want to keep the semantics of the methods you saw until now, in which the results from the second search engine are provided only after you finish emitting the results from the first search, you need to Concat the observables:

Concat receives two or more observables (depending on the overload) and returns an observable that’s a concatenation of the input observables, which emit their values without interleaving. All the items from the first observables are emitted, and only then all the items from the second, and so forth. Figure 5.4 provides a marble diagram so you can visualize it.
Figure 5.4. The Concat operator marble diagram. All items from the first observable are emitted. Only after the first observable completes will the items from the second observable be emitted.

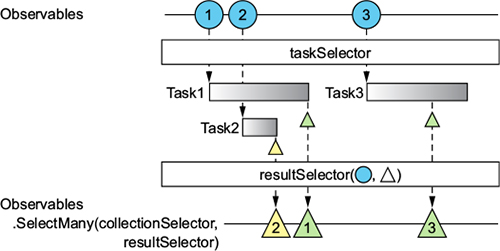
Still, after you concatenate the observables, you get IObservable<IEnumerable- <string>>. You need to flatten each enumerable so that the items will be pushed one by one, and so your observable will become IObservable<string>. This is where the SelectMany operator comes in. I’ll show the overload I used, and then I’ll explain it:

SelectMany projects each element of an observable sequence to an enumerable sequence and concatenates the enumerables into one observable sequence. SelectMany gets a selector of type Func<TSource, IEnumerable<TResult>>; this selector is called on every item in the observable and returns a collection from that item. The elements of the collection will afterward be emitted on the resulting observable. The marble diagram in figure 5.5 makes this clearer.
Figure 5.5. The SelectMany operator marble diagram. Each item produces an enumerable by the selector, and the items from each enumerable are emitted to the resulting observable.

Going back to our example, you concatenated the observables created from the search engines, and each observable carries one item that’s the collection of the search results. When you wrote SelectMany(results => results), you made it so that the returned observables will carry each search result separately.
Note
It’s also possible to convert from an observable to a task that you can later await to get the last value (or exception) produced by the observable. This is done with the ToTask operator. You also can await the observable itself because it provides its own Awaiter class.
Besides the use of SelectMany to project observables that emit collections into observables that emit the items from the collections, SelectMany has an important use when running asynchronous code as part of your observable pipeline, as you’ll see next.
5.1.5. Running asynchronous code as part of the pipeline
Running asynchronous code is beneficial not only for creating observables; it’s also extremely useful for running inside the operators that compose the observable pipeline, as shown in figure 5.6. This way, you don’t have to block your pipeline while processing an emitted element and can let your observable emit the next one while the processing happens in the background.
Figure 5.6. Asynchronicity can also be necessary in one of the pipeline operators. Operator 2 performs an async operation that, once completed, is passed to operator 3.

As you can see, an item begins its journey in the pipeline in operator 1, and then operator 2 performs an asynchronous operation. You’d like operator 3 to handle the result after the asynchronous operation completes.
Consider the next example in which you want to use the Where operator to check each item in the observable against an asynchronous service that determines whether the number is a prime:

The Where operator expects from the given predicate to return a Boolean that will determine whether the item will be allowed to proceed on the observable. But the IsPrimeAsync method returns a Task<bool> so you naïvely try to await it, which causes your lambda expression return type to again be Task<bool>. Unfortunately, Where (and most other operators) doesn’t support tasks, and that’s why your code doesn’t compile. But don’t lose hope; together we can make it work!
Note
In the observer’s OnNext method, nothing prevents you from running code with async-await (as long as the method is marked with async). But remember that because the method returns void, it will return to the caller the moment the first await is reached, so that the next OnNext might be called while still processing the previous one. Many times, this process turns out to be confusing and hard to track.
As you remember, Task<T> can be converted to IObservable<T>, so Task<bool> can become an IObservable<bool> on which the Where operator can work without a problem.
Here’s how the magic happens:
- Run the IsPrimeAsync method for each number.
- Convert the return task into an observable.
- Merge all the observables that were created, while still keeping the source (the number being checked) of each one.
- Allow only the observables that will emit the value true—meaning the number is prime—to proceed to the resulted observable.
Sounds complex, but it’s simple thanks to the SelectMany operator. In the previous example, the SelectMany operator was used to flatten a collection by passing a selector function that determined the enumerable to flatten. Here’s another overload of SelectMany (illustrated in figure 5.7 and the following bit of code) that will help here but is a little frightening at first look. Don’t worry about it; after the next code example, it will become clear, and you can return here and read the description again.
Figure 5.7. The SelectMany operator allows you to generate an asynchronous task from each element and then emit the task results on the resulted observable.
The overload of SelectMany does the same as before, but instead of selecting a collection from the item of the observable, it projects it to a task, invokes the result selector with the source element and the task result, and merges the results into one observable sequence:

Using this overload, the previous example can be written like so:

These are the printed results when I run it on my machine:
primes - OnNext(1)
primes - OnNext(2)
primes - OnNext(3)
primes - OnNext(5)
primes - OnNext(7)
primes - OnCompleted()
It takes time to digest, but what you see has a natural beauty and elegance. Let’s review it step by step.
In the example, you create a simple observable that emits the sequence 1 to 10. Each item is then received by the SelectMany operator that calls the asynchronous method IsPrimeAsync. This method returns a task, which isn’t interesting to the rest of your query; but what you want is the future result the task will give you, and so SelectMany awaits this result for you behind the scenes. When the result is ready, the transformed function you provided to the SelectMany operator is called. The transform method receives the number on which you ran IsPrimeAsync together with the result of the task, and in this case, you combine them into an object. This combined object is what’s emitted on the resulted observable and then received in the Where and Select operators.
This entire process is depicted in figure 5.8. (I’ve shortened variable names to reduce noise.)
Figure 5.8. A marble diagram that shows the use of the SelectMany operator with asynchronous code. Each number is checked (asynchronously) to see whether it’s prime. When the result is ready, the observable pipeline continues.
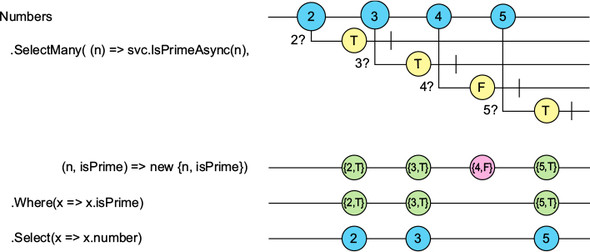
One thing that’s important in figure 5.8 is that I describe each task returned from the IsPrimeAsync method as an observable, which in the case of tasks have only one item, and then it emits no more.
I should be honest with you: not everybody agrees that this chain of methods is as beautiful as I think it is (shocking, isn’t it?). Luckily, the same query can be written in the query expression, which makes it more readable; judge for yourself:
IObservable<int> primes =
    from number in Observable.Range(1, 10)
    from isPrime in svc.IsPrimeAsync(number)
    where isPrime
    select number;

primes.SubscribeConsole("primes");
This query is the same as the one you used before, and translates to the same method chains. It’s important to understand the internal mechanics of things so you can control them better, so I started with the more complex approach. Also, not everything can be converted to the query syntax, so knowing how to use the SelectMany operator will be a powerful tool in your belt.
Now that we have that covered, see if you can predict what will be printed if the time that it takes for the IsPrimeAsync method to complete is different for different numbers. For example, if the time it takes for 3 is longer than it takes for 4. Can you predict the order?
5.1.6. Controlling the results order
SelectMany projects the items to tasks in the same order that they’re emitted. But the order of the items in the resulting observable (the results of the tasks) that SelectMany creates depends on the order that the tasks complete—which can be different from the original order.
For example, run the previous prime check example when the time to check the number 4 is a few seconds more than all the other numbers:

This yields the following output:
primes - unordered - OnNext(1)
primes - unordered - OnNext(2)
primes - unordered - OnNext(7)
primes - unordered - OnNext(5)
primes - unordered - OnNext(3)
primes - unordered - OnCompleted()
Notice that the number 3 is emitted last in our resulting observable.
You don’t always need or want the order of the resulted observable to be the same as the source observable, but when you do, SelectMany won’t help. Instead, you can take advantage of the Concat operator you used earlier in a different context.
The Concat operator provides an overload that works on an observable sequence of tasks, and emits the result of each task in the order the task was positioned in the sequence. The result of the first task is emitted first, and then of the second task, and so forth, even if the result of the first task is completed long after the second task. This is exactly what you need! Here’s the overload’s signature you’ll be using:
static IObservable<TSource> Concat<TSource>(
            this IObservable<Task<TSource>> sources)
Note
The same behavior exists for collections of tasks, or observable of observables (where the values from the first observable are emitted before the values from the second observable). The Concat operator provides overloads for each case.
What’s left is to create the observable of tasks that you could feed onto the source parameter of the Concat operator. Doing so is easy with the help of the Select operator that enables you to project an item into a different form, and you can use it to return the task that the IsPrimeAsync(number) returns:
IObservable<Task<bool>> observable =
    Observable.Range(1, 10)
        .Select(number => svc.IsPrimeAsync(number));
But there’s a problem. Note that the observable type is IObservable<Task<bool>>, which means you lost the original item from which the task was created.
To include the original item, you wrap the task and the original item together in a new task that yields them both. The final solution looks like this:

Running the example gives this output, which keeps the numbers ordered:
primes - OnNext(1)
primes - OnNext(2)
primes - OnNext(3)
primes - OnNext(5)
primes - OnNext(7)
primes - OnCompleted()
The lambda expression you provided as the selector function is using the async-await pattern. Inside it, you’re creating an anonymous type that has two properties: the original number and the result (due to the await) of the IsPrime asynchronous check. And so the return type of your lambda expression is a task of the anonymous type created inside.
The Concat operator is now working on an observable that pushes tasks of this new anonymous type—named 'a in Visual Studio IntelliSense, as you can see in figure 5.9.
Figure 5.9. Visual Studio IntelliSense names the anonymous type in the selector function 'a.

You can see that the Concat operator is working on IObservable<Task<'a>> but produces an observable of type IObservable<'a>. It seems you’ve solved the problem, but what if a task never completes? What will happen to your system?
Internally, the Concat operator must keep in memory the results of all the tasks that have completed, but their time hasn’t arrived yet. For example, if the source observable emits five tasks, and the last four complete successfully, but the first task takes an hour to complete, the four results will be kept in memory until the first task completes.
If one of the tasks never completes (if it’s stuck in a loop or a deadlock), Concat might cause memory pressure. As a general approach, it’s better to not rely on order when it comes to asynchronous execution.
You now have the power to add asynchronous code execution as part of your observable pipeline. When order isn’t mandatory, use SelectMany. When the order is a must, use Concat. SelectMany and Concat are explored further in chapter 8.
5.2. Creating observables of periodic behavior
One common request I see from developers who start to use Rx is to create observables that process in a periodic way (for example, every 2 seconds) and emit their results. In the imperative programing style, this is done with a timer. An example of such behavior might be checking for updates against a web service and emitting the updated items.
Rx provides two operators that enable creating observables of periodic behavior or scheduled emission that we’ll cover in this part of the chapter.
5.2.1. Emitting values in time intervals
The Interval operator creates an observable that produces a value periodically every time interval:
![]()
The Interval operator creates an observable of type IObservable<long> that periodically emits the next long value (starting with 0). The time between two subsequent notifications is determined by the period parameter. Figure 5.10 is a marble diagram that shows the operator effects with a period of 1 second.
Figure 5.10. The Interval operator in this marble diagram creates an observable that emits a value every time interval (every 1 second in the diagram).
![]()
With a period of 1 second, the first notification is emitted after 1 second, and the second notification occurs 1 second later, and so on.
Here’s an example that shows how to use the Interval operator to create a WPF window that polls a web service for updates every minute, and displays them in a list box:

Keeping the periodic call to the web service in the observable pipeline allows you to create elegant solutions, as you can see in the previous example. I owe you an explanation on the ObserveOnDispatcher operator. Until now, I deliberately ignored the elephant in the room: where are the Intervals coming from, on which threads? In chapter 10, you’ll learn the concurrency model that Rx uses and see the connection to the Interval operator as well as other time-based operators. For now, you should know that by default, the Interval operator runs on a different thread of the observer subscription. In WPF and other GUI frameworks, code that mutates the UI controls can run in only the UI thread. The ObserveOnDispatcher operator guarantees that the observer code will run on the UI thread (by using the WPF Dispatcher).
Note
In the example, it’s possible that a call to the web service will happen even if the previous one hasn’t yet returned. The Interval operator has no knowledge about the asynchronous action you perform at each cycle.
It’s important to note that the Interval operator supports the same period between all emissions, including the first one. The Timer operator that you’ll see next gives more flexibility.
5.2.2. Creating an observable timer
At times you may want to create an observable that periodically emits a value, but to differentiate the time that the first emission is made, perhaps you’d want it to be immediate or delayed to a future schedule. Using the Timer operator, you can achieve such flexibility. Here’s one of the overloads that’s commonly used:
static IObservable<long> Timer(TimeSpan dueTime, TimeSpan period)
Calling this overload creates an observable that periodically produces a value after the specified initial relative due time has elapsed from the moment an observer subscribes. Figure 5.11 shows an example of creating an observable that produces a value every second, but starting 2 seconds after subscription. You can say that the Interval operator that you saw earlier is a special case of the Timer operator, in which the dueTime and period are the same.
Figure 5.11. The Timer operator marble diagram creates an observable sequence that periodically produces a value (1 second in the diagram) after the specified initial relative due time has elapsed (2 seconds in the diagram).

The timer also includes overloads to schedule the beginning of the periodicity in both relative and absolute times. You’ll explore those definitions when you look at another special case, scheduling the emission of a single value.
5.2.3. Scheduling an emission with a timer
The Timer operator can also be used to schedule the production of a value (0 of type long) to a future time:

As you can see, Timer has two overloads that receive the due time to emit the single value. The difference between the two overloads is in the way you represent the time to emit the value:
- Relative time— Defined as TimeSpan, which reflects a time interval from the moment of the observer subscription. For example, in 5 seconds
Observable.Timer(TimeSpan.FromSeconds(5))
- Absolute time— Defined as DateTimeOffset, which reflects a particular date and time, regardless of the time of the observer subscription. For example, July 4 or today
at midnight
Observable.Timer(DateTimeOffset.Parse("00:00:00"))
Creating an observable that emits a value in a preconfigured time can be useful when combining with other observables. Here’s an example that uses the Switch combinator (combining operator) to change from one observable to the other after 5 seconds:

Running this example yields this output on my machine:
timer switch - OnNext(first0@10/08/2015 20:30:52 +00:00)
timer switch - OnNext(first1@10/08/2015 20:30:53 +00:00)
timer switch - OnNext(first2@10/08/2015 20:30:54 +00:00)
timer switch - OnNext(first3@10/08/2015 20:30:55 +00:00)
timer switch - OnNext(first4@10/08/2015 20:30:56 +00:00)
timer switch - OnNext(second0@10/08/2015 20:30:58 +00:00)
timer switch - OnNext(second1@10/08/2015 20:31:00 +00:00)
timer switch - OnNext(second2@10/08/2015 20:31:02 +00:00)
timer switch - OnNext(second3@10/08/2015 20:31:04 +00:00)
timer switch - OnNext(second4@10/08/2015 20:31:06 +00:00)
timer switch - OnCompleted()
You can see that after 5 seconds, the second observable begins emitting its values (every 2 seconds), and so the control switches from the first observable to the second. Switch is an interesting combinator that’s covered further in chapter 8.
You have more to learn about asynchronous code execution and handling inside your Rx code: How can you transition to another thread in the middle of the pipeline and go back to the original context later (as in the case of a UI), and how can those transitions affect the building of the pipeline and the results you may see? These topics are discussed in upcoming chapters, but for now you have solid ground to start creating your observables and using asynchronicity in your application. Let’s summarize what you’ve learned.
5.3. Summary
You’ve completed this two-part series of the ways to create observables, which makes you observables qualified. This chapter covered ways to create observables through asynchronous code execution.
Here’s a summary of what you learned:
- Rx observables provide an abstraction over the source that emits the notification in a way that makes it thread transparent so that the observers don’t need to know or care about the origin of the notification.
- Rx observables can be created from code via asynchronous operations by using the overloads of the Observable.Create or Observable.Defer operators. Those overloads accept an asynchronous subscribe function that can even be written using async-await.
- Rx can take care of connecting tasks cancellation and subscription disposal by providing you with a CancellationToken that Rx attaches to the disposable subscription object that’s returned after an observer subscribes.
- You can easily convert asynchronous types such as tasks into observables by using the extension method ToObservable.
- To run asynchronous code as part of the operators in your pipeline, you can use the SelectMany operator that can await the asynchronous code (which can be represented as Task or another IObservable) and then continue the pipeline upon completion or emission.
- Use the Concat operator if you want the order of processing the results of the asynchronous code that was started from different emissions to be the same as the order of the emissions.
- Creating observables that emit notification in a periodic way is also possible in Rx by using the Interval operator, or the Timer operator if you need further control of the due time of the emission.
Because there’s no real use for observables without the observers that subscribe to them, the next chapter concentrates on the observer’s side and the various ways to create them and control their lifetimes.