
Chapter 10. Working with Rx concurrency and synchronization
- Rx schedulers
- Time-based operators
- Synchronization in the observable pipeline
Timing is everything, or at least that’s what some say. Unlike collections (enumerables), timing plays a big part in the observables world. The time between notifications can be long or short, and it can affect how you process them. In chapter 9, you saw examples of buffering elements or creating sliding windows over time. There’s also the matter of where the execution takes place (for example, threads, tasks, dispatchers, and so on). The concepts of time and execution context are related and provide the foundation for the Rx concurrency model. The scheduler type and its derivations express this model. This chapter explains the scheduler’s layer in Rx and how to use it to control concurrency inside the Rx observable pipeline, as well as how to use it with Rx time-based operators.
10.1. Controlling concurrency with schedulers
In computer science, concurrency is a property of those systems in which several computations are executing simultaneously and, potentially, interacting with each other. I talked a bit about concurrency in chapter 5, where I mentioned the different .NET asynchronous types. Until now, I’ve avoided talking directly about how concurrency is handled inside the observable pipeline. If you use the Interval operator to create an observable that emits every 10 seconds, for example, on what thread will the notifications be received? On what thread will the observer’s subscription take place? In some cases, such as when working with UI frameworks, controlling those execution contexts is important because you may have restrictions on which thread executes the code that performs an operation. Usually UI controls can be mutated only on the UI thread; otherwise, you get an exception.
Rx follows this design guideline: everything that introduces concurrency must do so by using a Scheduler type, which is the abstraction layer Rx uses for concurrency and time.
10.1.1. Defining the scheduler
In simple terms, a scheduler is a unit that represents a clock and an execution context. The clock maintains the current time and allows for scheduling work at a specific time (such as a timer). The execution context determines where to process the work (for example, in the current thread or in the current SynchronizationContext object). This is shown in figure 10.1. All schedulers in Rx implement the IScheduler interface, shown in listing 10.1.
Figure 10.1. The Rx schedulers are like timers: you assign specific actions or tasks to the scheduler, and when a preset time expires, the scheduler posts the work to the execution context it’s bound to.

Listing 10.1. The IScheduler interface

The scheduler contains the property Now, which returns the scheduler’s notion of the current time. Most scheduler implementations return DateTimeOffset.UtcNow, but in more advanced cases, as you’ll see in appendix C, the scheduler’s time abstraction lets you control the time for testing and for revisiting past events.
Along with the Now property, the Scheduler interface provides a couple of overloads to the Schedule methods. Those overloads let you schedule actions to run at an absolute or relative time, or immediately. To schedule actions, you pass a state object of your choice, the scheduling time, and an action of type Func<IScheduler, TState, IDisposable>.
When the preset time arrives and the action is invoked, it receives the scheduler that invoked it and the state object you provided. The state object lets you maintain context from the caller that made the scheduling to the action that’ll be running at a later time. There’s no restriction on the type of the state object, and it can be any data type you choose.
The action you schedule must return a Disposable object, which acts as a cancellation token. Disposing of it is meant to trigger the cancellation of the running operation as well as to clean any resources that were created as part of it.
Let’s see an example of what working with the scheduler looks like. You’ll use NewThreadScheduler (which resides in System.Reactive.Concurrency) to schedule an action that prints the current time on-screen. You’ll want to schedule this action 2 seconds in the future and, instead of being coupled to the environment clock or the platform-specific timers, you’ll rely on the Rx scheduler to do the wiring for you, as shown in figure 10.2.
Figure 10.2. Scheduling work with NewThreadScheduler


Running this example (and waiting 2 seconds) displays this output:
Hello World, Now: 22/12/2015 13:45:00 +00:00
In this example, the state object and the returned disposable aren’t used, but often those objects are used to control what’s going on inside the scheduled action.
Let’s see a more advanced example of a recurring event (every 2 seconds) that needs to count how many times it happened. You’ll use the state object and also create recursive scheduling to run an action every 2 seconds, which can be canceled with the returned disposable:

Figure 10.3 shows the conceptual sequence of the periodic behavior you just created.
Figure 10.3. You can use schedulers to create a periodic behavior. You can also use the state parameter for passing information to the next iteration.

If you run this example now, it’ll keep on running and writing messages on-screen. When the time comes, and you want to stop it, you can simply dispose of the scheduling object.
Internally, the scheduler connects all disposables that are created downstream of the disposable returned from the initial call to the Schedule method, so even if an inner-level scheduling has already happened, disposing of the top disposable will affect the innermost one. (Appendix A delves deeper into the Rx Disposables library that enables this kind of disposable chain.)
Some schedulers, in addition to implementing the IScheduler interface, implement two more interfaces that Rx provides:
- ISchedulerPeriodic declares the SchedulePeriodic method for scheduling actions to run periodically.
- ISchedulerLongRunning declares the ScheduleLongRunning method for scheduling actions that’ll run for a long period of time.
In most cases, you won’t use the scheduler directly. Instead, you’ll pass it to Rx operators only to control concurrency.
10.1.2. Parameterizing concurrency
The IScheduler interface provides an abstraction over the concurrency that you introduce in your application. IScheduler allows the operators that perform a concurrent operation to be agnostic to the real implementation of the concurrency simply by providing it with the scheduler you want it to use as a parameter. To create an observable that emits a notification every second but ensures that the emissions happen on the current thread, you can write this code:
Console.WriteLine("Before - Thread: {0}",
     Thread.CurrentThread.ManagedThreadId);
Observable.Interval(TimeSpan.FromSeconds(1), CurrentThreadScheduler.Instance)
    .Take(3)
    .Subscribe(x => Console.WriteLine("Inside - Thread: {1}",
                           x,
                           Thread.CurrentThread.ManagedThreadId));
Note that I passed the CurrentThreadScheduler.Instance to the Interval operator. This ensures that the internal timer that Interval is using will use the current thread. The code yields this output (thread numbers could differ):
Before - Thread: 1
Inside - Thread: 1
Inside - Thread: 1
Inside - Thread: 1
Interval creates a cold observable. Because CurrentThreadScheduler is used in this example, an observable runs synchronously for each observer that subscribes, so the subscription call turns into a blocking operation that continues only after the entire observable sequence completes.
If no scheduler is passed to the Interval operator, it’ll use the default scheduler that runs the timer on another thread and, therefore, the emissions will happen on that thread, yielding this output (thread numbers could differ):
Before - Thread: 1
Inside - Thread: 4
Inside - Thread: 4
Inside - Thread: 4
In this case the thread in which the OnNext method was called is 4 and is different from the thread that the application was executed on before the subscription took place. In other words, the observable now runs asynchronously.
Like the Interval operator, all Rx operators that introduce concurrency in their operations receive a scheduler (a default scheduler is used otherwise). I’ll confess I wasn’t completely honest in the previous chapters, and I intentionally hid all the operators’ overloads that receive the IScheduler.
Many developers that approach Rx have a false assumption that everything in Rx is running in the background. This isn’t true. In fact, Rx operators are clear about their intentions to execute the so-called background operation by providing an overload that accepts IScheduler. Consider the next example of the Range operator that creates an observable that emits a sequence of numbers together with the Repeat operator that resubscribes to the observable. Try to predict what will be printed:
var subscription =
    Observable.Range(1, 5)
        .Repeat()
        .SubscribeConsole("Range on another thread");

subscription.Dispose();
Unlike what many developers falsely believe, this writes the sequence 1–5 indefinitely on the console and doesn’t immediately dispose of the subscription. Because when the observable that emits the sequence completes, the Repeat operator resubscribes to it. This happens over and over on the calling thread, so the Dispose method of the subscription will never be reached.
To overcome this, you can change the Range emissions to take place on another thread by doing this:
Observable.Range(1, 5, NewThreadScheduler.Default)
Now the calling thread won’t be blocked, and the call to the Dispose method will happen as quickly as possible.
Rx also provides a few implementations of the IScheduler interface that’s suited for different purposes.
10.1.3. Types of schedulers
To help you set the concurrency of your observable pipeline, Rx provides a couple of schedulers. All the standard Rx schedulers sit under the System.Reactive.Concurrency namespace. To demonstrate the different effect each scheduler has, I’ll use the test method shown here.
Listing 10.2. A test method to show the behavior of various schedulers
public static void TestScheduler(IScheduler scheduler)
{
    scheduler.Schedule(Unit.Default,
        (s, _) => Console.WriteLine("Action1 - Thread:{0}",
                           Thread.CurrentThread.ManagedThreadId));
    scheduler.Schedule(Unit.Default,
        (s, _) => Console.WriteLine("Action2 - Thread:{0}",
                           Thread.CurrentThread.ManagedThreadId));

}
NewThreadScheduler
Just as the name suggests, NewThreadScheduler runs the scheduled action on a new thread. By default, NewThreadScheduler creates a new Thread object for every scheduling operation, but you can also pass it a threadFactory of type Func<ThreadStart, Thread>, which is responsible for the way threads are created.
Most of the time, you won’t instantiate the scheduler, but will use the NewThreadScheduler.Default static property to receive a shared instance.
TestScheduler(NewThreadScheduler.Default);
Running the code displays this output (thread numbers could differ):
Action1 - Thread:7
Action2 - Thread:8
One issue usually confuses developers who use NewThreadScheduler with a recursive call to the scheduler—it won’t open a new thread. Internally, it will use the EventLoopScheduler that uses the same thread.
Because creating a new thread for every scheduling isn’t efficient,[1] you should use the NewThreadScheduler primarily for making long-running operations. For short-lived operations, it’s recommended to work with ThreadPool.
This issue is discussed in chapter 5.
ThreadPoolScheduler
Creating a new thread for every scheduled action isn’t efficient; opening and closing a thread in the OS is time and memory expensive. Instead, the .NET Framework provides the ThreadPool class that reuses threads instead of opening a new one each time. ThreadPoolScheduler works similarly to NewThreadScheduler, but uses the thread pool instead of creating new threads:
TestScheduler(ThreadPoolScheduler.Instance);
The output is as follows (thread numbers could differ):
Action1 - Thread:9
Action2 - Thread:10
You can see from the output that two actions are scheduled independently of one another, and on different threads.
Unlike NewThreadScheduler, recursive scheduling is also queued on the thread pool, so different scheduled actions might run on different threads. ThreadPoolScheduler should be your first choice when you specifically need to schedule on threads.
TaskPoolScheduler
TaskPoolScheduler works similarly to ThreadPoolScheduler except, instead of working with ThreadPool, it uses the Task Parallel Library (TPL) task pool. In some platforms (such as WinRT), the thread pool isn’t accessible, so TaskPoolScheduler is the perfect replacement.
CurrentThreadScheduler
CurrentThreadScheduler schedules the actions on the same thread where the caller of the Schedule method runs. Any recursive scheduling that happens inside a scheduled action is put into an ordered-by-time queue maintained by the scheduler. After a scheduled operation completes, the scheduler picks the next operations from the queue and runs it when its dueTime comes, or immediately if it has already passed.
TestScheduler(CurrentThreadScheduler.Instance);
The output is as follows (thread numbers could differ):
Calling thread: 1
Action1 - Thread:1
Action2 - Thread:1
The example shows that each scheduled action runs on the same thread, and that this thread is the same one the caller is running on. When you program recursive schedulings, they’ll also run on the same thread.
ImmediateScheduler
Like CurrentThreadScheduler, ImmediateScheduler schedules the action on the current thread. But unlike CurrentThreadScheduler that queues the scheduled actions and then runs them one after the other, ImmediateScheduler runs each action immediately or blocks it until the dueTime comes:

The output is as follows (thread numbers could differ):
Calling thread: 1 Current time: 24/12/2015 18:00:47 +00:00
Outer Action - Thread:1
Inner Action - Thread:1
Outer Action - Done
After the Schedule, Time: 24/12/2015 18:00:49 +00:00
There are a few things to note in this example output. First, all the actions run on the same thread that the initial caller runs on. Second, the inner action is scheduled immediately and not when the outer action completes. Third, the message After the Schedule prints 2 seconds after the call to the Schedule method. This is because you pass the TimeSpan.FromSecond(2) as an argument to the Schedule method that causes it to block until the dueTime arrives. You should use ImmediateScheduler when you need to schedule actions that involve a small amount of work that can be viewed as constant time operations.
EventLoopScheduler
EventLoopScheduler is a scheduler bound to a single thread that runs all the actions. When EventLoopScheduler is created, it creates a thread (or you can provide a thread factory of your own) to run all the actions that will be scheduled, regardless of what thread the actions are scheduled on.
Internally, EventLoopScheduler holds an ordered-by-time queue of the action. Every scheduled action is enqueued and, when the scheduler finishes running an action, the next action is dequeued.
TestScheduler(new EventLoopScheduler());
The output is as follows (thread numbers could differ):
Calling thread: 1
Action1 - Thread:14
Action2 - Thread:14
The example shows that all scheduled actions are running on the same thread, but this thread is different from the one that EventLoopScheduler was created on.
In one of the projects I was consulting on, three observables emitted values at a high rate, and observers used and modified the state of a shared object. All the modifications of the shared object had to be synchronized, so the developers used locks and other synchronization primitives in many places inside the shared object, thus degrading the performance. A small but powerful tweak I made to improve the performance was to make all the observers run on the same EventLoopScheduler so that no locks were needed while the processing was still synchronized.
Scheduling on the SynchronizationContext
In the .NET Framework, SynchronizationContext is an object that handles the synchronization of work for a specific threading context, such as the UI thread in WPF and WinForms or an ASP.NET request. By using SynchronizationContext, you can dispatch work from a source thread to a target thread and let SynchronizationContext handle the details.
SynchronizationContextScheduler in Rx provides a bridge between the Rx schedulers’ model and the .NET SynchronizationContext model so that each scheduled task is posted on SynchronizationContext. When creating the SynchronizationContextScheduler, you need to pass the SynchronizationContext you want to use. For example:
var syncContextScheduler = new SynchronizationContextScheduler(
                                  SynchronizationContext.Current);
In both WinForms and XAML platforms, SynchronizationContext plays a big part because if you try to run code that interacts with the UI component from a thread different than the UI thread, an exception is thrown. So every operation related to the UI needs to go through the right SynchronizationContext. In WinForms, you can use the control itself to invoke the actions on the right thread:
control.BeginInvoke(() => {/* the action code */});
With XAML platforms (such as WPF or WinRT), you can use the Dispatcher class:
Dispatcher.CurrentDispatcher.BeginInvoke(() => {/* the action code */});
To ease the use of schedulers in those frameworks, Rx provides ControlScheduler and DispatcherScheduler, which wrap the right synchronization context for WinForms and XAML platforms. To access these schedulers, add a reference to the relevant platform package—System.Reactive.Windows.Threading for XAML platforms such as WPF or UAP (www.nuget.org/packages/System.Reactive.Windows.Threading) and System.Reactive.Windows.Forms for WinForms (www.nuget.org/packages/System.Reactive.Windows.Forms).
In chapter 5, I showed how to create observables from asynchronous code. For the sake of the example (and because schedulers were introduced only in this chapter), I introduced concurrency by explicitly creating a task inside the observable creation method of an observable that emits prime numbers. To make amends, I’ll show here the correct way of introducing concurrency and parameterizing it. Note that the example can be optimized even more (by converting enumerables to observables, for example), but I want to show the simplest refactoring:

10.2. Using time-based operators
The main difference between an observable sequence and traditional enumerables is the dimension of time. With observables, the time between two notifications is dynamic and can be predicated by the observer. This dimension of time can affect the way you want to react to notifications—ignoring them or delaying them if they’re too fast.
In the previous chapters, you’ve already seen some of the operators that are time-based. In this section, I’m going to talk about them at a deeper level.
10.2.1. Adding a timestamp to a notification
Because the observable emits notifications at different times, it makes sense to ask what time each notification was emitted. Instead of manually adding the time information, Rx provides the Timestamp operator, which adds the UTC date and time details for each notification in the observable sequence. Figure 10.4 depicts the Timestamp operator.
Figure 10.4. The Timestamp operator adds a timestamp of the emission time to every notification.

The Timestamp operator takes no parameters (except for an optional scheduler) and wraps the notification object with the Timestamped<T> type that holds the timestamp of the emission:
IObservable<Timestamped<TSource>> Timestamp<TSource>(
                                  this IObservable<TSource> source);
IObservable<Timestamped<TSource>> Timestamp<TSource>(
                                  this IObservable<TSource> source,
                                  IScheduler scheduler)
In the next example, you create an observable that emits a notification every 1 second, like a heartbeat notification received from a hardware product that your software monitors.[2] You add a timestamp by using the Timestamp operator so you can log the information for future analysis. Because you don’t want the example to run forever, you’re taking only three notifications:
A heartbeat is a special notification used to monitor the availability of a resource; see https://en.wikipedia.org/wiki/Heartbeat_(computing).
IObservable<long> deviceHeartbeat =
    Observable.Interval(TimeSpan.FromSeconds(1));

deviceHeartbeat
    .Take(3)
    .Timestamp()
    .SubscribeConsole("Heartbeat");
Console.ReadLine();
Running this example on my machine shows this output:
Heartbeat - OnNext(0@25/12/2015 22:29:24 +00:00)
Heartbeat - OnNext(1@25/12/2015 22:29:25 +00:00)
Heartbeat - OnNext(2@25/12/2015 22:29:26 +00:00)
Heartbeat - OnCompleted()
The bolded text values were emitted by the observable. I got this formatted output because of the Timestamped<T> type. The Timestamped<T> type holds the notification object that was emitted by the timestamped observable and the timestamp of when the notification was emitted. It also implements a nice ToString method that helps when debugging.
The Timestamp operator can be useful when you need to investigate what’s going on inside your observable and how the time dimension affects your handling.
10.2.2. Adding the time interval between notifications
Useful as the Timestamp operator can be, sometimes all you care about is the time interval between two emissions. Instead of calculating this interval by subtracting the two timestamps, you can use the TimeInterval operator, which records the time interval between consecutive elements in the observable. Figure 10.5 shows a marble diagram of the TimeInterval operator.
Figure 10.5. The TimeInterval operator computes the time interval between two notifications.

TimeInterval wraps every notification object with a TimeInterval<T> type:
IObservable<TimeInterval<TSource>> TimeInterval<TSource>
    (this IObservable<TSource> source);
IObservable<TimeInterval<TSource>> TimeInterval<TSource>
    (this IObservable<TSource> source, IScheduler scheduler);
In the next example, you simulate a hardware device that sends heartbeat signals that the application monitors. You create an observable that emits three notifications with the following intervals between them: 1 second, 2 seconds, and 4 seconds. You use the TimeInterval operator to record the interval between them. Obviously, when there’s a long gap between heartbeats, it means that something is unhealthy with the device being monitored.
var deviceHeartbeat = Observable
    .Timer(TimeSpan.FromSeconds(1))
    .Concat(Observable.Timer(TimeSpan.FromSeconds(2)))
    .Concat(Observable.Timer(TimeSpan.FromSeconds(4)));
deviceHeartbeat
    .TimeInterval()
    .SubscribeConsole("time from last heartbeat");
Console.ReadLine();
This code prints the following output:
time from last heartbeat - OnNext(0@00:00:01.0120598)
time from last heartbeat - OnNext(0@00:00:02.0070871)
time from last heartbeat - OnNext(0@00:00:04.0029774)
time from last heartbeat - OnCompleted()
The bold text shows the time intervals that were recorded. Of course, the measured time isn’t the same as what you’ve set. That’s because many factors were involved in scheduling the notifications and in measuring the intervals: the preemptive OS, the time of the measurement itself, and so forth.
Even so, your application can now alert the user that something is wrong with the device simply by checking that the interval encapsulated in the TimeInterval type is within the normal time limits. The TimeInterval struct holds the Interval property (of type TimeSpan) and the Value property that contains the emitted notification, and implements a nice ToString method useful for debugging.
Using the TimeInterval operator lets you make decisions based on the distance between the emitted values. Sometimes the behavior you’re trying to implement is that if the time distance is too long, you want to cancel the operation (or query). This is known as setting a time-out.
10.2.3. Adding a time-out policy
As discussed in previous chapters, observables can represent an asynchronous operation or can be a result of an observable pipeline that involves some kind of an asynchronous operation, such as a request from a remote service.
When doing things asynchronously, you must always ask how long it takes before you can say that the action was faulty. When you work with asynchronous service providers, it’s common for some kind of error to happen that prevents you from receiving a response.
To make handling such cases easy, Rx provides the Timeout operator that, as its name indicates, handles the time-out cases for you. It monitors the notifications emitted by the observable and, if a notification hasn’t been emitted (since the previous one) in the period of time that you configured, it raises an exception that will be passed to the observer by its OnError method. Figure 10.6 illustrates Timeout.
Figure 10.6. The Timeout operator emits an error notification when the time-out duration has passed without emitting.

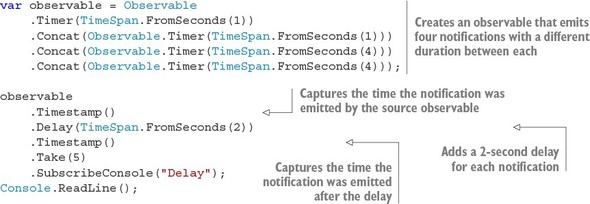
The next example simulates a case in which four remote requests are sent, one after the other, and you’re waiting for their responses. You set the time-out to 3 seconds, meaning that when a response takes more than 3 seconds to return, you can unsubscribe from the observable. To simulate this, you create an observable that emits two notifications with a 1-second gap between them, and two more notifications with a 4-second gap. You add the Timeout operator to your pipeline and configure it to 3 seconds:
var observable = Observable
     .Timer(TimeSpan.FromSeconds(1))
     .Concat(Observable.Timer(TimeSpan.FromSeconds(1)))
     .Concat(Observable.Timer(TimeSpan.FromSeconds(4)))
     .Concat(Observable.Timer(TimeSpan.FromSeconds(4)));

observable
    .Timeout(TimeSpan.FromSeconds(3))
    .SubscribeConsole("Timeout");
Console.ReadLine();
Running the example shows this output:
Timeout - OnNext(0)
Timeout - OnNext(0)
Timeout - OnError:
    System.TimeoutException: The operation has timed out.
You can see that because you define the time-out to be 3 seconds, and no notification was sent, you get a TimeoutException.
10.2.4. Delaying the notifications
The notifications emitted by the observable can come at any rate. In most cases, you’ll want to react to them as soon as they arrive. But in some cases delaying the handling of a notification is preferred; for example, when you get requests that have different priorities (based on customer service-level agreement, or SLA), and you want to delay the processing of the lower-priority requests and give precedence to requests of a higher priority.
The Delay operator lets you add the delay you want, either constantly to all notifications or independently per notification. Figure 10.7 shows how the Delay operator affects the notification when passing it a relative time span. (Overloads that accept an absolute time exists as well.)
Figure 10.7. The Delay operator shifts the observable notifications by a time duration.

If you want to add a fixed time period for each notification delay, you can accomplish it using the Delay operator.
Listing 10.3. Delaying notifications with the Delay operator
Running this example on my machine shows this output:
Delay - OnNext(0@26/12/2015 14:47:41 +00:00@26/12/2015 14:47:43 +00:00)
Delay - OnNext(0@26/12/2015 14:47:42 +00:00@26/12/2015 14:47:44 +00:00)
Delay - OnNext(0@26/12/2015 14:47:46 +00:00@26/12/2015 14:47:48 +00:00)
Delay - OnNext(0@26/12/2015 14:47:50 +00:00@26/12/2015 14:47:52 +00:00)
Delay - OnCompleted()
The important pieces of data here are the two timestamps. The one on the right (bolded text) is the time the notification was emitted after the delay, and the one on the left is the time the notification was emitted by the source observable. You can easily see that there’s a 2-second difference between the timestamps for each notification.
Adding a variable delay
When a constant delay doesn’t fit your needs, you can use the Delay operator overloads that let you specify the delay duration per notification:

Another overload also exists whereby you can omit the subscriptionDelay, which is used to delay the subscription to the source observable.[3]
The subscriptionDelay parameter gives a similar effect as the DelaySubscription operator I talked about in chapter 6.
In the next example, you create an observable of integers, and use each integer to determine the delay duration for each notification. These integers can be the request’s priority in your application or the requested handling time of your application user:

This is the output I got on my machine:
Delay - OnNext(1@26/12/2015 15:10:11 +00:00@26/12/2015 15:10:12 +00:00)
Delay - OnNext(2@26/12/2015 15:10:11 +00:00@26/12/2015 15:10:13 +00:00)
Delay - OnNext(3@26/12/2015 15:10:11 +00:00@26/12/2015 15:10:14 +00:00)
Delay - OnNext(4@26/12/2015 15:10:11 +00:00@26/12/2015 15:10:15 +00:00)
Delay - OnCompleted()
Because you create the observable from a collection of integers, all of them were emitted by the observable roughly at the same time. Each one was delayed independently, so even though number 4 was the first to be emitted by the source observable, it was the last to be received by the observer.
10.2.5. Throttling the notifications
In many cases, handling notifications emitted close to one another adds no real value. For example, if users update their details at a high rate (let’s say three times per second), it might not be cost-effective to handle the first two updates because they’re no longer relevant.
To add this kind of behavior to your observable pipeline, so notifications will be dropped unless a predefined period of time has passed without other notifications arriving, you can use the Throttle operator,[4] depicted in figure 10.8.
Some Rx implementations refer to this operator as Debounce.
Figure 10.8. The Throttle operator emits an item from an observable only if a particular time span has passed without emitting another item.

In the next example, you simulate a case in which multiple updates are arriving, but only if 2 seconds have passed without another update coming will the update be allowed to proceed:

Running the example displays this output:
Throttle - OnNext(Update A)
Throttle - OnNext(Update D)
Throttle - OnNext(Update E)
Throttle - OnCompleted()
You can see that updates B and C were dropped because both of them were followed by another notification that was emitted after less than 2 seconds.
Variable Throttling
The Throttle operator lets you control the throttling duration for each element in an independent way. To achieve that, you can pass a function that returns an observable for each element that signals when the throttling period ends:

Every emitted notification causes the Throttle operator to drop the previously returned observable and to start a new duration with the newly returned observable.
In listing 10.4, you extend your throttling example such that, in addition to the normal update messages, a new type of update message is created that triggers an immediate update. You use the Throttle operator to prevent handling of fast-rate messages, unless it’s an Immediate Message, which is handled immediately. In your applications, an Immediate Message might be a notification of high importance or an item that comes from a source of high priority.
Listing 10.4. Throttling notifications
var observable = Observable .Return("Msg A") .Concat(Observable.Timer(TimeSpan.FromSeconds(2)).Select(_ => "Msg B")) .Concat(Observable.Timer(TimeSpan.FromSeconds(1)).Select(_ => "Immediate Update")) .Concat(Observable.Timer(TimeSpan.FromSeconds(1)).Select(_ => "Msg D")) .Concat(Observable.Timer(TimeSpan.FromSeconds(3)).Select(_ => "Msg E")); observable .Throttle(x => x == "Immediate Update" ? Observable.Empty<long>() : Observable.Timer(TimeSpan.FromSeconds(2))) .SubscribeConsole("Variable Throttling");
Running the example creates this output:
Variable Throttling - OnNext(Msg A)
Variable Throttling - OnNext(Immediate Update)
Variable Throttling - OnNext(Msg D)
Variable Throttling - OnNext(Msg E)
Variable Throttling - OnCompleted()
In this example, you’re checking each element. If it’s an Immediate Update, you return an observable that emits a notification immediately (the OnCompleted notification). Otherwise, you create an observable that emits a notification after 2 seconds. That’s why, even though notifications were emitted less than 2 seconds from when the Immediate Update was emitted, Immediate Update was emitted as well.
10.2.6. Sampling the observable in intervals
Another way of handling rapid observables is to slow the reaction rate to the notifications and to sample the emitted values in predefined intervals. The Sample operator lets you define the duration of the interval, so that when an interval ends, the last value emitted by the source observable is emitted by the resulting observable. Figure 10.9 provides a marble diagram of Sample.
Figure 10.9. The Sample operator samples the observable sequence at each interval, emitting the last notification in the interval.

The next example shows how to take an observable that emits a notification every second and sample it every 3.5 seconds. (I limited the example to only three intervals.) In real-world scenarios, you might want to do that when the source of the notification is fast, but there isn’t a lot of advantage to collecting all received values. For example, digital signal processing (DSP) applications usually sample the audio of video signals at a rate that’s high enough to reconstruct the signal in a way that makes it understandable, even if some data is lost. (Displaying 24 frames per second is enough to fool our brains into seeing a moving picture.)
Observable.Interval(TimeSpan.FromSeconds(1))
    .Sample(TimeSpan.FromSeconds(3.5))
    .Take(3)
    .SubscribeConsole("Sample");
Console.ReadLine();
The example yields this output:
Sample - OnNext(2)
Sample - OnNext(5)
Sample - OnNext(9)
Sample - OnCompleted()
The duration of the interval doesn’t have to be constant. The next Sample overload lets you control the duration of each interval by passing an observable that emits when the interval ends:
IObservable<TSource> Sample<TSource, TSample>(
    this IObservable<TSource> source,
    IObservable<TSample> sampler)
Upon each emission done by the sampler (sampling tick), the latest element (if any) in the source observable during the last sampling interval is sent to the resulting sequence. All the operators you’ve learned about in this chapter (and others covered in other chapters) can receive the IScheduler you want them to use for introducing concurrency. But, for the operators that don’t introduce concurrency, you can’t pass the scheduler. So what do you do if you want to change the execution context in the middle of your observable pipeline? You use the Rx-provided operators that add synchronization.
10.3. Synchronizing the observable emissions
From the observer’s standpoint, the emissions done by the observables can happen on any thread and, therefore, the observer’s reaction can happen on any thread as well. In many cases, this has no real importance, but when dealing with certain frameworks or libraries you might need to perform certain operations on a specific execution context (for example, the UI thread). Furthermore, at times you need to synchronize the processing between different observers from different observables, either by making them all happen on the same thread or by using concurrency primitives (for example, mutex, semaphor, and so on). Luckily, you don’t need to write all that low-level code yourself; you can use the Rx synchronization operators.
10.3.1. Changing the observation’s execution context
If you need to control the execution context (the observations of elements done by the observer), Rx provides the ObserveOn operator that lets you pass the scheduler that the emissions will be scheduled on. You have the ability (to some extent) to specify on which thread you want the OnNext/OnError/OnCompleted functions to run. Figure 10.10 is a marble diagram of ObserveOn.
Figure 10.10. The ObserveOn operator runs the observer functions on the specified scheduler.

A classic use of ObserveOn occurs when you need your observer to modify a UI control (for example, changing the width of a button), and you need to make sure the observer runs in the UI thread. The UI thread is managed either by DispatcherScheduler for XAML platforms or by ControlScheduler in WinForms.
The next example creates an observable from the TextBox.TextChanged event and throttles it. The text values that survive the throttling are then added to a ListBox. Because the Throttle operator uses a default scheduler (usually ThreadPool), you use the ObserveOn operator to make sure the ListBox is changed on the UI thread.
Observable.FromEventPattern(TextBox, "TextChanged")
    .Select(_ => TextBox.Text)
    .Throttle(TimeSpan.FromMilliseconds(400))
    .ObserveOn(DispatcherScheduler.Current)
    .Subscribe(t => ThrottledResults.Items.Add(t));
Because the observation on the Dispatcher is something that happens frequently, you can use the shortened operator ObserveOnDispatcher, which does the same thing. The ObserveOn operator also has overloads that let you pass the Synchronization-Context or the WinForms Control with which you want to make the observation. Under the hood, the ObserveOn operator creates an interceptor in the observable pipeline that intercepts each call done on the observer and executes it on the specified scheduler.
10.3.2. Changing the subscription/unsubscription execution context
In addition to controlling the execution context of the observation, you can control the execution context that runs the subscription and unsubscription, meaning the thread in which the Subscribe method of the observable and the Dispose method of the subscription is called.
This is something that you’d typically want to do if the observable’s work must happen on a specific thread (as in Silverlight, where the registration to a control’s events has to happen on the UI thread, but the processing of the notifications can happen anywhere).
Consider the code for an observable that does heavy processing before emitting its values, such as connecting to a hardware device that is slow, as shown here:

When running this example, the calling thread will be blocked for 5 seconds, and only afterward do the messages appear. Adding ObserveOn to this example won’t help because the long operation happens as part of the subscription. What you want is to make the subscription itself on another thread.
The SubscribeOn operator lets you pass the scheduler that’ll be used to schedule the subscription and unsubscription. It creates interceptors in the observable pipeline that’ll intercept the call to the observable Subscribe method and make these calls run on the specified Scheduler. Then, the interceptor wraps the disposable returned by the Subscribe method so that its Dispose method will also run under the specified scheduler. Figure 10.11 depicts the SubscribeOn operator.
Figure 10.11. The SubscribeOn operator runs the observer subscription and unsubscription on the specified scheduler.

This interception over the unsubscription can cause confusion because the moment you call the Dispose method, it might go into effect only at a later time, based on the scheduler used. In the next example, you create an observable that emits every 1 second and uses the EventLoopScheduler for making the subscription. Then you schedule work items that take a long time to complete and dispose of the subscription. The unsubscription will take some time until it’s complete and, in the meantime, notifications will still be processed inside the pipeline.
Listing 10.5. Confusion from using SubscribeOn when unsubscribing

Running the example shows this output:
Subscription disposed
Before sleep
Inside Do
Inside Do
After sleep
Inside Do
Note that the call to Dispose happens almost immediately; but, because the real subscription will be disposed of on the event loop, it needs to wait until the long operation completes, and so you see the messages from the Do operator.
10.3.3. Using SubscribeOn and ObserveOn together
Depending on the observable you subscribe to, the thread on which you subscribe might also be the thread on which the emissions happens, or they might be totally different threads. You can combine the SubscribeOn and ObserveOn operators to gain better control over which thread will run in each step of your observable pipeline. And it’s important to understand the order in which these operators happen and where their effect is coming into play.
To help with that, I created this simple LogWithThread operator to provide insight on the threads on which the subscriptions and emissions happen.
Listing 10.6. The LogWithThread operator logs both events and threads.
public static IObservable<T> LogWithThread<T>(
     this IObservable<T> observable,
     string msg = "")
{
     return Observable.Defer(() =>
     {
         Console.WriteLine("{0} Subscription happened on Thread: {1}", msg,
                            Thread.CurrentThread.ManagedThreadId);

         return observable.Do(
             x => Console.WriteLine("{0} - OnNext({1}) Thread: {2}", msg, x,
                                     Thread.CurrentThread.ManagedThreadId),
             ex =>
             {
                  Console.WriteLine("{0} – OnError Thread:{1}", msg,
                                     Thread.CurrentThread.ManagedThreadId);
                  Console.WriteLine("	 {0}", ex);
             },
             () => Console.WriteLine("{0} - OnCompleted() Thread {1}", msg,
                                     Thread.CurrentThread.ManagedThreadId));
     });
}
The LogWithThread operator prints messages to the console when the observer subscribes and for every notification done by the source observable. With each log message, the thread on which the event happens is also written.
Now let’s see what happens when you use SubscribeOn and ObserveOn with LogWithThread to log the details for you. In the next example, you create a simple observable that emits three notifications (one every second), and you use the SubscribeOn and ObserveOn operators to control the execution context. The example creates an observable that emits five numbers and adds a few operators on it.
Listing 10.7. Testing the order of execution and effects of SubscribeOn and ObserveOn
new[] {0,1,2,3,4,5}.ToObservable()
    .Take(3).LogWithThread("A")
    .Where(x => x%2 == 0).LogWithThread("B")
    .SubscribeOn(NewThreadScheduler.Default).LogWithThread("C")
    .Select(x => x*x).LogWithThread("D")
    .ObserveOn(TaskPoolScheduler.Default).LogWithThread("E")
    .SubscribeConsole("squares by time");
Console.ReadLine();
Running the example on my machine shows this output:
E Subscription happened on Thread: 1
D Subscription happened on Thread: 1
C Subscription happened on Thread: 1
B Subscription happened on Thread: 3
A Subscription happened on Thread: 3
A - OnNext(0) Thread: 3
B - OnNext(0) Thread: 3
C - OnNext(0) Thread: 3
D - OnNext(0) Thread: 3
E - OnNext(0) Thread: 4
A - OnNext(1) Thread: 3
A - OnNext(2) Thread: 3
squares by time - OnNext(0)
B - OnNext(2) Thread: 3
C - OnNext(2) Thread: 3
D - OnNext(4) Thread: 3
E - OnNext(4) Thread: 4
squares by time - OnNext(4)
A - OnCompleted() Thread 3
B - OnCompleted() Thread 3
C - OnCompleted() Thread 3
D - OnCompleted() Thread 3
E - OnCompleted() Thread 4
squares by time - OnCompleted()
Figure 10.12 shows the marble diagram that displays what you see in the output.
Figure 10.12. The effects of SubscribeOn and ObserveOn on the observable pipeline

Here are the key points in the example output:
- The order of the subscriptions is from the bottom to the top (the subscription is first executed at stage E, and only at the end at stage A). This is because the observable returned by the last LogWithThread operator is the one the observer is subscribing to.
- The subscriptions are executed on thread 1 until SubscribeOn is called, and then the subscriptions are made with thread 3 (step B).
- The notifications are done from top to bottom (A is first, and E is last).
- The notifications are emitted on thread 3 (where the subscriptions occur) until ObserveOn is called (right before E), and then the notifications are emitted on thread 4.
- While the notification is observed on thread 4, thread 3 is free to observe the next notification. That’s why you see the observation of 0 together with the emission of 2 (the bolded lines).
Next, I’ll talk about how to synchronize processing of the notifications in the observable pipeline and between observables.
10.3.4. Synchronizing notifications
The notifications observed by the observer are assumed to arrive in a serialized fashion. The Rx Design Guidelines (see paragraphs 4.2 and 6.7) state that all Rx operators should safely assume that their inputs are serialized.[5] They won’t receive notifications concurrently, but only one after the other. If this assumption isn’t made, almost every operator and every observer should be written in a thread-safe way and use various kinds of locks to ensure the validity of their operations. This imposes a significant performance hit that isn’t necessary.
To read paragraphs 4.2 and 6.7 and for more details on the guidelines, see http://mng.bz/6bVR.
But you can’t control every observable subscribed to. Some observables might be from a third party or might be constructed on top of a source that doesn’t act in a serialized way. For these types of observables, you should synchronize their emissions in the observable pipeline.
Suppose you create an observable from an event exposed by a third-party component:
class Messenger
{
    public event EventHandler<string> MessageReceived;

    //Rest of the Messenger code
}
This is how to create the observable:
var messenger = new Messenger();
var messages =
    Observable.FromEventPattern<string>(
        h => messenger.MessageReceived += h,
        h => messenger.MessageReceived -= h);
And this is how to subscribe to it:

When I ran this example and received three messages from multiple threads, this is what I got:
Message msg2 arrived
Message msg1 arrived
Message msg0 arrived
Message msg1 exit
Message msg0 exit
Message msg2 exit
It’s obvious that the messages are received in an unserialized way. To serialize the notifications received in the observer (or in any operator), you need to use the Synchronize operator:

Now the messages are received in a serialized way, no matter from what thread the emission was made. Internally, the Synchronize operator creates a lock around every notification it makes to the observer. The lock is done on an inner object called the gate.
Synchronizing multiple observables
The Synchronize operator has an overload that lets you send the gate object that will be used to make the locks:
IObservable<TSource> Synchronize<TSource>(
    IObservable<TSource> source,
    object gate);
This overload can be useful when you need to share the lock between multiple subscribed observables. Suppose the Messenger class exposes another event, Friend-RequestReceived, of all the friend requests you receive. After you create an observable, you want to synchronize the processing of the two types of notifications (friend requests and text messages). This how to do that:

Now the friend requests and the messages will be received in a serialized fashion.
This chapter dealt with many advanced topics of the Rx world. Let’s summarize what you’ve learned.
10.4. Summary
In this chapter, you’ve learned about the way Rx models time and concurrency, and the techniques you can use to control the timing and execution context of the observable pipeline.
- In Rx, a scheduler is a unit that represents a clock and an execution context.
- With a scheduler, you can schedule work to be posted to an execution context at a specific time.
- All Rx schedulers implement the IScheduler interface.
- Some schedulers also implement the ISchedulerPeriodic or the ISchedulerLongRunning interfaces.
- Rx operators that introduce concurrency can receive a parameter of type IScheduler, allowing you to control the way concurrency is introduced.
- Out-of-the-box Rx comes with a handful of schedulers: NewThreadScheduler, ThreadPoolScheduler, TaskPoolScheduler, CurrentThreadScheduler, ImmediateScheduler, and EventLoopScheduler.
- Depending on the framework you use, other schedulers that are bound to the synchronization context will also be included (for example, Control-Scheduler or DispatcherScheduler).
- You use the Timestamp operator to add a timestamp of the emission time to every notification.
- You use the TimeInterval operator to add a time interval between two notifications.
- You use the Timeout operator to emit an error notification in case the time-out duration has passed without the source observable emitting.
- You use the Delay operator to shift the observable notifications by a time duration.
- You use the Throttle operator to emit an item from an observable if a particular time span has passed without the source observable emitting another item.
- You use the Sample operator to sample the observable sequence every time interval, emitting the last notification in each interval.
- You use the ObserveOn operator to enforce the observer functions to run on a specified scheduler.
- You use the SubscribeOn operator to enforce observer subscription and unsubscription to run on a specified scheduler.
- You use the Synchronize operator to create a lock so that the notifications are received in a serialized way.
The topics in this chapter are considered advanced and complex, but they’re inherent in many of the operators you’ve seen throughout the book. Controlling them will help you achieve the goals of your observable pipelines. The next chapter covers something we all dislike but must take care of: errors. Because they’re inevitable, I’ll show you how to add error handling and recovery toa your observable queries.