
Chapter 9. Partitioning and combining observables
This chapter covers
- Partitioning observables into groups of related notifications
- Emitting chunks of notifications by sliding windows and buffers
- Combining multiple observables into one
- Reacting to patterns of coincidence
A typical application is usually composed of multiple workflows that structure its behavior. In many cases, the application needs to handle and react to more than one data source, UI events, push notifications, remote procedure calls, and so on. Suppose your application needs to consume messages from various sources (such as social networking) and react to all of them in the same way. Or, say your application deals with a source that emits a stream of various kinds of notifications (such as stock prices), and it needs to look at each subgroup of notifications (for each stock) separately and independently. How do you do that?
There are many ways to combine observables and react to a combination of the notifications emitted by them (for example, taking only the latest, pairing, or joining by condition). And, there are different ways to create subgroups from an observable (for example, by time or condition). This chapter takes you to the next level by using concepts you already know from enumerables and applying those to the world of observables.
9.1. Combining observables
Working with a single observable has its benefits; however, the internet is composed of multiple events occurring independently. To react to notifications emitted from multiple observables, Rx provides operators that make it easy to combine the observables.
9.1.1. Pairing items from observables (zipping)
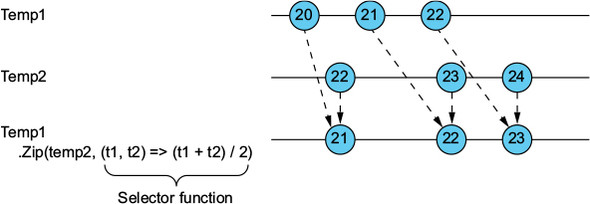
When you need to combine values that are in the same index in two (or more) observables, the Zip operator should be your answer. It takes the observables you want to pair and a selector function that describes how to do that. The first item of each observable is zipped together, the second item of each observable is zipped together, and so on.
The arguments for the selector function are the set of values, emitted at the same index (each in its source observable), from the items emitted by the observables you want to zip. The selector function then returns the calculated result from those values.
Suppose you have two temperature sensors in a room that emit values roughly at the same time and you want to show the average temperature from both readings. Here’s how to do that with the Zip operator:
IObservable<double> temp1 = ...
IObservable<double> temp2 = ...

temp1
    .Zip(temp2, (t1, t2) => (t1 + t2)/2)
    .SubscribeConsole("Avg Temp.");
A sample output of this program is shown in figure 9.1.
Figure 9.1. The Zip operator lets you zip values with the same index from two (or more) observables by using a selector function.
The problem with the Zip operator is that it relies on the index of the values emitted by both observables. If the rate of one of the observables is higher than the other, Zip accumulates the emitted values in memory until the next value is emitted from the second observable (this also means that if the second observable never emits or completes, the values from the first observable will never be used, but still remain in memory). In many cases, you’ll want to combine only the latest values emitted by the observables.
9.1.2. Combining the latest emitted values
To combine the set of values last emitted by the observables, use the CombineLatest operator (figure 9.2). Unlike the Zip operator, when one of the observables returns a value, CombineLatest also returns a value, even if a second observable doesn’t emit for a long time.
Figure 9.2. The CombineLatest operator combines the latest emitted values from each observable by using a selector function.

Consider this example: you have a sensor that monitors heart rate and one that monitors speed. You want to display the most up-to-date value, regardless of the update rate of each sensor. To simulate this case, you’ll create the observables as subjects you can control:

Now you can emit the values from each observable and see what happens:
heartRate.OnNext(150);
heartRate.OnNext(151);
heartRate.OnNext(152);
speed.OnNext(30);
speed.OnNext(31);
heartRate.OnNext(153);
heartRate.OnNext(154);
The output from this sequence is shown here:
Metrics - OnNext(Heart:152 Speed:30)
Metrics - OnNext(Heart:152 Speed:31)
Metrics - OnNext(Heart:153 Speed:31)
Metrics - OnNext(Heart:154 Speed:31)
Two things are of note here. First, you can see that the heart-rate value of 152 is emitted twice at the beginning. This is because the speed observable emits two values, one after the other, and 152 is the latest value emitted by the heartRate observable. The same thing happens when the heartRate observable emits its values while the latest speed value is 31 (shown in the last two lines).
The second thing to notice is that when the heartRate observable initially produces the values 150 and 151, nothing is emitted by the combined observable. Indeed, CombineLatest emits values only if all observables emit a value at least once; otherwise, there isn’t a latest value from all observables.
One way to overcome dropped values, making sure the combined observable emits a value even if all observables haven’t yet emitted a value, is to add a value at the beginning of each observable by using the StartWith operator. For example, changing the previous snippet to the following prints the heart-rate values of 150 and 151 as well:
speed.StartWith(0)
    .CombineLatest(heartRate.StartWith(0),
                   (s, h) => String.Format("Heart:{0} Speed:{1}", h, s))
    .SubscribeConsole("Metrics");
Note
Currently, the Rx codebase also includes the operator WithLatestFrom, which is like a one-way CombineLatest. WithLatestFrom combines each value from the first observable with the latest value from the second observable, but not the other way around. This operator isn’t included in Rx versions prior to 3.0, which this book is using.
Combining observables isn’t restricted only to taking a value from each observable and creating a unified result from them. As you’ll see next, another combination includes creating a unified observable and placing the values emitted from each observable into a single stream.
9.1.3. Concatenating observables
The Concat operator connects two or more observables of the same type into a single stream (figure 9.3). When the first observable completes, Concat links the values from the second observable to the resulting observable, even if they were emitted long before the first observable completes. It’s important to note that the Concat operator subscribes itself to the second observable only after the first observable completes, so if the second observable is hot and notifications were emitted before subscribing, they won’t be part of the resulting observable emissions.
Figure 9.3. The Concat operator concatenates the second observable sequence to the first observable sequence upon successful termination of the first.

Confusion about hot and cold observables and the Concat operator may arise when you use it in asynchronous operations. For example, say you use Concat to ensure that the results from two asynchronous operations are emitted in an order that isn’t the expected order returned by asynchronous operations. Remember, when tasks are converted to observables, an AsyncSubject is created so the value of the asynchronous computation won’t get dropped, which turns a hot operation into a cold observable.
The following example simulates two asynchronous operations that load messages from Facebook and Twitter. Facebook is slower in this case (due to the use of the Delay operator), but because I’m using Concat, the Facebook messages appear first in the output:

Running this example shows this output:
Concat Messages - OnNext(Facebook1)
Concat Messages - OnNext(Facebook2)
Concat Messages - OnNext(Twitter1)
Concat Messages - OnNext(Twitter2)
Concat Messages - OnCompleted()
Even though the results from Facebook take longer to arrive (due to the use of Delay), they’re still present first. At times, however, that order between the observables has no meaning, and you want to react to the notifications emitted by the observables the moment they’re pushed. For this, you need the Merge operator.
9.1.4. Merging observables
Merging observables means you want to route the notifications from the source observables into a single observable, so that when a notification is emitted by one of the sources, it’s also emitted by the merged observable (figure 9.4). This allows you to react to the notifications as fast as possible, no matter what source observable emitted them.
Figure 9.4. The Merge operator merges the notifications from the source observables into a single observable sequence.

The following example simulates two asynchronous operations that load messages from Facebook and Twitter. Facebook is slower in this case (due to the use of the Delay operator), but because I’m using Merge, the Twitter messages are shown first and only then. When the Facebook operation completes, its messages are then shown:

Now, even though the Facebook asynchronous operation is passed first to the Merge operator, the first values you’ll see printed are those from Twitter because this operation completes first:
Merged Messages - OnNext(Twitter1)
Merged Messages - OnNext(Twitter2)
Merged Messages - OnNext(Facebook1)
Merged Messages - OnNext(Facebook2)
Merged Messages - OnCompleted()
Concat and Merge are useful for combining a fixed set of observables when you write your code, but your application might create observables in a more dynamic way (based on user usage, for example). You’ll want those operators to be more dynamic with their inputs because, as mentioned in chapter 1, everything is a stream.
9.1.5. Dynamic concatenating and merging
Both Concat and Merge let you pass not only a fixed collection of observables you want to combine, but also an observable of the observables to combine. This is the construct:
IObservable<TSource> Concat<TSource>(
    this IObservable<IObservable<TSource>> sources)
IObservable<TSource> Merge<TSource>(
    this IObservable<IObservable<TSource>> sources)
These overloads let you add Merge or Concat as part of a broader pipeline; for example, when a source observable emits a value that’ll be transformed into another observable (like one that represents an asynchronous operation). Suppose you want to create an observable from the text-changed event of a text box, and when the text changes, you want to make a call to a remote search service and show all the results from all the searches.

Running the example yields this output:
Merging from observable - OnNext(Hello-Result)
Merging from observable - OnNext(World-Result)
Merging from observable - OnCompleted()
Note
Conceptually, the operator SelectMany (described broadly in chapter 8) operates the same as calling Select and Merge.
As with dynamic allocations, without dynamic operations, you sometimes need to set a limit; otherwise, performance decreases (just like overallocations that may cause OutOfMemoryException or responsiveness degradation). Luckily, Rx provides control over this.
Controlling the concurrency
Concat subscribes itself to an observable only when the previous observable completes, but Merge needs to subscribe to all the observables at the beginning of its operation. Subscribing to many observables might pose a performance problem for your application or a heavy load on the observable source (such as a remote service). For those reasons, you might need to restrict the amount of concurrent subscriptions that Merge is allowed to make. Here’s an example that shows how to do this:

In this case, you have three observables that can emit notifications concurrently. If Merge subscribes to all of them, you’d see the messages generated from the three observables intertwined. Instead, you get the following:
Merge with 2 concurrent subscriptions - OnNext(Second0)
Merge with 2 concurrent subscriptions - OnNext(First0)
Merge with 2 concurrent subscriptions - OnNext(Second1)
Merge with 2 concurrent subscriptions - OnNext(First1)
Merge with 2 concurrent subscriptions - OnNext(Third0)
Merge with 2 concurrent subscriptions - OnNext(Third1)
Merge with 2 concurrent subscriptions - OnCompleted()
Note that the notifications emitted by the third observable are separate from the others. This is because it’s subscribed to only when one of the first two observables completes (after 2 seconds). If after the first observable completes, the second observable still emits notifications, you’d see the merged result from the second and third observables.
9.1.6. Switching to the next observable
Consider the preceding example in which for every text change, you make a call to a remote search service and then display all the results onscreen. A more realistic approach is that you’d show only the latest results.
Now imagine that while waiting for the search results to arrive from the back end, another search is executed (the text has changed again). In this case, you’d unsubscribe from the previous asynchronous search operation and start a new search to which you’d now be subscribed.
To accomplish the task of switching to a new observable when it’s available, you need to use the Switch operator, depicted in figure 9.5.
Figure 9.5. The Switch operator takes an observable that emits observables and creates a single observable that emits the notifications from the most recent observable.

Here’s a simple program that simulates the text changes shown in the marble diagram. You use the Delay operator to add a little delay to R1 emissions so the system will switch to the R2 observable before the R results are available.
Listing 9.1. Switching to the most recent search results with the Switch operator

Switching to the first observable to emit
Imagine you have multiple observables that represent options to receive the same sequence of notifications (for example, multiple service representatives in real life), but you need to select only one of them—the one that’s the fastest (the first to emit).
This can be a selection between servers or a selection between a computed result and a cached one. Switch won’t help here because it’ll bind to the first observable to emit and then switch to the slower one.
The Amb (short for ambiguity) operator works similarly to the Switch operator, but instead of switching to a new observable each time a new one is emitted, Amb switches only to the first observable to emit. Think of it this way: if all the observables are considered equally fit as the source, you want them to duel, and the first one to shoot wins.
Here’s an example:
var server1 =
     Observable.Interval(TimeSpan.FromSeconds(2))
             .Select(i => "Server1-" + i);
var server2 =
     Observable.Interval(TimeSpan.FromSeconds(1))
             .Select(I => "Server2-" + i);

Observable.Amb(server1, server2)
    .Take(3)
    .SubscribeConsole("Amb");
Console.ReadLine();
In this case, the server2 observable emits first, so you’ll see only the values with the prefix Server2-.
Tip
You can also write the example like this: server1.Amb(server2).Take(3).SubscribeConsole("Amb");.
So far, you’ve learned how to combine and pair observables. Next, you’ll get to know techniques for breaking an observable into subobservables.
9.2. Grouping elements from the observable
The elements that observables emit can be grouped based on a particular condition. Unlike collections or datasets, grouping elements from observables creates a group with an unfixed size, in which the number of elements is unknown and can be infinite. This is because you can’t predict what elements will be emitted by the observable in the future.
To group elements from an observable, you need to generate the group as an observable by itself; that is, an observable that emits a notification for every element that’s part of the group. For example, using the GroupBy operator, you can split an information stream of people into a group of males and a group of females (figure 9.6).
Figure 9.6. The GroupBy operator groups the elements of an observable sequence according to a specified key selector function (for example, splitting a stream of people into a group of males and a group of females). Each group is an observable of the group elements.

The basic GroupBy signature looks like this:
IObservable<IGroupedObservable<TKey, TSource>> GroupBy<TSource, TKey>(
    this IObservable<TSource> source,
    Func<TSource, TKey> keySelector)
Note that the return type is an observable of grouped observables. The grouped observable is itself an observable that also includes the property Key, which holds the key that describes each element it emits.
GroupBy also includes overloads that let you pass an elementSelector (to decide how each element will be transformed before being emitted by the grouped observable) and a capacity (to control the maximum number of groups that can live concurrently).
By separating the elements into different observables, you can create separate queries for each group. For example, you can now get the average age for females and for males:

You can also use the GroupBy query syntax clause for the preceding example:
var genderAge =
    from p in people
    group p by p.Gender
    into gender
    from avg in gender.Average(p => p.Age)
    select new { Gender = gender.Key, AvgAge = avg };
Next, you’ll look at another concept that’s clear in the world of collections but is a little tricky in the world of observables: joins.
9.3. Joining observables (coincidence-based combining)
Combining observables isn’t restricted to only using the elements emitted to create a new type of result. Another interesting combination is to find relationships and logical correlations between elements—when trying to answer which elements exist in the same time frame, for example.
When querying database tables or collections of items, joining entities is clear—you combine fields from two or more entities by using values that are common to each. How can you apply this definition to the world of reactive streams? Rx bases commonality on the coincidence of occurrence, meaning when notifications are occurring in the same time frame.
In short, combining elements from various observables based on the coincidence that they exist in the same time frame is what we call joining. You can join two or more observables in two ways. The first emits joint pairs into a single flat stream. The second creates groups of correlated items and emits an item into a correlation group.
9.3.1. Joining to a flat stream
Let’s start with an example of how joining observables works. Suppose you’re running a statistical study and want to get notifications on the occurrence of males and females that are in the same room at the same time. This is a classic case for joins, as shown in figure 9.7.
Figure 9.7. The Join operator combines items emitted by two observables when an item from one observable is emitted during a time frame of an emitted item from the other observable.

To create joins between observables, you use the Join operator, which correlates the elements of two sequences based on overlapping durations. The signature for Join is complex and requires some explanation:

The tricky part of the method signature is the duration selector functions. Those functions receive an emitted element and return an observable whose emissions determine the end of the time frame for the element.
Suppose you have a sensor, coded as a hot observable of DoorEvent objects, that monitors people who enter and exit a room. You want to emit all the males and females that are in the same room at the same time:
IObservable<DoorOpened> doorOpened = doorOpenedSubject.AsObservable();
DoorEvent is defined as follows:

You can extract the observable of the males entering the room and the females entering the room like this:
var entrances = doorOpened.Where(o => o.Direction ==
    OpenDirection.Entering);
var maleEntering = entrances.Where(x => x.Gender == Gender.Male);
var femaleEntering = entrances.Where(x => x.Gender == Gender.Female);
In the same way, you can extract the observable of those leaving:
var exits = doorOpened.Where(o => o.Direction == OpenDirection.Leaving);
var maleExiting = exits.Where(x => x.Gender == Gender.Male);
var femaleExiting = exits.Where(x => x.Gender == Gender.Female);
Now, you’ll want to join the occurrence of males in the room with the occurrence of females in the room. For that you need to define for each notification (male or female entering) the time frame that marks the existence in the room. With the reactive approach, defining the time frame means defining an observable that emits (or completes) when the time frame closes. Here’s how you bring that into action:

Tip
An interesting type of a time-frame observable is one that uses the same observable that emits the elements as the one that defines the time frame. By doing this, you’re expressing that the time frame for an element is the time until the next element is emitted.
To test your code, you’ll create a subject that acts as the back end of your observable and then you’ll emit notifications that simulate the sequence shown previously in figure 9.7:
doorOpenedSubject.OnNext(
    new DoorOpened("Bob", Gender.Male, OpenDirection.Entering));
doorOpenedSubject.OnNext(
    new DoorOpened("Sara", Gender.Female, OpenDirection.Entering));
doorOpenedSubject.OnNext(
    new DoorOpened("John", Gender.Male, OpenDirection.Entering));
doorOpenedSubject.OnNext(
    new DoorOpened("Sara", Gender.Female, OpenDirection.Leaving));
doorOpenedSubject.OnNext(
    new DoorOpened("Fibi", Gender.Female, OpenDirection.Entering));
doorOpenedSubject.OnNext(
    new DoorOpened("Bob", Gender.Male, OpenDirection.Leaving));
doorOpenedSubject.OnNext(
    new DoorOpened("Dan", Gender.Male, OpenDirection.Entering));
doorOpenedSubject.OnNext(
    new DoorOpened("Fibi", Gender.Female, OpenDirection.Leaving));
doorOpenedSubject.OnNext(
    new DoorOpened("John", Gender.Male, OpenDirection.Leaving));
doorOpenedSubject.OnNext(
    new DoorOpened("Dan", Gender.Male, OpenDirection.Leaving));

// Rest of code that simulates participants leaving the room
Running this procedure produces the following output:
Together At Room - OnNext({ Male = Bob, Female = Sara })
Together At Room - OnNext({ Male = John, Female = Sara })
Together At Room - OnNext({ Male = Bob, Female = Fibi })
Together At Room - OnNext({ Male = John, Female = Fibi })
Together At Room - OnNext({ Male = Dan, Female = Fibi })
Writing joins with query syntax
The C# compiler lets you write joins with a LINQ query. The join clause is shown here:
from [left] in [leftObservable]
join [right] in [rightObservable] on [leftDuration] equals [rightDuration]
select ...
With the query syntax approach, finding the male and female pairs that are in the room at the same time looks like this:
from male in maleEntering
join female in femaleEntering on maleEntering.Where(exit =>
exit.Name == male.Name) equals
femaleExiting.Where(exit => female.Name == exit.Name)
select new {Male = male.Name, Female = female.Name};
The join clause creates a single observable on which all the correlations are emitted. Sometimes, however, a divide-and-conquer approach is easier to work with.
In the spirit of this approach, you’d like to receive per each male, all the occurrences of that male with the females in the room with him. So each male becomes a group key for the group of all the associated females, and this group is an observable of those females. So instead of one observable with all the pairs, you’ll have multiple observables—one for each group. For this behavior, you need to use the GroupJoin operator.
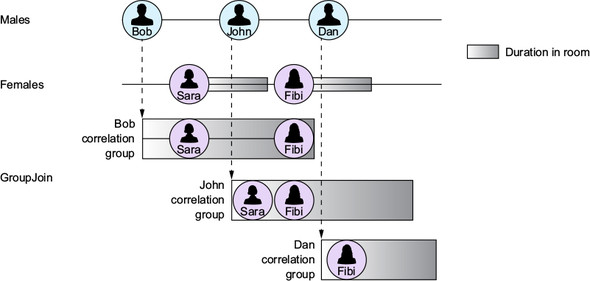
9.3.2. Joining into groups
The GroupJoin operator lets you correlate the elements of two observable sequences based on overlapping durations and combines the elements that correlate with each element into a group that’s itself an observable (figure 9.8). For example, in a statistical observation experiment, you want to emit, for each male, all the females that were in the same room with him. You’ll call this observable of associated females per male a group.
Figure 9.8. The GroupJoin operator correlates elements from two observables based on overlapping duration time frames. The elements from the second observable are grouped by the element from the first observable to which they correlate.
The motivation for this group, based on coincidence, is that for each group you can define a finer query in a much easier way. For example, what’s the average age of the women group?
The GroupJoin operator has a signature similar to Join:

Suppose you want to extend your example from the previous section (finding all the pairs of males and females in a room together). Now, you want to add a counter that shows the number of females that each male was in the room with, up to the current point.
As before, you have observables that emit the males and females that enter and exit the room:
var maleEntering = entrances.Where(x => x.Gender == Gender.Male);
var femaleEntering = entrances.Where(x => x.Gender == Gender.Female);
var maleExiting = exits.Where(x => x.Gender == Gender.Male);
var femaleExiting = exits.Where(x => x.Gender == Gender.Female);
Now you can use GroupJoin to create the groups of correlations. For each male, you create an object that contains the male’s name and the observable of females that correlate to him:
var malesAcquaintances =
    maleEntering
        .GroupJoin(femaleEntering,
            male => maleExiting.Where(exit => exit.Name == male.Name),
            female => femaleExiting.Where(exit => female.Name == exit.Name),
            (m, females) => new {Male = m.Name, Females = females});
Then you can create a query for the malesAcquaintances observable that computes the number of females each man meets in the room and subscribe to it:
var amountPerUser =
    from acquaintances in malesAcquaintances
    from cnt in acquaintances.Females.Scan(0, (acc, curr) => acc + 1)
    select new {acquaintances.Male, cnt};

amountPerUser.SubscribeConsole("Amount of meetings for User");
Running this example with the males and females shown in figure 9.8 generates this output:
Amount of meetings per User - OnNext({ Male = Bob, cnt = 1 })
Amount of meetings per User - OnNext({ Male = John, cnt = 1 })
Amount of meetings per User - OnNext({ Male = Bob, cnt = 2 })
Amount of meetings per User - OnNext({ Male = John, cnt = 2 })
Amount of meetings per User - OnNext({ Male = Dan, cnt = 1 })
Note that a notification emits each time the count changes.
GroupJoin with query syntax
For simplicity, you can write a GroupJoin clause by using the LINQ query syntax. GroupJoin has the same format as the clause used in LINQ, but the meaning of its parts is as follows:
from [left] in [leftObservable]
join [right] in [rightObservable] on [leftDuration] equals [rightDuration]
     into [correlationGroup]
select ...
This is how you’d correlate the males and females in the same room:
from male in maleEntering
join female in femaleEntering on maleExiting.Where(e => e.Name == male.Name)
equals femaleExiting.Where(e => female.Name == e.Name)
into maleEncounters
select new { Male = male.Name, Females = maleEncounters };
Joins are a powerful tool in the Rx toolbox, as they allow you to find correlations between elements and to capture coincidence.
At this point in the chapter, you already have a good idea of how to connect different observables and a basic understanding of how to split a single observable into subobservables (groups). Next, you’ll learn more useful techniques for breaking the observable into parts.
9.4. Buffers and sliding windows
When thinking about observables, you’ll look at them in many cases as a representation of an unbounded stream of elements (or notifications). Working with unbounded things, whether they’re observables or collections, isn’t easy to grasp. As humans, we like to break them into smaller, bounded things to process each separately until, finally, we reflect their result in the “big picture” of the entire unbounded set. This is known as the divide-and-conquer approach. With reactive programming, you can do that in two ways:
- Buffering breaks the observable sequence into bounded collections called buffers.
- Windowing breaks the observable sequence into finer observables to define their duration.
The important difference between the two is that with windowing, you get the emission as soon as it arrives, and with buffering you get the buffer’s emission only when it closes (either because it’s full or because the buffering time is over), as shown in figure 9.9.
Figure 9.9. Buffering versus windowing: with windowing, you get the emissions as soon as they arrive, and with buffering you get the buffer only when it closes.

The word window is a little confusing here because it represents two different but related things.
First, window is the substream of elements under a certain boundary (duration or amount).
Second, window is the logical boundary in which elements are gathered from the stream.
In figure 9.9 you can say that the buffer is created from a time frame (window) that spans over the three items, which are emitted and then collected to the buffer.
You can also say that the three items that are emitted in that time frame are emitted to an observable that we call a window.
You can define three types of windows when you consider them as containers of elements over time:
- Tumbling windows are a series of fixed-sized, nonoverlapping, contiguous time intervals.
- Hopping windows are a series of windows that “hop” forward in time by a fixed period.
- Sliding windows are a type of hopping window in which the window width is larger than the “hop,” causing the windows to overlap.

9.4.1. Buffering
With buffering, you can wrap consecutive elements emitted by an observable into a buffer and create an observable of collections, but not of single elements. You can buffer by time, number of items, or any logical duration you specify by using an observable whose notifications define when the buffer closes.
Suppose your application connects to your bike’s speedometer, which pushes the speed at a constant rate. You want your application to show how your acceleration changes. To do that, you need to get two consecutive readings and calculate the difference between them. You can use Buffer to accomplish that, where the buffering is done with a sliding window of two items.
Figure 9.10 shows the marble diagram of what you’re trying to achieve.
Figure 9.10. A marble diagram of acceleration calculated with the Buffer operator

This listing shows the code for the marble diagram in figure 9.10.
Listing 9.2. Using Buffer to find the deltas between two speedometer readings

In this example, you use the query syntax approach because it allows you to use the let keyword to introduce new subcalculations that make your code smaller. After applying the Buffer operator on the speedReadings observable, you get an observable of buffers with two consecutive items.
Tip
Instead of creating a buffer of two consecutive elements to find the speed delta, you could use the Zip operator like this: speedReadings.Zip (speedReadings.Skip(1), (x,y)=> y-x). This zips the observable with a shifted version of itself.
You can see in the example that you provide two arguments to the Buffer operator by using this overload:
IObservable<IList<TSource>> Buffer<TSource>(IObservable<TSource> source,
      int count,
      int skip);
The first argument passed is the number of items you want in each buffer, and the second argument (called skip) defines the number of notifications that need to be emitted when the first buffer opens, before another buffer will be opened. The combinations of the two arguments create the various types of windows (as a container of elements over time, explained in the beginning of this section), as shown in figure 9.11:
- Tumbling window: If skip is the same as the number of items in the buffer, a buffer opens the moment the previous one closes.
- Hopping window: If skip is larger than the number of items in the buffer, then after a buffer is closed, the next buffer opens only after count-skip (count minus skip) elements have been emitted.
- Sliding window: If skip is smaller than the number of items a buffer contains, then the buffer overlaps with the next one and shares some of the items.
Figure 9.11. Buffering with various combinations of amount and skip and the effect on the windows’ behavior

Buffer has overloads that let you make the buffering by time span, or you can set the buffering to be both by time and number of items, whichever happens first:

If you need more control over when the buffer starts and when it closes, you can use the Buffer overload that accepts observables as its triggers for starting or closing a buffer.
If the closing of a buffer triggers the opening of the next buffer, use this overload:

If a single observable for controlling the closing of the buffer (and opening the next one) isn’t enough for your needs, and you need to create a specific duration for each buffer that’s opened, consider using this overload:

If buffers can open and close independently, consider using this overload:

Suppose you’re writing a chat messaging application that can receive messages at a rapid rate. Because you don’t want to block your UI, you need to protect it from too many updates in a short period of time. What you want is to wait until there’s a short pause between the messages and then put all the messages on the screen at once. To do that, you can buffer the chat messages and control the buffering with another observable that emits when there’s a short pause:

To simulate the situation of high-rate messages, you’ll create an observable that emits four messages, one every 50 ms, and then pauses for 200 ms before it emits four more messages. (Note that I’m converting the cold observable into a hot one in order to get realistic results):
var coldMessages = Observable.Interval(TimeSpan.FromMilliseconds(50))
    .Take(4)
    .Select(x => "Message " + x);

IObservable<string> messages =
    coldMessages.Concat(
         coldMessages.DelaySubscription(TimeSpan.FromMilliseconds(200)))
         .Publish()
         .RefCount();

//Rest of the example as it is shown in the snippet and use the Buffer operator
Running this example displays these results:
Hi-Rate Messages - OnNext(Buffer 0 - Message 0)
Hi-Rate Messages - OnNext(Buffer 0 - Message 1)
Hi-Rate Messages - OnNext(Buffer 0 - Message 2)
Hi-Rate Messages - OnNext(Buffer 0 - Message 3)
Hi-Rate Messages - OnNext(Buffer 1 - Message 0)
Hi-Rate Messages - OnNext(Buffer 1 - Message 1)
Hi-Rate Messages - OnNext(Buffer 1 - Message 2)
Hi-Rate Messages - OnNext(Buffer 1 - Message 3)
Hi-Rate Messages - OnCompleted()
With the different overloads of the Buffer operator, you can control when a buffer is opened and when it’s closed. Still, your observer receives the elements inside the buffer only when the buffer closes, which can take some time (depending on your logic).
If you need to perform any operations on the elements inside the buffer (such as summing or filtering them), you can do that only at the end of each buffer. For cases like this, requiring a more “live” operation, you should use the Window operator.
9.4.2. Windowing the observable sequence
The Window operator lets you fragment the observable sequence into windows along temporal boundaries or capacity. A window is an observable that emits the elements in that temporal boundary (figure 9.12). The Window operator looks similar to the Buffer operator, but instead of wrapping all the elements of the buffer inside a collection that emits when the buffer closes, a window emits the items as soon as they arrive.
Figure 9.12. The Window operator splits the observable sequence into subobservables based on temporal boundaries or capacity.

Suppose you have an application for a call center that collects donations. The work is done in shifts of 1 hour, and you want to see how many donations were collected in each shift.
In this case, working with Buffer isn’t sufficient because you’ll get the sum of the donations only at the end of the 1-hour window. Instead, you’ll use the Window operator so that values are summed and displayed immediately onscreen:

The donations observable is broken into non-overlapping windows of 1 hour each. Then, you take each window and apply the Scan operator to sum all the values of the donations made. Scan emits the summation when the values change (as opposed to Aggregate, which emits when the observable completes).
The donationsSums observable is a flat observable that emits the summations from all the windows. Because you’ve added the Do operator to the windows observable, you’ll see a message between each window. Here’s the output I received when running the example for two shifts with the sample donation values:
Shift 1—50$, 55$, 60$
Shift 2—49$, 48$, 45$
Output:
New Window
donations in shift - OnNext(50)
donations in shift - OnNext(105)
donations in shift - OnNext(165)
New Window
donations in shift - OnNext(49)
donations in shift - OnNext(97)
donations in shift - OnNext(142)
donations in shift - OnCompleted()
The Window operator has some overloads that let you control when the window is opened and when it closes. Windows can be opened and closed based on the number of items they contain or by the duration of time they should be opened. You can also specify the number of items to be skipped between them or the duration of a pause between closing a window and opening another.
Here’s a small subset of these overloads (you’ll find them similar to the ones that the Buffer operator provides):
IObservable<IObservable<TSource>> Window<TSource>(
    IObservable<TSource> source,
    int count,
    int skip);
IObservable<IObservable<TSource>> Window<TSource>(
    IObservable<TSource> source,
    TimeSpan timeSpan,
    TimeSpan timeShift);
IObservable<IObservable<TSource>> Window<TSource>(
    IObservable<TSource> source,
    TimeSpan timeSpan,
    int count);
If the number of items to skip (or the time shift) is less than the number of items in the window (or the window duration), a sliding window is created, and there will be an overlap between the two windows, as shown in figure 9.13.
Figure 9.13. Fixed windows versus sliding windows

Dynamic windows
Windows can open and close dynamically, based on your own logic that might depend on other observables. You can define the window closure strategy differently for each window by providing a function that creates an observable per window. This observable determines when the window closes by emitting a notification on completion:
IObservable<IObservable<TSource>> Window<TSource, TWindowClosing>(
     IObservable<TSource> source,
     Func<IObservable<TWindowClosing>> windowClosingSelector);
Opening a window can be controlled in a similar fashion. You can provide an observable to the Window operator that triggers the opening of a window by emitting a notification:

If you want to create nonoverlapping windows and control the window boundaries by your own logic, you can use this overload:
IObservable<IObservable<TSource>> Window<TSource, TWindowBoundary>(
    IObservable<TSource> source,
    IObservable<TWindowBoundary> windowBoundaries);
windowBounderies is an observable that you provide to close the previous window and open the next by emitting a notification.
Windows and buffers are two ways you can split a big problem into many small ones and solve each one independently. By splitting your observable into parts, you can gain insight into the different parts that later can be reflected overall. This is ideal for aggregations or other operations over subsets of elements that fall within a certain period of time.
This concludes your journey into the ways to combine observables and the ways to split them. You accomplished quite a lot in this chapter, which presented advanced techniques in reactive logic. It’s time to summarize what you’ve learned so you’ll have a future reference to use for refreshing your memory.
9.5. Summary
In this chapter, you’ve learned that building reactive queries isn’t restricted to a single observable and that you can create queries that rely on the relationship and combinations of multiple observables:
- The Zip operator pairs elements from two or more observables that share the same index.
- The CombineLatest operator combines the latest values emitted from each of the observables.
- The Concat operator emits the elements from the next observable when the previous observable completes.
- Concat subscribes to the observable only when the previous one completes.
- The Merge operator subscribes to all of the observables and emits their notifications as they arrive.
- You can restrict the number of concurrent subscriptions for the Merge operator by passing the number of allowed concurrent subscriptions as an argument.
- The Switch operator creates a single observable that emits the notifications from the most recent observable.
- The Amb operator works similarly to Switch, but switches to the first observable that emits.
- In Rx, grouping means to create observables of elements that share the same key. This is done with the GroupBy operator.
- In Rx, joining two observables means to emit pairs of elements that exist in the same time frame.
- The Join operator combines items emitted by two observables in the same time frame and emits the pairs into a single flat observable.
- The GroupJoin operator correlates the elements of two observable sequences based on overlapping durations, and then groups all elements that correlate with each element, which is an observable itself.
- You can write your Join and GroupJoin queries using both query syntax and method chaining.
- The Buffer operator breaks an observable sequence into bounded collections and creates an observable of those collections.
- The Window operator breaks an observable sequence into finer observables.
- Both Buffer and Window allow you to control the duration or capacity of the buffer or windows and allow the creation of sliding windows.
In the many examples you’ve seen in this book, from creating observables through querying and combining, we’ve added the element of time and of execution context (threads, tasks, and so on). The next chapter teaches you how Rx models time and concurrency and how to use that to control the execution of your queries.