
Appendix C. Testing Rx queries and operators
One of the things that differentiates an amateur programmer from a professional is the ability to test the code that was written and ensure that it does what it needs to do. Writing unit tests allows you, the programmer, to validate that you created the right solution, and be certain that your future development won’t affect or ruin the code you previously wrote (known as regression). Rx queries and operators are no different, and you should invest the time to test them as well. I’ll even go so far as to say that by testing, you’ll get a better understanding of your craft and improve your design. In this appendix, you’ll learn the utilities that the Rx library provides to facilitate your testing and strategies you can use to improve your Rx code testability.
C.1. Testing Rx code
As you progress with your Rx work, at times you’ll find yourself writing the same pattern of code over and over. When this happens, you should follow the DRY principle and encapsulate the recurring pattern in a new operator. Of course, once you create a new operator, you need to test it and be certain you implement it correctly.
Imagine that you have a proximity sensor that emits notifications whenever a near object is sensed. The proximity sensor is sensitive, and every time an object gets closer, you get a burst of notifications, one after the other. Your application wants to react to the sensor notifications, but it’s necessary to filter the bursts so only a single emission will take place. At the same time, another application you write needs to react to mouse moves, but you don’t want to react to each and every one; you want to make the reaction smoother and react to a single emission from the burst. This type of filtering is known as throttling. Rx even provides the Throttle operator (discussed in chapter 10), but it emits only the last notification in a burst, whereas what you need here is emitting the first notification in the burst. Because you need this kind of logic in more than one place, you create a new Rx operator called FilterBursts. This operator receives the expected size of a burst, and emits back the first item of each burst:
public static class ObservableExtensions
{
    public static IObservable<T> FilterBursts<T>(
      this IObservable<T> src,
      int burstSize)
    {
        //The operator implementation
    }
}
Note
This appendix focuses on testing, not implementing the Rx code, so the operator implementation isn’t shown here. It’s available with the book source code, and I encourage you to check it out, or even better, try to implement it yourself as an exercise.
Now that you have the operator implementation, you want to test it. The examples in this chapter use xUnit (https://xunit.github.io/). Beside being a good testing framework, it’s the one used by the Rx team and is also one of the few frameworks that supports .NET Core at the time of this writing. Feel free to use whatever testing framework you like; the concepts I’ll show are applicable to all frameworks.
Before you can start writing the unit tests, you need to add the Rx testing library. To install it, you need to add the NuGet package Microsoft.Reactive.Testing.
Your first unit test, shown in the following listing, asserts that when applying the FilterBursts operator with a burstSize of 5 to a source observable of 10 values, the resulted observable will emit only the first and the sixth values.
Listing C.1. A basic unit test on an Rx operator

AssertEqual is part of the Rx test library. It checks that the resulted observable emits the same value as the observable it receives as an argument.
Note
It’s a common convention to name the source observables in unit tests as xs and ys.
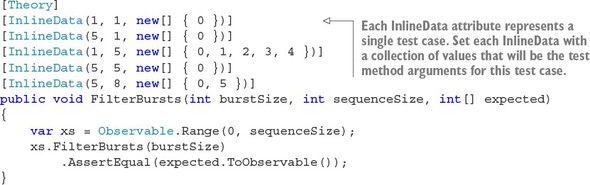
The preceding unit test works as expected and is small and clear. So now you want to add more test cases to make sure that your operator behaves as it should. For this, you can use the xUnit theory[1] feature that allows you to specify multiple inputs to the same test method (also known as a data-driven test).
For more details, see http://mng.bz/Pe5x.
Listing C.2. A data-driven test of an Rx operator
Running this test yields the results shown in figure C.1 in the Visual Studio Test Explorer.
Figure C.1. The results of the xUnit data-driven test, as shown in Visual Studio Test Explorer

So far you’ve managed to write simple tests the can validate the logical purpose of the Rx operator. Next I’ll show you how to write tests that take the time dimension into consideration, and you can assert that emissions were indeed what happened when they should’ve happened.
C.1.1. Writing reactive tests with the TestScheduler
The tests you’ve written in the previous section work well, but they’re limited because they don’t take the time dimension into consideration. When developing Rx operators and queries, you want to ensure that they behave correctly even if there’s a time difference in certain positions in the observer-observable relationship, for example:
- When there’s a time pause between emissions
- When there’s a time difference between the observer subscription and observable creation
- When the emission time the observer experiences is different from the time the source observable has emitted its value
- Any other time-related case that could influence the Rx code
Writing tests that involve timing is a complex thing to do by yourself, but luckily, Rx provides a way to virtualize time by using the TestScheduler and the ReactiveTest base class.
In chapter 10, I introduced schedulers and explained how they allow you to control and parameterize concurrency in the Rx pipeline. A scheduler is a unit that holds a clock and an execution location (such as a thread or a task) and enables scheduling the execution of work items to a specific time.
The TestScheduler (part of the Microsoft.Reactive.Testing namespace) is a special kind of scheduler that allows you to control its inner clock and configure when events will occur. The TestScheduler provides a clock of a virtual time counted by ticks, and ticks can be converted to (and from) DateTime and TimeSpan.
Tip
Both TimeSpan and DateTime implement a property called Ticks that returns the aforementioned value as ticks. You can convert ticks to TimeSpan by using the static method TimeSpan.FromTicks, and you can create a DateTime from ticks by using its dedicated constructor.
When you create the TestScheduler, it initializes its clock to the time 0. Until you explicitly start the clock, the time is frozen.
The following code shows an example of creating an observable that, after the observer subscription, will emit the values 1 and 2 with a gap of 20 ticks between them and then complete after another 20 ticks:
var testScheduler = new TestScheduler();

ITestableObservable<int> coldObservable = testScheduler.CreateColdObservable<int>(
    new Recorded<Notification<int>>(20, Notification.CreateOnNext<int>(1)),
    new Recorded<Notification<int>>(40, Notification.CreateOnNext<int>(2)),
    new Recorded<Notification<int>>(60,Notification.CreateOnCompleted<int>())
    );
Note
What is shown here is the full, long, and detailed way to create TestableObservable. After you inherit from ReactiveTest, this task becomes shorter, as you’ll see soon.
TestScheduler provides two methods for creating observables:
- CreateColdObservable—Creates an observable that emits its value relatively to when each observer subscribes
- CreateHotObservable—Creates an observable that emits its values regardless of the observer subscription time, and each emission is configured to the absolute scheduler clock
Both methods receive a collection of Recorded<Notification<T>> objects that specify the scheduling of the OnNext, OnError, and OnCompleted notifications you want the observable to emit, and return an observable of type ITestableObservable that lets you examine its messages and subscriptions so you can assert they’re what you expect them to be.
It’s important to remember that when you create a TestScheduler, its clock is frozen. Until you start it or advance its time explicitly, no emissions will be made. After you start the scheduler, it’ll execute every work item that was scheduled to it. After each one, it’ll increment its inner clock to the scheduled time of the next work item. After the last work item, the scheduler will increment its clock by one, and stop, so you’ll have to start it again after you schedule another work item.
The Rx testing library Microsoft.Reactive.Testing includes the Reactive Test base class that I recommend using whenever you write unit tests for Rx code. The ReactiveTest base class includes a few factory methods that make the unit-test code more fluent and concise so the observable you just created can now be declared, as shown in the following listing.
Listing C.3. An example of a reactive unit test with the ReactiveTest base class

C.1.2. Observing the TestableObservable
Now that you know how to create TestableObservables, you can continue to embed them in your tests so you can observe the Rx query they’re part of and take the time dimension into consideration.
Continuing with the tests of the FilterBursts operator introduced earlier, you can now test how time issues might affect it. The next test, shown in listing C.4, asserts that when two bursts of three values happen one after the other with a gap of 100 ticks between them, FilterBursts will emit the first value from each burst (a visualization of this is shown in figure C.2).
Figure C.2. Visualization of the expected result of applying the FilterBursts operator on an observable that emits two bursts with a time gap between them

Listing C.4. An example of a reactive unit test that embeds the time dimension


In the preceding code, you use the TestableObserver class to assert that the expected emission indeed took effect.
TestableObserver is created by calling the TestScheduler.CreateObserver method. This special observer records the notifications it observes and then exposes them through its Messages property so you can later inspect them and assert they’re correct.
As mentioned before, when created, the TestScheduler is in a stopped state, which means that the time is frozen. Calling the Start method causes the scheduler to begin executing all the work items that were scheduled to it. In the preceding unit test, you’ve created a hot observable with a set of scheduled emissions, so when the scheduler was started, those emissions were emitted and the observer that was subscribed observed them.
At the end of the unit test, you’re asserting that (a) all the notifications were indeed observed, and (b) the subscription lifetime of the single observer is as expected.
Tip
The OnNext factory method has another overload that accepts a predicate (of type Func<T,bool>) as a second parameter. This overload can be used in the Assertion phase to check that the emitted value is what was expected by using a logical condition.
Next, I want to take you through the fundamentals of testing operators that introduce concurrency and use time as part of their logic.
C.1.3. Testing concurrent Rx code
The FilterBurst operator used in the previous sections, as useful as it may be, tackled the problem of bursts from an items-amount perspective. This perspective ignores an important aspect of many Rx queries in which the time distance between items might be relatively large and might affect the resulted emissions. Therefore, another overload of this operator was created that deals with bursts of values over time (shown in figure C.3). According to the approach that this operator takes, the concept of a burst is defined as a sequence of values that has a maximal time difference between two adjacent values.
Figure C.3. The FilterBursts operator emits the first value from every burst of items

Here are the signatures of this overload:
public static class ObservableExtensions
{
    public static IObservable<T> FilterBursts<T>(
     this IObservable<T> src,
     TimeSpan maximalDistance)
    {
        //...
    }

    public static IObservable<T> FilterBursts<T>(
     this IObservable<T> src,
     TimeSpan maximalDistance,
     IScheduler scheduler)
    {
        //...
    }
}
As discussed in chapter 10, every operator that introduces concurrency as part of its logic should accept a scheduler that’ll be used to control that concurrency. One of the benefits of this rule is that it allows you to test the operator under different scenarios.
Here’s how to write the test for the scenario shown in figure C.3.
Listing C.5. An example of a reactive unit test on a time-based operator


Reactive tests tend to have a repetitive structure: you create a testable observable and a testable observer, subscribe the observer to the observable (not necessarily immediately), start the scheduler, and then assert the recorded notifications. Because this structure is repeated in many tests, the TestScheduler.Start method has overloads that encapsulate this structure.
In the preceding unit test, you use this kind of overload that has the following signature:

By default, the time at which the observer is subscribed to the observable is 200 (configured by the ReactiveTest.Subscribed constant). That’s why I assert that the first emitted value observed by the TestableObserver was observed at the time 450.
C.1.4. Finer control on the TestScheduler
Some tests require you to have finer control over the TestScheduler clock. Usually, in these cases, you need to break the test into two or more phases. Table C.1 lists the most used methods and members for controlling the scheduler.
Table C.1. The most used TestScheduler members (partial list)
|
Method/member |
Description |
|---|---|
| Start | Starts the scheduler clock. Each work item that was scheduled will be executed, and the clock will increment its time after each one. |
| AdvanceTo(long time) | Advances the scheduler clock to the specified absolute time. Every work item that was scheduled to a point between the current time and given time will be executed. |
| AdvanceBy(long time) | Advances the scheduler clock by the specified relative time. Every work item that was scheduled to a point between the current time and given time will be executed. |
| Sleep(long time) | Advances the scheduler by the specified relative time without executing the queued work items that were scheduled to that time frame. |
| Stop | Stops the scheduler. |
| Clock | Gets the current clock time (as ticks). |
| IsEnabled | Gets whether the scheduler is enabled to run work. |
C.2. Testing Rx queries
Everything you’ve learned in the previous sections about testing Rx operators is applicable to testing other Rx constructs and queries. The only difference is the lack of accessibility you might have to the Rx code when you write the test for the class that contains it. This lack of accessibility is usually a good thing (because you don’t want the test to rely on implementation details), but when you use time-based operators, this can cause the testing to be hard or even impossible.
C.2.1. Injecting schedulers
Consider this example: you’ve created a class named MachineMonitor that monitors a manufacturing machine that produces a lot of heat during its work. The monitor uses a proximity sensor and temperature sensor, so that if someone is getting near the machine while it’s hot, an alert is produced.
The rate of notifications produced by the proximity sensor and the temperature sensor is high, and therefore the MachineMonitor class emits many alerts. To slow the number of alerts produced, you add the FilterBursts operator that was discussed earlier in this chapter. This time, FilterBursts was extended so that it won’t filter emissions from the burst forever. Instead, a maximum burst duration is provided to the operator, such that if a burst is longer than the maximum burst duration, the burst is considered closed and the emission isn’t filtered.
The initial monitor class basic structure is shown here.
Listing C.6. Initial implementation of the MachineMonitor class

Note
The focus of this appendix is about testing and not the implementation of the Rx code, so the full implementation isn’t shown here. It’s available with the book source code, and I encourage you to check it out, or even better, implement it yourself as an exercise.
Looking at this code might make you wonder how you can test it for various scenarios. How can you make sure that if notifications are produced over a long period of time, they won’t be filtered?
The answer is, you can’t, at least not the way it’s written now. MachineMonitor isn’t testable. To make this class testable, you need a way to control the time from the outside and provide MachineMonitor the scheduler you want it to use in its queries.
The pattern often used to inject schedulers wraps them inside a class that provides the schedulers you need to use in your system. Then, you register this class in your IoC container.[2] This is the interface that I usually use in my projects:
An inversion of control container (also called a dependency injection, or DI container) is a class that’s in charge of creating other objects based on the configuration you specify, such as the implementation that’s registered for an interface. Read more at http://martinfowler.com/articles/injection.html.
public interface IConcurrencyProvider
{
    IScheduler TimeBasedOperations { get; }
    IScheduler Task { get; }
    IScheduler Thread { get; }
    IScheduler Dispatcher { get; }
}
Note that the members of this interface might be different based on the platform or type of application you write (for example, Dispatcher isn’t relevant to platforms that don’t support it). The implementation for this interface is also easy:
class ConcurrencyProvider : IConcurrencyProvider
{
    public ConcurrencyProvider()
    {
        TimeBasedOperations = DefaultScheduler.Instance;
        Task = TaskPoolScheduler.Default;
        Thread = NewThreadScheduler.Default;
        Dispatcher = DispatcherScheduler.Current;
    }

    public IScheduler TimeBasedOperations { get; }
    public IScheduler Task { get; }
    public IScheduler Thread { get; }
    public IScheduler Dispatcher { get;  }
}
Now that you have the IConcurrencyProvider in place, you can change the MachineMonitor implementation to make it testable by injecting the IConcurrency-Provider through its constructor:
public MachineMonitor(
    IConcurrencyProvider concurrencyProvider,
    ITemperatureSensor temperatureSensor,
    IProximitySensor proximitySensor)
{
    _concurrencyProvider = concurrencyProvider;
    _temperatureSensor = temperatureSensor;
    _proximitySensor = proximitySensor;
}
C.2.2. Injecting the TestScheduler
In this implementation of the MachineMonitor class, you set the value of the MaxAlertBurstTime property to 5 seconds and the value of the MinAlertPause property to 1 second. If two notifications are produced in less than a second from one another, you discard the latter one, but if more notifications are produced close to each other and 5 seconds has passed, then another notification will be emitted.
Listing C.7 shows an example of a unit test I’ve written to validate that if a burst is longer than 5 seconds and the temperature is high (higher than 70 degrees), two emissions are produced. In my test, I use NSubstitute (http://nsubstitute.github.io/) as a mocking framework and set the mock for the IConcurrencyProvider to return the TestScheduler from every member of the concurrency provider. In your tests, you can use whatever mocking framework you like (or none if you prefer).
Note
In my implementation, I consider an emitted temperature to be valid until another temperature value is emitted.
Listing C.7. Validating that 2 alerts are produced if the burst is longer than 5 seconds


As you can see, even though this is a complex scenario to test (which makes the test itself a bit complex), the test is still readable, and creating it was relatively easy thanks to the utilites provided by Rx.
C.3. Summary
- Testing Rx code is important, just like testing any other code. However, without the proper tools, testing Rx code can be cumbersome, which naturally results in fewer tests and in lower quality. Luckily, Rx provides excellent utilities to tackle this problem.
- To get access to Rx testing utilities, you need to add the Microsoft.Reactive.Testing NuGet package.
- Test classes that test Rx code should inherit from the ReactiveTest base class to simplify the test code.
- TestScheduler is a special scheduler that allows you to control its inner clock.
- For a cold observable with a predefined set of values that will be emitted relatively to the observer subscription, use the TestScheduler.CreateCold-Observable method.
- For a hot observable with a predefined set of values that will be emitted at an absolute time, use the TestScheduler.CreateHotObservable method.
- To create an observer that records the notifications it observes and the time they were observed, use TestScheduler.CreateObserver.
- The AssertEqual extension method allows you to assert that the expected emissions were observed by the test observer.
- Use the TestScheduler.Start method to start its clock.
- Use the TestScheduler.Start(Func<IObservable<T>>) method overload to simplify the test. It’ll create the observable with the provided factory method, subscribe to it, and return the collection of emissions that were observed.
- Make your Rx code testable by providing the schedulers that’ll be used through dependency injection.