
![]()
Implementing a Cluster
Engineers may find the process of building and configuring a cluster to be complex and that they can implement many variations of the pattern. Although DBAs may not always need to build a cluster themselves, they do need to be comfortable with the technology and often need to provide their input into the process. They may also take part in troubleshooting issues discovered with the cluster.
For these reasons, this chapter begins by looking at how to build a cluster at the Windows level and discusses some of the possible configurations.
Building the Cluster
Before you install a SQL Server AlwaysOn failover cluster instance, you must prepare the servers that form the cluster (known as nodes) and build a Windows cluster across them. The following sections demonstrate how to perform these activities.
![]() Note To support demonstrations in this chapter, we use a domain called PROSQLADMIN. The domain contains a domain controller, which is also configured to serve up five iSCSI disks (Data, Logs, TempDB, MSDTC, and Quorum). Two servers also act as cluster nodes named ClusterNode1 and ClusterNode2. Each server has two NICs (network interface cards) on different subnets; one will be used for data and the other for the cluster heartbeat.
Note To support demonstrations in this chapter, we use a domain called PROSQLADMIN. The domain contains a domain controller, which is also configured to serve up five iSCSI disks (Data, Logs, TempDB, MSDTC, and Quorum). Two servers also act as cluster nodes named ClusterNode1 and ClusterNode2. Each server has two NICs (network interface cards) on different subnets; one will be used for data and the other for the cluster heartbeat.
Installing the Failover Cluster Feature
In order to build the cluster, the first thing we need to do is install the failover cluster feature on each of the nodes. To do this, we need to select the Add Roles And Features option in Server Manager. This causes the Add Roles And Features Wizard to display. The first page of this wizard offers guidance on prerequisites, as shown in Figure 3-1.
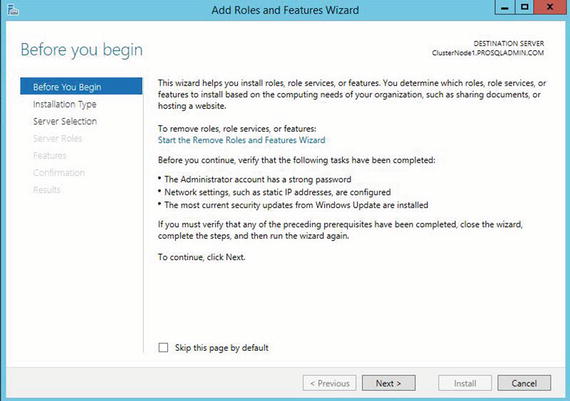
Figure 3-1. The Before You Begin page
On the Installation Type page, ensure that Role-Based Or Feature-Based Installation is selected, as illustrated in Figure 3-2.

Figure 3-2. The Installation Type page
On the Server Selection page, ensure that the cluster node that you are currently configuring is selected. This is illustrated in Figure 3-3.

Figure 3-3. The Server Selection page
The Server Roles page of the wizard allows you to select any server roles that you want configured. As shown in Figure 3-4, this can include roles such as Application Server or DNS Server, but in our case, this is not appropriate, so we simply move to the next screen.

Figure 3-4. The Server Roles page
On the Features page of the wizard, we need to select both .NET Framework 3.5 Features and Failover Clustering, as shown in Figure 3-5. This satisfies the prerequisites for building the Windows cluster and also the AlwaysOn failover cluster instance.

Figure 3-5. The Features page
When you select Failover Clustering, the wizard presents you with a screen (Figure 3-6) that asks if you want to install the management tools in the form of a checkbox. If you are managing the cluster directly from the nodes, check this option.

Figure 3-6. Selecting management tools
On the final page of the wizard, you see a summary of the features that are to be installed, as shown in Figure 3-7. Here, you can specify the location of the Windows media if you need to. You can also choose whether the server should automatically restart. If you are building out a new server, it makes sense to check this box. However, if the server is already in production when you add the feature, make sure you consider what is currently running on the box, and whether you should wait for a maintenance window to perform a restart if one is needed.

Figure 3-7. The Confirmation page
Instead of installing the cluster services through Server Manager, you can install them from PowerShell. The script in Listing 3-1 achieves the same results as the preceding steps.
Creating the Cluster
Once clustering has been installed on both nodes, you can begin building the cluster. To do this, connect to the server that you intended to be the active node using a domain account, and then run Failover Cluster Manager from Administrative Tools.
The Before You Begin page of the Create Cluster Wizard warns that the domain account you use to install the cluster must be an administrator of the cluster nodes and that Microsoft only supports clusters that pass all verification tests, as shown in Figure 3-8.

Figure 3-8. The Before You Begin page
On the Select Servers screen of the wizard, you need to enter the names of the cluster nodes. Even if you enter just the short names of the servers, they will be converted to fully qualified names in the format server.domain. This is illustrated in Figure 3-9. In our case, our cluster nodes are named ClusterNode1 and ClusterNode2, respectively.

Figure 3-9. The Select Servers page
On the Validation Warnings page, you are asked if you wish to run the validation tests against the cluster. You should always choose to run this validation for production servers, because Microsoft will not offer support for the cluster unless it has been validated. Choosing to run the validation tests invokes the Validate A Configuration wizard. You can also run this wizard independently from the Management pane of Failover Cluster Manager. The Validation Warnings page is shown in Figure 3-10.

Figure 3-10. The Validation Warning page
![]() Tip There are some situations in which validation is not possible, and in these instances, you need to select the No, I Do Not Require Support. . . option. For example, some DBAs choose to install one-node clusters instead of stand-alone instances so that they can be scaled up to full clusters in the future, if need be. This approach can cause operational challenges for Windows administrators, however, so use it with extreme caution.
Tip There are some situations in which validation is not possible, and in these instances, you need to select the No, I Do Not Require Support. . . option. For example, some DBAs choose to install one-node clusters instead of stand-alone instances so that they can be scaled up to full clusters in the future, if need be. This approach can cause operational challenges for Windows administrators, however, so use it with extreme caution.
After you complete the Before You Begin page of the Validate A Configuration Wizard, you see the Testing Options page. Here, you are given the option of either running all validation tests or selecting a subset of tests to run, as illustrated in Figure 3-11. Normally when you are installing a new cluster, you want to run all validation tests, but it is useful to be able to select a subset of tests if you invoke the Validate A Configuration Wizard independently after you make a configuration change to the cluster.

Figure 3-11. The Testing Options page
On the Confirmation page of the wizard, illustrated in Figure 3-12, you are presented with a summary of tests that will run and the cluster nodes that they will run against. The list of tests is comprehensive and includes the following categories:
- Inventory (such as identifying any unsigned drivers)
- Network (such as checking for a valid IP configuration)
- Storage (such as validating the ability to fail disks over, between nodes)
- System Configuration (such as validating the configuration of Active Directory)

Figure 3-12. The Confirmation page
The Summary page, shown in Figure 3-13, provides the results of the tests and also a link to an HTML version of the report. Make sure to examine the results for any errors or warnings. You should always resolve errors before continuing, but some warnings may be acceptable. For example, if you are building your cluster to host AlwaysOn Availability Groups, you may not have any shared storage. This will generate a warning but is not an issue in this scenario. AlwaysOn Availability Groups are discussed in further detail in Chapter 5.
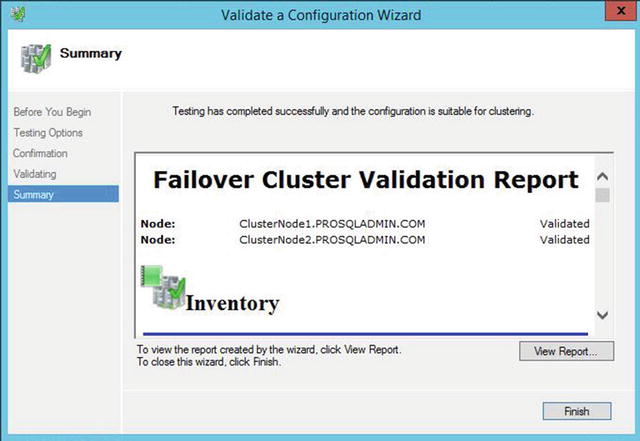
Figure 3-13. The Summary page
The View Report button displays the full version of the validation report, as shown in Figure 3-14. The hyperlinks take you to a specific category within the report, where further hyperlinks are available for each test. These allow you to drill down to messages generated for the specific test, making it easy to identify errors.

Figure 3-14. The Failover Cluster Validation Report
Clicking Finish on the Summary page returns you to the Create Cluster Wizard, where you are greeted with the Access Point For Administering The Cluster page. On this screen, illustrated in Figure 3-15, you need to enter the virtual name of your cluster and the IP address for administering the cluster. We name our cluster PROSQLADMIN-C and assign an IP address of 192.168.0.20.

Figure 3-15. The Access Point For Administering The Cluster page
![]() Note The virtual name and IP address are bound to whichever node is active, meaning that the cluster is always accessible in the event of failover.
Note The virtual name and IP address are bound to whichever node is active, meaning that the cluster is always accessible in the event of failover.
In our case, the cluster resides within a single site and single subnet, so only one network range is displayed. If you are configuring a multi-subnet cluster, however, then the wizard detects this, and multiple networks display. In this scenario, you need to enter an IP address for each subnet.
![]() Note Each of the two NICs within a node is configured on a separate subnet so that the heartbeat between the nodes is segregated from the public network. However, a cluster is only regarded as multi-subnet if the data NICs of the cluster nodes reside in different subnets.
Note Each of the two NICs within a node is configured on a separate subnet so that the heartbeat between the nodes is segregated from the public network. However, a cluster is only regarded as multi-subnet if the data NICs of the cluster nodes reside in different subnets.
![]() Tip If you do not have permissions to create AD (Active Directory) objects in the OU (organizational unit) that contains your cluster, then the VCO (virtual computer object) for the cluster must already exist and you must have the Full Control permission assigned.
Tip If you do not have permissions to create AD (Active Directory) objects in the OU (organizational unit) that contains your cluster, then the VCO (virtual computer object) for the cluster must already exist and you must have the Full Control permission assigned.
The Confirmation page displays a summary of the cluster that is created. You can also use this screen to specify whether or not all eligible storage should be added to the cluster, which is generally a useful feature. This screen is displayed in Figure 3-16.

Figure 3-16. The Confirmation page
After the cluster has been built, the Summary page shown in Figure 3-17 displays. This screen summarizes the cluster name, IP address, nodes, and quorum model that have been configured. It also provides a link to an HTML (Hypertext Markup Language) version of the report.

Figure 3-17. The Summary page
The Create Cluster report displays a complete list of tasks that have been completed during the cluster build, as shown in Figure 3-18.

Figure 3-18. The Create Cluster report
We could also have used PowerShell to create the cluster. The script in Listing 3-2 runs the cluster validation tests using the Test-Cluster cmdlet, before using the New-Cluster cmdlet to configure the cluster.
Figure 3-19 shows the results of running this script. The first part of the output provides the details of the validation report that has been generated. The second part confirms the name of the cluster that has been created.

Figure 3-19. Validate and create cluster output
Configuring the Cluster
Many cluster configurations can be altered, depending on the needs of your environment. This section demonstrates how to change some of the more common configurations.
Changing the Quorum
If we examine our cluster in the Failover Cluster Manager, we can instantly see one configuration change that we need to make. The cluster has chosen the Logs volume as the quorum drive, as shown in Figure 3-20.

Figure 3-20. Cluster disks
We can modify this by entering the context menu of the cluster and by selecting More Actions | Configure Cluster Quorum Settings, which causes the Configure Cluster Quorum Wizard to be invoked. On the Select Quorum Configuration Option page, shown in Figure 3-21, we choose the Select The Quorum Witness option.

Figure 3-21. The Select Quorum Configuration Option page
On the Select Quorum Witness page, we select the option to configure a disk witness. This is illustrated in Figure 3-22.

Figure 3-22. The Select Quorum Witness page
On the Configure Storage Witness page of the wizard, we can select the correct disk to use as a quorum. In our case, this is Disk 5, as illustrated in Figure 3-23.

Figure 3-23. The Configure Storage Witness page
The Summary page of the wizard, shown in Figure 3-24, details the configuration changes that will be made to the cluster. It also highlights that dynamic quorum management is enabled and that all nodes, plus the quorum disk, have a vote in the quorum. Advanced quorum configurations are discussed in Chapter 4.

Figure 3-24. The Summary Page
We can also perform this configuration from the command line by using the PowerShell command in Listing 3-3. Here, we use the Set-ClusterQuorum cmdlet and pass in the name of the cluster, followed by the quorum type that we wish to configure. Because disk is included in this quorum type, we can also pass in the name of the cluster disk that we plan to use, and it is this aspect that allows us to change the quorum disk.
If your instance of SQL Server uses distributed transactions, or if you are installing SQL Server Integration Services (SSIS), then it relies on MSDTC (Microsoft Distributed Transaction Coordinator). If your instance will use MSDTC, then you need to ensure that it is properly configured. If it is not, then setup will succeed, but transactions that rely on it may fail.
When installed on a cluster, SQL Server automatically uses the instance of MSDTC that is installed in the same role, if one exists. If it does not, then it uses the instance of MSDTC to which it has been mapped (if this mapping has been performed). If there is no mapping, it uses the cluster’s default instance of MSDTC, and if there is not one, it uses the local machine’s instance of MSDTC.
Many DBAs choose to install MSDTC within the same role as SQL Server; however, this introduces a problem. If MSDTC fails, it can also bring down the instance of SQL Server. Of course, the cluster attempts to bring both of the applications up on a different node, but this still involves downtime, including the time it takes to recover the databases on the new node, which takes a non-deterministic duration. For this reason, I recommend installing MSDTC in a separate role. If you do, the SQL Server instance still utilizes MSDTC, since it is the cluster’s default instance, and it removes the possibility of MSDTC causing an outage to SQL Server. This is also preferable to using a mapped instance or the local machine instance since it avoids unnecessary configuration, and the MSDTC instance should be clustered when a clustered instance of SQL Server is using it.
To create an MSDTC role, start by selecting the Configure Role option from the Roles context menu in Failover Cluster Manager. This invokes the High Availability Wizard. On the Select A Role page of the wizard, select the Distributed Transaction Coordinator (DTC) role type, as shown in Figure 3-25.

Figure 3-25. The Select Role page
On the Client Access Point page, illustrated in Figure 3-26, you need to enter a virtual name and IP address for MSDTC. In our case, we name it PROSQLMSDTC-C and assign 192.168.0.21 as the IP address. On a multi-subnet cluster, you need to provide an IP address for each network.

Figure 3-26. The Client Access Point page
On the Select Storage page of the wizard, select the cluster disk on which you plan to store the MSDTC files, as shown in Figure 3-27. In our case, this is Disk 4.

Figure 3-27. The Select Storage page
The Confirmation page displays an overview of the role that is about to be created, as shown in Figure 3-28.

Figure 3-28. The Confirmation page
Alternatively, we could create this role in PowerShell. The script in Listing 3-4 first uses the Add-ClusterServerRole cmdlet to create the role. We pass the virtual name to use for the role into the Name parameter, the name of the cluster disk to use into the Storage parameter, and the IP address for the role into the StaticAddress parameter.
We then use the Add-ClusterResource cmdlet to add the DTC resource. The Name parameter names the resource and the ResourceType parameter specifies that it is a DTC resource. We then need to create the dependencies between the resources within the role. We did not need to do this when using the GUI, as the dependencies were created for us automatically. Resource dependencies specify the resource or resources on which other resources depend. A resource failing propagates through the chain and could take a role offline. For example, in the case of our PROSQLMSDTC-C role, if either the disk or the virtual name becomes unavailable, the DTC resource goes offline. Windows Server supports multiple dependencies with both AND and OR constraints. It is the OR constraints that make multi-subnet clustering possible, because a resource can be dependent on IP address A OR IP address B. Finally, we need to bring the role online by using the Start-ClusterGroup cmdlet.
After creating a role, you may wish to configure it to alter the failover policy or configure nodes as preferred owners. To configure a role, select Properties from the role’s context menu. On the General tab of the Properties dialog box, which is shown in Figure 3-29, you can configure a node as the preferred owner of the role. You can also change the order of precedence of node preference by moving nodes above or below others in the Preferred Owners window.

Figure 3-29. The General tab
You can also select the priority for the role in the event that multiple roles fail over to another node at the same time. The options for this setting are as follows:
- High
- Medium
- Low
- No Auto Start
On the Failover tab of the Properties dialog box, you can configure the number of times that the role can fail over within a given period before the role is left offline. The default value for this is one failure within 6 hours. The issue with this is that if a role fails over, and after you fix the issue on the original node, you fail the role back, no more failovers are allowed within the 6-hour window. This is obviously a risk, and I generally advise that you change this setting. In our case, we have configured the role to allow a maximum of three failovers within a 24-hour time window, as illustrated in Figure 3-30. We have also configured the role to fail back to the most preferred owner if it becomes available again. Remember, when setting automatic failback, that failback also causes downtime in the same way that a failover does. If you aspire to a very high level of availability, such as five 9s, then this option may not be appropriate.

Figure 3-30. The Failover tab
Summary
Before creating the cluster, the Microsoft Cluster Service (MCS) must be installed on all nodes. This can be achieved by installing the Cluster Feature, using the Add Roles and Features wizard.
Once the cluster feature has been installed, clustering can be configured on each node by using the Create Cluster Wizard. Before building the cluster, this wizard will prompt you to run the Cluster Validation Wizard. The Cluster Validation Wizard will validate that environment meets the requirements for a cluster. If you find that your environment does not meet the requirements, you can continue to building the cluster, but the installation will not be supported by Microsoft.
Once the cluster has been built, it will also need to be configured. This will include configuring the quorum mode and may also include configuring MSDTC. After creating a role on the cluster, you may also wish to configure the role with failover policies or preferred owners.