
![]()
Administering AlwaysOn
This chapter will discuss how to administer AlwaysOn features. We will first look at cluster maintenance, including rolling patch upgrades and removing an instance. We will then discuss managing Availability Groups, including monitoring with the AlwaysOn Dashboard and a demonstration of how to failover.
Managing a Cluster
Installing the cluster is not the end of the road from an administrative perspective. You still need to periodically perform maintenance tasks. The following sections describe some of the most common maintenance tasks.
Moving the Instance between Nodes
Other than protecting against unplanned outages, one of the benefits of implementing high availability technologies is that doing so significantly reduces downtime for maintenance tasks, such as patching. This can be at the operating system level or the SQL Server level.
If you have a two-node cluster, apply the patch to the passive node first. Once you are happy that the update was successful, fail over the instance and then apply the patch to the other node. At this point, you may or may not wish to fail back to the original node, depending on the needs of your environment. For example, if the overriding priority is the level of availability of the instance, then you will probably not wish to fail back, because this will incur another short outage.
On the other hand, if your instance is less critical and you have licensed SQL Server with Software Assurance, then you may not be paying for the SQL Server license on the passive node. In this scenario, you only have a limited time period in which to fail the instance back to avoid needing to purchase an additional license for the passive node.
![]() Note For versions of SQL Server prior to SQL Server 2014, Software Assurance is not required in order to have a passive node without a license.
Note For versions of SQL Server prior to SQL Server 2014, Software Assurance is not required in order to have a passive node without a license.
To move an instance to a different node using Failover Cluster Manager, select Move | Select Node from the context menu of the role that contains the instance. This causes the Move Clustered Role dialog box to display. Here, you can select the node to which you wish to move the role, as illustrated in Figure 6-1.

Figure 6-1. The Move Clustered Role dialog box
The role is then moved to the new node. If you watch the role’s resources window in Failover Cluster Manager, then you see each resource move through the states of Online ![]() Offline Pending
Offline Pending ![]() Offline. The new node is now displayed as the owner before the resources move in turn through the states of Offline - Online Pending - Online, as illustrated in Figure 6-2. The resources are taken offline and placed back online in order of their dependencies.
Offline. The new node is now displayed as the owner before the resources move in turn through the states of Offline - Online Pending - Online, as illustrated in Figure 6-2. The resources are taken offline and placed back online in order of their dependencies.
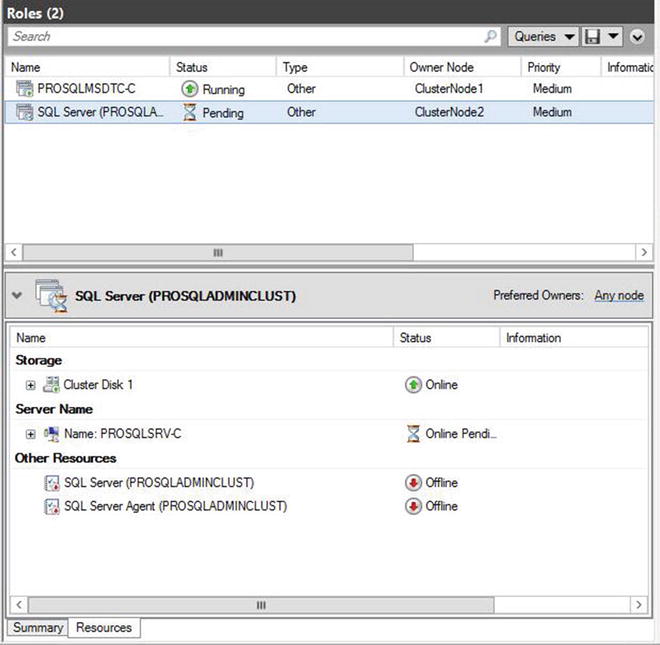
Figure 6-2. Resources coming onlinie on passive node
We can also fail over a role using PowerShell. To do this, we need to use the Move--ClusterGroup cmdlet. Listing 6-1 demonstrates this by using the cmdlet to fail back the instance to ClusterNode1. We use the -Name parameter to specify the role that we wish to move and the -Node parameter to specify the node to which we wish to move it.
If you have a cluster with more than two nodes, then consider performing a rolling patch upgrade when you are applying updates for SQL Server. In this scenario, you mitigate the risk of having different nodes, which are possible owners of the role, running different versions or patch levels of SQL Server, which could lead to data corruption.
The first thing that you should do is make a list of all nodes that are possible owners of the role. Then select 50 percent of these nodes and remove them from the Possible Owners list. You can do this by selecting Properties from the context menu of the Name resource, and then, in the Advanced Policies tab, unchecking the nodes in the possible owners list, as illustrated in Figure 6-3.

Figure 6-3. Remove possible owners.
To achieve the same result using PowerShell, we can use the Get-Resource cmdlet to navigate to the name resource and then pipe in the Set-ClusterOwnerNode to configure the possible owners list. This is demonstrated in Listing 6-2. The possible owners list is comma separated in the event that you are configuring multiple possible owners.
Once 50 percent of the nodes have been removed as possible owners, you should apply the update to these nodes. After the update has been verified on this half of the nodes, you should reconfigure them to allow them to be possible owners once more.
The next step is to move the role to one of the nodes that you have upgraded. After failover has successfully completed, remove the other half of the nodes from the preferred owners list before applying the update to these nodes. Once the update has been verified on this half of the nodes, you can return them to the possible owners list.
![]() Tip The possible owners can only be set on a resource. If you run Set-ClusterOwnerNode against a role using the -Group parameter, then you are configuring preferred owners rather than possible owners.
Tip The possible owners can only be set on a resource. If you run Set-ClusterOwnerNode against a role using the -Group parameter, then you are configuring preferred owners rather than possible owners.
Removing a Node from the Cluster
If you wish to uninstall an AlwaysOn failover cluster instance, then you cannot perform this action from Control Panel as you would a stand-alone instance. Instead, you must run the Remove Node Wizard on each of the nodes of the cluster. You can invoke this wizard by selecting Remove Node from a SQL Server Failover Cluster option from the Maintenance tab in SQL Server Installation Center.
The wizard starts by running a global rules check, followed by a rules check for removing a node. Then, on the Cluster Node Configuration page shown in Figure 6-4, you are asked to confirm the instance for which you wish to remove a node. If the cluster hosts multiple instances, you can select the appropriate instance from the drop-down box.

Figure 6-4. The Cluster Node Configuration page
On the Ready To Remove Node page, shown in Figure 6-5, you are given a summary of the tasks that will be performed. After confirming the details, the instance is removed. This process should be repeated on all passive nodes, and then finally on the active node. When the instance is removed from the final node, the cluster role is also removed.

Figure 6-5. The Ready To Remove Node page
To remove a node using PowerShell, we need to run SQL Server’s setup.exe application, with the action parameter configured as RemoveNode. When you use PowerShell to remove a node, the parameters in Table 6-1 are mandatory.
Table 6-1. Mandatory Parameters When Removing a Node from a Cluster
Parameter | Usage |
|---|---|
/ACTION | Must be configured as AddNode. |
/INSTANCENAME | The instance that you are adding the extra node to support. |
/CONFIRMIPDEPENDENCYCHANGE | Allows multiple IP addresses to be specified for multi-subnet clusters. Pass in a value of 1 for True or 0 for False. |
The script in Listing 6-3 removes a node from our cluster when we run it from the root directory of the SQL Server installation media.
Managing AlwaysOn Availability Groups
Once the initial setup of your availability group is complete, you still need to perform administrative tasks. These include failing over the availability group, monitoring, and on rare occasions, adding additional listeners. These topics are discussed in the following sections.
Failover
If a replica is in Synchronous Commit mode and is configured for automatic failover, then the availability group automatically moves to a redundant replica in the event of an error condition being met on the primary replica. There are occasions, however, when you will want to manually fail over an availability group. This could be because of DR testing, proactive maintenance, or because you need to bring up an asynchronous replica following a failure of the primary replica or the primary data center.
If you wish to fail over a replica that is in Synchronous Commit mode, launch the Failover Availability Group wizard by selecting Failover from the context menu of your availability group in Object Explorer. After moving past the Introduction page, you find the Select New Primary Replica page (see Figure 6-6). On this page, check the box of the replica to which you want to fail over. Before doing so, however, review the Failover Readiness column to ensure that the replicas are synchronized and that no data loss will occur.

Figure 6-6. The Select New Primary Replica page
On the Connect To Replica page, illustrated in Figure 6-7, use the Connect button to establish a connection to the new primary replica.

Figure 6-7. The Connect To Replica page
On the Summary page, you are given details of the task to be performed, followed by a progress indicator on the Results page. Once the failover completes, check that all tasks were successful, and investigate any errors or warnings that you receive.
We can also used T-SQL to fail over the availability group. The command in Listing 6-4 achieves the same results. Make sure to run this script from the replica that will be the new primary replica. If you run it from the current primary replica, use SQLCMD mode and connect to the new primary within the script.
If your availability group is in Asynchronous Commit mode, then from a technical standpoint, you can fail over in a similar way to the way you can for a replica running in Synchronous Commit mode, except for the fact that you need to force the failover, thereby accepting the risk of data loss. You can force failover by using the command in Listing 6-5. You should run this script on the instance that will be the new primary. For it to work, the cluster must have quorum. If it doesn’t, then you need to force the cluster online before you force the availability group online.
From a process perspective, you should only ever do this if your primary site is completely unavailable. If this is not the case, first put the application into a safe state. This avoids any possibility of data loss. The way that I normally achieve this in a production environment is by performing the following steps:
- Disable logins.
- Change the mode of the replica to Synchronous Commit mode.
- Fail over.
- Change the replica back to Asynchronous Commit mode.
- Enable the logins.
You can perform these steps with the script in Listing 6-6. When run from the DR instance, this script places the databases in App1 into a safe state before failing over, and then it reconfigures the application to work under normal operations.
Synchronizing Uncontained Objects
Regardless of the method you use to fail over, assuming that all of the databases within the availability group are not contained, then you need to ensure that instance-level objects are synchronized. The most straightforward way to keep your instance-level objects synchronized is by implementing an SSIS package, which is scheduled to run on a periodic basis.
Whether you choose to schedule a SSIS package to execute, or you choose a different approach, such as a SQL Server Agent job that scripts and re-creates the objects on the secondary servers, these are the objects that you should consider synchronizing:
- Logins
- Credentials
- SQL Server Agent jobs
- Custom error messages
- Linked servers
- Server-level event notifications
- Stored procedures in Master
- Server-level triggers
- Encryption keys and certificates
Monitoring
Once you have implemented availability groups, you need to monitor them and respond to any errors or warnings that could affect the availability of your data. If you have many availability groups implemented throughout the enterprise, then the only way to monitor them effectively and holistically is by using an enterprise monitoring tool, such as SOC (Systems Operations Center). If you only have a small number of availability groups, however, or if you are troubleshooting a specific issue, then SQL Server provides the AlwaysOn Dashboard and the AlwaysOn Health Trace. The following sections examine these two features.
AlwaysOn Dashboard
The AlwaysOn Dashboard is an interactive report that allows you to view the health of your AlwaysOn environment and drill through, or roll up elements within the topology. You can invoke the report from the context menu of the Availability Groups folder in Object Explorer, or from the context menu of the availability group itself. Figure 6-8 shows the report that is generated from the context menu of the App1 availability group. You can see that currently, synchronization of both replicas is in a healthy state.

Figure 6-8. The availability group dashboard
The three possible synchronization states that a database can be in are SYNCHRONIZED, SYNCRONIZING, and NOT SYNCHRONIZING. A synchronous replica should be in the SYNCHRONIZED state, and any other state is unhealthy. An asynchronous replica, however, will never be in the SYNCHRONIZED state, and a state of SYNCHRONIZING is considered healthy. Regardless of the mode, NOT SYNCHRONIZING indicates that the replica is not connected.
![]() Note In addition to the synchronization states, a replica also has one of the following operational states: PENDING_FAILOVER, PENDING, ONLINE, OFFLINE, FAILED, FAILED_NO_QUORUM, and NULL (when the replica is disconnected). The operational state of a replica can be viewed using the sys.dm_hadr_availability_replica_states DMV.
Note In addition to the synchronization states, a replica also has one of the following operational states: PENDING_FAILOVER, PENDING, ONLINE, OFFLINE, FAILED, FAILED_NO_QUORUM, and NULL (when the replica is disconnected). The operational state of a replica can be viewed using the sys.dm_hadr_availability_replica_states DMV.
At the top right of the report, there are links to the failover wizard, which we discussed earlier in this chapter; the AlwaysOn Health events, which we discussed in the next section; and also a link to view cluster quorum information. The Cluster Quorum Information screen, which is invoked by this link, is displayed in Figure 6-9. You can also drill through each replica in the Availability Replicas window to see replica-specific details.

Figure 6-9. The Cluster Quorum Information screen
AlwaysOn Health Trace
The AlwaysOn Health Trace is an Extended Events session, which is created when you create you first availability group. It can be located in SQL Server Management Studio, under Extended Events | Sessions, and via its context menu, you can view live data that is being captured, or you can enter the session’s properties to change the configuration of the events that are captured.
Drilling through the session exposes the session’s package, and from the context menu of the package, you can view previously captured events. Figure 6-10 shows that the latest event captured, was Database 5 (which, in our case, is Chapter5App1Customers), was waiting for the log to be hardened on the synchronous replica.

Figure 6-10. The target data
Usually, each availability group has a single Availability Group Listener, but there are some rare instances in which you may need to create multiple listeners for the same availability group. One scenario in which this may be required is if you have legacy applications with hard-coded connection strings. Here, you can create an extra listener with a client access point that matches the name of the hard-coded connection string.
As mentioned earlier in this chapter, it is not possible to create a second Availability Group Listener through SQL Server Management Studio, T-SQL, or even PowerShell. Instead, we must use Failover Cluster Manager. Here, we create a new Client Access Point resource within our App1 role. To do this, we select Add Resource from the context menu of the App1 role, and then select Client Access Point. This causes the New Resource Wizard to be invoked. The Client Access Point page of the wizard is illustrated in Figure 6-11. You can see that we have entered the DNS name for the client access point and specified an IP address from each subnet.

Figure 6-11. The Client Access Point page
On the Confirmation page, we are shown a summary of the configuration that will be performed. On the Configure Client Access Point page, we see a progress indicator, before we are finally shown a completion summary on the Summary page, which is illustrated in Figure 6-12.

Figure 6-12. The Confirmation page
Now we need to configure the Availability Group resource to be dependent upon the new client access point. To do this, we select Properties from the context menu of the App1 resource and then navigate to the Dependencies tab. Here, we add the new client access point as a dependency and configure an OR constraint between the two listeners, as illustrated in Figure 6-13. Once we apply this change, clients are able to connect using either of the two listener names.

Figure 6-13. The Dependencies tab
Other Administrative Considerations
When databases are made highly available with AlwaysOn Availability Groups, several limitations are imposed. One of the most restrictive of these is that databases cannot be placed in single_user mode or be made read only. This can have an impact when you need to safe-state your application for maintenance. This is why, in the Failover section of this chapter, we disabled the logins that have users mapped to the databases. If you must place your database in single-user mode, then you must first remove it from the availability group.
A database can be removed from an availability group by running the command in Listing 6-7. This command removes the Chapter5App1Customers database from the availability group.
There may also be occasions in which you want a database to remain in an availability group, but you wish to suspend data movement to other replicas. This is usually because the availability group is in Synchronous Commit mode and you have a period of high utilization, where you need a performance improvement. You can suspend the data movement to a database by using the command in Listing 6-8, which suspends data movement for the Chapter5App1Sales database and then resumes it.
![]() Caution If you suspend data movement, the transaction log on the primary replica continues to grow, and you are not able to truncate it until data movement resumes and the databases are synchronized.
Caution If you suspend data movement, the transaction log on the primary replica continues to grow, and you are not able to truncate it until data movement resumes and the databases are synchronized.
Another important consideration is the placement of database and log files. These files must be in the same location on each replica. This means that if you use named instances, it is a hard technical requirement that you change the default file locations for data and logs, because the default location includes the name of the instance. This is assuming, of course, that you do not use the same instance name on each node, which would defy many of the benefits of having a named instance.
Summary
Failover to a synchronous replica in the event of a failure of the primary replica is automatic. There are instances, however, in which you will also need to failover manually. This could be because of a disaster that requires failover to the DR site, or it could be for proactive maintenance. Although it is possible to failover to an asynchronous replica with the possibility of data loss, it is good practice to place the databases in a safe-state first. Because you cannot place a database in read only or single_user mode, if it is participating in an availability group, safe-stating usually consists of disabling the logins and then switching to Synchronous Commit mode before failover.
To monitor availability groups throughout the enterprise, you need to use a monitoring tool, such as Systems Operation Center. If you need to monitor a small number of availability groups or troubleshoot a specific issue, however, use one of the tools included with SQL Server, such as a dashboard for monitoring the health of the topology, and an extended events session, called the AlwaysOn Health Trace.
One benefit of achieving high availability for SQL Server is that doing so allows you to minimize downtime during planned maintenance. On a two-node cluster, you can upgrade the passive node, fail over, and then upgrade the active node. For larger clusters, you can perform a rolling patch upgrade, which involves removing half of the nodes from the possible owners list and upgrading them. You then fail over the instance to one of the upgraded nodes and repeat the process for the remaining nodes. This mitigates the risk of mixed version, across the possible owners.