
Chapter 6: Configuring Guided Selling
In the previous chapter, we discussed how product configurations and CPQ automation help reps sell the right combination of products at accurate prices, which is crucial for all businesses. But most businesses have extensive product catalogs, which make it hard for reps to remember product details. Guided selling is a Salesforce CPQ out-of-the-box feature that helps reps to guide customers to buy products, based on a few simple and easy-to-understand questions.
In this chapter, we will be covering the following topics:
- Guided selling and its advantages
- Configuring guided selling in Salesforce CPQ
By the end of this chapter, you will learn how guided selling helps automate the sales process.
Guided selling and its advantages
Guided selling in Salesforce helps admins create a set of questions that can be used by reps in the Quote Line Editor (QLE) while adding products to a quote. For example, these questions collect relevant customer data, such as the type of products the customer wants to buy, customer size, customer type, whether they are a partner or an end customer, and volume. It can also include information such as location, industry, and other specifics depending on the nature of your business. When there are many products, guided selling is like an interview process that can help reps quickly and easily sort their products. This will help reps easily navigate through large product catalogs. At the beginning of the quote creation process, when the reps are ready to add products to the Product Selection screen, they will start with a Guided selling screen, which presents a series of questions.
To set this up, your business should have at least one question to identify the products to start with. The answers act as the conditional logic to determine the next set of questions to be displayed. In addition, the questions act as filters, and the answers drive which products need to be displayed. The rep can then click the Suggest button to display the corresponding products. Salesforce-guided selling filters the product in the backend and, therefore, only relevant products will be displayed on the Add Products page.
For example, imagine that Packt Corporation is a cell phone distributor operating in multiple regions, such as America, Asia Pacific (APAC), and Europe, Middle East, and Africa (EMEA). Packt has reps working across regions. The types of cell phones and accessories that Packt sells in the US might be different than the type of cellphones and accessories it sells in Asia. The first question in guided selling is to find the country name. In this case, if the country is the US, then the Apple iPhone bundle with a 110 V charger will be displayed along with other matches. When the country is India, the same product bundle will be displayed, but with a 220 V charger. The next set of questions, based on the country, can be refined further.
As you can see, guided selling can be customized for the products your company is selling and how your business operates. It is hard for the rep to scroll through thousands of products manually to find a match. Guided selling helps streamline the sales process and new reps can be onboarded quickly. It can also help reps win more deals, drive customer satisfaction, and, in some scenarios, allow customers to self-serve (customers can use guided selling in communities where they will be able to search and add relevant products to the quote without needing help from a sales rep).
Configuring guided selling in Salesforce CPQ
The guided selling process is like navigating a flowchart on the backend to display the right set of products. It's best practice to map out your entire guided selling process before beginning any configuration. Let's imagine Packt Corporation sells a large number of products. The following diagram shows the flowchart for the products sold by Packt Corporation:
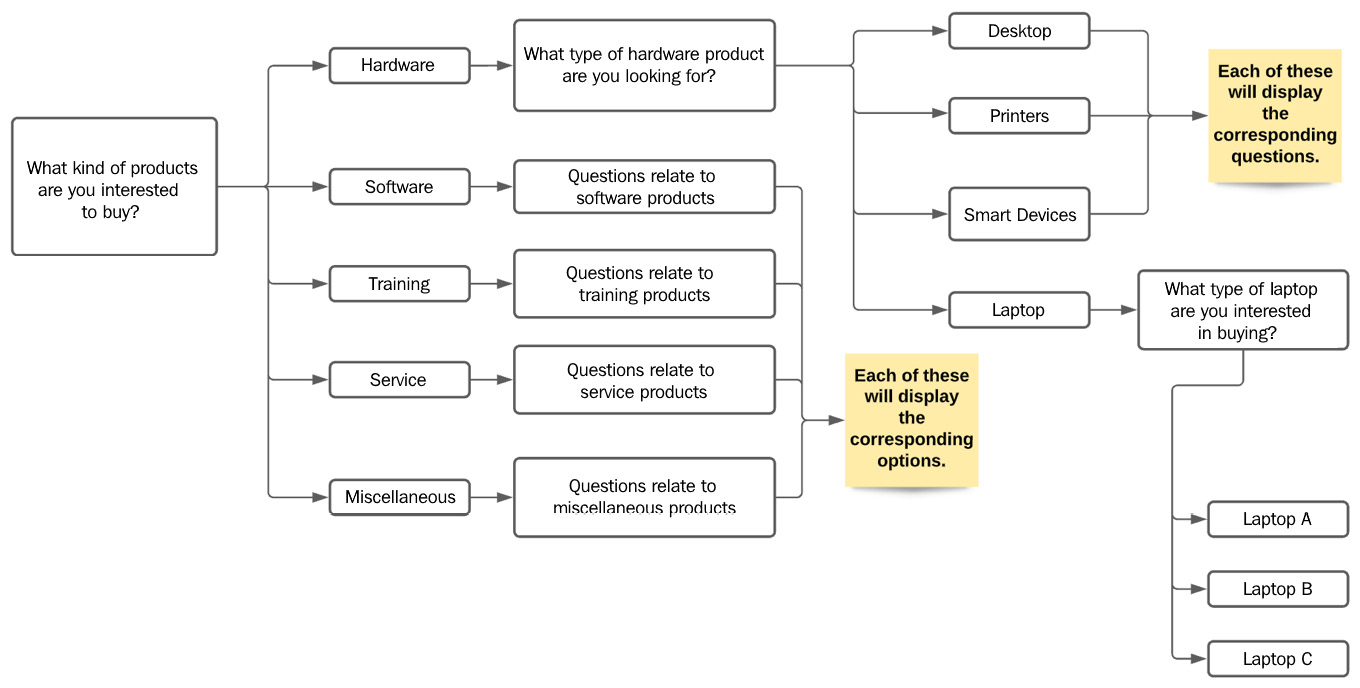
Figure 6.1 – Sample flowchart for laptop products
In the preceding diagram, in the quote that the rep created, the customer wanted to see all the available laptops and choose the right one from that list. So, we will configure the guided selling flow to display all the laptop models. First, we want to know what kind of products customers are interested in. Reps are already trained to know these high-level details about the products. When the rep chooses Hardware, then the questions related to hardware products will be displayed. If the customer wants to buy Software or Training products, we need to configure the corresponding questions.
For the sake of this example, we will only configure the questions that will lead the rep to the laptops. Based on your company's business process, create a flowchart for filtering products.
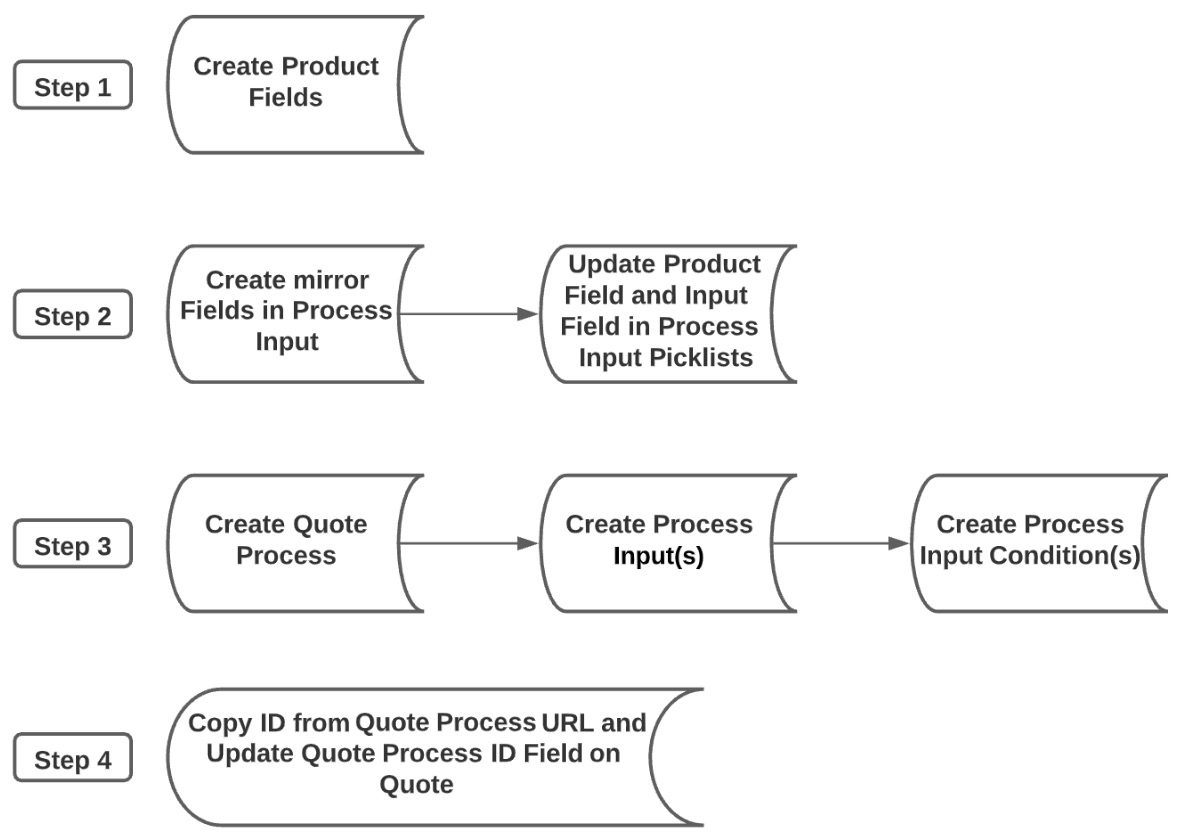
Figure 6.2 – Guided selling configuration
Once you have this kind of logical model of your products, your admins can configure guided selling in Salesforce. Guided selling can be set up in four steps:
- Create product attributes that can be used by guided selling to filter products based on rep input.
- Define process inputs, which are questions that select products based on rep feedback.
- Create a quote process that orchestrates the user through a series of process inputs to reveal the most suitable products for the sale.
- For testing purposes, admins can manually paste the process ID into the SBQQ__QuoteProcessId__c field. However, in practice, populating this field must always be automated as a user would never populate this as part of the selling flow.
Let's use the flowchart shown in Figure 6.1 to configure guided selling in CPQ. Guided selling matches the answers the rep provides to the questions displayed with the fields on the product object to filter the right products. Admins need to define fields on the product object that match new Process Input fields. It is recommended to use picklist and checkbox fields for the input method. We can use standard out-of-the-box product fields when the products can be identified using the standard fields. Alternatively, custom fields can be created as required. In this example, we will demonstrate creating a custom picklist:
- First, we need to make sure products have fields that the guided selling prompt can filter through. Create picklist fields on the product to store the values of attributes you want to filter. In this example, you need to create a product type picklist field with the values Hardware, Software, Training, Service, and Miscellaneous, as shown in Figure 6.2. To do this, navigate to Set up Quick Find Object Manager Quick Find Product Field & Relationships New Picklist Next Field Label and choose Product Type. Now, in the Values field, enter picklist values by selecting the Enter values, with each value separated by a new line radio button. Under Field Name, select Product_Type. Next, choose the field level access, add it to the required page layouts, and save.
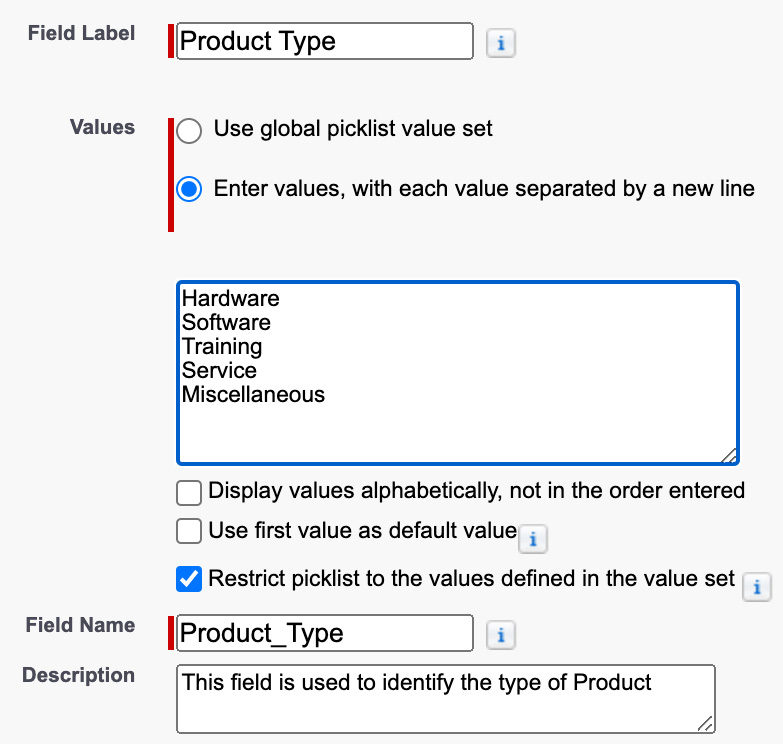
Figure 6.3 – Product object picklist
Similarly, create the other picklist values. As shown in Figure 6.1, we need to create two more picklist values. One is for Hardware with the values Desktop, Printer, Smart devices, and Laptop, and the other is for Laptop with the values Laptop A, Laptop B, and Laptop C.
Once the backend configuration is done, navigate to the Product tab and set up some products with these picklist values so that we can test them in the QLE. For the actual implementation, you may have to perform a one-time data load to update products with the defined picklist values.
- The next step is to create the Process Input fields, which are the questions to be displayed while configuring products using guided selling. Each process input record defines a question. In our example, we want our first question to be What kind of products are you interested in buying? Your admins can create a picklist field called Product Type. Custom fields can be created on this object, which can be used for configuring the questions you want to ask your reps. The picklist values hardware, software, training, service, and miscellaneous need to exactly match the picklist values that were created in step 1 on the Product object. As a best practice, a global picklist value set can also be used to keep the product and process input values in sync.
The setup of the process inputs requires two pieces of configuration to be in place:
- Create picklist values on the Process Input object.
- Link the API values to the Process Input object fields.
Let's learn how to do this configuration in the next sub-sections.
Creating picklist values on the Process Input object
Create these picklist values on the Process Input object, similar to the picklist values created in Figure 6.3. To do this, navigate to Set up Quick Find Object Manager Quick Find Process Input Fields & Relationships New Picklist Next Field Label, choose Product Type, enter picklist values Field Name Product__Type, and then click on Next and choose the field level access, but do not add them to the page layouts as they are user input fields and we don't want them to be modified on the object. These picklist values will be used by the CPQ engine and compared with the product picklist values that we created in step 1. We'll display only those products that match.
Similarly, create the other picklist values on the Process Input object as required. For the example in Figure 6.1, we need to create two more picklist values. One is the Hardware type with the values Desktop, Printer, Smart devices, and Laptop, and the other is the Laptop type with the values Laptop A, Laptop B, and Laptop C.
Linking the API values to the Process Input object fields
After creating the necessary picklist values, we need to link the product field API values to the Process Input object fields. On the Process Input object, we have two out-of-the-box picklist fields that need to be updated:
- Input Field: This field needs to be updated with the Product Type API name that we created in step 1. To do this, navigate to Set up Quick Find Object Manager Quick Find Process Input Fields & Relationships Input field Values New and add the Product Type field API name. In this example, it will be Product_Type__c. Then, click on Save.
- Product Field: Navigate to Setup Quick Find Object Manager Quick Find Process Input Fields & Relationships Product Field Values New and add the Product Type field API name, in this example, Product_Type__c, and then save.
In this case, the field API names that have been created on the Product and Process Input objects are the same. These values can also be different.
Similarly, add the other product picklist API names (in this example, Hardware type and Laptop type) that you created in the product object. This is a prerequisite for the next step of the quote process creation.
Finally, we create a new quote process for guided selling. The quote process object stores all the parameters that you have created for the guided selling prompt. This object defines how the prompt appears and how it adds products based on user input. The quote process record contains a related list for process input. To create a quote process, navigate to Setup App Launcher Quote Processes New.
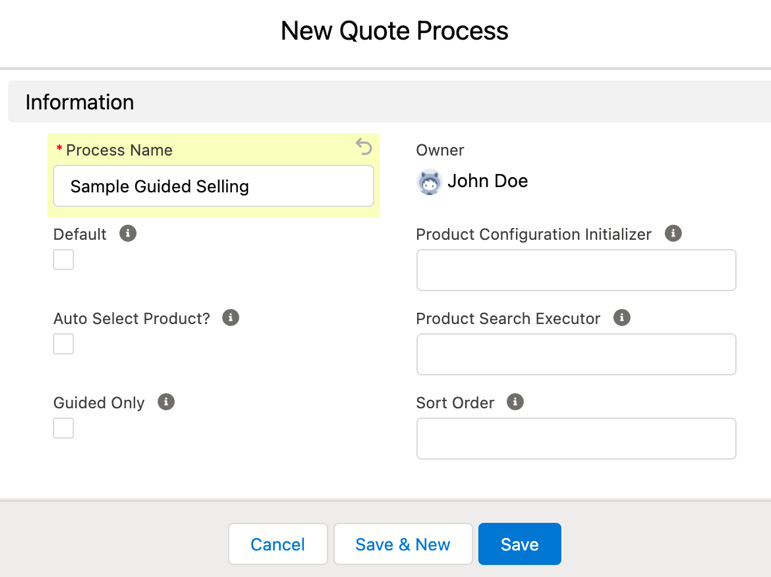
Figure 6.4 – The New Quote Process window
Let's learn about some important fields in the quote process:
- Process Name: Provide a meaningful quote process name. For this example, we have Sample Guided Selling.
- Default: Check this checkbox if you want this process to be the default for multiple quotes.
- Auto Select Product: If you select this, CPQ will automatically add the product to the quote when guided selling returns only one product.
- Guided Only: When this checkbox is selected, users can only search and add products using guided selling. When users access the product selection page for any quote containing this quote process, the filter panel button will be disabled.
Then, we need to create a new process input for all the process inputs we defined in step 2. Match the values of the input fields to the values of the product fields to ensure the sales rep returns the corresponding products. To do this, navigate to the quote process, which we created in Figure 6.4, Quote Process Related Process inputs New. This will open the New Process Input screen.
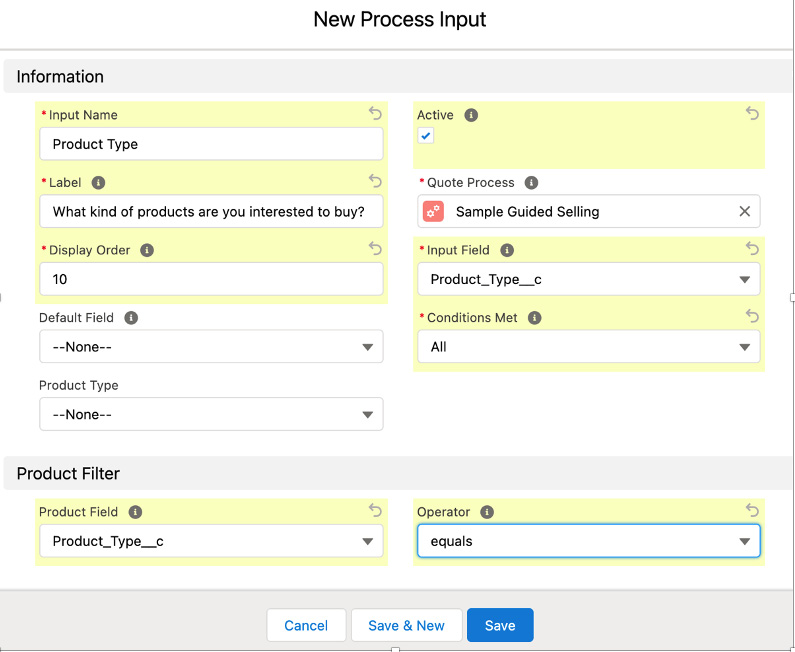
Figure 6.5 – Creating a process input field: Type – Product
Some important fields when creating a process input field include the following:
- Input Name: For each question we display in the QLE, there will be an associated input name, and this field is mainly for admins. In this example, we are naming this field Product Type.
- Label: This is the question displayed on the screen while using guided selling in the QLE.
- Display Order: The number entered here defines the order in which the process input is displayed. Provide some gaps while creating this order so that new requirements can be inserted. For this example, let's enter 10.
- Active: This is used to activate the process input field.
- Quote Process: Provide the quote process name. In this scenario, choose the quote process name created in Figure 6.4.
- Input Field: This is the answer picklist that we created for the Process Input object. In this example, we choose Product_Type__c.
- Conditions Met: When there is more than one condition, we can choose between the picklist values – All or Any. The relevant prompt will be displayed if the conditions are met.
- Product Field: The answer picklist field is going to match the picklist field on the product object.
- Operator: This is used to compare the process input field to the product field. For this example, we want to match the field exactly, and therefore we choose equals. If this is a numeric field, we can choose greater than or less than as needed.
Important Note
At the time of this writing, Salesforce does not recommend creating more than five Process Inputs for a Quote Process when reps use Lightning Experience.
To link the quote process to the quote the rep creates, update the ID of the quote process that you created in Figure 6.4 in the standard Process ID field on the quote. For this example, we are manually copying the ID and pasting it in the field. We can make this update using Salesforce automation rules.
The guided selling process prompts fire when you select Edit Quote Lines for the first time on a quote, or when you click Add Products in the QLE.
In the next section, let's learn how to create dynamic process input fields.
Creating dynamic process input
We can configure guided selling to dynamically display the questions based on the previous response. Admins can use the Process Input conditions-related list. Based on the conditions defined here, the search will dynamically display the products.
In the example shown in Figure 6.1, the second question is dependent on the first question's answer. If the answer to the first question is Hardware, then we want to display the questions related to Hardware. Similarly, if the answer is Software, the second question will ask what kind of Software product the user wants to buy.
To configure this dynamic input, admins need to create a new picklist field, Hardware Type, on the Product object (refer to step 1 of the previous section for configuration details) and on the Process Input object (refer to step 2 for configuration details) with the picklist values Desktop, Printer, Smart Devices, and Laptops. Next, they need to add the picklist field API names to Input Field and Product Field on the Process Input object.
The first question cannot be conditional as we don't have a dependency on the user input. The second question is dependent on the answer to the first one. When the rep chooses Hardware, we want to display the question: What type of hardware product are you looking for? This question needs to display conditionally only when the answer Hardware is selected. If the answer is Software, the corresponding question related to software needs to be displayed.
To configure dynamic process inputs, we will choose Sample Guided Selling, which we created in Figure 6.4, in the Quote Process box by navigating to App Launcher Quote Process Sample Guided Selling Related Process Input New. Link Hardware Type on the process input and product objects in the quote process, as shown here:
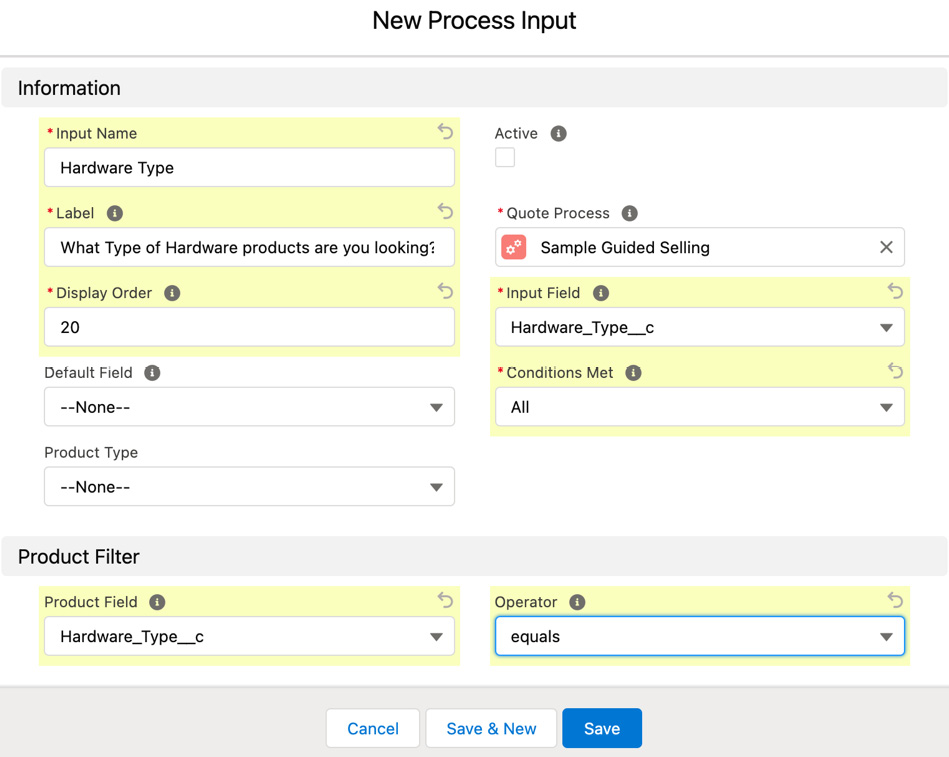
Figure 6.6 – Creating a process input field: Type – Product
Fill in the mandatory fields and save the record.
To create a Process Input Condition, navigate to Quote Process Related Process Input. Select Hardware Type. For this example, navigate to Related Process Input Conditions New, which will open the screen shown here:
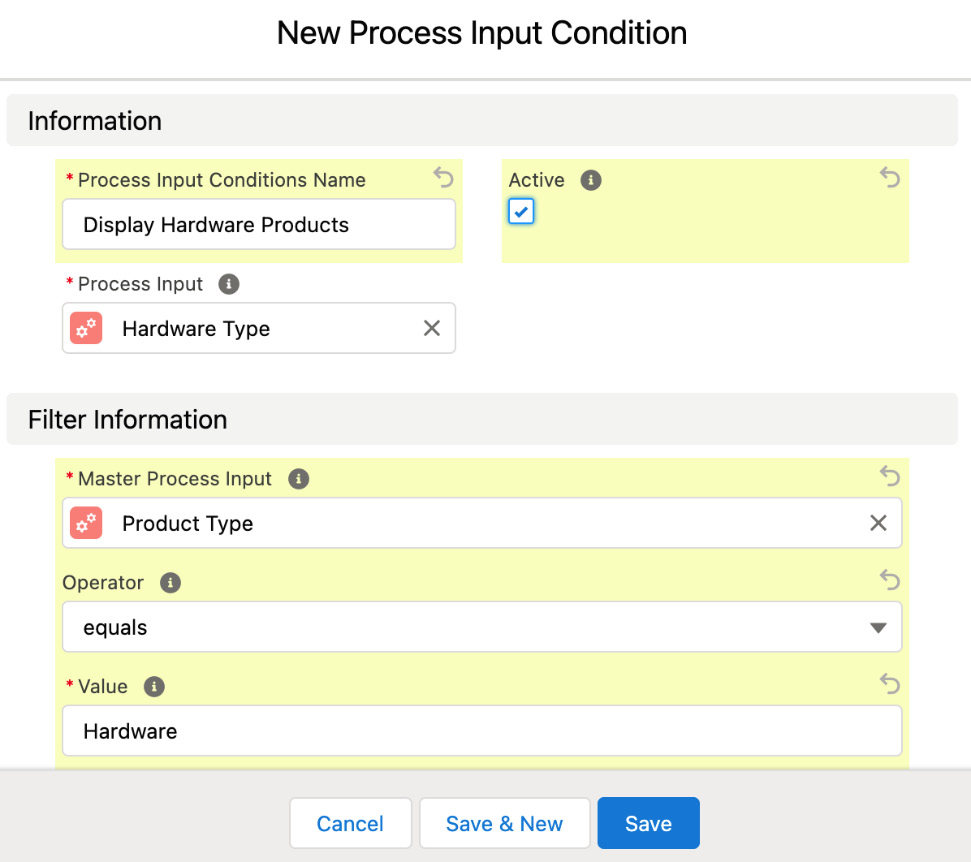
Figure 6.7 – New Process Input Condition
Fill in the following mandatory fields:
- Process Input Conditions Name: This field provides a meaningful name for the input condition. For this example, we are creating this condition to display hardware-related questions, so we name it Display Hardware Products.
- Process Input: This will default to the process input for which we are creating the condition. In this example, we want the hardware question (What type of hardware product are you looking for? from the example in Figure 6.1) to appear.
- Master Process Input: The value of this field determines whether the value of this process input condition evaluates to true. In this example, this is Product Type.
- Operator: This is a picklist value with different operators, such as equals, not equal to, contains, greater than, and less than. For example, in Figure 6.7, we are using the equals operator to check whether Product Type equals Hardware.
- Value: This is the answer value on which this question is dependent. In this example, we want this question to be displayed only when the previous answer is Hardware.
In the next section, let's see how guided selling can be tested in QLE.
Testing guided selling in QLE
In the previous section, we saw how guided selling can be configured. This can be applied to a specific quote or multiple quotes. Let's see how we can test this for a single quote. To apply the guided selling to a quote, input the ID of the Sample Guided Selling Quote process into the Quote Process ID field on the Quote object. If you have multiple guided selling quote processes, based on the business criteria, specific quotes can be updated with the corresponding quote process ID. Salesforce automations such as Flow or Apex can be used to automatically update the ID. In this example, let's update this manually. To do this, navigate to the quote process created in Figure 6.4, copy the Salesforce ID and update it in the quote process ID field.
To test the guided selling, navigate to Quote (for which we have updated the quote process ID) Edit Lines Add Products. This will display the Guided Selling screen, as shown in the following screenshot:
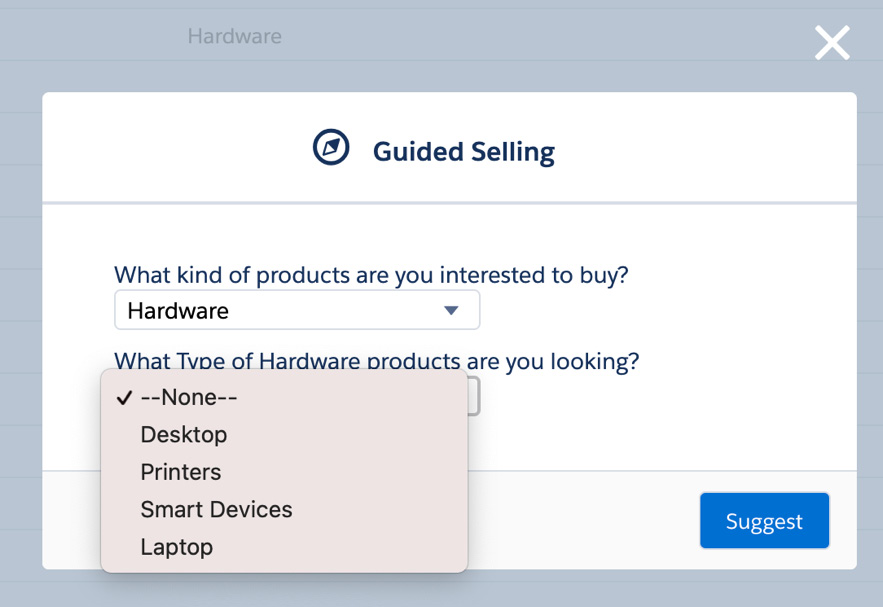
Figure 6.8 – Guided Selling in QLE
Based on the answer chosen, the next questions will follow. Clicking Suggest will display all the relevant products.
Summary
In this chapter, you have learned how to configure guided selling and seen why you should use it. We saw how guided selling can help businesses with complex product structures and help onboard new reps faster. Also, for scenarios where self-serving is needed without rep intervention, guided selling is very helpful to automate the sales process. Guided selling is like an experienced salesperson. It helps reps to ask questions about customers' needs and close deals faster. Guided selling also improves the customer experience by making their buying process much easier. The combination of search filters and guided selling makes for a well-rounded system. In the next chapter, you will learn about CPQ package configuration settings, which most configurations will be dependent on.