
Chapter 7: Creating Contracts, Amendments, and Renewals
So far, we have learned about configuring products, pricing, and quotes in CPQ. We have also detailed how a sales rep can create an opportunity and progress a deal. When the rep has an understanding of what the customer needs, a quote can be created.
Products are added to the quote and products and bundles are configured as needed. Based on the configuration, discounts, price rules, and product rules can be applied. Once the quote is approved, the quote document can be generated. If we have any external integration for e-signatures, the quote document is automatically sent to the customer for signatures.
Generally, once the document is signed by the customer, the deal will be closed by marking the opportunity as Closed Won. If orders are implemented, they are created now. For all the subscription products that we sold, we need a contract to keep track of which products need to be renewed later. The contract can then be used for future sales transactions. They are also used to facilitate amendments and renewals for the customer.
Contracts capture the subscription products and prices a customer has agreed to and are managed over time as a customer's install base changes.
In this chapter, you will learn about contracts, amendments, and renewals.
A contract will have subscription or asset records based on the type of products on the quote. These products on the quote will be translated to subscriptions if they are subscription products, or assets if they are standalone products. Amendments and renewals ensure continuity across assets and subscriptions tied to the account. All the products that a specific customer has bought can be tracked under the account object in Salesforce.
In this chapter, we will cover the following topics:
- Creating contracts
- Creating amendments
- Amending MDQ products
- Creating renewals
- Contracted pricing
Contracts overview
Contracts are used to manage subscription products that you have sold to your customers. In Salesforce CPQ, once a deal is completed and an opportunity is marked as Closed Won, a contract can be created.
In this section, we will learn how CPQ creates a contract. We can use the out-of-the-box Contracted checkbox field on opportunities or orders to initiate the contracting process, which will automatically create a contract record. Contracts can be created from either opportunities or orders. Generating contracts from orders is most common because then subscriptions and assets are related to order products and not just opportunity products. If Salesforce Billing is in play, orders must be created and all contracts must be generated from orders. This ensures amendments and renewals are billed correctly to the customer.
When Allow Multiple Orders is set to True in the CPQ package setting, CPQ can create multiple orders to a single quote. Orders can be split by the quote line field or quote line group field.
If orders are implemented, a contract needs to be generated from the order; otherwise, contracts can be generated from opportunities. The contract generated can be used for managing amendments and renewals. Salesforce CPQ can easily handle updates to the products included in the contract by creating amendments. Amending a contract will generate an amendment opportunity and an amendment quote. The process for amendments will follow the same flow as the original sales until the amendment opportunity is marked as Closed Won and it will be linked to the original contract.
Contracts can be renewed when they reach the contract end date. Tracking the contract end date for renewals is a tedious task and CPQ helps to automate this by creating renewal opportunities and renewal quotes. Renewals also help the sales team forecast accurately. When the same process is applied to renewals, a renewal opportunity and renewal quote can be created.
The Renewal Model setting in CPQ package configurations will determine how CPQ tracks the products on your quote. The renewal model can be either Contract Based or Asset Based. If your company sells both non-subscription and subscription products, you need to set this configuration to the Contract Based renewal model, which will help in creating a contract. If your company doesn't sell subscription products, you can set the renewal model to Asset Based. Renewal model setting should be done before creating subscriptions and assets with CPQ. Changing the renewal model after record creation is basically impossible.
Let's look at a simple example where Packt is selling a Packt Pro 13" Laptop (a sample product), which is a non-subscription product, and a Loss and Damage Warranty, which is a subscription product.
The following diagram shows the high-level contract creation process:

Figure 7.1 – Creating contracts
A rep has created an account for a customer who is interested in buying products and services from Packt. The sales process has progressed and an opportunity has been created. The customer looked at a few sample quotes and has finally accepted one quote, which is set as the primary, where all the products have been added. The rep has also added complimentary swag to this quote. Finally, the sale is completed and the opportunity status has been set to Closed Won. For the Loss and Damage Warranty, which is a service charged based on the number of years applicable, the quote lines will have a start date and an end date. This has been set up as a subscription product in Salesforce. We can now create a contract for this initial sale.
While creating a contract, the Salesforce CPQ engine looks at the opportunity products and determines whether a subscription or an asset needs to be created. We already learned how to create a subscription product in Chapter 3, Configuring CPQ Products. In this example, let's imagine we have three products on the primary quote that were synced to the opportunity:
- Loss and Damage Warranty, which is a subscription product
- Packt Pro 13" Laptop, which is a non-subscription product, with the Asset Conversion field set to One Per Quote Line or One Per Unit
- Swag, which is a non-subscription product, with the Asset Conversion field set to None
Based on this, the CPQ engine will create a subscription line for the Loss and Damage Warranty product, an asset for the Packt Pro 13" Laptop, and complimentary swag will be left, just as a one-time-sale product on the original quote. No record will be created for Swag.
The Asset Conversion field on a product determines whether a product needs to be converted into an asset or not. This field has three possible values:
- One per unit: If we are selling five laptops on a quote with this setting, CPQ will create five individual asset records. This will be useful for products where you want to track the serial number. If your business has bigger pieces of equipment, you might want to track each asset individually in the system.
- One per quote line: If we are selling five laptops on a quote, with this setting, CPQ will create one asset record with a quantity of five.
- None: With this setting, the product will not be converted into an asset. For the complimentary swag in our example, the Asset Conversion field is set to None.
Important Note
When you contract an opportunity containing a subscription quote line with a quantity of 0, Salesforce CPQ creates a zero-quantity subscription record on the contract.
Unlike asset products, where you can exclude certain products from asset creation, there is no configuration for subscription creation. These subscriptions get created automatically for all the relevant products. When you contract an order or opportunity under the contract-based renewal model, Salesforce CPQ creates a contract record. CPQ creates subscription records for all the subscription products on the quote and asset records for non-subscription products.
When you have percent of total products, subscribed assets are going to be created to link the percent of total subscriptions to the assets they cover. We learned about percent of total product and pricing configuration in Chapter 4, Configuring CPQ Pricing. For example, let's imagine you have a Warranty Extension product set up as a percent of total product based on the total hardware products on the quote. The hardware products will be set up as assets and subscribed assets will be created to link the Warranty Extension to the hardware. A subscribed asset is a related list on a subscription. It is a junction object between the subscription product and the asset.
Contracts contain lookups to subscription records for each subscription quote line. Each account in Salesforce serves as a source of truth for everything that a customer currently possesses and everything that was purchased in the past. A Closed Won opportunity and an associated primary quote contain the details of what was purchased for a specific deal. If you have implemented orders, they will manage post-sales activities, such as shipping, fulfillment, and activations. Orders are also suggested points of integration for external systems and are necessary for Salesforce Billing.
In the following subsections, let's learn how to create a contract from an opportunity and order.
Creating a contract from an opportunity
Salesforce CPQ provides out-of-the-box functionality to create contracts from an opportunity to manage subscription products. To configure contract creation from an opportunity, we have a few prerequisites, which are listed as follows:
- We must have an opportunity with at least one subscription product.
- There must be a primary quote associated with this opportunity that has at least one subscription product.
- The renewal method on the account related to this opportunity should be set to Contract Based.
- At least one quote line must have the Subscription Pricing field set to Fixed Price or Percent Total.
- Every quote line must have a start date, which is why it is recommended to include the start date on either the quote or quote line group. This will ensure that a start date is included in every subsequent quote line.
To demonstrate contract creation, we will manually select the Contracted checkbox and save the record. During actual implementation, this can be set automatically using either a Salesforce flow or Apex automation. For example, you can automatically update the Contracted checkbox to True whenever an opportunity is marked as Closed Won.
The conditions will depend on your business process and when you want a contract record to be created. For this example, a test account, Packt Communications, is used to create an opportunity named Packt Laptop. This opportunity has a primary quote with a few products. One of the sample products is a subscription product. The following screenshot shows an opportunity with products and an associated quote:

Figure 7.2 – Opportunity and quote with subscription products
As shown in the preceding screenshot, the Contracted checkbox on an opportunity has been selected and the opportunity's Stage property has been set to Closed Won. When this opportunity is saved, the CPQ engine automatically generates a contract with subscription lines and asset records using a future Apex method (contractQuotesDeferred).
As we have one subscription product for our example, Loss and Damage Warranty, the corresponding subscription line is created and attached to the contract. To view the contract, navigate to App Launcher Contract Related. This will display all the subscription lines associated with the contract, as shown in the following figure:
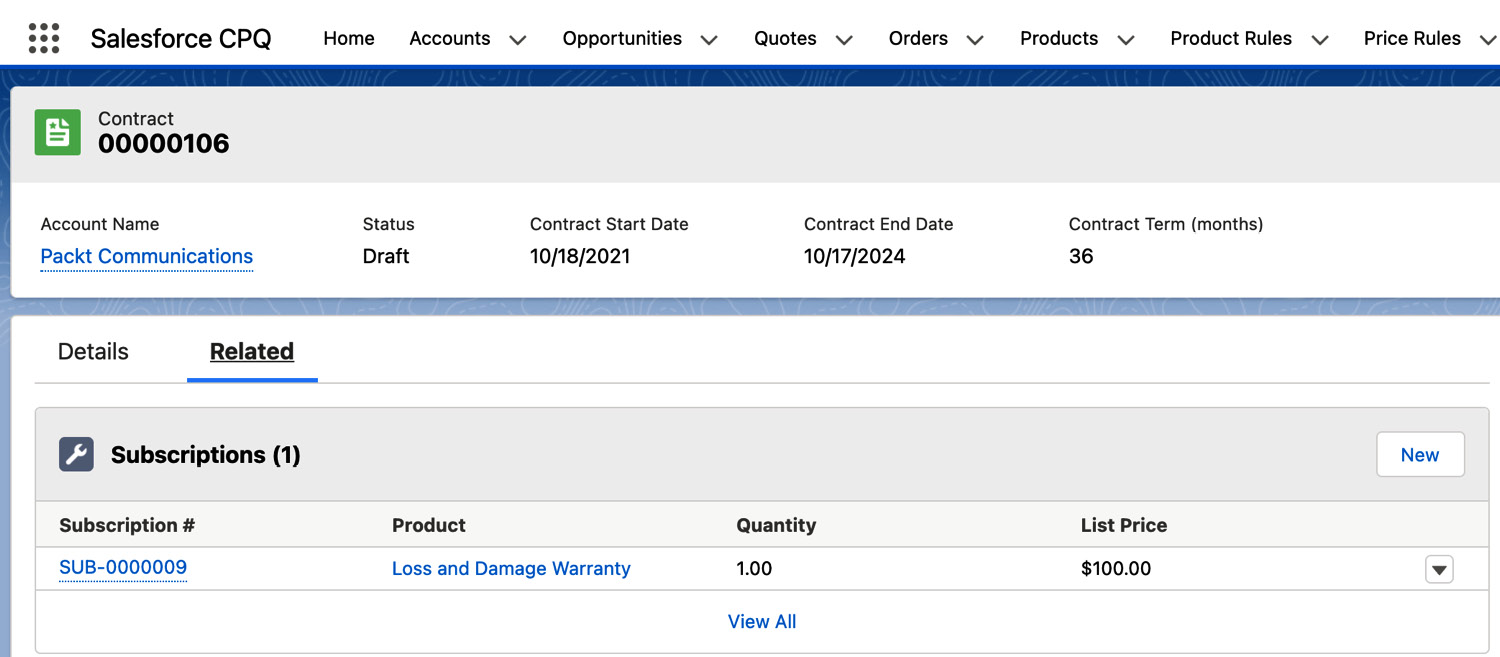
Figure 7.3 – Contract subscription lines
The subscription records contain pricing and date values for each of the subscription products on the quote. By default, the subscription product inherits its start and end dates from the quote line groups' start and end dates. If these are null, then the quote lines' start and end dates will be selected. Next, if the start and end dates are also null, then the quote lines' effective start date and effective end date values will be selected. The subscriptions inherit the values of all other matching quote line fields. This is a waterfall of Quote Line Quote Line Group Quote.
Salesforce CPQ sets a Contract Start Date and a Contract End Date and distributes subscription products based on the Contracting Method quote field. This has two possible values:
- By Subscription End Date: This is the default value. CPQ groups subscription products by the end date into separate contracts. The contract start date for every contract is equal to the earliest start date among its subscription products.
- Single Contract: CPQ creates one contract for all your opportunity's subscription products. This is not available for evergreen quote lines. Evergreen subscriptions go onto their own contract. Evergreen and non-evergreen subscriptions must be managed in different contracts:
Creating a contract from an order
Salesforce CPQ provides out-of-the-box functionality to create contracts from an order. It is used to manage subscription products that you have sold. To configure contract creation from an order, we have a few prerequisites:
- We must have an order with at least one subscription product.
- The renewal method on the account related to this order must be set to Contract Based.
- All the subscription order products you want to contract must be activated.
- We should have an uncontracted opportunity for the quote related to the order.
- Order products must be related to the quote line of the quote from which the order was generated.
To create a contract from the order, select the Contracted checkbox in the order and save the record. Salesforce CPQ will generate a contract with subscription lines and assets using a queueable Apex. In order-based contracting, CPQ distributes the subscription products based on the Contracting Method field on the order. This field inherits the By Subscription End Date and Single Contract values from the quote. Even if there are multiple orders, CPQ will attempt to create one contract based on this setting.
Contracting an opportunity or order locks the original quote lines and prevents them from being edited. To edit these quote lines, Salesforce CPQ provides two options:
- Amend the contract by creating an amendment opportunity and an amendment quote. The amendment quote lines can be edited and changes can be made as required.
- If the contract is ready for renewal, then a renewal opportunity and a renewal quote can be created. Renewal quote lines can be edited as required.
Service Cloud for Salesforce CPQ
So far, the contracting process that we have learned about is for Sales Cloud. Contracting for Service Cloud differs from Sales Cloud. Salesforce CPQ has an optional connector package that we can install for Service Cloud. This will help Service Cloud to be more CPQ focused.
For subscription products, this will generate service contracts instead of contracts and contract line items instead of subscriptions. For a percent of non-subscription products, CPQ will create assets, which is the same as for Sales Cloud. For percent of total products, CPQ will create entitlements in place of subscribed assets. Service contracts and service contract line items are the standard objects in Salesforce Service Cloud.
The following table shows the high-level differences in the contract process for Sales Cloud and Service Cloud:

Table 7.1 – Contracts for Sales Cloud versus Service Cloud
Once the contract is created and activated, if the customer requests any changes to the existing contract, Sales Cloud CPQ amendments can be used. In the next section, let's learn how amendments can be created.
Creating amendments
As we all know, changes are inevitable in any business. After a contract gets created, your customers may request changes. Contract amendments are used to add or remove products. Price changes and subscription end date changes must be managed via a cancel and replace amendment.
For example, some requests may be to increase the quantities of existing products or services or buy additional products or services after the initial deal is closed. These changes can be handled in CPQ by creating amendments.
When the customer calls a sales rep, the rep needs to have access to information such as what the customer is currently subscribed to, when their current subscriptions end, whether or not the customer can upgrade to a different level of service, how much the upgrade costs, and where we can track changes to current subscriptions. This is a lot to handle for your sales team without automation. CPQ has built-in functionalities to track all this information on your subscriptions automatically. The account object provides a 360-degree view to the rep.
When do customers need amendments?
Amendments are created when a customer needs an upgrade or an add-on. A customer may need amendments typically when there is a need for the following:
- A change of quantity: When the customer wants to buy more products or services.
- A different start date than the contract being amended: An amendment opportunity or quote can have a different start date than the contract being amended. Changing the start date signifies when exactly the amendment is effective. For example, even though the contract may start from January, the amendment may be effective from March.
- Adding or removing products: The customer may have already bought a few products and be interested in buying different products. Instead of creating a new opportunity and quote, you can amend the existing contract.
- Early contract termination: You can create amendments with zero quantity from the end date of the contract. For example, say you have a contract from January 1 to December 31 for 20 products. You want to terminate the contract by October 31. You create an amendment from November 1 to December 31 and change the quantity to 0 for all the products.
When a customer calls to make changes to their existing contracts, CPQ knows what they have already purchased and uses that information to quickly create an amendment quote. The starting point for amendment creation is an existing contract. The following diagram describes the amendment creation process in CPQ:
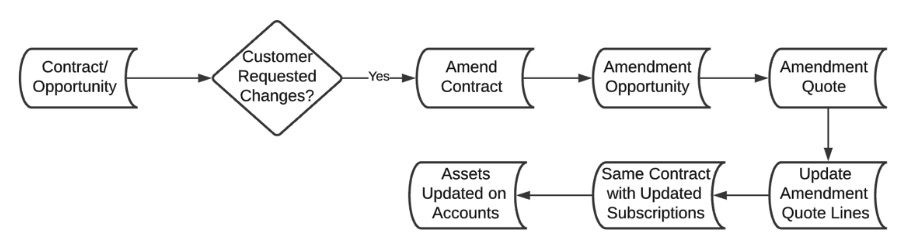
Figure 7.4 – Creating amendments
Let's learn about the standard CPQ amendment process, which can be customized for specific businesses as needed:
- Initially, you have an opportunity that is marked as Closed Won and a contract created for all the subscription products and assets created for non-subscription products.
- When you amend a contract, you are telling CPQ that you want to make changes to your existing subscriptions and assets.
- Amending a contract will take you to the Quote Line Editor (QLE) where you see all the existing subscriptions with a zero Net Total price because the customer has already paid for these products and services.
- You can add new products and make changes to the existing quantities. There are a few limitations when altering the existing quote lines in amendment quotes. You can change the quantity but it will not allow you to change the price or discounts on the original quote lines because these have already been negotiated with the customer and the sale is complete.
- When you make changes to the quote lines and save, the CPQ engine will automatically create the amendment opportunity and associate an amendment quote. These are different from your original opportunity and quote where the customer has purchased the goods. CPQ provides a link to all these details under your contract.
- The amendment opportunity and quote can be progressed and contracted similarly to how the initial deal was closed and contracted. If you are using orders, an order product is created for each new quote line or each quote line whose quantity was modified. Order products are not created for quote lines that were not modified in the QLE.
- When you contract the amendment opportunity, CPQ recognizes that there is an existing contract associated with it and it updates the subscription lines on the original contract. CPQ will add subscription lines with positive/negative quantities unless you are terminating a quote line. Then, it will update the quote line.
- It also updates the assets on the account for any non-subscription products.
- In addition, it adds a co-terminated quote against the original contract. Co-terminating a contract means having the same contract end date. For example, if you have an original contract that has an end date of December 31, 2022, and in the process an amendment has been created, Salesforce CPQ matches the termination date of the amendments to the termination date of the original contract.
We now have an overview of standard CPQ out-of-the-box amendment functionality. Remember this process can be customized as per your business needs.
Important Note
To change the pricing and discount of existing quote lines, cancel the quote lines, which is similar to terminating the contracts by updating the quantity to 0, and re-add the same product, which allows you to change the pricing.
Cancel and replace
Salesforce Labs provides a free, open source AppExchange product for the cancel and replace functionality. This functionality will cancel the existing contract and create a new one. It will be useful for scenarios where multiple contracts need to be combined and will extend the contract beyond the original term. This is supported only in Salesforce Lightning. The cancel and replace functionality is not supported for percent of total and MDQ products.
The full code base is available in the public GitHub repo: https://github.com/rjhalvorson/cancelAndReplace.
Salesforce administrators can install the cancel and replace package by following these steps:
- The cancel and replace managed package can be installed from AppExchange in your Salesforce instance. Navigate to Account Setup Edit Page and add the custom ActiveContracts Lightning component to the screen.
- Navigate to Setup Users and add the Salesforce CPQ Cancel and Replace permission set for the users who need this functionality.
The cancel and replace functionality is ready to use. To use it, do the following:
- Navigate to any account in your Salesforce instance where you have more than one contract.
- On the Account page, find the Lightning component that was added during installation.
- Select the contracts that you would like to cancel and replace. Click the Cancel and Replace button and fill in all the required data on the Salesforce screen that opens:
- When do you want to start: This is the start date for the new quote as well as cancellation quotes.
- Term: This is the length of the replacement quote (new contract).
- Opportunity: This is the name of the opportunity that will be created.
- Stage: This is populated from the opportunity stage in your Salesforce org. You can set it to any stage where you require a new opportunity to be generated.
Once you have filled in the details, click Continue. Salesforce creates queueable jobs that will perform the necessary steps:
- Amend all the selected contracts using the API and create the amendment opportunity and amendment quotes. These quotes will be canceled to generate negative orders.
- The quantity of all the line items in the cancellation quote will be set to 0.
- After all the contracts are amended, a new replacement quote will be created.
- The system will loop through all the cancellation quotes, aggregate the line items and quantities, and add them to the new quote.
Amendment fields on a contract
Let's look at the fields that influence the creation of amendments and renewals in a contract. Navigate to App Launcher Contract Salesforce CPQ Amendment Information, as shown in the following figure:
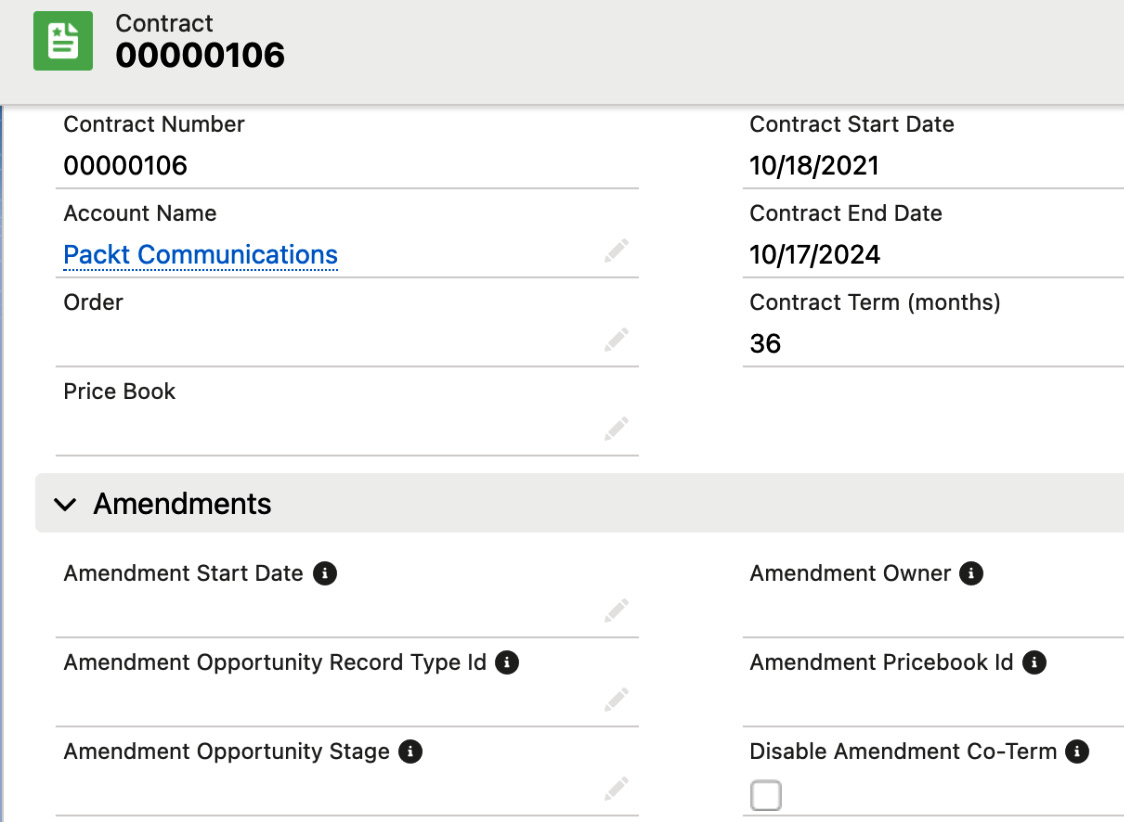
Figure 7.5 – Amendment fields on a contract
In the preceding figure, you can see the following fields that can be configured:
- Amendment Start Date: By default, the start date is set to the current date and we can override this value if needed.
- Amendment Pricebook Id: If you have a different price book for the amendments that you want to use, you can update the Salesforce ID for that price book in this field.
- Amendment Opportunity Stage: An amendment opportunity does not have to go through all the same stages as an initial opportunity. We can set the stage at which we want the amendment opportunity to be created by setting a stage value in this field.
- Amendment Opportunity Record Type Id: If we have a separate sales process for amendments, we can link it to the specified record type so that the amendments are created with that record type.
- Amendment Owner: You can set a default owner for amendment opportunities using this field. The default owner is the admin user who authorized the API.
- Disable Amendment Co-Term: This determines whether you are co-terming the amendments or not. The best practice is to co-term but you can override that if you want to by selecting this checkbox. When you select this checkbox, the end date is not populated for amendment quotes.
Let's take an example where Packt is selling a 12-month subscription to their customers. Packt always want to capture a full year of pricing when they are selling the license. Packt initially sold 10 licenses with a 12-month term starting on January 1, 2021. In March, the customer requested an additional five licenses.
The subscriptions on the amendment will inherit the contract end date December 31, 2021. But because we need 12 months for these additional licenses, these amendments need to have an end date of February 28, 2022. To change the end date before creating the amendment, set Disable Amendment Co-Term to True. When the amendments are created with this setting, the amendment quote will be created with a start date of March 1, 2021, and an end date of February 28, 2022. This ensures Packt sold the licenses for a 12-month term. When the original contract comes for renewal on December 31, 2021, CPQ renews all 15 subscriptions in the same renewal quote.
Creating a sample amendment
Let's revisit the previous example where the customer bought a Packt Pro 13" Laptop and the related Loss and Damage Warranty. The customer returns after a few months and wants to buy two additional products that Packt is selling, one a Home Security Console, which is a non-subscription product, and the other Home Security Monitoring, which is a subscription product.
The original contract has amendment lines and assets related to the account. As stated, an amendment can be created from either the contract or an opportunity. Many opportunities can relate to one contract. In this example, we are creating an amendment from the contract. To do this, follow these steps:
- Navigate to App Launcher Contract Amend. The following figure shows an existing contract where we have the Amend button:

Figure 7.6 – Creating amendments from a contract
Clicking the Amend button will open a screen displaying all the existing subscriptions related to the contract, as shown here:
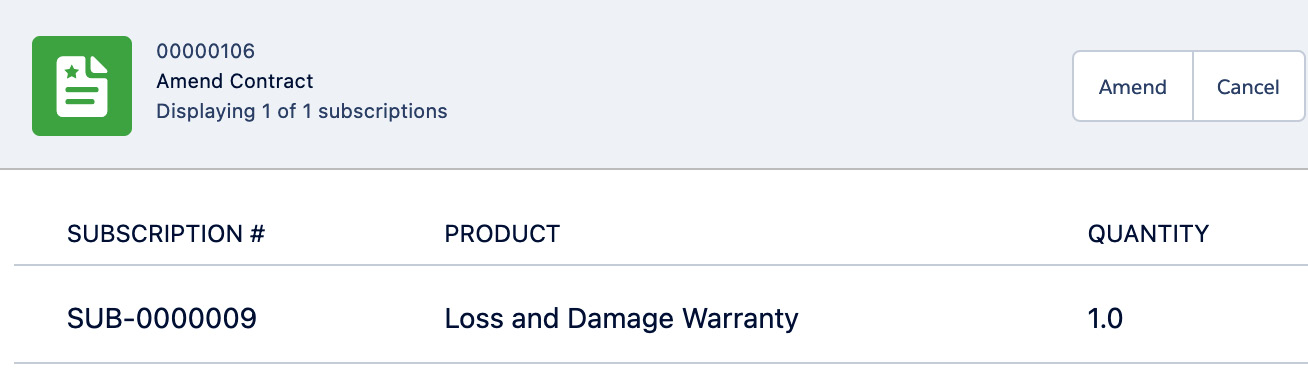
Figure 7.7 – Creating amendments from a contract
- Again, click on the Amend button. This will take you to the QLE, where you can make changes and save.
The net total in our example is 0 as we have already charged the customer in the initial quote. The end date is always co-terminated with the contract. It is advised not to change the end date as we want all the lines to be co-terminated at the same time.
We can change the start date and the CPQ prorate functionality will calculate the prices accordingly. CPQ supports a native prorate functionality for amendments. Refer to the prorate multiplier setting configurations in Chapter 8, Configuring CPQ Package Settings, for details on how to set up proration. The following figure shows the QLE with existing subscriptions:
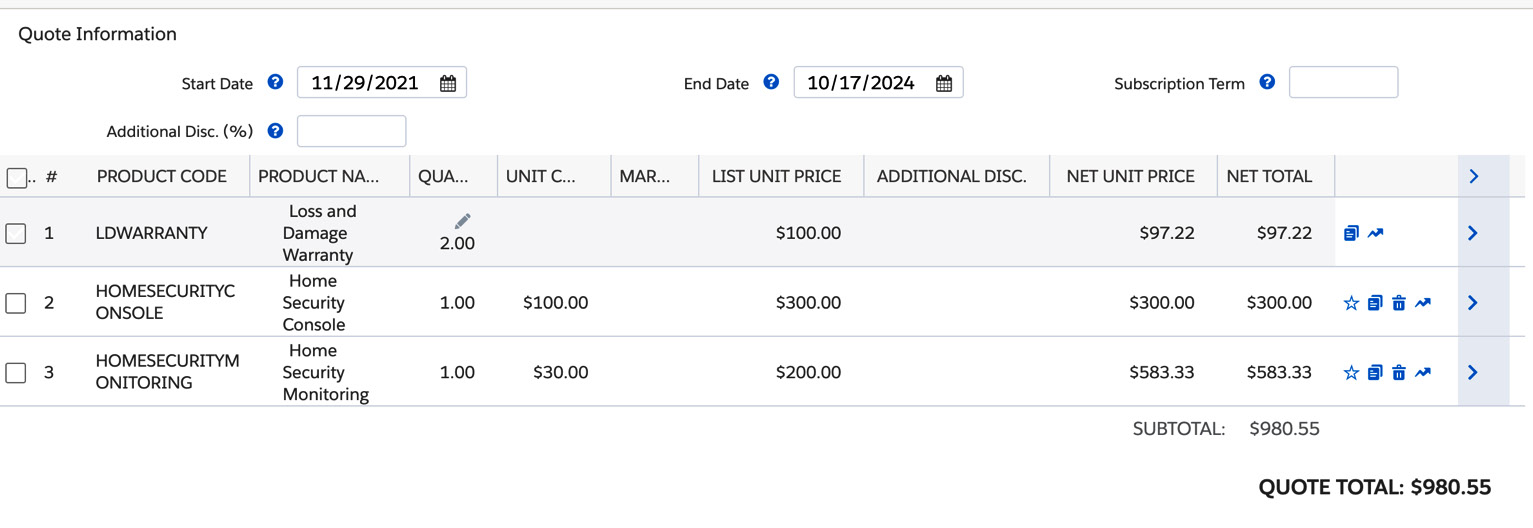
Figure 7.8 – Amendments QLE
- The QLE can be edited to make changes. In this example, we have increased the quantity of Loss and Damage Warranty to 2.00 (initially the quantity was set to 1.00).
The net total is calculated, but only for the additional quantity, as the original unit has already been paid for. You are also seeing that even though the list price is $100.00, the net total is calculated using CPQ proration and instead of $100.00, the total is $97.22. Also, this is only calculated for the updated quantity, and in this example, it's a quantity of 1.
- We have also added two new products: Home Security Console and Home Security Monitoring. For these additional products, we can also apply discounts as required.
- Save the record and this will take you to the Amendment Quote screen. The CPQ engine will create the quote and the opportunity in the background. The amendment opportunity will have only the changed products and new products.
- If needed, we can also remove a product by updating the quantity to 0.
- Now set Opportunity Stage to Closed Won and select the Contracted checkbox on this opportunity to create a contract.
Navigate to the account and view the asset and contract details. You will notice that the asset records have been created for all the non-subscription products, in this example, for Home Security Console. We see in the following figure that we still have only one contract and CPQ has updated the existing contract with the new subscription lines:
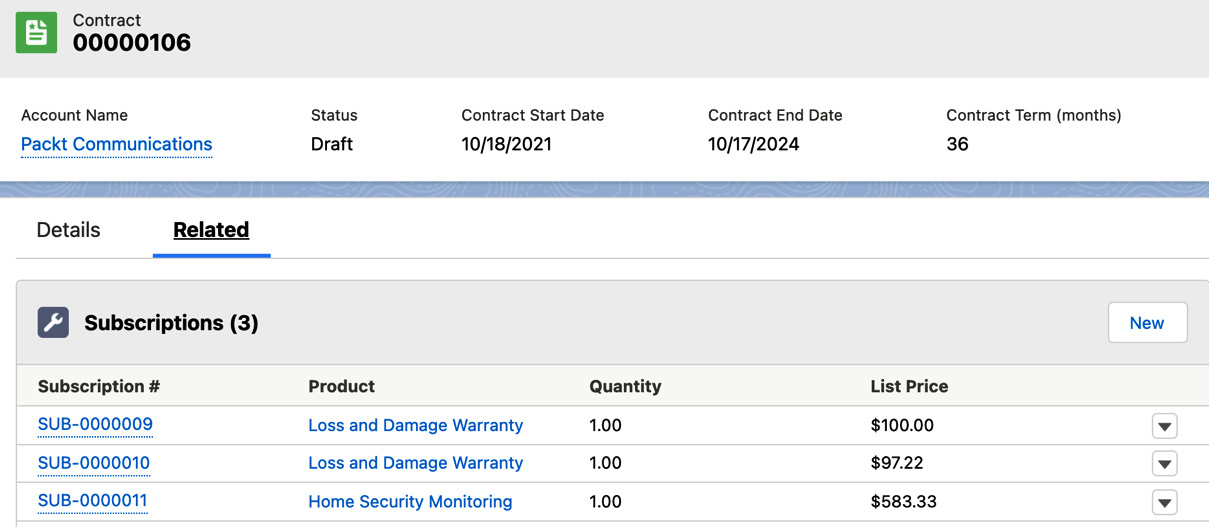
Figure 7.9 – Contract lines post amendment
As shown in the preceding figure, SUB-0000009 is the original subscription line. SUB-0000010 is the amendment subscription for the additional quantity. SUB-0000011 is the amendment subscription line for the new subscription product that we have added as part of amendment creation. In the next section, we will discuss amending MDQ products; MDQ quote lines require different treatment than a standard quote line.
Amending MDQ products
In Chapter 4, Configuring CPQ Pricing, we learned how to create an MDQ quote. We also saw that CPQ creates a separate quote line for each segment. When you add an MDQ product and standard product to the same quote, they are separated in the QLE. CPQ allows a rep to make changes to the segmented product using the quote lines drawer. Products can be segmented either monthly, quarterly, or yearly or by a custom term. For products with custom segments, a rep can create the segment start date and end dates in the QLE.
A few considerations about MDQ quoting, contracts, and amendments are as follows:
- The quote start date is mandatory to calculate the MDQ quote line prices.
- MDQ products support daily, monthly, yearly, and quarterly based subscription term units.
- MDQ products cannot be parent bundles and you cannot have product options associated with them.
- The standard bundle parent can contain MDQ child options. When you add this bundle to a quote, a bundle parent will appear as a standard product table, and the MDQ product will be separated in a segmented table.
- MDQ products cannot be configured and cannot have configuration attributes.
- The user experience for MDQ quotes for a large number of segments is limited. If you have price dimensions set to a monthly basis, there could be instances where you will end up with a large number of segments, which may not display well in the QLE.
- Contracting works differently for MDQ products. Let's take an example of Packt subscription MDQ products segmented yearly, as shown in Figure 7.10:
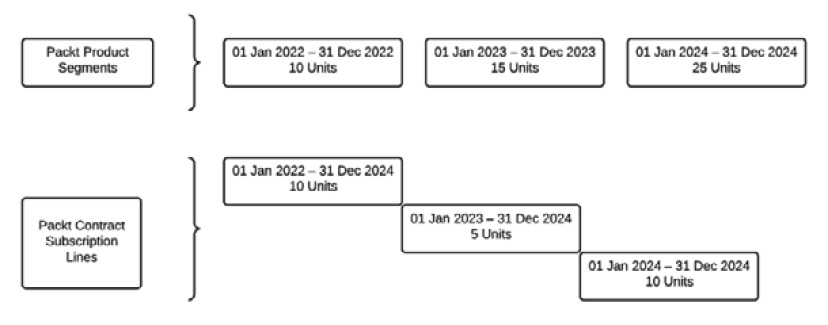
Figure 7.10 – MDQ subscription lines
- When MDQ is contracted, the subscriptions will be different from the standard CPQ contract. The first subscription will be created with a start date of the first segment, which is January 1, 2022, and the end date of the last segment, which is December 31, 2024. This subscription will have the number of units of the first segment. The next subscription starts from the second segment start date, which is January 1, 2023, until the end of the last segment, which is December 31, 2024. In the first subscription, we have added 10 units and CPQ maps the remaining units for the second subscription; in this example, it's 15 – 10, which is 5 units. The third subscription considers the last segment and the remaining units: 25 – 15, which is 10 units.
- You can only amend the current and future segments of an MDQ subscription. Past segments will not be available.
- CPQ doesn't support amending multiple MDQ subscriptions that have different start dates.
- The product record for an amended MDQ subscription contains a lookup to the subscription record from which it was amended.
From the previous discussion, you will realize that amendments and subscriptions become a little complex for MDQ products.
Now that we have learned how to configure and create amendments, we will see how to create renewals in the next section.
Creating renewals
As the contract progresses closer to the end date, you may need to renew it. We can extend subscriptions or make changes for up-selling or down-selling. The rep needs to talk to the customer and make sure that the renewals are successful and whether the customer is interested in up-selling the deal. This is again similar to negotiations that take place in the initial sales process, offering discounts for renewals, and up-selling is also common for a few businesses.
Contract-based renewal process
Let's learn how Salesforce CPQ creates renewals using the contract-based renewal model. We have a contracted opportunity and the contract has subscription lines with start dates and end dates. Renewals will be created for subscription products and percent of total products.
Important Note
If Preserve Bundle Structure is on, then CPQ will try to recreate the assets, which is a hassle.
The following are the steps to create a renewal:
- First, there is an out-of-the-box Renewal Forecasting checkbox on contracts that need to be selected for creating renewals.
By selecting this checkbox, you are telling the CPQ engine that there is a renewal that needs to be created. This checkbox can be selected as soon as the initial contract is created so that the forecasting can be accurate. Subscription products are added as renewal opportunity products with the existing pricing information from the original opportunity.
To create these opportunity products, Salesforce CPQ creates a quote in the backend, which is primarily used to sync all the products from a quote to the opportunity and deletes this quote. This is also referred to as the ghost quote, as it is just used to sync the renewal products.
The following figure shows the CPQ out-of-the-box renewal opportunity process:
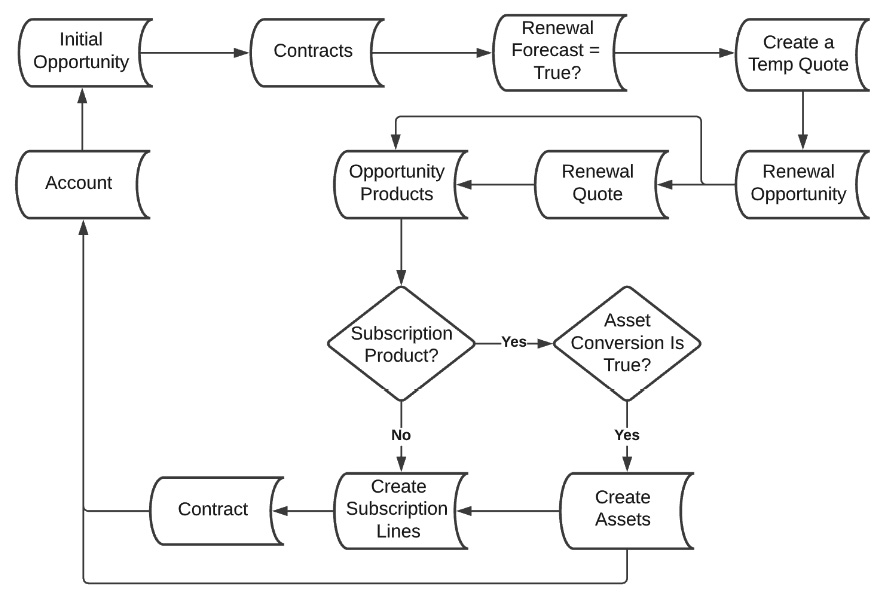
Figure 7.11 – Renewal opportunity process
- Next, you want to create a renewal quote for which the Renewal Quote checkbox on the contract needs to be selected.
The reason why these two (a temporary quote to sync the products and the actual renewal quote) are kept separate is to make sure that the renewal quote has all the subscription products in the sales process when the deal gets closer to the renewal date. For example, if the original contract was created for 3 years, there might have been a few new subscription products in these 3 years. If we created the renewal quote as soon as the initial sale was closed, then it will only have the initial sale subscription products.
Also, there might have been amendments that were created on this contract after the end of the original sale, when the deal was closer to renewal. This may happen even though the renewal opportunity has been created with the original subscription products. The renewal quote generated now will have all the contract subscription line items. Technically, the renewal quote should be created when the rep is ready to negotiate with the customer. Then, it follows the same sales process.
Important Note
If your sales rep creates any amendments after the renewal quote creation, then the CPQ out-of-the-box functionality will not sync these new amendment products to the renewal quote. The rep needs to manually sync these amendment products to include them on the renewal quote.
The difference between a renewal quote and an amendment quote is that the renewal quote is exactly the same as a new quote. You can change prices, add discounts, and perform all the actions that can be performed on a new quote and create a new contract.
Asset-based renewal process
When you have an asset-based renewal model, you can renew your assets from the account for percent of total products and at least one covered asset. Creating asset-based renewals is much simpler compared to contract-based renewals. The following figure shows the asset-based renewal process:
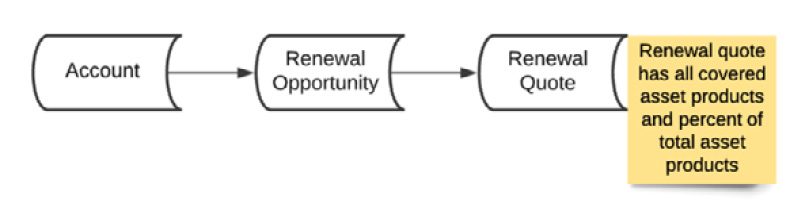
Figure 7.12 – Asset-based renewal process
Let's see the important steps in creating renewals for an asset-based renewal model:
- To renew an asset, navigate to the account and click the Renew Asset button. This will display the Asset Selection page containing all the assets on this account that are covered by a percent of total product.
- Select the assets that you need to renew and click Renew. Salesforce CPQ creates a renewal quote, associates it with a renewal opportunity, and opens the QLE.
- Edit the quantities of the assets from your original quote if required. You can also add new products as needed and save the record. Salesforce CPQ updates your renewal opportunity to reflect the assets you added or removed on your renewal quote.
- For asset-based renewals, Salesforce CPQ always uses the standard price book to price the renewed quote lines, unlike contract-based renewals where you have an option to select a different price book. Large Scale Amendment and Renewal Service do not support asset-based renewals, so the number of quote lines supported by CPQ is lower.
Before creating a sample renewal opportunity using the contract-based renewal model, let's look at the renewal pricing and renewal-related fields on a contract that controls the renewal process.
Renewal pricing
There is a field called Renewal Pricing Method on the account object that drives the pricing behavior for products on renewals. It can have three values:
- Same: This is the default option. This value will take the same price, including discounts from the original opportunity, and apply that to the renewal opportunity and quote at the time of renewal creation. For example, if you had a list price of $100 and a discount of 10%, then the initial discounted sale was at $90. The renewal will have the same prices applied.
- List: This value will take the list price of the product based on the price book used in the original opportunity. If we have an updated renewal price book ID on the contract, then renewals will take the list price from this price book. The original sale's discounts will not be applied in this case.
- Uplift: This option will be used when you want to have the renewal price increased by a percentage each time the renewal is created. In addition to marking the field on the account, you will need to set Renewal Uplift Rate at either the subscription or contract level. If both are set, the subscription takes precedence over the contract. The discounts will flow from the original opportunity and then Uplift will be applied on top of that. The additional discount field will not be null when this is used and may result in negative values in the discount field on account of the uplift.
Important Note
If contracted prices exist for the defined pricing method, they will be overridden by injecting Special Price with a special price type. CPQ will calculate the additional discount as the discrepancy between regular and customer prices.
Renewal fields on a contract
A contract has several fields related to renewals that can be used to customize the renewal process. Navigate to App Launcher Contract Salesforce CPQ Information, which will open the screen shown here:
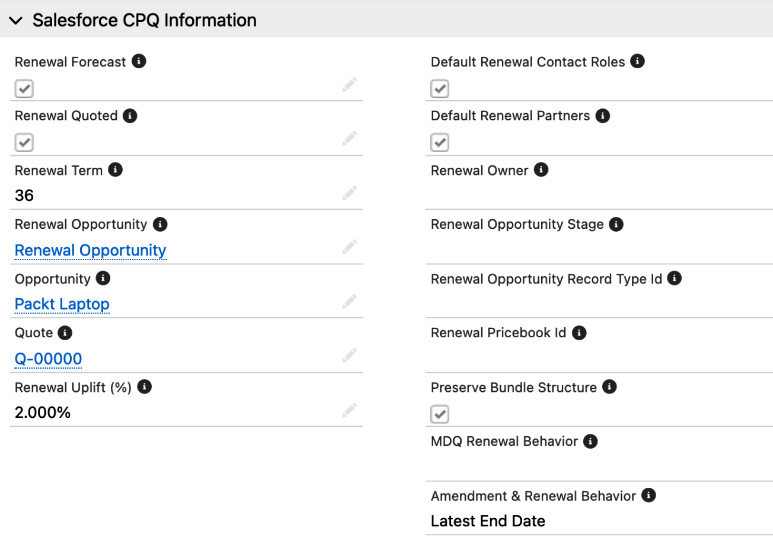
Figure 7.13 – Renewal fields on a contract
Let's learn about some of the important renewal fields shown in the preceding figure:
- Renewal Forecast: When this checkbox is selected, CPQ will automatically create the renewal opportunity and sync all the existing subscription product lines to the renewal opportunity. The ghost quote will be created in the backend and deleted.
- Renewal Pricebook Id: If you want to use a different price book for renewals, you can set that price book ID here. We can create renewal opportunities in a different record type. This may not go through all the same steps as the initial opportunity.
- Renewal Opportunity Stage: This field represents the stage at which you want the renewal opportunity to be created. You can directly assign a stage from your sales process and skip the other stages prior to the selected one. Sometimes the initial contract may be for 12 months, but the renewals may happen for 36 months.
- Renewal Opportunity: This field is the lookup for the renewal opportunity that gets created. This will be automatically updated based on the period you select for the renewal forecast. Salesforce CPQ by default names this Renewal Opportunity. You can customize this to have a different name as needed.
- Renewal Term: This value is the term of the renewal and will be used for the new contract creation. This will default to the term we have in the original contract. You can override this value if needed.
- Renewal Owner: This is the opportunity owner; you can preset this to the required owner from the Salesforce user object as needed. The default owner is the user who authorized the API.
- Renewal Uplift: This field can be used to apply an uplift to the original opportunity products. If you want to increase the price of the products by a certain percentage every time a deal is due for renewal, then the percentage increase can be specified here.
- MDQ Renewal behavior: This field is used for multidimensional quoting and can have two picklist values. By default, this is set to None. If you have an MDQ product in your original contract, the same MDQ product will be added to the renewal opportunity. You can opt out of the MDQ process by setting this picklist value to De-segmented.
- Renewal Quoted: When you are ready to work on the renewal opportunities and negotiate with customers, this checkbox can be selected. Selecting this checkbox and saving the contract record will automatically create a renewal quote. In typical business scenarios, the Renewal Forecast checkbox can be automatically selected using flows or Apex based on business needs or as soon as the deal is closed. A sales rep can also select this manually to generate the renewal opportunity.
- Amendment and Renewal behavior: You can set the renewal start date and amendment end date. When you have multiple subscriptions that have different end dates on a quote, you can choose which end date you want to use for the renewal start date. You can then pick either the latest one or the earliest one.
There is one more important feature for renewals, which is the ability to swap products while creating renewals. This field is on the product record. Navigate to the Product Renewal Product field. This field is a lookup field to the product. When you set this field, this new product will be considered at the time of renewal, replacing the original product. If this product is part of a bundle, then the renewal product needs to be specified at both the product level and the product option record level.
All of these fields can be set manually but you can automatically update them as needed using a flow or Apex logic. For example, contract activation can automatically set the Renewal Forecasting checkbox to True. These are some of the controls that can be customized as per the business needs.
Creating a sample renewal
In this section, we will see how to create a sample renewal opportunity and complete the renewal process using the contract-based renewal model.
Let's revisit the previous example where we created a contract from the initial sale and have an associated amendment. We have one subscription from the initial sale and another from the amendment.
For this example, we will manually select the Renewal Forecast checkbox and save the contract. The CPQ engine will create a renewal opportunity in the backend and the renewal opportunity field on the contract is populated.
The following figure shows the renewal opportunity. It has all the products from the initial contract, including amendments, and is available for all forecasting and pipeline reporting in Salesforce:
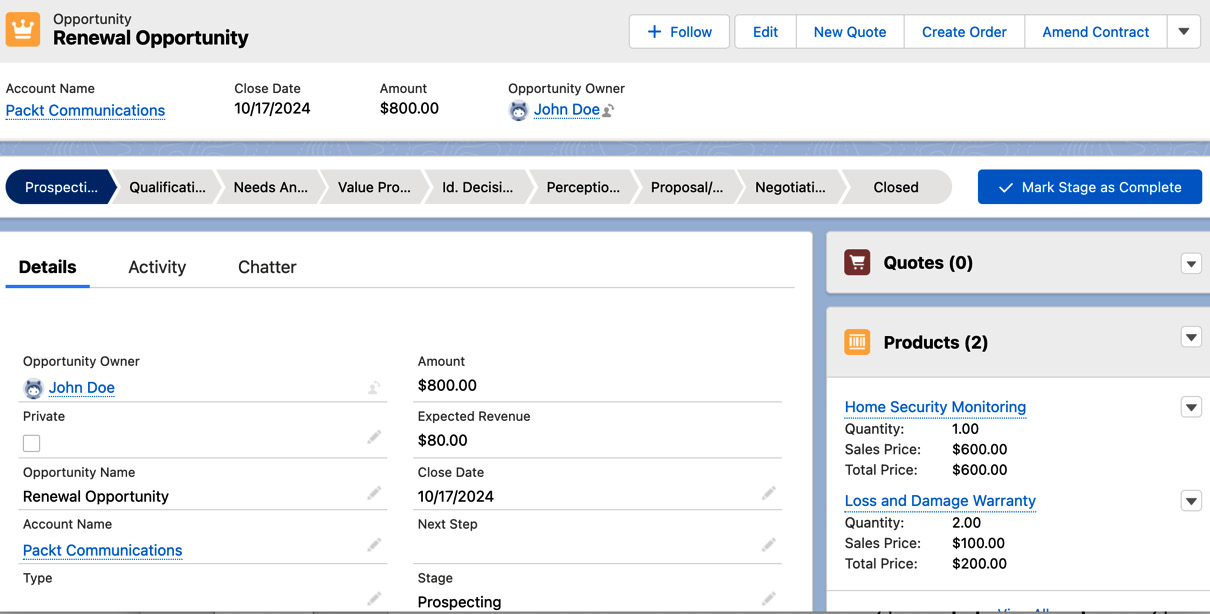
Figure 7.14 – Renewal opportunity
Let's imagine that you are nearing the initial contract end date and your rep needs to create a renewal quote. We can create the renewal quote by checking the Renewal Quoted checkbox on the contract manually. We can also have this selected automatically based on the business process. Once the contract is saved with this checkbox selected, a renewal quote is created automatically and set as the primary. Navigate to Quote Edit Lines, which will open the QLE, as shown here:
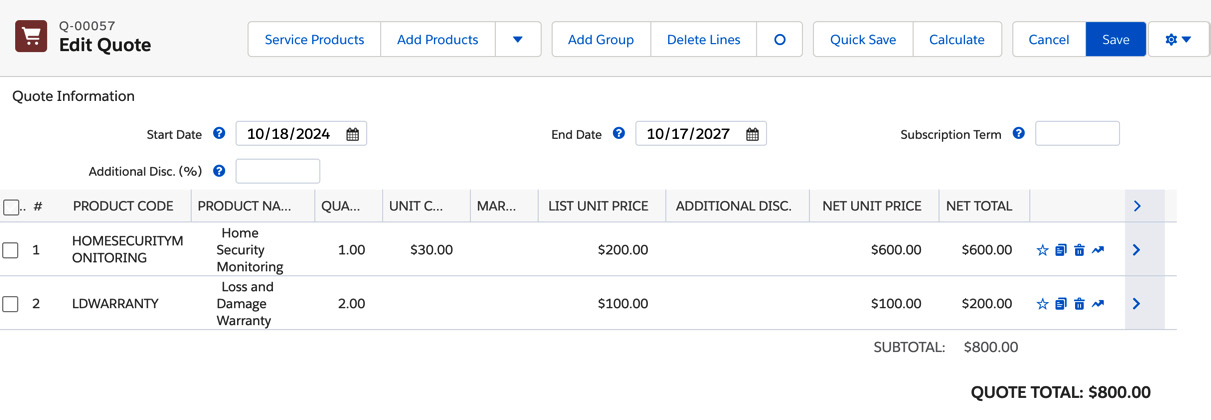
Figure 7.15 – QLE renewal quote
The renewal quote has all the initial subscription lines and pricing from the original subscriptions. The rep can also update discounts and make changes to this quote like any other new quote.
As the sales process progresses, the renewal opportunity status can be set to Closed Won. Once the deal is closed, the Contracted checkbox can be selected on the opportunity, which will generate a new contract, as shown here:
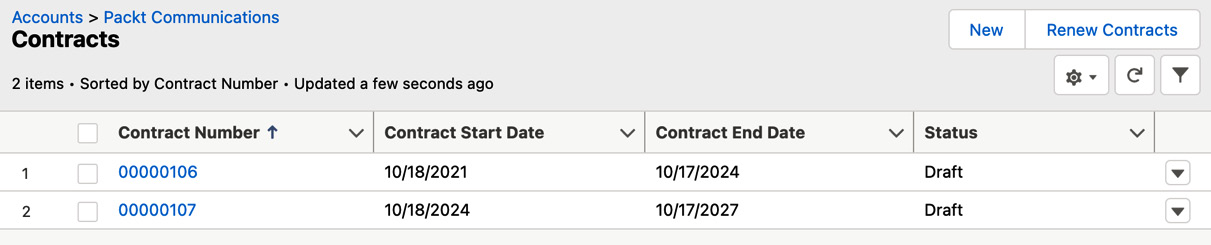
Figure 7.16 – Account with related contracts
The new contract starts from the next day after the previous one ends based on the term and the contract end date. If we have added non-subscription products to the renewal quote, the corresponding assets related to the account can be created. New subscriptions are created, with new start and end dates.
So far, you have learned how a typical renewal process works. In the actual implementation, we will often have situations where we need to migrate contracts from a legacy system.
Having multiple contracts is a common scenario in CPQ implementation. One of the use cases is legacy data migration. If businesses have implemented CPQ from the beginning, then all the contracts would have been generated in CPQ. But often we need to migrate data from a third-party system to CPQ and these contracts might have been created differently and may not align with CPQ.
The end dates for each of these contracts might be different. Salesforce CPQ provides a feature to merge all the contracts into one master contract. Refer to Figure 7.16, which has a Renew Contracts button. This button allows you to select all the contracts that need to be merged and decide which one is the master. When you select a particular contract as a master, the end date of that contract is inherited by all the quote lines.
Let's look at one advanced feature available in creating renewals, which is early renewal.
Early renewals
Early renewal is the process of renewing your contract before the end date. Let's see why we might need to perform an early renewal.
Imagine we have already created the renewal quote and the customer has decided to make some changes to the contract and they do not want to wait until the renewal start date to make these changes. They want to make the changes to the contract now and sign for the upcoming renewal. This needs an early renewal. Setting an early renewal is a two-step process:
- Extend the start date of the renewal opportunity. First, we need to adjust the renewal quote to make the changes required by the customer. In this scenario, let's imagine the customer needs additional licenses. Navigate to Renewal Quote Edit Quote Line. Reconfigure the QLE and add additional products as needed. For example, we have two Loss and Damage Warranty licenses, as shown in Figure 7.14, and we need to increase the number of licenses to five.
Also, the customer needs these five licenses on August 17, and they don't want to wait until the renewal date, which is October 17. So, we need to adjust the start date of the renewal quote to the date the customer needs these changes. When we adjust the renewal quote start date, we are double-charging the customer because the customer has already paid for the two licenses as part of the initial renewal and when we backdate the renewal quote to August 17 (2 months earlier), we are charging for all five licenses.
- To avoid double-charging, we need to credit the additional period, in this example, 2 months for quantity 2, for which we have already charged the customer, for the same products under the initial contract. To make this adjustment, we need to create an amendment. To do this, navigate to Contract Amend Amend. Set the start date to the date when the early renewal starts, which in this scenario is August 17. Make sure you select only the products for which you are creating the early renewal and set the quantity to 0. This will create a negative line for which credit can be created.
In the next section, let's learn about contracted pricing.
Contracted pricing
Imagine you have sold a particular product to a customer for $100 and you want to keep that price on hold every time the customer renews the contract irrespective of any price updates in the price book. For this, Salesforce CPQ offers a feature called contracted pricing, which is set at the account level. Contracted pricing will help you to honor the initial deal price. To configure contracted pricing, navigate to App Launcher Account Related Contracted Prices New, which will open the screen shown here:
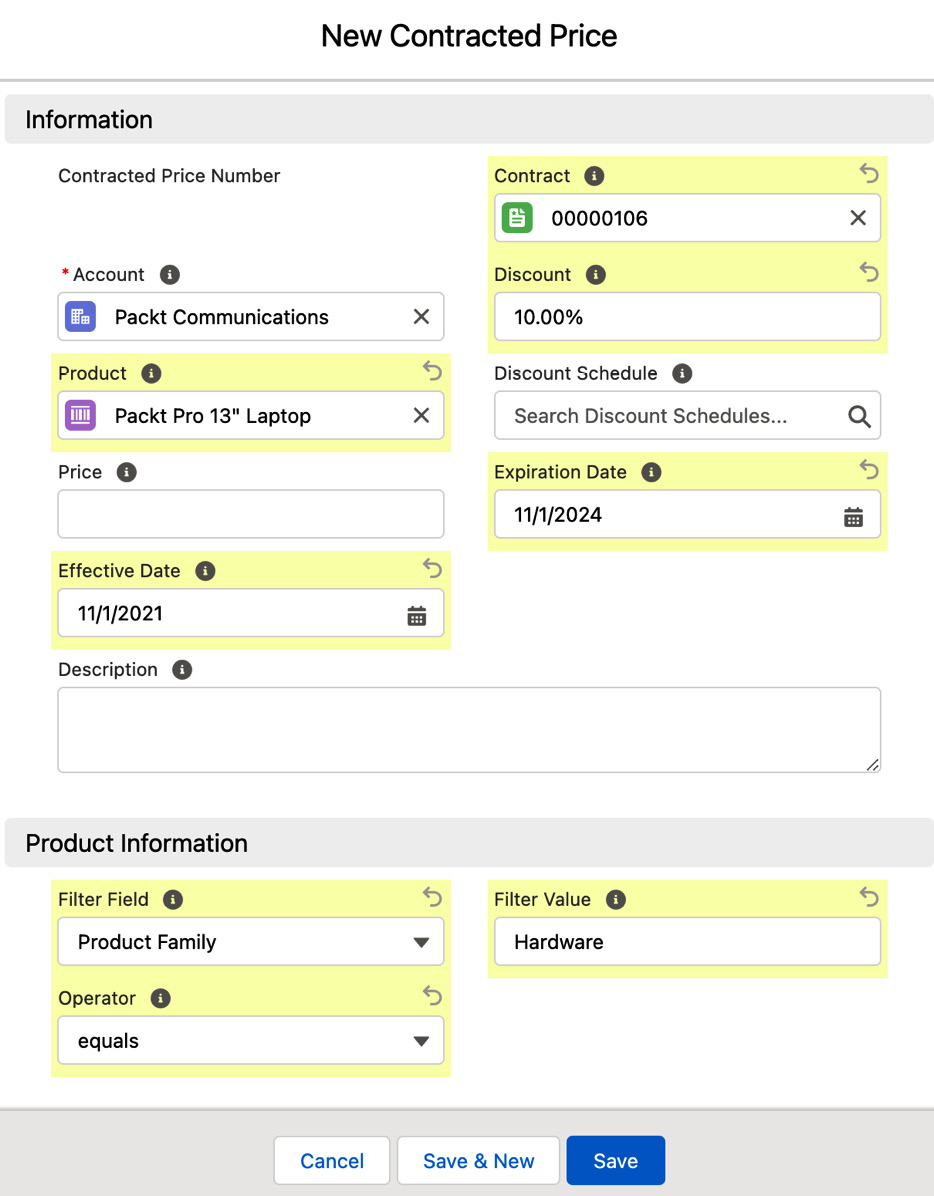
Figure 7.17 – Contracted pricing
Let's learn about a few important fields in contracted pricing creation:
- Product: Select the product for which this special pricing needs to be applied.
- Price: Add the specific price that needs to be applied to this product. If you remember the CPQ price waterfall diagram (Figure 4.13 in Chapter 4, Configuring CPQ Pricing), the contracted price comes in the special price field. When we are setting this price, remember that this is the price for the subscription term of the product. For example, if the term is 12 months, then this price will apply to the entire term.
- Discount: The percentage of discount to be applied.
- Discount Schedule: This discount schedule will override the discount schedule at the product level. This is specific to the account or customer that you are selling to.
- Effective Date and Expiration Date: These define the start date and end date when the contract pricing is applicable.
- Product Information: This section contains the information related to product filters. Instead of setting this at the product level, you can apply filters so that contracted pricing is applicable at the product family level. For example, you want to discount all the Hardware products to 10% and when the customer is renewing the contract, this filter can be used.
When you are setting this up, do not use the Price field as you have different products with different prices and you cannot apply the same price to all the products. It's always advisable to use the Discount field for setting up contracted pricing for a range of products.
While calculating the quote line price, Salesforce CPQ verifies whether your quote line has a contracted price. If it does, then Salesforce CPQ passes that price to your quote line's special price. It then updates the quote line's Special Price Type field to Contracted Price. As a best practice, set only one contracted price per product. If you create more than one, it shows an error when you create a quote. Also, it is preferred to generate a contracted price on a quote rather than the product.
If Generate Contacted Price on a quote is set to True, when you add a product to the quote, the price of the product is added as the contracted price to that customer only. When you set it at the product level, it gets applied to all the quotes, which may throw an error.
Contracted pricing can be inherited through account hierarchy by cascading down the hierarchy. When in conflict, the one set at the lowest level will take precedence. We can set Ignore Parent Contracted Prices at the account level if needed.
You can retrieve the contracted price from an alternate account by creating a ContractedAccountid__c CPQ special field on a quote set as an account lookup or formula so that it stores the ID of the alternate account.
Summary
In this chapter, you learned when and how to create contracts, amendments, and renewals. Several use cases can be configured using these out-of-the-box features.
This is a complex functionality in CPQ that will help you configure products for any specific business. Renewals are as important as your initial deals. Creating and negotiating renewals promptly will help generate a lot of revenue by up-selling. You have also learned how the contract-based renewal model helps in managing the recurring relationship with customers after the initial sale. You have also understood how to customize renewals and amendment processes. You have seen how accounts can be a single source of truth for contracts, amendments, and renewals. While CPQ manages all the record-keeping for amendments and renewals, reps can focus on closing more deals.
In the next chapter, you will learn about the CPQ data model and the object relationships for some of the major CPQ objects.