
Chapter 9: The CPQ Data Model and Migration Concepts
In the previous chapters, we learned about Salesforce's Configure, Price, Quote (CPQ) out-of-the-box configurations and used them to optimize the quote-to-cash process. Typically, many businesses won't have an existing CPQ implementation.
Often, a business uses spreadsheets, ad hoc software, in-house tools, or Salesforce standard objects to store data. When you decide to migrate such businesses to CPQ, you need to have a strategy for migrating data from those legacy sources into Salesforce, as well as being ready to anticipate a business process transformation. In this chapter, we will learn about successfully implementing CPQ and data migration.
Implementing CPQ is like building a home. You first need to lay the foundation for it. Understanding the data model is like building this foundation. Then, you can build relationships using CPQ with the products, bundles, options, features, price rules, product rules, approvals, quote templates, and so on that we have learned about so far in the previous chapters. For your convenience, you can configure some of the aforementioned stages in parallel too, but you need to be aware of the interdependencies in the implementation. In this chapter, you will learn about the CPQ data model and the interdependencies.
Finally, we will understand how the deployment of CPQ changes, from Sandbox to Production, play a crucial role in the implementation. All the changes need to be developed in a sandbox, following a project methodology that works for your company before migrating them to production.
Specifically, we will be covering the following topics:
- Understanding the CPQ implementation strategy
- Deploying CPQ changes
- Understanding the CPQ data model
- Legacy data migration
- CPQ localizations
Understanding the CPQ implementation strategy
In the previous chapters, we saw that Salesforce CPQ can dramatically improve the quote-to-cash process. Proper implementation is the key to success. Unlike Sales Cloud or Service Cloud, CPQ, across the platform, impacts several business stakeholders. As CPQ involves changing product configurations, pricing, contracting, order management, and much more, it involves different groups from your organization, such as product engineering, finance, sales, sales operations, and legal. Communication is important for a successful project implementation. In addition, not engaging the right people in a project is one of the biggest failures. Identifying key internal resources and building an implementation team consisting of management, business Subject Matter Experts (SMEs), and technical SMEs becomes crucial for successful implementations.
CPQ is a managed package; once installed, it's going to be embedded into the standard Salesforce package. You can use a standard data model, such as accounts, opportunities, products, and price books. You can use the standard Salesforce data from these objects to configure products, pricing, and other automation. You need to evaluate the state of this data to see whether the current data can be effectively used.
CPQ implementation is a major change in the way reps sell products and deliver quotes to customers. It is more than a system deployment; it's an organizational change. The following are some of the key points to be considered during CPQ implementation:
- Project phasing: Every project has it; we don't recommend all business units in all regions go live at the same time with completed data migration. Rather, we usually phase by geography, customer segment, or product line.
- Integrations/dependent systems: Only focusing on CPQ and the requirements driven by rep behavior can cause certain integrations to be overlooked. It is equally important to consider the existing integrations as part of the CPQ implementation and migration project.
- Design for the rule, not the exceptions: Do not try to automate the edge cases in a business process. Leave them as manual processes. For example, if the automation only impacts a small percentage of use cases or corner-case scenarios, then it doesn't make sense to work on that and over-engineer things for automation. These one-off scenarios can be handled manually.
- Low-hanging fruits: Focus on the use case that provides the most value and keep it simple.
- Maximize CPQ configurations: CPQ comes with its own set of tools – line summary variables, price rules, product rules, and much more. As a best practice, it is important to note that a CPQ implementation should rely on CPQ tools and not Salesforce tools. For example, to calculate a price, use a price rule and not a workflow rule. To summarize a variable, use a summary variable and not a roll-up summary field. It can be hard to predict how standard Salesforce configurations operate with the CPQ module.
- Engage users early and often: Adoption is the key. Implementing CPQ is not rolling out a fancy tool; it is a business transformation.
- Requirements: Identify key pain points in the current system and see how CPQ can help with minimum or no customization. Simplify and standardize the current business processes. This will be a drastic change in the way the quote-to-cash process was used before. With automation, businesses may lose flexibility.
- What type of transactions are to be supported when going live?: Is it just net-new (no data migration) or is it a migration/conversion of existing customer and contract data that is required to support day-one amendment transactions?
- Iterative design: Incorporate feedback and refine CPQ configurations.
- Deployment: Make sure you maintain a deployment sheet from the beginning of a project. This ensures that you don't miss any components during the project deployment. There are three primary types of CPQ configuration to be mindful of when deploying:
- Metadata
- Record data
- Package settings
- Post-development: Use key SMEs to help with training and enablement.
Deploying CPQ changes
In any implementation, development can happen in multiple sandboxes. These can be either dev or dev pro environments. All the changes from a development environment need to be migrated to an integrated QA environment. Once the changes are tested, these changes need to be deployed into a full sandbox so that User Acceptance Testing (UAT) can be performed in this instance.
A UAT instance can be thoroughly tested end to end to complete testing of new and regression cases. CPQ testing and UAT should be conducted in a fully integrated environment. Once a business sign-off is complete, the changes can be deployed to a pre-production or staging environment. Then, finally, the changes can be deployed to the production environment. The following figure shows a standard linear development strategy:

Figure 9.1 – The development strategy
It is always strongly advised to perform smoke testing following a CPQ deployment to production. Smoke testing should include two things:
- Testing of the new features
- A light regression test across major use cases
Important Note
It is always recommended to have a rollback strategy so that if things go wrong in production, changes can be rolled back and business can continue.
Metadata changes, such as objects, fields, and workflows, can be easily migrated from one Salesforce instance to another using tools such as changesets for easy environments and DevOps and release management for complex environments. Record data containing relationships is not easy to deploy between different instances of Salesforce. We know that Salesforce allocates a unique 15- or 18-digit ID to each record we create.
We cannot maintain relationships between records when deploying changes through multiple development environments and then, finally, to the production environment. It's important to note that all CPQ configurations, such as product rules and price rules, are data records and not metadata, which makes CPQ deployment difficult. The metadata changes need to be deployed before the data changes. For example, consider deploying a price rule and associated metadata (for example, a new field). The new field needs to be deployed before deploying the price rule. For the price rule, you will have multiple records in multiple objects. You will have a price rule record, a price action record, and a price condition record, all of which need to be deployed.
Your organization should have several standard test scenarios that are used to test-exercise a system for errors and compatibility. These scenarios need to be executed before deploying the changes to production. This is included as part of the internal release schedule.
Let's look at a few guidelines for deploying CPQ changes from one instance to another:
- Consider an external deployment tool, such as Prodly or Copado. This is one of the best options for deploying CPQ data from one environment to another. Using these deployment tools will help to automatically deploy all the dependencies. In the price rule example, by choosing to deploy a price rule, the deployment tool will automatically deploy all its price actions, price conditions, and much more.
- Manually creating the changes in each environment is not advisable, as it is error-prone and doesn't keep the environments in sync.
- Evaluate the existing DevOps process and include the CPQ metadata migration.
- Using external IDs connected to the records will help the deployment, as these values will never change. Admins need to create an ID field to stamp the record ID from the development environment. Then, as a record is promoted through higher environments, it has a consistent ID and makes deployment validation/reconciliation easier.
- The internal release schedule will help streamline the deployment process and choose the best time for deployment. It is considered a best practice to avoid major deployments during the quarter-end and year-end periods.
- There is no right or wrong tool for deployment. Choose the tool that fits your organization's existing deployment process.
In the next section, let's learn about another important concept, which is the CPQ data model.
Understanding the CPQ data model
CPQ uses standard Salesforce objects and CPQ objects. All the CPQ object API names start with SBQQ__, which identifies a specific object that is linked to Salesforce CPQ. All the CPQ field names that come out of the box are also prefixed with SBQQ.
In Chapter 1, Getting Started with Salesforce CPQ Implementation, we learned about the high-level CPQ object model. But that model was basic and didn't provide extensive information about all the objects and fields. CPQ is an enterprise-level application with more than 80 objects, 1,000 fields, 28 fieldsets, and 500 classes; the scale of the product is huge.
The most important and major Salesforce objects are products and opportunities. Most organizations, before implementing CPQ, might have customized these two objects heavily. As businesses grow further, they implement CPQ; so, we may need to decouple the existing customization in these objects and move the functionality to CPQ objects.
The following figure shows the object model for major objects:
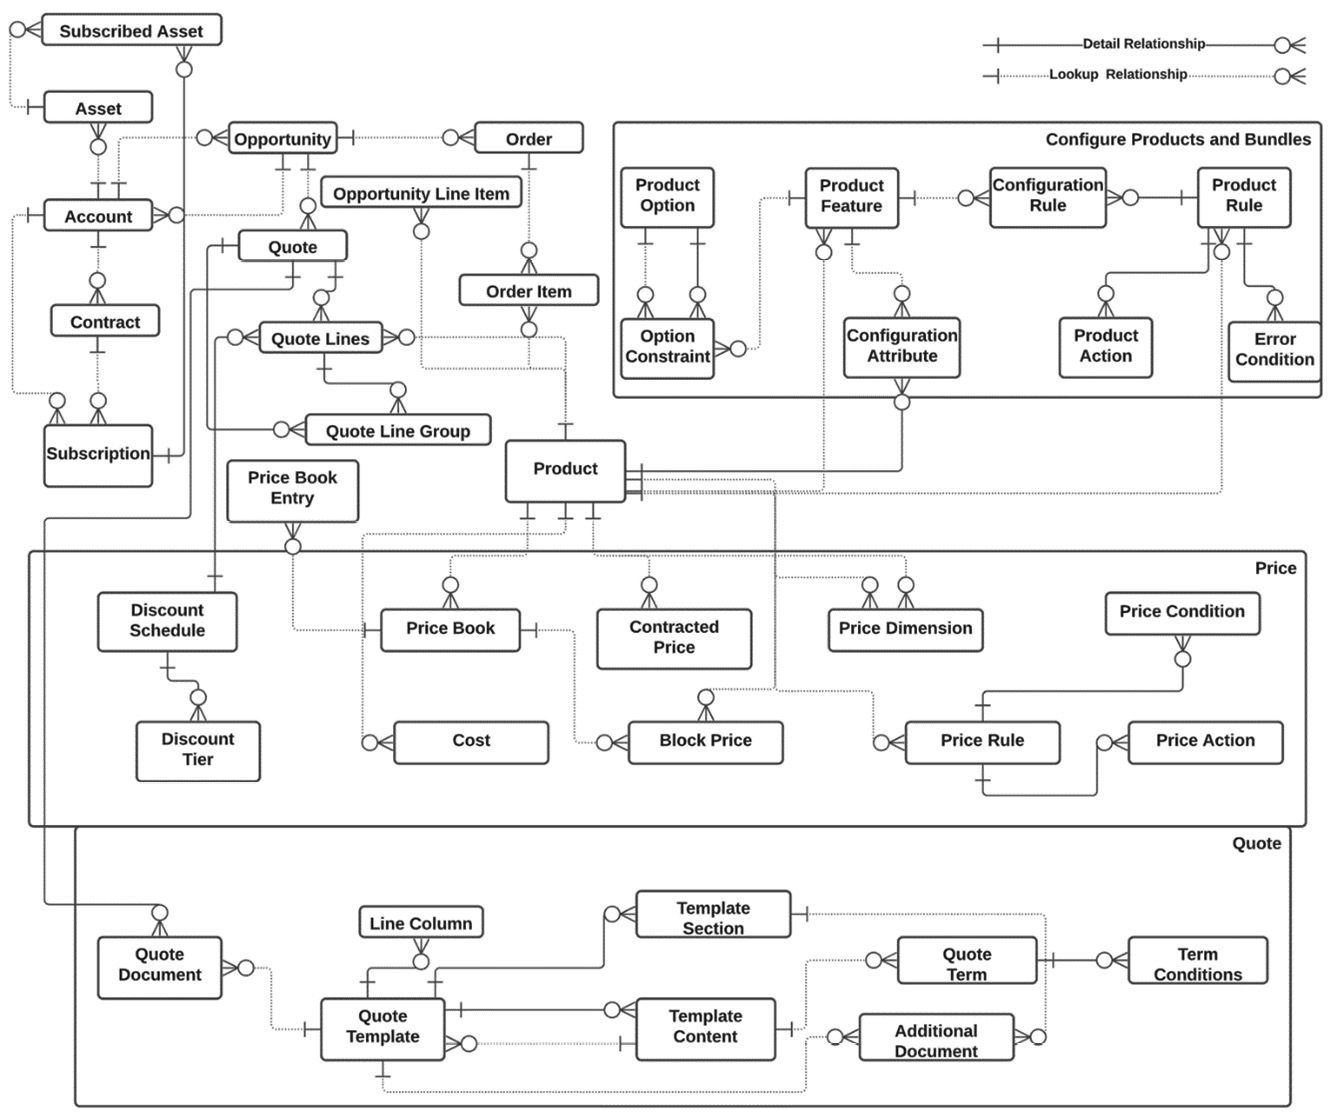
Figure 9.2 – A sample CPQ object model
Refer to the Salesforce help documentation for an exhaustive list of the lookup and master-detail relationships: https://help.salesforce.com/s/articleView?id=sf.cpq_object_relationships.htm&type=5.
For your specific implementation, you will be building a data model that will include major objects and their relationships. This is not a one-time activity; as part of your implementation progress, you can revisit these objects and/or their relationships as needed.
The Salesforce Schema Builder can be used for extracting a data model. You don't need the 500+ objects from the CPQ package and the thousands of fields to build the object model. But even for the objects that are needed for your implementation, this is a cumbersome task. However, this object model will be very useful, and you'll have an overview of the data structures. You can view the relationships between the major CPQ objects listed as follows using Schema Builder:
- Opportunity
- Opportunity product
- Quote
- Quote line
- Order
- Order product
- Contract
- Subscription
The detailed relationships between objects can be reviewed in many ways. Schema Builder is an out-of-the-box Salesforce tool that helps to visualize the object model. In the next section, let's learn about Schema Builder.
Exporting a Salesforce object model
The Schema Builder is an easy and out-of-the-box Salesforce tool that helps you visualize an object model and its relationships. Navigate to Setup Quick Find Schema Builder. On the left-hand side of the panel, you can select objects and clear objects. You can also select specific objects whose relationships you want to display. Select View Options to display the field only with relationship; that way, you can get a simpler object view. Click on Auto-Layout to view all the selected options in the display.
The following figure shows a Schema Builder example with a few sample objects - opportunity, quote, quote lines, and products:
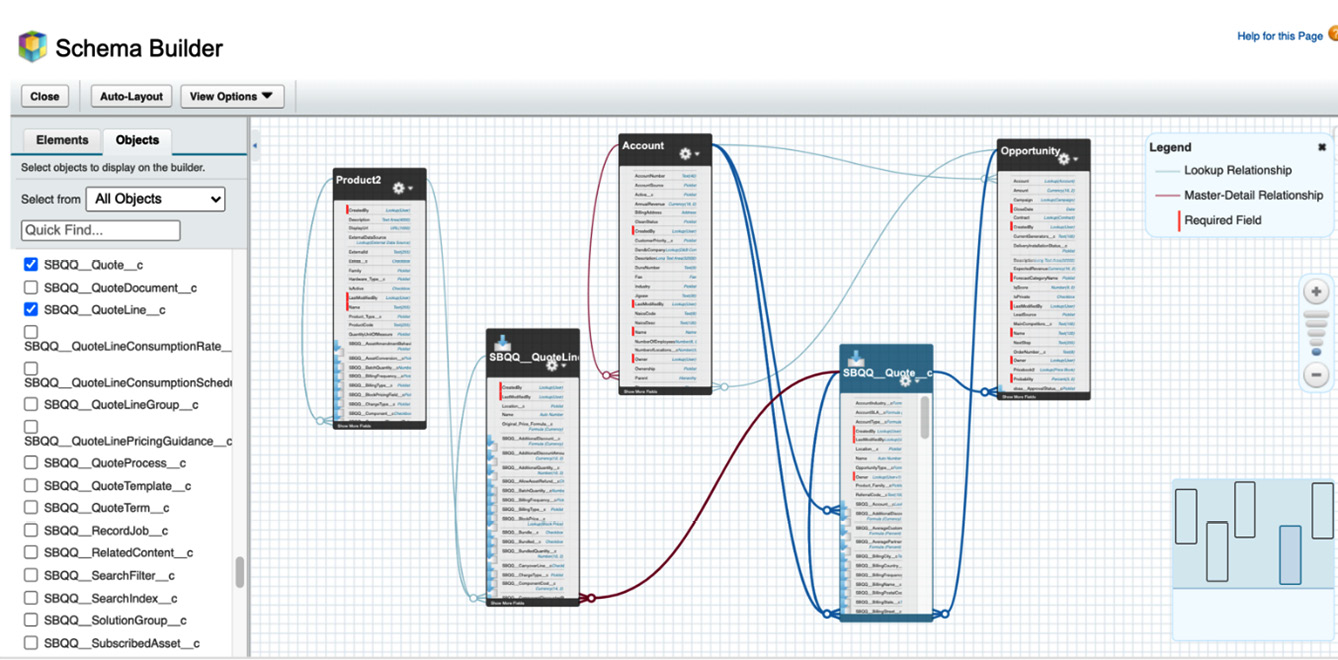
Figure 9.3 – A sample of objects in Schema Builder
As you can see, Schema Builder displays the lookup and master-detail relationship between objects. You can choose standard and CPQ objects as needed. In this example, we are showing the relationship between Account, Opportunity, SBQQ_Quote__C, SBQQ__QuoteLines__C, and Product2 objects. This is a user-friendly and intuitive tool that can be used to understand the Salesforce object model very well.
Exporting Salesforce objects to Lucidchart
Another method of creating a data model outside Salesforce is using Lucidchart. This provides an out-of-the-box integration to export Salesforce objects.
To do this, navigate to Lucidchart File Import Data Entity Relationship (ERD) Import your Data Import from Salesforce. Lucidchart will prompt you to connect to either a sandbox or a production instance. Provide the Salesforce credentials. Choose the objects that you want to import from the search window, as shown here:

Figure 9.4 – Importing Salesforce objects
Select the Show only relationship fields on each object option to display only the required fields. The objects will be added to the left-hand panel of the Lucidchart window under the Entity Relationship Diagram (ERD). These objects can be dragged and dropped to the chart. The following figure shows sample objects in a chart:
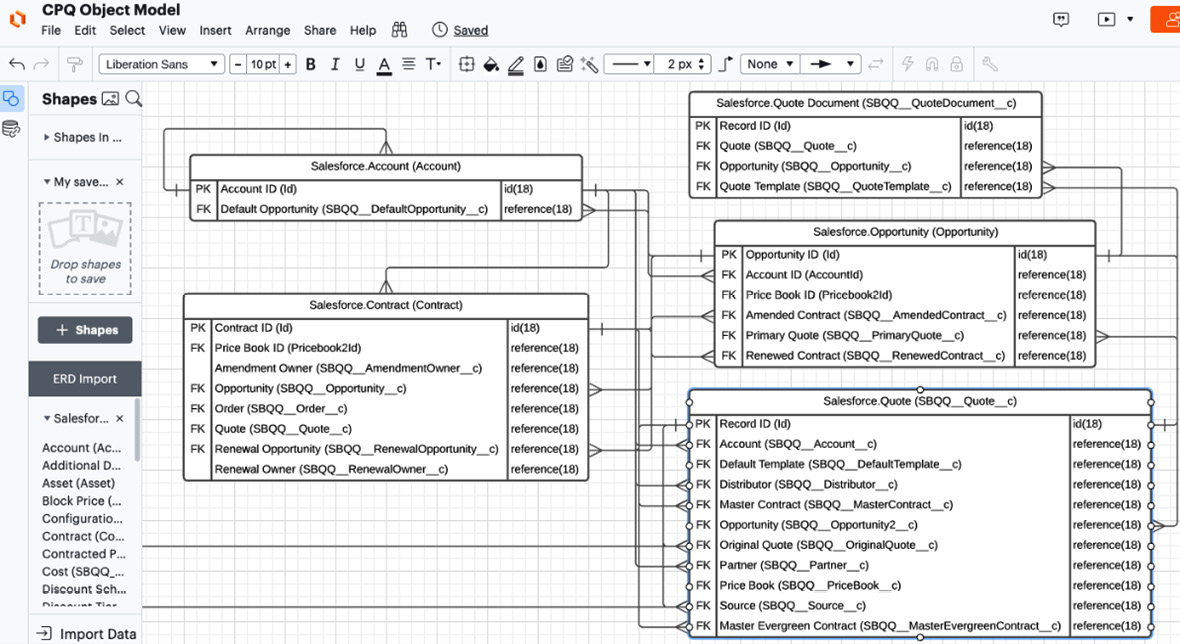
Figure 9.5 – A sample of objects in Lucidchart
Once you import the objects, you can see a list of the objects on the left-hand side, and you can add objects as needed. The fields on these objects can be deleted to simplify the ERD view. Deleting fields from Schema Builder will delete them from the database.
In the next section, let's learn about data migration from legacy systems to Salesforce.
Legacy data migration
Data migration is the process of moving data from one system to another. Migrating legacy data to Salesforce CPQ has a few prerequisites to ensure that all dependencies are migrated accordingly. For example, if you are migrating a contract, the dependencies to the account and the initial opportunity need to be migrated before migrating contract data. If the account already exists in your Salesforce instance, then you will need to map the relevant properties to the Salesforce objects to auto-populate the account fields when you migrate the contract. While migrating, make sure that the field API values are not changed.
Data migrations need to be performed in a full sandbox for business validation and regression testing. Make sure that the test scenarios include historical data, new data, and in-progress (in-flight) data. Once the business validates and provides a sign-off, the same migration can be performed in production. When you have large historical data volumes, check with business stakeholders whether they need all the data to be migrated. Note that for businesses, the current fiscal year/quarter data is much more important than historical data.
Make sure that you check the amount of time taken to load the data to a full sandbox to estimate the production data load times. Communicate to business stakeholders in advance the implementation dates and possible downtimes (if applicable).
When importing data to Salesforce objects, we can use the external ID to prevent duplicate record creation. These are unique IDs for each record in your organization. External IDs can also help with moving data from one organization to another. The external ID keeps the original record ID in a field so that when we have records related to it, we can easily find them. But the drawback of using the external ID is that cloning will fail, as these are unique.
There are several steps that CPQ admins need to perform to maintain data integrity and manage these dependencies. Admins need to make sure that in the data migration, they are migrating the prerequisites for historical data and new data as well.
Data migration tools
As the Salesforce platform is very flexible for exchanging data between internal or external systems, we have several tools for migrating legacy data. There is no right or wrong tool to choose for migration, and you need to choose the tool that best suits your migration needs. Some tools include the following:
- Salesforce tools: Data from Salesforce can be easily exported to Excel or into .csv files using Salesforce reports. Data can be imported using the data loader application without writing any code but only in .csv format. If you have used Salesforce, your admins will be familiar with reports and the data loader. The only limitation to be aware of is that this activity is manual. Data from other systems needs to be cleaned and formatted before loading it into Salesforce.
- Application Programming Interface (API) integration: Salesforce developers can use an API to upload and download data. Developers can write code to insert, update, or delete data from either a standard object or a custom object. The main drawback of this approach is the need to program for data migration.
- Third-party tools: These tools are in between the manual migration process and using code. Most of these tools have drag-and-drop interfaces that make them easy to use. These third-party tools promise faster implementation and in-built data validations. The drawbacks of this approach include high costs, vendor management, and no single tool being the best fit.
Now that we know how to choose the best method of migration to import and export data, let's learn some of the important considerations for organizing and migrating data.
Data migration best practices
Data migration is always a complex process in CPQ implementation. Data quality plays a crucial role in a successful migration. Make sure data is validated in the test system thoroughly before migrating to the production system. A few important considerations in CPQ legacy data migration include the following:
- If data migration is owned by a certain migration team, this team must be engaged throughout the entire project.
- Data migrations are a very large effort. Expect data migration to be one of many, if not the largest, efforts in a CPQ rollout.
- Plan many mock migrations. We always push for a minimum of three test loads (which includes a full simulation of data migration), which is rarely enough.
- If possible, avoid using CPQ to calculate pricing on the quotes being migrated. If you are creating quotes/quote lines because you are recording an already completed sale, stamp the final price to the quote line as opposed to having CPQ calculate this price. For example, you may need to create quotes as a means for arriving at a migrated contract.
- Identify the data you need to migrate. Choose which objects need to be migrated and the relationships. Consider the order of operations for these objects for data loading.
- Always back up your data before performing a data loader operation.
- Create templates for data – for each object, create an Excel template and validate the data before loading.
- Start off small – load a small subset of data. Validate and test before performing the complete load.
- Prepare the destination organization and make sure all the metadata and prerequisites are available.
- Package setting plays an important role in data migration. Disable triggers, as this is critical for migration. Make sure triggers are enabled again after the migration.
- Make sure the production version of the CPQ package is the same as the sandbox.
- Testing – thorough testing is the key. Once the data is migrated, perform regression testing with that data. The data will drive functionality in CPQ.
One of the key concerns while migrating your data to Salesforce CPQ is to ensure its integrity and accuracy. Ignoring the quality of the data migrated will end up affecting all your business processes carried out using the concerned records.
- Run reports for validation. For example, a pipeline report before and after migration needs to be the same. Check the invoicing and billing details of existing and new systems to make sure there is no revenue impact.
- While migrating, make sure the field API values are not changed.
- CPQ configuration is data-driven. Missing data in CPQ is missing functionality. Run your test scripts while moving data from one organization to another. Picklist values cannot be added using a data loader; this must be done manually. Picklist values migrated in a changeset must be activated in the new organization.
The data migration sequence
Irrespective of the tool chosen, the migration process is implemented in sequence so that the prerequisites are migrated as required. For example, you cannot migrate opportunities without migrating accounts because you need the parent records to migrate any child records.
Each stage must be executed and completed before executing the next stage. Some stages are executed by an external Extract, Transform, Load (ETL) tool, and other stages can be executed directly in Salesforce using batch Apex or queueable Apex. Migration initially needs to be performed in a full sandbox environment where regression testing needs to be completed. Once the business validates and provides a sign-off, the same migration process needs to be executed in the production organization.
For example, if you have used a data loader to migrate the data in the sandbox, the same .csv file and data loader mappings need to be used for production migration. Additional records can be added to the .csv file based on the business. You may have loaded the contracts into the sandbox using a .csv file on January 1, 2021. The actual go-live date may be on January 15 after the UAT. Additional contracts that were generated in these 15 days need to be appended to the .csv file.
Alternatively, if you have used migration scripts, the same migration script needs to be executed in the production organization. Email deliverability needs to be turned off while migrating the data to production to avoid sending emails to users associated with the records. While using the data loader, verify the time zone of the target organization and make sure the data loader has been correctly configured.
Make sure the order of migration is determined correctly. You can decide your organization's object dependencies using Schema Builder. The following are the major stages in CPQ data migration:
- Account stage: In this stage, the existing accounts can be modified to support account-dependent migration. For example, you may have to migrate or create the corresponding account when you have a dependent opportunity or a contract from the legacy system.
- Contact stage: Billing contacts are required for invoicing. Parent accounts related to the new contacts should have already been migrated.
- Price books: At this stage, we can create a legacy price book that can be used specifically for migration.
- Product2: At this stage, products from third-party or Enterprise Resource Planning (ERP) systems can be migrated to the Salesforce Product2 object.
Products and related records drive most of the CPQ functionality. Missing product data can break the functionality. The product metadata schema needs to be migrated completely. For example, when you are migrating a bundle, you need to make sure all the dependencies are migrated.
- Pricebook entry stage: Legacy products that were migrated will be associated with legacy and standard price books. For multi-currency, a price book entry is created for each currency.
- Opportunity stage: Active subscriptions and orders from the legacy system can be created as closed-won opportunities. In progress, opportunities can be migrated by mapping the opportunity stage.
- Migrating opportunities to quotes: With CPQ, the entire sales process is changing, and data needs to change along with it. Opportunity/quote lines need to be migrated to CPQ quote lines in this stage. For active contracts, a historical quote is no longer necessary to process an amendment or renewal. Quotes need to be created only for in-flight opportunities.
Field-level data, configurations, automation, and so on need to be taken care of. Do you need all the versions of the legacy quotes to be migrated? Think about an archival plan for old data.
CPQ migrations can take days or weeks. Involve sales teams/stakeholders. Close as many deals as possible for the CPQ implementation so that you will have a minimum number of open deals to migrate.
Identify Salesforce reports and a list view that might break and needs rework.
The timing makes a lot of difference. Avoid migration during the quarter end or the year end, where reps need to meet targets and close deals. For example, closed-won opportunities can be migrated automatically. After year end or by quarter end, we may have minimum in-progress opportunities, and these can be created manually to avoid errors.
- Quote stage: In-flight quotes can be extracted and transformed to map CPQ quotes before migration.
- Quote line item stage: Products on quote lines need to be remapped to the Salesforce products object. Once quotes and quote lines are loaded, we enter into the stage(s) of the migration where we can generate subsequent records using the standard package triggers (namely, orders, order products, contracts, and subscriptions). We don't necessarily need to load orders and contracts. We can have the package create these records if it is possible without performance concerns.
- CPQ pricing engine stage: The CPQ engine summarizes all the line items to calculate the total amount on the quote. Migration provides the quantity, list price, term, and discount values. For deals being migrated that are already closed-won, avoid running the calculation sequence on migrated quotes. There are performance guardrails around the CPQ pricing sequence that seriously hamper the number of records that can be migrated.
- Contract migration stage: Standard contracts are migrated with related subscription and asset records. Another option is to mass-create the contract by setting the opportunity stage to closed-won. The contract start date, renewal date, and total amount need to be validated thoroughly. Use migrated opportunities to bulk-create contracts by updating the opportunity stage to closed-won. A contract is not useful without subscription records.
When we don't have subscriptions in a legacy system, we need to gather the subscription data from external information and assets and create contracts in Salesforce. Test the renewal opportunity generation with a manual contract and product data.
When you have Salesforce contracts, archive contracts that you don't need.
Make sure that CPQ contract fields are added to existing contracts and create subscription lines.
- Renewal opportunity stage: Renewal opportunities can optionally be provided at this stage.
- Order migration stage: Standard orders and line items are generated from CPQ quotes at this stage. Orders represent the next steps following an opportunity being closed-won. As a best practice, never use opportunities for order data; leverage the order object for updating order-related data. Orders are also the point for integrations. Fulfillments and delivery processes can be best used with orders.
- Billing migration stage: For active subscriptions, make sure only unbilled charges are invoiced to the customer. For example, while you are migrating customers, you may have a 3-year subscription with yearly billing. A legacy system may have already billed for 1 year; the remaining 2 years need to be billed in Salesforce. Invoice schedules can be created at this stage. A payment gateway and configuration need to be set up.
These are some of the common stages. They can be modified, and other custom object migrations need to be included as needed.
In the next section, let's learn how CPQ can be used for multi-language requirements.
CPQ localizations
When selling your products in different countries, you might need to display the product information in a country-specific language. You may also need translations when you are selling in a country supporting multiple languages. Salesforce CPQ provides a localization functionality, extending the standard Salesforce metadata translations. CPQ also supports all the languages supported by native Salesforce. The Salesforce CPQ localization object provides translations for text, text area, long text area, and rich text area fields on the following objects:
- Product
- Product feature
- Product option
- Price dimension
- Quote template
- Line column
- Template content
- Quote term
Salesforce CPQ stores the translated values in a localization record. On the page layout of the record that needs to be translated, add the Translate button. For example, let's create translations for a product. Navigate to a sample product record in your Salesforce instance and click Translate. This will open the page shown in the following figure:
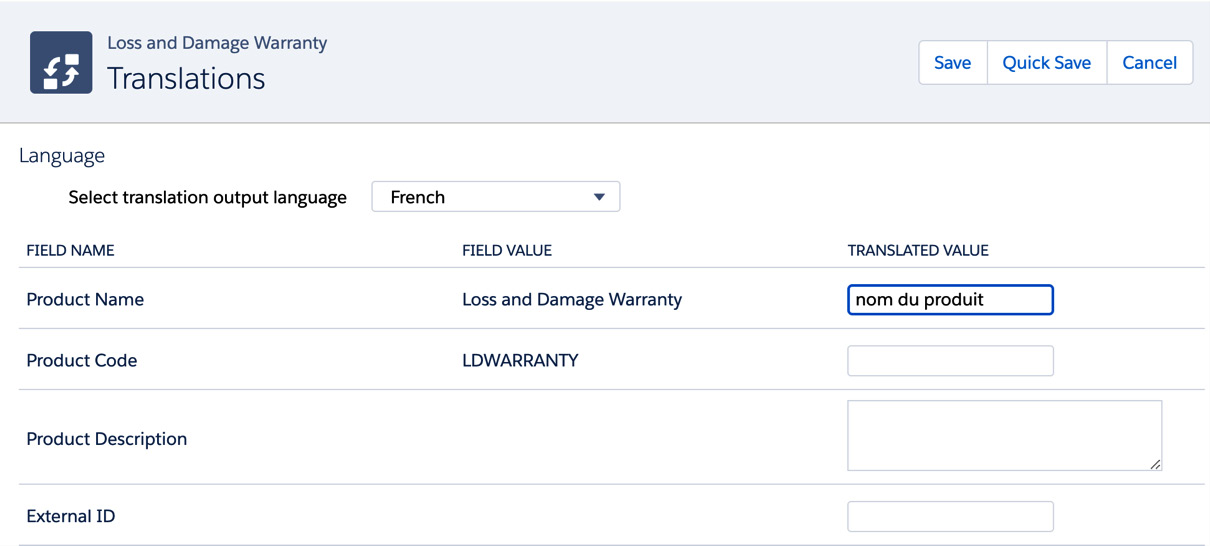
Figure 9.6 – Creating product translations
In this example, we navigated to the Loss and Damage Warranty product. Select the language to be translated; in this example, we selected French. For all the fields to be translated, provide the translated values, and save the record. In the previous figure, the Product Name field has been translated.
Summary
In this chapter, you learned how to extract and work with the Salesforce object model, which helped you understand object dependencies and relationships. We also saw the important role legacy data migration plays in the successful implementation of the CPQ project.
Migration may sound as simple as migrating data from point A to point B, but in this chapter, we realized that there are a lot of complexities involved in this process, and it is very challenging. We also realized that the data in each legacy system is different, and thus it is very important to understand the legacy data mapping to Salesforce CPQ objects. We learned how CPQ changes can be migrated from one Salesforce instance to another. There is no right tool that fits all migration needs. Based on the business process and the functionality, the solution needs to be analyzed and implemented.
In the next chapter, we will learn about Salesforce Billing.