
Chapter 2: Configuring Opportunities and Quotes
Customers often ask for more than one quote when buying products or services. They compare the quotes' total prices and often spend more to get an additional discount. Alternatively, a sales representative can provide more than one quote to a customer to provide various options and close the deal faster. When the customer's budget is unknown, the sales rep will provide multiple quotes with different combinations of products and pricing. This chapter will help you understand how Salesforce CPQ can help create multiple quotes. You will also learn about the relationship between quotes, opportunities, and products or services, creating orders and returns in CPQ, and the advantages of using Salesforce CPQ Billing.
CPQ Billing can be used as an add-on to carry out end-to-end customer engagement that can be managed in Salesforce. Accounting systems can focus only on general ledger accounts. This facilitates having the end-to-end quote to cash process in Salesforce itself.
Upon completion of this chapter, you will be able to create an opportunity, associate it with a primary quote, submit the quote for approval, and complete the approval process. Optionally, you will also be able to create an order for the customer.
In this chapter, we will be covering the following topics:
- Salesforce opportunities, quotes, and products
- CPQ quotes and the quote line editor
- CPQ Advanced Approvals and configuration
- Creating orders from a quote
Salesforce opportunities, quotes, and products
Opportunities are potential revenue-generating deals for the sales org. They can be created from a lead conversion process, or a sales rep can create them manually from accounts in Salesforce. When a customer needs a quote, the sales rep can quickly use CPQ to generate the quote, add products using CPQ automation, generate the quote PDF, and then send it to the customer. If a customer already exists, then Salesforce amendments can be used. Chapter 7, Creating Contracts, Amendments, and Renewals, describes in detail amendments and renewals.
Let's learn how to create opportunities and quotes and add products in Salesforce CPQ.
Opportunities
Opportunities progress through different stages as the deal progresses from Prospecting to Closed Won or Closed Lost. Each opportunity stage is associated with a probability and these stages can be customized as per the business needs. As the stages progress, the probability of winning the sale will increase. We can also have a separate sales process for each type of sale (B2C versus B2B). These probabilities can also be used in sales forecasting.
For example, John Doe from Packt Communications is interested in buying laptops from you. Let's create an opportunity for Packt Communications:
- Log in to your Salesforce organization and navigate to Opportunities New.
- Fill in the mandatory fields: Opportunity Name, Stage, Close Date, and so on.
- Associate the account and click Save.
In the Salesforce Lightning experience, interactive tools such as the sales path interactive visual representation can be used to track deal progress and close deals faster.
The following figure shows an opportunity created in Salesforce CPQ and the corresponding stages:
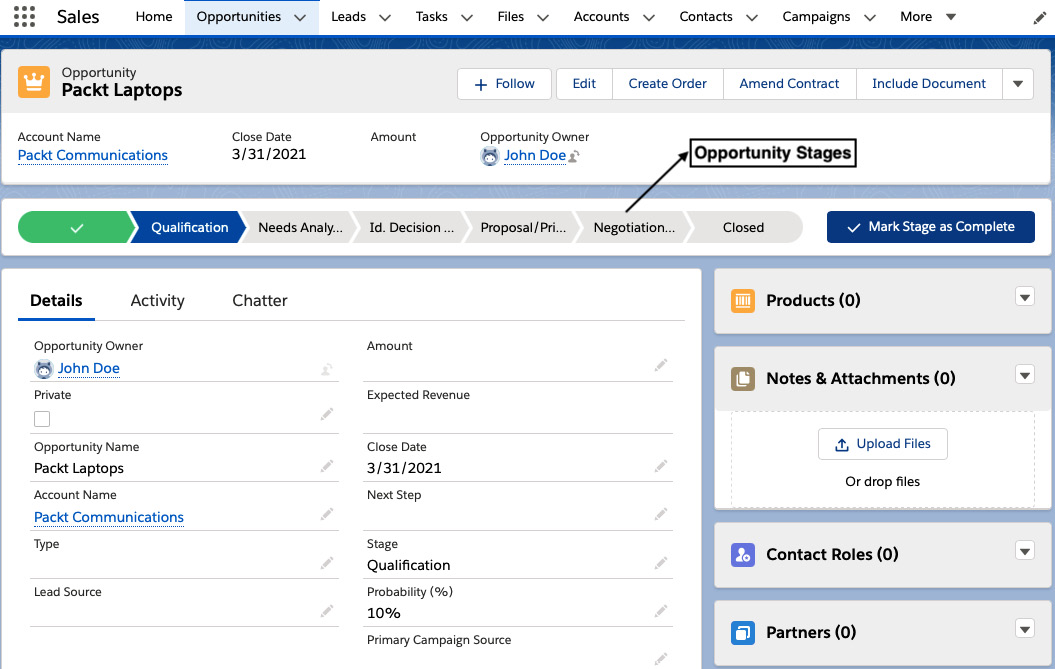
Figure 2.1 – Creating an opportunity
Each stage in the sales path can be marked as closed upon completion. The sales path can also be customized to show reps the mandatory fields that are required to move to the next stage level.
Now that you have created an opportunity, you are ready to create a quote.
Quotes
A quote contains the information on all products and services, including the pricing details.
During the negotiation phase, multiple quotes can be created for an opportunity. At any point in time, only one quote can be made primary. The primary quote has a special relationship with the opportunity. When the quote is marked as primary (by selecting the Primary Quote checkbox), all the quote lines will automatically be synced to the opportunity product lines.
Products
Products are goods and services that your company will be selling to its customers.
The following figure shows the relationship between Opportunity Quote Product:

Figure 2.2 – Opportunity-Quote-Product
In Figure 2.2, Quote 1 was initially marked as primary. Quote lines store the information about the products added to the quote. Products associated with Quote 1 will be synced to opportunity products. If the customer does not agree with the initial quote, they may ask to modify a few products or to make some changes to the product quantity of Quote 1. A sales rep can quickly create another quote and change that to the primary quote. When Quote 2 is marked as primary, all the products related to it will be synced to opportunity products.
Opportunity products contain information related to the products that you are selling, their quantity, price, discount details, and so on. You can add opportunity products as a related list to the opportunity page layout.
When a quote is marked as primary, Salesforce will sync the following fields from quote to opportunity products:
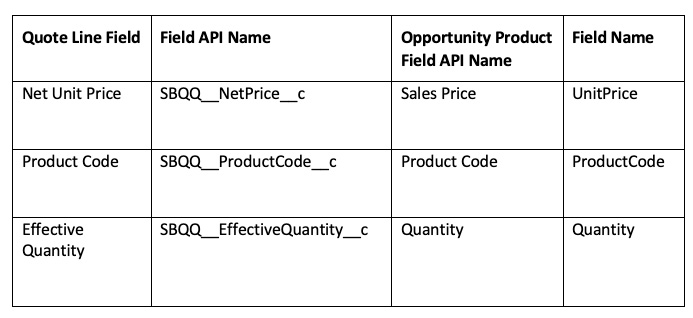
Table 2.1 – Quote line to opportunity product mapping
Additional fields can be synced by using the twin fields functionality. A twin field is CPQ functionality that can be used for certain objects. Two fields can be called twin fields when they have the same data type and API names. Creating a twin field will automatically sync the data from one object to the other. Creating a twin field between the quote line and the opportunity product line will automatically sync the quote line value to the opportunity product.
The total price (the TotalPrice API name) on the opportunity product is calculated by multiplying the opportunity product quantity by the sales price (Unit Price).
When a customer requests a quote, the sales rep can provide multiple quotes, as applicable, from the opportunity. In the next section, we will see how reps can create multiple quotes and how Salesforce administrators can configure the quote creation process as per specific business needs.
Introducing CPQ quotes
In this section, we will discuss the one-time prerequisite to enable permissions that CPQ admins perform after the package installation. When your customer asks for a quote, they are looking for details about the products and services that they are planning to buy. Sales reps can create and modify quotes as per the customer's requirements.
Enabling CPQ permission set licenses
After installing the CPQ package, the Salesforce administrator needs to enable the Permission Set Licenses (PSLs) for configuring and customizing CPQ:
- Users are required to have the PSLs assigned for interacting with Salesforce CPQ or Advanced Approvals (AA) related objects. To enable the CPQ PSL for a user, navigate to Setup Users, click on the username for who you want to enable the CPQ permissions for, click Permission Set License Assignments Edit Assignments, and select the Salesforce CPQ AA License and Salesforce CPQ License options.
Figure 2.3 shows enabling PSL assignment to user John Doe in a Salesforce test environment:
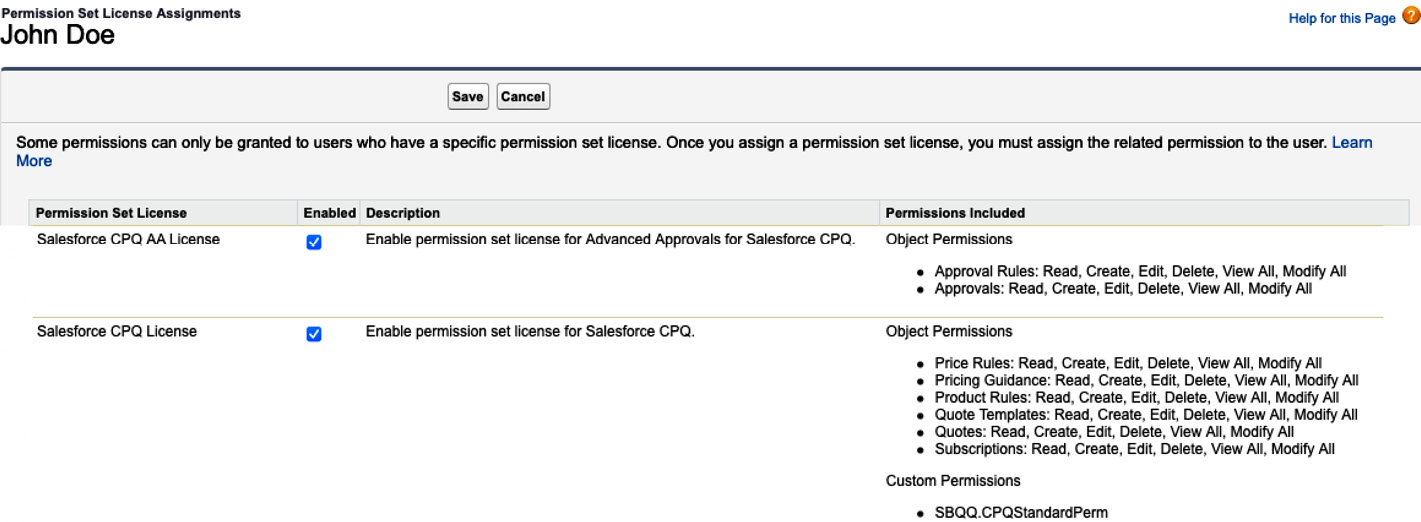
Figure 2.3 – CPQ permission sets
Enabling PSL assignments is an important step and without this, the user will not be able to use CPQ.
Salesforce administrators can execute SOQL queries in the Developer Console Query Editor to view the list of PSL assignments either for Salesforce CPQ or AA. PSLs are not available for standard Salesforce reports.
Admins can run these queries in the Developer Console and view the results to see who has access to these PSLs:
- SOQL query to view a list of PSL assignments for Salesforce CPQ:
select Assignee.Id, Assignee.Name,
PermissionSetLicense.MasterLabel from
PermissionSetLicenseAssign
Where PermissionSetLicense.MasterLabel in
('Salesforce CPQ License')
- SOQL query to view list of PSL assignments for an AA package:
select Assignee.Id, Assignee.Name,
PermissionSetLicense.MasterLabel from
PermissionSetLicenseAssign
Where PermissionSetLicense.MasterLabel in
('Salesforce CPQ AA License')
The next step is to assign CPQ permission sets to specific users who need to access CPQ.
To do this, navigate to Setup Quick Find Users (select the user for whom you need to enable the permission sets) Permission Set Assignments Edit Assignments and add the Salesforce CPQ Admin and Salesforce CPQ User permission sets.
The CPQ object and field permissions (create, read, update, and delete) can be controlled by using the permission sets. Figure 2.4 shows an admin user who has been assigned both the Salesforce CPQ User and Salesforce CPQ Admin permission sets:
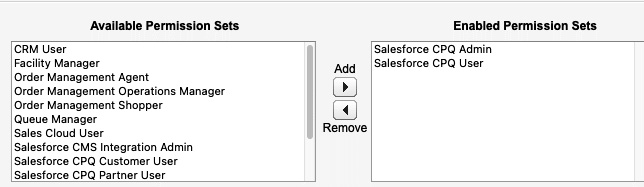
Figure 2.4 – Assigning CPQ permission sets to a user
The Salesforce CPQ Admin permission set can be assigned to only admins who maintain the system. End users who are not administrators need only the Salesforce CPQ User permission set. These two permission sets must be manually adjusted to include the necessary objects and fields to perform the correct tasks.
After enabling CPQ configurations, you are now ready to create a CPQ quote. Admins need to enable these configurations for users, and this is a one-time implementation task. Let's see how reps can create a quote.
Creating a quote
Salesforce administrators can assign PSLs to all the users who need to use CPQ. A CPQ quote can be created, modified, and edited using the Quote Line Editor (QLE). Implementation consultants and administrators can configure and customize the QLE in Salesforce. This will help reps to create quotes effectively and accurately. Any user with an active PSL and the CPQ permissions can now create a CPQ quote. Quotes are closely related to opportunities:
- A quote can be created from the related list on the opportunity or the New Quote button in the opportunity. From here, navigate to an opportunity for which you would like to create a quote.
- A Salesforce custom action can be used to create the quote. For this example, the custom action button New Quote has been created on the opportunity. In the Opportunities tab, click New Quote and the screen shown in Figure 2.5 will be displayed. From here, select the quote's related opportunity and account details:
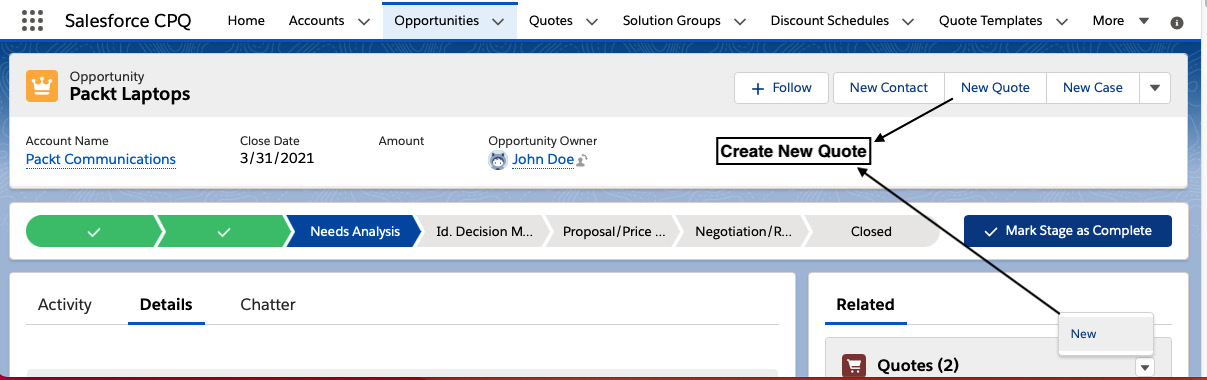
Figure 2.5 – Creating a quote from an opportunity
Mark the quote as Primary and click Save as shown here:
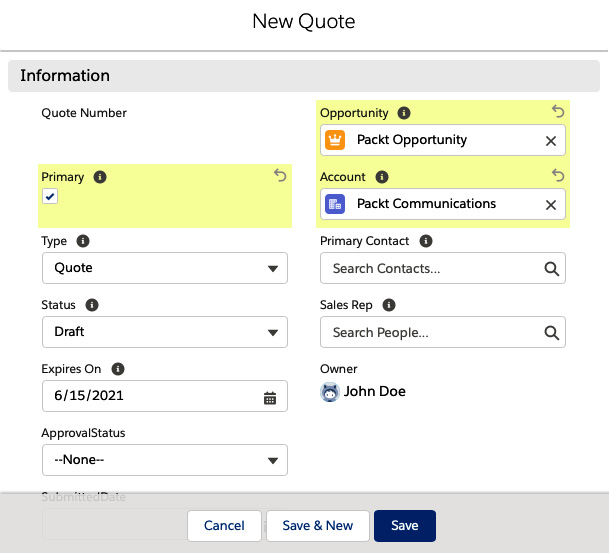
Figure 2.6 – Creating a quote
- Saving the quote will link the quote to the related opportunity for which it was created. To add products to the quote, open the quote, and click Edit lines. If this is the first quote, the system will prompt you to choose a price book. Select the price book. Any new quotes created after the first quote will use the price book that was already used for the first quote. The price book is set on the opportunity and all the quotes related to that opportunity must use the same price book.
- Editing the quote lines will take you to the QLE. Open the quote and click on Edit Lines. This will open the QLE as shown here:

Figure 2.7 – QLE
- To add products and services to the quote, click on the Add Products button. This will display all the products that are associated with the selected price book. You can select products from the list. Alternatively, the products can also be searched using keywords:

Figure 2.8 – Selecting products in the QLE
The filter icon can be used to show the search filter box while selecting products. This can be used to search by Product Code, Product Name, and Product Description by default. We can add or remove standard and custom fields by editing the product objects search filter field set.
- Click Save after the products are added.
- Because the quote is marked as primary, product lines from the quote will automatically sync to the opportunity.
Now that you have learned how to create opportunities and quotes and add products to quotes, in the next section, we will learn more about the QLE and how to configure and customize it.
The Quote Line Editor
The QLE is the user interface that Salesforce CPQ provides to reps for adding, deleting, and editing products. The QLE can be configured and customized as per your business needs. We can also apply discounts and markups and calculate the pricing.
Some of the Salesforce CPQ out-of-the-box QLE features that can be customized with configurations without using code are as follows:
- Additional columns can be added to the QLE header or lines using field sets.
- We can dynamically change the column headers and adjust the column width.
- Default buttons on the QLE can be customized as per the business needs using quick actions.
Products can be grouped together and related product images can be associated as required.
The following figure shows a sample QLE with the quote header, quote line fields, and default buttons:
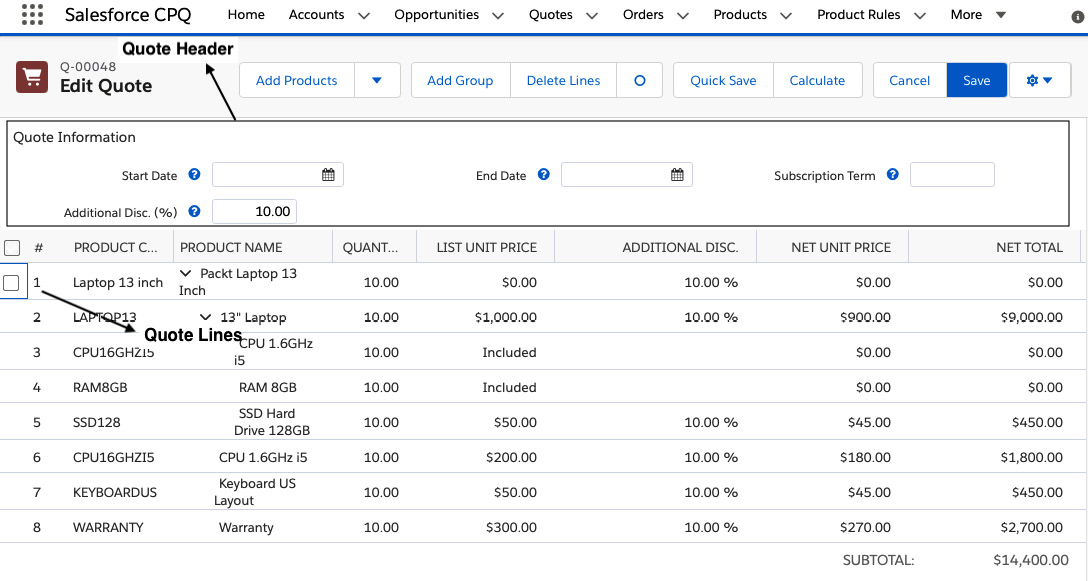
Figure 2.9 – QLE quote header, quote lines, and products
Using the QLE, changes can be made at the quote header or quote line level. Fields on the header are stored in the quote object and fields on the lines are stored in the quote line object.
Let's learn how to customize the quote line header and line fields using field sets and customize different column and field visibility, as well as sorting. We will also learn how to customize the out-of-the-box QLE buttons and create new buttons.
Field sets
Fields that are displayed in the quote header or quote lines can be modified by customizing field sets.
Field sets are used to add or remove columns from the QLE. For example, based on the business process of your company, you may have a specific requirement where you want the sales rep to modify the start date and end date at the line level. Using the field set configuration, you can add these fields from the quote lines. To configure this in Salesforce CPQ, navigate to Setup Object Manager Quote Line Object Field Sets Line Editor, as shown here:
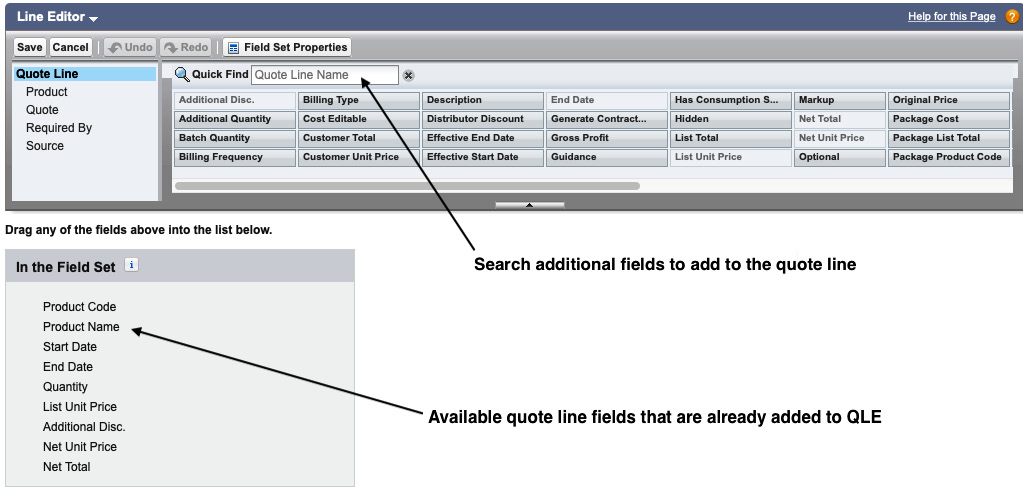
Figure 2.10 – Line editor field set
You can see the default available fields in the field set section of the QLE. You can also search for specific fields in the line editor and add those fields to the field sets. For example, if you would like to add the Start Date and End Date fields, search for them in the quick find, drag and drop the fields into the field set section, and click Save. In Figure 2.10, you can see that the start date and end date fields have been added to the quote line field set. This is similar to editing the Salesforce page layouts.
When you go back to the QLE and refresh the screen, you can see the new fields added.
Similarly, to customize the fields in the quote header section, the header field sets need to be configured. To configure quote header fields, navigate to Setup Object Manager Quote Field Sets Line Editor.
As per your business process, you can decide which fields are at the quote header level versus the line level. When there is a need for a particular field to be applied to all the lines, for example, the Additional Disc. field, we can add this to the header (the quote information section). Instead of editing each line of the quote, an update at the header level will apply to all the lines. A particular field can be added to both the quote header level and the line level. Sales reps can use these fields as required for editing.
Dynamically changing CPQ QLE column headers
The quote line object field set controls what columns are displayed in the QLE. When you add columns to a field set, these new columns will always be displayed. To dynamically change the visibility of these columns, we can use a list view or a formula field on the QLE header.
The quote field set controls what columns are displayed in the quote header section. Quote header columns can be dynamically changed using the Salesforce CPQ HeaderFieldSetName special field.
The QLE columns can be changed dynamically as per the business requirements using the Salesforce CPQ EditLinesFieldSetName special field.
For example, say your sales rep sells your product to both direct customers and distributors. When selling to distributors, you want to display an additional distributor discount field and this field should not be visible when you are selling to a direct customer. To do this, you can create a new custom view picklist value and add the None and Distributor_view picklist values. The rep can then manually select one of the picklist values in the QLE header, or this field can be automatically calculated based on a formula.
The following figure shows a sample QLE with a custom picklist view that can be used to dynamically change the quote line columns:
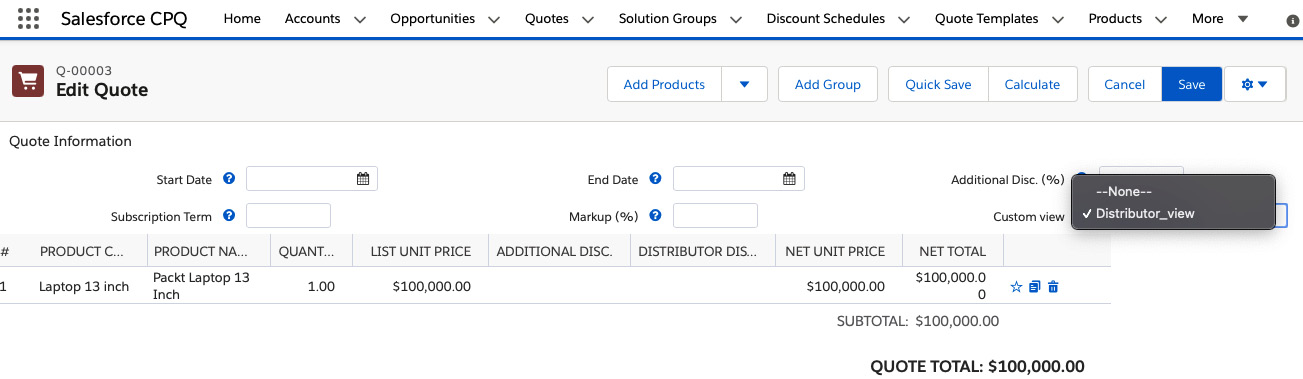
Figure 2.11 – Line editor field set
In the next section, we will see how administrators can configure the custom view values on the quote line header so that the quote line columns can be changed dynamically.
Dynamically changing the QLE list view using a picklist value
To change the QLE list view using a picklist value, create a new distributor view field set in the quote line object by navigating to Object Manager Quote Line Object Field Set Create New Field Set.
Create a new picklist value (custom view) on the quote object. Based on the picklist value, the QLE view can be changed dynamically. Set a field label and the field name as EditLinesFieldSetName. The picklist values for this field need to be the API names of the field set that you have created on the quote line object. Field set API names do not contain __C.
To make this picklist value available in the quote information section, navigate to the quote line object line editor field set and add this new picklist field. The user can change this picklist value manually to modify the field sets and display the columns accordingly.
Dynamically changing the QLE list view using a formula
To change the QLE list view automatically, instead of creating a picklist field, create a formula in the quote object and set the return type as text. Based on the formula evaluation output, the corresponding field set will be displayed for the user.
Quote line drawers
Quote line drawers can be used to reduce horizontal scrolling on the QLE when you have many columns. Drawers will help you create a collapsible view for QLE columns.
The following figure shows a sample QLE with quote line drawers; clicking the > symbol in the QLE opens the quote drawer and displays additional fields (such as Pricing Method and Original Price):
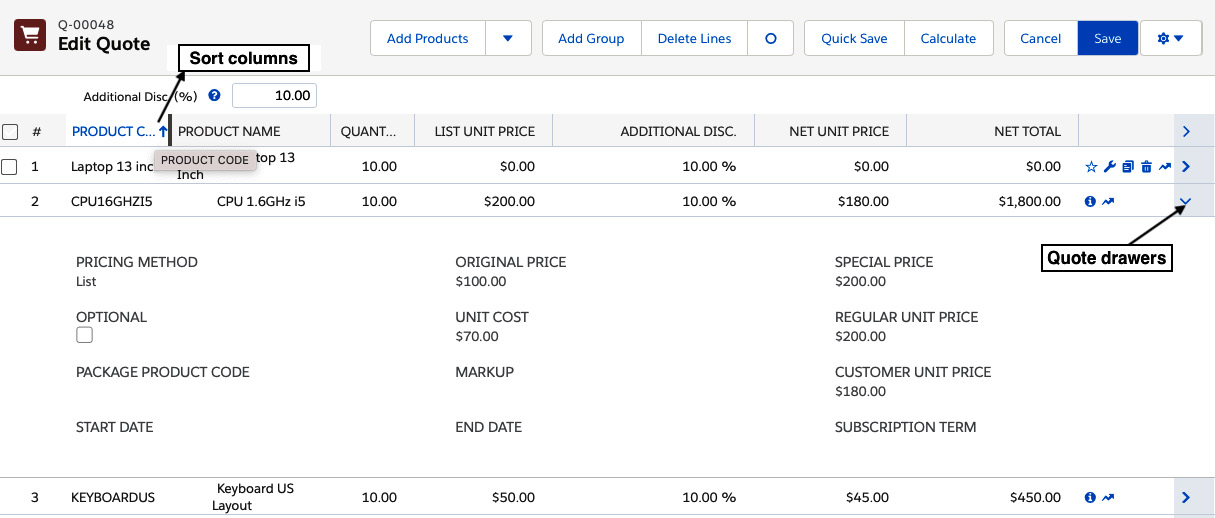
Figure 2.12 – QLE sorting columns
In the preceding figure, you can see that the important fields can be on the main view and the remaining fields can be moved to the drawer.
To create a drawer, navigate to Setup Object Manager Quote Line Object Field Sets Standard Line-Item Drawer. Add and delete QLE fields as needed.
Sorting QLE line columns
The columns in the QLE can also be sorted by clicking the up arrow shown in Figure 2.12 next to the PRODUCT CODE field. Text columns can be sorted alphabetically, and numerical columns can be sorted ascending or descending. This feature is helpful for finding a specific quote line when there are a large number of lines.
Default buttons on the QLE
These are the default buttons that the Salesforce CPQ package provides out of the box. Let's see what functionality each of these buttons provides and how we can use them:
- Add Products: You can click on the Add Products button to navigate to the standard Add Products lookup page. All the products related to the quote price book will be available. You can select the products that need to be added to the QLE.
- Add To Favorites: This option can be used to add products to favorites. Reps can mark a product as a favorite product if it is sold frequently. The reps will not need to search for that product as it will be available in the favorites section. We can add previously saved favorites. In the QLE, clicking the small star icon will save that product to the favorites, as shown here:
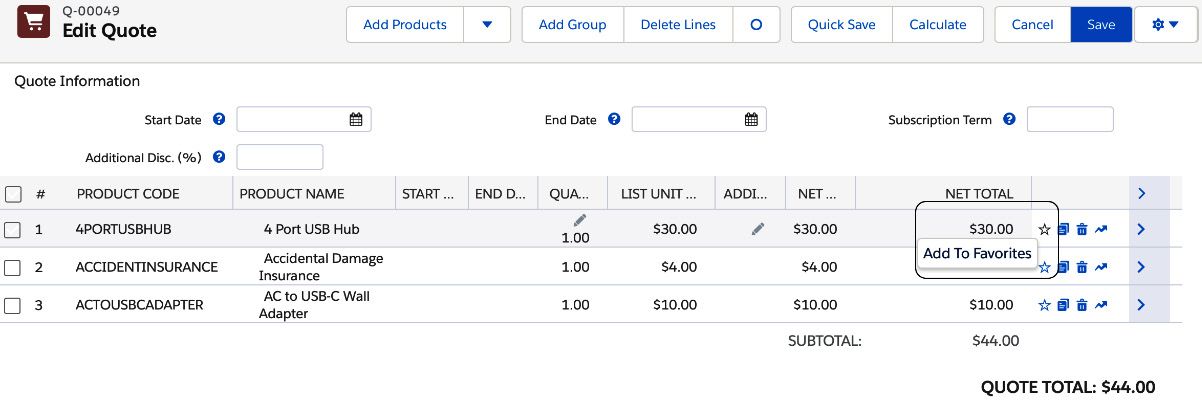
Figure 2.13 – QLE favorites
- Add Group: Groups help to apply discounts or obtain totals for specific sets of quote lines by organizing them into groups.
A quote line group can be used to organize related quote lines. Quote line groups can also show multiple options for a customer to consider on one quote. All quote lines where the group's Optional field is set to TRUE are not synced to the opportunity and do not contribute to the quote total. Quote line groups are also useful if you are eventually shipping products to different locations or from different warehouses. CPQ+ has advanced order management, which will split a quote into multiple orders. To create a group, from the QLE, click Add Group. Within the group, click Add Products to open the product selection page and select all the products that you would like to add. All the existing quote lines are added to group 1. A quote line group is only available for the specific quote it has been created for.
Tip
Quote lines with groups cannot contain any ungrouped items.
Quote line groups do not transfer to an amendment or renewal, so should be used carefully.
To remove groups, you can click Ungroup.
- Delete Lines: This button is visible only if the Salesforce admin enables it for the specific user profile. Select all the lines that need to be deleted and click Delete Lines.
- Quick Save: Saves the record and the user stays in the QLE.
- Calculate: Calculates all the automation on quotes, including applying discounts, product rules, and price rules, and displays the results in the QLE. Changes are not saved to the database; changes are displayed only in the user interface.
- Cancel: Returns to the quote detail page without saving the changes.
- Save: Saves the changes to the database and returns to the quote detail page.
Custom buttons in the QLE
Custom actions can be used to create custom buttons in the QLE. These buttons can be used to customize the QLE according to the business' needs. Using custom actions, we can create a subset of products and/or a filtered view of our products from the price book.
For example, you can create a custom action to show only regional-specific products.
Imagine, if your company is selling products in multiple regions, you can create a custom button such as US Products or EMEA Products, and show only those subsets of products. We will learn more about custom actions in Chapter 3, Configuring CPQ Products.
Cloning a quote line
To enable the clone functionality, the CPQ package Enable Multi Line Delete setting must be selected. Select the clone icon to duplicate an existing line and reconfigure the product lines. We see that the quote line maintains all the field values and configurations. Any changes to the cloned quote line are not applicable to the original line.
Figure 2.14 shows a sample QLE with the Clone Line button:
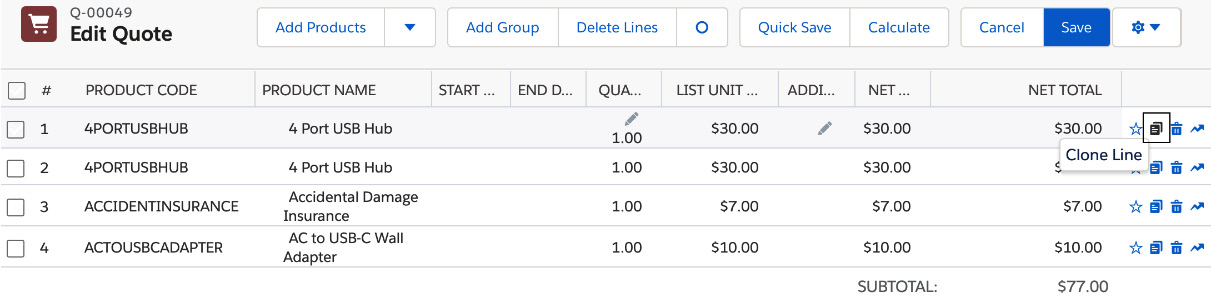
Figure 2.14 – QLE cloning lines
Customizing the QLE column width
When you have too many columns with long names, the column width can be adjusted as per the user's need to avoid horizontal scrolling. This feature was added as part of the Salesforce Summer '20 release. As we add more fields to the QLE, horizontal scrolling will be helpful.
To adjust the quote line field column width, drag the column (similar to Microsoft Excel) and save. Users can customize the layout by resizing the columns. The changes are saved automatically. Only columns can be resized and not rows. Also, the columns cannot be resized below a minimum width as users will lose complete visibility. Resizing columns will only apply to the field set you are editing and each field set needs to be resized separately. The column adjustments that you made can be reset back to the system defaults. Click on the gear icon on the QLE and click on Reset Column Widths:

Figure 2.15 – QLE Reset Column Widths
To enable this feature, navigate to Setup Installed Packages CPQ Configure Line Editor Enable column resizing (checkbox).
You also need to give CRUD (Create, Read, Update, and Delete) permissions to the column metadata. Field set metadata object permissions are needed for the user profile.
In the next section, we will learn how to install and customize advanced approvals. When quotes created by reps need to be approved by a sales manager or a finance director, we will see how advanced approvals can be used.
CPQ approvals
The approval process in Salesforce defines how records are approved. For example, when the sales rep provides a discount that is over a certain threshold, based on your company's business process, the rep needs to get approval on the quote from the sales manager. In this section, we will learn about the approval processes available in Salesforce CPQ.
Salesforce provides two types of approvals: standard approvals and advanced approvals. Standard approvals are available as part of a Sales Cloud license. Advanced Approvals is an add-on license through Salesforce and is a part of the CPQ+ license. Let's look at these individually.
Standard approvals
The standard approval process is linear in nature. The progression through the process is dictated based on the approval of the current step. When a quote is submitted for approval, it goes through a series of approvals from the sales manager to the finance director, as shown in the following figure:
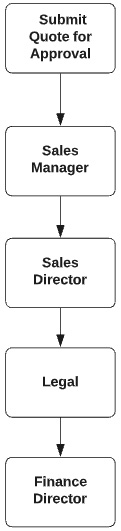
Figure 2.16 – Standard approvals
In this process, if any approver rejects the quote, the sales reps will make changes to the quote. The quote will need to be resubmitted and all the approvers will need to reapprove the quote, which delays the process.
Advanced Approvals
The approval process can be automated and customized using CPQ AA. For business scenarios with simple approval use cases, Salesforce standard approvals are usually sufficient. However, for businesses with complex approval workflows, CPQ offers AA; this allows a structure in which independent verticals, also known as chains, operate in parallel. These chains are independent of each other, and approvals can be triggered simultaneously for each chain.
AA works for any object in Salesforce, including standard and custom objects. Let's see an example of AA requiring approvals from multiple people, as shown here:
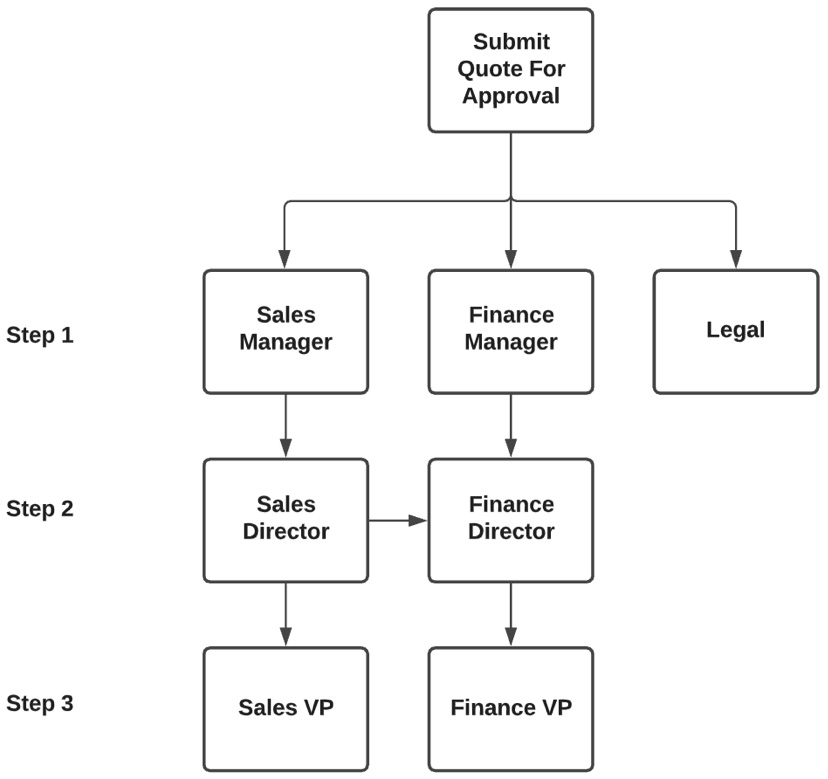
Figure 2.17 – Advanced Approvals
For example, if a quote needs multiple approvals from different stakeholders, as shown in Figure 2.17, it can be parallelly sent to all the approvers. The quote will be approved only if all the approvals within each chain are completed.
Reps can click the Preview Approvals button in the CPQ quote and view the status summary of the approvals.
Dynamic assignment of approvers is possible using advanced approvals. Following the process outlined in Figure 2.17, if the quote is submitted by a sales representative in the United States, it can be dynamically assigned to the United States sales manager. Similarly, if the same quote is submitted for approval by a sales rep in Europe, it can be automatically submitted to the European sales manager.
Using the smart approvals feature, if an approval is rejected by one of the approval members in the chain, Salesforce CPQ remembers the approval history. When the quote is resubmitted, the same users do not need to reapprove. Only the person who rejected the quote earlier needs to approve.
AA comes with a package that is built on top of Salesforce CPQ. AA comes with two permission sets: admins and users. Admins approve submissions and must be licensed users.
AA installation instructions
To use AA, we need to install the Salesforce AA package for our sandbox or production organization. CPQ installation is a prerequisite for installing AA. Follow these steps to install AA:
- Open https://install.steelbrick.com in your browser.
- Scroll down to Advanced Approvals and click Production or Sandbox, depending on where you are installing the package. Currently, Winter 22 is the latest version. Salesforce will upgrade the version automatically for installation as new releases are implemented:

Figure 2.18 – Installing AA
- Follow the instructions, similar to the CPQ package instructions in Chapter 1, Getting Started with Salesforce CPQ Implementation, and install the package.
- Once the installation is complete, the package will appear in the installed package list in your sandbox/production organization.
Configuring AA for a quote object
The Salesforce CPQ package enables AA for opportunities by default. In this section, you will see how Salesforce administrators can enable and configure AA for CPQ quotes:
AA for Other Standard or Custom Objects
The same instructions can be followed to enable AA for any other object. (Replace the quote with the object for which you want to enable AA.)
- On the approval object, create a lookup for the quote.
Navigate to Setup Object Manager Approval Object Fields & Relationships New Lookup Relationship Next Related to (Quote) Field Name (Quote) Next Make the field visible Next Save.
- Create an Approval Status picklist field on the quote object.
Navigate to Setup Object Manager Quote Fields & Relationships New Picklist Field Label (Approval Status) and set the API name as ApprovalStatus__c. Make sure that the API names match exactly and add the following picklist values, then click Next Save.
Lets add the following picklist values:
- Pending
- Approved
- Rejected
- Recalled
Figure 2.19 shows the ApprovalStatus picklist field creation in a Salesforce test instance:
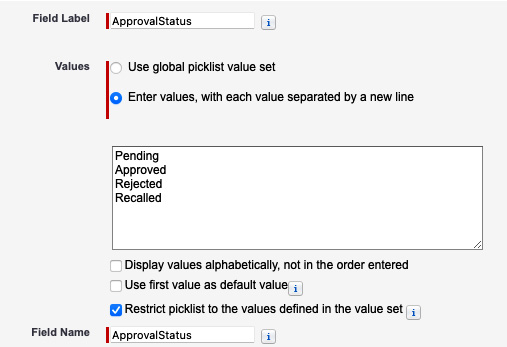
Figure 2.19 – Creating an ApprovalStatus picklist field on a quote
- Create a Submitted Date date field on the quote object. Set the API name as SubmittedDate__c.
- Create one more lookup field, called Submitted User, on the quote object. Set the API name as SubmittedDate__c. This lookup is related to the user object.
- Make sure that the Invalid_First_Segment_Term_End_Date validation rule on the quote object is inactive.
- Create a QuoteExtController apex class. To do this, navigate to Setup Quick Find Apex Classes New, paste the class QuoteExtController code, and save.
QuoteExtController can be used in the Visualforce page where the admin can create the SubmitQuote and RecallQuote buttons:
public with sharing class QuoteExtController {
private Id quoteId;
public QuoteExtController(ApexPages
.StandardController stdController) {
quoteId = stdController.getId();
}
public PageReference onSubmit() {
if (quoteId != null) {
SBAA.ApprovalAPI.submit(quoteId,
SBAA__Approval__c.Quote__c);
}
return new PageReference('/' + quoteId);
}
public PageReference onRecall() {
if (quoteId != null) {
SBAA.ApprovalAPI.recall(quoteId,
SBAA__Approval__c.Quote__c);
}
return new PageReference('/' + quoteId);
}
}
- Create another apex class, called QuoteExtControllerTests, and copy the class QuoteExtControllerTests code. This is the test class for the QuoteExtController class.
This test class will help the Salesforce administrator to deploy the QuoteExtController code to the Salesforce production instance:
@isTest
private class QuoteExtControllerTests {testMethod
static void testSubmit() {
SBQQ__Quote__c quote = new SBQQ__Quote__c();
insert quote; Test.startTest();
QuoteExtController con = new
QuoteExtController(newApexPages
.StandardController(quote));
con.onSubmit();
quote = [SELECT ApprovalStatus__c FROM
SBQQ__Quote__c WHERE Id = :quote.Id LIMIT 1];
Test.stopTest(); System.assertEquals
('Approved', quote.ApprovalStatus__c);
} testMethod static void testRecall() {
SBQQ__Quote__c quote = new SBQQ__Quote__c();
insert quote; Test.startTest();
QuoteExtController con = new QuoteExtController
(new ApexPages.StandardController(quote));
con.onRecall();
quote = [SELECT ApprovalStatus__c FROM
SBQQ__Quote__c WHERE Id = :quote.Id LIMIT 1];
Test.stopTest();
System.assertEquals('Recalled',
quote.ApprovalStatus__c);
}
}
We are now ready to create the Visualforce pages for submitting and recalling a quote. Next, we can add buttons to submit a quote for approval, recall a submitted quote, and preview the approval process. Let's learn how an admin can configure AA and add these buttons to the quote page layout.
Creating AA buttons
Sales reps can use AA buttons to submit a quote for approval, recall an already submitted approval, or preview the approval status. These buttons will be available on the CPQ quote object. Let's learn how to create these buttons using CPQ configurations:
- Create two Visualforce pages, one for the SubmitQuote button, which can be used to submit a record for approval, and the other for RecallQuote, which reps can use when recalling submitted quotes.
- To create the SubmitQuote button, navigate to Setup Quick Find box Visualforce Pages New. Apply the following settings:
- Label: SubmitQuote
- Name: SubmitQuote
- Visualforce Markup:
<apex:page standardController="SBQQ__Quote__c"
extensions="QuoteExtController" action="{!onSubmit}">
<apex:pageMessages />
</apex:page>
- To create the RecallQuote button, navigate to Setup Quick Find box Visualforce Pages New. Apply the following settings:
- Label: RecallQuote
- Name: RecallQuote
- Visualforce Markup:
<apex:page standardController="SBQQ__Quote__c"
extensions="QuoteExtController" action="{!onRecall}">
<apex:pageMessages />
</apex:page>
- Create three buttons, Submit for approval, Recall approval, and Preview approval, and link them to the Visualforce pages created in steps 2 and 3.
- To create the Submit for approval button, navigate to Setup Object Manager Quote Buttons, Links, and Actions New Button or Link:
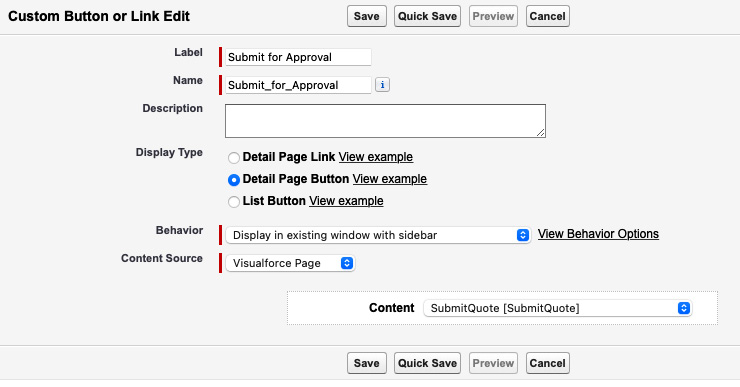
Figure 2.20 – Creating the Submit for Approval button
A Salesforce admin can create a Submit for Approval button as shown in Figure 2.20. End users can use these buttons on the quote record to perform the corresponding actions. The following settings should be filled in:
- Label: Submit for Approval. This will be the label of the button that will be displayed to the user on the quote object.
- Name: Submit_for_Approval. This unique name will be used by the API and managed packages.
- Display Type: This determines where the button or link appears on the page layout. Using this option, we can create a button that we can add to the heading of the quote detail page. These buttons perform an action on the record that the user is viewing.
- Behavior: This defines where the interface will open when the user clicks the button. For this example, we have selected to display it in the existing window with a sidebar.
- Content Source: This can have the values URL, OnClick JavaScript, or Visualforce Page. For this example, we have selected Visualforce Page. For this, we can use the Visualforce page defined in step 2 with a standard controller.
- Content: SubmitQuote [SubmitQuote]. We will use the QuoteExtController Apex class that we have previously created.
- To create the Recall Approval button, navigate to Setup Object Manager Quote Buttons, Links, and Actions New Button or Link:
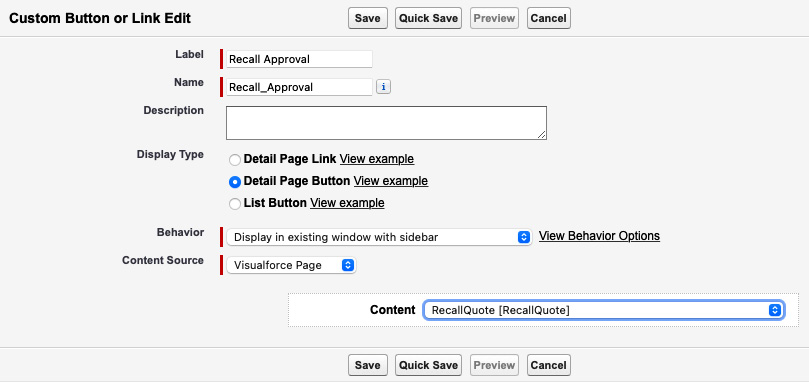
Figure 2.21 – Creating the Recall Approval button
Create the Recall Approval button as shown in Figure 2.21:
- Label: Recall Approval. This will be the label of the button that will be displayed to the user on the quote object.
- Name: Recall_Approval. This unique name will be used by the API and managed packages.
- Behavior: This defines where the interface will open when the user clicks the button. For this example, we have selected to display it in the existing window with a sidebar.
- Content Source: For this example, we have selected Visualforce Page. For this, we can use the Visualforce page defined in step 3 with a standard controller.
- Content: RecallQuote [RecallQuote]. We will use the QuoteExtController Apex class that we have previously created.
- To create the Preview Approval button, navigate to Setup Object Manager Quote Buttons, Links, and Actions New Button or Link:
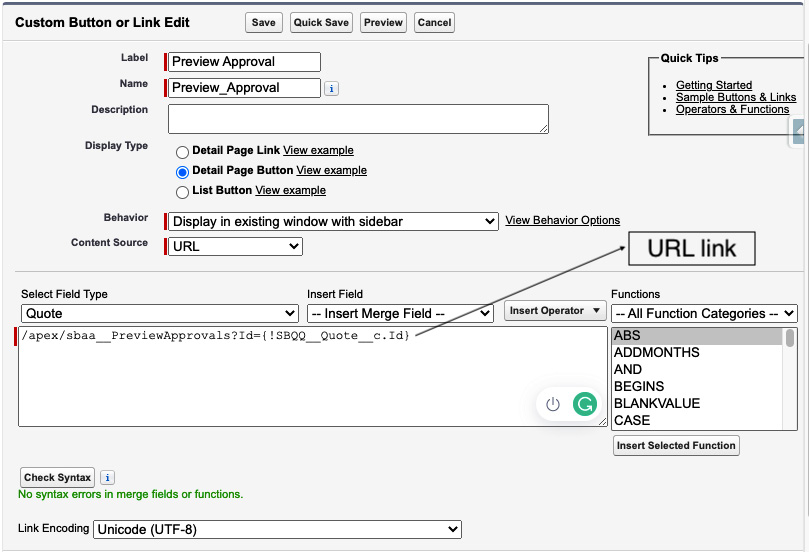
Figure 2.22 – Creating the Preview Approval button
Create the Preview Approval button as shown in Figure 2.22. Clicking this button on the quote object will redirect the user to the CPQ Preview Approvals page and pass the quote ID as the parameter:
- Label: Preview Approval. This will be the label of the button that will be displayed to the user on the quote object.
- Name: Preview_Approval. This unique name will be used by the API and managed packages.
- Behavior: This defines where the interface will open when the user clicks the button. For this example, we have selected to display it in the existing window with a sidebar.
- Content Source: This can have the values URL, OnClick JavaScript, or Visualforce Page. For this example, we have selected URL.
- URL link: For the content source URL, this field provides the URL link. Paste the URL /apex/sbaa__PreviewApprovals?Id={!SBQQ__Quote__c.Id} and click the Check Syntax button to verify the syntax.
- Link Encoding: Choose the encoding setting. Encoding defaults to Unicode (UTF-8).
- To add these buttons to the quote page layout, navigate to Setup Object Manager Quote Page Layout Quote Layout Buttons:
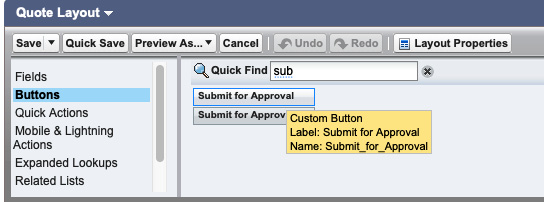
Figure 2.23 – Adding approval buttons to the quote page
As shown in Figure 2.23, we see two Submit for Approval buttons: one is the standard button and the other is a custom button for CPQ approvals.
- Add the custom button to the quote page layout, which will be used to submit approvals. Add the other two buttons, Recall Approvals and Preview Approvals, to the quote page layout. Reps can use these buttons to perform the corresponding actions.
Setting up email services for advanced approvals
Once a record is submitted for approval, the approver can respond with an email that automatically approves or rejects the record. The keyword for approval or rejection can be set in the AA package configuration.
To set up the approval keyword for your Salesforce organization, navigate to Setup Quick Find Installed Package Advanced Approvals Configure to set up the Approved Keywords (for example, Approved, Approve, Yes) and Rejected Keywords (for example, Rejected, Reject, Decline, No).
Approvers can respond to emails with these keywords for approvals and rejections.
Setting up an email service
Setting an email service and email service address is a prerequisite for applying the email responses to AA. This email service will help approvers to receive notifications in their mailbox and they can use the keywords in their responses. The corresponding record in Salesforce will be updated with an approved status or rejected status based on the response. To configure the email service, follow these steps:
- Make sure your Orgs email deliverability is set to All Email.
- Navigate to Setup Email Services New Email Service. Enter email service name (Approval Services) Apex class (ApprovalEmailHandler) Accept email from (input domain details as needed, for example, mail.com) Failure responses section Bounce message for all the fields select Enable Error Routing Route email (administrator email) Save.
Refer to Figure 2.24 for the email service configuration:
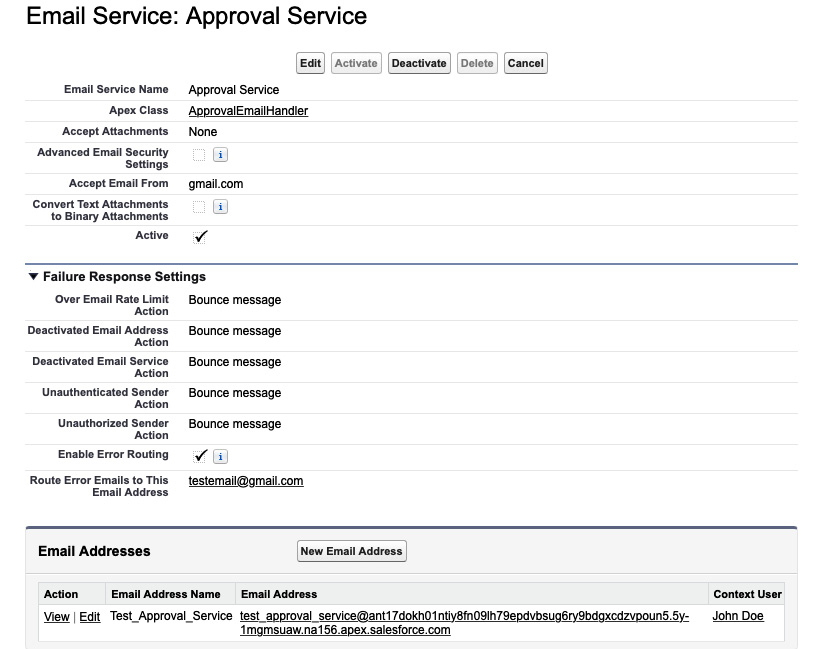
Figure 2.24 – Approval email service
The preceding approval service is set up to accept emails from Gmail. You can add other service providers, such as Yahoo or Hotmail, as needed. The email service created in Figure 2.24 needs to be linked to the CPQ AA package setting.
Enable Error Routing
When email services cannot process an incoming email, enabling error routing in the failure response settings sends an error message to the email specified in the Route Error Emails to This Email Address field.
Connecting the email service to AA
To enable email approvals, copy the email address from the email service in Figure 2.24 and update this email address in the AA approval package configuration.
Navigate to Setup Quick Find Installed Packages Advanced Approvals Configure and paste the email address in the Inbound Approval Email (Long) field and save the changes.
Setting up AA email templates
Visualforce AA email templates need to be configured to send the AA process email in response to an approval request, rejection, recall, or approval. It's recommended to create a separate email template for each of these actions. In this example, we will walk through creating an email template for setting up a request email. You can follow these same steps for creating email templates for the remaining actions:
- First, we need to create a Salesforce Visualforce email template and then link it with an AA email template record. To create an email template, navigate to Setup Quick Find Box Classic Email Templates New Template Visualforce Next. This will open the screen shown in the following screenshot:
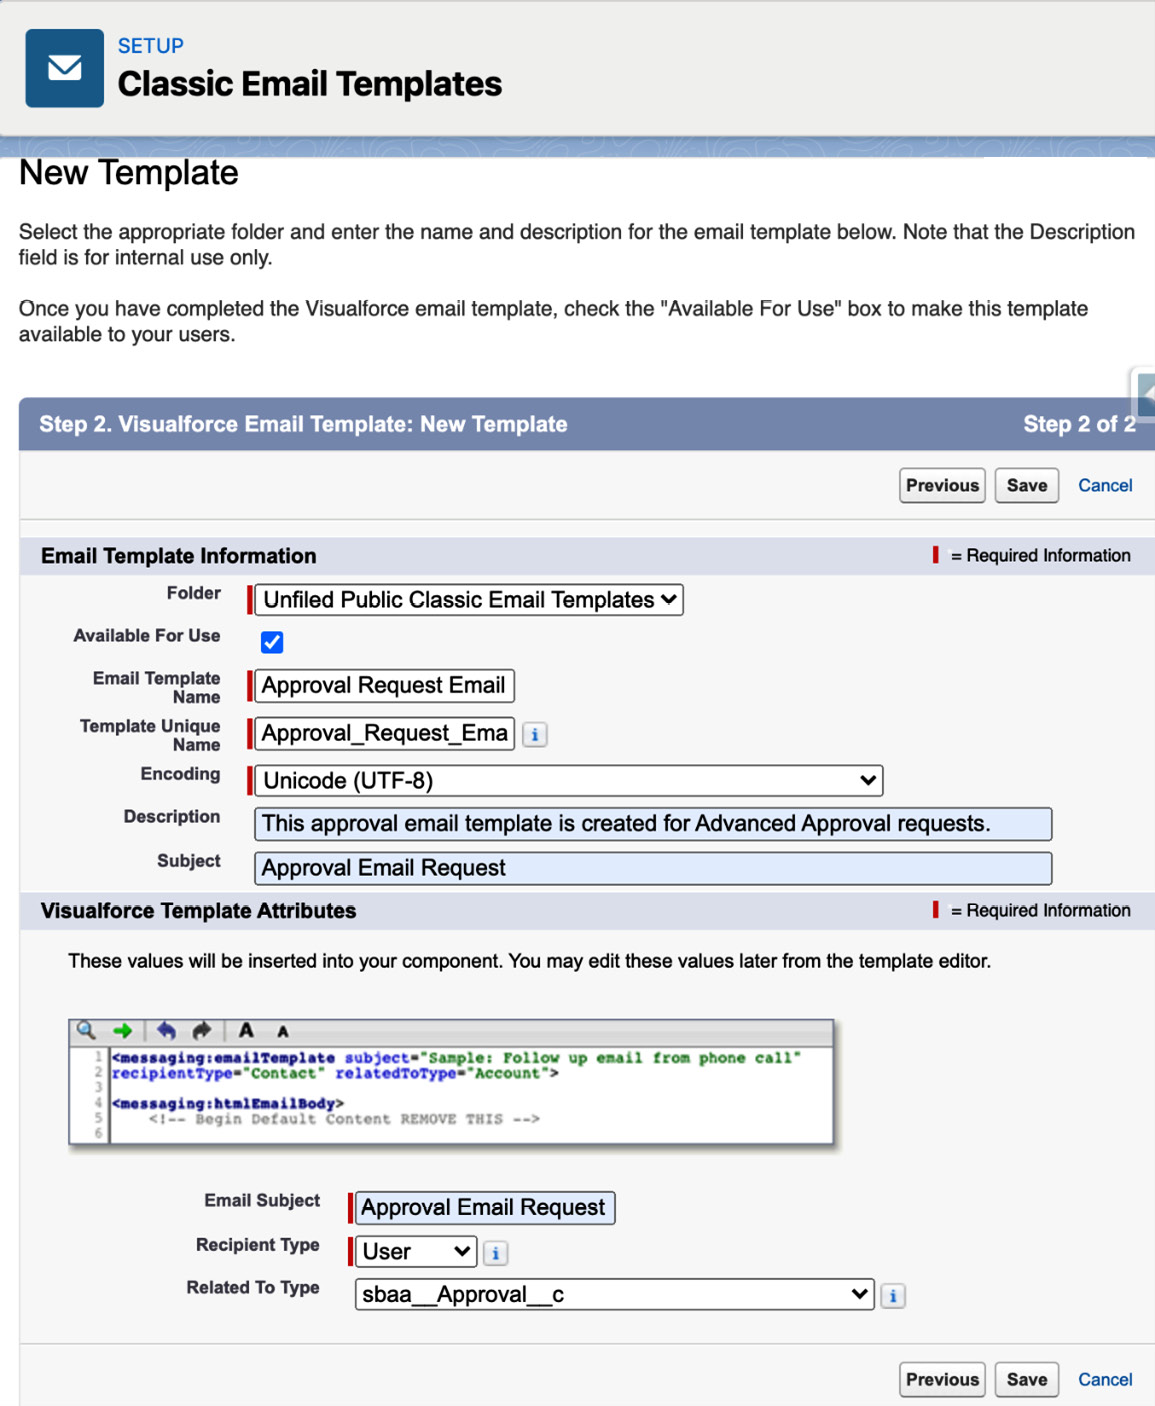
Figure 2.25 – Email template
Set the following fields:
- Choose the Folder where you want to store the email template.
- Select the Available For Use checkbox.
- Update the mandatory fields, such as Email Template Name, Template Unique Name, Encoding, and Email Subject.
- Set Recipient Type to User and Related to Type to sbaa_Approval__C. This is the object from which the email template merge fields will be selected.
- Once you're done, click on Save. Edit the email template that you created, and make sure that the template contains the reference to the ID of your approval record. Add the text and any markup that you want to show in your approval request email. For example, to style the code's text color as white, the sample code is <p> "style=color:white" "apex:outputText" value="{!relatedTo.ID}" </p>.
- Next, you need to create an AA email template record. To do this, navigate to App Launcher Email Template New. This will open the screen as shown here:

Figure 2.26 – AA email template record
- Update Template Id. This is the Salesforce ID of the email template created in the first step. Set the field Email Template Name and click Save.
The AA approval email template is now ready to use.
AA objects
Once AA is configured for the quote object, the approval rules can be created as per the business needs. Installing AA creates all the related components from the package, including a few main objects:
- Approver: An approval request can be sent to a user or a group within Salesforce. Approvers are assigned to a rule that will fire based on one or more conditions. An approver record is typically named for the job role and not the individual. All users who will be a part of AA (including individual salespeople) must have an approver record created for them. An approver can approve or reject an approval request.
- Approval rule: Approval rules drive the process. Approval rules can be defined based on your business requirements. For example, if the finance manager wants to approve all quotes where the rep provides a discount that is more than 25%, we can define an approval rule with this condition. Additional conditions can be added as needed, such as when you want to fire this approval rule only for quotes where the quote total exceeds $50,000.
- Approval condition: All approval rules need at least one approval condition. Approval condition fields can be used to create a logical statement. For example, when we have two approval conditions, the first one based on the discount percent and the next condition based on the quote total, we can combine these two conditions with an and operator.
- Approval chain: An approval chain can be created when you need to send approvals in a specific sequence. For instance, say you want to send an approval to the sales manager first, and then trigger the next level to the sales director, and then to the sales vice president.
- Approval variable: Approval variables are child objects of approval rules. They aggregate data from child records for evaluating a condition. These variables can be used in place of standard rollups and apex triggers for aggregating data. These are evaluated in synchronous mode.
Let's see how an admin can configure approvals using these CPQ objects.
Creating a new approver
To create an approver, navigate to the approver object and click on New. Fill in the approver name. Then, update the User field, either with a single user or a user group. You can also use a delegated approver if the primary approver is on vacation.
Let's look at creating an approval rule, condition, and chain. Based on the business criteria for approvals, these configurations can be customized. When the rep adds the products to the QLE, CPQ AA will trigger in the backend. Records that need approval will be assigned to the approver automatically and the quote status will be pending approval until the approvals are completed.
Creating a new approval rule
To create an approval rule, navigate to App Launcher Approval Rules New
and follow these steps:
- Fill in the rule name and the target object to evaluate the rule.
- Mark it as active and fill in the approval step based on where it fits in the approval chain and update the approver to whom the request should go.
Approval chains can send approvals to several approvers in a sequence or in parallel paths.
- Then, set the combination of conditions the rule must meet. Email templates can be included to send the approval requests. These must be Visualforce based email templates.
Defining the approval condition
To define an approval condition, navigate to App Launcher Approval Rules Related Approval Conditions New. Then, follow these steps:
- If the approval rule evaluates several conditions in a logical statement, provide an index value referencing each condition.
- Select the approval condition test by choosing the tested field or tested variable.
- Update the filter information for evaluating the conditions.
Creating a new approval chain
To create an approval chain, navigate to the App Launcher Approval Chains New.
Provide the chain name. In the target object name, provide the object for which you want to run the approval process. Click Save.
After the quote is approved, the sales rep can create an order for the customer. In the next section, we will learn about CPQ order management.
Advantages of creating orders from a quote
When a customer is ready to order, an order can be created from the quote. Orders contain order products for each of your quote lines. Creating orders is a prerequisite for using Salesforce Billing. Orders are also a great location for integrations with other services beyond Salesforce Billing. You can create invoices from an order object using Salesforce Billing. We will learn more about Salesforce Billing in Chapter 10, Salesforce Billing.
Advanced order management is available for customers who buy CPQ+ licenses. With this feature, a business can provide a single quote for multiple orders, making it possible for the business to deliver the shipment to multiple locations at different times. In addition, an order object can be used to activate subscriptions after their implementation.
Enabling orders
Before users can create orders, Salesforce admins need to perform a one-time activity: enabling orders at the org level. To enable orders, log in to your Salesforce org and navigate to Setup Quick Find Orders Enable Orders Save.
Orders must also be configured to support negative quantity lines. To do this, navigate to Setup Quick Find Order Settings Enable Negative Quantity.
Use Salesforce profiles or permission sets to assign user and object permissions to the appropriate users. Orders can be disabled to hide order-related data. To access the data again, re-enable orders.
Orders must be created from a primary quote. The primary quote cannot be modified after an order is created. List price, unit price, and the total price will be inherited from quote to order. Orders can be created using the Create Order button on an opportunity or quote. Alternatively, setting the Ordered field to True on an opportunity or quote and saving the record will automatically create an order.
For an end-to-end solution on quote-to-cash automation, both order management and Salesforce Billing can provide a lot of advantages and shorten the sales cycle.
Summary
This chapter helped you understand how you can create an opportunity, quote, and quote line items. You also learned when AA can be applied for a quote object. By applying the approval rules to CPQ quotes at various stages, you can speed up the whole approval process, as well as customize the CPQ package as per your business needs. The QLE interface helps you to create quotes easily and accurately. You have also seen the advantages of implementing orders and how to enable orders.
In the next chapter, you will learn how to configure product bundles and further automation related to product configurations.