
Chapter 3: Configuring CPQ Products
In this chapter, we will discuss product configurations and their crucial role in CPQ implementation. As your business grows, the complexity of operations increases. Based on your business process, you need to decide what information to capture at the product level, how to define your product catalog, and how to break up the product components. This solely depends on the type of product or service you are selling. CPQ configuration supports both products and services. Products and services can be configured as non-subscription and subscription products in CPQ.
For example, if you are selling a laptop and an associated service as warranty and support, some of these components may be mandatory and some may be optional that a rep can select, based on which the pricing will change. You cannot build a laptop without a hard drive or memory, but the size of these components can be changed by selecting different options. Each of these options will have a different price. All these components that make up the laptop need to be defined as products and Salesforce CPQ can help build the configuration by automating the product selection process and guiding the rep. Sometimes, preconfiguring all the mandatory products into a laptop bundle will be helpful. These products can be added to the quote easily, and the rep can concentrate on selling the configurations rather than having to remember their details.
If your company is selling huge medical equipment, such as an X-ray unit, you need to decide what components need to be defined as products. You cannot define every component, such as the nuts and bolts, as a product, as they will be added to the quote and it will become impossible to manage. We will see how CPQ product attributes can help organize these products.
The success of CPQ implementation depends a lot on the product master data and its configuration. In this chapter, we will learn different ways for how a product can be configured and how we can bundle products together, define options, and define product features. In addition, we will learn how a Salesforce admin can manage these configurations in CPQ so that the reps can easily add them to quotes and work efficiently to close deals faster.
In particular, we will be covering the following topics:
- Products overview
- Configuring products
- Configuring product bundles
- Creating product rules
- Creating custom actions and search filters
- Creating twin fields
Products overview
Salesforce CPQ uses the native Salesforce product object. Before a product can be added to a quote, the product needs to be configured and activated in Salesforce. Based on your company's business process, you would need to create the products and define attributes such as the product code, product name, and product family. Product attributes help organize products. Using Salesforce custom fields, you can create custom attributes such as recyclable products or whether a product is shippable or not on a product object. These attributes will be useful for automating things such as product rules and custom actions, which we will learn about in the next sections.
To create a product in CPQ, navigate to App Launcher Salesforce CPQ Products and click on New. Provide a product name, a unique product code, and a product family and activate the product. Admins can create additional custom fields on products as required. Products need to be activated and added to a standard price book.
Tip
To ensure fast system performance with price books, keep the number of products under 2 million.
Let's learn about product types and some of the out-of-the-box attributes that Salesforce CPQ provides.
Types of products
Products in Salesforce can be configured as non-subscription or subscription products. Non-subscription products are one-time purchases, such as a laptop or hardware, that can be converted to assets. Subscription products are sold as services that last for a specific period (whether that's days, months, or years). For example, Amazon Prime is a subscription product. Subscription products have a recurring payment associated with them. These models drive the pricing, contracts, and renewal functionalities.
Salesforce CPQ handles subscriptions with built-in proration. Proration is common in businesses that sell subscription products. For example, suppose you are buying a cell phone subscription for a month that costs $100. When you sign the contract on January 10, the price can be prorated for the remaining 21 days. They can be added from one contract to the next and renewals can be generated. Non-subscription products are not renewable and the price cannot be prorated. Subscription products are added to the contract as subscriptions and perpetual products become assets.
To define a product as a subscription model, there are specific custom fields on the product object and product attributes that need to be updated:
- Subscription type: The product subscription type field influences how Salesforce CPQ handles renewals for a subscription product. CPQ provides four picklist values, out of the box. Based on the picklist value (it is advised not to change these picklist values) selected at the product level, the functionality changes:
- Renewable includes subscriptions in a renewal quote.
- One-time subscriptions will not include products in renewal quotes. Note that there is a Preserve Bundle Structure package setting in CPQ that, when activated, adds one-time subscriptions to a renewal.
- Evergreen subscriptions remain active until canceled and cannot be renewed. Note that these evergreen subscriptions cannot be on the same contract as renewable or one-time subscriptions. CPQ will always split them out automatically.
- Evergreen/renewable subscriptions are renewable, or evergreen, on individual quote lines in the quote line editor (QLE). These values can be manually selected or automated using Apex or a flow.
Important Note
To select the Evergreen/renewable picklist option for a product, first enable evergreen subscriptions in the CPQ package settings. Once enabled, these cannot be disabled.
- Subscription pricing: Product subscription pricing defines how the quote pricing will be calculated for the subscription products. Subscription pricing has three default picklist values: Fixed price, Percentage of total, and None:
- Fixed price: Products get their list price from the price book.
- Percentage of total: The product's list price is a percentage of either the quote, the quote line group, or a bundle's total price.
- None: Not a subscription product.
- Subscription term: A product subscription term is the default amount of time the subscription lasts. A subscription term unit is set in the CPQ package settings. When a product is added to the quote, the quote lines subscription inherits the value from the product's subscription term. This is closely associated with the price book entry. For a fixed-price product, if the subscription term is 12 months, the price book entry should be a 12-month price. For a percent of total product subscription pricing, the percentage should reflect the term.
Percent of total is used when you want to scale a product's price relative to another product. For example, when you go to a restaurant, a tip is an example of a percent of total price. We will learn more about this concept in Chapter 4, Configuring CPQ Pricing.
Now that we have discussed product types, let's see how they can be configured in Salesforce CPQ.
Configuring products
Products can be configured in Salesforce CPQ as product bundles, Multi-Dimensional Quoting (MDQ) products, subscription products, and usage products. Product configuration depends on the products that your company sells and how you want to price your products. Let's learn about the different product configurations that CPQ offers out of the box and how we can configure and customize them as per the specific business use cases:
- Product bundles: Product bundles are a collection of products that are sold together. Bundles may include options to choose from; these are like the subproducts. Product options with similar characteristics can be grouped together as features. For example, a laptop can be a bundle with a charger and a mouse as its components. The color and memory can be the options to choose from.
- MDQ products: Show a fixed-price subscription product in the QLE as one quote line broken into segments. Each segment that is an additional quote line represents a unit of time (quarter, month, year, or custom) and has pricing and a quantity independent of the line's other segments. They're useful if you want your sales rep to have detailed control over the pricing of specific units of time within one subscription product.
- Subscription products: These products are services that run for a specific period. For example, you can purchase an Amazon Prime subscription for a year or a month.
- Usage products: These products change based on product consumption. The price of the products will be based on the predefined rates for future consumption of the product. The rates can be defined based on the volume. The more you buy, the lower the price, and this increases revenue. For example, your cell phone consumption pricing is based on the amount of data you consume per month. CPQ will let you quote usage and create a billing table, but the pricing shown on the output doc is not going to show the billing table without a lot of customization. Usage products typically show up as zero on a quote line.
Now that we have learned about the product types, in the next section, let's learn about a few more configurations that admins can use to customize the QLE.
Creating custom actions and search filters
Custom actions and search filters are Salesforce features that we can use to customize the QLE and the configurator as per the business needs. They can be added as buttons in the QLE that will help the rep to easily select and add products. In this section, we will learn how admins can create them and look at examples where they are useful. Let's start with custom actions.
Creating custom actions
Custom actions are buttons that perform an action. These can be added to the QLE, configurator, or other detail pages. These actions will vary based on where the admin configures the custom actions. For example, custom actions in the QLE can delete lines, add a quote line group, save the quote, or navigate to an internal/external page. Custom actions in the configurator can load an internal/external page and apply edit rules. Custom actions in contracts can amend or renew them.
You can also create conditions for custom actions and Salesforce CPQ will not display the custom actions until the conditions are satisfied. When the rep clicks the custom action button in the QLE or configurator, the products are displayed based on the search filter parameters.
Salesforce CPQ provides a lot of out-of-the-box custom actions; the add products button and the save favorites button that we saw in earlier chapters are both custom actions. It is advisable to limit the custom actions to five or fewer.
If the sales rep wants to search only the hardware products, they can use the search filter and view products. The admin can create a button and add it to the QLE that can be used by the rep. Clicking the button will display all the hardware products.
Let's see how an admin can create a custom action.
To create a custom action, navigate to App Launcher Salesforce CPQ Custom Action New. This will open the New Custom Action screen, as shown here:
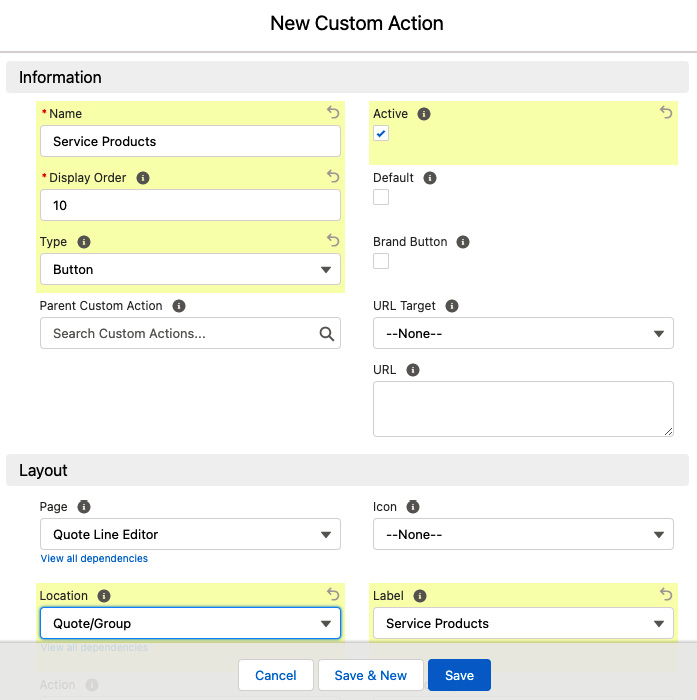
Figure 3.1 – Custom action
Some important fields in custom action creation include the following:
- Name: The name of the custom action.
- Display Order: Specifies where the custom action is displayed.
- Type: Determines whether the custom action is a button, menu, or separator. In this example, we are creating a button for service products.
- Parent Custom Action: If you want to group a child custom action under an existing custom action, then you need to select this.
- URL Target: If your custom action is a URL, then you can provide the link here.
- Page: This is where your custom action will be displayed.
- Location: The place where the custom action appears on the chosen page.
- Action: Determines the result of selecting a custom action. In this example, let's select Add Products.
- Label: Display the name in the QLE for the end users. Create a label picklist field in the custom objects by navigating to Setup Object Manager Custom Action Fields & relationship Label Values New. Add the new picklist value. In this example, we are adding Service Product. Once the picklist value is added, you can select that in the Label field here.
After entering all the required fields, save the custom action. The admin can now create a search filter. In the next section, let's learn how to create a search filter.
Creating a search filter
Search filters are used to filter products based on the search criteria. Search filters can be created from custom actions. To create a search filter, navigate to App Launcher Custom Action (select the sample custom action service product created in Figure 3.1) Related Search filter New. This will open the new search filter, as shown here:

Figure 3.2 – Search filter
In the sample search filter created in the preceding figure, the admin is filtering all the service products.
Verifying custom actions in the QLE
Let's see how reps can benefit from the sample custom action the admin has created for service products in the previous section. To view the custom action, navigate to any quote and click on Edit Lines. The rep can see the new Service Products custom action, as shown in Figure 3.3. Rather than searching for service products manually, the rep can directly click this button:

Figure 3.3 – Custom action in the QLE
When you click on the Service Products button, only the service products will be displayed. Reps can change the filter criteria, as shown in Figure 3.4. If you do not want the rep to change the search filter, you can hide this by selecting the Hidden checkbox while creating the custom action.
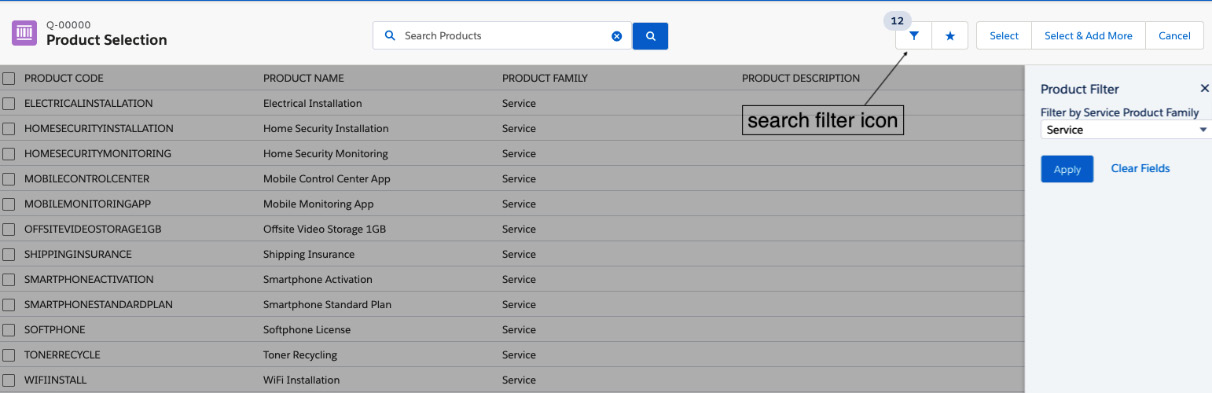
Figure 3.4 – Custom filter in the QLE
The preceding figure shows the sample product selection for the service products' custom action.
Creating dynamic search filters
QLE search filters are used to filter products, assets, or subscriptions by their field values. We can navigate to Quote Edit Lines the search filter icon; a search can be based on a product code, name, or family. Additional fields can be added as required. Creating dynamic search filters makes a limited set of products available to your rep. CPQ admins can set the custom search filter using a filter source object and fields from the search filter. To create a dynamic search filter, navigate to App Launcher Search filter New. This will open the new search filter screen, as shown here:
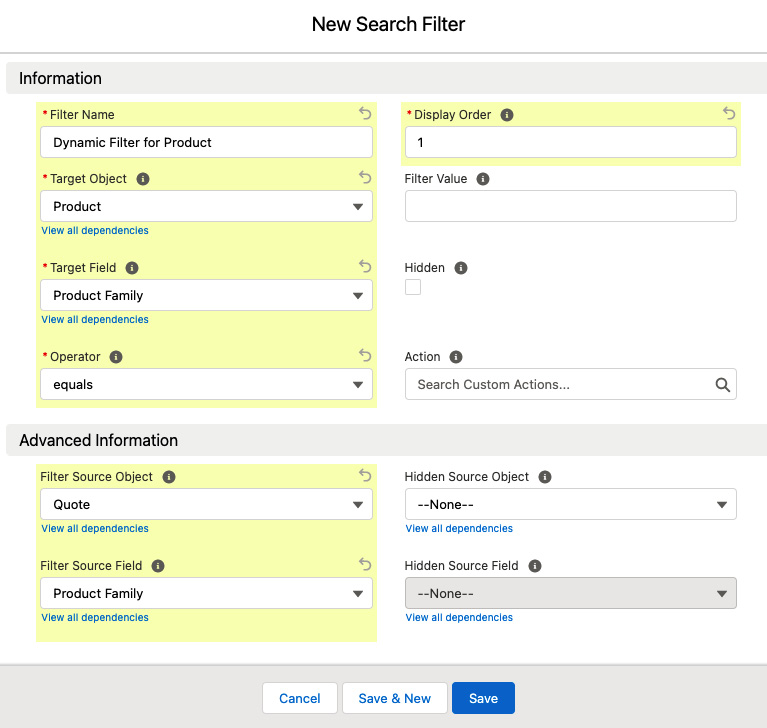
Figure 3.5 – Dynamic search filter
Admins can update all the mandatory information as shown in the preceding figure.
This search filter will display only the products that belong to the product family, region, company size, and/or seasonality selected in the quote.
A CPQ admin can create a product family field in the quote. Reps can then select this field while creating a quote. When the reps start to configure the products, only the products whose product family matches will be displayed. A rep can edit the product family and based on that, the product filter will dynamically change.
Now that we have learned how to define the products and select the products, in the next section, let's see how admins can create and configure these products in Salesforce.
Configuring product bundles
In this section, let's learn more about product bundles. This will help sales reps enforce business logic for mandatory products, a minimum quantity of a product in a bundle, and so on. For example, when you are selling a laptop, rather than the rep hand-selecting the products one by one, a preconfigured bundle can be selected that includes all the products. Adding a bundle to a CPQ quote adds all the related products automatically. Bundles are a great tool for moving to package or solution-based selling.
There are three types of bundles:
- Static bundle: These bundles always have the same products. In a static bundle, you want your reps to always sell the products together and they will not have an option to modify anything. A cheese pizza is an example of a static bundle as it will always have the fixed pizza crust, cheese, and tomato sauce.
- Configurable bundle: In a configurable bundle, some products are predefined, but others can be changed as per your requirements. This is like making a pizza with your choice of toppings. The pizza crust might be mandatory, but you can choose the type of cheese you want, choose the vegetable toppings you want, and increase the quantity as per your preferences.
- Nested bundle: This is a bundle inside a bundle. Nested bundles can be static or configurable. For instance, a sandwich is a bundle that contains bread, cheese, and tomatoes, which can be inside your lunch box, which is another bundle containing sandwich, chips, and juice. It becomes hard to maintain multiple levels in nested bundles, so the best practice is to keep to one or a max of two levels. Nested bundles should be avoided if CPQ is being interacted with by external systems using the CPQ API for quote configuration and amendments.
So, why do we need bundles? They will help a rep choose the right products. Bundles provide a user interface (UI) that will help a rep select the correct products for a situation. Without bundles, reps would need to select from a huge list of product catalogs and any error will add an incompatible product to the quote. A rep needs to thoroughly understand what products go together, which will be very difficult if the rep is new to the company. Bundles are preconfigured with all the mandatory products that are needed. These are one-time activities that admins can perform, and reps can add these bundles to any quotes.
Bundles also allow us to facilitate special pricing and discounting. For example, a charger when bundled together with a laptop can be sold at 0 dollars or at a discounted price and when sold separately as a single product, the charger will be sold at full price.
For an admin to create a bundle, all the products in that bundle need to be created in CPQ. The admin can create a bundle, add all the required products, and link them together. Products can be linked to each other by creating options.
For example, many laptops may use the same processor (CPU 1.6 GHz i5). The processor needs to be created as one product. All the laptop models can have this processor as a product option. Options can be grouped together logically as features for a better user experience. Features are not mandatory, but they will help organize products. Features are not products but containers of products. Using the Category field on a feature, we can organize features into categories and display these categories in separate tabs. This is a useful UI tool. For example, all the important features for configuring a laptop can be grouped under the Essential category in a tab, and all the accessories such as laptop cases and additional cables can be grouped under the Other category in a different tab. For instance, all the different processors (i5, i7, and so on) for the laptop can be grouped under the processor feature.
Let's imagine Packt Corporation is a company selling laptops and other office supply products to their customers. We will help Packt Corporation reps by creating a bundle that the company sells together with options and features that their salesperson can configure in the QLE.
Creating a product bundle in a Salesforce instance
Salesforce admins at Packt Corporation can create different bundles and combine the related products together. This helps the rep to just add the bundle to the quote without trying to remember all the components that need to be added. Admins can create many bundles as required. Let's try creating a sample bundle for a 13-inch laptop.
To create a Packt Pro 13" Laptop bundle in a Salesforce instance, navigate to Product New, fill in Product Name and Product Code, and select the Active checkbox. Then click on Product Family Configuration type Configuration event Save. This will take you to the New Product screen, as shown here:
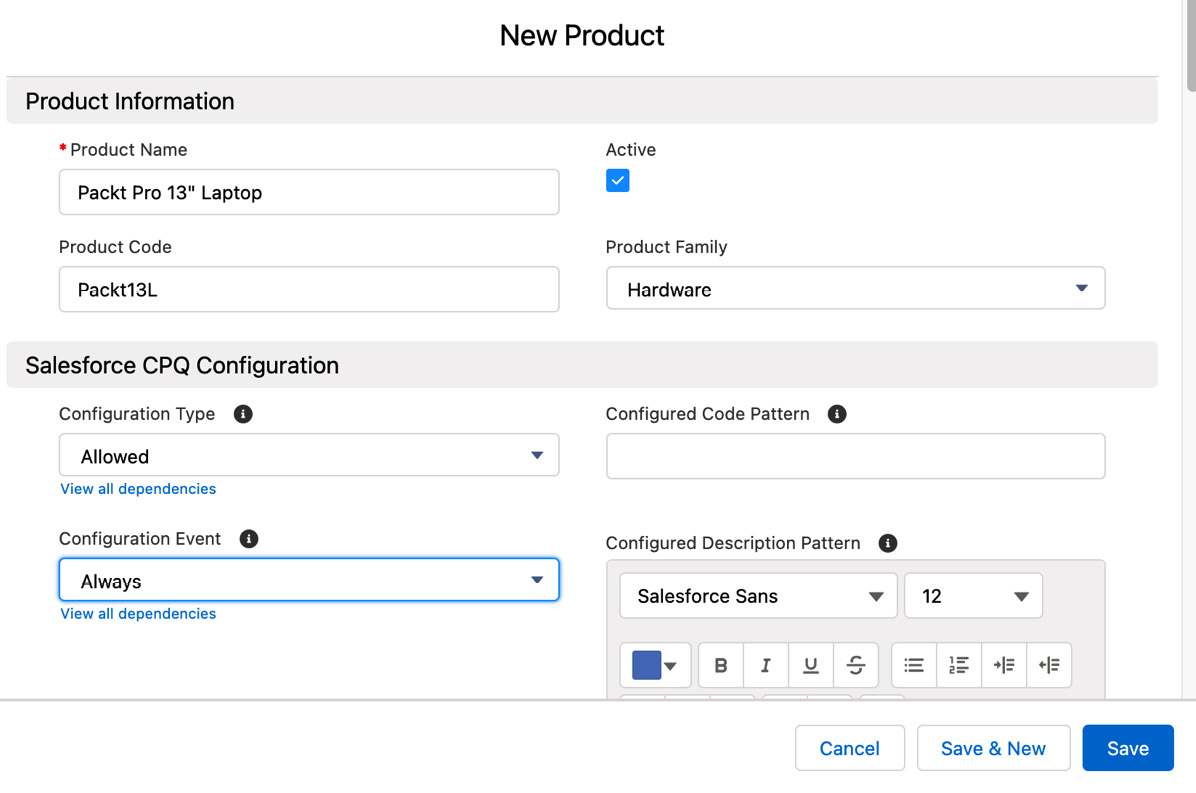
Figure 3.6 – Creating a product bundle
As shown in Figure 3.6, bundles are created the same way new products are created. Bundle configuration for any product is guided by business rules that validate the configuration. There are different ways admins can control how this bundle can be added to a quote and configured. This depends on the combination of the configuration type (this value determines whether a bundle requires a configuration or not) and configuration event (this value determines when to allow product configuration). Let's see what functionality each of these combinations provides:
- Allowed/Always: The user will first select the product bundle and will be able to configure products immediately after adding the product bundle. When you set up a bundle with this combination, the user can configure the products in the QLE by clicking the wrench icon. The user can also go back and forth as many times as they need and save the products to the QLE.
- Allowed/Edit: This combination skips the configuration at first, and after the bundle selection, the rep goes to the QLE page. This combination allows the rep to configure products by clicking the wrench icon in the QLE when needed. This option will be useful for scenarios where most of the time users do not need to reconfigure. But if needed, they will have the option to do so.
- Disabled/Always: This combination skips configuring products completely and will never allow users to configure. The bundle is static, and this option will be suitable for scenarios where we do not want the reps to change anything.
- Allowed/Add: This combination allows the user to configure products just one time before they go to the QLE page. This type of setting will be useful for business scenarios where there are two bundles (nested bundles) that the rep needs to add, and the second bundle needs to be configured based on the first bundle configuration. Hence, we do not want the rep to change the first bundle.
- Required/Always: This combination forces users to configure bundles, reminding them of important configuration possibilities and allowing rules and other business logic to be evaluated. The rep must click on the wrench icon and acknowledge the options. Until then, the systems will not let the user save the record. This will help in scenarios where you have nested bundles and before adding them to the quote you want the reps to validate the configuration.
For the sample Packt Pro 13" Laptop bundle, we have set the configuration event as Allowed and the configuration type as Always with which reps can edit the configuration as many times as needed. Most organizations choose this setting for their implementation. In the next section, let's see how admins can configure and add options to this bundle.
Creating a product option in a Salesforce instance
Product options are the glue that puts together the set of products that make the bundle. They are the junction record that places a product within the bundle of another product. A product can belong to many bundles, and bundles can have many products. There are a lot of different behaviors that we can set on product options. These behaviors control the way the products are added while configuring and adding to the QLE. To create product options (in this example, we will learn how to create an option for the i5 processor and add it to the bundle), navigate to the Packt Pro 13" Laptop bundle. To do that, click on the App Launcher (the nine dots in the top left-hand menu in your Salesforce instance), search products, then click Packt Pro 13" Laptop Related Options New. This will open the New Product Option screen, as shown here:
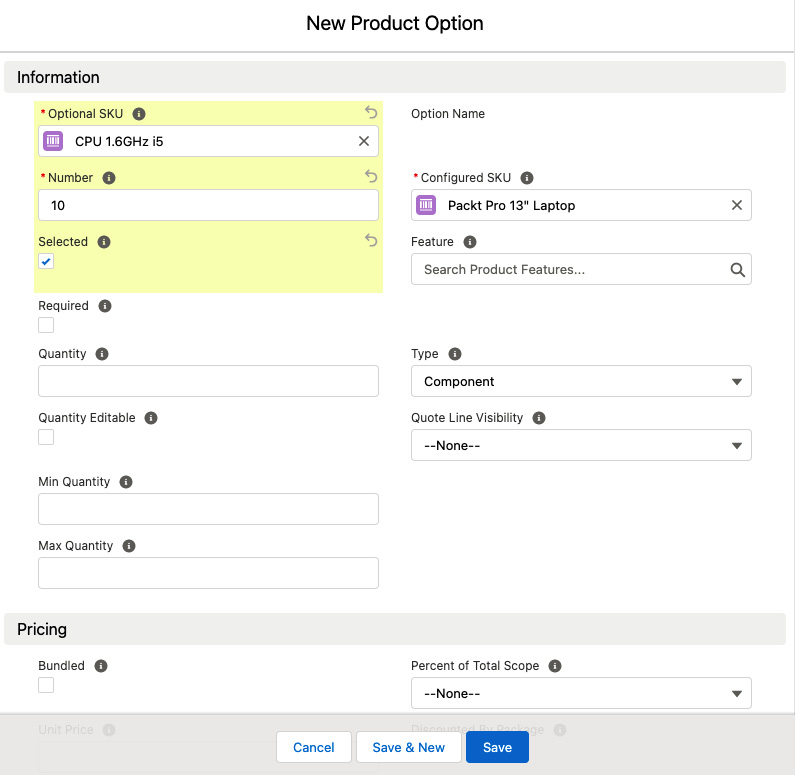
Figure 3.7 – Creating a product option
As shown in Figure 3.7, a few important fields in product option creation include the following:
- Optional SKU: This is a lookup for the product's object. Select CPU 1.6GHz i5 – this is an already existing product (in the CPQ test environment). Optional SKU will be a product within the bundle.
- Number: This is the display order of the option within the feature. When the rep configures the bundles, the product options will be displayed based on this configuration. This is useful when you have several products and you want to display them in a certain order. The order is typically entered in multiples of 10 (10, 20, 30, 40) initially. This allows an admin to have space to insert additional options later in the sort order.
- Selected: When this checkbox is ticked, any product added to this quote will be preselected.
- Required: Selecting the Required checkbox will make the product mandatory in the QLE, and end users cannot uncheck it.
- Quantity: This is the product quantity that will be added to the quote. If the Required checkbox is selected, then you should provide a default quantity.
- Quantity Editable: This checkbox is selected if you want your reps to be able to edit the quantity or check the quantity editable. Alternatively, you can leave the previously discussed Quantity field blank. If Quantity Editable is turned off, a user will not be able to amend and remove the quote line on contracts.
- Min Quantity and Max Quantity: These set the limit on the number of products a rep can add to the quote.
- Bundled: The products in the bundle contribute to the bundle price. When this checkbox is selected, the product option will have a zero-dollar price regardless of the price book.
- Type: There are three possible option types that can be selected: Component, Accessory, or Related Product. These option types determine the behavior of the bundle quantity in the QLE. The various Type options are explained as follows:
- Component is a factor of bundle quantity. When you increase the bundle quantity, the option gets multiplied.
- Accessory is independent of bundle quantity. When you increase the bundle quantity, the option does not multiply.
- Related Product is special and not used very often. You can change the quantity of the option in the QLE while the other two types are not editable. For example, I can order a burrito and a side of guacamole as a related product. I do not want the guacamole to be affected by the bundle's configuration and the guacamole is shared with everyone.
- Quote Line Visibility: This determines when you can see a product option. The following picklist values can be selected for quote line visibility:
- Always: This option is the default setting where the product is visible in both the QLE and the output document.
- Editor Only: With this option, the product appears only on the QLE and is excluded in the output document.
- Document Only: With this option, the product appears on the quote output document.
- Never: This option hides the product from both the QLE and the output document. It is used when a product serves a downstream purpose (provisioning, billing, rev-rec most commonly) but should not be viewable or modified by the rep. This option is only important to the order visibility team.
A product bundle can have as many options as needed. Similar options can be grouped together as features. In this example, these products (processors) can be grouped into a processor feature.
Creating a product feature in a Salesforce instance
A feature is a way to organize many options and we associate options with features. They also help enforce some business logic. For example, in the laptop bundle with i5 and i7 processors, the product feature will make sure at least one processor is selected because the rep cannot sell a laptop without a processor. In the Packt Laptop bundle, the following figure shows how a feature is used to link the product options to a bundle:
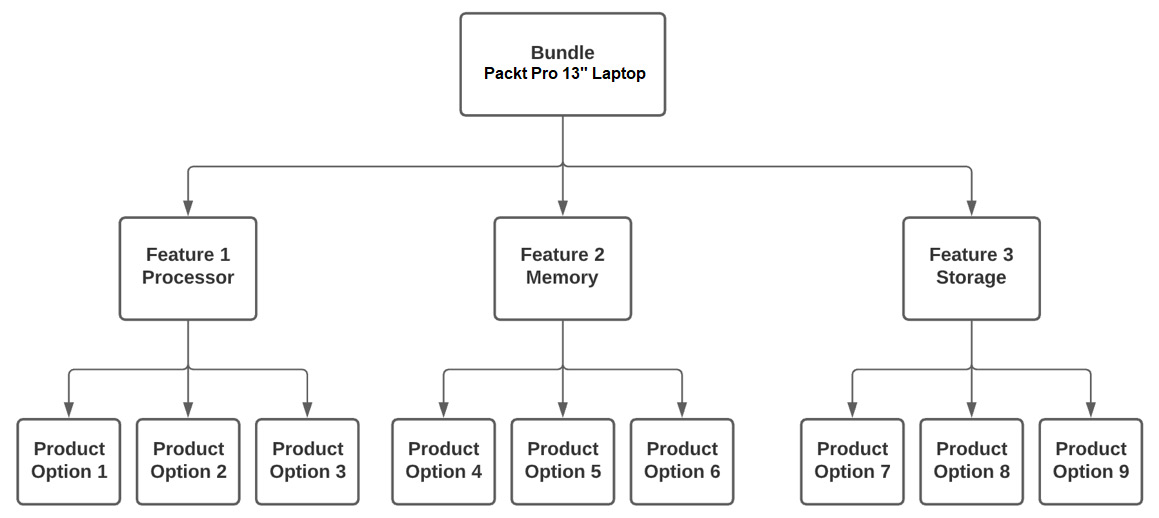
Figure 3.8 – Relationship between bundles, features, and options
To create a product feature, navigate to the sample Packt Pro 13" Laptop bundle, click on the App Launcher (the nine dots on the top left-hand menu in your Salesforce instance), search products, then click Packt Pro 13" Laptop Related Feature New. This will open the New Product Feature screen, as shown here:
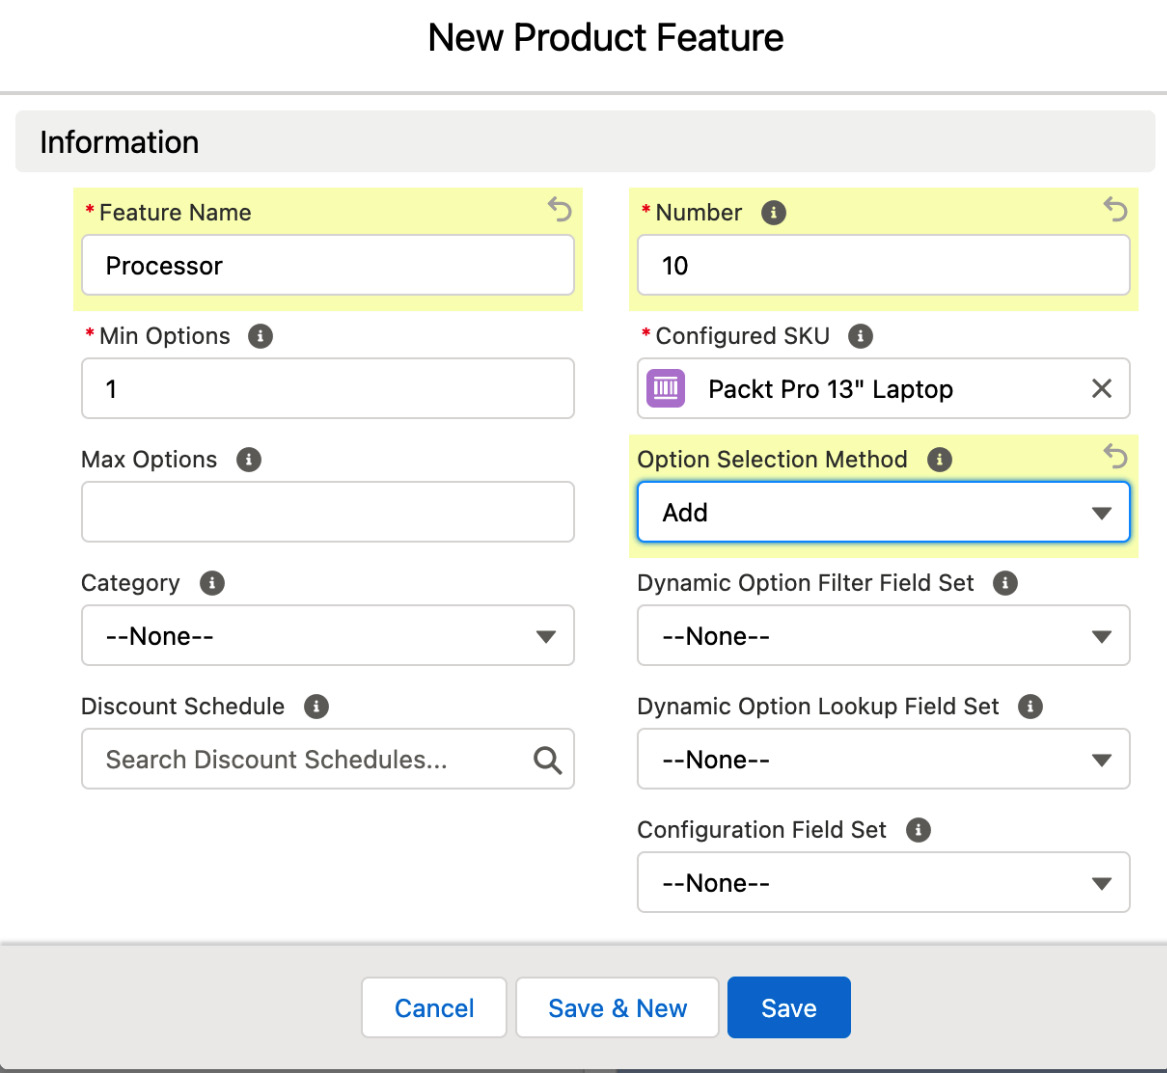
Figure 3.9 – Creating a product feature
A few important fields in product feature creation include the following:
- Feature Name: Provide a meaningful name. For example, as we are creating this feature for processors, let's name this Processor.
- Number: This field is used to sort features when displayed to the end user.
Go back to the i5 processor option and update the feature lookup. Similarly, add an i7 option to the processor feature.
- Min Options: Minimum number of options required for this feature.
- Max Options: Maximum number of options that can be selected as part of the product bundle.
- Option Selection Method: Determines how users select options attached to a bundle product. This has three values: Click, Add, and Dynamic.
- Click presents options with checkboxes next to them.
- Add renders a button that will show the predefined options.
- Dynamic renders a button that will show all the active products.
For this example, let's select Add.
- Category: Assign a category if you want to group this feature to a specific category and display it in a separate tab.
- Additional Instructions: This is a special field configuration that helps your rep with some additional instructions on a feature. Create a new text field in the product feature object. Name this field exactly as AdditionalInstructions. This can be displayed to the rep while they're configuring products.
Let's group the previously created options in Figure 3.2 into the features processor, memory, storage, and accessories.
The next figure shows the example bundle that the admin has created with options and features:
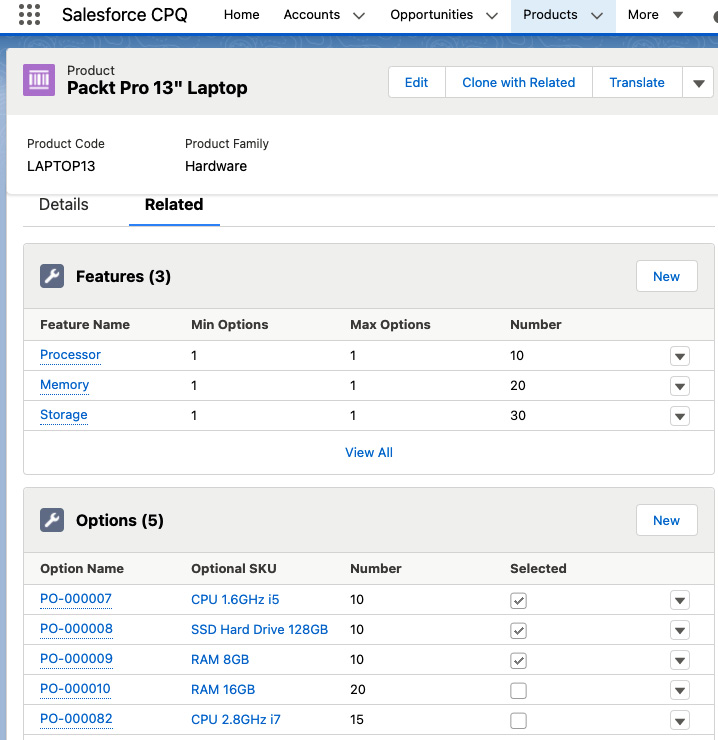
Figure 3.10 – Product bundle with options and features
Let’s see how reps can add these bundles to QLE.
Adding a bundle to the QLE
When the rep adds a bundle to the quote, CPQ provides all the options related to this bundle. The rep can choose which options to add to the quote. The following figure shows the QLE where the sample bundle is added:

Figure 3.11 – Product bundle in the QLE
As shown in the preceding figure, bundles help reps to add products easily to the QLE without having to manually add products. Salesforce CPQ provides another functionality that will help to exclude some of the options from the bundle. It is called option constraints, which are used when you want to exclude one option while another one is selected for the product bundle. They are also used to preselect the dependencies or exclude them. For example, a Wi-Fi Router product needs to be selected before Wi-Fi Installation is selected. In another use case, you don't want your reps to add two options for processors: one for i5 and another for i7. Option constraints can either enable or disable an option. It is important to note that the system will not force a user to select an option that is handled by a constraint. The user must still select it. They can be used in real-time rule processing, which gives immediate feedback to the sales rep.
What if we want to automatically select products for a specific user, automatically hide or show products, and validate a user selection for a specific product or bundle? Product rules can be used to dynamically generate options based on filter logic. In the next section, we will learn how to configure product rules in CPQ.
Creating product rules
If a customer is buying a printer from your company and your sales rep forgets to add a cartridge, it costs time and energy for everyone involved in the process to buy the right combination of products. This also results in a poor customer experience. In some cases, the rep may not know the actual combination of products, which may lead to incompatible products that are included in a quote. It is difficult for a rep to remember these combinations and rules, especially when a business is selling a lot of products. Salesforce CPQ and its product rules are designed to help the rep get the right products added to the quote the first time.
Admins can work with the business to define these rules for your organization and perform a one-time configuration.
Product rules are derived based on the if/then structure. If a condition is satisfied, then an action will be performed. Product rules allow admins to define advanced configuration logic compared to option constraints. We can show/hide specific product options that are more resource-intensive.
There are four types of product rules:
- Validation: This prevents the rep from saving a record until the error is corrected. For example, when you are selling a laptop without a power cord, it stops the rep from saving the incorrect configuration until the right products are added.
- Alert: These are like soft alerts, where the system will warn the rep that a required product is missing but will still allow them to save the record. For example, when your rep is selling a laptop, the system will provide an alert that the mouse is missing but the sales rep can still decide whether to include a mouse, and the system will not have a hard stop.
- Selection: Selection rules work with the product option configurations for selected products to provide more dynamic and specific bundle configurations. It automatically performs actions on product options without displaying any message. Selection adds, removes, or hides products during bundle configuration. For instance, when a rep is selling a laptop, mandatory products such as the power cord will be automatically added to the configuration. This overrides the product bundle option while adding the products.
- Filter: Allows specific products in a feature that uses the dynamic selection option. For example, when a US sales rep is creating a quote, it shows only US-compatible products in the configuration.
A product rule is an object in Salesforce CPQ. It contains business logic that helps sales reps get the right products into a quote. There are some main objects that look up to the product rule. Salesforce admins use these objects to configure most of the product automation. They are as follows:
- Error Condition: This defines the condition for which the product rule should be executed.
- Product Action: This defines how CPQ changes the bundle configuration. Product Action performs an action on a product option, such as selecting or deselecting the option within the bundle.
- Lookup Query: This is used in product rules to query data from an object (both standard and custom objects) other than a quote. They map the data from the lookup object back to the product rule.
- Configuration Rule: This links the product rule with a bundle or individual product.
- Summary Variable: A summary variable is a way of aggregating data. Be mindful of the number of summary variables. It should not be more than 5 or 10 per rule. Excessive use may result in performance issues and governor issues.
- Configuration Attribute: This is a field that the sales rep can set during the product configuration. These are not part of product rules, but they are used in error conditions and sometimes in lookup queries.
In the next section, let's learn how to create the different types of product rules. Along with creating the product rule, we will see how an admin can leverage the out-of-the-box CPQ objects to configure the rules.
Creating a validation product rule
Imagine Packt Corporation is selling a warranty product named Laptop Loss and Damage Warranty along with the laptops. The company does not want its reps to sell a warranty quantity that is greater than the laptop quantity.
If the warranty quantity is greater, the product rule will trigger and will not allow the rep to save the record until the error is resolved. To create this rule, the admin can navigate to App Launcher Salesforce CPQ Product Rules New. This will open the following screen:
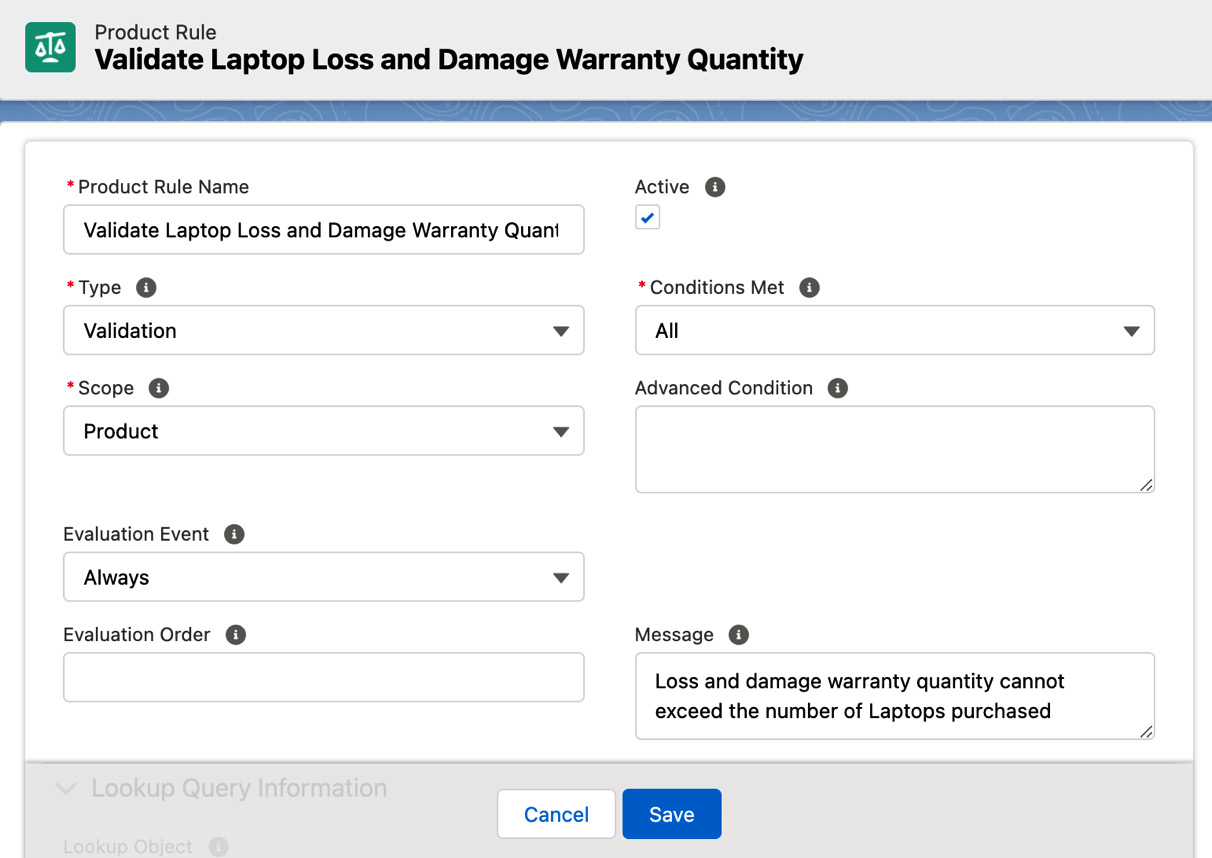
Figure 3.12 – Validation product rule
The preceding figure shows the configuration of a sample product rule in a Salesforce instance. Please refer to it while creating your product rule. The important fields in this configuration include the following:
- Product Rule Name: Provide a descriptive name that's easy to understand why we created this rule.
- Type: This is one of the four product rule types. In this example, we want to create a product rule of the Validation type.
- Scope: This field's value can be a product or quote. When Product is selected as the scope, the product rule will be applied to the specific bundle and will be executed during the configuration. When Quote is selected as the scope, the product rule will be applied to the entire quote and will be executed in the QLE.
- Conditions Met: Based on this value, the rule will be executed when all the conditions are met, if one condition is met, or a combination is met.
- Advanced Condition: When an admin has more than one condition, they can be logically grouped using advanced conditions.
- Evaluation Event: Determines when Salesforce CPQ runs this rule. It can have the following values:
- Load: The rule will be evaluated when the product bundle is opened.
- Edit: The rule will be evaluated when the product bundle is changed.
- Save: The rule will be evaluated when the user saves the record.
- Always: The rule will always be evaluated.
- None: The rule is applied after the user clicks save.
- Evaluation Order: Determines the order in which the rules should fire when there are multiple rules. The best practice is to leave some gaps between the numbers so that when there is a need to add additional rules, you can do so.
- Message: This is the text that will be visible to the rep when the rule is triggered.
Save the product rule and navigate to the Related section. Error conditions can be created in the Related section. In the next section, we will learn how admins can create summary variables and error conditions for a product rule.
Creating a summary variable and an error condition
For the validation product rule that we want to create for Packt Corporation, whenever a rep tries to add products to the quote, we want Salesforce CPQ to calculate the warranty and laptop totals in the backend and compare them in the error condition. To create the product totals, the rep can use the out-of-the-box functionality using summary variables. These variables can be used in the error condition filter values to evaluate when the rule should fire. Summary variables are aggregations of products on quotes. They can be referenced in a product's rule error conditions. These are like Salesforce rollup fields except that you don't store these values in a field. Let's first create a sample summary variable:
- In this product validation rule, we want to compare the total number of laptops and the total number of warranty products. To create a summary variable, navigate to App Launcher Salesforce CPQ Summary variables New.
The following figure shows a sample summary variable creation in a Salesforce instance:
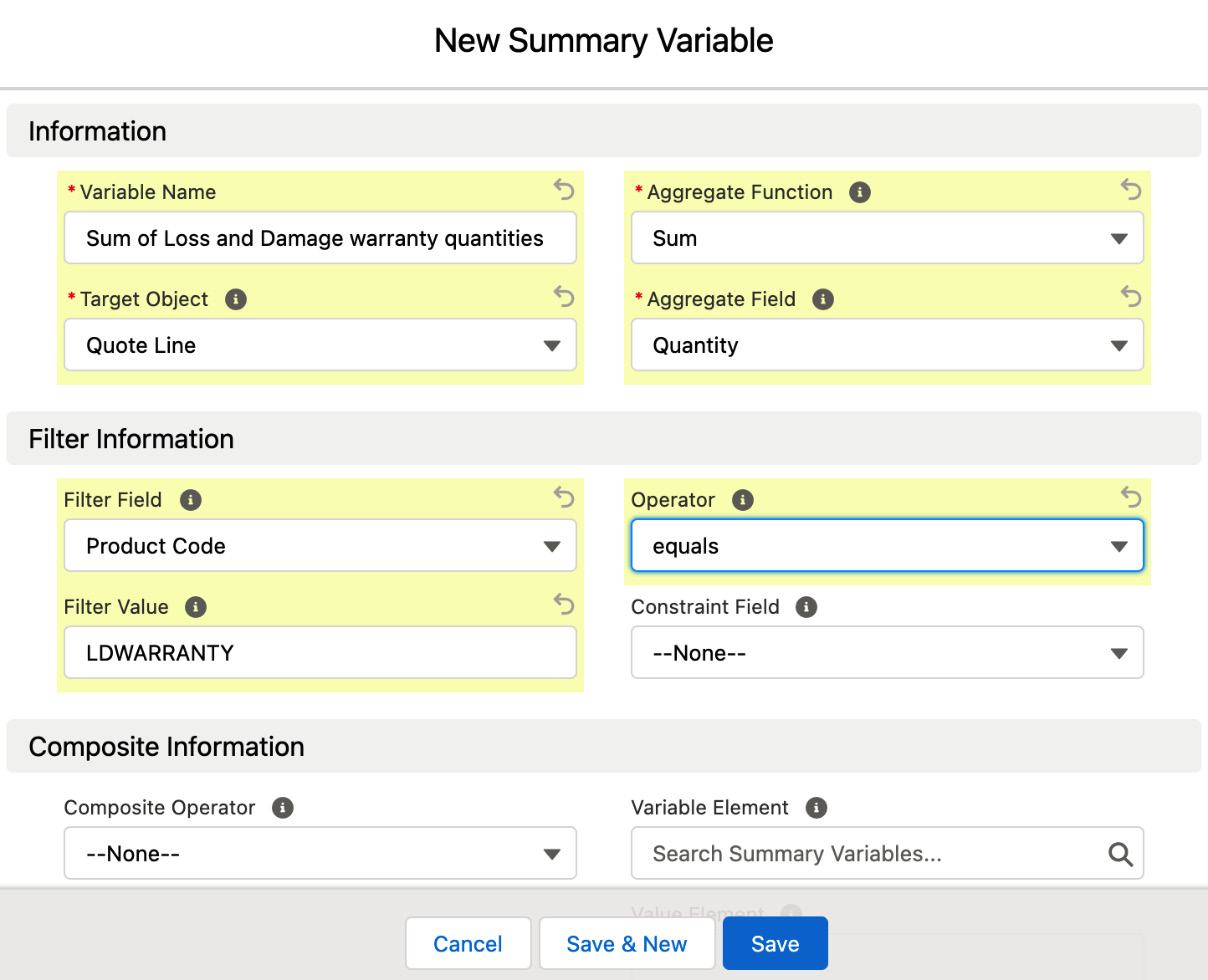
Figure 3.13 – Creating a summary variable
A few important fields in the summary variable creation include the following:
- Variable Name: The name of the summary variable. Provide a meaningful name.
- Target Object: This is the object we want to calculate the sum for. In this example, we want to sum the product quantities.
- Aggregate Function: There are different aggregate functions – sum, average, min, max, and count. In this example, we want to sum the total warranty products, therefore we selected Sum.
- Aggregate Field: This is the field for which we wanted to perform the aggregate operation. In this example, we want to sum up the Quantity field.
- Filter Information: Here, we want to sum all the quantities where the product code is LDWARRANTY. This is the product code associated with the Loss and Damage Warranty product in the Salesforce test instance.
- Similarly, create another summary variable (Sum of Laptop quantity) that calculates the sum of all the laptops. You can add the filter condition based on the product family as we may have more than one hardware product.
Summary Variable for Custom Product Fields
If the target object is a product option and the custom field is not available, create the custom field before creating the summary variable. A summary variable is just going to query the quantity and return it to the filter condition.
These two summary variables can be used in the error condition creation. Next, let's create an error condition.
This is where we define the product rule conditions. To do this, navigate to the Validate Laptop Loss and Damage Warranty Quantity sample product rule created for Packt Corporation, by going to Product Rule Error Conditions New. This will land you on the screen shown here:
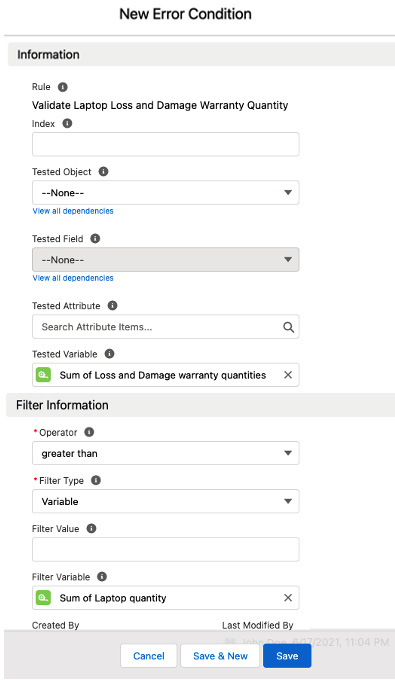
Figure 3.14 – Product rule error condition
The error condition can be created using either Tested Object/Tested Field or Tested Variable. In this example, we will learn how to create the error condition using the tested variable the summary variable created. Important fields in the error condition include the following:
- Tested Object and Tested Field: The object/field for this error condition to be evaluated. This should not be used if Tested Variable is populated.
- Tested Variable: Look up a summary variable that needs to be evaluated. This should be left blank if Tested Object/Tested Field values are used. In this example, we are using the Sum of Loss and Damage warranty quantities summary variable.
- Operator: Choose how the filtered information will be compared to the evaluated information.
- Filter Type: Choose this if a filter value or filter variable will be used to compare against the evaluated information.
- Filter Value: A manually entered value that is compared against the evaluated information.
- Filter Variable: Look up a summary variable such as Sum of Laptop quantity to compare against the evaluated information.
Associating a product rule with a product bundle
Now we can associate the product rule to the bundle using the configuration rule. This example is specific to one bundle and one rule; many configuration rules can be created to relate a single product rule to many products. Here, we want this product rule to apply only to this bundle. To do this, navigate to the Packt Pro 13" Laptop product bundle Related Configuration Rules New. This will open the configuration rule screen, as shown here:
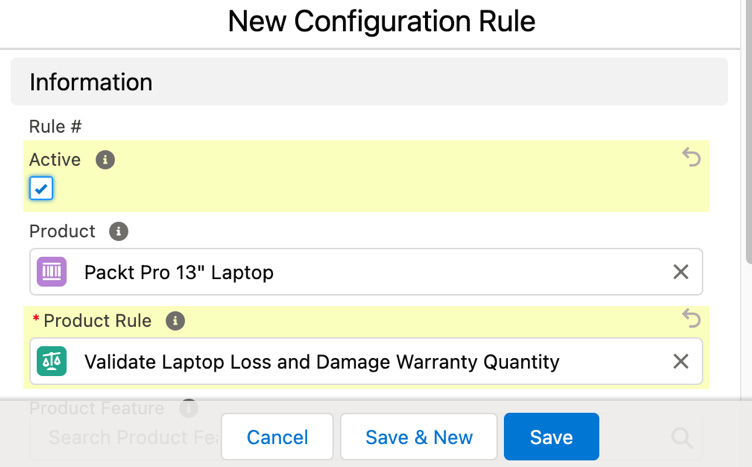
Figure 3.15 – Associating a product rule to the bundle
In the configuration rule shown in the preceding figure, we are associating the Validate Laptop Loss and Damage Warranty Quantity product rule with the Packt Pro 13" Laptop bundle.
Testing the validation product rule in the QLE
Let's learn how reps use the bundles created by admins and add bundles to quotes. We can test the product rule created for validating the warranty quantity. A rep can navigate to the QLE page to do this. Open any opportunity, then go to Quote Edit Lines. This takes you to the QLE. Click Add Products Search Products. Search for the Packt Pro 13" Laptop bundle and click Select. This will take you to the Configure Products page, where you can see all the features and options that the admin has configured in the backend.
When you try to add a warranty quantity greater than the laptop's purchased quantity, the product rule will fire and display an error message, as shown in the following screenshot:
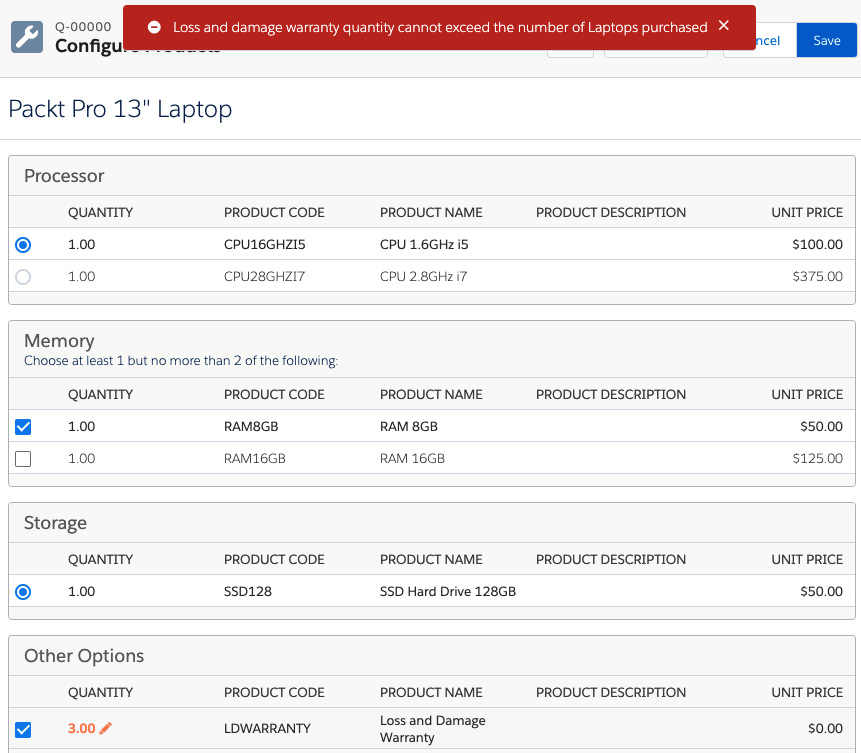
Figure 3.16 – Product rule validation error message on the QLE
As shown in the screenshot, the rep can choose from the product features and select the product options as per the customer's requirements. At the same time, the automation that the admins created using product rules will make sure that the configuration is accurate.
Creating an alert product rule
An alert is a soft validation. It displays a message for the user to acknowledge. It's at the user's discretion to continue or cancel. For instance, if your company is selling printers, when a rep is configuring a printer bundle, we would like to provide an alert to see whether the customer is interested in buying printer paper. A good admin limits the number of alerts in an org to only the most important ones. The rep can either add printer paper to the configuration or ignore it as per the customer's needs. To create an alert product rule, the admin can navigate to App Launcher Salesforce CPQ Product Rules New. This will open the New Product Rule window, as shown in the following figure:
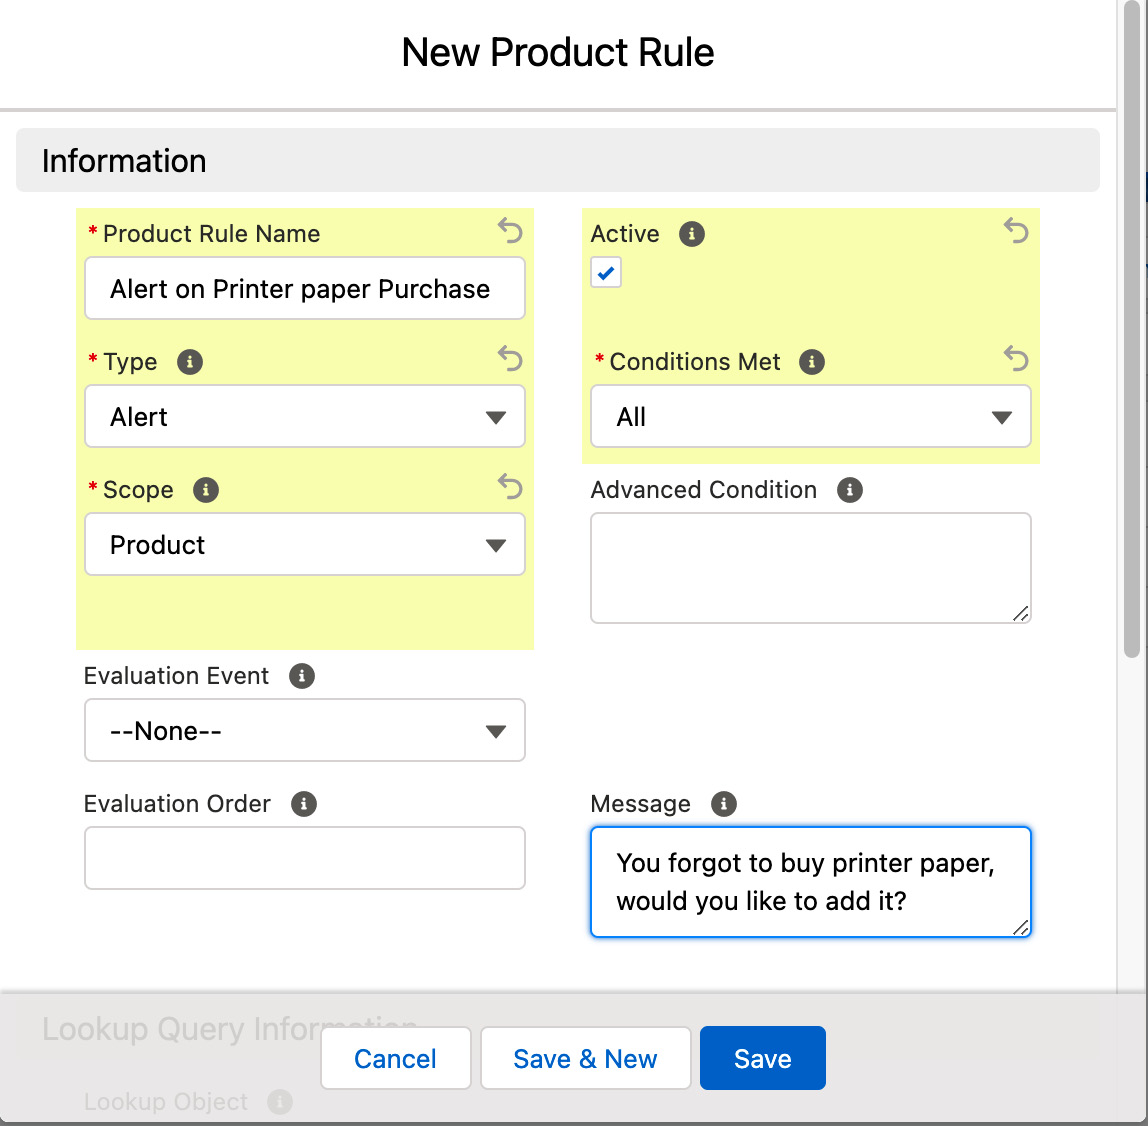
Figure 3.17 – New Product Rule
This product rule's type is Alert and its scope is Product as we would like to trigger this rule only for the laser printer bundle.
Creating an alert product rule error condition
Let's create the error condition for this alert and define the criteria to trigger this rule. To add an error condition, navigate to Product Rule Error Conditions New.
In the previous example, we created an error condition with a summary variable using the Tested Variable field in the error condition. Now, let's use Tested Object and Tested Field to define this condition. You can only use one or the other and based on the business requirement, you can decide whether a summary variable is needed or not. In this example, we are simply verifying whether the customer is interested in buying paper along with the printer. There is no mathematical aggregation needed and hence there is no need for a summary variable:
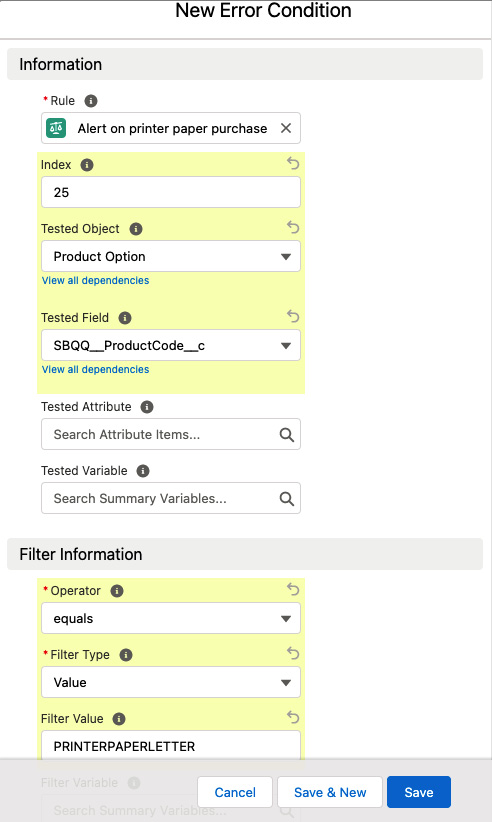
Figure 3.18 – Product rule error condition
Update the mandatory fields in the error condition as shown in the preceding figure. There is more than one way an error condition can be configured for a product rule. Let's learn more about the important fields that can be used to configure these error conditions:
- Tested Object and Tested Field: The object/field for which this condition should be evaluated. This should not be used if the tested variable is populated.
- Tested Object: For this example, we want to verify the product option.
- Tested Field: In the product option, we want to alert the user if printer paper needs to be added. The product code for printer paper is PRINTERPAPERLETTER, as shown in the test instance where this product rule is being created.
Associate the product rule to the bundle using the configuration rule for which the product rule should trigger.
Testing the validation product rule in the QLE
Now, let's see the end user experience with this product rule. Navigate to any opportunity Quote Edit Lines. This takes you to the QLE. Click Add Products Search Products, search the Laser Printer bundle, and then click Select.
When the rep saves the production configuration, the alert will be displayed as shown here:
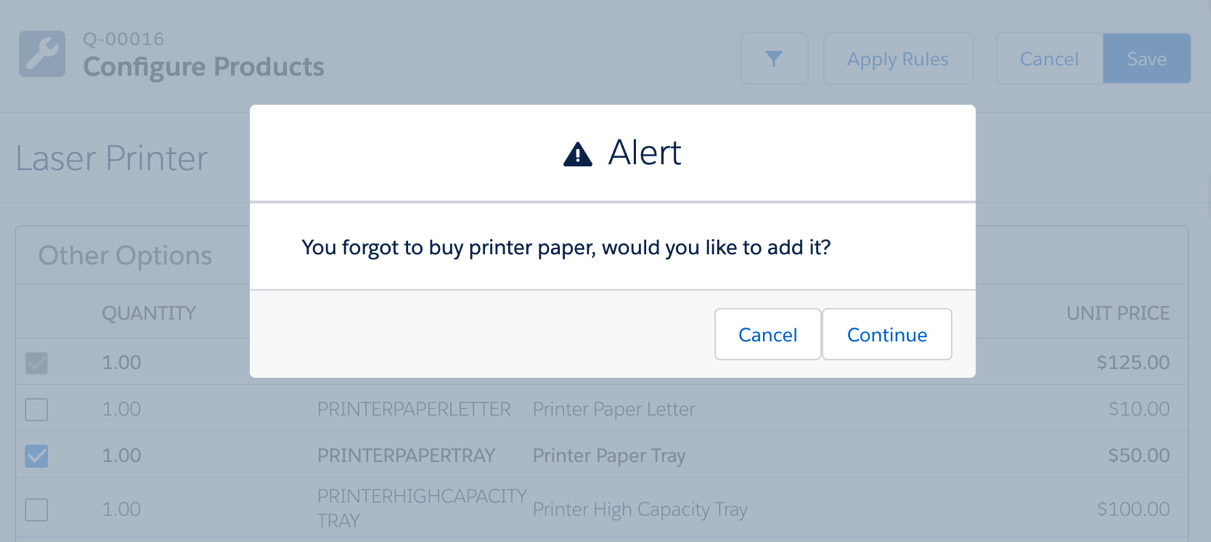
Figure 3.19 – Product rule alert message on the QLE
The user can continue and add the printer paper or cancel the alert as required.
Creating a selection product rule
Until now, we have seen how admins can help reps with the validation and alert product rules, where the system can guide them to add the correct products. Here, we see a product rule that will automatically add products to avoid issues and create the right configuration. This can be built using the selection product rules.
Let's consider an example where your company is selling products in multiple countries. Based on the location, you want to show US products or UK products to your reps. For instance, look at the example given in Figure 3.20; when the rep chooses the location in the QLE as the US, we want to show US products and hide or disable UK products:
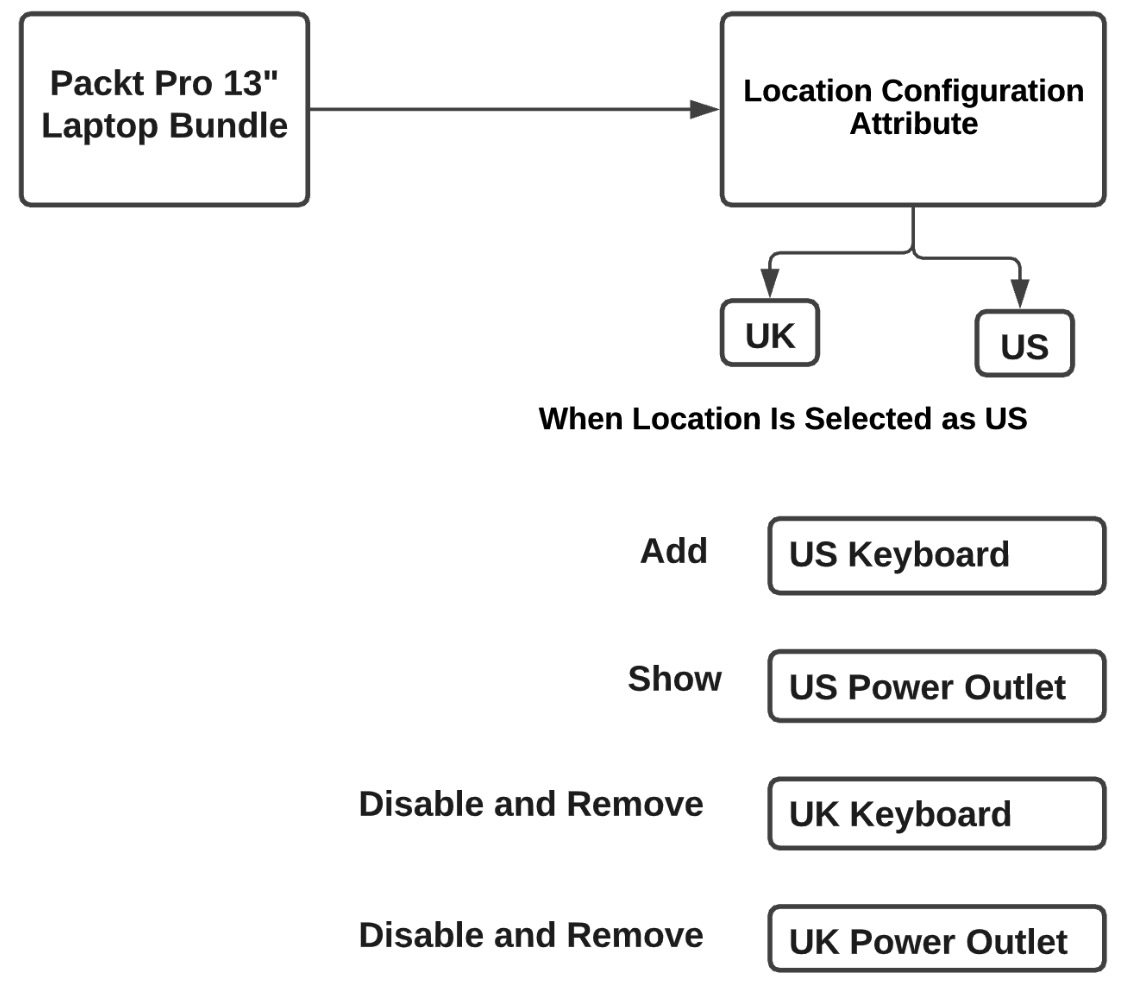
Figure 3.20 – Selection product rule use case
We can create a location field as a configuration attribute that is visible to the rep when configuring the bundles. First, let's create this custom field called location:
- To create the location picklist field in the product option object, navigate to Setup Object Manager Product Option Fields & Relationships New. Select Picklist Next Field Label (Location) Values (enter the values United States and United Kingdom, with each value separated by a new line) Field Name (Location) Next Save Important .
Important Note
It is strongly recommended to use global picklist value sets as we need the same values in many different objects. This will be useful for the long run and also for maintenance to just need to change the value at one place rather than going to multiple individual picklists.
- Update the target field picklist on the configuration attribute object to include the API name of the location field. Navigate to Setup Object Manager Configuration Attribute Fields & Relationships Target Field New and type Location__c in the text box. Then, check Configuration Attribute and select Save.
- Create the configuration attribute on the Packt Pro 13" Laptop bundle. Navigate to App Launcher Salesforce Product Bundles (Packt Pro 13" Laptop) the Related tab. In the Configuration Attributes related list, click New. This will take you to the configuration attribute screen shown here:
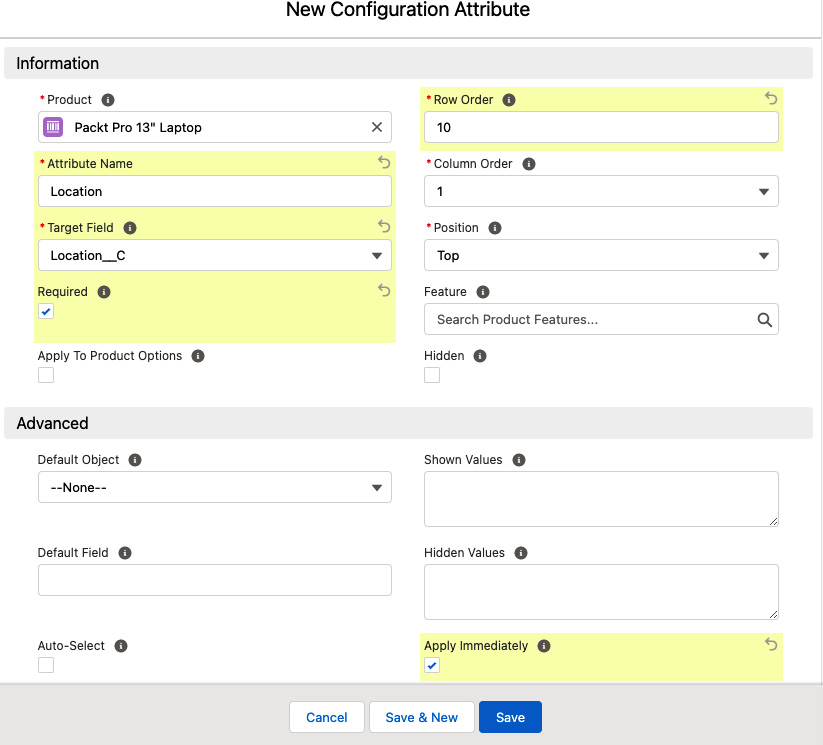
Figure 3.21 – Product rule configuration attribute
Update the mandatory fields as shown in Figure 3.21.
- Next, the admin needs to create a twin field for the location in the quote line object. To do this, navigate to Setup Object Manager Quote Line Fields & Relationships New. Select Picklist Next Field Label (Location) Values (enter the values United States and United Kingdom, with each value separated by a new line) Field Name (Location) Next Save.
When the rep selects the location as United States, a US keyboard and US power outlet should be added and displayed. To create a selection product rule, navigate to App Launcher Salesforce CPQ Product Rules New. This will take you to the new product rule window, as shown next:
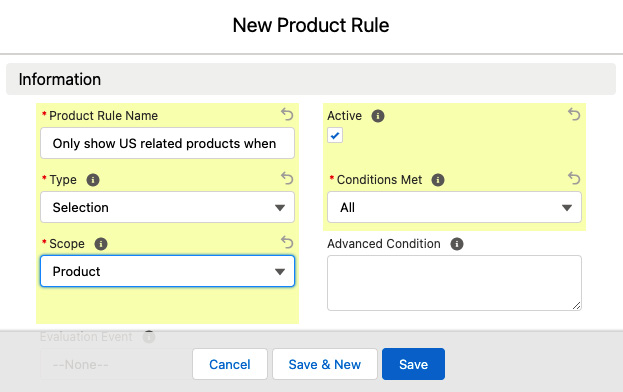
Figure 3.22 – Selection product rule
Update the mandatory fields as shown in the preceding figure.
- Because Location is a custom field, before we can use this field in the error condition, we need to update the Tested Field picklist. To do this, navigate to Setup Object Manager Error Condition Fields & Relationships Tested Field Values New, type Location__C, then click Save under Picklist Options. Click Change next to the controlling field of Tested Object. Click Location__C in the Configuration Attributes column and select Include Values Save.
Now we can create an error condition for the selection product rule so that, based on the filter criteria, the rule gets triggered.
Creating a selection product rule error condition
To create an error condition for this alert, navigate to the selection product rule (Only show US related products when location is US) Error Condition New. This will take to the new error condition screen, as shown here:

Figure 3.23 – Selection product rule error condition
Update the filter condition for United States. Here, unlike the validation and alert product rules, where we displayed an error message to the user, we want to show the relevant products and select them automatically. This can be done by creating a product rule action.
Creating an alert product rule action
Salesforce CPQ provides several actions out of the box, such as Enable, Disable, Add, Remove, Show, and Hide. Based on the requirements, these actions can be selected in the Type field.
Important Note
Selecting Remove will deselect the Product Options Selected checkbox. If the product option is hidden, this action won't show in the configurator. You can still use other product rules to select or deselect the Product Options Selected checkbox. Selecting Disable will prevent users from selecting the Product Options Selected checkbox. Product rules let you adjust product options in a bundle on your quote.
In this example for a location-based selection product rule, let's create a sample action to hide the UK products. To do this, navigate to the Only show US related products when location is US selection product rule Actions New Type Hide & Remove Product Keyboard UK Layout and click Save. This will take you to the New Product Action screen, as shown here:
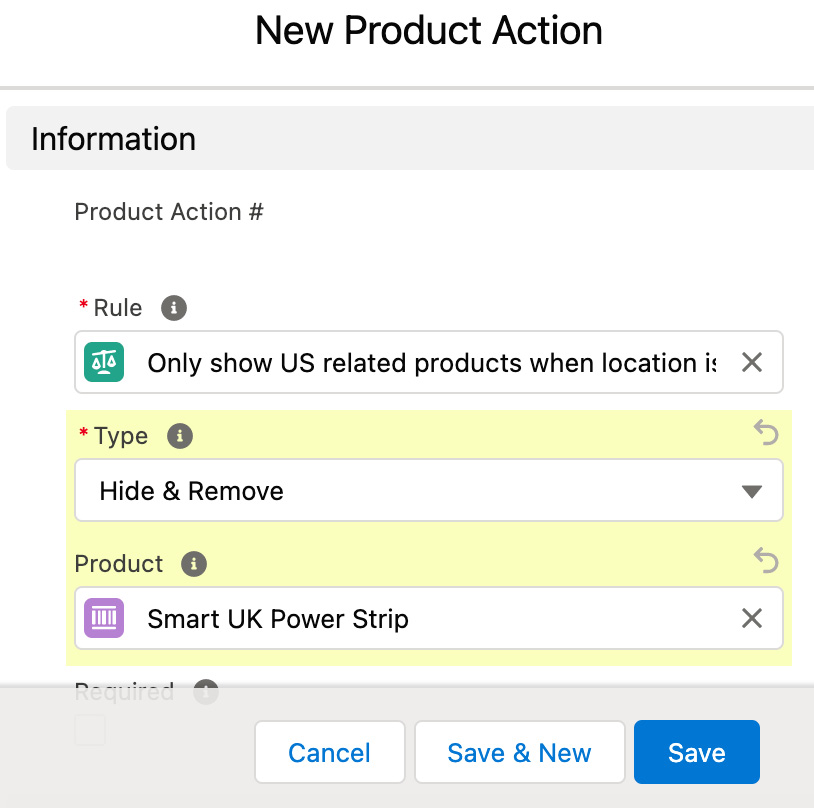
Figure 3.24 – Product action
For the example shown in the preceding figure, we have selected the type as Hide & Remove as we wanted to hide the UK products when the location is selected as United States.
Important Note
The Required checkbox needs to be selected for the add action product rule otherwise the rule will not work. Similarly, if the Required checkbox is checked for any other types, such as Hide, Disable, and Remove, the product rule will not work.
Similarly, create another product action to hide the UK products. Follow the same steps and create a product option for each UK product. After that, link the product rule with the bundle using a configuration rule (you can refer to the Creating a validation product rule section to see how to create a configuration rule).
Testing the validation product rule in the QLE
Verify the end user experience by opening any opportunity Quote Edit Lines. This takes you to the QLE. Click Add Products Search Products, search the Packt Pro 13" Laptop bundle, and click Select. This will take you to the Configure Products page, where the rep can select the location. Before selecting the location, you can see that all the options are enabled, as shown in the following figure:
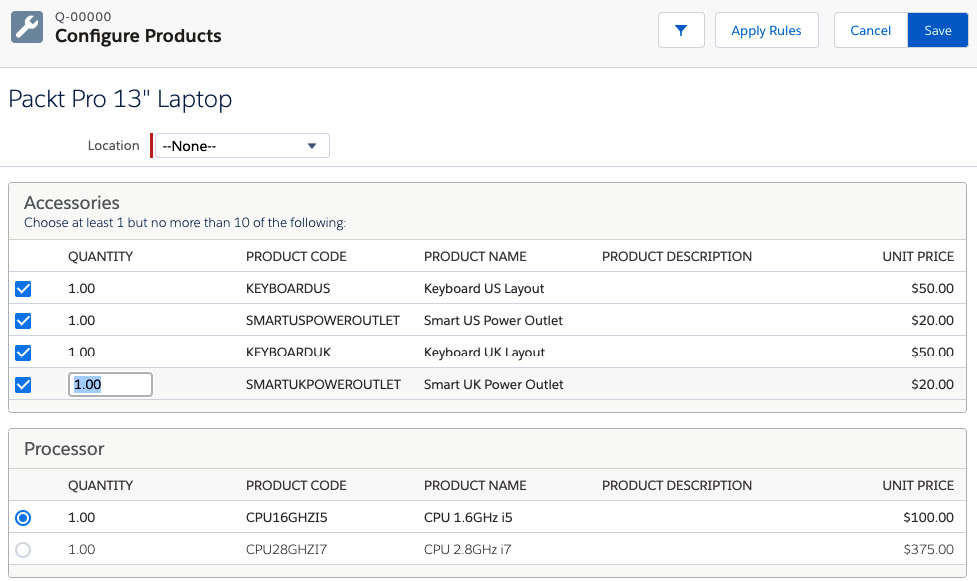
Figure 3.25 – Selection product rule in the QLE
As soon as the rep selects the location as United States, the UK accessories will be removed and disabled.
Creating a filter product rule
A filter product rule will dynamically add products to a bundle. The product feature option selection method needs to be dynamic for filter products to work. This will be helpful for use cases where there are new products added frequently. Instead of the rep modifying the options manually, we can use a filter product rule to automatically add them to the bundle.
We need to ensure that the option selection method for the product features is dynamic. This is very important for dynamic bundle creation. In addition, we should make sure that the filter field is available for products and product options so that we can compare both values and create the bundle automatically.
Let's create a product rule of the filter type and associate an action with it. Follow the steps provided in the previous product rule sections for the syntax. We will be able to automatically add options to the product bundle using a filter field. For example, you can filter all the products by product family, dynamically adding all products of the promo type. This product family picklist needs to be added to both products and product options. Based on this, the product rule filter condition can be created.
In the next section, we will learn about an out-of-the-box CPQ mapping that can help admins with CPQ configuration.
Creating twin fields
Salesforce CPQ can mirror custom field values from one object to the other. These fields are called twin fields. The values will be passed from one object to the other only if the fields are editable, have matching field types, and have the exact same API names (case-sensitive and even considering space).
Twin fields can replace the creation of formula fields, workflow rules, process builders, or other automation. There are a few points to remember when creating twin fields:
- Twin fields work only for custom fields and not standard fields.
- They are populated only upon record creation.
- Twin fielding is not a good solution when you need the value of a field to be maintained on two records throughout their life.
- Even though a bundle is defined as a favorite, adding the favorite bundle to the QLE will not capture the twin field values.
- Twin fields only map between specific objects.
For example, you want to have an attribute of your product that is defined in a field in the product record. This can be automatically populated in a quote line by using twin fields.
Please refer to the following Salesforce help link for a complete twin field mapping that is available out of the box:
https://help.salesforce.com/s/articleView?id=sf.cpq_twin_fields.htm&type=5
Summary
In this chapter, you have learned how to configure products and guide sales reps in automating different business processes for adding products to quotes. Now that we have learned how to use CPQ product configurations out of the box, your reps can sell complex product configurations easily and accurately. These configurations are one-time activities that an admin can create as per the company's business requirements.
In the next chapter, you will learn how to price these products and learn more about CPQ pricing.