Way back when Photoshop Version 7 was released, Adobe added a feature called the File Browser, which enabled users to quickly find the files they needed by using a visual interface. Over the past few releases, this tool was greatly enhanced and eventually turned into its own application, called Bridge.
Bridge acts as the hub for your digital media assets. It can track the locations of the files that you’re using and creating in the CS3 suite, as well as files created outside of CS3 that are supplemental to your projects. Think of Bridge as the ultimate media file browser for your system that just happens to also include
An integrated browser for accessing online resources
A photo downloader for your camera
An advanced file tagger and search engine
A control center for the Version Cue system
This chapter will look at many of the features of the Bridge application and how you can use it to better manage your digital files.
The easiest way to figure out how Bridge can help you organize your digital assets is to start using it. So go ahead and launch Bridge now, either by opening it from the Macintosh Finder or Windows Explorer, or by choosing Browse from within one of the Adobe CS3 applications.
Bridge, seen in Figure 5.1, looks a bit different from the other CS3 applications. With such a specialized purpose, the interface is a bit more stylized and “fun” than the core suite. Let’s start by looking at the default Bridge window browsing a few photographs on my computer.

Along the top of the Bridge window is the toolbar, with simple buttons and menus for navigating through your file system, similar to what you’d see in the Finder or Windows Explorer.
Along the sides are additional panels for quickly jumping to your favorite locations, navigating the folder structure on your computer, specifying filter criteria for image search, and viewing/previewing any information about files that you have currently selected.
In the center of the Bridge workspace is the primary content area, called the Content panel. When you select a folder from the Favorites or Folders panel, this area refreshes to show thumbnails of all the files within a selected folder. Alternatively, if you perform a search, the Content panel shows the search results.
At the bottom of the Bridge window is the status bar. A double-arrow icon at the left side of the status bar enables you to quickly expand and collapse the panels on the sides. On the right side of the status bar, you’ll notice a slider bar; this controls the size of the thumbnails within the content area. For example, in Figure 5.1, the thumbnails were sized at the default setting. In Figure 5.2, the slider has been changed to show significantly more detail.

At the far right of the status bar are three buttons that represent different workspace presets that you might want to use.
A workspace, in case you haven’t encountered that term, is just a way of referring to the current organization of all the panels onscreen. For example, you can expand and collapse the onscreen panels by clicking and dragging their sides, or you can move them around by clicking and dragging their tabs. To hide a panel entirely, either right-click on its tab and choose Close, or deselect it from the Windows menu. As you change the panels, you are customizing your workspace.
We’re going to be using the default workspace (the initial setting for the first workspace button), but you might want to explore or set workspaces for the other buttons by clicking them, or clicking and holding to choose a specific workspace preset.
All of the same features and panels are available regardless of what workspace you use—they might just be organized differently to emphasize different features or to hide options that aren’t relevant to your current project. If you come up with a particular arrangement that you like better than the presets, you can click and hold any of the workspace preset buttons in the status bar and choose Save Workspace to save your very own workspace variation.
After you’re up and running in Bridge, the first thing you’ll probably be asking yourself is “Okay, where are my files?!” This is a natural reaction, as Bridge doesn’t quite behave like a standard file browser on the Mac or Windows. If Adobe decides to make its own operating system, we might get used to it, but it’s okay if it feels a bit “alien” to you starting out.
The easiest way to start using Bridge to browse and manage your files is by using the Folders panel, shown in Figure 5.3.
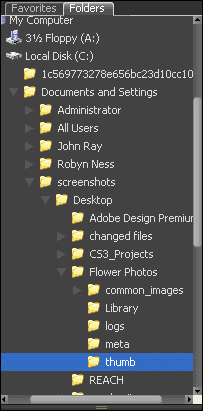
This panel displays a hierarchical list of the folders on your computer, as well as any network connections that you have in place. Using the icon in front of each folder, you can expand and collapse your directory structure and dig as deeply into your system as you’d like.
While you’re working your way through the folders, you’ll notice that the Content panel updates to show the contents of the folder you currently have selected. You can use the icons in the Content panel to open files (or navigate to other folders) by double-clicking the icons.
If you’d prefer to view more details about the files in the content area (rather than a simple icon), choose View, As Details from the menu bar. This displays additional metadata for each of your files, in addition to the thumbnail, as demonstrated in Figure 5.4.

A cool way to quickly step through and rate large collections of images is to use Bridge’s slideshow feature. Choose View, Slide Show to see images in full-screen mode. Press the H key to view all the keyboard shortcuts for the things you can apply to images as they appear on your screen, such as rating them.
Navigating to your most commonly used folders using the Folders panel (or Content panel) works, but is hardly efficient. To speed things up, you can create shortcuts using the Favorites panel.
This panel lists several icons that provide quick access to different functions, services, and locations, as seen in Figure 5.5. For example, clicking on the Version Cue item enables you to access files in Version Cue projects right from Bridge (we talk more about this a little later), while clicking the Adobe Photographers Directory connects you to a live directory of national photographers.

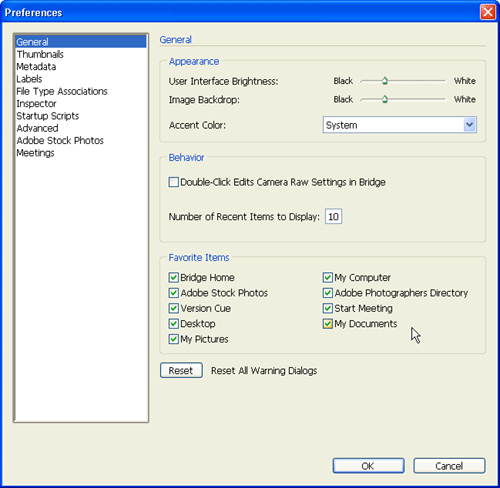
Items that appear below the divider line in the Favorites panel are specific folders or files that you access frequently. You can add your own favorites simply by dragging any folder or file into the panel. To delete a favorite, either drag it to your system trash or choose File, Remove from Favorites. You can also specify what does or does not appear in the Favorites panel in the General panel in Bridge Preferences, as seen in Figure 5.6.
To this point, we’ve been focusing on the Folders, Favorites, and Content panels. As you’ve clicked through these areas, you’ve probably noticed that there are other things changing on your screen as well. These other panels provide previews of your files’ content, as well as a means of setting metadata for each file and filtering your file view based on metadata.
The first new panel that we’re going to take a look at is the Preview panel. This panel provides (surprise!) a preview of the content that you have selected. What might actually surprise you is that the Preview panel does more than just display pictures; it can also provide playback of audio and video files, as demonstrated in Figure 5.7.

Directly below the Preview panel (in the default workspace) is the Metadata panel (shown in Figure 5.8). Here you can view all of the information about your currently selected file, including camera settings, file sizes, resolutions, color space, and more things than we can possibly mention here.

For some types of files, you’ll notice that there is a pencil to the right of certain metadata field names. This means that the metadata is editable. To enter your own information, click the pencil and you can type into the field—it’s as simple as that!
To save the changes, click the check mark in the lower-right corner of the panel. To cancel your modifications, click the circle with the line through it.
Sometimes there is metadata that you want to set for a file, but it isn’t part of the metadata available for the file type. In these cases, you can create custom keywords and apply them to files however you’d like. To access the keyword feature of Bridge, open the Keywords panel, as seen in Figure 5.9.

Keywords are organized by sets and, within each set, multiple keywords can be set.
By default, there are several example categories and sample keywords. You can delete the categories or keywords by clicking their label in the panel, and then choosing the trashcan icon in the lower-right corner.
To add a new keyword, click the paper-pad button at the bottom of the panel. This adds a new keyword to a set called Other Keywords. If you want to add a new set, click the folder button. You can move keywords between sets by clicking and dragging their labels.
To assign a keyword to a file, make sure the file is selected in the Content panel, and then click the box beside the keyword label. All assigned labels are displayed at the top of the panel. To quickly assign all the labels to a set, just use the check box for the set itself, rather than the individual keywords.
Believe it or not, you can set even more pieces of metadata for a file. Using the Label menu, you can set labels for selected files or select star ratings to denote your preference for one file versus another.
Advanced users might want to look at the Metadata Template Creation tools found under the Tools menu for even more options related to metadata.
One of the nicest features of Bridge is the capability to filter the files you are viewing based on the metadata that has been set for a given file. By default, all files are shown when you view a folder. At the same time you’re viewing a folder of files, the Filter panel (shown in Figure 5.10) is being populated with metadata information about the files.
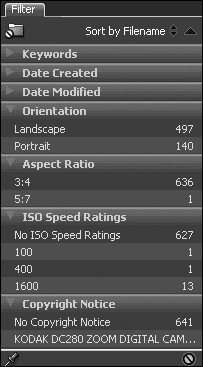
To limit your view to specific metadata attributes, scroll through the Filter panel and check or uncheck the items you want to use as filter criteria. As you activate or deactivate filter items, the Content panel updates accordingly.
At the top of the Filter panel are two additional functions. On the left side is a folder icon. Clicking this button applies your filter criteria across all files, not just the selected folder. Note that this can take quite a bit of time! On the right side of the panel is a pop-up menu that can be used to set how the files in the Content panel are sorted.
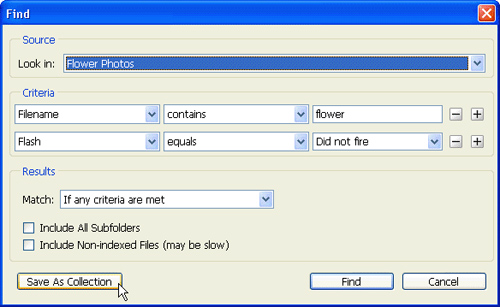
Choose Edit, Find to run a search within Bridge. Use the Criteria section of the dialog box to specify exactly what you’re looking for, again, based on metadata.
That’s not the best part of it. After you perform a find, you can click the Save As Collection button (see Figure 5.11). This creates what Bridge calls a collection, which you can access by clicking on the Collections icon in the Favorites panel. Collections are like live searches and can be very useful when you need to perform functions on the same kinds or groups of files. As you add or remove files that match the criteria of your collections, they are automatically added to or removed from the collection itself.
Bridge features two innovative services that can help you locate photos and photographers. The Stock Photos service enables you to browse and search several leading royalty-free image libraries, download watermark-free compositions (called “comps” in designer-land), and even purchase high-resolution images—all from within the application itself. The Adobe Photographers directory, on the other hand, provides an easy way to locate photographers in your area or around the world.
Adobe doesn’t have its own library of images; instead, it has partnered with stock photo giants Photodisc (Getty images), Comstock, and others that make managing the process of using stock photos easier and more efficient.
You can access the Adobe Stock Photos service by clicking on the Adobe Stock Photos icon in the Favorites panel. You can then perform searches (across all partners simultaneously) and download watermark-free comps without having to even launch a browser or log into a site, as shown in Figure 5.12.

Adobe Stock Photos actually embeds metadata into each comp that you download that contains the image ID, the partner site from which the image came, and other important information. This means that you can change the name of a downloaded comp (they always have meaningless names such as AA45900012.jpg anyway), and InDesign or Illustrator is still capable of identifying the image as a low-resolution comp. In fact, from either of those two applications, you can select the comp image and purchase the high-resolution version of the file right from the Links palette.
Adobe makes purchasing stock photo images easy because you can set up a single shopping cart account (accessible right from within Bridge) that enables you to purchase images all at once, even if they are from multiple partner libraries. Adobe has also negotiated with all the partners to offer a single consistent license agreement for all images.
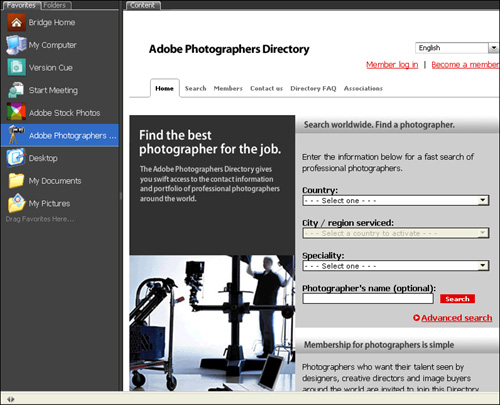
Few of us are professional photographers. Although the stock photo library might come in handy for common types of images, there are times when you might need to find a photographer to take the perfect picture for your project (try saying that five times fast!). Thankfully, Bridge now includes direct access to an online directory of photographers through the Adobe Photographers Directory link in Favorites.
Through this interface, shown in Figure 5.13, you can search for photographers by location, specialty, and name.
As we finish up our look at Adobe Bridge, there are still a few more features that you might be interested in trying—specifically, Bridge Home, Adobe Connect, Get Photos from Camera, Version Cue, and Color Settings. Let’s review these remaining items now.
Adobe’s Bridge Home, found at the top of your favorites list, is a great place to get information about the products in the CS3 suite. Seen in Figure 5.14, Bridge Home gives you direct access to training, conference information, and other resources.

Acrobat Connect is Adobe’s cross-platform conferencing solution. Based on the Flash engine, Connect is a great tool for collaborating with others across distances. If you have a Connect account, you can initiate a conference from directly within Bridge by clicking the Start Meeting link within the Favorites panel.
Visit http://www.adobe.com/products/acrobatconnect/ for more information on Acrobat Connect and the option to sign up for a free trial account.
As mentioned earlier, Bridge can serve as your digital camera download application. To use this feature, simply plug in your camera, and then choose Get Photos from Camera from the File menu. You are prompted about whether you want Bridge to start each time you plug in your camera (this can be reset in the Bridge General preferences). Bridge displays the Photo Downloader dialog, as seen in Figure 5.15.

After making your settings, click Get Photos and your images are transferred from your camera.
Version Cue is a product that is built into CS3 that enables groups of people to create and collaborate on products over a network. It can be used to manage multiple versions of files, and it acts essentially as a mini file server for your local network. To activate Version Cue, you can click the Version Cue item in Favorites, and then click the Start Server button. You are guided through a configuration process in your web browser where you are prompted to set up user accounts and server-type information.
After a server is up and running, you are able to browse it directly from the Version Cue shortcut in any CS3 application, as well as Bridge itself.
You’ve heard people say it before: “Never trust your monitor.” Getting consistent color on your desktop has always been an issue with designers, and, at some point, we’ve all believed in all the gadgets, plug-ins, and utilities that promised to deliver computer color nirvana (like those emails I get that promise you can lose weight by eating chocolate).
So here comes Adobe saying that, with one click of a button, you can get consistent colors on your screen. Let’s see how true that is. Choosing Creative Suite Color Settings from the Edit menu opens the Suite Color Settings dialog box, seen in Figure 5.16.

From here you can choose a color setting that will be synchronized across all your suite applications. And that’s the key concept to focus on: consistency across the suite. The way I see it, there are two levels to color management. The first level is having what you see on your screen match perfectly to proofs, press sheets, and anywhere else your files need to go. This first level is the most complex when you consider that so many different devices and technologies exist, in addition to all the external physical factors.
The second level of color management is consistency across the applications that you use. I don’t care as much about how close my screen is to my press proof. I do care that my colors look consistent among Illustrator, Photoshop, InDesign, and Acrobat.
Adobe promises this second level of color management with the Creative Suite Color Settings setting in Bridge. With one click, you can synchronize your color settings across the entire suite, ensuring that a color displayed in Photoshop looks exactly the same when displayed in Illustrator, InDesign, or Acrobat. Overall, that makes me happy.
This chapter introduced Adobe Bridge and the features that it provides across the CS3 suite. What started as a simple file browser is now a full-featured file organization, search, and preview utility. Although it is different from the browser built into your operating system, you’ll appreciate the consistency across Windows and Macintosh platforms.
In addition to the file-browsing features, Bridge also acts as a camera image download utility, a central hub for managing color settings, a way to locate professional photographers and download stock photos, and even a multimedia conference program. How (and if) you use it is entirely up to you, but you’ll definitely be surprised at the number of features you can access from a single application.