Have you ever tried to send a document to someone, only to find that it can’t be read on her system? Dealing with compatibility issues across software products and different systems can be a nightmare. The Portable Document Format (PDF or .pdf), is easily read by any computer system and used extensively on the Web. If you don’t have a PDF viewer (Adobe’s is called “Reader”), you can download one free. Many web designers use Acrobat to create their PDF files, add forms to their websites, and add a reviewing/commenting system to multiple-page documents. Additionally, designers and printers can use Acrobat 8.0 Professional to preflight and touch up files for final printing.
PDF is a file format that is used universally as a standard for file transmission. PDF is perfect for use across multiple platforms as well. Regardless of the system they are viewed on, Adobe PDF files retain all the original file information, such as fonts, graphics, and text formatting. What you see on Windows matches on Mac OS X, Linux, and so on. Mac OS X, in fact, uses PDF natively for generating its onscreen display.
PDF files are small and easily transferred anywhere to anyone with Internet access. Many companies today use PDF files for enabling web surfers to send in job or membership applications, and for internally passing information for review between departments and to other divisions.
To get started with Acrobat, let’s begin by reading a PDF file. To open a PDF file, you can choose File, Open; double-click a PDF file; or drag the PDF file icon to the Acrobat program icon.
After you have a file open, you can choose from several viewing options. In Full Screen mode, for example, you see only the document—no menus, toolbars, or windows.
To view a PDF file in Full Screen mode, choose Full Screen View from the Window menu, or press (Cmd+L) [Ctrl+L]. Pressing the key command a second time toggles between Full Screen mode and default mode. You can also press the Esc key in Full Screen mode to return to default mode.
If you prefer to keep things in a window, but get rid of some of the clutter, switch to Reading Mode (View, Reading Mode). This keeps the PDF file in a window, but removes all the toolbars.
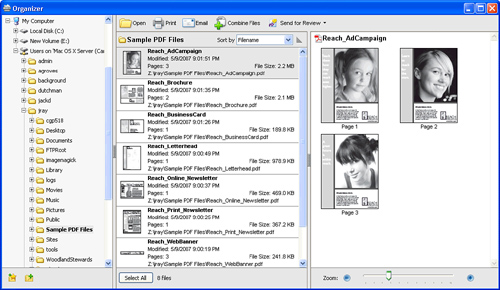
Another option is to view a single page or continuous pages of a PDF file. One nice advantage to viewing continuous pages is that you can set it up to view facing pages to read your documents as you would a book. This is a perfect setting for reading e-books with Acrobat.
To view a PDF document in continuous facing pages, choose Two-Up Continuous from the Page Layout submenu of the View menu. To go back to Single Page view, you can choose from the Page Layout submenu or click the Single Page or Single Page Continuous button in the toolbar, shown in Figure 11.2.
Now that you have opened a PDF file and set how you want to look at it, navigating the document is the next step. Getting around the page quickly and efficiently is easy using the various Acrobat toolbars, which can be enabled and disabled from the View, Toolbars submenu.
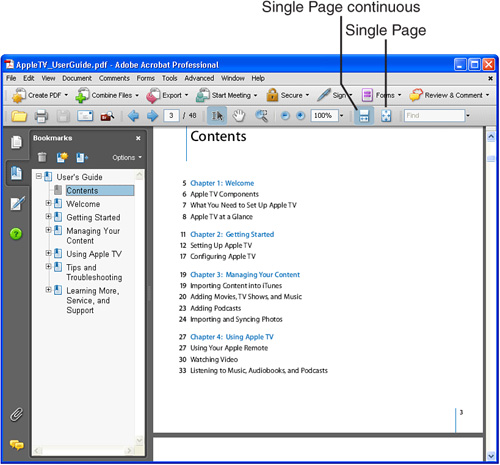
Acrobat offers various tools to zoom in, zoom out, and move around your PDF file. The Select and Zoom toolbar houses the Zoom In and Zoom Out buttons, preset zoom levels, and an area to enter the level of the zoom. In addition, you can use the Marquee Zoom tool (the magnifying glass with a superimposed rectangle) to quickly zoom in and out.
With the Marquee Zoom tool selected, click to zoom in, or hold down (Option) [Alt] and click to zoom out. This tool also enables you to zoom in or out on a specific area by clicking and dragging to create a selection marquee, as seen in Figure 11.3.
To move around within a page, use the Hand tool. The Hand tool acts as your hand does in real life with paper. Need to look at the bottom of a page? Click and drag up. Need to look at the top? Click and drag down.
To navigate between pages, click the forward and backward buttons in the Page Navigation toolbar, as seen in Figure 11.4.
To go to a specific page, enter a number in the Page Number field and press the Return or Enter key. You will automatically go to the page you requested.
By default, you can’t see all of the different navigation elements in the Acrobat toolbars. To access advanced controls, go to Tools, Customize Toolbars. You’ll find a myriad of additional options that you can add to the existing toolbars, such as:
Dynamic Zoom—. Click and drag with the Dynamic Zoom tool to zoom in or out on an image.
Loupe Tool—. Magnifies a selected area of the document; similar to looking through a magnifying glass.
First Page—. Jump to the first page in the document.
Last Page—. Jump to the last page in the document.
You can also add toolbars (or additional controls to existing toolbars) by right-clicking a toolbar in the Acrobat window.
In addition to the navigation tools in the Acrobat toolbar, you can add panels to your workspace to enhance your navigation and document-viewing options.
Managing your PDF document’s pages is quick and easy in Acrobat Professional. Jump to a specific page by entering the page in the status bar. Go to the beginning or end of the document by clicking the arrow button in the status bar. In addition to the page-by-page navigation, you can use the Pages panel.
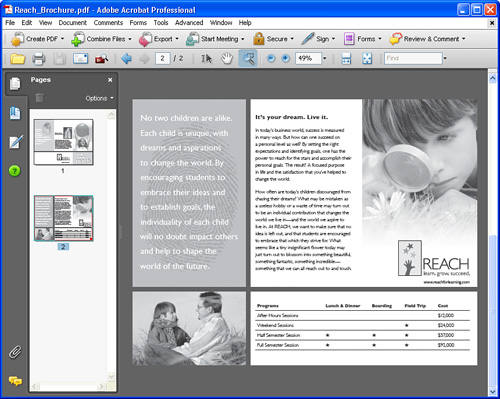
The Pages panel shows a thumbnail view of each page in the PDF document. Use the Pages panel to delete pages, rearrange pages, or jump to a certain page by double-clicking on it. To access the Pages panel, click the icon of two overlapping pages in the top-left corner of the document window, as seen in Figure 11.5.
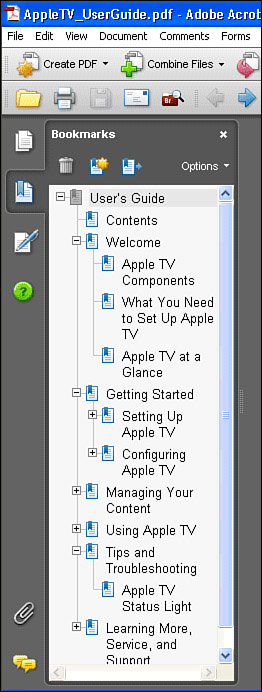
The Bookmarks panel works just like the bookmarks in your web browser. Use this panel to bookmark specific pages in a PDF file, or to jump to a previously specified bookmark. To access the Bookmarks panel, click the button of the page with a bookmark ribbon overlaid on it. A list of bookmarks within the document (if any) appears, as demonstrated in Figure 11.6.
Layers capability in Acrobat? Well, if there were layers in the original Adobe application used to create a PDF file, there might be layers in Acrobat. Let’s say you create this fantastic multilevel floor plan in Illustrator and you want to send it out for reviews. Save the Illustrator file as a PDF file with layers and all, and you’ll see those same layers in Acrobat. To see the layers in Acrobat, click the Layers panel button (two stacked squares).
Click the pen and paper button to open the Signatures panel where you can quickly verify any digital signatures that are added to the document.
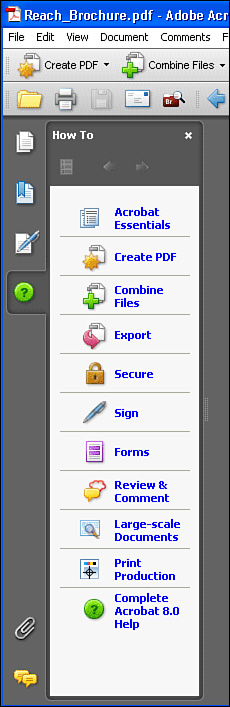
The How To panel, shown in Figure 11.7, provides a great way to learn about common features of Acrobat. This integrated help feature is unique to Acrobat and should be your first stop when looking for help. Access the How To panel by clicking the question-mark icon in the middle of the left side of your Acrobat window.
Near the bottom left of the Acrobat window is the Attachments (paperclip) button. Clicking this button opens the Attachments panel, where you can add file attachments to the PDF file and view any attachments that have already been added.
As you’ll learn later in “Using Comments and Markup,” you can add and read comments to and from a PDF file. The Comments panel provides a convenient way to both view and reply to comments in the file you are currently viewing.
Work with multiple PDF documents by arranging the pages in various ways. Choose from tiling your multiple windows horizontally or vertically. To bring the active window (the one you are currently working on) to the front, choose Cascade from the Window menu. The active window is placed in front, and the window title is black. All other windows show a gray window title to let you know that they are not active.
Of course, viewing PDF files is great, but you also need to be able to create them. With Acrobat Professional, you can create a PDF file from one file, many different files, a web page or pages, scanned images, or Microsoft Office applications, with just a single button click.
Create a PDF document from a file by choosing File, Create PDF, From File. You can also choose Create PDF, From File from the Welcome screen when Acrobat first opens or from the Create PDF pop-up menu in the Acrobat toolbar.
When prompted, simply find the file on your computer and choose Open. When you open the file, you must save the file to make it into a PDF. The file types you can open in Acrobat to create a PDF file from include BMP, CompuServe GIF, HTML, JPEG, JPEG 2000, Microsoft Word, PCX, PNG, PostScript/EPS, text file, and TIFF.
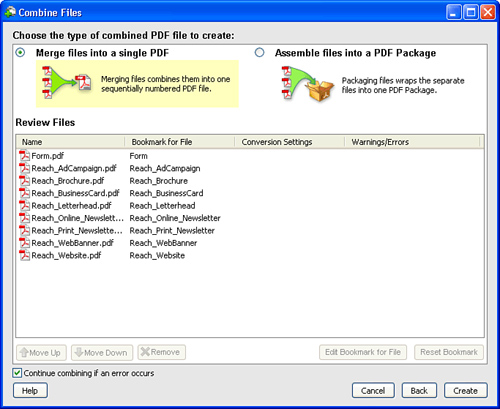
To create a PDF file from multiple files, choose From Multiple Files from the menu, Welcome screen, or pop-up choices in the Create PDF button on the toolbar. This launches the Combine Files dialog box, as seen in Figure 11.8.
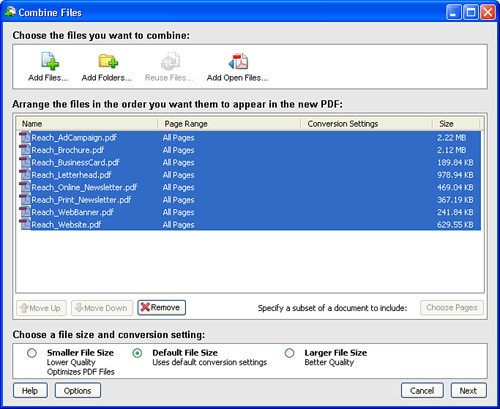
Under the Choose Files area, click the Add Files button to select your files. You can do this multiple times to get all of your files if they aren’t in the same folder. If they are in the same folder but are not contiguous, hold the (Cmd) [Ctrl] key to select the noncontiguous files. To select a folder full of files, use the Add Folder button, or use the Add Open Files to select from files you currently have open.
When the files are selected, you can arrange them in the Files to Combine area by dragging and dropping them in the order you want. You can also change the order in Acrobat. Then click OK to bind all the pages in one PDF file.
One valuable feature is one-click PDF creation from Microsoft applications. In Microsoft Office applications, an Adobe toolbar is available with a Convert to Adobe PDF button. If the Convert to Adobe PDF button isn’t showing, find it under View, Toolbars, Adobe Acrobat PDFMaker.
In Internet Explorer, go to the website you want to convert to a PDF, and click the Convert Current Web Page to PDF File button. This launches the Convert Web Page to PDF dialog box. Enter a name for the PDF file and click the Save button to convert the current web page to a PDF file.
Downloading a web page or a whole website into Acrobat is an easy task. Create a PDF file from a web page by choosing From Web Page from the Create PDF button in the menu bar; choose File, Create PDF, From Web Page; or create the file from the Welcome screen.
Enter the URL of the website you want to download into the URL field. You can also set how many levels of the website you want to convert (see Figure 11.9). Keep in mind that if you choose to convert the whole website or many levels of the website, the result could be a huge PDF file. You might want to limit the PDF file to staying within the same directory on the server and not following links to other servers by activating the Stay on same path and Stay on same server options.
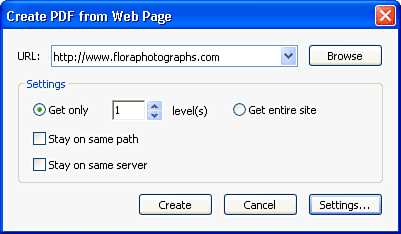
You can convert HTML pages that include forms, links, frames, Flash, JPEG or GIF graphics, tables, and text files into PDF pages. To fine-tune what is converted, click the Settings button.
After the web page is converted into a PDF file, you can edit and enhance it as you see fit.
Sometimes the PDF file you want to create might be based on an existing printed document. In these cases, if you have a scanner connected and configured on your computer, you can choose Create PDF, From Scanner, as seen in Figure 11.10.
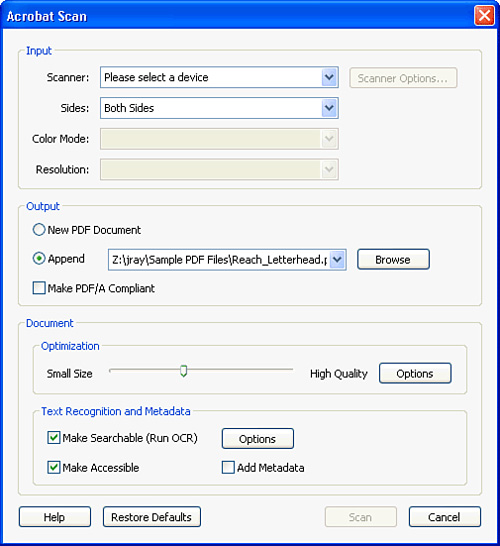
For typewritten documents, you can even set Acrobat to run the scans through optical character recognition (OCR), converting them back into text, rather than just an image.
After you have converted files into a PDF, you can edit and alter the files as you want. Not only can you edit the text in the PDF file, but you also can add comments, stamps, headers and footers, watermarks, backgrounds, sound, movie clips, and more.
The basic tools for manipulating existing PDFs are the Hand tool and the Select tool (for text, tables, and images). Use the Hand tool to move your page around. The Select tool simply selects text, tables, or objects so you can copy and paste.
The more advanced editing features include the Select Object, Article, Crop, Link, Movie, 3D, Sound, TouchUp Text, TouchUp Object, and various other tools. To view the Advanced Editing tools, choose Tools, Advanced Editing, Show Advanced Editing Toolbar. Many of the advanced editing tools are covered throughout this chapter.
The TouchUp tools enable you to edit an object as well as text. Use the TouchUp Object tool to edit an existing object. With the TouchUp Object tool, you can do only basic edits, such as copying, deleting, and altering properties. If you need to do more extensive editing, you need to edit in the program with which the object was created. When you double-click a placed object with the TouchUp Object tool, the original application launches, enabling you to edit the object. When you save, the saved version updates in your PDF file.
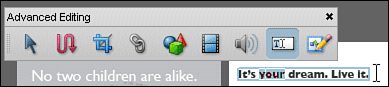
The TouchUp Text tool lets you edit text in a PDF document. You first select the text using the TouchUp Text tool, and then you enter the new text in the highlighted area, as seen in Figure 11.11. This works only if the font was initially embedded in the PDF file or if you have the font on your system.
The TouchUp Reading Order tool provides the capability to change the reading order of sections within a PDF document, as well as adding alternative text to images and form fields.
You can check the spelling in form fields or comments of any PDF file. To check the spelling of the form fields and comments, choose Edit, Check Spelling, In Comments. You can also edit the dictionary to include odd words that might not be recognized by default. You can have Acrobat automatically check the spelling as you are typing comments or form fields.
Adding comments or basic edits is a breeze in Acrobat. The Comments and Markup toolbar (or menu) is used to add notes, highlights, or other markings to a PDF document to indicate changes. Comments can be as simple as a sticky note, or as complex as a long explanation. You can also add text edit marks or proofreader marks to the PDF file. Sound and movie attachments can be included, as well as stamps to indicate approval, rejection, and more.
The tools include Sticky Note, Text Edits, Stamp, Highlight Text, Cross Out Text, Underline Text, several drawing tools, Text Box, Pencil, and Attachment. These tools can be found under Tools, Comment and Markup, and can be added to an onscreen toolbar by choosing Tools, Comment and Markup, Show Comment and Markup Toolbar.
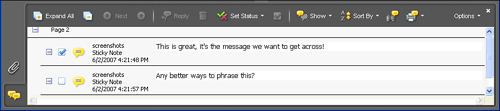
To make finding comments (and comment tools) easy, you can enable the Comment panel, which displays a list of all the comments in a document. To open this view, shown in Figure 11.12, click the comment bubble icon in the lower-left corner of your window.
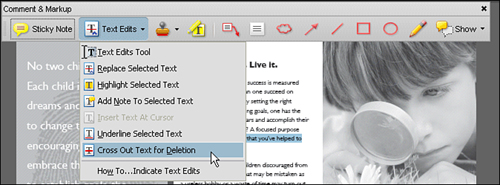
Text edits modify the textual content of the PDF file.
To insert a text edit, first choose the Text Edit tools from the Comment and Markup toolbar. Choose the Text Edits tool and highlight the text on which you want to show edits. Then choose from Insert Text at Cursor, Replace Selected Text, Highlight Selected Text, Add Note to Selected Text, Cross Out Text for Deletion, and Underline Selected Text, as seen in Figure 11.13. When you choose any of the text edit functions, they automatically change the selected text to your chosen text edits.
Many people simply write a comment on a sticky note and slap it on a printed document. I have even seen sticky notes stuck on a computer screen! To add a sticky note without the mess to your PDF file, choose the Sticky Note tool from the Comment and Markup toolbar. Click and drag to make the note the needed size. Don’t worry, the note won’t show up as a huge yellow page covering your PDF. When the note isn’t active, it is a small symbol. You can also resize your note at any time. After creating the note, enter the text for your note, as demonstrated in Figure 11.14.
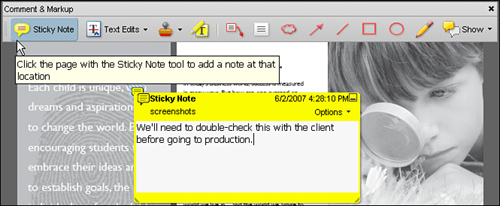
Obviously, notes are only good if you can read them! To read a note that you or someone else have added to a PDF, first choose the Hand tool. Next, let the Hand tool rest over the note, and you’ll see a pop-up of what the note says. You can also double-click the note to open the note completely. To close the note, click the box in the upper-right corner of the Note text box. Double-clicking the note symbol again also closes the note.
Additionally, you can click the Options pop-up menu in the Sticky Note box to perform a variety of tasks, including replying to the comment (creating a thread), setting the status of the comment, and changing the properties of the note itself, such as color and opacity.
Another interesting tool is the Stamp feature. Using a virtual rubber stamp, you can stamp a document approved, disapproved, or even create your own stamps.
To add a stamp to a document, you can choose a stamp from the menu, or you can create and use your own stamp. When choosing from the Stamp menu, choose from Dynamic, Sign Here, or Standard Business. Under Dynamic, you can choose from Approved, Confidential, Received, Reviewed, and Revised. In the Sign Here stamp submenu, you’ll find Rejected, Accepted, Initial Here, Sign Here, and Witness. The Standard Business stamps are Approved, Completed, Confidential, Draft, Final, For Comment, For Public Release, Information Only, Not Approved, Not for Public Release, Preliminary Results, and Void. Under each of those stamp submenus, you can see a preview of what the stamp looks like, as shown in Figure 11.15.

Under the Stamp menu, you’ll see the commands Create Custom Stamp, Add Current Stamp to Favorites (in the Favorites submenu), and Manage Stamps. Before choosing Create Custom Stamp, you first must have created the stamp image in another program, such as Adobe Illustrator or Adobe Photoshop. Then you can follow the steps under the Create Custom Stamp command. Alternatively, if you have an image in your clipboard that you’d like to use as a stamp, choosing the Paste Clipboard Image As Stamp Tool command lets you quickly create a custom stamp.
In addition to the basic tools we’ve seen, Acrobat provides access to other comment and markup tools. You can access these additional tools under the Tools, Comment and Markup submenu, or by choosing Tools, Customize Toolbar and adding the tools to the existing Comment and Markup toolbar. The Advanced Commenting tools fall into the categories of Drawing, Text Box, Pencil, and Attachment.
Under the Drawing tools, you’ll find the Rectangle, Oval, Arrow, Line, Cloud, Polygon, and Polygon Line tools. Use the Drawing tools to add a visual markup to your PDF file. The tools can create a dramatic marking to really show your editing ideas. With the Drawing tools, you can add notes as well.
The Text Box tool lets you create a box in which you enter text. You can enhance the text box by accessing the properties of the box. To access the properties, right-click the text box with the Text Box tool as the active tool and choose Properties from the context menu. Under the Properties, change the border color, style, background color, opacity, and border thickness.
The Pencil tool is handy for adding free-form sketching and shapes to a PDF document. The partner to the Pencil tool is the Pencil Eraser tool. Use the Pencil Eraser tool to remove any sections of the lines you have drawn. The Pencil Eraser tool removes only lines drawn with the Pencil tool, not those drawn with any other drawing tools.
Add attachments to your PDF file with the Attachment tools. The Attach a File as a Comment tool allows you to choose any file and add it as an attachment to the PDF file. The Record Audio Comment tool, on the other hand, provides the capability to record and attach a sound file.
To attach a sound to a PDF file, first select the Record Audio Comment tool. Click the cursor on the PDF file where you want the sound symbol to appear. This launches the Record Sound dialog box. You can either record your sound or notes verbally, or choose a sound stored on your computer.
Assume that copies of your PDF document get sent to your colleagues for commenting. Once they’re done, you might want to import their comments (from all the individual PDF files) and then export your own comments.
To import comments, you first must have the document open into which you want to import the comments. Then choose Import Comments from the Comments menu. This launches the Import Comments dialog box, where you choose the PDF file on your computer. The comments then show up in the comment window and are added into the document as well.
To export your comments, first make sure you have the file with your comments open. Choose Export Comments from the Comment menu. Choose the Save As Type (PDF or XPDF) option, and save the file on your computer.
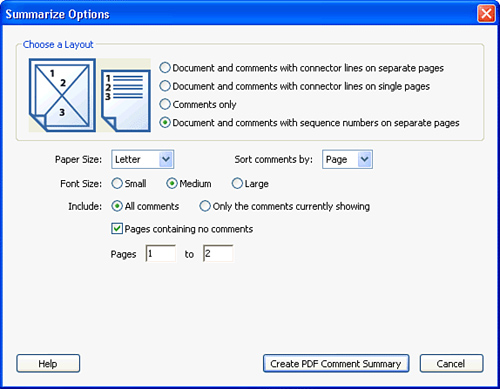
The Summarizing feature enables you to create a PDF file with all the comments shown and organized by date, author, and type. To use this feature, choose Summarize Comments from the Comments menu or from the Options menu in the Comments panel. You then set how the comments will be organized and displayed. Choose by date, author, type, and page. In the Summarize Options dialog box, you can choose to include the original PDF file with the comments (this might be a large file) or just the comments (see Figure 11.16).
Additionally, you can choose Comments, Print with Comments Summary to print the comments in a PDF file. This is useful when you need to make corrections to your source file in, say, InDesign.
Acrobat has added the option for you to include others in a reviewing process with PDF documents. You can send a PDF document to your coworkers to get their comments on a file. Use email to start your review or your web browser to host the review. This is a great way to get instant feedback without waiting for the postal or delivery systems to send paper files back and forth. You can set up an email-based review.
Setting up an email-based review is a fairly easy task. First open the PDF file you want to be reviewed. Choose Attach for Email Review under the Review and Comment menu of the Tasks toolbar. Then follow the step-by-step process to enter the email addresses of the reviewers and add your email address, and your email program takes care of the rest. Acrobat enters instructions in the email on how to review. Simply click the Send button (if necessary), and the review process is under way.
Acrobat also has the capability to track the reviews. Under the Review and Comment menu of the Tasks toolbar is the Review Tracker command. Under the Review Tracker, choose which review you want to track. You’ll see the list of any documents you have set up for review. The Review Tracker can also be used to invite more people to your review or send a reminder.
The commercial versions of Acrobat can mark up and review PDF files, but those who have the free Adobe Reader don’t have that capability—until now, that is. You can choose Comments, Enable for Commenting in Adobe Reader to allow Adobe Reader users to review and comment on your PDF file.
To go beyond just plain text and graphical markup, sounds and video can be added to your document. These capabilities can be found in the Advanced Editing tools. The Advanced Editing tools, found under the Tools menu, are Select Object, Article, Crop, Link, Sound, 3D, Movie, TouchUp Text, TouchUp Object, and TouchUp Reading Order. The addition of sound or a movie clip nudges the simple, boring PDF to the next level.
You can select the tools directly from this menu, or turn on the Advanced Editing toolbar from the same menu.
Add sound clips to any PDF file using the Advanced Editing toolbar. Sound can be played when the sound button is clicked or when a certain action is performed. Use any sounds that can be played in Flash, RealOne, QuickTime, and Windows Media Player. If you are recording your own sounds, make sure you have a microphone attached to your computer. You can add a sound by dragging out a sound button, or you can add sound to a page action or a form field.
Movies can be added to any PDF document. Unlike attachments, movies are considered an editing feature. You’ll find the Movie tool under the Advanced Editing toolbar. Just as you use other applications to access your sound clips, you need other applications to access your video clips. Adding a movie clip to a PDF file is done just as you would add a sound clip. Keep in mind that the larger the movie is, the larger your PDF file will be.
Acrobat lets you create amazing interactive documents using various tools. We have already discussed the Sound and Movie tools. Bookmarks, Flash, links, actions, and buttons are all used to create interactive PDF documents. You can make any PDF form interactive as well. Interactivity just lets you go where no static document has ever gone before.
Just as you would create a bookmark in your web browser, you can create bookmarks in your PDF documents. This is quite handy for large PDF files with numerous pages. You can access often-used pages quickly with bookmarks.
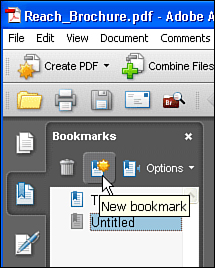
To create a bookmark, first open the Bookmarks panel by clicking the Bookmarks (page with ribbon) button on the left side of the Acrobat window or via the View, Navigation menu.
Next, go to the page you want to bookmark. Then choose New Bookmark from the Options menu on the Bookmarks panel (or by clicking the bookmark page with a star on it), as seen in Figure 11.17. I suggest entering a name for the page you are bookmarking that lets you know what the page is about.
In large PDF files, the bookmarks are really nice for navigating in the document. Bookmarks organize your PDF files. You can also access the New Bookmark option by (Ctrl-clicking) [right+clicking] the PDF page you want to bookmark and choosing New Bookmark from the contextual menu.
At any time, you can rename, rearrange, or remove bookmarks. By dragging a bookmark above or below another bookmark, you can change the order of the bookmarks. You can also drag a bookmark within a bookmark as a subset of the other bookmark.
The Link tool is used to create a button link to other pages in the PDF file. You can also link to other documents or websites on the Internet. Within the link, you can set the properties of the button as you can for the Sound and Movie buttons. You can not only set the properties, but also add an action to the link.
You can choose Actions in the Link Properties dialog box (not in the Create Link dialog box). Some of the actions you can choose from are Go to a Page View, Open a File, Read an Article, Execute a Menu Item, Set Layer Visibility, Show/Hide a Field, Submit a Form, Reset a Form, Import Form Data, Run a JavaScript, Play Media (Acrobat 5 Compatible), Play a Sound, Play Media (Acrobat 6 Compatible), and Open a Web Link. So when you set a link, it can do multiple things.
To set an action to a link, follow these steps:
Using the Link tool, drag out a button area for the link.
Enter the type of link in the Create Link dialog box.
Click OK. Ctrl+click the link with the Link tool to access the Link Properties dialog box.
In the Link Properties dialog box, click the Actions tab.
Choose an action from the pop-up menu and click OK.
After the link is added, use the Hand tool to click the button to see the action activated.
JavaScript enables you to add more cross-platform interactivity to your PDF forms that you just can’t get with Acrobat alone. Use JavaScript with forms, links, and page actions. For those of you who are wondering what JavaScript is, it is a coding language for HTML pages. Use it in Acrobat forms for adding up items, costs, and so forth.
To access a JavaScript, choose a button’s properties and choose Run a JavaScript from the pop-up menu. Select the desired JavaScript and choose Edit to access the JavaScript Editor. In this editor, you can alter the JavaScript code. Click OK when you are done. For more information on JavaScript, see Moncur, Micheal. Sams Teach Yourself JavaScript in 24 Hours, 4th Edition (Sams Publishing: 0-672-32879-8 2006).
Acrobat has added accessibility functions to make using Acrobat easier for vision- and motor-challenged people. The features added include the capability of reading out loud, visibility, autoscrolling, keyboard shortcuts, and creating accessible PDF documents.
The Read Out Loud settings are found in Acrobat’s Reading preferences. You can set the volume, voice type, pitch, words per minute, reading order, and screen reader options.
Visibility can be enhanced by changing the document’s color options in the Accessibility area of Acrobat’s Preferences. Other visual enhancements are to increase the magnification in the Default Zoom area of Page Display Preferences.
Under the View menu, you can set the page to automatically scroll. Use the number keys to control the scroll speed (9 being fast scrolling and 0 being slow scrolling). You can also use the up and down arrows for autoscrolling. The right and left arrows take you to the next page and the previous page.
Memorizing keyboard shortcuts is always a great way to enhance your productivity, whether or not you have special needs.
Forms are probably the most sought-after feature in Acrobat. Use Acrobat to create interactive PDF forms that you can access on a website. Forms are created with data fields to be filled out. Form fields can include buttons, check boxes, combo boxes, list boxes, radio buttons, signature fields, and text fields. Acrobat includes a Forms palette and Form tools. Forms are so popular because you can save form data within Acrobat Standard or Reader. Your only limitation is that you cannot edit in Standard or Reader. Forms are the best way to get information on your client or from your website.
When you first decide to create a form, you’ll need to figure out the type of data you’ll require. After you determine the data, the form fields are easy to add. Use a design program to create your actual form. When choosing a size, keep in mind the computer screen and how it will be seen. In the design program, create the text, labels, and any graphic elements.
Typically, you start by designing a form in another application, such as Adobe Illustrator or Microsoft Word. When you’ve created a PDF file for the form you started in the other program, use the Form tools to create form fields to complete your PDF form.
After you create the form’s graphic appearance, save the file as a PDF and open it in Acrobat to add the actual form fields.
The form elements come in various appearances and functions. Each function is used for specific effects. Buttons are used to create an action. You click a button and something happens, such as going to another page or seeing different fields appear. Check boxes are used to narrow selections. A combo box is used like a pop-up menu—you see a list of choices and pick one from the box. The list box is similar to the combo box—you choose one option from the menu. Radio buttons are used to choose an option. You pick one option by clicking the radio button next to it. In the Signature field, you enter a digital signature or, in a printed form, sign your name. The text fields are used to enter such things as names, addresses, items, costs, and totals.
To start a form, add the Forms toolbar to your display.
By the Way
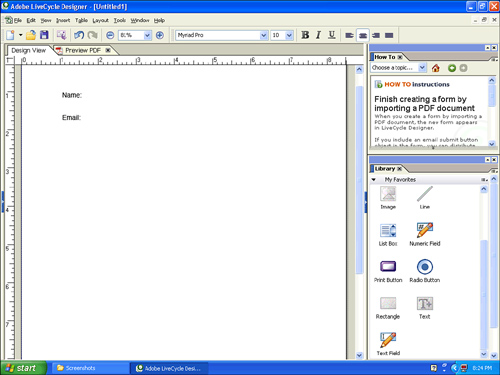
An alternative way to create forms is by using Adobe LiveCycle Designer (Windows Only). To use this feature, click the Forms toolbar button and choose Create a New Form. You are prompted to choose from a variety of existing templates, to import from a spreadsheet, to scan from a paper form, or use a PDF file that has the form base already created in another graphic program.
You are then taken into LiveCycle Designer, which contains extensive tools for precisely laying out PDF forms (see Figure 11.18).
To create a text field, use the Text Field tool from the Forms toolbar. Drag out a box to the size that you want the text field to be. This launches the Text Field Properties dialog box, shown in Figure 11.19.
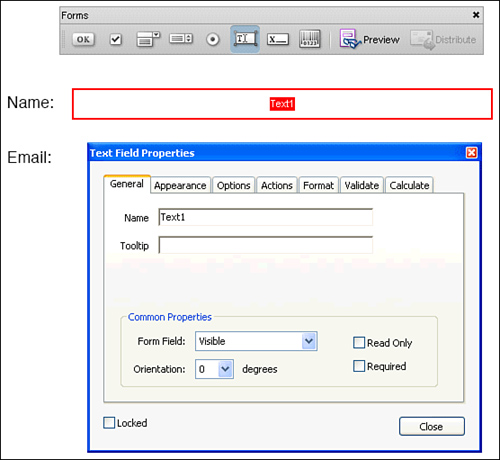
These are the tabs in the Text Field Properties dialog box:
General—. Under the General properties, set the name of the field and the Tooltips. Tooltips are the little notes that come up when you rest your cursor over an item such as the text field. The Form Field properties you set are whether the box is visible, hidden, visible but not printable, or hidden but printable. Set the orientation to
 or
or  . Also choose whether to check the Read Only and Required check boxes.
Appearance—. In the Appearance tab, set the Border Color, Fill Color, Line Thickness, and Line Style. Under Text, choose the Font, Font Size, and Text Color.
Options—. Choose the alignment for the text field in the Options tab. Enter a default value. Check or uncheck the following boxes: Multiline, Scroll Long Text, Allow Rich Text Formatting, Limit of Characters, Password, Field Is Used for File Selection, Check Spelling, and Comb of Characters.
Actions—. Set an action for the text field just as you would in a link. Choose your action and the settings.
Format—. Choose from a format category pop-up: None, Number, Percentage, Date, Time, Special, or Custom.
Validate—. Check the radio button to specify whether the field value is validated, to indicate whether a field value is within a certain range, or to run a custom validation script.
Calculate—. Under the Calculate tab, choose whether the field value is calculated and, if it is, whether it is the sum, product, average, minimum, or maximum of a group of fields that you pick. You can also choose a simplified field notation or a custom calculation script.
Set the General, Appearance, Options, Actions, Format, Validate, and Calculate tabs to your liking, and then click the Close button to set the text field.
Probably one of the most fun things to do with Acrobat is to create interactive buttons. Acrobat has a Button tool in the Advanced Editing toolbar. Use the Button tool to drag out the size of the button. Enter the properties that you want for the button. Be sure to make an action for the button, or the point of having a button is lost. If you want a more exciting look for your button, use Adobe Illustrator to create a fantastic button and then use Acrobat to activate it.
Add options to your buttons by altering their look and how they act in the Options tab of the Button Properties dialog box. Choose the Icon and Label states: Label Only, Icon Only, Icon Top Label Bottom, Label Top Icon Bottom, Icon Left Label Right, Label Left Icon Right, and Label over Icon.
Use the combo box to list various choices for the form field. A list box is very similar to a combo box, in that it offers choices in menu pull-down form. The big difference between the two is that you use the combo box for adding text, whereas a list box can’t be used to add text. The combo box is also great for fewer choices. The options you’ll find in the list and combo boxes are Item, Export Value, Add, Delete, Up/Down, Sort Items, Multiple Selection (List Box Only), Check Spelling, Item List, and Commit Selected Value Immediately.
Radio buttons and check boxes are used for selecting or deselecting certain variables. The options you’ll find under radio buttons and check boxes are Button/Check Box Style, Export Value, Button/Check Box Is Checked by Default, and Buttons with the Same Name and Value Are Selected in Unison.
Calculations are great for figuring out a total of items, determining total cost, adding in taxes, and so on. As with spreadsheet programs, you can set up a range of calculations in the Field Properties dialog box. The calculations you can set are adding, multiplying, averaging, and figuring out the minimum and maximum.
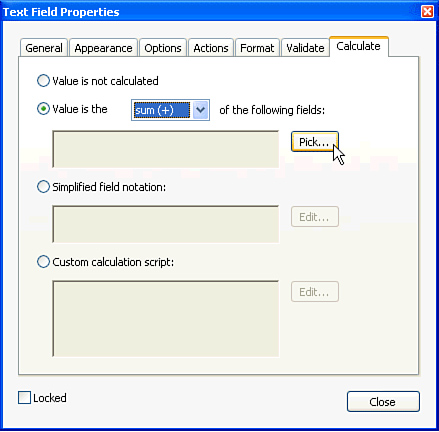
To set a calculation field, first pick the type of calculation and then select which fields you want to calculate. To set the field for calculation, use the Text Field tool to create the box for the calculation. In the Text Field Properties dialog box, click the Calculate tab. In the Calculate tab, seen in Figure 11.20, choose from Sum (+), Product (x), Average, Minimum, or Maximum. After you set your value, click the Pick button. This launches the Field Selection dialog box. This dialog box lists all the fields used in your PDF file. Here you can choose which fields will be calculated.
Now that you are getting the hang of forms, you’ll need to know how you can import and export the data from the forms. The key to getting your data is having your field names match word for word. To export your PDF data, choose Forms, Manage Forms, Export Forms Data. Enter a name for your form data file and click Save.
Import your form data by choosing Forms, Manage Forms, Import Forms Data. Locate your file and click Select. Make sure you have the correct and matching file open so the data will be brought in to the file.
Use Acrobat’s security to protect your files from unwanted access. When you create a PDF file, it isn’t protected until you set the protection. Security commands are located in a submenu of the Advanced menu. Under the Security submenu, choose Show Security Properties, and then click Security. You can now choose from different security methods, as seen in Figure 11.21.

The most common form of security is password security, found in the Security Method pop-up menu. After choosing Password Security, a dialog box appears with the options for protecting your document.
Within this dialog box, you can set the Compatibility version of Acrobat. The lower the version is, the lower the encryption level. The higher the version of Acrobat it is, the higher the encryption level.
You can check the box to require a password to open the document. When you choose this option, you are asked to enter a password. If you choose this option, you always have to use a password to open the document.
Permissions options include using a password to restrict printing and editing of the PDF file and its security settings. With the Permissions check box, you set the password and choose whether you allow no printing, low-resolution printing, or high-resolution printing, as seen in Figure 11.22.
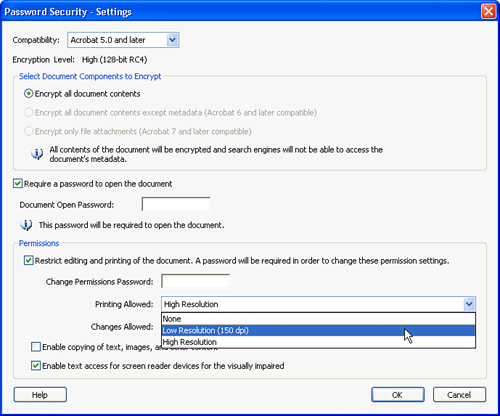
You also set whether changes will be allowed, including Inserting, Deleting, and Rotating Pages; Filling in Form Fields and Signing; Commenting, Filling in Form Fields, and Signing; and Any Except Extracting Pages. Other check boxes include Enable copying of text, images, and other content; Enable text access for screen reader devices for the visually impaired; and Enable Plain-Text Metadata.
You have three tries to open a password-protected PDF file. After three tries, the document closes, and you have to reopen it to try the password again.
If you choose the certificate security method, the Certificate Security dialog box launches. From here, you are walked through the process of adding authorized recipients to the PDF file.
More than ever, people want to use digital signatures to replace hand signatures. Using a digital signature saves a ton of time and money because you don’t have to ship physical documents back and forth. A digital signature can be an actual handwritten name, text, or a graphic symbol. When you have a digital signature, you can verify that the signature is authentic.
Acrobat has a Self-Sign Security feature that will create your own signed security certificate. To begin the signing process, choose Advanced, Security Settings. Click the Add ID button to start creating your signature.
When the Add Digital ID dialog appears, click the Create a Self-Signed Digital ID for Use with Acrobat radio button, and then click Next. Enter the digital ID information as prompted in Figure 11.23, and then click Next.
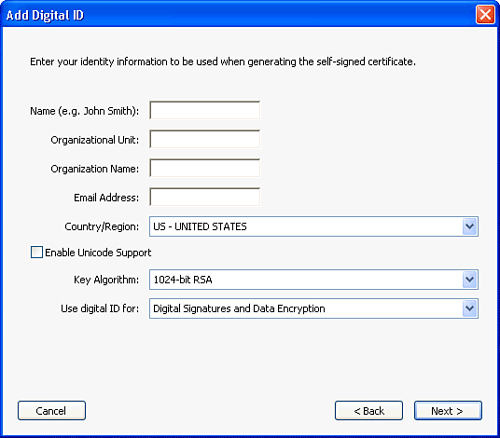
Continue through the Add Digital ID wizard, and, when finished, you’ll have a digital signature that can be used for signing your documents.
If you’d prefer that your signature appear differently from what the default Adobe signature looks like, you can import graphics and make other modifications. In Acrobat’s Preferences dialog box, select Security from the list on the left. Click the New button to add your scanned signature. This launches the Configure Signature Appearance dialog box. In this dialog box, enter a title; under Configure Graphic, choose the imported graphic button, and then click File. In the Select Picture dialog box, click the Browse button, choose your image file, and then click OK. In the Select Picture dialog box, you see a small preview of your signature. Click OK three times while clicking your heels together, and you have a saved digital signature.
The signature you have saved can now be applied to any PDF document.
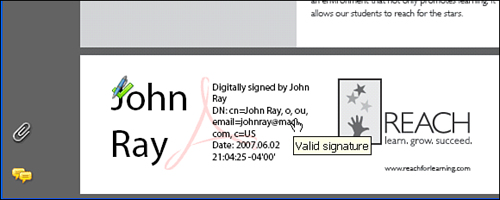
To sign your PDF document with your digital signature, choose Advanced, Sign and Certify, Place Signature. Next, drag out a box to hold your signature. The Digital Signature Properties dialog box comes up. Select the appearance for the box. Enter your password and then click the Sign button. Your digital signature appears in the box you dragged out, as seen in Figure 11.24.
After you digitally sign a document, you might want to certify the PDF document. Doing this lets you exercise some control over the editing of the file. To certify your PDF, follow these steps:
Choose Save As Certified Document under the File menu. The Save As Certified Document dialog box comes up.
In this dialog box, you are told that you need a digital ID to certify the document. You can get a digital ID from an Adobe Partner, or click OK if you already have a digital ID. After you click OK, you set the allowable actions.
Drag out the area where you want the certification to appear on your document.
Choose your ID appearance, and enter a password.
At the bottom of the window, use the Permitted Changes pop-up menu to determine what the user can do after the document is certified.
Click the Sign button.
Enter a name and location, and click Save.
Presentations are not limited to PowerPoint or Apple Keynote. Believe it or not, Acrobat can be used for a slideshow presentation. You even get to use fancy transitions between the slides!
One really nice perk of using Acrobat to create a slideshow is that you can send the file to anyone and that person can view it. You need only Adobe Reader (available free online at www.adobe.com) to view the slideshow.
To create a slideshow presentation with Acrobat, first pick the files you want to be in the slideshow. Make sure that all the files are PDFs. In fact, you can use the Create PDF from Multiple Files function to convert the files and open them together as one bound PDF file as described in “Creating PDF Files.”
Using the Create PDF from Multiple Files function, arrange the files in the order in which you want them to appear in the slide show, as seen in Figure 11.25. When you have all the files arranged, click OK. Choose to merge the files into a single PDF file, and then click the Create button.
Creating a slideshow is pretty easy. Now let’s clean it up by editing the Full Screen preferences. Choose Acrobat, Preferences (Macintosh) or Edit, Preferences (Windows), or press (Cmd-K) [Ctrl+K]. Choose Full Screen from the choices on the left. Here is where you can set how the slideshow functions, as seen in Figure 11.26.
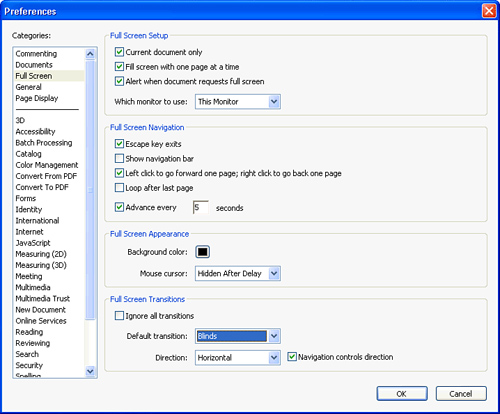
Enter a value in seconds for how quickly or slowly the slides automatically advance. Check the Loop after last page box to have the slideshow run continually. Keep the Escape key exits box checked so you can quickly get out if you forget the keyboard shortcut. The last option in this area is Left click to go forward one page; right click to go back. These are just nice keyboard commands to navigate your slideshow manually.
Under this Full Screen preference, you can specify the visibility of the mouse cursor, and background color.
Transitions are a wonderful way to advance from one page of your slideshow to the next. Use transitions to enhance your presentation. When choosing a transition, keep in mind what your slides look like. For example, if you have mostly text or tables, using a dissolve transition looks rather sloppy and confusing. When you choose a transition, it is used between all slide transitions; you can’t choose a different one for each slide. If you are looking for variety, choose the Random transition. This option randomly uses the various transitions between slides.
If some day you decide you don’t want the transitions anymore, go to Full Screen Preferences and check the Ignore all transitions option, or choose No transition from the Default transition pop-up menu. Remember that you can also change the background color from the default black to any color you want.
After creating a fantastic PDF document, you need to make sure that it is saved. Actually, you should be saving periodically so you don’t ever lose any information. Saving a PDF file is routine and easy. Choose Save from the File menu to save over the original file, or choose Save As to save the file with a different name. Another choice is Save As Certified Document; this option was discussed earlier in the “Certified PDF” section.
You might wonder about printing your PDF file. As with any other file, you can print your PDF documents.
When you create a PDF file using most methods, the first time you choose Save you get the Save As dialog box. You don’t have to save every file as a PDF. These are the file format choices:
PDF—. Portable Document Format, or PDF, is easily read by any user who has Adobe Reader (the free program is found at www.adobe.com).
EPS—. Encapsulated PostScript is used when working with design or page-layout programs.
HTML—. Use this file type to save documents as text for the Web.
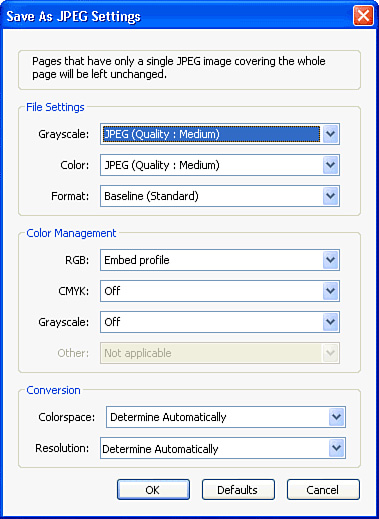
Graphic formats—. You can save a PDF file as these graphic-type formats: JPEG, JPEG 2000, PNG, and TIFF. When you save a PDF file as any of these formats, you lose the text-editing capability.
PostScript—. Similar to EPS, PostScript is mostly used to change the printing options of a file.
RTF—. Rich Text Format lets you use the file in a word-processing application.
Word—. Use this format to save the file so you can take it back into Microsoft Word.
Text—. Use this format for plain or accessible text. The text file format retains the text but not the text’s formatting.
XML—. Use this format and XML Data Package Files for forms and to manage document workflows.
Saving a file as anything other than a PDF can offer many options under the Save As dialog box. If you choose to change the default settings under any of the other formats, click the Settings button to see your options, as demonstrated in Figure 11.27.
The Revert command under the File menu takes the document you are working on back to the last saved version. If you realize that you have made some errors and Undo just won’t get you back, choose Revert to revert to the last saved version of the document.
Print any PDF file by choosing the Print command under the File menu. This launches the Print dialog box. In the Print dialog box, choose the options for Printer, Presets, and Copies and Pages. If you are connected to multiple printers, choose the printer you want to use from the pop-up menu. Choose from standard presets, or if you have saved your own presets, choose one of your own. On Mac OS under Copies and Pages, you have more options from which to choose:
Copies and View—. In this area, choose All Pages, Current View, Current Page, or From [page number] To [page number].
Subset—. In the Subset area, choose from All Pages in Range, Even Pages, and Odd Pages.
Print What—. Use this setting to choose Document, Document and Comments, or Form Fields Only.
Page Scaling—. With Page Scaling, choose None, Fit to Paper, Shrink Large Pages, Tile Large Pages, or Tile All Pages.
Auto-Rotate and Center—. This check box rotates the page to fit the paper and centers the document on the page.
The Printing Tips button launches the troubleshooting area on printing for Acrobat at Adobe’s website.
In the Advanced Print Setup dialog box (click the Advanced button to get there), choose from the following: Output, Marks and Bleeds, Transparency Flattening, and PostScript Options. Each area allows you to do the following:
Under the Output options are Color, Screening, Flip, Printer Profile, Apply Working Color Spaces, Apply Proof Settings, Simulate Overprinting, Use Maximum Available JPEG 2000 Image Resolution, Emit Trap Annotations, and Ink Manager.
In the Marks and Bleeds setup, choose Emit Printer Marks or All Marks. The Marks Style pop-up menu lets you pick the style of printer’s marks. Check or uncheck Crop Marks, Trim Marks, Bleed Marks, Registration Marks, Color Bars, and Page Information.
In the Transparency Flattening area, you set the Quality/Speed slider (higher for vector-based images and lower for raster-based images). Enter the rasterization resolution for line art, text, gradients, and meshes in pixels per inch. The other options you can check or uncheck are Convert All Text to Outlines, Convert All Strokes to Outlines, and Clip Complex Regions.
The PostScript Options you can choose are Font and Resource Policy, Print Method, Download Asian Fonts, Emit Undercolor Removal/Black Generation, Emit Halftones, Emit Transfer Functions, Emit PS Form Objects, and Discolored Background Correction.
Use Adobe Acrobat to print your color separations for a color PDF document. In the Print dialog box, click the Advanced button to access your color separation options. Under the Color pop-up menu in the Output options, choose Separations. You can even get as specific as choosing which plates to print. When printing with separations, you get one black, one cyan, one yellow, and one magenta file. Printing separations lets you see whether the different plates register (line up) with each other. If the plates are off in any way, you’ll get gaps in the printing and might need to use trapping to fix any problems.
If you want to see what the separations will look like before printing, choose Advanced, Print Production, Output Preview. This launches the Output Preview dialog box (shown in Figure 11.28) where you can see each plate on its own by unchecking the other plates. The preview is directly on your PDF document.
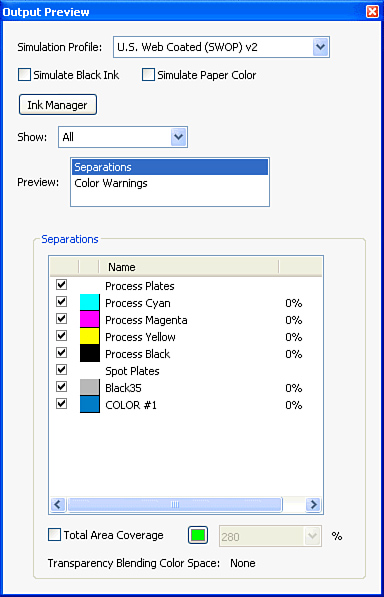
The Output Preview dialog box can help identify ink coverage limits and also highlight areas in your file that are set to overprint.
Preflight refers to the analyzing of a document for printing. Preflighting checks for any problems before sending a file to the print shop or service bureau.
Choose Preflight from the Advanced, Print Production submenu to activate the Preflight command. This launches the Preflight dialog box. Under this list, you can choose a preset profile, or you can edit a preset profile by choosing the file and clicking the Edit button. After you have chosen your profile, click the Analyze button to check the file.
You can choose from a bunch of preflight profiles. Click one and click Edit to see the rules and conditions of that particular profile. Each profile has certain rules and conditions.
After you have either chosen or created the preflight profile, click the Analyze button to check the current file. It might take a few minutes to analyze the file, depending on the file size. After the file is analyzed, the results appear in the dialog box. Any problems with the file are listed, based on the rules of the profile that you chose earlier. Then with the results listed, you can decide whether and how to fix the files.
When you have a preflight validated file, you can create a PDF/X-compliant file. Use this when sending out a file for a professional print job. PDF/X is a form of the PDF created by the International Standards Organization. The intent is to increase the reliability of printing and streamline the process by getting rid of unneeded information in a PDF document.
Included with Acrobat is Distiller. Distiller is used to convert a PostScript file (created by another application) into a PDF file. To convert a PostScript file to a PDF document using Distiller, you can simply drag the PostScript file on top of the Distiller icon, or with Distiller active, open the PostScript file. You can also adjust the settings in Distiller to output the PDF file the way you want.
Acrobat Distiller can be launched as a separate application, or you can start it in Acrobat under the Advanced menu.
In this chapter you learned about Adobe Acrobat 8 and PDF files—the standard for viewing styled documents on multiple platforms. Acrobat provides many tools for manipulating PDFs, including commenting, editing, sticky notes, and more. Using the Acrobat tools, you can even create electronic forms that can be filled in using the free Acrobat reader software. Acrobat integrates with OCR software and Microsoft Office to provide a seamless and convenient way to get all of your documents—electronic or on paper—into a standard digital format.