In this chapter, you’ll create a web banner that the REACH company can use to help promote itself online. Things that are important to ad banner advertising are a clear message, eye-catching graphics, and a small file size. With Adobe Creative Suite 3, you have all the tools necessary to achieve those goals. You’ll use Illustrator to create a layered file and Flash to animate it.
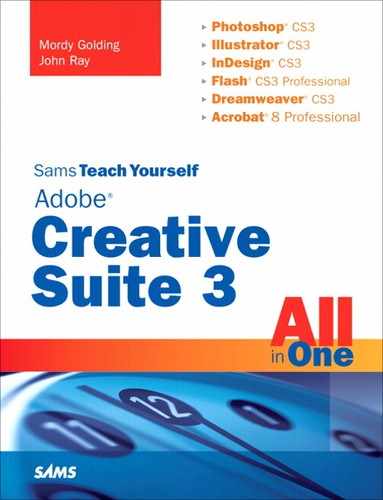
Begin by launching Illustrator and creating a new file. In the New Document dialog box, set a width of 468 pixels and a height of 60 pixels. Show the advanced settings and change the Color Mode to RGB and the Raster Effects resolution to Screen (see Figure 15.1).
Next, you’ll set up a few things in Illustrator to make the task of designing web graphics easier and more precise:
If needed, choose View, Pixel Preview. This enables you to view your art as it would appear in a web browser, with correct antialiasing applied.
Press (Cmd-R) [Ctrl+R] to turn on your rulers if they’re not already visible. This assists you in positioning items.
Finally, open your Transform panel by choosing it from the Window menu. The Transform panel helps you edit and position graphics perfectly.
With your file set up this way, you can be assured that you’ll be creating high-quality web graphics. Now would also be a good time to save your file into your Version Cue project with the name of your choice.
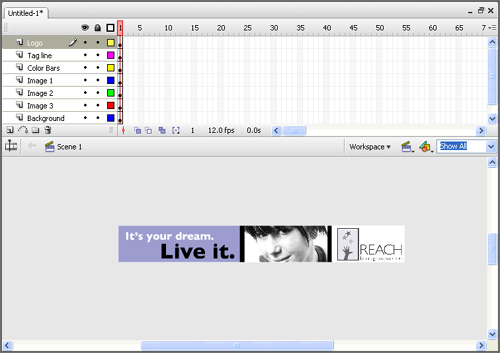
You’re going to split the banner into three sections. The animation that you’ll create will rotate through the images in the center, and the logo and tag line will remain the same.
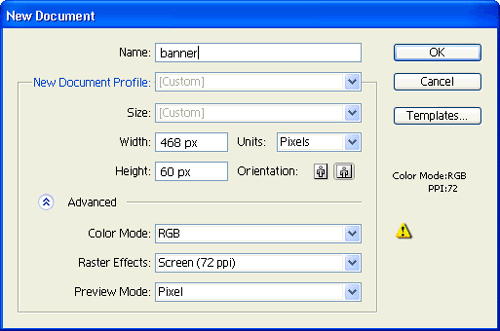
Before you create elements for the three areas of the banner, you’ll first create a rectangle to use as a mask for the image that will appear in the center section. Select the Rectangle tool and click once anywhere on your artboard to create a rectangle numerically. Enter 150 pixels for the Width and 60 pixels for the Height. Give the rectangle a black fill and no stroke. With the rectangle still selected, click on the lower-left box of the proxy in the Transform panel, and enter a value of 200 for the x coordinate and 0 for the y coordinate. This positions the black rectangle perfectly inside the banner (see Figure 15.2).
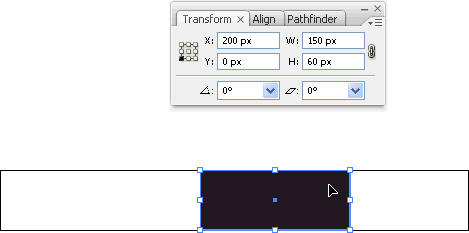
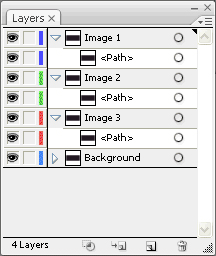
Double-click on Layer 1 in your Layers palette and rename the layer Background. This rectangle will serve as the background for the banner. Create three new layers in your document. Name them Image 1, Image 2, and Image 3 (see Figure 15.3).
Select the rectangle that you created earlier. If you look at the Layers panel, you’ll see a dot appear on the Background layer. Dragging this dot into the Image 1 layer while holding the (Option) [Alt] key moves a copy of the selected rectangle to that layer. (A plus sign appears to indicate that you’re copying artwork from one layer to another.) Use this method to copy rectangles to layers Image 2 and Image 3, respectively (see Figure 15.4).
Now you’re ready to bring in the images. For the three images, you’ll reuse the images from the ad campaign in the previous chapter. However, because the web is a colorful environment, use the full-color versions of the photos rather than the black-and-white versions you prepared for the print pieces.
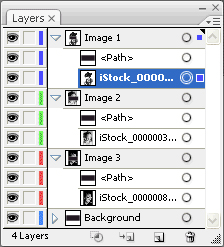
Navigate to the folder of the stock photos you’ve been using for all your projects and find the original versions. Select the three images of confident young people (iStock_000000359619Large.jpg, iStock_000000813871Large.jpg, and iStock_000000439439Large.jpg), and drag them all into your Illustrator document. In your Illustrator file, you’ll want to move the images onto their correct layers and set up masks as well, which you can do directly from the Layers panel.
Click on the disclosure triangles for each of the layers you created to view the contents of the file. Drag each of the images so that they all appear on a different layer, each beneath the rectangles you created (see Figure 15.5).
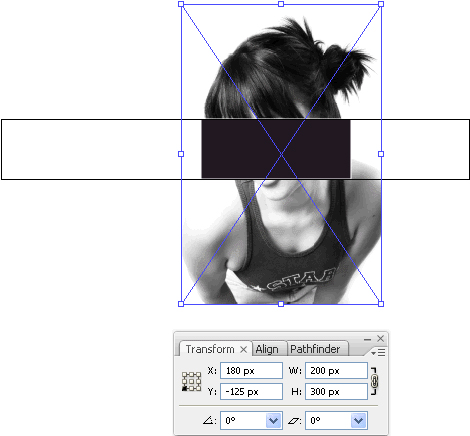
Now you’ll resize and position the images. Select the image in the first layer and click on the Lock icon in the Transform panel, which constrains the proportion when scaling. Specify 200 pixels for Width and press Enter. Click on the lower-left box of the proxy in the Transform panel, and enter a value of 180 for the x coordinate and –125 for the y coordinate (see Figure 15.6).
Click on the Image 1 layer in the Layers panel to highlight that layer, and then click on the Make/Release Clipping Mask button at the bottom of the panel (see Figure 15.7). You’ll notice that the rectangle now becomes a mask for the photo in that layer. You can move the image vertically to get the best cropping for the image.

Hide the Image 1 layer (by clicking on the eyeball) to make it easier to see and work with the next layer. Repeat the steps to resize, position, and mask the images on the Image 2 and Image 3 layers. You will have to adjust the values in the Transform panel to scale and position the images to get similar face sizes across the three images.
Now that the center section of the banner is complete for all three versions, let’s complete the edges. Hide the image layers so you can focus on the Background layer.
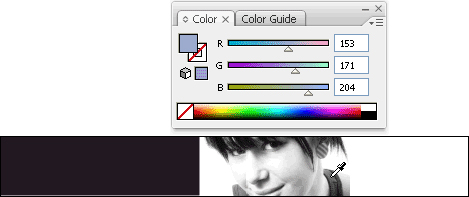
The rectangle on the Background layer will appear behind the images, but we’d like to place it on the left side. Select it and change the values in the Transform panel to make it 200 pixels wide and positioned up against the edges of the canvas. The rectangle is filled with black, which won’t work well in your design. Looking at the images used, you decide that a periwinkle blue would make an excellent color for the background. (It’s the color of the tank top worn in one of the photos, and will also look nice with the other images.) Make sure the layer with this color is visible. Then select the Eyedropper tool and Shift-click on a blue part to sample a color.
Open your Color panel and you’ll see that the color you sampled appears there. You’ll also notice a small cube, which indicates that the color you’ve sampled is not a Web-safe color. Click on the cube to have Illustrator change the color you sampled to the closest Web-safe color equivalent (see Figure 15.8).
Hide the layers for the three images to reveal the rectangle on the Background layer. Click on the rectangle and fill it with the Web-safe color you just created.
Before continuing, let’s bring in one of the design elements you’ve used in previous projects—color bars. Create a new topmost layer and name it Color Bars. In that layer, create a rectangle 60 pixels tall and 8 pixels wide and fill with black. Be sure to remove any stroke around the rectangle. Position it using the Transform panel. Click on the lower-left box of the proxy, and enter a value of 200 for the x coordinate and 0 for the y coordinate. Show the objects in the Color Bars layer and copy and paste the color bar to make an exact duplicate. Then, select the copy, and use the Transform panel to position it 345 pixels from the left edge (see Figure 15.9).
Create a new layer and name it Tag Line. Select the Type tool and click on your artboard to create a point text object (don’t click on an existing shape). Enter the text It’s your dream.. Style the text with 18-point Gill Sans Bold. Color the text white and position it on the left edge of the background. Then, create a separate text object with the line Live it.. Style the text to 36-point Gill Sans Bold, color the text black, and position it below the first line (see Figure 15.10).
Create a new layer and name it Logo. Position it at the very bottom of the layers panel. Then choose File, Place and browse to the REACH logo file you created way back in the first project. Select the Scale tool and size the logo fit in the banner, approximately 33% of full size. Position it on the right side of the canvas. You’ll also want to create a clipping mask around the logo, in case the background edges interfere with the elements behind it. (Refer to the steps for masking an image in “Adding the Images” above.) The logo appears correctly scaled and in position (see Figure 15.11).

Save the Illustrator file to your hard drive.
The file is nearly complete, but you need to put your objects and layers in order so you can bring them into Flash to complete the animation.
This is easy to do by copying and pasting between applications. Use the Layers panel to make all layers visible, and then select all by using the Selection tool to trace a rectangle containing all the objects on the page. The Layers panel will show that everything is selected by displaying colorful squares (see Figure 15.12). Choose Edit, Copy from the menu bar.

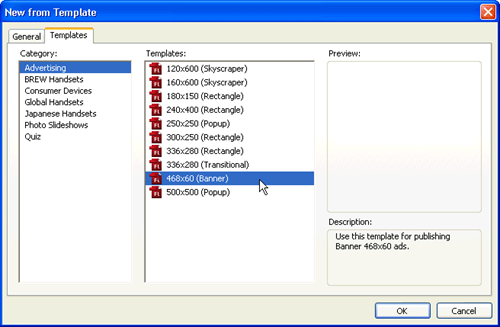
Now you’re ready to bring your layers into Flash. Open Flash and create a new file of the correct size by choosing Templates, Advertising from the New Document dialog (see Figure 15.13). Select the option 468×60 (Banner). With the new document open, choose Edit, Paste in Center. When prompted, choose the option Paste Using AI File Importer Preferences and wait for Flash to bring in the Illustrator layers. The layers appear in the order they existed in the Illustrator document (see Figure 15.14).
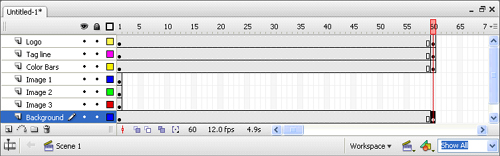
With your layers prepared, you are ready to create your animation effects. For this animation, you will need a total of three keyframes, which divide the timeline into three sections—one for displaying each image layer. Note that the remaining layers will be visible for the entire animation.
Let’s start by creating a keyframe at Frame 60 that includes the layers that don’t change. To do this, hold down the (Cmd) [Ctrl] key and click the frames representing them at Frame 60 (see Figure 15.15). Then, choose Insert, Timeline, Keyframe.
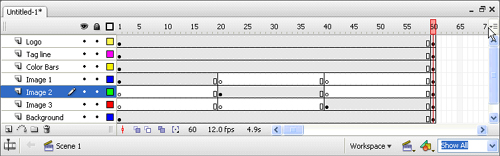
Next, you need to create frames for the image layers at even intervals in the timeline. To do this, insert keyframes containing only the image layers at Frame 20, Frame 40, and Frame 60. Hold down the Shift key and select the boxes for the first and last image for Frame 20—holding down the Shift key selects the range so the middle image will also be selected. Then, insert a keyframe as before. Repeat this process for Frame 40 and Frame 60 so your timeline shows all layers (see Figure 15.16).
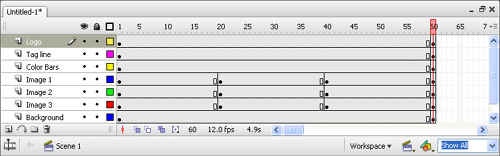
Although you want one image to show for each section of the timeline, you currently have them all used in each section—which means the top image will be the only one that is viewable. To achieve the desired effect of changing images, you need to selectively delete the frames containing the unneeded images from each of the three sections you’ve created. In the first section, select the frames for images 2 and 3 and press the Delete key to remove them. For the second section delete the frames for images 1 and 3, and for the final section delete the frames for images 1 and 2 (see Figure 15.17). (To quickly delete all the frames for a layer prior to a keyframe, select the white rectangle preceding it.) Drag the playhead at the top of the timeline for a quick preview of the effect.
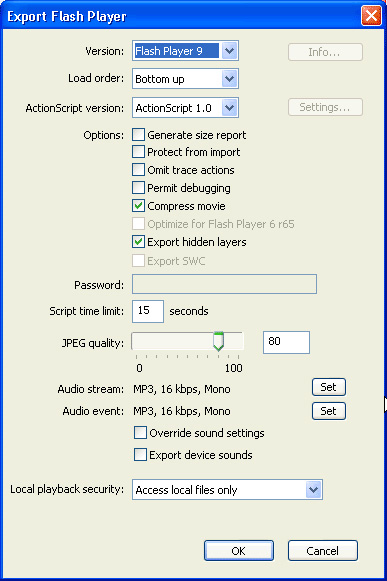
The final step is to export the movie by choosing File, Export, Export Movie from the menu. Name your file, choose a location to save the file, and then click Save. In the next dialog box, choose which version of Flash you want to support and click OK (see Figure 15.18).
Now, double-click the saved file to test the animation.
Congratulations, you’ve just created an animated web ad banner!
In this chapter, you used Illustrator and Flash to create an animated web graphic. As you work with the CS3 suite, you’ll find that this is a powerful application combination for creating web animations. By practicing with the Illustrator tools and the Flash timeline, you’ll be creating dynamic web presentations in no time.