
Hour 3. Build Your First Bootstrap Website with the Basic Template
What You’ll Learn in This Hour:
![]() The minimum HTML you need to use Bootstrap
The minimum HTML you need to use Bootstrap
![]() How to add Bootstrap to any web page
How to add Bootstrap to any web page
![]() An explanation of the basic Bootstrap template
An explanation of the basic Bootstrap template
![]() How to use Bootstrap in a few example templates
How to use Bootstrap in a few example templates
One thing you will learn when building a Bootstrap website is that the basics of using Bootstrap come down to adding a few lines of code to your HTML. In this hour, you will learn about the basic Bootstrap template as well as a few other sample templates you can use to add more features to your website.
The Minimum Bootstrap Page
After you’ve installed Bootstrap (see Hour 2, “Downloading and Installing Bootstrap”), you need to add a few lines of HTML to your web pages to create a Bootstrap website. Listing 3.1 shows a simple HTML5 web page without Bootstrap.
LISTING 3.1 A Simple HTML5 Web Page
<!doctype html>
<html>
<head>
<meta charset="UTF-8">
<title>Untitled Document</title>
</head>
<body>
</body>
</html>
To make this a Bootstrap page, you just need to add the Bootstrap CSS (Listing 3.2) to the <head> of the document.
<link href="css/bootstrap.min.css" rel="stylesheet">
Make sure that the href points to your copy of the Bootstrap CSS file.
But Bootstrap offers more than just CSS. To add all the Bootstrap plugins, you need to add both jQuery and the Bootstrap JavaScript to the bottom of the document. Add the lines in Listing 3.3 to the very bottom of the HTML page, just before the </body> tag.
LISTING 3.3 Bootstrap JavaScript and jQuery
<script
src="https://ajax.googleapis.com/ajax/libs/jquery/2.1.3/jquery.min.js">
</script>
<script src="js/bootstrap.min.js"></script>
As with the CSS, be sure to change the JavaScript src to point to your Bootstrap JavaScript file.
With just those few lines, your web page is now a Bootstrap page, and you can start using the styles and plugins that you’ll learn more about in the later hours of this book.
The Basic Bootstrap Template
The basic Bootstrap template is the template that is recommended on the Bootstrap website. As you can see in Listing 3.4, the basic Bootstrap template is just a little more complicated than the minimum page I described previously.
LISTING 3.4 Basic Bootstrap Template
<!doctype html>
<html lang="en">
<head>
<meta charset="utf-8">
<meta http-equiv="X-UA-Compatible" content="IE=edge">
<meta name="viewport" content="width=device-width, initial-scale=1">
<title>Bootstrap 101 Template</title>
<!-- Bootstrap -->
<link href="css/bootstrap.min.css" rel="stylesheet">
<!-- HTML5 shim and Respond.js for IE8 support of HTML5 elements and
media queries -->
<!-- WARNING: Respond.js doesn't work if you view the page via
file:// -->
<!--[if lt IE 9]>
<script
src="https://oss.maxcdn.com/html5shiv/3.7.2/html5shiv.min.js"></script>
<script src="https://oss.maxcdn.com/respond/1.4.2/respond.min.js">
</script>
<![endif]-->
</head>
<body>
<h1>Hello, world!</h1>
<!-- jQuery (necessary for Bootstrap's JavaScript plugins) -->
<script
src="https://ajax.googleapis.com/ajax/libs/jquery/1.11.1/jquery.min.js">
</script>
<!-- Include all compiled plugins (below), or include individual
files as needed -->
<script src="js/bootstrap.min.js"></script>
</body>
</html>
This template might look complicated, but it isn’t all that much more complex than the minimum template in the previous section. Let’s look at the elements of the template.
This is the doctype or document type. It tells the browser that this is both HTML and HTML5. If you don’t include this line, your page will still work, but it won’t be good HTML.
<html lang="en"> ... </html>
The <html> tag is the container element. The basic Bootstrap template includes the lang="en" attribute. This tells the browser that this page is written in English. If your page is in another language, you should change the en to the two-letter character code for that language. You can find a list of the ISO 639-1 language codes on the Web at http://www.html5in24hours.com/reference/language-codes-iso-639-1/.
<head> ... </head>
This is the <head> element that contains information about the web page. In most cases this information is “meta” information about the page that doesn’t display to the customers but provides information to browsers, search engines, and other tools.
<meta charset="utf-8">
This is a very important line in the <head> of HTML pages. It should be the first line of your <head> and tells the browser which character set the page uses. The vast majority of pages use Unicode or UTF-8, so you won’t need to change this line at all. But do not leave it out—without it, your page may be at risk for being hacked.
Note: A Simple Protection for Your Web Pages
Just because a web page does not have the <meta charset="utf-8"> tag in the HTML does not mean that the page will be hacked. There needs to be more going on on the page than just lacking that tag to open it up to hacking. But it’s still a good idea to use this tag. It’s a simple line of code you can add to all your web pages, and it will ensure that if your document does have other areas that might be vulnerable to a cross-site scripting (XSS) UTF-7 attack, they will still be protected because the character set is defined in the first line of the HTML.
<meta http-equiv="X-UA-Compatible" content="IE=edge">
This meta tag tells the Internet Explorer web browser to display this web page in as high a version emulation as that browser can. Other browsers will completely ignore it. This line is recommended but not required.
<meta name="viewport" content="width=device-width, initial-scale=1">
The viewport meta tag helps mobile browsers display pages more effectively. This version says to set the width of the page to the device width and the initial zooming to 100%. This line ensures that your pages are easier to read in larger DPI, small-screen devices like iPhones and modern Android phones.
<title>Bootstrap 101 Template</title>
This is the title of the web page. It’s the only part of the <head> that customers will see. It displays in the browser tab bar or title bar and is used as the default text when the page is bookmarked.
<link href="css/bootstrap.min.css" rel="stylesheet">
This is the Bootstrap CSS file.
<!--[if lt IE 9]>
<script src="https://oss.maxcdn.com/html5shiv/3.7.2/html5shiv.min.js"></script>
<script src="https://oss.maxcdn.com/respond/1.4.2/respond.min.js"></script>
<![endif]-->
This is a conditional comment. It states that if the browser is less than Internet Explorer 9, the enclosed HTML should be executed. Otherwise, it’s not.
In this block, Internet Explorer 8 and lower would get two scripts (html5shiv.min.js and respond.min.js) loaded, but all other browsers would not. These two scripts help Internet Explorer 8 display HTML5 elements and media queries. If these scripts don’t run, the pages don’t work well in older versions of Internet Explorer.
<body> ... </body>
The <body> element contains all the web page content that will be displayed in the web browser.
<h1>Hello, world!</h1>
This is the only content on the basic template—a headline. You can change this to whatever you want and add content here.
<script
src="https://ajax.googleapis.com/ajax/libs/jquery/1.11.1/jquery.min.js">
</script>
To use the JavaScript plugins, you need to include jQuery on the pages. The basic template uses an older version of jQuery, but you can update this to subsequent versions of jQuery as well. In Listing 3.3, I used a pointer to jQuery version 2.1.3.
<script src="js/bootstrap.min.js"></script>
This is the Bootstrap JavaScript file.
You can see how the Bootstrap basic template looks in Figure 3.1.

More Bootstrap Sample Templates
You might be thinking that that basic template is pretty boring. But there is more to Bootstrap than just a “Hello World” headline.
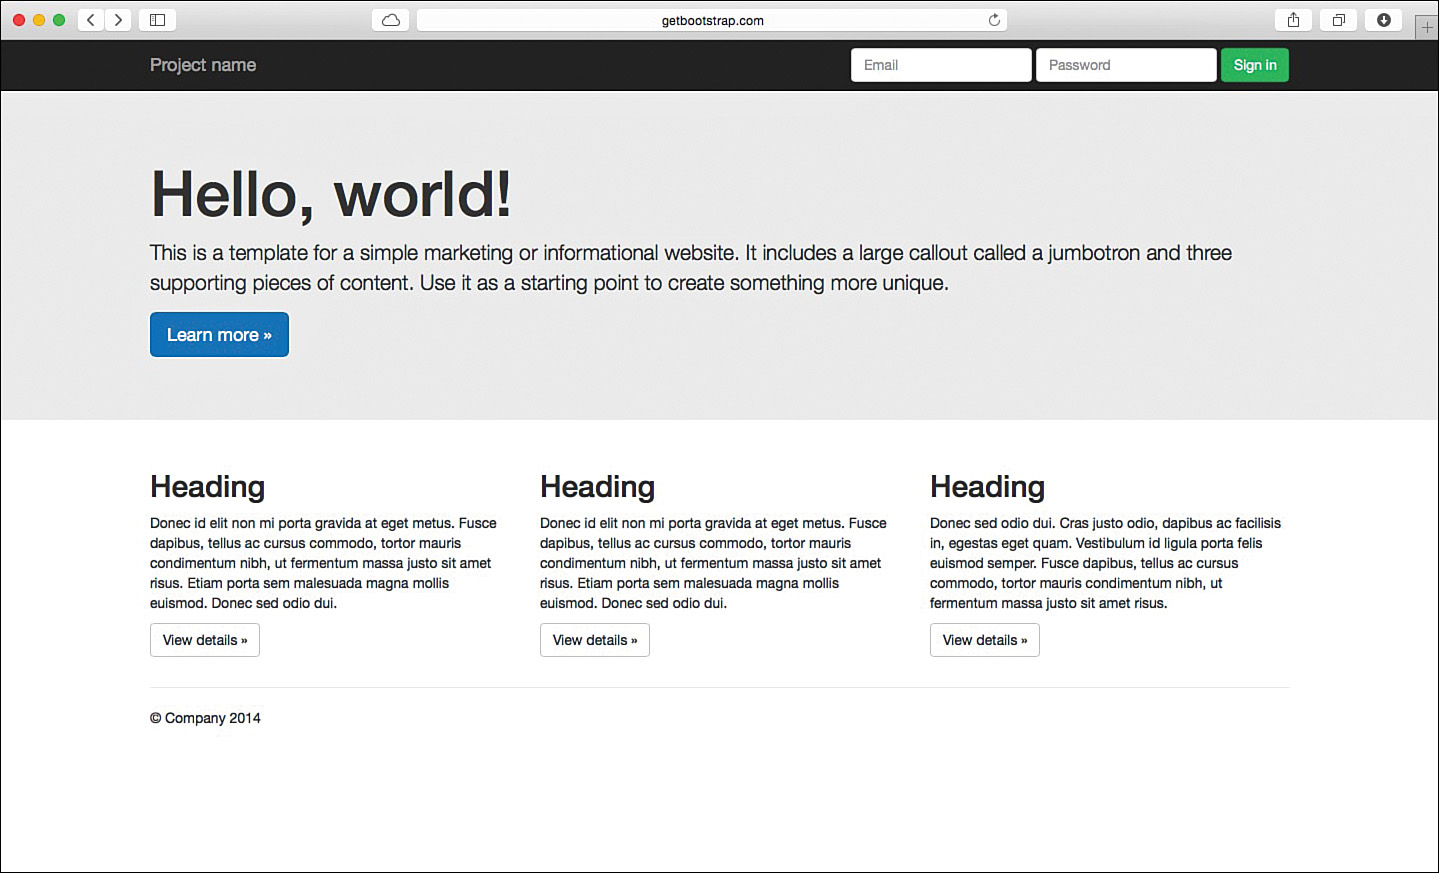
The Bootstrap Starter Template
This template gives you a static navigation bar across the top of the page and some basic HTML with text. You can use it to create nice-looking pages quickly. Figure 3.2 shows the Bootstrap Starter Template in Safari, and you can see the HTML for that in Listing 3.5.

LISTING 3.5 Bootstrap Starter Template
<!DOCTYPE html>
<html lang="en">
<head>
<meta charset="utf-8">
<meta http-equiv="X-UA-Compatible" content="IE=edge">
<meta name="viewport" content="width=device-width, initial-scale=1">
<title>Bootstrap Starter Template</title>
<!-- Bootstrap -->
<link href="css/bootstrap.min.css" rel="stylesheet">
<style>
body {
padding-top: 50px;
}
.starter-template {
padding: 40px 15px;
text-align: center;
}
</style>
<!-- HTML5 shim and Respond.js for IE8 support of HTML5 elements and
media queries -->
<!-- WARNING: Respond.js doesn't work if you view the page via
file:// -->
<!--[if lt IE 9]>
<script
src="https://oss.maxcdn.com/html5shiv/3.7.2/html5shiv.min.js"></script>
<script
src="https://oss.maxcdn.com/respond/1.4.2/respond.min.js"></script>
<![endif]-->
</head>
<body>
<nav class="navbar navbar-inverse navbar-fixed-top">
<div class="container">
<div class="navbar-header">
<button type="button" class="navbar-toggle collapsed"
data-toggle="collapse" data-target="#navbar"
aria-expanded="false" aria-controls="navbar">
<span class="sr-only">Toggle navigation</span>
<span class="icon-bar"></span>
<span class="icon-bar"></span>
<span class="icon-bar"></span>
</button>
<a class="navbar-brand" href="#">Project name</a>
</div>
<div id="navbar" class="collapse navbar-collapse">
<ul class="nav navbar-nav">
<li class="active"><a href="#">Home</a></li>
<li><a href="#about">About</a></li>
<li><a href="#contact">Contact</a></li>
</ul>
</div><!--/.nav-collapse -->
</div>
</nav>
<div class="container">
<div class="starter-template">
<h1>Bootstrap starter template</h1>
<p class="lead">Use this document as a way to quickly start any
new project.<br> All you get is this text and a mostly barebones
HTML document.</p>
</div>
</div><!-- /.container -->
<!-- jQuery (necessary for Bootstrap's JavaScript plugins) -->
<script
src="https://ajax.googleapis.com/ajax/libs/jquery/1.11.1/jquery.min.js">
</script>
<!-- Include all compiled plugins (below), or include individual
files as needed -->
<script src="js/bootstrap.min.js"></script>
</body>
</html>
The only difference between the previous code and the code you can find online (http://getbootstrap.com/examples/starter-template/) is that I moved the extra styles into a <style> tag rather than another external style sheet.
The Bootstrap Theme
Many people think that the Bootstrap Theme is the “real” Bootstrap, and it is often what people think of when they think of Bootstrap sites. It offers prebuilt color themes, buttons, tables, image thumbnails, labels, badges, and much more. Figure 3.3 shows the top of the Bootstrap Theme in Safari. You can get the HTML for it at http://getbootstrap.com/examples/theme/.

Bootstrap Jumbotron
The Jumbotron is a template you see on many different websites. Bootstrap offers two ways to build a Jumbotron. Figure 3.4 shows the basic Jumbotron, and Figure 3.5 shows the Narrow Jumbotron.

You can find both of these Jumbotron examples, as well as other Bootstrap examples, on the Get Bootstrap website at http://getbootstrap.com/getting-started/#examples.
Summary
In this hour we took a look at the basic Bootstrap HTML template. You learned how to add Bootstrap to any HTML document and how to create a Bootstrap page from scratch using either a minimalist HTML5 template or the basic Bootstrap template. You also learned about some of the sample templates you can use to get started creating your own Bootstrap website.
Workshop
The workshop contains quiz questions to help you process what you’ve learned in this hour. Try to answer all the questions before you read the answers.
Q&A
Q. I’m worried that if I use Bootstrap, my web pages will look like every other Bootstrap site. How do I prevent this?
A. If you stick with the Bootstrap template or theme, then yes, you might risk creating a page that looks like a lot of other Bootstrap sites. But you can add your own styles to modify your website to look how you want. You will learn more about this in Hour 21, “Customizing Bootstrap and Your Bootstrap Website.”
Q. Is Bootstrap responsive?
A. Bootstrap automatically uses responsive web design (RWD) to adjust the pages for various screen sizes. This is covered in more detail in Hour 5, “Grids and How to Use Them.”
Q. What is the benefit of the Bootstrap Theme over the basic Bootstrap CSS?
A. The Bootstrap Theme uses the bootstrap-theme.css file to get what Bootstrap calls a “visually enhanced experience.” However, in my experience, most of the colors and visual enhancements are already included in the bootstrap.css file, so you don’t need this second theme CSS file. I never use it in my designs.
Quiz
1. What is the least amount of code you need to add Bootstrap to a web page?
a. The Bootstrap CSS file
b. The Bootstrap CSS and JavaScript files
c. The Bootstrap CSS and JavaScript files and jQuery
d. The Bootstrap CSS and JavaScript files, jQuery, and your custom CSS
e. The Bootstrap CSS and JavaScript files, jQuery, and your custom CSS and JavaScript
2. True or False: Bootstrap is not HTML5.
3. True or False: Bootstrap plugins require jQuery.
4. True or False: You must use the Bootstrap template to be compliant with Bootstrap.
5. Why is the <meta charset="utf-8"> line so important?
a. Because without it, the characters won’t display.
b. Because it tells browsers the page is internationally ready.
c. Because without it, your page is vulnerable to certain hacker exploits.
d. It’s not important.
6. True or False: The X-UA-Compatible line is what makes the Bootstrap framework work in Internet Explorer.
7. True or False: The viewport meta tag is what makes Bootstrap responsive.
8. What does the code <!--[if lt IE 9]> do?
a. Nothing, it’s in a comment.
b. It activates the following code in Internet Explorer 8 and lower.
c. It activates the following code in Internet Explorer 9 and lower.
d. It activates the following code in any version of Internet Explorer.
9. Where is the best location for the Bootstrap JavaScript file?
a. In the <head> of the document
b. Anywhere in the <body> of the document that you need scripting
c. Just above the </body> tag, but before the jQuery script
d. Just above the </body> tag, but after the jQuery script
10. True or False: The bootstrap-theme.css file is the only way to get the Bootstrap colors and visual enhancements.
Quiz Answers
1. a. The minimum you need to add Bootstrap to a web page is the Bootstrap CSS file.
2. False. Bootstrap uses the <!doctype html> doctype, which indicates that it is HTML5.
3. True. Bootstrap JavaScript plugins require jQuery to work.
4. False. As long as you use the Bootstrap CSS and JavaScript files, you are using Bootstrap.
5. c. Without the <meta charset="utf-8"> line in the <head> of your document, the web page becomes vulnerable to certain hacker exploits.
6. False. The X-UA-Compatible line helps Internet Explorer work more effectively, but it is not required to get Bootstrap to work in that browser.
7. False. The viewport meta tag helps the design look better in smaller screens, but it is not required for a responsive design.
8. b. The line <!--[if lt IE 9]> is a conditional comment that activates the following HTML in versions of Internet Explorer lower than 9.
9. d. The best place for the Bootstrap JavaScript file is the very last place in the HTML, just above the </body> tag, after the jQuery script.
10. False. The Bootstrap Theme CSS file ensures that you have all the colors and visual customizations, but they are typically included in the standard Bootstrap CSS file by default.
Exercises
1. Convert a web page you already have to Bootstrap using the instructions in this hour. Compare the new page to the old one in a web browser.
2. Create a brand-new page using the Bootstrap standard template.