
Day 21. What’s Next
Congratulations! You are nearly done with a full three-week intensive introduction to C++. By now, you should have a solid understanding of C++, but in modern programming there is always more to learn. This final day’s lesson fills in some missing details and then sets the course for continued study.
Most of what you write in your source code files is C++. This is interpreted by the compiler and turned into your program. Before the compiler runs, however, the preprocessor runs, and this provides an opportunity for conditional compilation.
Today, you will learn
• What conditional compilation is and how to manage it
• How to write macros using the preprocessor
• How to use the preprocessor in finding bugs
• How to manipulate individual bits and use them as flags
• What the next steps are in learning to use C++ effectively
The Preprocessor and the Compiler
Every time you run your compiler, your preprocessor runs first. The preprocessor looks for preprocessor instructions, each of which begins with a pound symbol (#). The effect of each of these instructions is a change to the text of the source code. The result is a new source code file—a temporary file that you normally don’t see, but that you can instruct the compiler to save so you can examine it if you want to.
The compiler does not read your original source code file; it reads the output of the preprocessor and compiles that file. You’ve seen the effect of this already with the #include directive. This instructs the preprocessor to find the file whose name follows the #include directive and to write it into the intermediate file at that location. It is as if you had typed that entire file right into your source code, and by the time the compiler sees the source code, the included file is there.
Tip
Nearly every compiler has a switch that you can set either in the Integrated Development Environment (IDE) or at the command line, which instructs the compiler to save the intermediate file. Check your compiler manual for the right switches to set for your compiler if you want to examine this file.
The #define Preprocessor Directive
You can create string substitutions using the #define command you write
#define BIG 512
you have instructed the precompiler to substitute the string 512 wherever it sees the string BIG. This is not a string in the C++ sense. The characters “512” are substituted in your source code wherever the word “BIG” is seen. Thus, if you write
#define BIG 512
int myArray[BIG];
the intermediate file produced by the precompiler looks like this:
int myArray[512];
Note that the #define statement is gone. Precompiler statements are all removed from the intermediate file; they do not appear in the final source code at all.
Using #define for Constants
One way to use #define is as a substitute for constants. This is almost never a good idea, however, because #define merely makes a string substitution and does no type checking. As explained in the section on Constants, tremendous advantages exist in using the const keyword rather than #define.
Using #define for Tests
A second way to use #define is simply to declare that a particular character string is defined. Therefore, you could write
#define DEBUG
Later in your listing, you can test to determine whether BIG has been defined and take action accordingly. To check if it is defined, you can use the preprocessor #if command followed by the defined command:
#if defined DEBUG
cout << Debug defined";
#endif
The defined expression evaluates to true if the name it tests—DEBUG in this case—has been defined already. Keep in mind that this happens in the preprocessor, not in the compiler or in the executing program.
When the preprocessor reads the #if defined, it checks a table it has built to see whether you’ve defined the value that follows. If you have, defined evaluates to true, and everything between the #if defined DEBUG and its #endif is written into the intermediate file for compiling. If it evaluates to false, nothing between #if defined DEBUG and #endif is written into the intermediate file; it is as if it were never in the source code in the first place.
A shortcut directive also exists for checking defined values. This is the #ifdef directive:
#ifdef DEBUG
cout << "Debug defined";
#endif
You can also test to see if a value is not defined. This is done by using the not operator with the defined directive:
#if !defined DEBUG
cout << "Debug is not defined";
#endif
There is also a shortcut version for this as well, #ifndef:
#ifndef DEBUG
cout << "Debug is not defined.";
#endif
Note that #ifndef is the logical reverse of #ifdef. #ifndef evaluates to true if the string has not been defined up to that point in the file.
You should notice that all of these checks required that #endif also be included to indicate the end of the code impacted by the check.
The #else Precompiler Command
As you might imagine, the term #else can be inserted between either #ifdef or #ifndef and the closing #endif. Listing 21.1 illustrates how these terms are used.
Listing 21.1. Using #define
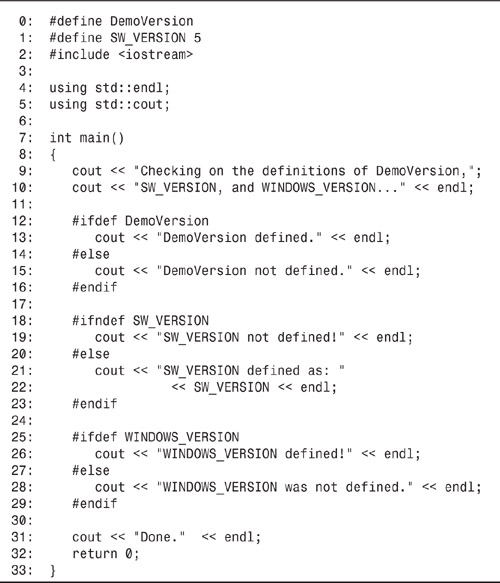
![]()
Checking on the definitions of DemoVersion, NT_VERSION,_and WINDOWS_VERSION...
DemoVersion defined.
NT_VERSION defined as: 5
WINDOWS_VERSION was not defined.
Done.
![]()
On lines 0 and 1, DemoVersion and NT_VERSION are defined, with SW_VERSION defined with the string 5. On line 12, the definition of DemoVersion is tested, and because DemoVersion is defined (albeit with no value), the test is true and the string on line 11 is printed.
On line 18 is the test that SW_VERSION is not defined. Because SW_VERSION is defined, this test fails and execution jumps to line 21. Here the string 5 is substituted for the word SW_VERSION; this is seen by the compiler as
cout << "SW_VERSION defined as: " << 5 << endl;
Note that the first word SW_VERSION is not substituted because it is in a quoted string. The second SW_VERSION is substituted, however, and thus the compiler sees 5 as if you had typed 5 there.
Finally, on line 25, the program tests for WINDOWS_VERSION. Because you did not define WINDOWS_VERSION, the test fails and the message on line 28 is printed.
Inclusion and Inclusion Guards
You will create projects with many different files. You will probably organize your directories so that each class has its own header file (for example, .hpp) with the class declaration and its own implementation file (for example, .cpp) with the source code for the class methods.
Your main() function will be in its own .cpp file, and all the .cpp files will be compiled into .obj files, which will then be linked into a single program by the linker.
Because your programs will use methods from many classes, many header files will be included in each file. Also, header files often need to include one another. For example, the header file for a derived class’s declaration must include the header file for its base class.
Imagine that the Animal class is declared in the file ANIMAL.hpp. The Dog class (which derives from Animal) must include the file ANIMAL.hpp in DOG.hpp, or Dog will not be able to derive from Animal. The Cat header also includes ANIMAL.hpp for the same reason.
If you create a program that uses both a Cat and a Dog, you will be in danger of including ANIMAL.hpp twice. This generates a compile-time error because it is not legal to declare a class (Animal) twice, even though the declarations are identical.
You can solve this problem with inclusion guards. At the top of your ANIMAL header file, you write these lines:

This says, if you haven’t defined the term ANIMAL_HPP, go ahead and define it now. Between the #define statement and the closing #endif are the entire contents of the file.
The first time your program includes this file, it reads the first line and the test evaluates to true; that is, you have not yet defined ANIMAL_HPP. So, it defines it and then includes the entire file.
The second time your program includes the ANIMAL.hpp file, it reads the first line and the test evaluates to false because you have already included ANIMAL.hpp. The preprocessor, therefore, doesn’t process any lines until it reaches the next #else (in this case, there isn’t one) or the next #endif (at the end of the file). Thus, it skips the entire contents of the file, and the class is not declared twice.
The actual name of the defined symbol (ANIMAL_HPP) is not important, although it is customary to use the filename in all uppercase with the dot (.) changed to an underscore. This is purely convention; however, because you won’t be able to give two files the same name, this convention works.
Note
It never hurts to use inclusion guards. Often, they will save you hours of debugging time.
Macro Functions
The #define directive can also be used to create macro functions. A macro function is a symbol created using #define that takes an argument, much like a function does. The preprocessor substitutes the substitution string for whatever argument it is given. For example, you can define the macro TWICE as
#define TWICE(x) ( (x) * 2 )
and then in your code you write
TWICE(4)
The entire string TWICE(4) is removed, and the value ( (4) * 2 ) is substituted. When the precompiler sees the 4, it substitutes ( (4) * 2 ), which then evaluates to 4 * 2, or 8.
A macro can have more than one parameter, and each parameter can be used repeatedly in the replacement text. Two common macros are MAX and MIN:
#define MAX(x,y) ( (x) > (y) ? (x) : (y) )
#define MIN(x,y) ( (x) < (y) ? (x) : (y) )
Note that in a macro function definition, the opening parenthesis for the parameter list must immediately follow the macro name, with no spaces. The preprocessor is not as forgiving of whitespace as is the compiler. If there is a space, a standard substitution is used like you saw earlier in today’s lesson.
For example, if you write:
#define MAX (x,y) ( (x) > (y) ? (x) : (y) )
and then try to use MAX like this:
int x = 5, y = 7, z;
z = MAX(x,y);
the intermediate code is
int x = 5, y = 7, z;
z = (x,y) ( (x) > (y) ? (x) : (y) )(x,y)
A simple text substitution is done, rather than invoking the macro function. Thus, the token MAX has substituted for it (x,y) ( (x) > (y) ? (x) : (y) ), and then that is followed by the (x,y), which follows MAX.
By removing the space between MAX and (x,y), however, the intermediate code becomes:
int x = 5, y = 7, z;
a = ( (5) > (7) ? (5) : (7) );
This, of course, then evaluates to 7.
Why All the Parentheses?
You might be wondering why so many parentheses are in many of the macros presented so far. The preprocessor does not demand that parentheses be placed around the arguments in the substitution string, but the parentheses help you to avoid unwanted side effects when you pass complicated values to a macro. For example, if you define MAX as
#define MAX(x,y) x > y ? x : y
and pass in the values 5 and 7, the macro works as intended. But, if you pass in a more complicated expression, you receive unintended results, as shown in Listing 21.2.
Listing 21.2. Using Parentheses in Macros
0: // Listing 21.2 Macro Expansion
1: #include <iostream>
2: using namespace std;
3:
4: #define CUBE(a) ( (a) * (a) * (a) )
5: #define THREE(a) a * a * a
6:
7: int main()
8: {
9: long x = 5;
10: long y = CUBE(x);
11: long z = THREE(x);
12:
13: cout << "y: " << y << endl;
14: cout << "z: " << z << endl;
15:
16: long a = 5, b = 7;
17: y = CUBE(a+b);
18: z = THREE(a+b);
19:
20: cout << "y: " << y << endl;
21: cout << "z: " << z << endl;
22: return 0;
23: }
![]()
y: 125
z: 125
y: 1728
z: 82
![]()
On line 4, the macro CUBE is defined, with the argument x put into parentheses each time it is used. On line 5, the macro THREE is defined, without using parentheses.
In the first use of these macros on lines 10 and 11, the value 5 is given as the parameter, and both macros work fine. CUBE(5) expands to ( (5) * (5) * (5) ), which evaluates to 125, and THREE(5) expands to 5 * 5 * 5, which also evaluates to 125.
In the second use, on lines 16 to 18, the parameter is 5 + 7. In this case, CUBE(5+7) evaluates to
( (5+7) * (5+7) * (5+7) )
( (12) * (12) * (12) )
which, in turn, evaluates to 1728. THREE(5+7), however, evaluates to
5 + 7 * 5 + 7 * 5 + 7
Because multiplication has a higher precedence than addition, this becomes
5 + (7 * 5) + (7 * 5) + 7
which evaluates to
5 + (35) + (35) + 7
which finally evaluates to 82. As you can see, without the parenthesis, an error occurs—three of 5+7 is really 36!
String Manipulation
The preprocessor provides two special operators for manipulating strings in macros. The stringizing operator (#) substitutes a quoted string for whatever follows the stringizing operator. The concatenation operator bonds two strings into one.
Stringizing
The stringizing operator puts quotes around any characters following the operator, up to the next whitespace. Thus, if you write
#define WRITESTRING(x) cout << #x
and then call
WRITESTRING(This is a string);
the precompiler turns it into
cout << "This is a string";
Note that the string This is a string is put into quotes, as required by cout.
Concatenation
The concatenation operator allows you to bond more than one term into a new word. The new word is actually a token that can be used as a class name, a variable name, an offset into an array, or anywhere else a series of letters might appear.
Assume for a moment that you have five functions named fOnePrint, fTwoPrint, fThreePrint, fFourPrint, and fFivePrint. You can then declare
#define fPRINT(x) f ## x ## Print
and then use it with fPRINT(Two) to generate fTwoPrint and with fPRINT(Three) to generate fThreePrint.
At the conclusion of Week 2, a PartsList class was developed. This list could only handle objects of type List. Suppose that this list works well, and you want to be able to make lists of animals, cars, computers, and so forth.
One approach is to create AnimalList, CarList, ComputerList, and so on, cutting and pasting the code in place. This quickly becomes a nightmare because every change to one list must be written to all the others.
An alternative is to use macros and the concatenation operator. For example, you could define
#define Listof(Type) class Type##List
{
public:
Type##List(){}
private:
int itsLength;
};
This example is overly sparse, but the idea is to put in all the necessary methods and data. When you are ready to create an AnimalList, you write
Listof(Animal)
and this is turned into the declaration of the AnimalList class. Some problems occur with this approach, all of which were discussed in detail on Day 19, “Templates.”
Predefined Macros
Many compilers predefine a number of useful macros, including __DATE__, __TIME__, __LINE__, and __FILE__. Each of these names is surrounded by two underscore characters to reduce the likelihood that the names will conflict with names you’ve used in your program.
When the precompiler sees one of these macros, it makes the appropriate substitutes. For __DATE__, the current date is substituted. For __TIME__, the current time is substituted. __LINE__ and __FILE__ are replaced with the source code line number and filename, respectively. You should note that this substitution is made when the source is precompiled, not when the program is run. If you ask the program to print __DATE__, you do not get the current date; instead, you receive the date the program was compiled. These defined macros are very useful in debugging, as mentioned on Day 20, “Handling Errors and Exceptions,” during the discussion of exceptions.
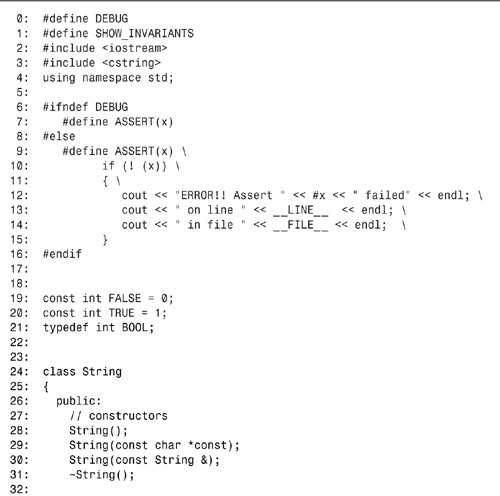
The assert() Macro
Many compilers offer an assert() macro. The assert() macro returns true if its parameter evaluates to true and takes some kind of action if it evaluates false. Many compilers abort the program on an assert() that fails; others throw an exception (see Day 20).
The assert() macro is used for debugging your program before you release it. In fact, if DEBUG is not defined, the preprocessor collapses the assert() so that no code from it is included in the generated source for the compiler. This is a great help during development, and when the final product ships, there is no performance penalty or increase in the size of the executable version of the program.
Rather than depending on the compiler-provided assert(), you are free to write your own assert() macro. Listing 21.3 provides a simple custom assert() macro and shows its use.
Listing 21.3. A Simple assert() Macro

First assert:
Second assert:
ERROR!! Assert x !=5 failed
on line 24
in file List2104.cpp
Done.
![]()
On line 1, the term DEBUG is defined. Typically, this is done from the command line (or the IDE) at compile time, so you can turn this on and off at will. On lines 8–14, the ASSERT() macro is defined. Typically, this is done in a header file, and that header (assert.hpp) is included in all your implementation files.
On line 5, the term DEBUG is tested. If it is not defined, ASSERT() is defined to create no code at all. If DEBUG is defined, the functionality defined on lines 8–14 is applied.
The ASSERT() itself is one long statement split across seven source code lines as far as the precompiler is concerned. On line 9, the value passed in as a parameter is tested; if it evaluates false, the statements on lines 11–13 are invoked, printing an error message. If the value passed in evaluates true, no action is taken.
Debugging with assert()
When writing your program, you will often know deep down in your soul that something is true: A function has a certain value, a pointer is valid, and so forth. It is the nature of bugs that what you know to be true might not be so under some conditions. For example, you know that a pointer is valid, yet the program crashes. assert() can help you find this type of bug, but only if you make it a regular practice to use assert() liberally in your code. Every time you assign or are passed a pointer as a parameter or function return value, be certain to assert that the pointer is valid. Any time your code depends on a particular value being in a variable, assert() that that is true.
No penalty is assessed for frequent use of assert(); it is removed from the code when you undefine debugging. It also provides good internal documentation, reminding the reader of what you believe is true at any given moment in the flow of the code.
Using assert() Versus Exceptions
Yesterday, you saw how to work with exceptions to handle error conditions. It is important to note that assert() is not intended to handle runtime error conditions such as bad data, out-of-memory conditions, unable to open file, and so forth. assert() is created to catch programming errors only. That is, if an assert() “fires,” you know you have a bug in your code.
This is critical because when you ship your code to your customers, instances of assert() are removed. You can’t depend on an assert() to handle a runtime problem because the assert() won’t be there.
It is a common mistake to use assert() to test the return value from a memory assignment:
Animal *pCat = new Cat;
Assert(pCat); // bad use of assert
pCat->SomeFunction();
This is a classic programming error; every time the programmer runs the program, enough memory is available and the assert() never fires. After all, the programmer is running with lots of extra RAM to speed up the compiler, debugger, and so forth. The programmer then ships the executable, and the poor user, who has less memory, reaches this part of the program and the call to new fails and returns NULL. The assert(), however, is no longer in the code and nothing indicates that the pointer points to NULL. As soon as the statement pCat->SomeFunction() is reached, the program crashes.
Getting NULL back from a memory assignment is not a programming error, although it is an exceptional situation. Your program must be able to recover from this condition, if only by throwing an exception. Remember: The entire assert() statement is gone when DEBUG is undefined. Exceptions are covered in detail on Day 20.
Side Effects
It is not uncommon to find that a bug appears only after the instances of assert() are removed. This is almost always due to the program unintentionally depending on side effects of things done in assert() and other debug-only code. For example, if you write
ASSERT (x = 5)
when you mean to test whether x == 5, you create a particularly nasty bug.
Suppose that just prior to this assert(), you called a function that set x equal to 0. With this assert(), you think you are testing whether x is equal to 5; in fact, you are setting x equal to 5. The test returns true because x = 5 not only sets x to 5, but returns the value 5, and because 5 is nonzero, it evaluates as true.
When you pass the assert() statement, x really is equal to 5 (you just set it!). Your program runs just fine. You’re ready to ship it, so you turn off debugging. Now, the assert() disappears, and you are no longer setting x to 5. Because x was set to 0 just before this, it remains at 0 and your program breaks.
In frustration, you turn debugging back on, but hey! Presto! The bug is gone. Again, this is rather funny to watch, but not to live through, so be very careful about side effects in debugging code. If you see a bug that only appears when debugging is turned off, take a look at your debugging code with an eye out for nasty side effects.
Class Invariants
Most classes have some conditions that should always be true whenever you are finished with a class member function. These class invariants are the sine qua non of your class. For example, it might be true that your CIRCLE object should never have a radius of zero or that your ANIMAL should always have an age greater than zero and less than 100.
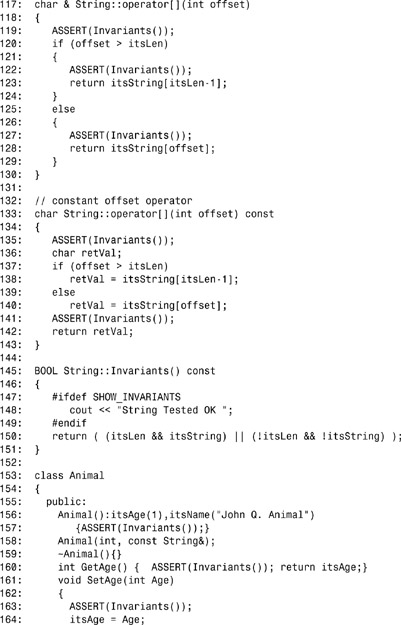
It can be very helpful to declare an Invariants() method that returns true only if each of these conditions is still true. You can then ASSERT(Invariants()) at the start and at the completion of every class method. The exception would be that your Invariants() would not expect to return true before your constructor runs or after your destructor ends. Listing 21.4 demonstrates the use of the Invariants() method in a trivial class.
Listing 21.4. Using Invariants()
![]()
String Tested OK String Tested OK String Tested OK String Tested OK
String Tested OK String Tested OK String Tested OK String Tested OK
String Tested OK StringTested OK String Tested OK String Tested OK
String Tested OK String Tested OK Animal Tested OK String Tested OK
Animal Tested OK
Sparky is Animal Tested OK 5 years old.Animal Tested OK Animal Tested OK
Animal
Tested OK
Sparky is Animal Tested OK 8 years old.String Tested OK
![]()
On lines 9–15, the ASSERT() macro is defined. If DEBUG is defined, this writes out an error message when the ASSERT() macro evaluates false.
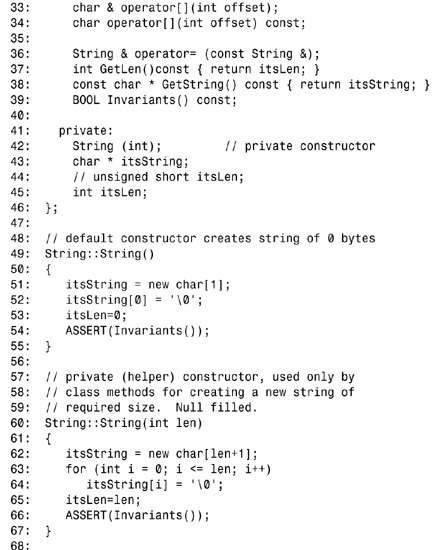
On line 39, the String class member function Invariants() is declared; it is defined on lines 143–150. The constructor is declared on lines 49–55; on line 54, after the object is fully constructed, Invariants() is called to confirm proper construction.
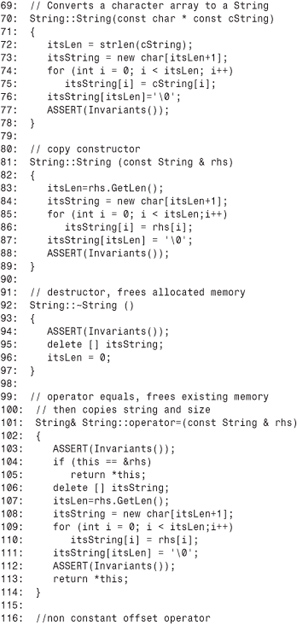
This pattern is repeated for the other constructors, and the destructor calls Invariants() only before it sets out to destroy the object. The remaining class functions call Invariants() before taking any action and then again before returning. This both affirms and validates a fundamental principle of C++: Member functions other than constructors and destructors should work on valid objects and should leave them in a valid state.
On line 176, class Animal declares its own Invariants() method, implemented on lines 189–195. Note on lines 155, 158, 161, and 163 that inline functions can call the Invariants() method.
Printing Interim Values
In addition to asserting that something is true using the ASSERT() macro, you might want to print the current value of pointers, variables, and strings. This can be very helpful in checking your assumptions about the progress of your program and in locating off-by-one bugs in loops. Listing 21.5 illustrates this idea.
Listing 21.5. Printing Values in DEBUG Mode
0: // Listing 21.5 - Printing values in DEBUG mode
1: #include <iostream>
2: using namespace std;
3: #define DEBUG
4:
5: #ifndef DEBUG
6: #define PRINT(x)
7: #else
8: #define PRINT(x)
9: cout << #x << ": " << x << endl;
10: #endif
11:
12: enum BOOL { FALSE, TRUE } ;
13:
14: int main()
15: {
16: int x = 5;
17: long y = 73898l;
18: PRINT(x);
19: for (int i = 0; i < x; i++)
20: {
21: PRINT(i);
22: }
23:
24: PRINT (y);
25: PRINT("Hi.");
26: int *px = &x;
27: PRINT(px);
28: PRINT (*px);
29: return 0;
30: }
![]()
x: 5
i: 0
i: 1
i: 2
i: 3
i: 4
y: 73898
"Hi.": Hi.
px: OO12FEDC
*px: 5
![]()
The PRINT() macro on lines 6 and 8–9 provides printing of the current value of the supplied parameter. Note that the first thing fed to cout on line 9 is the stringized version of the parameter; that is, if you pass in x, cout receives "x".
Next, cout receives the quoted string ": ", which prints a colon and then a tab. Third, cout receives the value of the parameter (x), and then finally, endl, which writes a new line and flushes the buffer.
Note that you might receive a value other than 0012FEDC.
Macros Versus Functions and Templates
Macros suffer from four problems in C++. The first is that they can be confusing if they get large because all macros must be defined on one line. You can extend that line by using the backslash character (), but large macros quickly become difficult to manage.
The second problem is that macros are expanded inline each time they are used. This means that if a macro is used a dozen times, the substitution appears a dozen times in your program, rather than appearing once as a function call does. On the other hand, they are usually quicker than a function call because the overhead of a function call is avoided.
The fact that they are expanded inline leads to the third problem, which is that the macro does not appear in the intermediate source code used by the compiler; therefore, it is unavailable in most debuggers. This makes debugging macros tricky.
The final problem, however, is the biggest: Macros are not type-safe. Although it is convenient that absolutely any argument can be used with a macro, this completely undermines the strong typing of C++ and so is an anathema to C++ programmers. Of course, the right way to solve this is with templates, as you saw on Day 19.
Inline Functions
It is often possible to declare an inline function rather than a macro. For example, Listing 21.6 creates an inline Cube() function, which accomplishes the same thing as the CUBE macro in Listing 21.2, but it does so in a type-safe way.
Listing 21.6. Using Inline Rather than a Macro
0: #include <iostream>
1: using namespace std;
2:
3: inline unsigned long Square(unsigned long a) { return a * a; }
4: inline unsigned long Cube(unsigned long a)
5: { return a * a * a; }
6: int main()
7: {
8: unsigned long x=1 ;
9: for (;;)
10: {
11: cout << "Enter a number (0 to quit): ";
12: cin >> x;
13: if (x == 0)
14: break;
15: cout << "You entered: " << x;
16: cout << ". Square(" << x << "): ";
17: cout << Square(x);
18: cout<< ". Cube(" << x << "): ";
19: cout << Cube(x) << "." << endl;
20: }
21: return 0;
22: }
![]()
Enter a number (0 to quit): 1
You entered: 1. Square(1): 1. Cube(1): 1.
Enter a number (0 to quit): 2
You entered: 2. Square(2): 4. Cube(2): 8.
Enter a number (0 to quit): 3
You entered: 3. Square(3): 9. Cube(3): 27.
Enter a number (0 to quit): 4
You entered: 4. Square(4): 16. Cube(4): 64.
Enter a number (0 to quit): 5
You entered: 5. Square(5): 25. Cube(5): 125.
Enter a number (0 to quit): 6
You entered: 6. Square(6): 36. Cube(6): 216.
![]()
On lines 3 and 4, two inline functions are defined: Square() and Cube(). Each is declared to be inline, so like a macro function, these are expanded in place for each call, and no function call overhead occurs.
As a reminder, expanded inline means that the content of the function is placed into the code wherever the function call is made (for example, on line 17). Because the function call is never made, there is no overhead of putting the return address and the parameters on the stack.
On line 17, the function Square is called, as is the function Cube on line 19. Again, because these are inline functions, it is exactly as if this line had been written like this:
16: cout << ". Square(" << x << "): " ;
17: cout << x * x ;
18: cout << ". Cube(" << x << "): " ;
19: cout << x * x * x << "." << endl;
Bit Twiddling
Often, you will want to set flags in your objects to keep track of the state of your object. (Is it in AlarmState? Has this been initialized yet? Are you coming or going?)
You can do this with user-defined Booleans, but some applications—particularly those with low-level drivers and hardware devices—require you to be able to use the individual bits of a variable as flags.
Each byte has eight bits, so in a four-byte long you can hold 32 separate flags. A bit is said to be “set” if its value is 1 and clear if its value is 0. When you set a bit, you make its value 1, and when you clear it, you make its value 0. (Set and clear are both adjectives and verbs.) You can set and clear bits by changing the value of the long, but that can be tedious and confusing.
Note
Appendix A, “Working with Numbers: Binary and Hexadecimal,” provides valuable additional information about binary and hexadecimal manipulation.
C++ provides bitwise operators that act upon the individual bits of a variable. These look like, but are different from, the logical operators, so many novice programmers confuse them. The bitwise operators are presented in Table 21.1.
Table 21.1. The Bitwise Operators
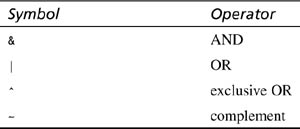
Operator AND
The AND operator (&) is a single ampersand, in contrast to the logical AND, which is two ampersands. When you AND two bits, the result is 1 if both bits are 1, but 0 if either or both bits are 0. The way to think of this is the following: The result is 1 if bit 1 is set and if bit 2 is set; otherwise, the result is 0.
Operator OR
The second bitwise operator is OR (|). Again, this is a single vertical bar, in contrast to the logical OR, which is two vertical bars. When you OR two bits, the result is 1 if either bit is set or if both are. If neither bit is set, the value is 0.
Operator Exclusive OR
The third bitwise operator is exclusive OR (^). When you exclusive OR two bits, the result is 1 if the two bits are different. The result is 0 if both bits are the same—if both bits are set or neither bit is set.
The Complement Operator
The complement operator (~) clears every bit in a number that is set and sets every bit that is clear. If the current value of the number is 1010 0011, the complement of that number is 0101 1100.
Setting Bits
When you want to set or clear a particular bit, you use masking operations. If you have a four-byte flag and you want to set bit 8 so that it is true (on), you need to OR the flag with the value 128.
Why? 128 is 1000 0000 in binary; thus, the value of the eighth bit is 128. Whatever the current value of that bit (set or clear), if you OR it with the value 128, you will set that bit and not change any of the other bits. Assume that the current value of the eight bits is 1010 0110 0010 0110. ORing 128 to it looks like this:
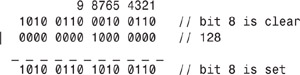
You should note a few more things. First, as usual, bits are counted from right to left. Second, the value 128 is all zeros except for bit 8, the bit you want to set. Third, the starting number 1010 0110 0010 0110 is left unchanged by the OR operation, except that bit 8 was set. Had bit 8 already been set, it would have remained set, which is what you want.
Clearing Bits
If you want to clear bit 8, you can AND the bit with the complement of 128. The complement of 128 is the number you get when you take the bit pattern of 128 (1000 0000), set every bit that is clear, and clear every bit that is set (0111 1111). When you AND these numbers, the original number is unchanged, except for the eighth bit, which is forced to zero.
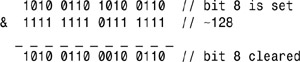
To fully understand this solution, do the math yourself. Each time both bits are 1, write 1 in the answer. If either bit is 0, write 0 in the answer. Compare the answer with the original number. It should be the same except that bit 8 was cleared.
Flipping Bits
Finally, if you want to flip bit 8, no matter what its state, you exclusive OR the number with 128. If you do this twice, you end up back with the original setting. Thus,

Bit Fields
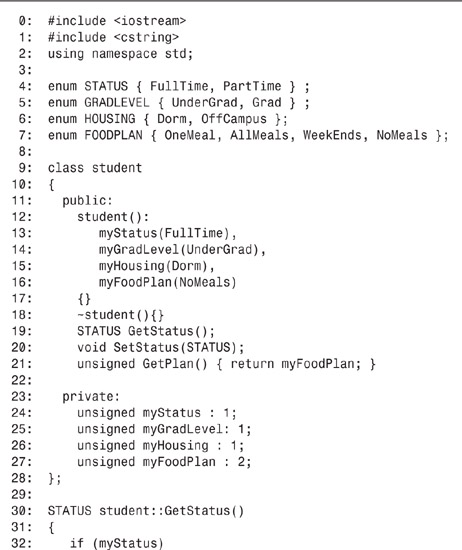
Under some circumstances, every byte counts, and saving six or eight bytes in a class can make all the difference. If your class or structure has a series of Boolean variables or variables that can have only a very small number of possible values, you might save some room using bit fields.
Using the standard C++ data types, the smallest type you can use in your class is a type char, which might be just one byte. You will usually end up using an int, which is most often four bytes on a machine with a 32-bit processor. By using bit fields, you can store eight binary values in a char and 32 such values in a four-byte integer.
Here’s how bit fields work: Bit fields are named and accessed the same as any class member. Their type is always declared to be unsigned int. After the bit field name, write a colon followed by a number.
The number is an instruction to the compiler as to how many bits to assign to this variable. If you write 1, the bit represents either the value 0 or 1. If you write 2, two bits are used to represent numbers; thus, the field would be able to represent 0, 1, 2, or 3, a total of four values. A three-bit field can represent eight values, and so forth. Appendix A reviews binary numbers. Listing 21.7 illustrates the use of bit fields.
Listing 21.7. Using Bit Fields
![]()
Jim is part-time
Jim is full-time
Jim is on the No Meals food plan.
![]()
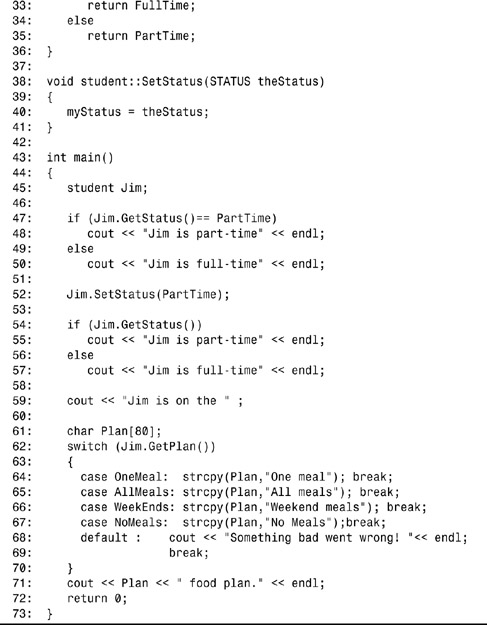
On lines 4–7, several enumerated types are defined. These serve to define the possible values for the bit fields within the student class.
student is declared on lines 9–28. Although this is a trivial class, it is interesting because all the data is packed into five bits on lines 24–27. The first bit on line 24 represents the student’s status, full-time or part-time. The second bit on line 25 represents whether this is an undergraduate. The third bit on line 25 represents whether the student lives in a dorm. The final two bits represent the four possible food plans.
The class methods are written as for any other class and are in no way affected by the fact that these are bit fields and not integers or enumerated types.
The member function GetStatus() on lines 30–36 reads the Boolean bit and returns an enumerated type, but this is not necessary. It could just as easily have been written to return the value of the bit field directly. The compiler would have done the translation.
To prove that to yourself, replace the GetStatus() implementation with this code:
STATUS student::GetStatus()
{
return myStatus;
}
No change whatsoever should occur in the functioning of the program. It is a matter of clarity when reading the code; the compiler isn’t particular.
Note that the code on line 47 must check the status and then print the meaningful message. It is tempting to write this:
cout << "Jim is " << Jim.GetStatus() << endl;
that simply prints this:
Jim is 0
The compiler has no way to translate the enumerated constant PartTime into meaningful text.
On line 62, the program switches on the food plan, and for each possible value, it puts a reasonable message into the buffer, which is then printed on line 71. Note again that the switch statement could have been written as follows:
case 0: strcpy(Plan,"One meal"); break;
case 1: strcpy(Plan,"All meals"); break;
case 2: strcpy(Plan,"Weekend meals"); break;
case 3: strcpy(Plan,"No Meals");break;
The most important thing about using bit fields is that the client of the class need not worry about the data storage implementation. Because the bit fields are private, you can feel free to change them later and the interface will not need to change.
Programming Style
As stated elsewhere in this book, it is important to adopt a consistent coding style, although in many ways it doesn’t matter which style you adopt. A consistent style makes it easier to guess what you meant by a particular part of the code, and you avoid having to look up whether you spelled the function with an initial cap the last time you invoked it.
The following guidelines are arbitrary; they are based on the guidelines used in projects done in the past, and they’ve worked well. You can just as easily make up your own, but these will get you started.
As Emerson said, “Foolish consistency is the hobgoblin of small minds,” but having some consistency in your code is a good thing. Make up your own, but then treat it as if it were dispensed by the programming gods.
Indenting
If you use tabs, they should be three spaces. Be certain your editor converts each tab to three spaces.
Braces
How to align braces can be the most controversial topic between C++ programmers. Here are a few suggested tips:
• Matching braces should be aligned vertically.
• The outermost set of braces in a definition or declaration should be at the left margin. Statements within should be indented. All other sets of braces should be in line with their leading statements.
• No code should appear on the same line as a brace. For example,
if (condition==true)
{
j = k;
SomeFunction();
}
m++;
Note
As stated, the alignment of braces can be controversial. Many C++ programmers believe you should put the opening brace on the same line as the command it is associated with and the closing brace lines up with the command:
if (condition==true) { j = k; SomeFunction();}
This format is considered harder to read because the braces don’t line up.
Long Lines and Function Length
Keep lines to the width displayable on a single screen. Code that is off to the right is easily overlooked, and scrolling horizontally is annoying.
When a line is broken, indent the following lines. Try to break the line at a reasonable place, and try to leave the intervening operator at the end of the previous line (instead of at the beginning of the following line) so that it is clear that the line does not stand alone and that more is coming.
In C++, functions tend to be much shorter than they were in C, but the old, sound advice still applies. Try to keep your functions short enough to print the entire function on one page.
Structuring switch Statements
Indent switches as follows to conserve horizontal space:
switch(variable)
{
case ValueOne:
ActionOne();
break;
case ValueTwo:
ActionTwo();
break;
default:
assert("bad Action");
break;
}
As you can see, the case statements are slightly indented and lined up. In addition, the statements within each case are lined up. With this layout, it is generally easy to find a case statement and easy to then follow its code.
Program Text
You can use several tips to create code that is easy to read. Code that is easy to read is generally easier to maintain.
• Use whitespace to help readability.
• Don’t use spaces between object and array names and their operators (., ->, []).
• Unary operators are associated with their operands, so don’t put a space between them. Do put a space on the side away from the operand. Unary operators include !, ~, ++, --, -, * (for pointers), & (casts), and sizeof.
• Binary operators should have spaces on both sides: +, =, *, /, %, >>, <<, <, >, ==, !=, &, |, &&, ||, ?:, =, +=, and so on.
• Don’t use lack of spaces to indicate precedence:
(4+ 3*2).
• Put a space after commas and semicolons, not before.
• Parentheses should not have spaces on either side.
• Keywords, such as if, should be set off by a space: if (a == b).
• The body of a single-line comment should be set off from the // with a space.
• Place the pointer or reference indicator next to the type name, not the variable name:
char* foo;
int& theInt;
rather than
char *foo;
int &theInt;
• Do not declare more than one variable on the same line.
Naming Identifiers
The following are guidelines for working with identifier names:
• Identifier names should be long enough to be descriptive.
• Avoid cryptic abbreviations.
• Take the time and energy to spell things out.
• Do not use Hungarian notation. C++ is strongly typed and there is no reason to put the type into the variable name. With user-defined types (classes), Hungarian notation quickly breaks down. The exceptions to this might be to use a prefix for pointers (p) and references (r), as well as for class member variables (its).
• Short names (i, p, x, and so on) should be used only where their brevity makes the code more readable and where the usage is so obvious that a descriptive name is not needed. In general, however, you should avoid this. Also, avoid the use of the letters i, l, and o as variable names because they are easy to confuse with numbers.
• The length of a variable’s name should be proportional to its scope.
• Be certain identifiers look and sound different from one another to minimize confusion.
• Function (or method) names are usually verbs or verb-noun phrases: Search(), Reset(), FindParagraph(), ShowCursor(). Variable names are usually abstract nouns, possibly with an additional noun: count, state, windSpeed, windowHeight. Boolean variables should be named appropriately: windowIconized, fileIsOpen.
Spelling and Capitalization of Names
Spelling and capitalization should not be overlooked when creating your own style. Some tips for these areas include the following:
• Use all uppercase and underscore to separate the logical words of #defined names, such as SOURCE_FILE_TEMPLATE. Note, however, that these are rare in C++. Consider using constants and templates in most cases.
• All other identifiers should use mixed case—no underscores. Function names, methods, class, typedef, and struct names should begin with a capitalized letter. Elements such as data members or locals should begin with a lowercase letter.
• Enumerated constants should begin with a few lowercase letters as an abbreviation for the enum. For example,
enum TextStyle
{
tsPlain,
tsBold,
tsItalic,
tsUnderscore,
};
Comments
Comments can make it much easier to understand a program. Sometimes, you will not work on a program for several days or even months. In that time, you can forget what certain code does or why it has been included. Problems in understanding code can also occur when someone else reads your code. Comments that are applied in a consistent, well-thought-out style can be well worth the effort. Several tips to remember concerning comments include the following:
• Wherever possible, use C++ single-line // comments rather than the /* */ style. Reserve the multiline style (/* */) for commenting out blocks of code that might include C++ single-line comments.
• Higher-level comments are infinitely more important than process details. Add value; do not merely restate the code.
n++; // n is incremented by one
This comment isn’t worth the time it takes to type it in. Concentrate on the semantics of functions and blocks of code. Say what a function does. Indicate side effects, types of parameters, and return values. Describe all assumptions that are made (or not made), such as “assumes n is nonnegative” or “will return –1 if x is invalid.” Within complex logic, use comments to indicate the conditions that exist at that point in the code.
• Use complete English sentences with appropriate punctuation and capitalization. The extra typing is worth it. Don’t be overly cryptic and don’t abbreviate. What seems exceedingly clear to you as you write code will be amazingly obtuse in a few months.
• Use blank lines freely to help the reader understand what is going on. Separate statements into logical groups.
Setting Up Access
The way you access portions of your program should also be consistent. Some tips for access include the following:
• Always use public:, private:, and protected: labels; don’t rely on the defaults.
• List the public members first, then protected, then private. List the data members in a group after the methods.
• Put the constructor(s) first in the appropriate section, followed by the destructor. List overloaded methods with the same name adjacent to each other. Group accessor functions together whenever possible.
• Consider alphabetizing the method names within each group and alphabetizing the member variables. Be certain to alphabetize the filenames in include statements.
• Even though the use of the virtual keyword is optional when overriding, use it anyway; it helps to remind you that it is virtual, and it also keeps the declaration consistent.
Class Definitions
Try to keep the definitions of methods in the same order as the declarations. It makes things easier to find.
When defining a function, place the return type and all other modifiers on a previous line so that the class name and function name begin at the left margin. This makes it much easier to find functions.
include Files
Try as hard as you can to minimize the use of #include, and thus minimize the number of files being included in header files. The ideal minimum is the header file for the class from which this one derives. Other mandatory includes are those for objects that are members of the class being declared. Classes that are merely pointed to or referenced only need forward references of the form.
Don’t leave out an include file in a header just because you assume that whatever .cpp file includes this one will also have the needed include. And don’t add extra ones to try to “help out” other included files.
Tip
All header files should use inclusion guards.
Using assert()
You learned about assert() earlier today. Use assert() freely. It helps find errors, but it also greatly helps a reader by making it clear what the assumptions are. It also helps to focus the writer’s thoughts around what is valid and what isn’t.
Making Items Constant with const
Use const wherever appropriate: for parameters, variables, and methods. Often, there is a need for both a const and a non-const version of a method; don’t use this as an excuse to leave one out. Be very careful when explicitly casting from const to non-const and vice versa (at times, this is the only way to do something), but be certain that it makes sense, and include a comment.
Next Steps in Your C++ Development
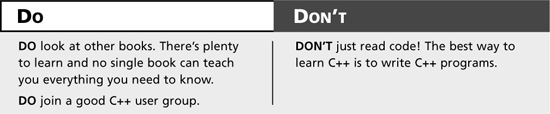
You’ve spent three long, hard weeks working at C++, and you are likely to have the basics needed to be a competent C++ programmer, but you are by no means finished. There is much more to learn and many more places you can get valuable information as you move from novice C++ programmer to expert.
The following sections recommend a number of specific sources of information, and these recommendations reflect only personal experience and opinions. Dozens of books and thousands of articles are available on each of these topics, however, so be certain to get other opinions before purchasing.
Where to Get Help and Advice
The very first thing you will want to do as a C++ programmer will be to tap into one or more of the C++ communities on the Internet. These groups supply immediate contact with hundreds or thousands of C++ programmers who can answer your questions, offer advice, and provide a sounding board for your ideas.
The C++ Internet newsgroups (comp.lang.c++ and comp.lang.c++.moderated) are recommended as excellent sources of information and support. There are also sites such as http://www.CodeGuru.com and http://www.CodeProject.com. These two sites have hundreds of thousands of C++ developers come to them every month. They offer resources such as articles, tutorials, news, and discussions on C++. Numerous other such communities are available as well.
Also, you might want to look for local user groups. Many cities have C++ interest groups where you can meet other programmers and exchange ideas.
Finally, compiler vendors such as Borland and Microsoft have newsgroups that can be invaluable sources of information about their development environments and the C++ language.
Related C++ Topics: Managed C++, C#, and Microsoft’s .NET
Microsoft’s new .NET platform is radically changing the way many of us develop for the Internet. A key component of .NET is the new language, C#, as well as a number of serious extensions to C++ called Managed Extensions.
C# is a natural extension of C++, and is an easy bridge to .NET for C++ programmers. A number of good books on C# are available, including Programming C# (O’Reilly Press), and of course, there is Sams Teach Yourself the C# Language in 21 Days, which follows a similar structure to the one used in this book.
As a programming language, C# has some differences from C++. For example, multiple inheritance is not allowed in C#; though the use of interfaces provides similar capabilities. In addition, C# avoids the use of pointers. This removes issues with dangling pointers and other such problems, at the price of making the language less capable of low-level, real-time programming. The final item worth mentioning on C# is that it uses a runtime and a garbage collector (GC). The GC takes care of freeing resources when they are needed so you, the programmer, don’t have to.
Managed C++ is also from Microsoft and a part of .NET. In very simple terms, this is an extension to C++ that gives C++ the ability to use all the features of .NET, including the garbage collector and more.
Staying in Touch
If you have comments, suggestions, or ideas about this book or other books, I’d love to hear them. Please contact me through my Web site: www.libertyassociates.com. I look forward to hearing from you.
Summary
Today, you learned more details about working with the preprocessor. Each time you run the compiler, the preprocessor runs first and translates your preprocessor directives such as #define and #ifdef.
The preprocessor does text substitution, although with the use of macros these can be somewhat complex. By using #ifdef, #else, and #ifndef, you can accomplish conditional compilation, compiling in some statements under one set of conditions and in another set of statements under other conditions. This can assist in writing programs for more than one platform and is often used to conditionally include debugging information.
Macro functions provide complex text substitution based on arguments passed at compile time to the macro. It is important to put parentheses around every argument in the macro to ensure the correct substitution takes place.
Macro functions, and the preprocessor in general, are less important in C++ than they were in C. C++ provides a number of language features, such as const variables and templates, that offer superior alternatives to use of the preprocessor.
You also learned how to set and test individual bits and how to allocate a limited number of bits to class members.
Finally, C++ style issues were addressed, and resources were provided for further study.
Q&A
Q If C++ offers better alternatives than the preprocessor, why is this option still available?
A First, C++ is backward-compatible with C, and all significant parts of C must be supported in C++. Second, some uses of the preprocessor are still used frequently in C++, such as inclusion guards.
Q Why use macro functions when I can use a regular function?
A Macro functions are expanded inline and are used as a substitute for repeatedly typing the same commands with minor variations. Again, however, templates usually offer a better alternative.
Q How do I know when to use a macro versus an inline function?
A Use inline functions whenever possible. Although macros offer character substitution, stringizing, and concatenation, they are not type-safe and can make code that is more difficult to maintain.
Q What is the alternative to using the preprocessor to print interim values during debugging?
A The best alternative is to use watch statements within a debugger. For information on watch statements, consult your compiler or debugger documentation.
Q How do I decide when to use an assert() and when to throw an exception?
A If the situation you’re testing can be true without your having committed a programming error, use an exception. If the only reason for this situation to ever be true is a bug in your program, use an assert().
Q When would I use bit structures rather than simply using integers?
A When the size of the object is crucial. If you are working with limited memory or with communications software, you might find that the savings offered by these structures is essential to the success of your product.
Q Can I assign a pointer to a bit field?
A No. Memory addresses usually point to the beginning of a byte. A bit field might be in the middle of a byte.
Q Why do style wars generate so much emotion?
A Programmers become very attached to their habits. If you are used to the following indentation:
if (SomeCondition){
// statements
} // closing brace
it is a difficult transition to give it up. New styles look wrong and create confusion. If you get bored, try logging in to a popular online service and asking which indentation style works best, which editor is best for C++, or which product is the best word processor. Then sit back and watch as ten thousand messages are generated, all contradicting one another.
Q Is that it?
A Yes! You’ve learned C++, but… there is always more to learn! Ten years ago, it was possible for one person to learn all there was to know about a computer programming language, or at least to feel pretty confident about being close. Today, it is out of the question. You can’t possibly catch up, and even as you try, the industry is changing. Be certain to keep reading, and stay in touch with the resources—magazines and online services—that will keep you current with the latest changes.
Workshop
The Workshop provides quiz questions to help you solidify your understanding of the material covered and exercises to provide you with experience in using what you’ve learned. Try to answer the quiz and exercise questions before checking the answers in Appendix D, and be certain you understand the answers before continuing to the final Week in Review.
Quiz
1. What is an inclusion guard?
2. How do you instruct your compiler to print the contents of the intermediate file showing the effects of the preprocessor?
3. What is the difference between #define debug 0 and #undef debug?
4. Consider the following macro:
#define HALVE(x) x / 2
What is the result if this is called with 4?
5. What is the result if the HALVE macro in Question 5 is called with 10+10?
6. How would you modify the HALVE macro to avoid erroneous results?
7. How many bit values could be stored in a two-byte variable?
8. How many values can be stored in five bits?
9. What is the result of 0011 1100 | 1111 1111?
10. What is the result of 0011 1100 & 1111 1111?
Exercises
1. Write the inclusion guard statements for the header file STRING.H.
2. Write an assert() macro that prints an error message and the file and line number if debug level is 2, that prints a message (without file and line number) if the level is 1, and that does nothing if the level is 0.
3. Write a macro DPrint that tests whether DEBUG is defined and, if it is, prints the value passed in as a parameter.
4. Write the declaration for creating a month, day, and year variable all stored within a single unsigned int variable.