
Appendix E. A Look at Linked Lists
On Day 13, “Managing Arrays and Strings,” you learned about arrays. You also learned what a linked list is. A linked list is a data structure that consists of small containers that are designed to link together as needed. The idea is to write a class that holds one object of your data that can point at the next container of the same type. You create one container for each object that you need to store, and you chain them together as needed.
The containers are called nodes. The first node in the list is called the head, and the last node in the list is called the tail.
Lists come in three fundamental forms. From simplest to most complex, they are
• Singly linked
• Doubly linked
• Trees
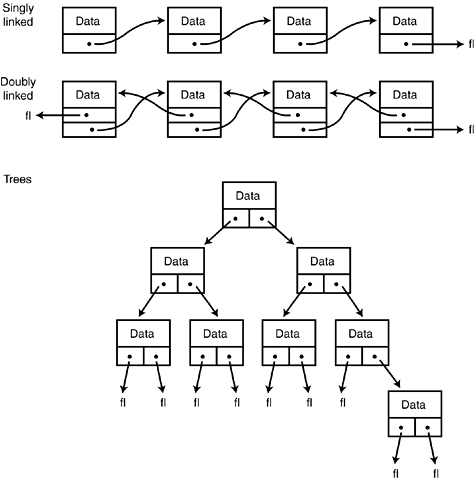
In a singly linked list, each node points forward to the next one, but not backward. To find a particular node, start at the top and go from node to node, as in a treasure hunt (“The next node is under the sofa”). A doubly linked list enables you to move backward and forward in the chain. A tree is a complex structure built from nodes, each of which can point in two or more directions. Figure E.1 shows these three fundamental structures.
Figure E.1. Linked lists.
In this appendix, you examine a linked list in detail as a case study of how you create complex structures and, more importantly, how you use them.
The Component Parts of Your Linked List
The linked lists you create will consist of nodes. The node class itself will be abstract; you’ll use three subtypes to accomplish the work. There will be a head node whose job is to manage the head of the list, a tail node (guess what its job is!), and zero or more internal nodes. The internal nodes will keep track of the actual data to be held in the list.
Note that the data and the list are quite distinct. You can, in theory, save any type of data you like in a list. It isn’t the data that is linked together; it is the node that holds the data.
The driver program doesn’t know about the nodes; it works with the list. The list, however, does little work; it simply delegates to the nodes.
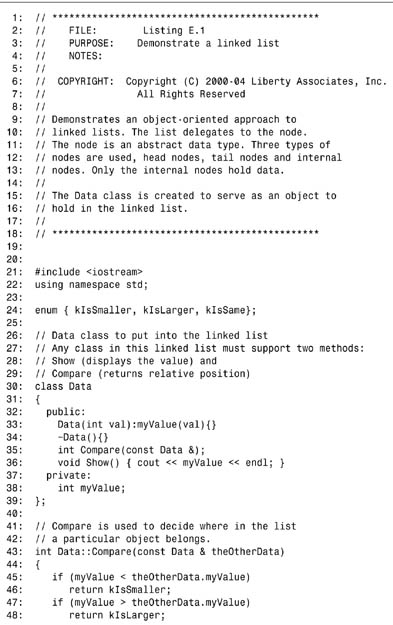
Listing E.1 shows the code; you’ll examine it in excruciating detail in the rest of this appendix.
Listing E.1. Linked List


![]()
What value? (0 to stop): 5
What value? (0 to stop): 8
What value? (0 to stop): 3
What value? (0 to stop): 9
What value? (0 to stop): 2
What value? (0 to stop): 10
What value? (0 to stop): 0
2
3
5
8
9
10
![]()
The first thing to note is the enumerated constant defined on line 24, which provides three constant values: kIsSmaller, kIsLarger, and kIsSame. Every object that might be held in this linked list must support a Compare() method. These constants will be the result value returned by the Compare() method.
For illustration purposes, the class Data is created on lines 30–39, and the Compare() method is implemented on lines 43–51. A Data object holds a value and can compare itself with other Data objects. It also supports a Show() method to display the value of the Data object.
The easiest way to understand the workings of the linked list is to step through an example of using one. On line 203, a driver program is declared; on line 206, a pointer to a Data object is declared; and on line 208, a local linked list is defined.
You can see the LinkList class on lines 177–186. When the linked list is created, the constructor on line 192 is called. The only work done in the constructor is to allocate a HeadNode object and to assign that object’s address to the pointer held in the linked list on line 185.
This allocation of a HeadNode invokes the HeadNode constructor shown on lines 163–166. This, in turn, allocates a TailNode and assigns its address to the head node’s myNext pointer. The creation of the TailNode calls the TailNode constructor shown on line 131, which is inline and which does nothing.
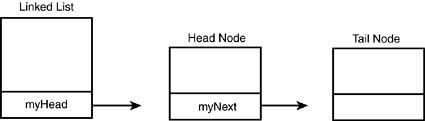
Thus, by the simple act of allocating a linked list on the stack, the list is created, a head and a tail node are created, and their relationship is established, as illustrated in Figure E.2.
Figure E.2. The linked list after it is created.
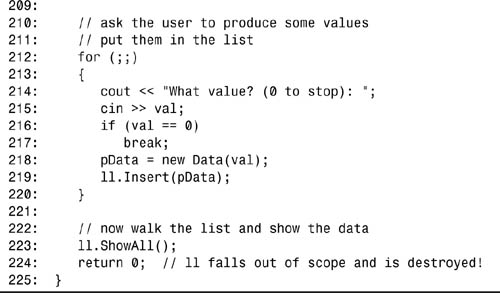
Back in the driver program, line 212 begins an infinite loop. The user is prompted for values to add to the linked list. He can add as many values as he likes, entering 0 when he is finished. The code on line 216 evaluates the value entered; if it is 0, it breaks out of the loop.
If the value is not 0, a new Data object is created on line 218, and that is inserted into the list on line 219. For illustration purposes, assume the user enters the value 15. This invokes the Insert method on line 198.
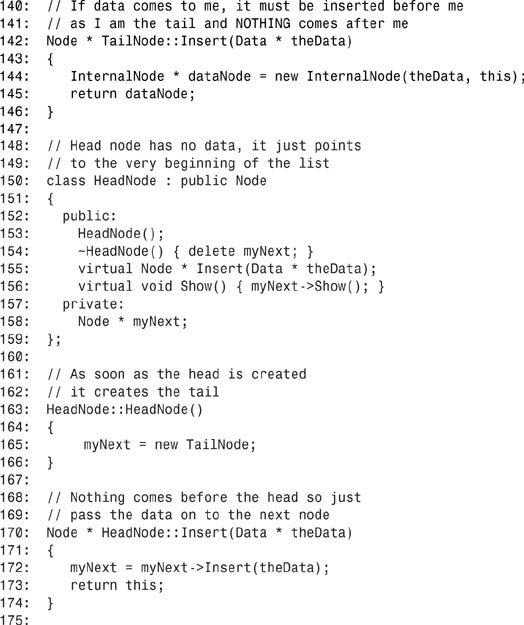
The linked list immediately delegates responsibility for inserting the object to its head node. This invokes the method Insert on line 170. The head node immediately passes the responsibility to whatever node its myNext is pointing to. In this (first) case, it is pointing to the tail node (remember, when the head node was born, it created a link to a tail node). This, therefore, invokes the method Insert on line 142.
TailNode::Insert knows that the object it has been handed must be inserted immediately before itself—that is, the new object will be in the list right before the tail node. Therefore, on line 144 it creates a new InternalNode object, passing in the data and a pointer to itself. This invokes the constructor for the InternalNode object, shown on line 90.
The InternalNode constructor does nothing more than initialize its Data pointer with the address of the Data object it was passed and its myNext pointer with the node’s address it was passed. In this case, the node it points to is the tail node (remember, the tail node passed in its own this pointer).
Now that the InternalNode has been created, the address of that internal node is assigned to the pointer dataNode on line 144, and that address is in turn returned from the TailNode::Insert() method. This returns us to HeadNode::Insert(), where the address of the InternalNode is assigned to the HeadNode’s myNext pointer (on line 172). Finally, the HeadNode’s address is returned to the linked list where, on line 200, it is thrown away (nothing is done with it because the linked list already knows the address of the head node).
Why bother returning the address if it is not used? Insert is declared in the base class, Node. The return value is needed by the other implementations. If you change the return value of HeadNode::Insert(), you receive a compiler error; it is simpler just to return the HeadNode and let the linked list throw its address on the floor.
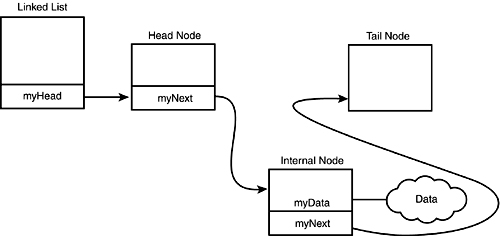
So what happened? The data was inserted into the list. The list passed it to the head. The head, blindly, passed the data to whatever the head happened to be pointing to. In this (first) case, the head was pointing to the tail. The tail immediately created a new internal node, initializing the new node to point to the tail. The tail then returned the address of the new node to the head, which reassigned its myNext pointer to point to the new node. Hey! Presto! The data is in the list in the right place, as illustrated in Figure E.3.
Figure E.3. The linked list after the first node is inserted.
After inserting the first node, program control resumes at line 214. Once again, the value is evaluated. For illustration purposes, assume that the value 3 is entered. This causes a new Data object to be created on line 218 and to be inserted into the list on line 219.
Once again, on line 200, the list passes the data to its HeadNode. The HeadNode::Insert() method, in turn, passes the new value to whatever its myNext happens to be pointing to. As you know, it is now pointing to the node that contains the Data object whose value is 15. This invokes the InternalNode::Insert() method on line 99.
On line 103, the InternalNode uses its myData pointer to tell its Data object (the one whose value is 15) to call its Compare() method, passing in the new Data object (whose value is 3). This invokes the Compare() method shown on line 43.
The two values are compared, and, because myValue will be 15 and theOtherData.myValue will be 3, the returned value will be kIsLarger. This causes program flow to jump to the kIsLarger case on line 110.
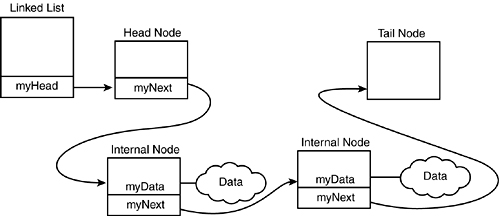
A new InternalNode is created for the new Data object. The new node points to the current InternalNode object, and the new InternalNode’s address is returned from the InternalNode::Insert() method to the HeadNode. Thus, the new node, whose object’s value is smaller than the current node’s object’s value, is inserted into the list, and the list now looks like Figure E.4.
Figure E.4. The linked list after the second node is inserted.
In the third invocation of the loop, the customer adds the value 8. This is larger than 3 but smaller than 15, and so it should be inserted between the two existing nodes. Progress is like the previous example, except that when the node whose object’s value is 3 does the compare, rather than returning kIsLarger, it returns kIsSmaller (meaning that the object whose value is 3 is smaller than the new object, whose value is 8). This causes the InternalNode::Insert() method to branch to the kIsSmaller case on line 118. Rather than creating a new node and inserting it, the InternalNode just passes the new data on to the Insert method of whatever its myNext pointer happens to be pointing to. In this case, it invokes InsertNode on the InternalNode whose Data object’s value is 15.
The comparison is done again, and a new InternalNode is created. This new InternalNode points to the InternalNode whose Data object’s value is 15, and its address is passed back to the InternalNode whose Data object’s value is 3, as shown on line 119.
The net effect is that the new node is inserted into the list at the right location.
If at all possible, you’ll want to step through the insertion of a number of nodes in your debugger. You should be able to watch these methods invoke one another and the pointers be properly adjusted.