
Lesson 24
Responding to Events and Using Windows
What You’ll Learn in This Lesson:
 How event handlers work
- How event handlers relate to objects
- How to create an event handler
- How to detect mouse and keyboard actions
- How to use
onclickto change the appearance of<div> - How to access and use the
windowobject hierarchy with JavaScript - How to delay a script’s actions by using timeouts
- How to display alerts, confirmations, and prompts
In your experience with JavaScript so far, most of the scripts you’ve written have executed in a calm, orderly fashion, quietly and methodically moving from the first statement to the last. You’ve seen a few event handlers used in sample scripts and it is likely that you have noticed that the event handler names provide clues to their meaning. For example, onclick means “when a click happens.” That alone speaks to the relative ease and simplicity of using JavaScript event handlers within your HTML.
In this lesson, you’ll learn to use various event handlers supported by JavaScript. Rather than execute statements in a methodical order, a user can interact directly with different parts of your scripts by invoking an event handler. You’ll use event handlers in just about every script you write throughout the rest of these lessons, and event handlers are likely to feature prominently in most scripts you will write, especially if you want to follow best practices and use unobtrusive JavaScript.
In this lesson we’ll also return to some specific aspects of the Document Object Model (DOM). You’ll learn more about some of the structural objects in the DOM—browser windows and dialog boxes—and how JavaScript can interact with them using events.
Understanding Event Handlers
As you learned in Lesson 20, “Getting Started with JavaScript Programming,” JavaScript programs don’t have to execute in order. You also learned that JavaScript programs can detect events and react to them. Events are things that happen within the scope of the browser—the user clicks a button, the mouse pointer moves, or a web page finishes loading from the server (just to name a few). Various events enable your scripts to respond to the mouse, the keyboard, and other circumstances. Events are the key methods JavaScript uses to make web documents interactive.
A script that you create and use to detect and respond to an event is generally referred to as an event handler. Event handlers are among the most powerful features of JavaScript. Luckily, they’re also among the easiest features to learn and use; often, a useful event handler requires only a single statement.
Objects and Events
As you learned in Lesson 21, “Working with the Document Object Model (DOM),” JavaScript uses a set of objects to store information about the various parts of a web page—buttons, links, images, windows, and so on. An event can often happen in more than one place (for example, the user could click any one of the links on a page), and each event is associated with an object.
Each event has a name. For example, the onmouseover event occurs when the mouse pointer moves over an object on the page. When the pointer moves over a particular link, the onmouseover event is sent to that link’s event handler, if it has one. In the next few sections you’ll learn more about creating and using event handlers in your own code.
Creating an Event Handler
You don’t need the <script> tag to invoke an event handler. Instead, you use the event name and code to invoke the event handler as an attribute of an individual HTML tag. For example, here is a link that invokes an event handler script when a mouse-over occurs on a link:
<a href="http://www.google.com/"
onmouseover="alert('You moved over the link.');">
This is a link.</a>
Note that this snippet is all one <a> element, although it’s split into multiple lines for readability here. In this example, the onmouseover attribute specifies a JavaScript statement to invoke—namely, an alert message that is displayed when the user’s mouse moves over the link.
Note
The previous example uses single quotation marks to surround the text. This is necessary in an event handler because double quotation marks are used to surround the event handler itself. You can also use single quotation marks to surround the event handler and double quotes within the script statements. Just don’t use the same type of quotation marks because that is a JavaScript syntax error.
You can invoke JavaScript statements like the preceding one in response to an event, but if you need to invoke more than one statement, it’s a good idea to use a function instead. Just define the function elsewhere in the document or in a referenced document and then call the function as the event handler, like this:
<a href="#bottom"onmouseover="doIt();">Move the mouse over this link.</a>
This example calls a function called doIt() when the user moves the mouse over the link. Using a function in this type of situation is convenient because you can use longer, more readable JavaScript routines as event handlers—and you can also reuse the function elsewhere without duplicating all of its code.
Note
For simple event handlers, you can use two statements if you separate them with a semicolon. However, in most cases it’s easier and more maintainable to use a function to perform multiple statements.
Defining Event Handlers with JavaScript
Rather than specify an event handling script each time you want to invoke it, you can use JavaScript to assign a specific function as the default event handler for an event. This enables you to set event handlers conditionally, turn them on and off, and dynamically change the function that handles an event.
Note
Setting up event handlers this way enables you to use an external JavaScript file to define the function and set up the event, keeping the JavaScript code completely separate from the HTML file.
To define an event handler in this way, first define a function and then assign the function as an event handler. Event handlers are stored as properties of the document object or another object that can receive an event. For example, these statements define a function called mousealert and then assign it as the event handler for all instances of onmousedown in the current document:
function mousealert() {
alert("You clicked the mouse!");
}
document.onmousedown = mousealert;
You can use this technique to set up an event handler for only a specific HTML element, but an additional step is required to achieve that goal: You must first find the object corresponding to the element. To do this, use the document.getElementById function.
First, define an element in the HTML document and specify an id attribute:
<a href="http://www.google.com/" id="link1">
Next, in the JavaScript code, find the object and apply the event handler:
var link1_obj = document.getElementById("link1");
link1_obj.onclick = myCustomFunction;
You can do this for any object as long as you’ve defined it and therefore can reference it by a unique id attribute in the HTML file. Using this technique, you can easily assign the same function to handle events for multiple objects without adding clutter to your HTML code.
Supporting Multiple Event Handlers
What if you want more than one thing to happen when you click on an element? For example, suppose you want two functions, called update and display, to both execute when a button is clicked. It’s very easy to run into syntax errors or logic errors such that two functions assigned to the same event won’t work as expected. One solution for clean separation and execution is to define a single function that calls both functions:
function updateThenDisplay() {
update();
display();
}
This isn’t always the ideal way to do things. For example, if you’re using two third-party scripts and both of them want to add an onload event to the page, there should be a way to add both events. The W3C DOM standard defines a function, addEventListener, for this purpose. This function defines a listener for a particular event and object, and you can add as many listener functions as you need.
There are many events you can listen for. These are some of the most commonly used ones:
- focus—When the element is focused on with a mouse or keyboard (tab)
- blur—When the element loses focus
- click—When the element is clicked
- dblclick—When the element is clicked twice
- keydown—When a key is pressed down
- keyup—When a key is released
- keypress—When a key is pressed, relaying the key value
- mouseover—When the mouse pointer is over the element
- mouseout—When the mouse pointer is moved off an element after hovering
- mousemove—When the mouse moves
- mousedown—When the mouse button is pressed over an element
- mouseup—When the mouse button is released over an element
- load—When the element has fully loaded
There are many more events you can listen for. You can learn more about them at https://developer.mozilla.org/en-US/docs/Web/Events#Standard_events. To listen for an event, you simply attach the event listener to the element you want to listen for. For example, to apply the mousealert function when a user clicks a link with the link1 id, you would write the following:
document.getElementById("link1").addEventListener("click",
mousealert);
You can also remove event listeners when you’re done with them: Simply use the removeEventListener method. As with the addEventListener method, simply attach it to the element you want to stop listening to.
Note
Remember that you can attach event listeners to any element in the DOM, including the document itself. When you write document.addEventListener("click", myFunction); you tell the browser to run the function myFunction whenever someone clicks anywhere on the document.
The addEventListener method is well supported in modern browsers, but if you have to support extremely old versions of Internet Explorer, you have to use a different function, attachEvent, to support them. In Lesson 25, “JavaScript Best Practices,” you’ll create a function that combines these two for a cross-browser event-adding script.
Using the event Object
When an event occurs, you might want or need to know more about the event in order for your script to perform different actions; for example, for a keyboard event, you might want to know which key was pressed, especially if your script performs different actions depending on whether the j key or the l key was pressed. The DOM includes an event object that provides this type of granular information.
Caution
Don’t include the on prefix on your listeners when using addEventListener. Instead just use the event itself. For example, use click rather than onclick. This is a common error, especially if you’re used to using HTML attributes rather than listeners.
To use the event object, you can pass it on to your event handler function. For example, this statement defines a keypress event that automatically passes the event object to the getKey function:
document.addEventListener("keypress", getKey);
You then define your function to accept the event as a parameter:
function getKey(e) {
// more code
}
In modern browsers, an event object is automatically passed to the event handler function. This is why you don’t need to define the parameter in your function.
Note
Internet Explorer 8 and below handle events differently. If you must support these older versions, you need to check the window object for the event properties. One way to do this is to check whether the properties exist inside your function. For example, you could add the line if (!e) var e = window.event; to your function.
The following are some of the commonly used properties of the event object for modern browsers:
- event.modifiers—A flag that indicates which modifier keys (Shift, Ctrl, Alt, and so on) were held down during the event. This value is an integer that combines binary values representing the different keys.
- event.pageX—The x coordinate of the event within the web page.
- event.pageY—The y coordinate of the event within the web page.
- event.which—The key code for keyboard events (in Unicode) or the button that was pressed for mouse events.
- event.button—The mouse button that was pressed. The left button’s value is
0, and the right button’s value is2. If the mouse has a middle button, the value is1. - event.target—The object where the element occurred.
Note
The event.pageX and event.pageY properties are based on the top-left corner of the element where the event occurred, not always the exact position of the mouse pointer.
Using Mouse Events
The DOM includes a number of event handlers for detecting mouse actions. Your script can detect the movement of the mouse pointer and when a button is clicked, released, or both. Some of these events will be familiar to you already because you have seen them in action in previous lessons.
Over and Out
You’ve already seen the first and most common event handler, mouseover, which is called when a user’s mouse pointer moves over a link or another object. Note that mouseout is the opposite: It is called when the user’s mouse pointer moves out of the object’s border. Unless something strange happens and the user’s mouse never moves again while the viewer is viewing the particular document, you can count on mouseout happening sometime after mouseover.
mouseout is particularly useful if your script has made a visual change within the document when the user’s mouse pointer moved over the object—for example, displaying a message in the status line or changing an image. You can use a mouseout event handler to undo the action when the pointer moves away.
Note
One of the most common uses for the mouseover and mouseout event handlers is to create rollovers—images that change when the mouse moves over them. You’ll learn how to create these later in the lesson.
Ups and Downs (and Clicks)
You can also use events to detect when the mouse button is clicked. The basic event handler for this is onclick. This event handler is called when the mouse button is clicked while positioned over the appropriate object.
For example, you can use the following event handler to display an alert when a link is clicked:
<a href="http://www.google.com/"
onclick="alert('You are about to leave this site.');">
Go Away</a>
Or you can do it unobtrusively by giving the link the id goAway and this script:
function goAway(e) {
alert('You are about to leave this site.');
}
document.getElementById("goAway").addEventListener("click", goAway);
In this case, the click event handler invokes the JavaScript alert before the linked page is loaded into the browser. This is useful for making links conditional or displaying a disclaimer before sending the user away to the linked page.
If your click event handler returns the false value, the link will not be followed. For example, the following is a link that displays a confirmation dialog. If you click Cancel, the link is not followed; if you click OK, the new page is loaded:
function goAway(e) {
if (!confirm('Are you sure?'))
e.preventDefault();
}
document.getElementById("goAway").addEventListener("click", goAway);
This example uses the confirm method to display a modal dialog box. Then if the user chooses Cancel, it adds the preventDefault property to the event. This stops the link from being followed.
The dblclick event handler is similar but is used only if the user double-clicks on an object. Because links usually require only a single click, you could use this to make a link do two different things, depending on the number of clicks. (Needless to say, this could be confusing to the user, but it is technically possible.) You can also detect double-clicks on images and other objects.
To give you even more control of what happens when the mouse button is pressed, two more events are included:
- mousedown—Used when the user presses the mouse button
- mouseup—Used when the user releases the mouse button
These two events are the two halves of a mouse click. If you want to detect an entire click, use click, but you can use mouseup and mousedown to detect just one part or the other.
To detect which mouse button is pressed, you can use the button property of the event object. This property is assigned the value 0 for the left button or 2 for the right button. This property is assigned for click, dblclick, mouseup, and mousedown events.
Caution
Browsers don’t normally detect click or dblclick events for the right mouse button. If you want to detect the right button, using mousedown is the most reliable way.
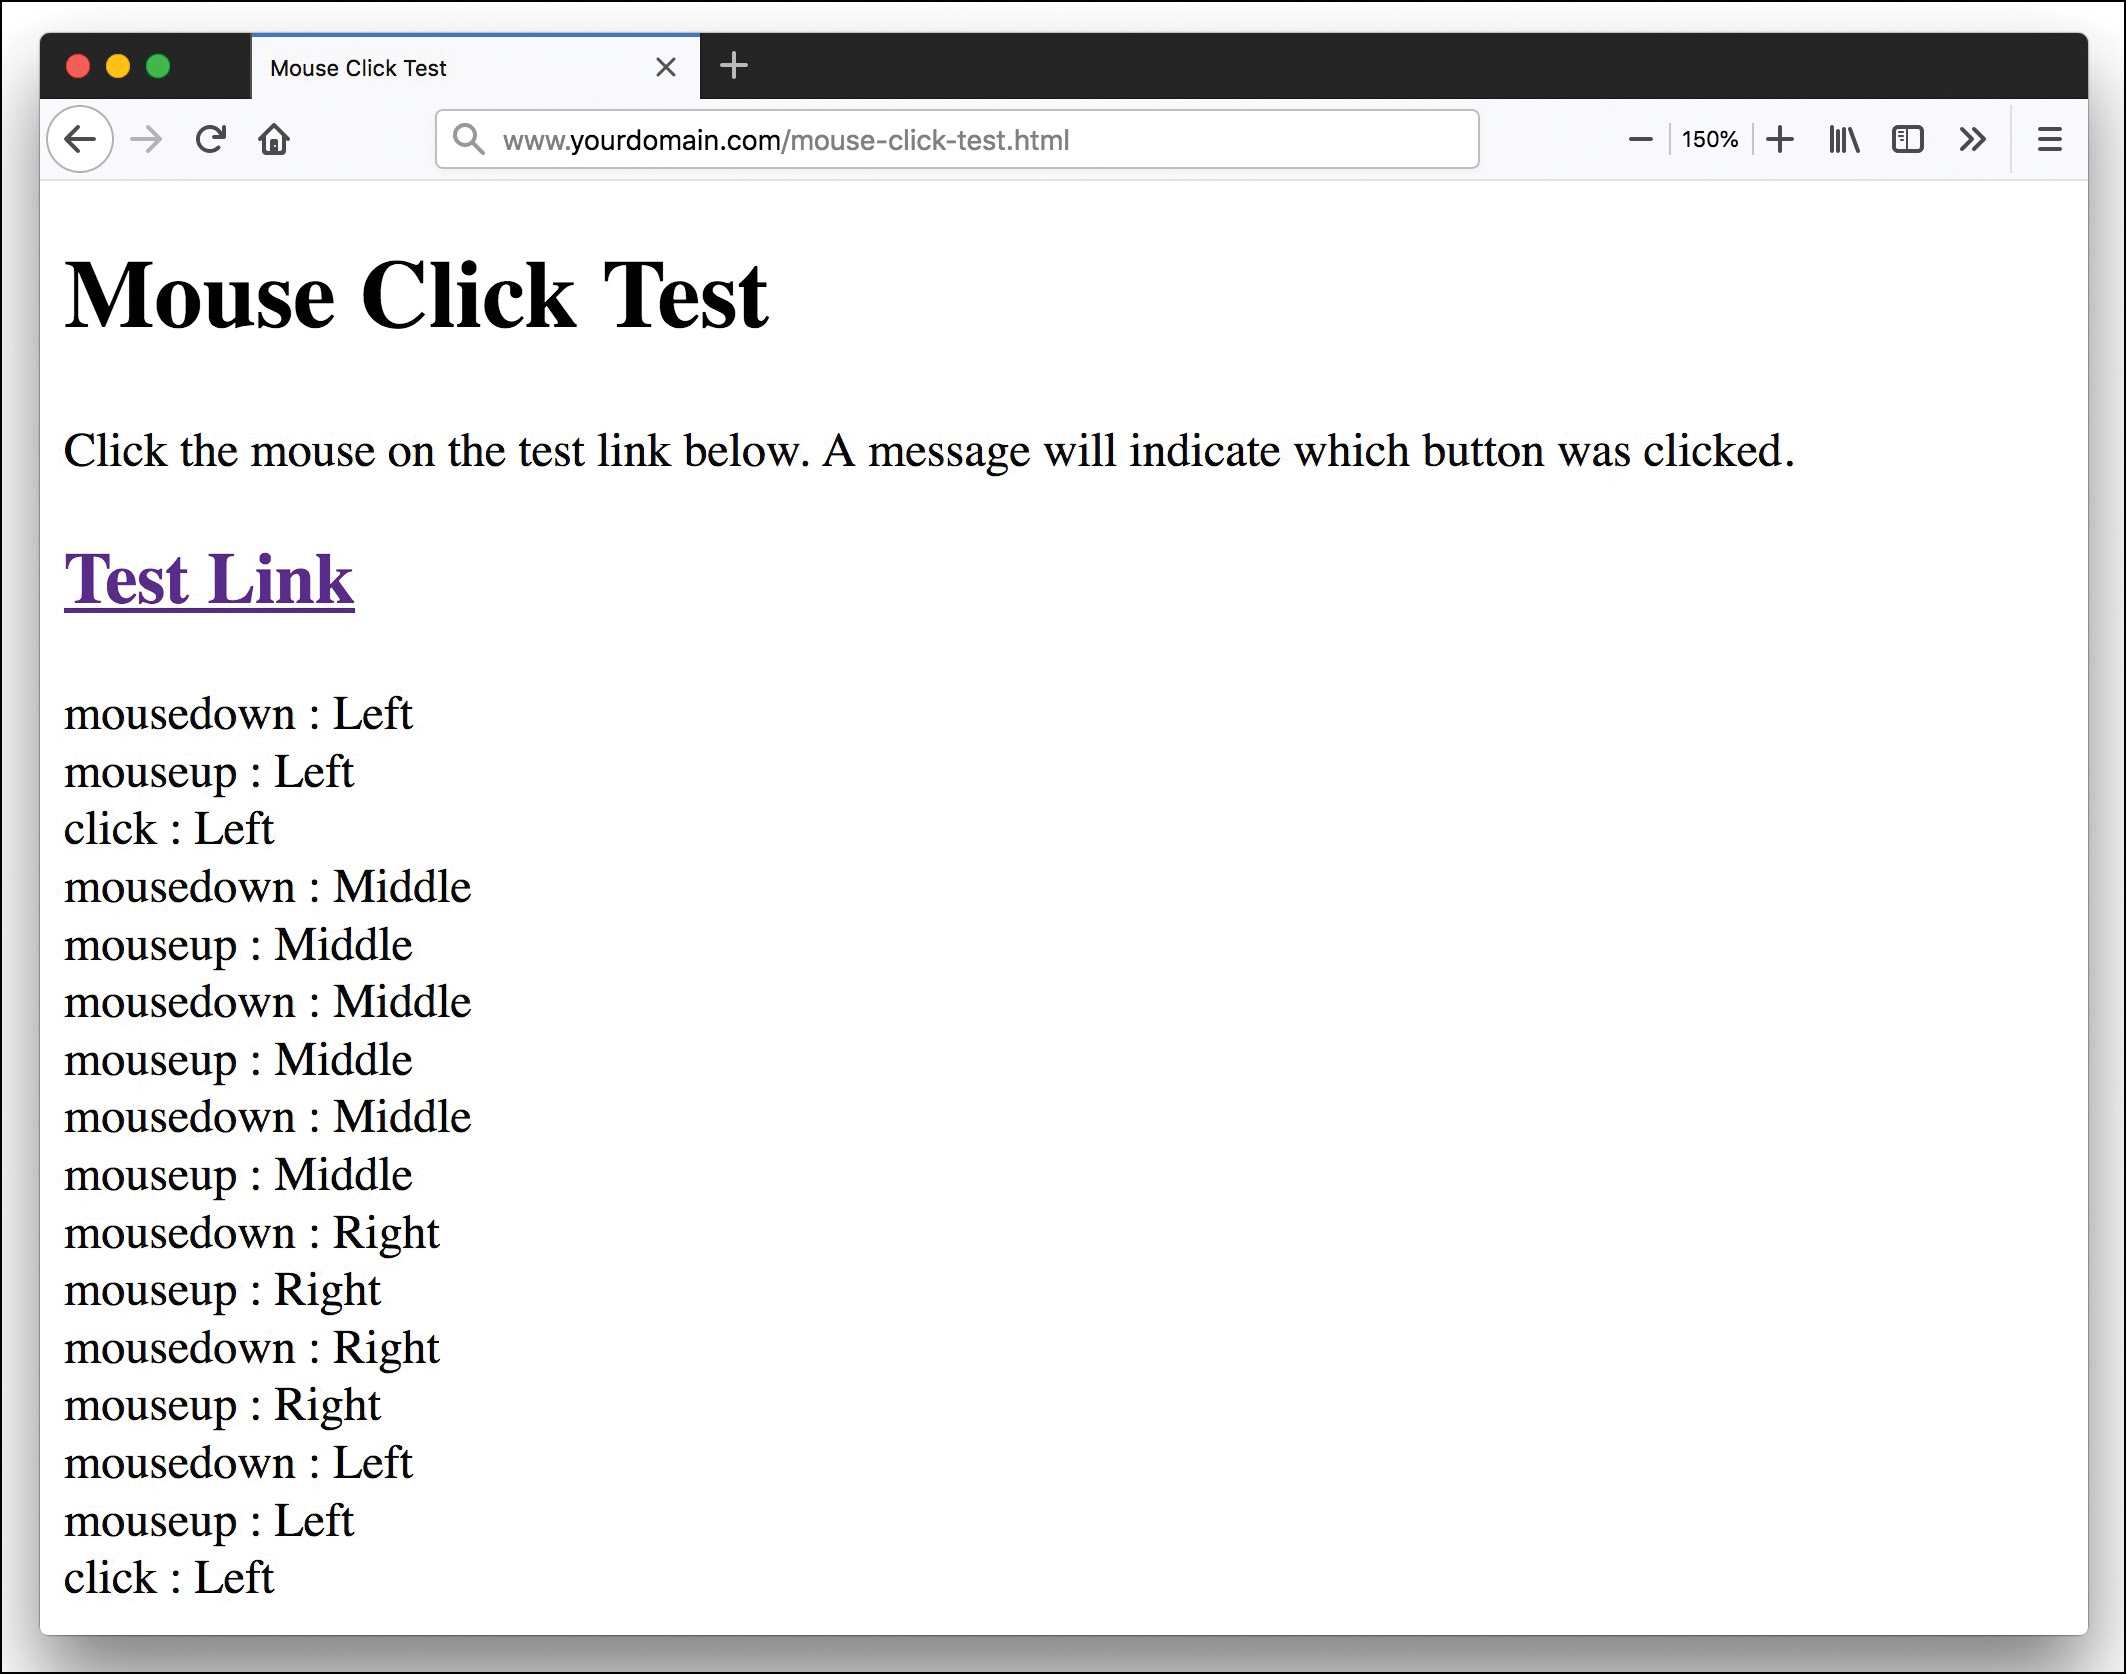
As an example of these event handlers, you can create a script that displays information about mouse button events and determines which button is pressed. Listing 24.1 shows a script that handles some mouse events.
Listing 24.1 The JavaScript File for the Mouse Click Example
function mousestatus(e) {
if (!e) e = window.event;
btn = e.button;
switch(btn) {
case 0:
whichone = "Left";
break;
case 1:
whichone = "Middle";
break;
case 2:
whichone = "Right";
break;
default:
whichone = "UNKNOWN";
}
message=e.type + " : " + whichone + "<br>";
document.getElementById('testarea').innerHTML += message;
e.preventDefault();
}
obj=document.getElementById('testlink');
obj.addEventListener("click", mousestatus);
obj.addEventListener("mousedown", mousestatus);
obj.addEventListener("mouseup", mousestatus);
obj.addEventListener("dblclick", mousestatus);
This script includes a function, mouseStatus, that detects mouse events. This function uses the button property of the event object to determine which button was pressed. It also uses the type property to display the type of event, since the function will be used to handle multiple event types.
After the function, the script finds the object for a link with the id attribute testlink and assigns its mousedown, mouseup, click, and dblclick events to the mousestatus function. The mousestatus function uses a switch statement to determine if the left, center, or right mouse button was clicked and then writes that information to the testarea <div>.
Save this script as click.js. Next, you need an HTML document to work with the script; this is shown in Listing 24.2.
Listing 24.2 The HTML File for the Mouse Click Example
<!doctype html>
<html lang="en">
<head>
<meta charset="utf-8">
<title>Mouse Click Test</title>
<meta name="viewport"
content="width=device-width, initial-scale=1">
</head>
<body>
<h1>Mouse Click Test</h1>
<p>
Click the mouse on the test link below. A message will
indicate which button was clicked.
</p>
<h2><a href="#"id="testlink">Test Link</a></h2>
<div id="testarea"></div>
<script src="click.js"></script>
</body>
</html>
This file defines a test link with the id property testlink, which is used in the script to assign event handlers. It also defines a <div> with an id of testarea, which is used by the script to display the message regarding the events. To test this document, save it in the same folder as the JavaScript file you created previously and load the HTML document into a browser. Some sample results are shown in Figure 24.1.
Note
Notice that a single click of the left mouse button triggers three events: mousedown, mouseup, and then click, whereas clicking the right mouse button triggers only two events.
Using Keyboard Events
JavaScript can also detect keyboard actions. The main event handler for this purpose is keypress, which occurs when a key is pressed and released or held down. As with mouse buttons, you can detect the down and up parts of a keypress with the keydown and keyup event handlers.
Note
The keypress and keydown events may seem to be the same thing, but they are subtly different. The keydown event references the exact moment that the key is moving down, while the keypress event references the key being pressed and sends the value of that key back to the script. The keydown event does not relay which key was pressed.
Of course, you might find it useful to know which key the user pressed. You can find this out with the event object, which is sent to your event handler when the event occurs. The event.which property stores the ASCII character code for the key that was pressed.
Note
ASCII (American Standard Code for Information Interchange) is the standard numeric code used by most computers to represent characters. It assigns the numbers 0 to 128 to various characters. For example, the capital letters A through Z are ASCII values 65 to 90.
If you’d rather deal with actual characters than key codes, you can use the fromCharCode String method to convert them. This method converts a numeric ASCII code to its corresponding string character. For example, the following statement converts the event.which property to a character and stores it in the key variable:
var key = String.fromCharCode(event.which);
Note
In older versions of Internet Explorer, event.keyCode stores the ASCII character code for the key that was pressed rather than event.which. If you must support Internet Explorer 8 or earlier, you should include a check for the e.keyCode property, like so:
if (e.keyCode) {
var keycode = e.keyCode;
} else {
var keycode = e.which;
}
The following function displays each key as it is typed:
function displayKey(e) {
// which key was pressed?
var keycode=e.which;
character=String.fromCharCode(keycode);
// find the object for the destination paragraph
var keys_paragraph = document.getElementById('keys');
// add the character to the paragraph
keys_paragraph.innerHTML += character;
}
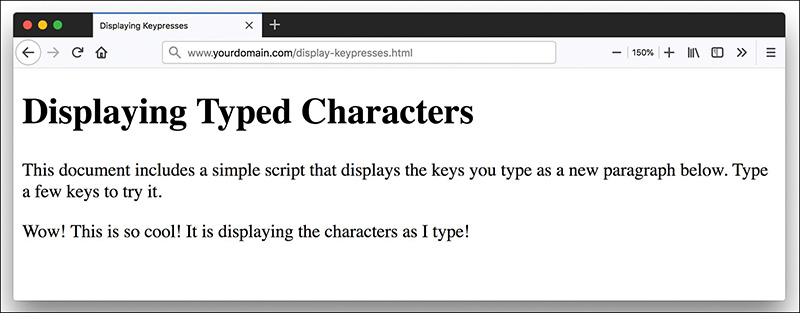
The displayKey function receives the event object from the event handler and stores it in the variable e. It assigns keycode to the e.which property. Then the remaining lines of the function convert the key code to a character and add it to the paragraph in the document with the id attribute keys. Listing 24.3 shows a complete example using this function.
Note
The final lines in the displayKey function use the getElementById function and the innerHTML attribute to display the keys you type within a paragraph on the page—in this case, a paragraph with an id of keys.
Listing 24.3 Displaying Typed Characters
<!doctype html>
<html lang="en">
<head>
<meta charset="utf-8">
<title>Displaying Keypresses</title>
<meta name="viewport"
content="width=device-width, initial-scale=1">
</head>
<body>
<h1>Displaying Typed Characters</h1>
<p>
This document includes a simple script that displays the keys
you type as a new paragraph below. Type a few keys to try it.
</p>
<p id="keys"></p>
<script>
function displayKey(e) {
// which key was pressed?
var keycode=e.which;
character=String.fromCharCode(keycode);
// find the object for the destination paragraph
var keys_paragraph = document.getElementById('keys');
// add the character to the paragraph
keys_paragraph.innerHTML += character;
}
document.addEventListener("keypress",displayKey);
</script>
</body>
</html>
When you load this example, you can type and then watch the characters you’ve typed appear in a paragraph of the document. Figure 24.2 shows the result of some typing, but you should try it yourself to see the full effect!
Using the load and unload Events
Another event you are likely to use often is load. This event occurs when the current page (including all of its images) finishes loading from the server.
The load event is related to the window object, and to define it you use an event handler in the <body> tag. For example, the following is a <body> element that uses a simple event handler to display an alert when the page finishes loading:
window.addEventListener("load", function() {
alert("Loading complete");
});
This event handler uses an anonymous function to display the alert. An anonymous function is typically used when the functionality of the function doesn’t have a long-term use or doesn’t need to be used in several locations.
Caution
Because the load event occurs after the HTML document has finished loading and displaying, you should not use the document.write or document.open statements within a load event handler because it would overwrite the current document.
An image can also have a load event handler. When you define a load event handler for an <img> element, it is triggered as soon as the specified image has completely loaded.
You can also specify an unload event for the <body> element. This event will be triggered whenever the browser unloads the current document—which occurs when another page is loaded or when the browser window is closed.
Using click to Change the Appearance of a <div>
As you’ve learned already in this lesson, the click event can be used to invoke all sorts of actions. You might think of a mouse click as a way to submit a form by clicking on a button, but you can capture this event and use it to provide interactivity within your pages as well. In the example that follows, you will see how you can use the click event to show or hide information contained in a <div> element.
In this case, you will be adding interactivity to a web page by allowing the user to show previously hidden information by clicking on a piece of text. I refer to it as a piece of text because, strictly speaking, the text is not a link. Although to the user it will look like a link and act like a link, it will not be marked up within an <a> tag.
Listing 24.4 provides the complete code for this example, which we’ll walk through momentarily.
Listing 24.4 Using click to Show or Hide Content
<!doctype html>
<html lang="en">
<head>
<meta charset="utf-8">
<title>Steptoe Butte</title>
<style>
a {
text-decoration: none;
font-weight: bold;
}
img {
margin-right: 12px;
margin-bottom: 6px;
border: 1px solid #000;
}
.mainimg {
float: left;
max-width: 35%;
height: auto;
}
#eHide, #pHide, #elevation, #photos {
display: none;
}
#eShow, #pShow {
display: block;
}
#photos {
clear: both;
}
#photos img { max-width: 20%; height: auto; clear: left; }
.fakelink {
cursor: pointer;
text-decoration: none;
font-weight: bold;
color: #E03A3E;
}
section {
margin-bottom: 6px;
}
</style>
<meta name="viewport"
content="width=device-width, initial-scale=1">
</head>
<body>
<header>
<h1>Steptoe Butte</h1>
</header>
<section>
<p>
<img src="images/steptoe-butte.jpg"class="mainimg"
alt="View from Steptoe Butte">Steptoe Butte is a quartzite
island jutting out of the silty loess of the <a
href="http://en.wikipedia.org/wiki/Palouse">Palouse</a>
hills in Whitman County, Washington. The rock that forms
the butte is over 400 million years old, in contrast with
the 15-7 million year old <a
href="http://en.wikipedia.org/wiki/Columbia_River">Columbia
River</a> basalts that underlie the rest of the Palouse
(such "islands" of ancient rock have come to be called
buttes, a butte being defined as a small hill with a flat
top, whose width at top does not exceed its height).
</p>
<p>
A hotel built by Cashup Davis stood atop Steptoe Butte from
1888 to 1908, burning down several years after it closed.
In 1946, Virgil McCroskey donated 120 acres (0.49 km2) of
land to form Steptoe Butte State Park, which was later
increased to over 150 acres (0.61 km2). Steptoe Butte is
currently recognized as a National Natural Landmark because
of its unique geological value. It is named in honor of <a
href="http://en.wikipedia.org/wiki/Colonel_Edward_Steptoe">
Colonel Edward Steptoe</a>.
</p>
</section>
<section>
<button class="fakelink" id="eShow">
» Show Elevation
</button>
<button class="fakelink" id="eHide">
« Hide Elevation
</button>
<div id="elevation">
3,612 feet (1,101 m), approximately 1,000 feet (300 m)
above the surrounding countryside.
</div>
</section>
<section>
<button class="fakelink" id="pShow">
» Show Photos from the Top of Steptoe Butte
</button>
<button class="fakelink" id="pHide">
« Hide Photos from the Top of Steptoe Butte
</button>
<div id="photos">
<img src="images/sb-top1.jpg" alt="View from Steptoe Butte">
<img src="images/sb-top2.jpg" alt="View from Steptoe Butte">
<img src="images/sb-top3.jpg" alt="View from Steptoe Butte">
</div>
</section>
<footer>
<p>
<em>Text from
<a href="http://en.wikipedia.org/wiki/Steptoe_Butte">
Wikipedia</a>, photos by Julie C. Meloni.</em>
</p>
</footer>
<script>
document.getElementById("eShow").addEventListener("click", function() {
this.style.display = 'none';
document.getElementById("eHide").style.display='block';
document.getElementById("elevation").style.display='block';
});
document.getElementById("eHide").addEventListener("click", function() {
this.style.display = 'none';
document.getElementById("eShow").style.display='block';
document.getElementById("elevation").style.display='none';
});
document.getElementById("pShow").addEventListener("click", function() {
this.style.display = 'none';
document.getElementById("pHide").style.display='block';
document.getElementById("photos").style.display='block';
});
document.getElementById("pHide").addEventListener("click", function() {
this.style.display = 'none';
document.getElementById("pShow").style.display='block';
document.getElementById("photos").style.display='none';
});
</script>
</body>
</html>
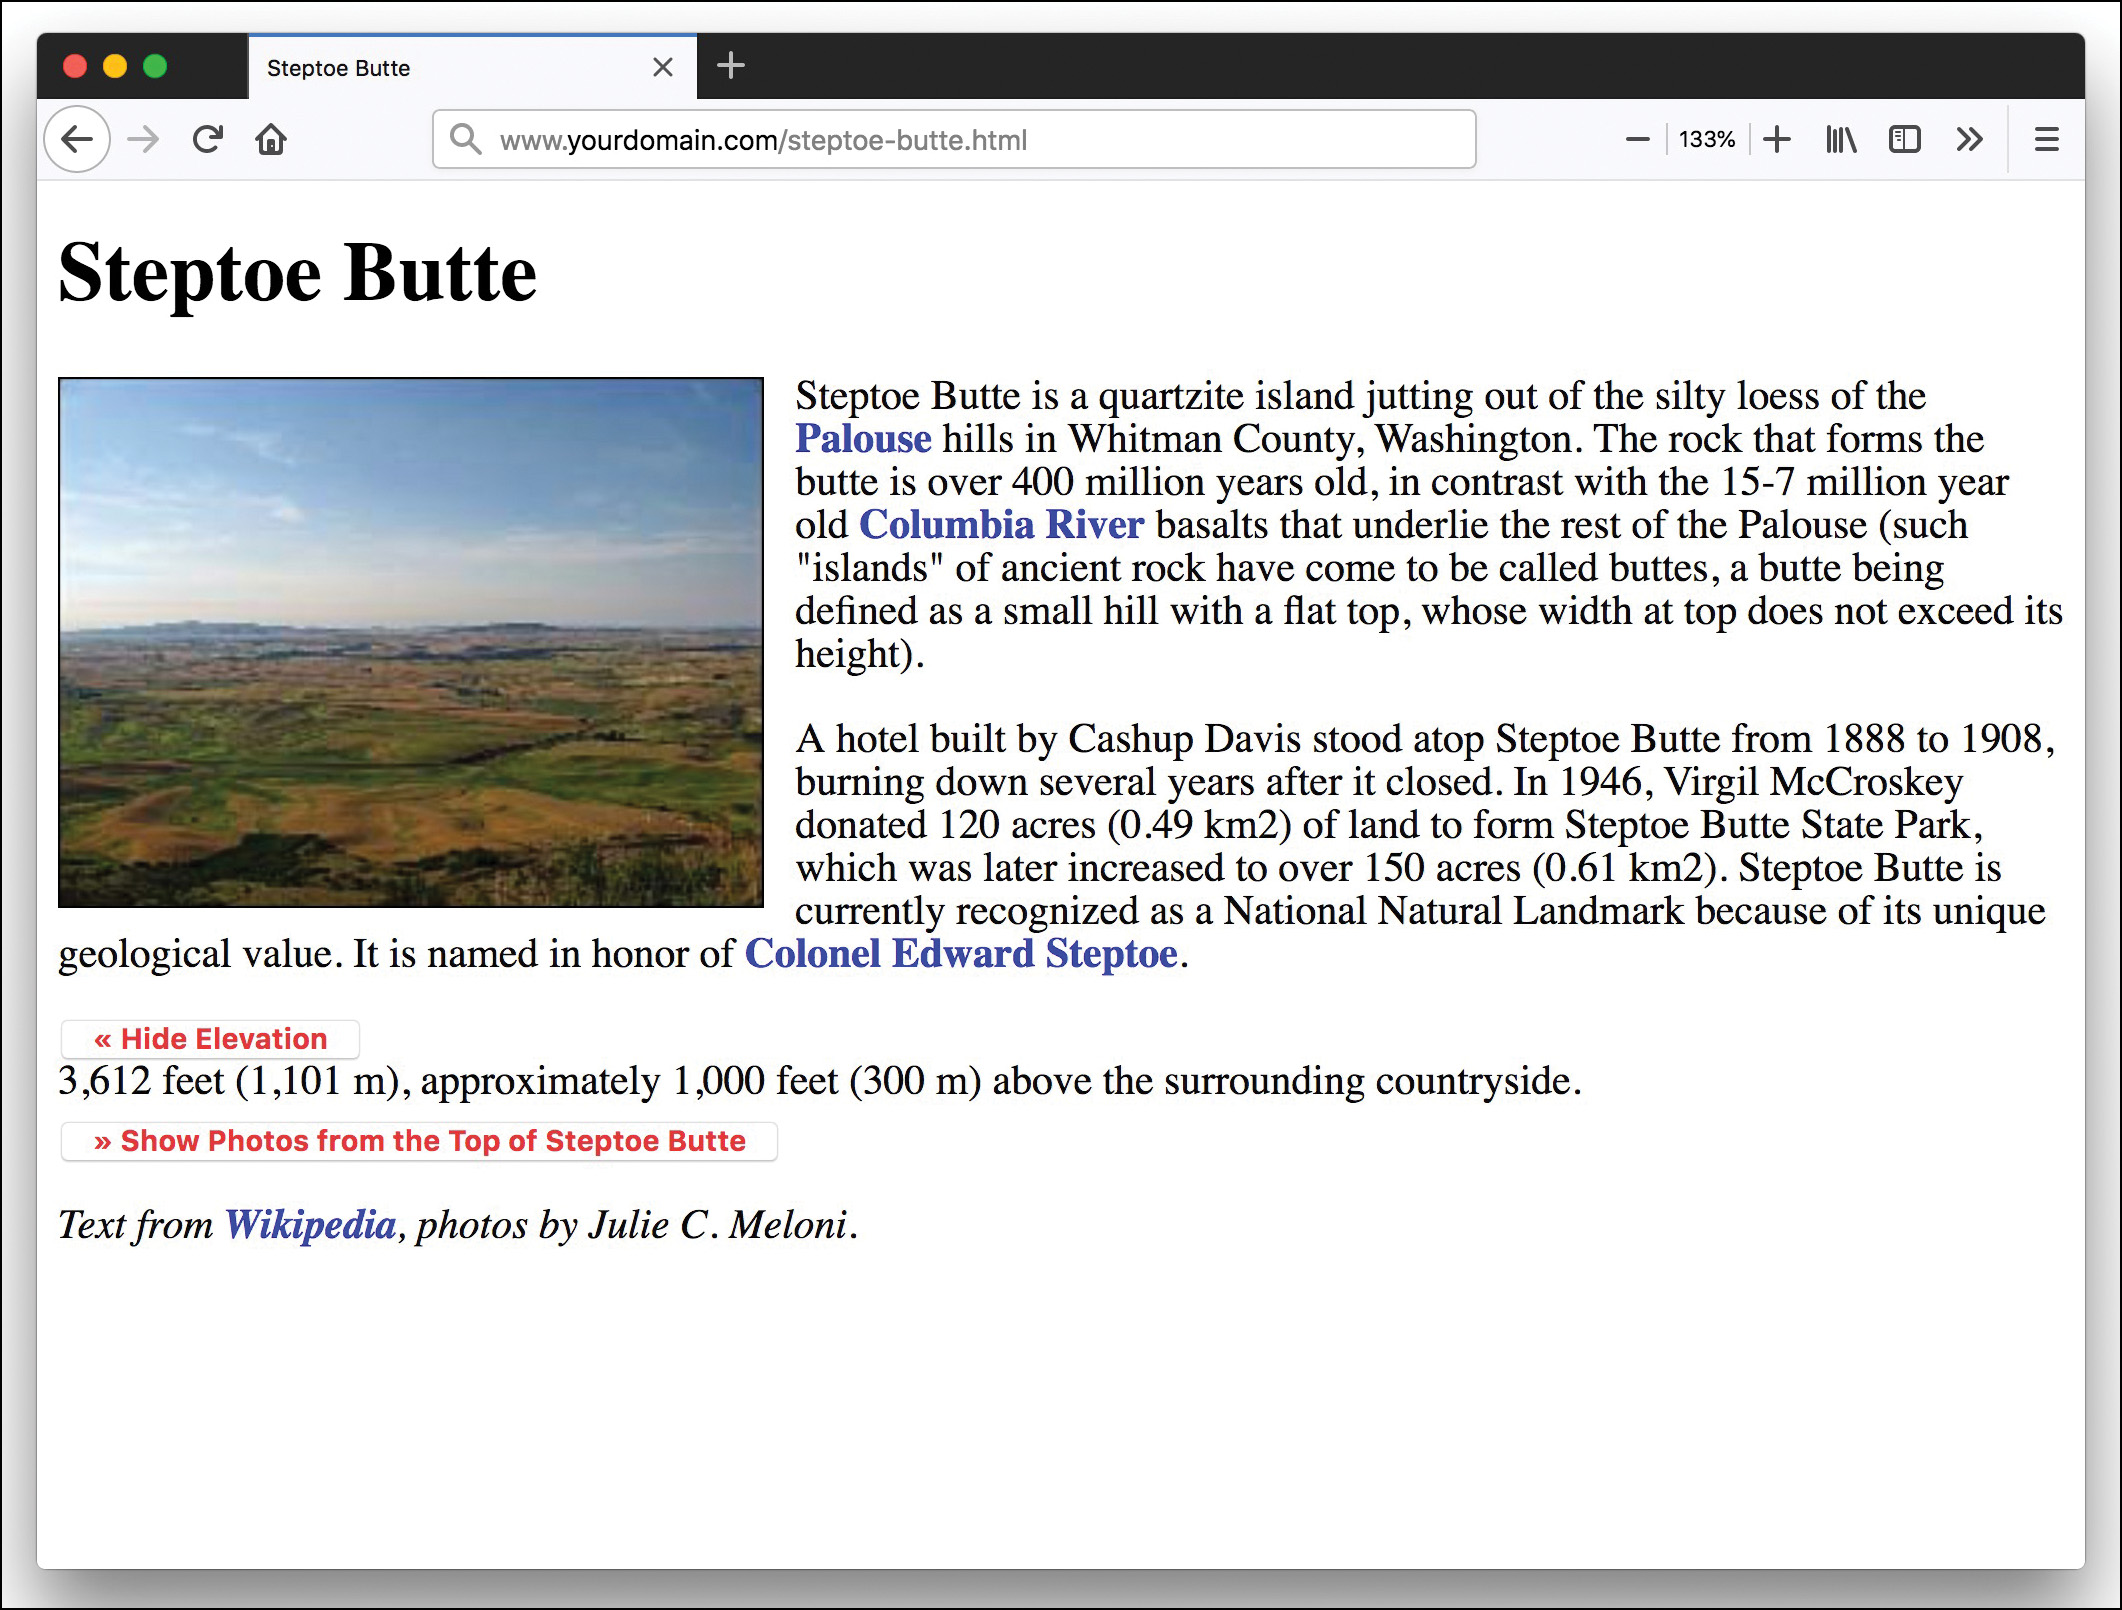
Figure 24.3 shows how this code renders in a browser.
To begin, look at the entries in the style sheet. The first entry simply styles links that are surrounded by the <a></a> tag pair; these links display as non-underlined, bold, blue links. You can see these regular links in the two paragraphs of text in Figure 24.3 (and in the line at the bottom of the page). The next two entries make sure that the images used in the page have appropriate margins; the entry for <img> element sets some margins and a border, and the .mainimg class enables you to apply a style to the main image on the page but not the set of three images at the bottom of the page.

The next entry is for specific IDs, and those IDs are all set to be invisible (display: none;) when the page initially loads. In contrast, the two IDs that follow are set to display as block elements when the page initially loads. Again, strictly speaking, these two IDs do not have to be defined as block elements because that is the default display. However, this style sheet includes these entries to illustrate the differences between the two sets of elements. If you count the number of <button> elements in Listing 24.4, you will find four in the code: two that are invisible and two that are visible upon page load. There are also two <div> elements that are not visible when the page loads: the ones with the IDs elevation and photos.
The goal in this example is to change the display value of two IDs when another ID is clicked. But first you have to make sure users realize that a piece of text is clickable, and that typically happens when users see their mouse pointers change to reflect a present link. Although you can’t see it in Figure 24.3, if you load the sample code on your machine and view it in your browser, the mouse pointer changes to a hand with a finger pointing at a particular link.
This functionality is achieved by defining a class for this particular text; the class is called fakelink, as you can see in this snippet of code:
<button class="fakelink" id="eShow">
» Show Elevation
</button>
The fakelink class ensures that the button is rendered as non-underlined, bold, and red; cursor: pointer; causes the mouse pointer to change in such a way that users think the text is a link of the type that would normally be enclosed in an <a> element.
But the really interesting stuff happens when we associate a click event with a <button>. To be unobtrusive, we do this with an event listener on the element, as you can see in this snippet of code:
document.getElementById("eShow").addEventListener("click", function() {
this.style.display = 'none';
document.getElementById("eHide").style.display='block';
document.getElementById("elevation").style.display='block';
});
In the sample snippet just shown, when the click event is seen on the eShow element, a function runs a series of commands to change the current value of CSS elements. Let’s look at them separately:
this.style.display = 'none';
document.getElementById("eHide").style.display='block';
document.getElementById("elevation").style.display='block';
In the first line of the snippet, the this keyword refers to the element itself. In other words, this refers to the <button> element (actually any element) with the ID eShow. The keyword style refers to the style object; the style object contains all the CSS styles that you assign to the element. In this case, we are most interested in the display style. Therefore, this.style.display means “the display style of the eShow ID,” and we are setting the value of the display style to none when the button is clicked.
But three actions also occur within the click event. The other two actions begin with document.getElementById() and include a specific ID name within the parentheses. We use document.getElementById() instead of this because the second and third actions set CSS style properties for elements that are not the parent element. As you can see in the snippet, in the second and third actions, we are setting the display property values for the element IDs eHide and elevation. When users click the currently visible <div> called eShow, the following happens:
- The
eShow<div>becomes invisible. - The
eHide<div>becomes visible and is displayed as a block. - The
elevation<div>becomes visible and is displayed as a block.
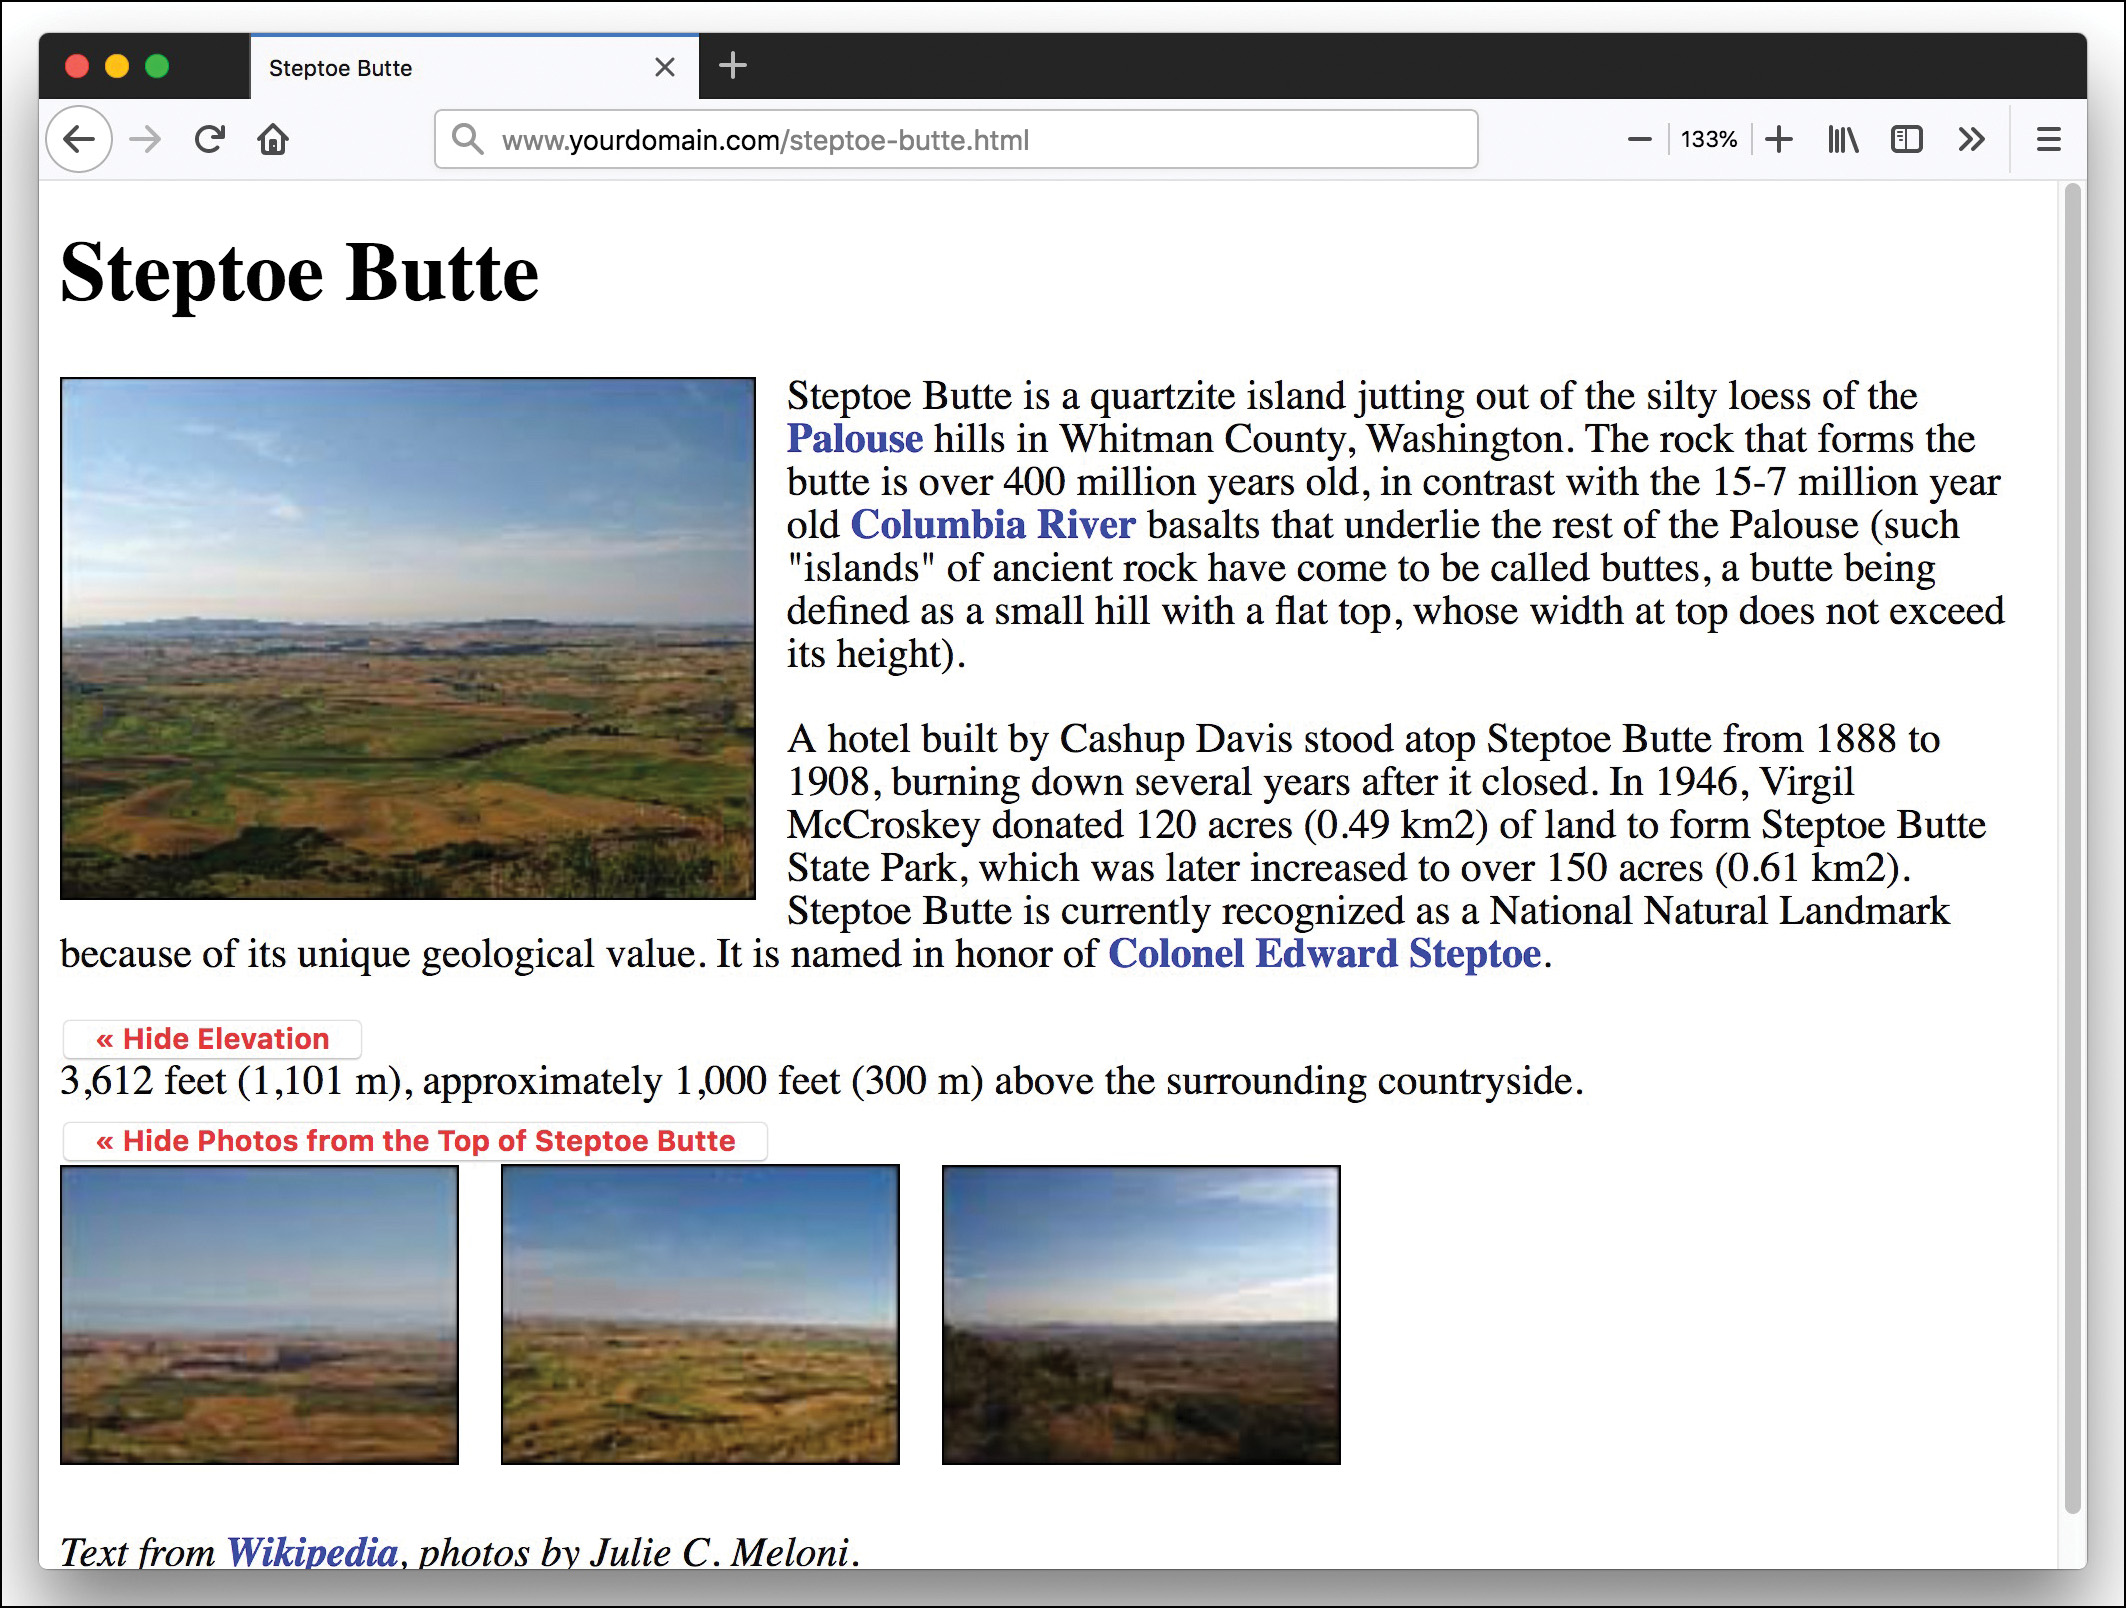
Figure 24.4 shows the result of these actions.
click event listener function.Another set of elements in the code in Listing 24.4 controls the visibility of the additional photos. These elements are not affected by the click events in the elevation-related elements. That is, when you click either Show Elevation or Hide Elevation, the photo-related <div> elements do not change. You can show the elevation and not the photos (as shown in Figure 24.4), the photos and not the elevation, or both the elevation and the photos at the same time (see Figure 24.5).
This brief example has shown you the very beginning of the layout and interaction possibilities that await you when you master CSS in conjunction with events. For example, you can code your pages so that your users can change elements of the style sheet or change to an entirely different style sheet, move blocks of text to other places in the layout, take quizzes or submit forms, and do much, much more.
Controlling Windows with Objects
In Lesson 21 you learned that you can use DOM objects to represent various parts of the browser window and the current HTML document. You also learned that the history, document, and location objects are all children of the window object.
Now we’ll take a closer look at the window object itself. As you’ve probably guessed by now, this means you’ll be dealing with browser windows.
The window object always refers to the current window (the one containing the script). The self keyword is also a synonym for the current window. As you’ll learn in the next sections, you can have more than one window on the screen at the same time and can refer to these windows by using different names.
Properties of the window Object
Although there is normally a single window object available in a browser session, users might have more than one window object available in their browser session because they have multiple tabs open or a web page has opened a pop-up window. As you learned in Lesson 21, the document, history, and location objects are properties (or children) of the window object, and each open window object has these properties available for scripting purposes. In addition to these properties, each window object has the following useful properties:
- window.closed—Indicates whether the window has been closed. This makes sense only when you’re working with multiple windows because the current window contains the script and cannot be closed without ending the script.
- window.name—Specifies the name for a window opened by a script.
- window.opener—In a new window opened by a script, provides a reference to the window containing the script that opened it.
- window.outerHeight and window.outerWidth—Specify the height and width, respectively, of the outside of a browser window.
- window.screen—Provides a child object that stores information about the screen the window is in—its resolution, color depth, and so on.
- window.self—Acts as a synonym for the current
windowobject.
Note
The properties of the window.screen object include height, width, availHeight, and availWidth (the available height and width rather than the total), colorDepth (which indicates the color support of the monitor: 8 for 8-bit color, 32 for 32-bit color, and so on), and pixelDepth, which indicates the color resolution, in bits per pixel of the screen.
You can find a complete list of window properties (and methods) at https://developer.mozilla.org/en-US/docs/Web/API/Window.
Creating a New Window
One of the most convenient uses for the window object is to create a new window. You can do this to display a new document—for example, a pop-up advertisement or the instructions for a game—without clearing the current window. You can also create windows for specific purposes, such as navigation windows.
You can create a new browser window with the window.open method. A typical statement to open a new window looks like this:
myNewWindow=window.open("URL", "WindowName", "LIST_OF_FEATURES");
The following are the components of the window.open statement in this syntax:
- The
myNewWindowvariable is used to store the newwindowobject. You can access methods and properties of the new object by using this name. - The first parameter of the
window.openmethod is a URL, which will be loaded into the new window. IfURLis left blank, no web page will be loaded. In this case, you could use JavaScript to fill the window with content. - The second parameter,
WindowName, specifies a window name. This is assigned to thewindowobject’snameproperty and is used to refer to the window. - The third parameter,
LIST_OF_FEATURES, is a list of optional features, separated by commas. You can customize the new window by choosing whether to include the toolbar, status line, and other features. This enables you to create various “floating” windows, which might look nothing like a typical browser window.
The features available in the third parameter of the window.open() method include width and height, to set the size of the window in pixels; left and top, to set the distance in pixels of the new window from the left side and top of the user’s desktop, respectively; and several features that can be set to either yes (1) or no (0): toolbar, location, status, menubar, personalbar, scrollbars, and resizable, among a few others. You list only the features you want to use.
This example creates a small window with no toolbar or status bar:
newSmallWin = window.open("","small","width=300,height=220,toolbar=0,status=0");
Opening and Closing Windows
Of course, if you can open a window, you can use JavaScript to close windows as well. The window.close method closes a window. Browsers don’t normally allow you to close the main browser window without the user’s permission; this method’s main purpose is for closing windows you have created. For example, this statement closes a window called updateWindow:
updateWindow.close();
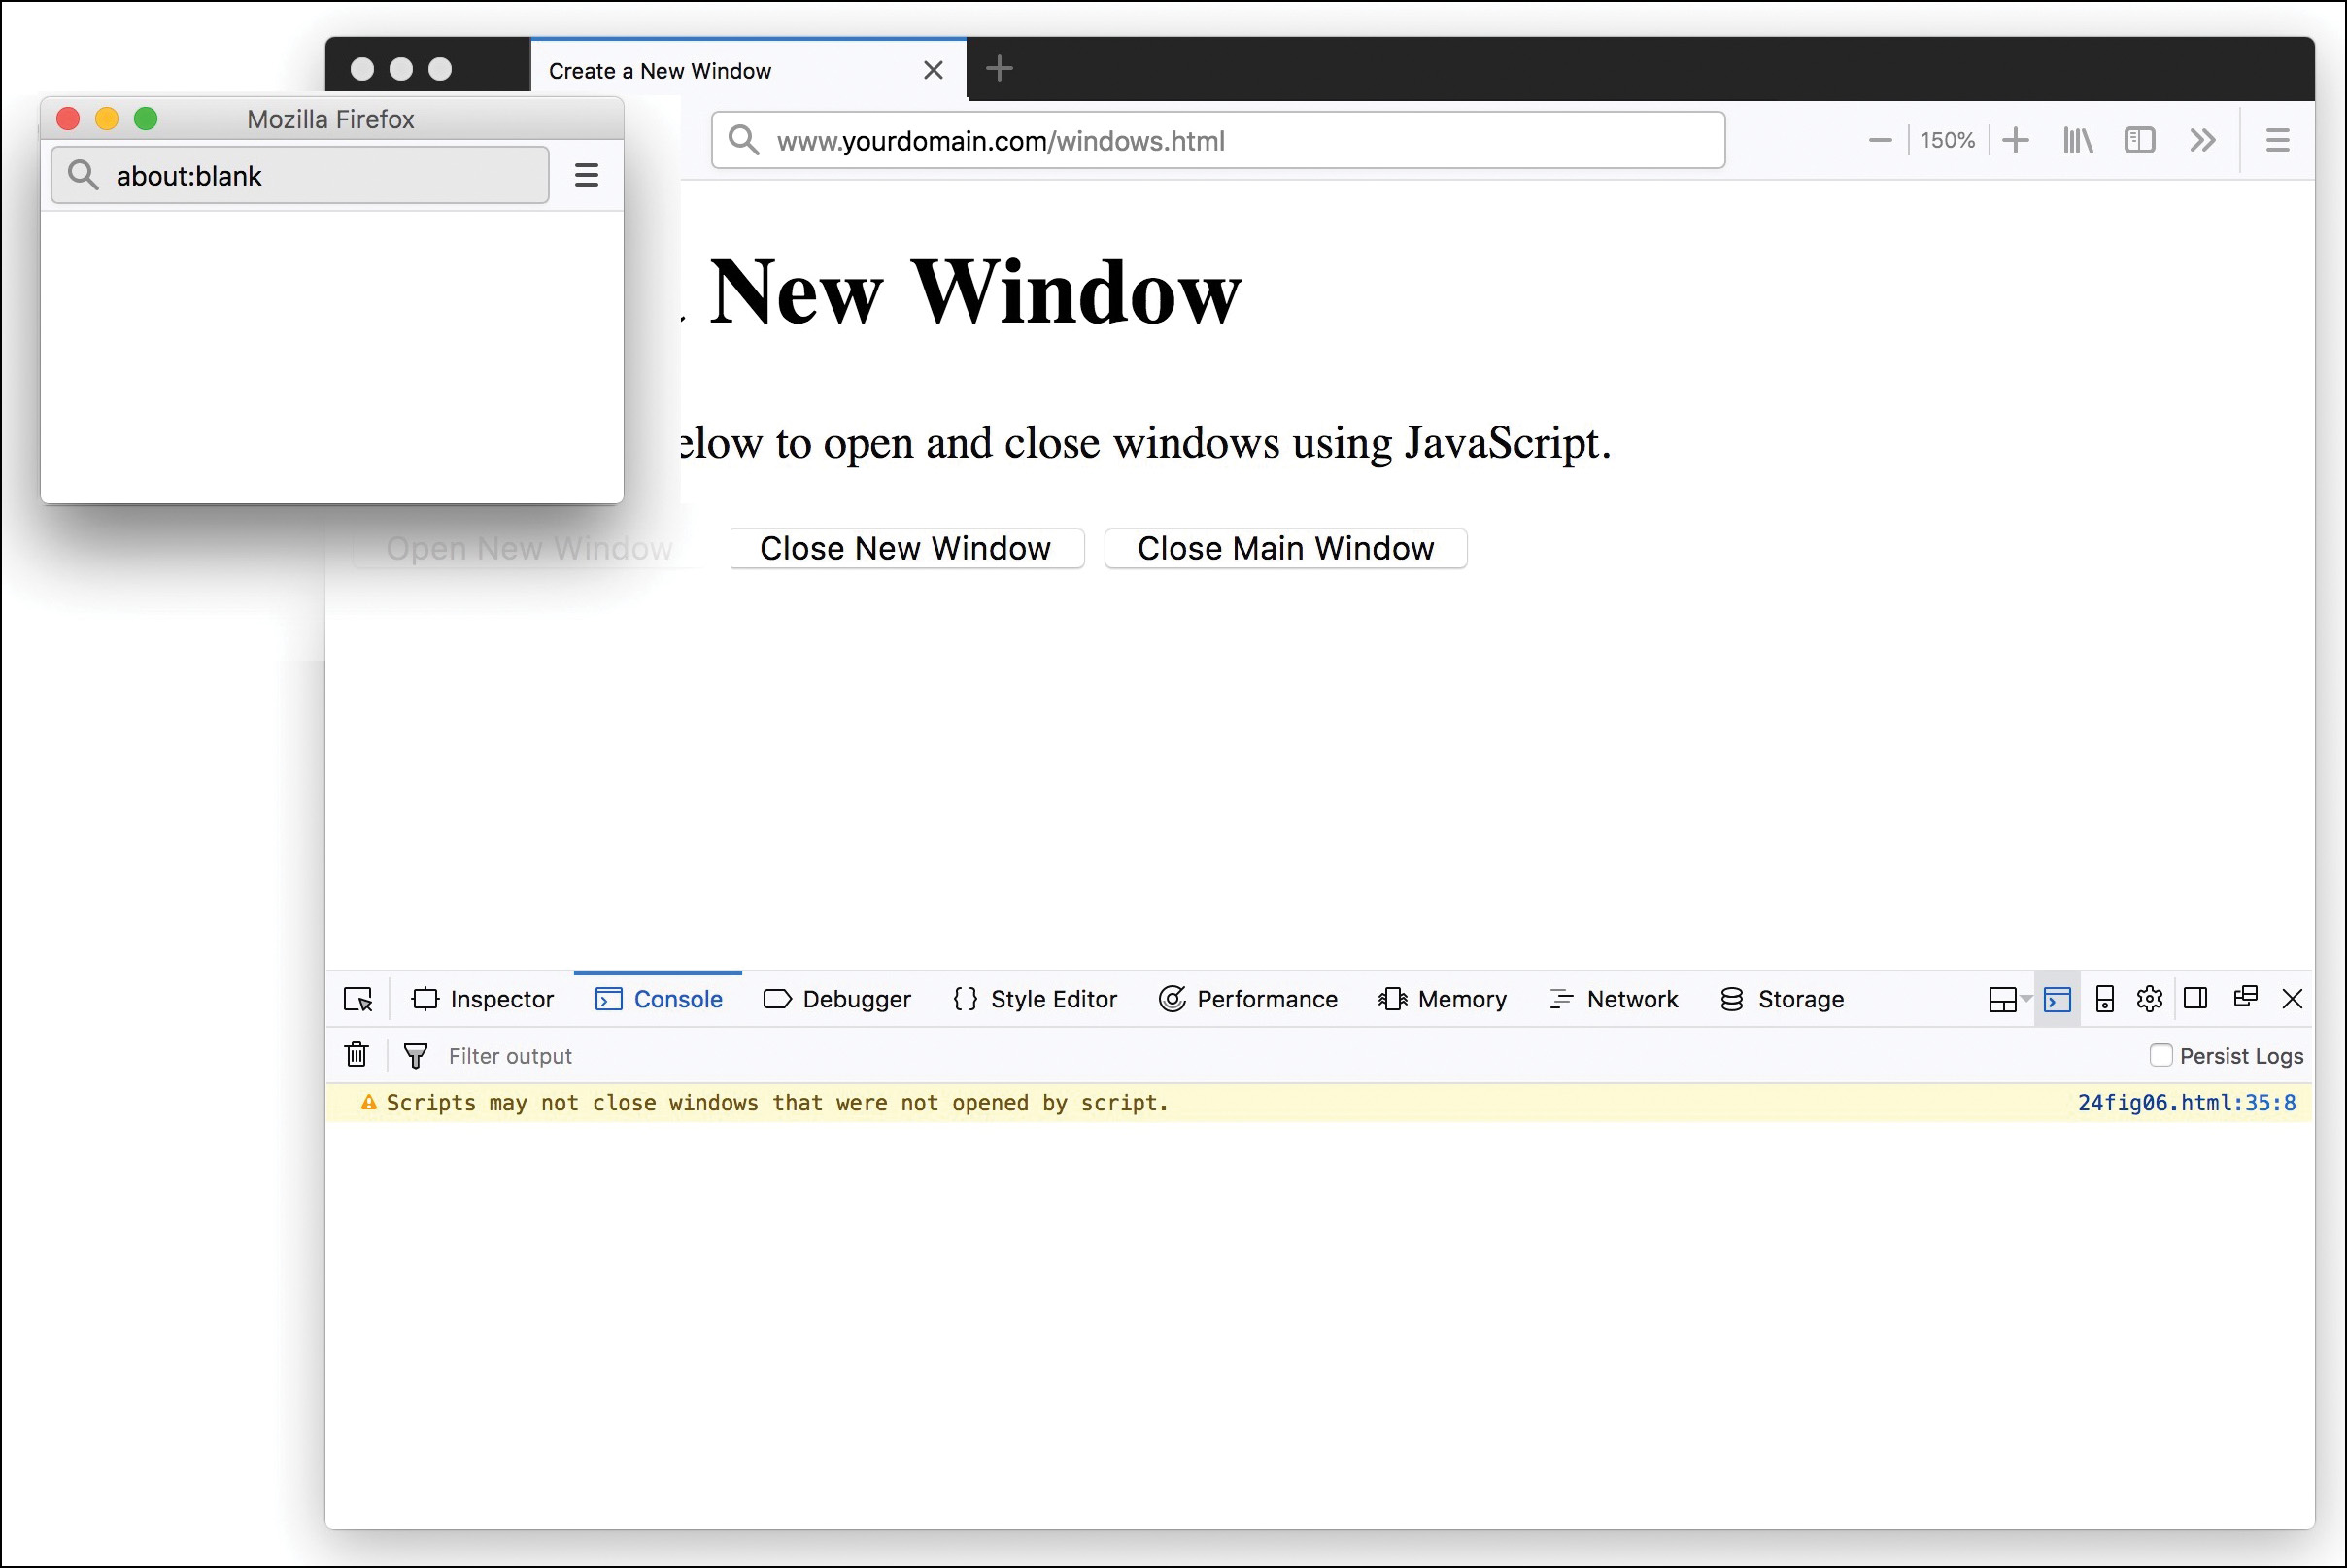
As another example, Listing 24.5 shows an HTML document that enables you to open a small new window by clicking a button. You can then click another button to close the new window. The third button attempts to close the current window, and you’ll see how well that works out later in this lesson.
Listing 24.5 An HTML Document That Uses JavaScript to Enable You to Create and Close Windows
<!doctype html>
<html lang="en">
<head>
<meta charset="utf-8">
<title>Create a New Window</title>
<meta name="viewport"
content="width=device-width, initial-scale=1">
</head>
<body>
<h1>Create a New Window</h1>
<p>
Use the buttons below to open and close windows using
JavaScript.
</p>
<button type="button" id="openNew">Open New Window</button>
<button type="button" id="closeNew">Close New Window</button>
<button type="button" id="closeSelf">Close Main Window</button>
<script>
document.getElementById("openNew").addEventListener("click", function() {
newWin = window.open("", "NewWin", "toolbar=no,status=no,width=200,
height=100");
});
document.getElementById("closeNew").addEventListener("click", function() {
newWin.close();
});
document.getElementById("closeSelf").addEventListener("click", function() {
window.self.close();
});
</script>
</body>
</html>
This example uses simple event handlers to do its work by providing a different listener for each of the buttons. Figure 24.6 shows the result of clicking the Open New Window button: It opens a small new window on top of the main browser window.

However, notice the error message shown in the JavaScript console in Figure 24.7. This error message appears after an attempt is made to close the main browser window from this script. As you can see, modern web browsers do not allow JavaScript to close the entire browser window because JavaScript did not originally open the window.
Moving and Resizing Windows
The DOM enables you to move or resize windows that your scripts have created. You can do this by using the following methods for a window object:
- window.moveTo(x, y)—Moves the window to a new position. The parameters specify the
x(column) andy(row) position. - window.moveBy(numX, numY)—Moves the window relative to its current position, by
numXornumYpixels. ThenumXandnumYparameters can be positive or negative and are added to the current values to reach the new position. - window.resizeTo(width, height)—Resizes the window to the width and height specified as parameters.
- window.resizeBy(numX, numY)—Resizes the window relative to its current size, by
numXornumYpixels. The parameters are used to modify the current width and height.
As an example, Listing 24.6 shows an HTML document with a simple script that enables you to resize and move a new window you’ve created based on values entered in a form.
Listing 24.6 Moving and Resizing a New Window
<!doctype html>
<html lang="en">
<head>
<meta charset="utf-8">
<title>Moving and Resizing Windows</title>
<meta name="viewport"
content="width=device-width, initial-scale=1">
</head>
<body>
<h1>Moving and Resizing Windows</h1>
<form name="changeform">
<p>
<strong>Resize to:</strong> <br>
<input size="5" type="text" name="w"> pixels wide and
<input size="5" type="text" name="h"> pixels high
</p>
<p><strong>-- AND/OR --</strong></p>
<p>
<strong>Move to:</strong> <br>
X-position: <input size="5" type="text" name="x">
Y-position: <input size="5" type="text" name="y">
</p>
<p><input type="button" value="Change Window" id="doIt"></p>
</form>
<script>
function doIt() {
if ((document.changeform.w.value) &&
(document.changeform.h.value)) {
NewWin.resizeTo(document.changeform.w.value,
document.changeform.h.value);
}
if ((document.changeform.x.value) &&
(document.changeform.y.value)) {
NewWin.moveTo(document.changeform.x.value,
document.changeform.y.value);
}
}
window.addEventListener("load", function() {
NewWin=window.open('','NewWin', 'width=200,height=100');
});
document.getElementById("doIt").addEventListener("click", doIt);
</script>
</body>
</html>
In this example, the doIt function is called as an event handler when you click the Change Window button. This function checks whether you have specified width and height values. If you have, the function uses the self.resizeTo method to resize the current window. Similarly, if you have specified x and y values, it uses NewWin.moveTo to move the window. If you have set both pairs of values, the script both resizes and moves your window. Load up this code in a web browser and give it a try!
Using Timeouts
Sometimes the hardest thing to get a script to do is to do nothing at all—for a specific amount of time. Fortunately, JavaScript includes a built-in function to do this “nothing at all,” which is also called “sleeping.” The window.setTimeout method enables you to specify a time delay and a command that will execute after the delay passes.
Note
Timeouts don’t make the browser stop what it’s doing. Although the statement you specify in the setTimeout method won’t be executed until the delay passes, the browser will continue to do other things while it waits (for example, acting on other event handlers and loading external content).
You begin a timeout with a call to the setTimeout method, which has two parameters. The first is a JavaScript statement, or group of statements, enclosed in quotation marks. The second parameter is the time to wait in milliseconds (thousandths of seconds). For example, the following statement displays an alert dialog box after 10 seconds:
timeoutID=window.setTimeout("alert('Time's up!')",10000);
Caution
Like an event handler, a timeout uses a JavaScript statement within quotation marks. Make sure that you use a single quote on each side of each string within the statement, as shown in the previous code snippet.
A variable (timeoutID in this example) stores an identifier for the timeout. This enables you to set multiple timeouts, each with its own identifier. Before a timeout has elapsed, you can stop by using the clearTimeout method and specifying the identifier of the timeout to stop:
window.clearTimeout(timeoutID);
Normally, a timeout happens only once because the statement you specify in the setTimeout statement is executed only once. But often you’ll want a statement to execute over and over. For example, your script might be updating a clock or a countdown and might need to execute once per second.
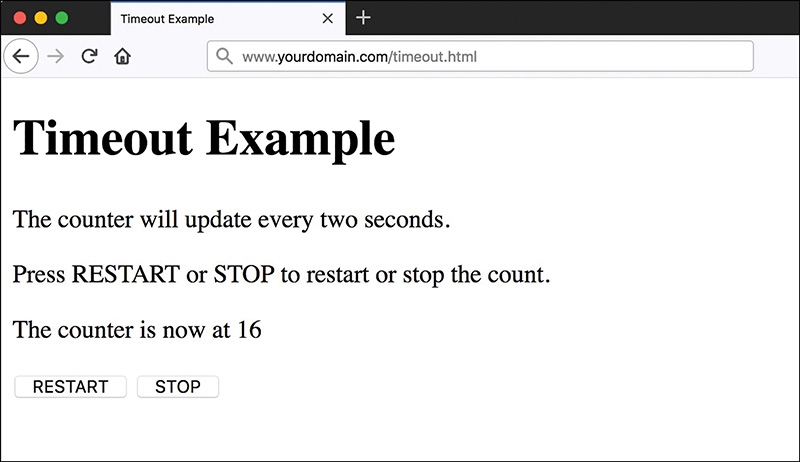
You can make a timeout repeat by issuing the setTimeout method call again in the function called by the timeout. Listing 24.7 shows an HTML document that demonstrates a repeating timeout.
Listing 24.7 Using Timeouts to Update a Page Every Two Seconds
<!doctype html>
<html lang="en">
<head>
<meta charset="utf-8">
<title>Timeout Example</title>
<meta name="viewport"
content="width=device-width, initial-scale=1">
</head>
<body>
<h1>Timeout Example</h1>
<p>The counter will update every two seconds.</p>
<p>Press RESTART or STOP to restart or stop the count.</p>
<p id="showText"></p>
<section>
<button type="button" id="restart">RESTART</button>
<button type="button" id="stop">STOP</button>
</section>
<script>
var counter = 0;
// call Update function 2 seconds after first load
timeoutID=window.setTimeout("Update();",2000);
function Update() {
counter++;
var textField = document.getElementById("showText");
textField.innerHTML = "The counter is now at " + counter;
// set another timeout for the next count
timeoutID=window.setTimeout("Update();",2000);
}
// set event listeners for the buttons
document.getElementById("restart").addEventListener("click", function() {
counter = 0;
Update();
});
document.getElementById("stop").addEventListener("click", function() {
window.clearTimeout(timeoutID);
});
</script>
</body>
</html>
This script displays a message inside a specially named <p> element every two seconds, and it includes an incrementing counter that displays as part of that message. The specific <p> tag has an id value of showText, and the Update function includes two lines that tell the script that the text should be placed between these two tags:
textField = document.getElementById("showText");
textField.innerHTML = "The counter is now at " + counter;
The first line creates a variable called textField that holds the value of the element, given the id value of showText. The second line says that, given that value, the text message about the counter and the counter number should be placed inside the starting and ending tags of the element with the id value of showText; that is the purpose of the innerHTML method, as you learned previously.
This script calls the setTimeout method when the page loads and again at each update. The Update function performs the update, adding one to the counter and setting the next timeout. Clicking the RESTART button sets the counter to zero and reasserts the Update function, and clicking the STOP button demonstrates the clearTimeout method. Figure 24.8 shows the display of the timeout example after the counter has been running for a while.
Displaying Dialog Boxes
The window object includes three methods that are useful for displaying messages and interacting with the user. You’ve already used them in some of your scripts. Here’s a summary:
- window.alert(message)—Displays an alert dialog box. This dialog box simply gives the user a message.
- window.confirm(message)—Displays a confirmation dialog box that displays a message and includes OK and Cancel buttons. This method returns
trueif OK is pressed andfalseif Cancel is pressed. - window.prompt(message,default)—Displays a message and prompts the user for input. It returns the text entered by the user. If the user does not enter anything, the default value is used.
When using the confirm and prompt methods, you should use a variable to receive the user’s response. For example, this statement displays a prompt and stores the text the user enters in the text variable:
text = window.prompt("Enter some text","Default value");
Note
You can usually omit the explicit reference to the window object when referring to these methods because it is the default context of a script. For example, you can use alert("text") instead of window.alert("text").
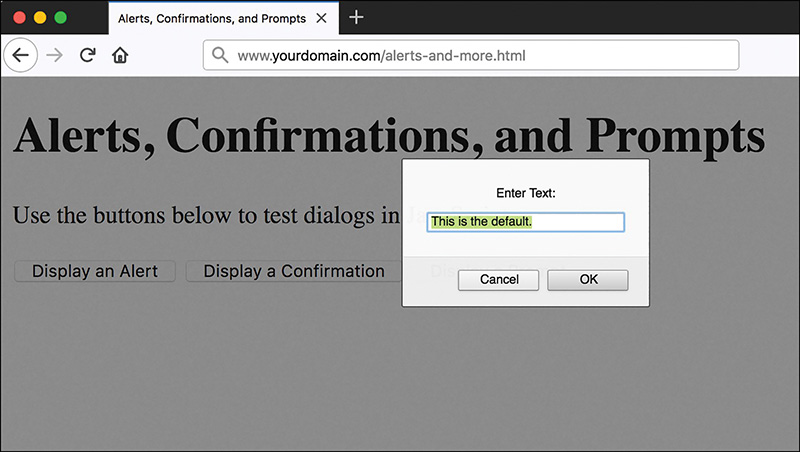
As a further illustration of these types of dialog boxes, Listing 24.8 shows an HTML document that includes buttons and event handlers to enable you to test dialog boxes.
Listing 24.8 An HTML Document That Uses JavaScript to Display Alerts, Confirmations, and Prompts
<!doctype html>
<html lang="en">
<head>
<meta charset="utf-8">
<title>Alerts, Confirmations, and Prompts</title>
<meta name="viewport"
content="width=device-width, initial-scale=1">
</head>
<body>
<h1>Alerts, Confirmations, and Prompts</h1>
<p>
Use the buttons below to test dialogs in JavaScript.
</p>
<button type="button" id="alert">
Display an Alert
</button>
<button type="button" id="confirm">
Display a Confirmation
</button>
<button type="button" id="prompt">
Display a Prompt
</button>
<script>
document.getElementById("alert").addEventListener("click",
function() {
alertVal = window.alert("This is a test alert.");
});
document.getElementById("confirm").addEventListener("click",
function() {
confirmVal = window.confirm("Would you like to confirm?");
});
document.getElementById("prompt").addEventListener("click",
function() {
promptVal = window.prompt("Enter Text:","This is the default.");
});
</script>
</body>
</html>
This document displays three buttons, and each button uses an event handler to display one of the three types of dialog boxes.
Figure 24.9 shows the Listing 24.8 script in action, with the prompt dialog box currently displayed and showing the default value.
Summary
In this lesson, you learned to use events to detect mouse actions, keyboard actions, and other events, such as the loading of the page. You can use event handlers to perform a simple JavaScript statement when an event occurs or to call a more complicated function. In learning this, you learned how to make nearly every JavaScript script you write unobtrusive. By listening for events, you can place the script last in the HTML document so that it doesn’t disrupt the loading of the rest of the page.
JavaScript includes various events. Many of them are related to forms, which you’ll learn more about in Lesson 27, “Working with Web-Based Forms.” In a longer example in this chapter, you saw how to use click to show or hide text in a page with some design elements in it. Some new CSS was introduced: the use of the cursor property. Assigning a cursor property of pointer enabled you to indicate to users that particular text or an HTML element was acting as a link even though it was not enclosed in <a></a> tags, as you are used to seeing.
In this lesson, you learned how to use the window object to work with browser windows and used its properties and methods to set timeouts and display dialog boxes. You also worked through several examples in which you put together all the pieces of the puzzle from the previous several lessons: working with the Document Object Model to change content and window display, creating new functions, and invoking those new functions through events.
Q&A
Q. Can you capture mouse or keyboard events on elements other than text, such as images?
A. Yes, these types of events can be applied to actions related to clicking on or rolling over images as well as text. However, some multimedia objects, such as embedded YouTube videos or Flash files, are not used in the same way, because those objects are played via additional software for which other mouse or keyboard actions are applicable. For instance, if a user clicks on a YouTube video that is embedded in your web page, he or she is interacting with the YouTube player and no longer your actual web page; that action cannot be captured in the same way.
Q. What happens if I define both keydown and keypress event handlers? Will they both be called when a key is pressed?
A. The keydown event handler is called first. If it returns true, the keypress event is called. Otherwise, no keypress event is generated.
Q. When a script is running in a window created by another script, how can it refer to the original window?
A. JavaScript includes the window.opener property, which lets you refer to the window that opened the current window.
Q. What are some examples of using timeouts in JavaScript? I’m not sure why I would want code to go to sleep.
A. Ideally, you want your code to execute all the time, but sometimes you need to wait for user input, or for long processes to finish, or even to ensure that users are not overloading your system by clicking on elements too often. In such cases, you can include a timeout that effectively disables certain buttons for a certain amount of time, such as to limit voting or “liking” something more than once every second.
Workshop
The Workshop contains quiz questions and activities to help you solidify your understanding of the material covered. Try to answer all questions before looking at the “Answers” section that follows.
Quiz
1. Which of the following is the correct event handler for detecting a mouse click on a link?
mouseuplinkclick
2. When does the load event handler for the <body> element execute?
When an image is finished loading
When the entire page is finished loading
When the user attempts to load another page
3. Which of the following event object properties indicates which key was pressed for a keypress event?
event.whichevent.keyCodeevent.onKeyPress
4. Which of the following methods displays a dialog box with OK and Cancel buttons and waits for a response?
window.alertwindow.confirmwindow.prompt
5. What does the window.setTimeout method do?
Executes a JavaScript statement after a delay
Locks up the browser for the specified amount of time
Sets the amount of time before the browser exits automatically
6. True or False: JavaScript can take control of a browser window and resize it, even if the script did not open it.
True
False
7. What is an anonymous function?
A function that only runs when other functions cannot.
A function with no name that is used as a default value.
A function that takes the place of other functions.
A function that has no name and doesn’t need to be used anywhere except the one location.
8. How do you write an event that happens when the user leaves the page?
window.addListener("unload", function() { });window.addEvent("unload", function() { });window.addEventListener("unload", function() { });window.addEventListener("leave", function() { });
9. What does the resizeBy method do, and what arguments does it use?
Resizes the window relative to its current size with two arguments:
numXandnumYResizes the window relative to the browser’s current size with the arguments:
numXandnumYResizes the current element using the arguments:
numXandnumYResizes the current element using the arguments:
numX,numY, andnumZ
10. What does window.self do?
A synonym for the current window object
Reloads the current window
Sends the link to the current open window
Opens the link in a new window
Note
Just a reminder for those of you reading these words in the print or e-book edition of this book: If you go to www.informit.com/register and register this book (using ISBN 9780672338083), you can receive free access to an online Web Edition that not only contains the complete text of this book but also features an interactive version of this quiz.
Answers
1. c. The event handler for a mouse click is click.
2. b. The <body> element’s load handler executes when the page and all its images are finished loading.
3. b. The event.which property stores the character code for each keypress.
4. b. The window.confirm method displays a dialog box with OK and Cancel buttons and waits for a response.
5. a. The window.setTimeout method executes a JavaScript statement after a delay.
6. b. False. Only windows created by a script can be manipulated by the script.
7. d. An anonymous function is a function that has no name and doesn’t need to be used anywhere except the one location.
8. c. These lines will do something when the user leaves the page:
window.addEventListener("unload", function() {
// add statements here
});
9. a. The window.resizeBy method resizes the window relative to its current size. It takes two arguments: numX and numY.
10. a. The window.self property is a synonym for the current window object.
Exercises
To gain more experience using event handlers and controlling windows in JavaScript, try the following exercises:
 Extend any (or all!) of the sample scripts in this lesson to check for specific values of keypress actions before continuing on to execute the underlying JavaScript statements within their associated functions.
- Add commands to the
clickattributes in Listing 24.4 such that only one of the elements—the elevation or photos—is visible at a time. - Using timeouts and JavaScript to display date and time (which you learned earlier in these lessons), create a script to display a “live” clock with hours, minutes, and seconds shown.
- Modify Listing 24.9 to do something with the results of the
window.prompt()dialog box—print the text, perform another action depending on specific text, or do something that combines the two.