
Lesson 25
JavaScript Best Practices
What You’ll Learn in This Lesson:
 Best practices for creating unobtrusive scripts
- The importance of separating content, presentation, and behavior
- The importance of following web standards to create cross-browser scripts
- How to read and display browser information
- How to use feature sensing to avoid errors
- How to support older, less compliant browser versions
- How to support non-JavaScript browsers
In this lesson, you’ll learn some guidelines for unobtrusive scripting—creating scripts and pages that are easy to maintain and easy to use and that follow web standards. Unobtrusive scripting adds features without getting in the way of the user, the developer maintaining the code, or the designer building the layout of the site. You’ll also learn how to make sure your scripts will work in multiple browsers and won’t stop working when a new browser comes along. In addition, and perhaps most importantly, these practices will help you become a better developer and a better member of the overall JavaScript developer community.
Scripting Best Practices
As you start to develop more complex scripts, it’s important to know some scripting best practices. These are guidelines for using JavaScript that more experienced programmers have learned the hard way. Here are a few of the benefits of following these best practices:
- Your code will be readable and easy to maintain, whether you’re turning the page over to someone else or just trying to remember what you did a year ago.
- You’ll create code that follows standards and won’t be crippled when a new version of a browser is released.
- You’ll create pages that work even without JavaScript.
- It will be easy to adapt code you create for one site to another site or project.
- Your users will thank you for creating a site that is easy to use and easy to fix when things go wrong.
Whether you’re writing an entire AJAX web application or simply enhancing a page with a three-line script, it’s useful to know some of the concepts that are regularly considered by those who write complex scripts for a living. The following sections introduce some of these best practices.
Avoid Overusing JavaScript
An important best practice is to avoid overusing JavaScript. This might seem counterintuitive in lessons teaching you to become a competent developer using JavaScript, but it’s true. Because HTML5 and CSS3 have matured, and so has browser support for these advanced standards, there’s now much less reason to use JavaScript for some of the enhanced interactions that required it even just a few years ago. For example, some developers spent years crafting useful JavaScript-based form validation scripts, all of which have been rendered moot by the inclusion of native HTML5 form field validation. So, as you’re thinking about what to build with JavaScript, keep the following in mind:
- Many of the visual effects that once needed to be coded in JavaScript can now be achieved perfectly well using CSS. When both approaches are possible (for example, with image rollovers, animations, and some types of menus), CSS is usually preferable. It’s well supported across browsers. In the rare case that CSS isn’t supported, the page is rendered as standard HTML, usually creating a page that’s at least perfectly functional, even if it’s not so pretty.
- Users are likely to spend a lot of their Internet time on sites other than yours. Experienced Internet users become accustomed to popular interface components such as menus, breadcrumb trails, and tabbed browsing. These elements are popular, in general, because they work well, can be made to look good, and don’t require the user to read a manual first. Familiarity with a site’s operation will likely increase a user’s productivity more than the potential benefits of your all-new JavaScript-heavy whizz-bang design. And if users are more productive, they will be happier with your site and stay longer.
- Users in many areas of the world are still using outdated, underpowered, hand-me-down computers and might also have slow and/or unreliable Internet access and old versions of web browsers. The CPU cycles taken up by unnecessary JavaScript code might be precious to them.
- In some cases you might cost yourself a degree of search engine page rank because the search engines’ spiders don’t always correctly index content that’s been generated by JavaScript or designs that require it for navigation. Plus, if the JavaScript makes the page less mobile friendly, you will definitely get penalized by search engines.
Used carefully and with forethought, JavaScript can be a great tool, but sometimes there is such a thing as too much of a good thing.
Content, Presentation, and Behavior
When you create a web page, or especially an entire site or application, you need to deal with three key areas, content, presentation, and behavior, all of which you’ve learned about in the previous lessons:
- Content consists of the words that a visitor can read on your pages. You create the content as text and mark it up with HTML to define different classes of content—headings, paragraphs, links, and so on.
- Presentation is the appearance and layout of the words, images, and other elements on each page—text formatting, fonts, colors, and graphics. This is where the power of CSS comes into play.
- Behavior is what happens when you interact with a page—items that highlight when you move over them, forms you can submit, and so on. This is where JavaScript enters into the picture for enhanced front-end interactivity, along with server-side languages such as PHP and Ruby.
It’s a good idea to keep these three areas in mind, especially as you create larger sites. It’s also a good idea to keep content, presentation, and behavior separated as much as possible. One good way to do this is to create an external CSS file for the presentation and an external JavaScript file for the behavior and link them to the HTML document.
Keeping things separated like this makes it easier to maintain a large site. If you need to change the color of the headings, for example, you can make a quick edit to the CSS file without having to look through all the HTML markup to find the right place to edit. This separation also makes it easy for you to reuse the same CSS and JavaScript on multiple pages of a site. Last but not least, this separation encourages you to use each language where its strengths lie, which ultimately makes your job easier.
Speed and Web Page Loading
JavaScript can be a huge drain on a web page because it is downloaded all by itself. The browser cannot download anything else while the script is loading. This means that if there are other page elements to download that come after the script or scripts on your page, they will not begin downloading until the scripts are done.
There are two techniques to remedy this: Use only one external JavaScript file and place the <script> tag last in the HTML. By placing the <script> tag last—right before the closing </body> tag—you ensure that the entire page will render and be visible even as the script is loading. And putting all your scripts together in one JavaScript file ensures that the browser has to make only one call to the server for those scripts. This isn’t always possible—sometimes you need to load things like libraries that are housed on other servers—but any scripts you write should all be contained in the same file as much as possible.
Graceful Degradation
Some of the earliest web browsers didn’t even support the inclusion of images in HTML. As the <img> element and other tags were introduced, it became important for those text-only browsers to present something helpful to the user whenever an unsupported tag was encountered. In the case of the <img> tag, that facility was provided by the alt attribute. Web designers could assign a string of text to alt, and text-only browsers would display that text to the user instead of showing the image. At the whim of the page designer, the alt text might be simply a title for the image, a description of what the picture would have displayed, or a suggestion for an alternative source of the information that would have been carried in the graphic.
This was an early example of graceful degradation—the process by which a user whose browser lacks the required technical features to make full use of a web page’s design (or has those features disabled) can still benefit from the site’s content.
Let’s take JavaScript itself as another example. Virtually every browser supports JavaScript, and only a small percentage of users turn it off. So, do you really need to worry about that 1% of possible visitors who don’t have JavaScript enabled? The answer is probably yes. One type of frequent visitor to your site will no doubt be the spider programs from search engines, busy indexing the pages of the Web. A spider attempts to follow all the navigation links on your pages to build a full index of your site’s content; if such navigation requires the services of JavaScript, you might find some parts of your site not being indexed. Your search ranking will probably suffer as a result.
Another important example lies in the realm of accessibility. No matter how capable a browser program is, there are some users who will access your site with other limitations, such as the inability to use a traditional mouse or the necessity to use screen-reading software. You probably want your site to be accessible to this part of your audience, and that may mean doing without all your JavaScript bells and whistles.
Many mobile devices also have limitations compared to traditional desktop computers. The obvious limitation is the small screen size. In addition, mobile devices don’t have a mouse or other pointer device, so click and hover events don’t work on them. Mobile devices are becoming an increasingly large portion of the web browsing audience, and ignoring them is a really bad idea.
Progressive Enhancement
The counterpart of graceful degradation is progressive enhancement, in which the primary development principle is to keep HTML documents as simple as possible so that they’ll definitely work in even the most primitive browsers. After you’ve tested that and made sure that the basic functionality is always available, you can dynamically add features that make the site easier to use or better looking for those with new browsers. If you add these features unobtrusively, they have little chance of preventing the site from working in its primitive HTML form.
Here are some guidelines for progressive enhancement:
- Enhance your site’s presentation by adding style rules to a separate CSS file. Try to avoid using HTML tags for presentation only, such as
<b>for boldface or<blockquote>for an indented section. - Enhance behavior by adding scripts to an external JavaScript file.
- Add events without using inline event handlers, as described later in this lesson and in Lesson 24, “Responding to Events and Using Windows.”
- Use feature sensing, described later in this lesson, to ensure that JavaScript code executes only on browsers that support the features it requires.
Adding Event Handlers
In Lesson 24, you learned that there is more than one way to set up event handlers. The simplest way is to add them directly to an HTML tag. For example, this <body> tag has an event handler that calls a function called Startup:
<body onload="Startup();">
This method works, but it does involve putting JavaScript code in the HTML page, which means you haven’t fully separated content and behavior. To keep things entirely separate, you can set up the event handler in the JavaScript file instead, like this:
window.onload=Startup;
This is an acceptable way to set up events: It keeps JavaScript out of the HTML file, and it works in all modern browsers. However, it does involve one problem: You can’t attach more than one event to the same element of a page. For example, you can’t have two different load event handlers that both execute when the page loads.
When you’re the only one writing scripts, this is no big deal; you can combine the two into one function. But when you’re trying to use two or three third-party scripts on a page, and all of them want to add a load event handler to the body, you have a problem.
The W3C Event Model
To solve this problem and standardize event handling, the W3C created an event model as part of the DOM Level 2 standard. It uses a method, addEventListener, to attach a handler to any event on any element. For example, the following uses the W3C model to set up the same load event handler as the previous examples:
window.addEventListener('load', Startup, false);
The first parameter of addEventListener is the event name, without the on prefix—load, click, mouseover, and so on. The second parameter specifies the function to handle the event, and the third is an advanced flag that indicates how multiple events should be handled (false works for most purposes).
Any number of functions can be attached to an event in this way. Because one event handler doesn’t replace another, you use a separate function, removeEventListener, which uses the same parameters:
window.removeEventListener('load', Startup, false);
One problem with the W3C model is that although Internet Explorer 9 supports it, Internet Explorer 8 does not. Instead, Internet Explorer 8 supports a proprietary method, attachEvent, that does much the same thing. Here’s the Startup event handler defined Microsoft-style:
window.attachEvent('onload', Startup);
The attachEvent method has two parameters. The first is the event, with the on prefix—onload, onclick, onmouseover, and so on. The second is the function that will handle the event. Internet Explorer also supports the detachEvent method, which has the same parameters, for removing an event handler.
Attaching Events the Cross-Browser Way
As you can see, attaching events in this new way is complex and requires different code for different browsers. In most cases, you’re better off using the traditional method to attach events, and that method is used in most of the examples in these lessons. However, if you really need to support multiple event handlers, you can use some if statements to use either the W3C method or Microsoft’s method. For example, the following code adds the ClickMe function as an event for the element with the id attribute btn:
obj = document.getElementById("btn");
if (obj.addEventListener) {
obj.addEventListener('click',ClickMe,false);
} else if (obj.attachEvent) {
obj.attachEvent('onclick',ClickMe);
} else {
obj.onclick=ClickMe;
}
This checks for the addEventListener method and uses it if it’s found. Otherwise, it checks for the attachEvent method and uses that. If neither is found, it uses the traditional method to attach the event handler. This technique, called feature sensing, is explained in detail later in this lesson.
Many universal functions are available to compensate for the lack of a consistent way to attach events. If you are using a third-party library, there’s a good chance it includes an event function that can simplify this process for you.
Note
The YUI library, like many other third-party libraries, includes an event-handling function that can attach events in any browser, attach the same event handler to many objects at once, and perform other nice functions. See https://yuilibrary.com for details, and see Lesson 26, “Using Third-Party JavaScript Libraries and Frameworks,” for information about using various other available libraries. Be aware that the YUI library is no longer being maintained, but you can still use the scripts and styles in it.
Web Standards: Avoiding Being Browser Specific
The Web was built on standards, such as the HTML standard developed by the W3C. Now there are a lot of standards involved with JavaScript—CSS, the W3C DOM, and the ECMAScript standard that defines JavaScript’s syntax.
Microsoft, the Mozilla Project, Google, and other browser developers such as Opera Software continually improve their browsers’ support for web standards, but there are always going to be some browser-specific, nonstandard features, and some parts of the newest standards won’t be consistently supported between browsers.
Although it’s perfectly fine to test your code in multiple browsers and do whatever it takes to get it working, it’s a good idea to follow the standards rather than browser-specific techniques when possible. This ensures that your code will work on future browsers that improve their standards support, whereas browser-specific features might disappear in new versions.
Note
One reason to make sure you follow standards is that your pages can be better interpreted by search engines, which often helps your site get search traffic. Separating content, presentation, and behavior is also good for search engines because they can focus on the HTML content of your site without having to skip over JavaScript or CSS.
One place you can go to find out what features are supported by which browsers and browser versions is Can I Use: www.caniuse.com. This site provides up-to-date information on both desktop and mobile browsers and what features of JavaScript, HTML, CSS, and other web technologies they support.
Handling Errors Well
No matter how good your development skills are or might become, your code will have errors. All code has errors at some point, and handling errors well is a sign of a careful developer. When your JavaScript program encounters an error of some sort, a warning or an error will be created inside the JavaScript interpreter and displayed in the JavaScript console of your web browser. Whether and how this is displayed to the user depends on the browser in use and the user’s settings; the user might see some form of error message, or the failed program might simply remain silent but inactive.
Neither situation is good for the user; he or she is likely to have no idea what has gone wrong or what to do about it. As you try to write your code to handle a wide range of browsers and circumstances, it’s possible to foresee some areas in which errors might be generated. Examples include the following:
- The uncertainty about whether a browser fully supports a certain object and whether that support is standards compliant
- Whether an independent procedure has completed its execution, such as an external file being loaded
A useful way to try to intercept potential errors and deal with them cleanly is by using the try and catch statements. The try statement enables you to attempt to run a piece of code. If the code runs without errors, all is well; however, if an error occurs, you can use the catch statement to intervene before an error message is sent to the user and determine what the program should then do about the error. The syntax looks like this:
try {
doSomething();
}
catch(identifier) {
doSomethingElse();
}
Here, identifier is an object created when an error is caught. It contains information about the error. For instance, if you wanted to alert the user to the nature of a JavaScript runtime error, you could use a code construct like this to open a dialog containing details about the error:
catch(err) {
alert(err.description);
}
Documenting Your Code
As you create more complex scripts, don’t forget to include comments in your code to document what it does, especially when some of the code seems confusing or is difficult to get working. It’s also a good idea to document all the data structures, variables, and function arguments used in a larger script.
Using comments is a good way to organize code and will help you work on the script in the future. If you’re creating websites for a living, you’ll definitely need to use comments so that others can work on your code as easily as you can. The following are some examples of how to use comments:
- Using comments as a prologue to any object or function that contains more than a few lines of simple code:
function calculateGroundAngle(x1, y1, z1, x2, y2, z2) {
/**
* Calculates the angle in radians at which
* a line between two points intersects the
* ground plane.
* @author Jane Doe [email protected]
*/
if(x1 > 0) {
.... more statements - Using inline comments wherever the code would otherwise be confusing or prone to misinterpretation:
// need to use our custom sort method for performance reasons
var finalArray = rapidSort(allNodes, byAngle) {
.... more statements - Using a comment wherever the original author can pass on specialist knowledge that the reader is unlikely to know:
// workaround for image onload bug in browser X version Y
if(!loaded(image1)) {
.... more statements - Using comments as instructions for commonly used code modifications:
// You can change the following dimensions to your preference:
var height = 400px;
Ensuring Usability
While you’re adding cool features to your site, don’t forget about usability—making things as easy, logical, and convenient as possible for users of your site. Although there are many books and websites devoted to usability information, a bit of common sense goes a long way.
For example, suppose you provide a drop-down list as the only way to navigate between pages of your site. This is a common interface element, and it works well, but do your users find it usable? Try comparing it to using a simple set of links across the top of a page, and you might find that the following is true:
- The list of links lets you see at a glance what the site contains; the drop-down list requires you to click to see the same list.
- Users expect links and can spot them quickly; a drop-down list is more likely to be part of a form than a navigation tool, and thus it won’t be the first thing users look for when they want to navigate your site.
- Navigating with a link takes a single click, whereas navigating with a drop-down list takes at least two clicks.
Remember to consider the user’s point of view whenever you add any functionality—and especially potentially intrusive JavaScript functionality—to a site. Ensure that you’re making the site easier to use—or at least not harder to use. Also make sure that the site is easy to use without JavaScript; although this might apply to only a small percentage of your users, that percentage is likely to include users of screen readers or other software packages necessary for people with visual impairments.
Ensuring Accessibility
As a developer you must consider accessibility—making your site as accessible as possible for all users, including disabled users. For example, blind users might use a text-reading program that will ignore images and most scripts on your site. Accessibility is more than just good manners; it is mandated by law in some countries.
The subject of accessibility is complex, but you can provide most what is needed by following the philosophy of progressive enhancement: Keep the HTML as simple as possible, keep JavaScript and CSS separate, and make JavaScript an enhancement rather than a requirement for using your site.
Note
Ensuring that a site functions without JavaScript is one of the first steps toward accessibility compliance. For more information on accessibility, see www.w3.org/WAI/.
Benefitting from Design Patterns
If you learn more about usability, you’ll undoubtedly see design patterns mentioned. In computer science, a design pattern is an optimal solution to a common problem. In web development, you use design patterns to design and implement part of a site that you run into over and over.
For example, if you have a site that displays multiple pages of data, you’ll have Next Page and Previous Page links, and perhaps numeric links for each page. This is a common design pattern—a problem many web designers have had to solve, and one with a generally agreed-on solution. Other common web design patterns include a login form, a search engine, and a list of navigation links for a site.
Of course, you can be completely original and make a search engine, a shopping cart, or a login form that looks nothing like any other, but unless you have a way of making them even easier to use, you’re better off following the pattern and giving your users an experience that matches their expectations.
Although you can find some common design patterns just by browsing sites similar to yours and noticing how they have solved particular problems, there are also sites that specialize in documenting these patterns, and they’re a good place to find ideas on how to make your site work.
Note
Google Developers offers a number of tools web designers can use to create more effective sites. For a bunch of responsive design patterns, visit https://developers.google.com/web/fundamentals/design-and-ux/responsive/patterns.
Reusing Code Where You Can
Now that you have all this JavaScript code sitting around, remember that the more you can modularize your code and make it reusable, the better. Take a look at this function:
function getElementArea() {
var high = document.getElementById("id1").style.height;
var wide = document.getElementById("id1").style.width;
return high * wide;
}
This function attempts to return the area of screen covered by a particular HTML element. Unfortunately, it can work only with an element that has an id with the value id1, which is really not very helpful at all: It eliminates the possibility for you to use this code anywhere else, and if you want to do something similar, you’re going to have to duplicate around 98% of this function elsewhere.
Collecting your code into modules such as functions and objects that you can use and reuse throughout your code is a process known as abstraction. You can give the preceding function a higher level of abstraction to make its use more general by passing as an argument the id of the element to which the operation should be applied:
function getElementArea(elementId) {
var element = document.getElementById(elementId);
var high = element.style.height;
var wide = element.style.width;
return parseInt(high) * parseInt(wide);
}
You can now call this function into action for any element that has an id, by passing the value of id as a parameter when the function is called:
var area1 = getElementArea("id1");
var area2 = getElementArea("id2");
Reading Browser Information
In Lesson 21, “Working with the Document Object Model (DOM),” you learned about the various objects (such as window and document) that represent portions of the browser window and the current web document. JavaScript also includes an object called navigator that you can use to read information about the user’s browser. Knowing more about the browser can help your scripts determine whether to use certain elements of JavaScript—for example, if your script can tell that an older browser like Internet Explorer 8 is in use, it might try to implement code written specifically for that browser rather than generic code that might fail.
The navigator object isn’t part of the DOM, so you can refer to it directly. It includes several properties, each of which tells you something about the browser:
- navigator.appCodeName—Specifies the browser’s internal code name, such as
Mozilla. You should be aware that all modern browsers will returnMozillafor this property, regardless of whether they are a Mozilla-based browser or not. - navigator.appName—Specifies the browser’s name, such as
FirefoxorMicrosoft Edge. - navigator.appVersion—Specifies the version of the browser being used—for example,
5.0 (Windows). - navigator.userAgent—Specifies the user agent header, a string that the browser sends to the web server when requesting a web page. It includes all of the version information—for example,
Mozilla/5.0 (Macintosh; Intel Mac OS X 10.13; rv:59.0) Gecko/20100101 Firefox/59.0. - navigator.language—Specifies the language (such as English or Spanish) of the browser. This is stored as a code, such as
en-USfor U.S. English. - navigator.platform—Specifies the computer platform of the current browser. This is a short string, such as
Linux i686,Win32, andMacIntel. You can use this to enable any platform-specific features—for example, ActiveX components for Internet Explorer on Windows machines.
Note
The navigator object is named after Netscape Navigator, the browser that originally supported JavaScript. Fortunately, this object is also supported by all modern browsers, despite its name.
Many other properties of the navigator object can be useful. You can learn more about the navigator object at https://developer.mozilla.org/en-US/docs/Web/API/Navigator.
Displaying Browser Information
As an example of how to read the navigator object’s properties, Listing 25.1 shows a script that displays a list of the properties and their values for the current browser.
Listing 25.1 A Script to Display Information About the Browser
<!doctype html>
<html lang="en">
<head>
<meta charset="utf-8">
<title>Browser Information</title>
<meta name="viewport"
content="width=device-width, initial-scale=1">
</head>
<body>
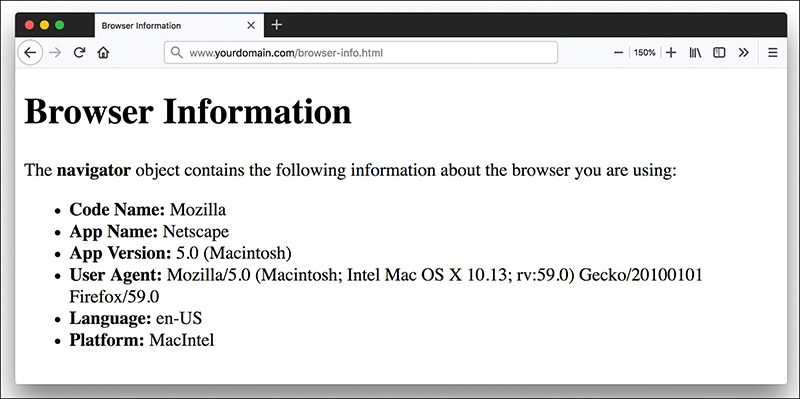
<h1>Browser Information</h1>
<p>
The <strong>navigator</strong> object contains the
following information about the browser you are using:
</p>
<ul id="info"></ul>
<script>
var txt = "";
txt += "<li><strong>Code Name:</strong> "+ navigator.appCodeName;
txt += "<li><strong>App Name:</strong> "+ navigator.appName;
txt += "<li><strong>App Version:</strong> "+ navigator.appVersion;
txt += "<li><strong>User Agent:</strong> "+ navigator.userAgent;
txt += "<li><strong>Language:</strong> "+ navigator.language;
txt += "<li><strong>Platform:</strong> "+ navigator.platform;
document.getElementById("info").innerHTML = txt;
</script>
</body>
</html>
This script is wrapped inside a basic HTML document. JavaScript is used to display each of the properties of the navigator object with the innerHTML property of the element with the id info.
To try this script, load it into the browser of your choice. If you have more than one browser or browser version handy, try it in each one. Firefox’s display of the script is shown in Figure 25.1.
Dealing with Dishonest Browsers
If you tried the browser information script in Listing 25.1 using certain versions of Internet Explorer, you probably got a surprise. Figure 25.2 shows how Internet Explorer 6.0 displays the script.
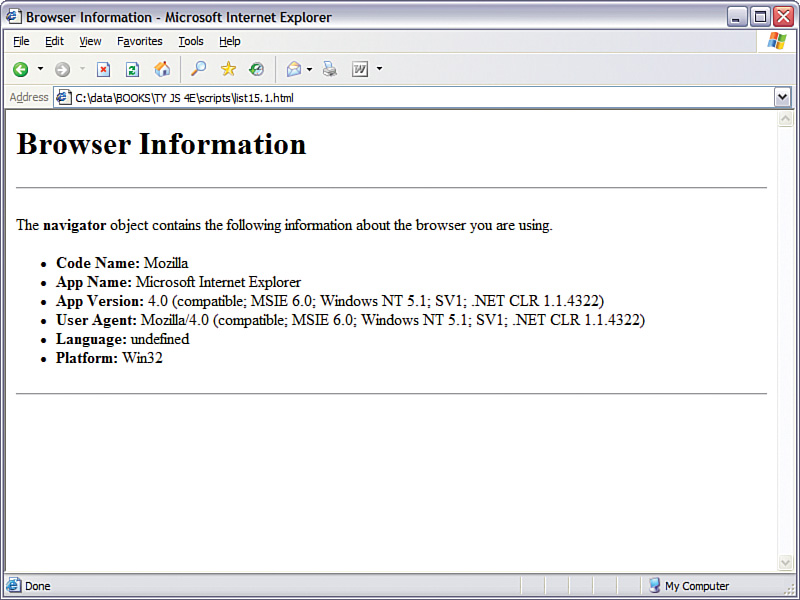
There are several unexpected things about this display. First, the navigator.language property is listed as undefined. This isn’t much of a surprise because this property isn’t supported by Internet Explorer.
More importantly, notice that the word Mozilla appears in the Code Name and User Agent fields. The full user agent string reads as follows:
Mozilla/4.0 (compatible; MSIE 6.0; Windows 98)
Believe it or not, Microsoft did have a good reason for this. At the height of the browser wars, about the time Netscape 3.0 and Internet Explorer 3.0 came out, it was becoming common to see “Netscape only” pages. Some webmasters who used features such as frames and JavaScript set their servers to turn away browsers without Mozilla in their user agent string. The problem with this was that most of these features were also supported by Internet Explorer.
Microsoft solved this problem in Internet Explorer 4.0 by making Internet Explorer’s user agent read Mozilla, with the word compatible in parentheses. This allowed Internet Explorer users to view those pages and still included enough details to tell web servers which browser was in use.
You’ve probably already noticed the other problem with Internet Explorer 6.0’s user agent string: the portion reading Mozilla/4.0. Not only is Internet Explorer claiming to be Netscape, but it’s also masquerading as version 4.0. Why?
As it turns out, this was another effort by Microsoft to stay one step ahead of the browser wars, although this one doesn’t make quite as much sense. Because poorly written scripts were checking specifically for “Mozilla/4” for dynamic HTML pages, Microsoft was concerned that its 5.0 version would fail to run these pages. Because changing it later on would only create more confusion, this tradition continued with Internet Explorer 6.0.
These are two interesting episodes in the annals of the browser wars, but what does all this mean to you? Well, you’ll need to be careful when your scripts are trying to differentiate between Internet Explorer and Netscape and between different versions. You’ll need to check for specific combinations instead of merely checking the navigator.appVersion value. Fortunately, there’s a better way to handle this situation, as you’ll learn in the next section.
Cross-Browser Scripting
If all the details about detecting different browser versions seem confusing, here’s some good news: In most cases, you can write cross-browser scripts without referring to the navigator object at all. This is not only easier but better because browser-checking code is often confused by new browser versions and has to be updated each time a new browser is released.
Feature Sensing
Checking browser versions is sometimes called browser sensing. A better way of dealing with multiple browsers is called feature sensing. In feature sensing, rather than check for a specific browser, you check for a specific feature. For example, suppose your script needs to use the document.getElementById function. You can begin a script with an if statement that checks for the existence of this function:
if (document.getElementById) {
// do stuff
}
If the getElementById function exists, the block of code between the brackets is executed. Another common way to use feature sensing is at the beginning of a function that makes use of a feature:
function changeText() {
if (!document.getElementById) return;
// the rest of the function executes if the feature is supported
}
Note
The getElementById method is widely supported by all modern browsers. You need to set up feature sensing for it only if your scripts are breaking and you’ve investigated every other possibility.
You don’t need to check for every feature before you use it—for example, there’s not much point in verifying that the window object exists in most cases. You can also assume that the existence of one feature means others are supported: If getElementById is supported, chances are the rest of the W3C DOM functions are supported.
Feature sensing is a very reliable method of keeping your JavaScript unobtrusive: If a browser supports the feature, it works, and if the browser doesn’t, your script stays out of the way. It’s also much easier than trying to keep track of hundreds of different browser versions and what they support.
Note
Feature sensing is also handy when you’re working with third-party libraries, as discussed in Lesson 26. You can check for the existence of an object or a function belonging to a library to verify that the library file has been loaded before your script uses its features.
Dealing with Browser Quirks
So if feature sensing is better than browser sensing, why do you still need to know about the navigator object? There’s one situation in which it still comes in handy, although if you’re lucky you won’t find yourself in that situation.
As you develop a complex script and test it in multiple browsers, you might run across a situation in which your perfectly standard code works as it should in one browser and fails to work in another. Assuming that you’ve eliminated the possibility of a problem with your script, you’ve probably run into a browser bug or a difference in features between browsers at the very least. Here are some tips for this situation:
- Double-check for a bug in your own code.
- If the problem is that a feature is missing in one browser, use feature sensing to check for that feature.
- When all else fails, use the
navigatorobject to detect a particular browser and substitute some code that works in that browser. This should be your last resort.
Note
Peter-Paul Koch’s QuirksMode, at www.quirksmode.org, is a good place to start when you’re looking for specific information about browser bugs.
Supporting Non-JavaScript-Enabled Browsers
Some visitors to your site will be using browsers that don’t support JavaScript at all. As hinted a few times in this lesson, these aren’t just a few holdouts using ancient browsers. Actually, there are more non-JavaScript browsers than you might think:
- Most modern browsers, such as Safari, Firefox, and Chrome, include an option to turn off JavaScript, and some users do so. More often, the browser might have been set up by the user’s ISP or employer with JavaScript turned off by default, usually in a misguided attempt to increase security.
- Some corporate firewalls and personal antivirus software block JavaScript.
- Some ad-blocking software mistakenly prevents scripts from working even if they aren’t related to advertising.
- Some older mobile phones support little to no JavaScript.
- Some visually impaired users use special-purpose browsers or text-only browsers that do not support JavaScript.
As you can see, it would be foolish to assume that all your visitors will support JavaScript even though 99% of traffic is through JavaScript-enabled devices. Two techniques you can use to make sure these users can still use your site are discussed in the following sections.
Note
Search engines are another “browser” that will visit your site frequently, and they usually don’t pay any attention to JavaScript. If you want search engines to fully index your site, it’s critical that you avoid making JavaScript a requirement to navigate the site.
Using the <noscript>
<noscript>One way to be friendly to non-JavaScript browsers is to use the <noscript> tag. Supported in all modern browsers, this tag displays a message to non-JavaScript browsers. Browsers that support JavaScript ignore the text between the <noscript> tags, whereas others display it. Here is a simple example:
<noscript>
This page requires JavaScript. You can either switch to a browser
that supports JavaScript, turn your browser's script support on,
or switch to the <a href="nojs.html">Non-JavaScript</a> version of
this page.
</noscript>
Some older browsers don’t support <noscript>. An alternative to using <noscript> is to send users with JavaScript support to another page. This can be accomplished with a single JavaScript statement:
<script>
window.location="JavaScript.html";
</script>
This script redirects the user to a different page. If the browser doesn’t support JavaScript, of course, the script won’t be executed, and the rest of the page can display a warning message to explain the situation. This is a pretty drastic option, so you should avoid using it unless you absolutely have to.
Keeping JavaScript Optional
Although you can detect JavaScript browsers and display a message to non-JavaScript-enabled browsers, the best choice is to simply make your scripts unobtrusive. This means using JavaScript to enhance rather than as an essential feature: If you keep JavaScript in separate files and assign event handlers in the JavaScript file rather than in the HTML, browsers that don’t support JavaScript will simply ignore your script.
In rare cases when you absolutely need JavaScript—for example, with a JavaScript game—you can warn users that JavaScript is required. However, it’s a good idea to offer an alternative, JavaScript-free, way to use your site, especially if it’s an e-commerce or business site that your business relies on. Don’t turn away customers by succumbing to lazy programming.
One place you should definitely not require JavaScript is in the navigation of your site. Although you can create drop-down menus and other fancy navigation tools using JavaScript, they prevent users’ non-JavaScript browsers from viewing all of your site’s pages. They also prevent search engines from viewing the entire site, which compromises your chances of getting search traffic.
Note
Google’s Gmail application (https://mail.google.com), requires JavaScript for its elegant interface. However, Google offers a Basic HTML View that can be used without JavaScript. This enables Google to support older browsers and mobile phones without compromising the user experience for those with modern browsers.
Avoiding Errors
If you’ve made sure that JavaScript is only an enhancement to your site, rather than a requirement, those with browsers that don’t support JavaScript for whatever reason will still be able to navigate your site. One last thing to worry about: It’s possible for JavaScript to cause an error or confuse these browsers into displaying your page incorrectly. This is a particular concern with browsers that partially support JavaScript, such as older mobile phone browsers. They might interpret a <script> tag and start the script but might not support the full JavaScript language or DOM.
Here are some guidelines for avoiding errors:
- Use a separate JavaScript file for each script. This is the best way to guarantee that a browser will ignore a script completely if it does not have JavaScript support.
- Use feature sensing whenever your script tries to use the newer DOM features.
- Test your pages with your browser’s JavaScript support turned off. Make sure nothing looks strange and make sure you can still navigate the site.
Note
The developer’s toolbars for Firefox and Chrome include a convenient way to turn off JavaScript for testing.
Creating an Unobtrusive Script
As an example of unobtrusive scripting, you can create a script that adds functionality to a page with JavaScript without compromising its performance in older browsers—in this case, a script that creates graphic check boxes as an alternative to regular check boxes.
Let’s start with the final result: Figure 25.3 shows this example as it appears in Chrome. The first check box is an ordinary HTML one, and the second is a graphic check box managed by JavaScript.
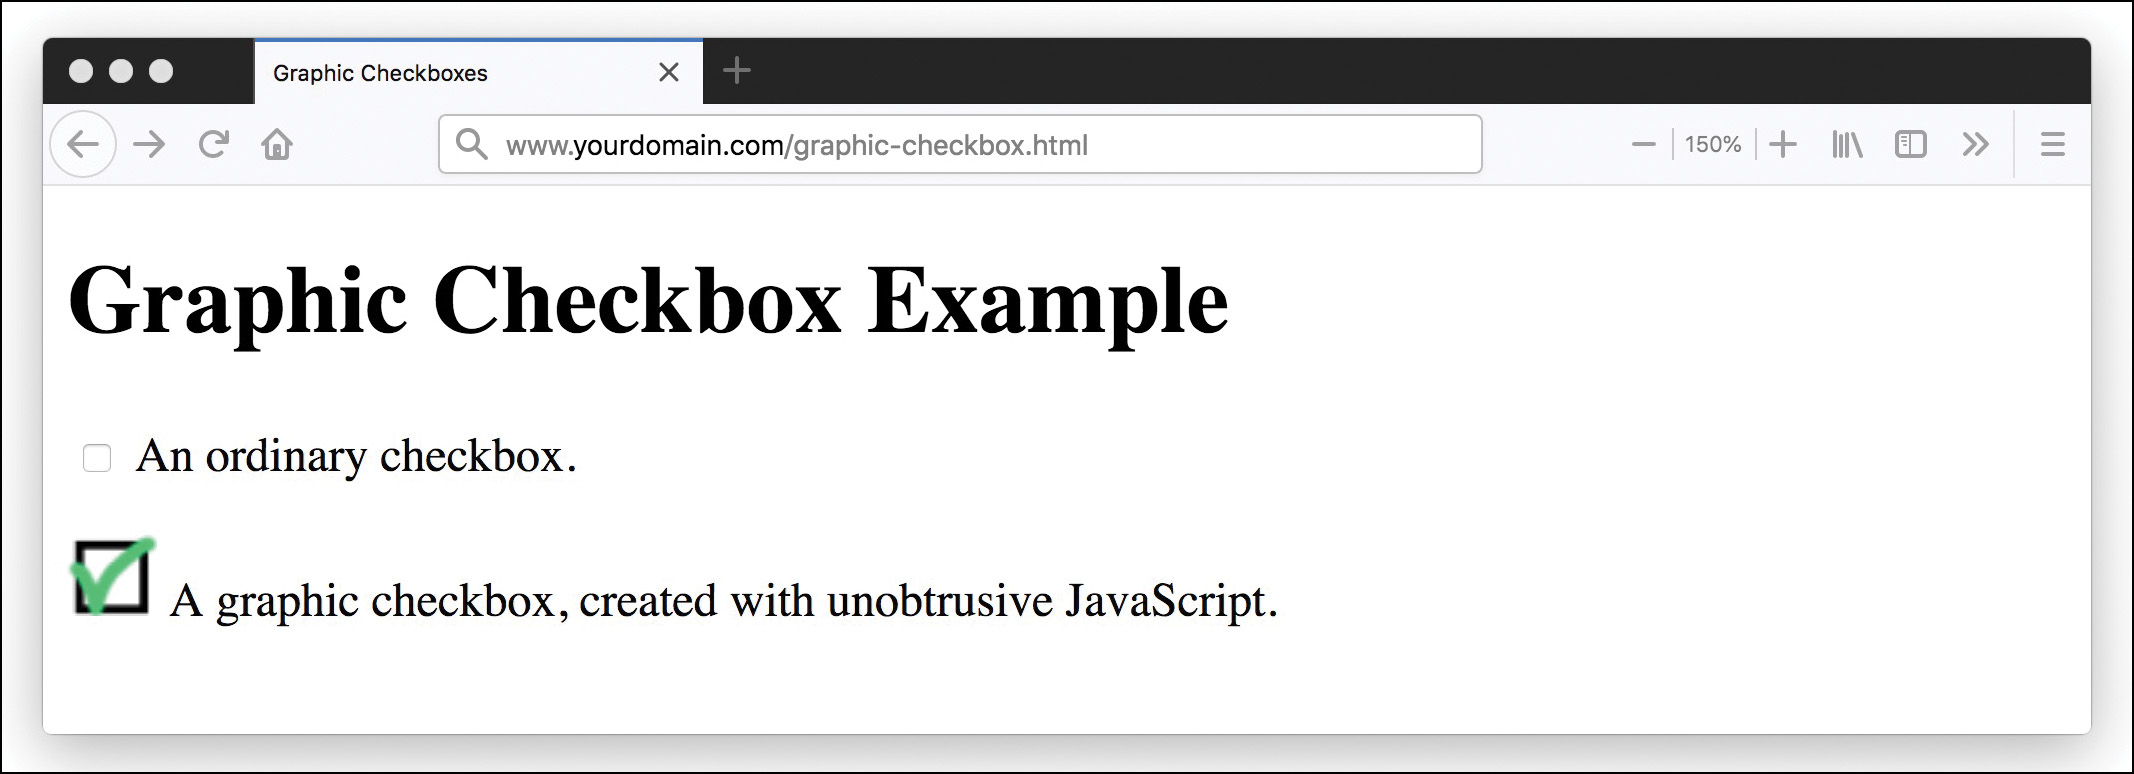
The graphic check box is just a larger graphic that you can click on to display the checked or unchecked version of the graphic. Although this could just be a simple JavaScript simulation that acts like a check box, the implementation here is a bit more sophisticated. Take a look at the HTML for this example in Listing 25.2.
Listing 25.2 The HTML File for the Graphic Check Box Example
<!doctype html>
<html lang="en">
<head>
<meta charset="utf-8">
<title>Graphic Checkboxes</title>
<meta name="viewport"
content="width=device-width, initial-scale=1">
</head>
<body>
<h1>Graphic Checkbox Example</h1>
<form name="form1">
<p>
<input type="checkbox"name="check1"id="check1">
An ordinary checkbox.
</p>
<p>
<input type="checkbox"name="check2"id="check2">
A graphic checkbox, created with unobtrusive JavaScript.
</p>
</form>
<script src="checkbox.js"></script>
</body>
</html>
If you look closely at the HTML, you’ll see that the two check boxes are defined in exactly the same way, using a standard <input> element. Rather than substitute for a check box, this script actually replaces the regular check box with the graphic version. The script for this example is shown in Listing 25.3.
Listing 25.3 The JavaScript File for the Graphic Check Box Example
function graphicBox(box) {
// be unobtrusive
if (!document.getElementById) return;
// find the object and its parent
obj = document.getElementById(box);
parentobj = obj.parentNode;
// hide the regular checkbox
obj.style.display = "none";
// create the image element and set its onclick event
img = document.createElement("img");
img.addEventListener("click", Toggle);
img.src = "images/unchecked.png";
// save the checkbox id within the image ID
img.id = "img"+ box;
// display the graphic checkbox
parentobj.insertBefore(img,obj);
}
function Toggle(e) {
if (!e) var e=window.event;
// find the image ID
img = (e.target) ? e.target : e.srcElement;
// find the checkbox by removing "img"from the image ID
checkid = img.id.substring(3);
checkbox = document.getElementById(checkid);
// "click"the checkbox
checkbox.click();
// display the right image for the clicked or unclicked state
if (checkbox.checked) {
file = "images/checked.png";
} else {
file="images/unchecked.png";
}
img.src=file;
}
// replace the second checkbox with a graphic
graphicBox("check2");
This script has three main components:
- The
graphicBoxfunction converts a regular check box to a graphic one. It starts by hiding the existing check box by changing itsstyle.displayproperty and then creates a new image node containing theunchecked.pnggraphic and inserts it into the DOM next to the original check box. It gives the image anidattribute containing the textimgplus the check box’sidattribute to make it easier to find the check box later. - The
Togglefunction is specified bygraphicBoxas the event handler for the new image’sclickevent. This function removes the textimgfrom the image’sidattribute to find theidof the real check box. It executes theclickmethod on the check box, toggling its value. Finally, it changes the image tounchecked.giforchecked.gif, depending on the state of the real check box. - The last line of the script file runs the
graphicBoxfunction to replace the second check box with theidattributecheck2.
Using this technique has three important advantages. First, it’s an unobtrusive script, in that the HTML has been kept simple, and browsers that don’t support JavaScript will simply display the ordinary check box. Second, because the real check box is still on the page but hidden, it will work correctly when the form is submitted to a server-side script. Last but not least, you can use it to create any number of graphic check boxes simply by defining regular ones in the HTML file and adding a call to graphicBox to transform each one.
To try this example, save the JavaScript file as checkbox.js and ensure that the HTML file is in the same folder. You also need to have two graphics the same size, unchecked.gif and checked.gif, in the same folder.
Summary
In this lesson, you learned many guidelines for creating scripts that work in as many browsers as possible and learned how to avoid errors and headaches when working with different browsers. Most importantly, you learned how you can use JavaScript while keeping your pages small, efficient, and valid by using web standards.
Q&A
Q. Is it possible to create 100% unobtrusive JavaScript that can enhance a page without causing any trouble for anyone?
A. Not quite. For example, the unobtrusive script in the last section of this lesson is close: It will work in the latest browsers, and the regular check box will display and work fine in even ancient browsers. However, it can still fail if someone with a modern browser has images turned off: The script will hide the check box because JavaScript is supported, but the image won’t be there. This is a rare circumstance, but it’s an example of how any feature you add can potentially cause a problem for some small percentage of your users.
Q. Can I detect the user’s email address by using the navigator object or another technique?
A. No. There is no reliable way to detect users’ email addresses by using JavaScript. (If there were, you would get hundreds of advertisements in your mailbox every day from companies that detected your address as you browsed their pages.)
Workshop
The Workshop contains quiz questions and activities to help you solidify your understanding of the material covered. Try to answer all questions before looking at the “Answers” section that follows.
Quiz
1. Which of the following is the best place to put JavaScript code?
In an HTML file
In a JavaScript file
In a CSS file
2. Which of the following is something you can’t do with JavaScript?
Send browsers that don’t support a feature to a different page
Send users of Internet Explorer to a different page
Send users of non-JavaScript browsers to a different page
3. What is the term for modularization of code into reusable blocks for more general use?
Abstraction
Inheritance
Unobtrusive JavaScript
4. Where is the best place to call a script in your HTML?
In the
<head>elementAt the top of the
<body>elementAt the bottom of the
<body>elementIt doesn’t matter where you call your scripts
5. If you can either build something as a script or with CSS or HTML, which is the better choice?
HTML first then add CSS
HTML alone
JavaScript
There is no difference
6. Which is better: graceful degradation or progressive enhancement?
Graceful degradation
Progressive enhancement
Use both
Use neither
7. Why is attaching events like this: window.onload=start; less effective than using event listeners?
These events are slower than event listeners.
You can add only one event to the element, which can get in the way if other libraries need to attach events too.
Not all browsers can understand event listeners.
It’s not less effective. This is how you should attach events.
8. Is doing browser detection with the navigator object a good idea?
Yes, it is very effective.
No. It’s too slow to be effective.
No. Some modern browsers don’t support it.
No. Browsers all send the same value.
9. What is a better way to solve the cross-browser scripting problem than using the navigator object?
Feature detection
Method detection
Object detection
There is no better way
10. Why should you test your pages with JavaScript turned off?
Because many customers don’t use JavaScript
Because mobile browsers don’t use JavaScript
To ensure JavaScript isn’t required
You don’t need to do this.
Note
Just a reminder for those of you reading these words in the print or e-book edition of this book: If you go to www.informit.com/register and register this book (using ISBN 9780672338083), you can receive free access to an online Web Edition that not only contains the complete text of this book but also features an interactive version of this quiz.
Answers
1. b. The best place for JavaScript is in a separate JavaScript file.
2. c. You can’t use JavaScript to send users of non-JavaScript browsers to a different page because the script won’t be executed at all.
3. a. Abstraction.
4. c. You should place all scripts last in the HTML document to ensure that the page is fully loaded before the scripts start.
5. a. You should try to create as much as possible with basic HTML and then use CSS. JavaScript should be a last resort.
6. c. People who use the Mobile First technique would claim that progressive enhancement is better, but both progressive enhancement and graceful degradation make your web pages more usable, so you should use both where it makes sense.
7. b. You can add only one event to the element, and if you’re using multiple third-party scripts along with your own, this will become a problem.
8. d. This is not a good idea because while all modern browsers support the navigator object, they support the object by returning the same value (“Mozilla”), regardless of the browser being used.
9. a. A better way to deal with multiple browsers is to do feature detection. If a feature doesn’t work on the browser, the script will fail gracefully, and the user will be left with the fallback option or with just HTML and CSS.
10. c. You should test your pages with JavaScript turned off to ensure that the pages don’t require JavaScript to work.
Exercises
 Add several check boxes to the HTML document in Listing 25.2 and add the corresponding function calls to the script in Listing 25.3 to replace all of those check boxes with graphic check boxes.
- Modify the script in Listing 25.3 to convert all check boxes with a
classvalue ofgraphicinto graphic check boxes. You can usegetElementsByTagNameand then check each item for the rightclassNameproperty. You can also usegetElementsByClassNameand then step through the array, as you learned to do in Lesson 23, “Controlling Flow with Conditions and Loops.”