
Creating an Android App
Android apps are ordinary Java programs that use an application framework, a core set of classes and files that all apps have in common. The framework embodies a set of rules for how apps must be structured in order to run properly on Android devices.
To get started writing apps, you must install and configure the Android SDK, the Eclipse IDE, and the Android Plug-in for Eclipse.
If this is your first experience with Android programming, you can find out how to acquire and set up these tools in Appendix D, “Setting Up an Android Development Environment.”
Go ahead and do that. I’ll wait for you here and catch up with some friends on Facebook.
Done? Good.
The first project you undertake is to write a SalutonMondo app, a modest program that displays a single line of text on the screen of an Android device.
1. Run the Eclipse IDE, which looks and acts a lot like NetBeans.
2. Choose File, New, Android Project. The New Android Project Wizard opens, as shown in Figure 24.1.
Figure 24.1. Creating a new Android project in Eclipse.
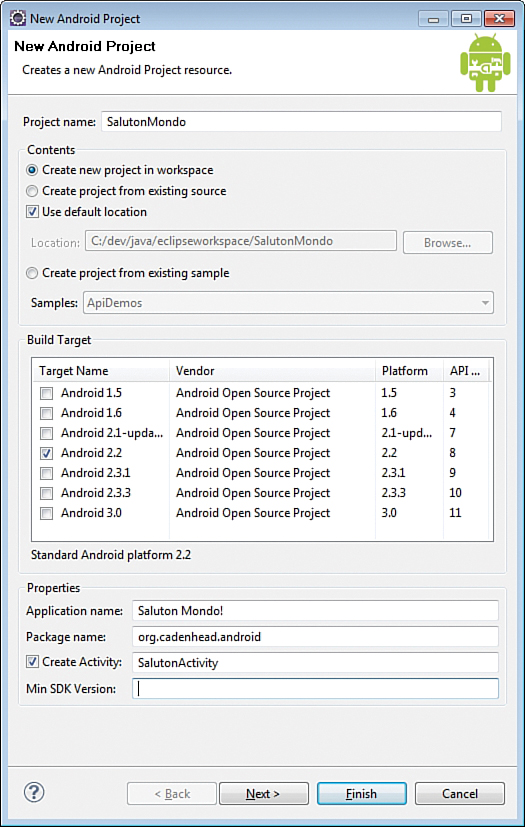
3. In the Project Name field, enter SalutonMondo.
4. In the Contents section, click Create New Project in Workspace.
5. The Use Default Location checkbox determines where the project is stored. If you’re happy with the default, keep this selected. Otherwise, deselect the checkbox, click the Browse button, and choose the folder where the project is stored.
6. Every Android project requires a build target. The target represents the oldest version of Android that can run your app. Because each new Android release has enhanced features, your target choice determines which features you can use.
For a simple app like this one, an early target is OK. Choose Android 2.2.
7. In the Application name field, give the app the name Saluton Mondo!. This name will be displayed on Android devices.
8. The Package name field should contain the name of the Java package to which the classes of this app belong. Enter org.cadenhead.android.
9. The Create Activity checkbox indicates whether the new app will be created with an Activity class. An activity is a task the app can accomplish. Keep this checkbox selected and enter SalutonActivity in the adjacent text field.
10. Click Finish. The new app is created and a SalutonMondo item appears in the Package Explorer pane.
Exploring a New Android Project
A new Android project consists of around 20 files and folders that always are organized the same way in an Android app. There might be more files you add depending on the capabilities of the app, but these starting files and folders always must be present.
Figure 24.2 shows the Eclipse Package Explorer after a new Android project has been created.
Figure 24.2. Viewing the parts of an Android project.

You can use the folder to explore the file and folder structure of the project. The new SalutonMondo app starts out with the following components:
• /src folder—The root folder for the app’s Java source code.
• /src/org.cadenhead.android/SalutonActivity.java—The class for the activity that launches by default when the app is run.
• /gen folder—The folder for generated Java source code you do not edit manually.
• /gen/org.cadenhead.android/R.java—The automatically generated resource management source code for the app. (Never edit this!)
• /assets—The folder for file resources that will not be compiled into the app.
• /res—The folder for application resources such as strings, numbers, layout files, graphics and animation. There are subfolders for specific resource types: layout, values, drawable-hdpi, drawable-ldpi, and drawable-mdpi. These folders contain five resource files: three versions of icon.png, main.xml and strings.xml.
• AndroidManifest.xml—The app’s primary configuration file.
• default.properties—A build file generated by the Android Plug-in that you should not edit.
• proguard.cfg—A configuration file for ProGuard, a tool that optimizes an app and makes the source code harder for others to decompile.
These files and folders form the application framework. The first thing you undertake as an Android programmer is to learn how to modify the framework so you can discover what each component can accomplish.
There are additional files that are added to the framework to suit specific purposes.
Creating an App
Although you haven’t done anything to it yet, you could successfully run the new Android project. The framework functions as a working app.
Because there’s no fun in that, you customize the SalutonMondo app to offer the traditional computer programming greeting “Saluton Mondo!”
In Hour 2, “Writing Your First Program,” you displayed the text “Saluton Mondo!” as a string by calling the method System.out.println().
Android apps display strings that have been stored first in a resource file called strings.xml. You can find this file in the /res/values folder.
Use the Package Explorer to navigate to this folder. Double-click strings.xml. A Resources editor opens, as shown in Figure 24.3.
Figure 24.3. Editing an Android app’s string resources.
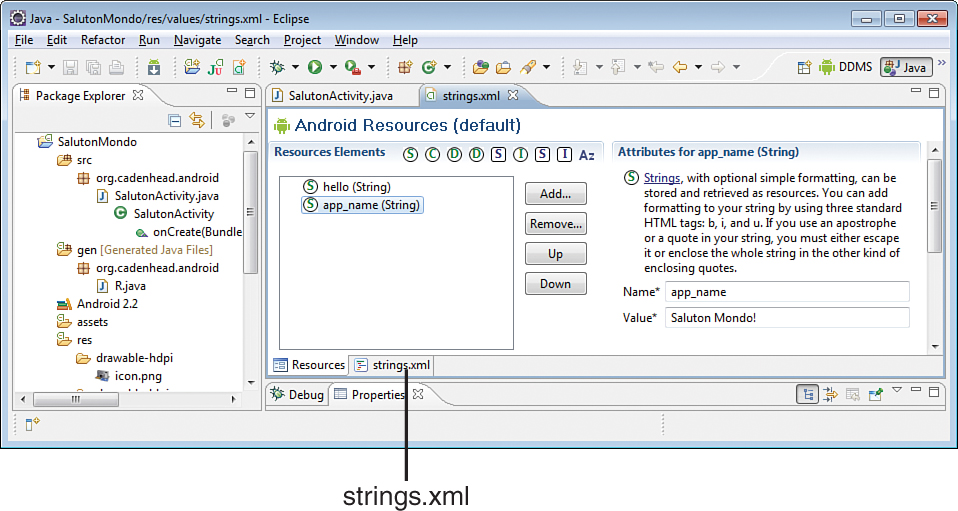
Strings and other resources are given a name and a value, just like a variable in Java. There are two string resources listed in the Resources elements pane: hello and app_name.
The names of resources follow three rules:
• They must be all lowercase.
• They must have no spaces.
• They must use only the underscore character (“_”) as punctuation.
Click a string in the Resources elements pane. Name and Value text fields appear along with some guidance on how to edit strings (which also is shown in Figure 24.3).
The app_name string resource was something you chose when running the New Android Project Wizard. The name should match what you gave it earlier, but you can make changes at any time by editing this string.
The hello string contains text to display on the app’s main (and only) screen when it is run. Click the name of this string to bring it up for editing.
In the Value field, enter Saluton Mondo!.
Resources are stored in XML files. The Resources editor is a simple XML editor. You also can directly edit the XML itself. Click the strings.xml tab at the bottom of the editor to load this file for direct editing. (Refer to Figure 24.3 where this tab is identified.)
Although you can edit XML directly, don’t. There’s usually no need to do it when creating resources for an Android app. The exception is when the Eclipse editor doesn’t support something you want to do in defining a resource. This isn’t the case with strings, so it’s better to stick to the Resources editor. You’re more likely to make errors editing the XML files directly.
Here’s what strings.xml looks like at the moment:
<?xml version="1.0" encoding="utf-8"?>
<resources>
<string name="hello">Saluton Mondo!</string>
<string name="app_name">Saluton Mondo!</string>
</resources>
This editor allows everything in the XML file to be edited, even the markup tags. The string element contains a name attribute that identifies the name of the resource. The value is enclosed within the tag as character data.
To go back to the Resources editor, click the Resources tab. Click the Save button in the Eclipse toolbar to save your change to the file strings.xml.
With that modification, you’re almost ready to run the app.
Setting Up an Android Emulator
Before you can build an Android app, you must set its debugging environment. This can be handled within Eclipse. You must set up an Android Virtual Device (AVD) that can run the app on your desktop as an emulator. You also must create the project’s debug configuration. When you’re done, you can build the app and run it in the emulator.
To configure an Android Virtual Device, first click the green Android icon with a down arrow in the Eclipse toolbar, which is shown in Figure 24.4.
Figure 24.4. Configuring an Android Virtual Device.
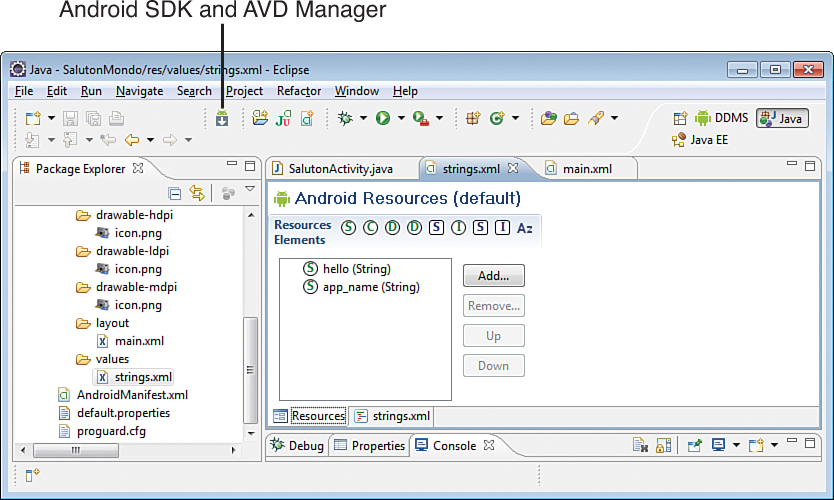
This launches the Android SDK and AVD Manager, one of the tools in the Android SDK. Click the Virtual Devices item in the left pane. The emulators that you’ve created are listed to the right. The manager is shown in Figure 24.5.
Figure 24.5. Creating a new Android emulator.
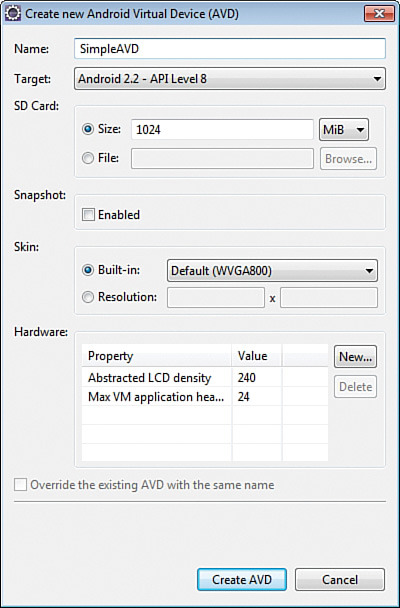
To add a new emulator, click New and follow these steps:
1. In the Name field, give it the name SimpleAVD.
2. In the Target field, you must choose a target version of Android from the drop-down menu. Choose Android 2.2 - API Level 8.
3. In the Size field, choose a size for the fake SD card. Enter 1024 and choose MiB from the associated drop-down for an SD card that’s 1024MB in size. You must have this much available space on your computer, so choose smaller if you’d prefer not to take up that much space. The minimum size is 9MB.
4. Click Create AVD. The new emulator is created, which might take a little while (no longer than a minute, generally).
You can create as many emulators as you need. They can be customized for different versions of Android and different kinds of displays.
Close the Android SDK and AVD Manager to return to the main Eclipse interface.
Creating a Debug Configuration
The last thing required before you can launch the SalutonMondo app is to create a debug configuration in Eclipse. Follow these steps:
1. Choose Run, Debug Configurations. The Debug Configurations window opens.
2. In the left pane, double-click the Android Application item (shown in Figure 24.6). A new entry called New_configuration is created as its subitem. The right pane displays some configuration options for the new item.
Figure 24.6. Creating an Android debug configuration.
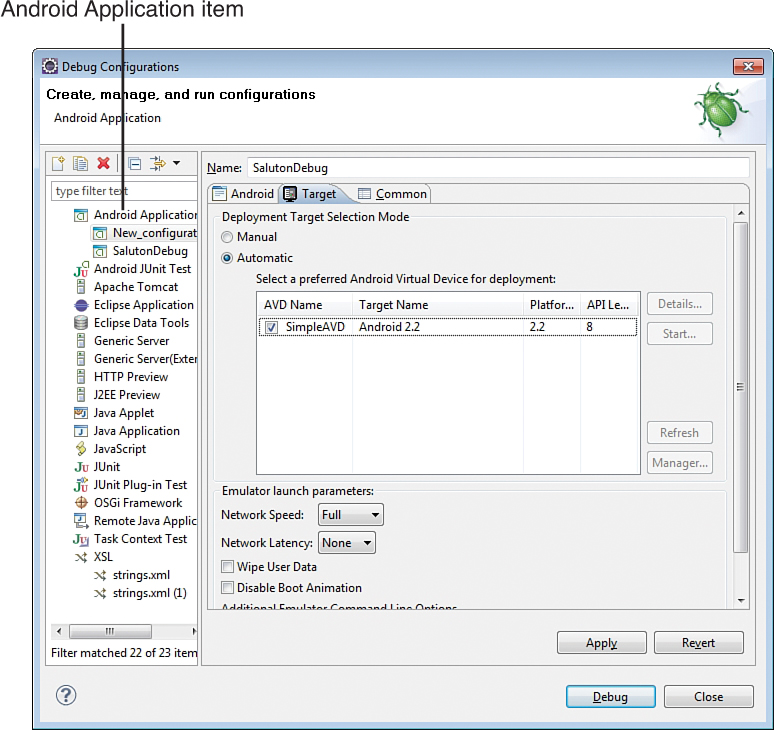
3. In the right pane, in the Name field, change it to SalutonDebug.
4. Click the Browse button. The Project Selection dialog opens.
5. Choose the project SalutonMondo and click OK.
6. Click the Target tab.
7. Under Deployment Target Selection Mode, choose Automatic (if it isn’t already chosen). A table enables you to select a target AVD.
8. In the table, select the checkbox for the SimpleAVD emulator.
9. Click Apply to save your changes and then click Close.