
Designing a Real App
Android apps can exploit all the device’s functionality, such as SMS messaging, location-based services, and touch input. In this book’s final programming project, you create a real app called Take Me To Your Leader.
This app takes advantage of an Android phone’s capabilities to make a phone call, visit a website, and load a location in Google Maps. The app puts you in touch with the White House via phone, Web, and maps. (If the president of the United States is not your leader, the app can be customized.)
To get started, you create a new project in Eclipse by performing these steps:
1. Click File, New, Android Project. The New Android Project Wizard opens.
2. In the Project Name field, enter Leader.
3. Make sure Create New Project in Workspace is selected.
4. Choose the Build Target Android 2.2.
5. In the Application Name field, enter Take Me To Your Leader.
6. In the Package Name field, enter org.cadenhead.android.
7. Make sure Create Activity is selected, and enter LeaderActivity in the adjacent text field. The wizard should resemble Figure 24.9.
Figure 24.9. Creating a new Android project.
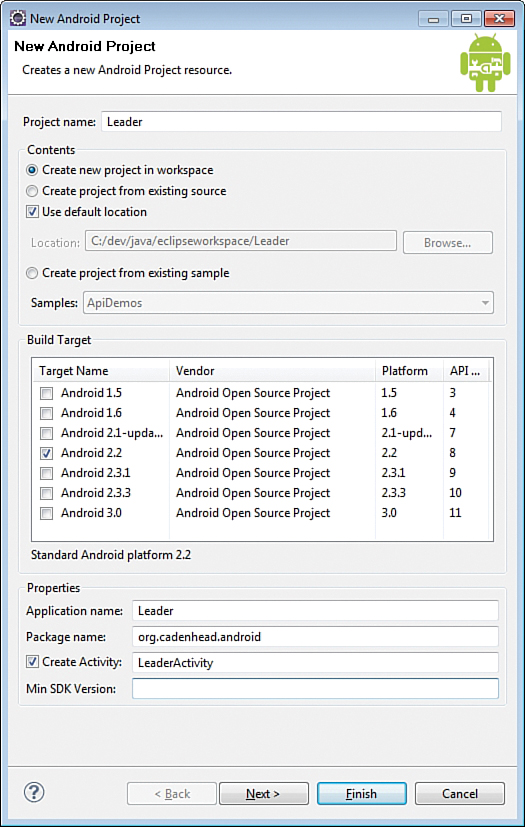
8. Click Finish.
This project covers a lot of ground. As you work through it, you’ll find it handy to keep a browser open to the Android Developer site’s reference section at http://developer.android.com/reference. You can search for the Java classes in the Android class library and the filenames of the files in the project to learn more.
The project appears in the Eclipse Package Explorer, as does the SalutonMondo project. To avoid confusion, you should close SalutonMondo before proceeding. Right-click SalutonMondo in the Package Explorer, and then choose Close Project from the pop-up menu.
Organizing Resources
Creating an Android app requires Java programming, but a lot of the work is done in the Eclipse interface. When you are fully versed in the capabilities of the Android SDK, you can accomplish a great deal without writing a single line of Java code.
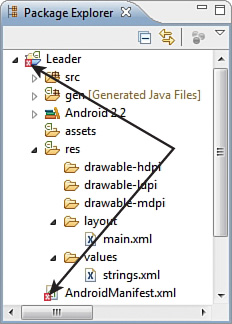
One thing you do without programming is create resources that will be used by the app. Every new Android project starts out with several folders where resources are placed. To see these folders, expand the Leader folder in the Package Explorer, and then expand the /res folder and all of its subfolders (as shown in Figure 24.10).
Figure 24.10. Examining an app’s resource folders.

Resources consist of graphics in the PNG, JPG, or GIF format, strings stored in a file called strings.xml, user interface layout files in XML format, and other files you can create. Two you add often to projects are colors.xml for colors used in the app and dimens.xml for dimensional measurements that set text size and other things that are displayed.
The /res folder of a new project contains folders called drawable-hdpi, drawable-mdpi, and drawable-lpdi that have three different versions of icon.png, the app’s icon. The icon is the small graphic used to launch the app.
The three versions of icon.png are the same graphic sized for high-resolution, medium-resolution, and low-resolution displays. You won’t be using these icons, so it’s OK to delete them: Click one of the icon.png files in Package Explorer, and then press the Delete key. You’ll be asked to confirm each deletion.
Deleting these files causes two red X’s to appear in Package Explorer: One over AndroidManifest.xml and another over the top-level Leader item (which are identified in Figure 24.11). These X’s indicate that the app now has errors that will prevent it from being compiled and run.
Figure 24.11. Detecting and fixing errors in the app.
The errors cropped up because the app now lacks an icon. A new graphics file, appicon.png, will be added to the project and designated as its icon in the file AndroidManifest.xml, the app’s main configuration file.
This book’s website contains appicon.png and four other graphics files needed by this app: browser.png, maps.png, phone.png, and whitehouse.png. Visit www.java24hours.com and go to the Hour 24 page for this edition of the book. Download all five files and save them in a temporary folder on your computer.
Android’s support for multiple resolutions is handy, but it’s not necessary here. Instead of using the existing drawable folders, a new one will be created by following these steps:
1. Click the /res folder in Package Explorer to select it.
2. Choose File, New, Folder. The New Folder dialog opens.
3. Enter drawable in the Folder Name field.
4. Click Finish.
A new folder will be created inside /res called drawable. All the graphics needed by the app can be stored here without consideration of their resolution.
Resources are identified in an app using an ID formed from their filename with the extension removed. appicon.png has the ID appicon, browser.png has the ID browser, and so on. No two resources can have the same ID (with the exception of the same graphic being stored at different resolutions in the three drawable-*dpi folders, because they count as a single resource).
If two resources have the same name without the extension, such as appicon.png and appicon.gif, Eclipse will flag the error and the app won’t compile.
Resources also must have names that contain only lowercase letters, numbers, underscores (_), and periods (.). The files in this project follow these rules.
Files can be added to resources using drag and drop. Open the temporary folder containing the five files, select them, and drag them to the drawable folder in Package Explorer.
Now that the project has a new icon, you can set it as the app’s icon and get rid of the errors noted in Package Explorer. This will be handled by editing AndroidManifest.xml.
Configuring the App’s Manifest File
The primary configuration tool in an Android app is a file called AndroidManifest.xml in the main app folder. All XML files utilized by an app can be edited manually or by using the built-in editor in Eclipse. The latter is easier and less error prone. Unless you’re extremely comfortable editing XML, you should stick to the editor until you’ve gained more experience as an Android programmer.
To choose the proper icon for the app, do the following:
1. Double-click AndroidManifest.xml in Package Explorer. The file opens for editing in the main Eclipse window using the built-in editor.
2. Several tabs run along the bottom edge of the editor. Click the Application tab to see settings related to the app (see Figure 24.12).
Figure 24.12. Editing the app’s AndroidManifest.xml file.
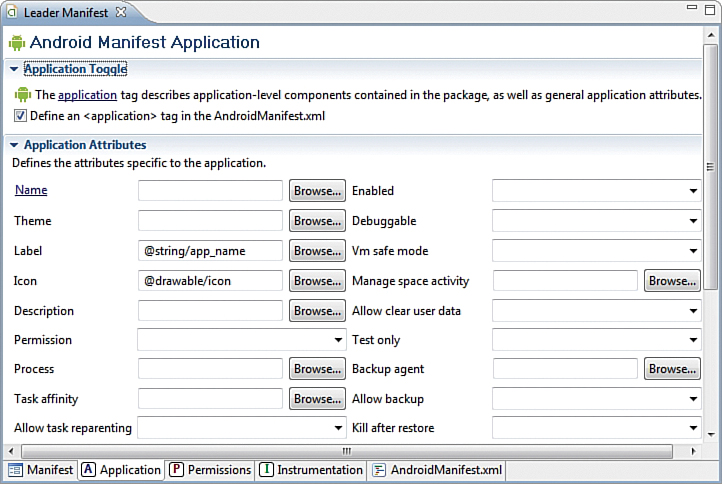
3. The Icon field identifies the app’s icon, which currently has the incorrect value @drawable/icon. Click the Browse button next to this field. A Resource Chooser dialog appears listing the five “drawable” resources contained in the app.
4. Choose appicon and click OK. The Icon field now has the correct value.
5. Save the file: Click the Save button in the main Eclipse toolbar or choose File, Save.
The red X’s disappear from the Package Explorer, indicating that the app now has a properly designated icon.
Designing a User Interface
An app’s graphical user interface consists of layouts, which are containers that hold widgets such as text fields, buttons, graphics, and custom widgets of your own design. Each screen displayed to a user can have one layout or multiple layouts within each other. There are layouts to stack components vertically or horizontally, organize them in a table, and other arrangements.
An app can be as simple as a single screen or contain multiple screens. A game could be organized into these screens:
• A splash screen that displays as the game is loading
• A main menu screen with buttons to view the other screens
• A help screen explaining how to play
• A scores screen that lists the highest player scores
• A credits screen naming the game’s developers
• A game screen for actual play
The Leader app consists of a single screen, which holds buttons for contacting the president of the United States or a leader to be named later.
All of an app’s screens are kept in the /res/layout folder. A new project has a main.xml file in this folder that’s already designated as the screen to display when the app loads.
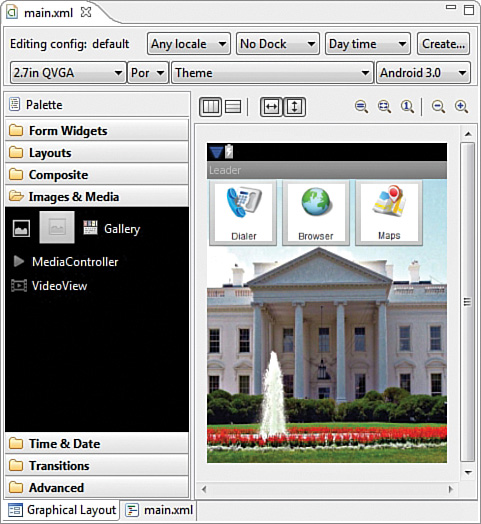
To begin editing this screen’s layout, double-click main.xml in Package Explorer. The screen opens in the main Eclipse window, as shown in Figure 24.13.
Figure 24.13. Editing the app’s AndroidManifest.xml file.
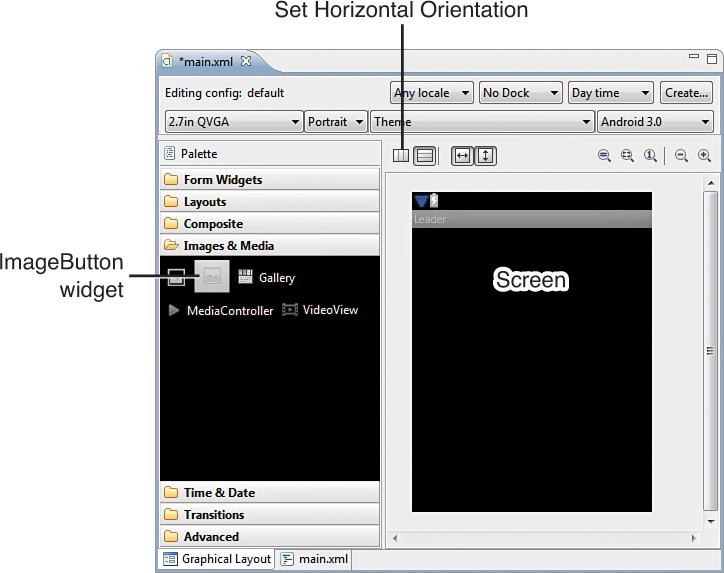
The editing window includes a Palette pane with several folders that can be expanded. The Form Widgets subpane, which is likely to be expanded, displays some simple widgets that can be dragged and dropped onto the screen at right.
Follow these steps to add three graphical buttons to the screen:
1. Delete the textview widget that displays the “Hello World” text. Click this widget on the screen and press Delete.
2. Double-click the Images & Media folder in the Palette pane. The subpane expands.
3. Drag an ImageButton widget from the Palette to the screen. A narrow blue box appears on the screen and an error message appears below the screen. The error is flagged because the button lacks an image—don’t worry about it.
4. Drag two more ImageButton widgets to the screen. They will be stacked vertically.
5. An Outline pane lists the widgets on the screen. Select the imageButton1 item. The properties of the button open in the Properties pane (see Figure 24.14).
Figure 24.14. Customizing a widget’s properties.
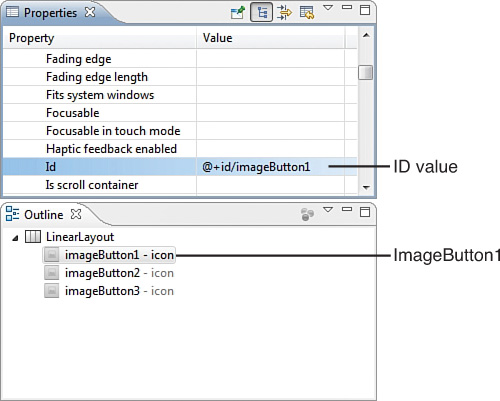
6. Scroll down the Properties pane until you see an ID property. Its value currently is set to @+id/imageButton1. Change this to @+id/phonebutton.
7. Scroll down to the Src property, which currently equals drawable/icon. Click this value. An ellipse (...) button appears.
8. Click the ... button. A Reference Chooser dialog opens.
9. Expand the Drawable heading to see a list of the app’s graphics, which are the resources you added earlier. Choose phone and click OK. The button now has a graphic of a phone.
10. In the On Click property, enter the value processClicks. (This is explained in the next section.)
11. Repeat steps 5–10 for imageButton2, giving it the ID @+id/webbutton and the Src drawable/browser.
12. Repeat steps 5–10 for imageButton3, giving it the ID @+id/mapbutton and the Src drawable/maps.
13. Click the Set Horizontal Orientation button above the screen (refer to Figure 24.13). The buttons now are lined up side by side.
14. Click the LinearLayout item in the Outline. The properties for the screen appear in the Properties pane.
15. Click the value for Background, and then click the ... button. The Reference Chooser opens.
16. Expand Drawable, choose whitehouse, and click OK. A graphic of the White House becomes the screen’s background.
17. Click the Save button.
The finished screen appears in Figure 24.15.
Figure 24.15. Previewing an app’s graphical user interface.
Writing Java Code
At this point you’ve done the bulk of the work on the new app, but you haven’t written a single line of Java code. App development is easier when you utilize as many capabilities of the Android SDK as possible without resorting to programming.
Apps are organized into Activities, which represent things an app can do. Each Activity is defined by its own Java class. When you created this app, you specified that an Activity named LeaderActivity should be created. A class matching this name runs automatically when the app is loaded.
The source code for LeaderActivity.java can be found in Package Explorer in the /src/org.cadenhead.android folder. Double-click this file to edit it.
When you start, the class has the code in Listing 24.1.
Listing 24.1. The Starting Text of LeaderActivity.java
1: package org.cadenhead.android;
2:
3: import android.app.Activity;
4: import android.os.Bundle;
5:
6: public class LeaderActivity extends Activity {
7: /** Called when the activity is first created. */
8: @Override
9: public void onCreate(Bundle savedInstanceState) {
10: super.onCreate(savedInstanceState);
11: setContentView(R.layout.main);
12: }
13: }
Like all Activities, the LeaderActivity class is a subclass of Activity in the android.app package, which contains the behavior necessary to display a screen, collect user input, save user preferences, and so on.
You can open the R.java file for editing in the /res/gen/org.cadenhead.android folder to learn more about why the main resource is referred to as R.layout.main. The R class is generated automatically by the Android SDK to enable resources to be referenced by their IDs. You never should edit this class yourself.
The onCreate() method defined in lines 9–12 is called when the class is loaded. The first thing the method does is use super() to call the same method in its superclass. Next, it calls setContentView(), a method that selects the screen that will be displayed. The argument to this method is an instance variable, R.layout.main, that refers to the file main.xml in /res/layout. As you may recall, the ID of a resource is its filename without the extension.
The first thing you must do in the LeaderActivity class is give it a class variable. Add the following statement right below the class definition:
public static final String TAG = "Leader";
This variable serves as an identifier for the class, which you use to log events that occur as it runs. Android classes can log their activities to let you know what’s happening in the app. Here’s one of the log statements you will add later:
Log.i(TAG, "Making call");
This statement displays a log message tagged with the name “Leader.”
The Log class in the android.util package displays messages in the log. This class has five different methods to log messages, each of which indicates what type of message it is, such as a warning, debugging message, or error. The i() method is for info messages—information that explains what’s going on in the app.
The first argument to Log.i() identifies the app and the second contains the message.
When you designed the app’s user interface earlier, you set the On Click property of each button to processClicks. This indicated that a method called processClicks() would be called when a user clicked a widget on the screen. Now it’s time to implement that method. Add these statements to LeaderActivity below the onCreate() method:
public void processClicks(View display) {
Intent action;
int id = display.getId();
}
This method is called with one argument, a View object from the android.view package. A View is a visual display of some kind in an app. In this case, it’s the screen containing the Dialer, Browser, and Maps buttons.
The View object’s getId() method returns the ID of the button that was clicked: phonebutton, webbutton, or mapbutton.
This ID is stored in the id variable so it can be used in a switch statement to take action based on the click:
switch (id) {
case (R.id.phonebutton):
// ...
break;
case (R.id.webbutton):
// ...
break;
case (R.id.mapbutton):
// ...
break;
default:
break;
}
This code will take one of three actions, using the integer of each ID as the conditional in the switch. The first statement in the processClicks() method creates a variable to hold an Intent object, a class in Android’s android.content package:
Intent action;
Intents in Android are how Activities tell another Activity what to do. They’re also the way an app communicates with the Android device.
Here are the three Intents employed in this method:
action = new Intent(Intent.ACTION_DIAL, Uri.parse("tel:202-456-1111"));
action = new Intent(Intent.ACTION_VIEW, Uri.parse("http://whitehouse.gov"));
action = new Intent(Intent.ACTION_VIEW, Uri.parse("geo:0,0?q=White House, Washington, DC"));
The Intent() constructor takes two arguments:
• The action to take, represented by one of its class variables
• The data associated with the action
These three Intents tell the Android device to set up an outgoing phone call to the White House public phone line at (202) 456-1111, visit the website http://whitehouse.gov, and load Google Maps with the partial address “White House, Washington, DC,” respectively.
After you have created an Intent, the following statement makes it do something:
startActivity(action);
The full text of the LeaderActivity class is in Listing 24.2. Add the import statements in lines 3–8 and the processClicks() method to what you already have entered. Make sure your code matches the entire listing.
Listing 24.2. The Full Text of LeaderActivity.java
1: package org.cadenhead.android;
2:
3: import android.app.Activity;
4: import android.content.Intent;
5: import android.net.Uri;
6: import android.os.Bundle;
7: import android.util.Log;
8: import android.view.View;
9:
10: public class LeaderActivity extends Activity {
11: public static final String TAG = "Leader";
12:
13: /** Called when the activity is first created. */
14: @Override
15: public void onCreate(Bundle savedInstanceState) {
16: super.onCreate(savedInstanceState);
17: setContentView(R.layout.main);
18: }
19:
20: public void processClicks(View display) {
21: Intent action;
22: int id = display.getId();
23: switch (id) {
24: case (R.id.phonebutton):
25: Log.i(TAG, "Making call");
26: action = new Intent(Intent.ACTION_DIAL,
27: Uri.parse("tel:202-456-1111"));
28: startActivity(action);
29: break;
30: case (R.id.webbutton):
31: Log.i(TAG, "Loading browser");
32: action = new Intent(Intent.ACTION_VIEW,
33: Uri.parse("http://whitehouse.gov"));
34: startActivity(action);
35: break;
36: case (R.id.mapbutton):
37: Log.i(TAG, "Loading map");
38: action = new Intent(Intent.ACTION_VIEW,
39: Uri.parse("geo:0,0?q=White House, Washington, DC"));
40: startActivity(action);
41: break;
42: default:
43: break;
44: }
45: }
46: }
Save the file when you’re done. It should compile successfully (something Eclipse does automatically)—if not, the familiar red X’s appear in the Package Explorer, identifying the files in the project where the errors were found.
When there are no errors, you’re almost ready to run the app.
You must create a new debug configuration for the project first:
1. Click the arrow next to the Debug button in the main Eclipse toolbar, then choose Debug Configurations. The Debug Configurations dialog opens.
2. Double-click Android Application in the left pane. A new configuration called New_configuration (1) is created.
3. Enter LeaderDebug as the Name.
4. Click the Browse button, choose the project Leader, and click OK.
5. Click the Target tab to bring it to the front.
6. With Automatic selected as the Deployment Target Selection Mode, select the SimpleAVD Android virtual device.
7. Change Deployment Target Selection Mode to Manual, click Apply, and then click Close.
A new debug configuration called LeaderDebug is created.
To run the app, click the arrow next to the Debug button and choose LeaderDebug (if it is present). If not, choose Debug Configurations, choose LeaderDebug, and click Debug. The Android Device Chooser opens. Select Launch a New Android Virtual Device, select SimpleAVD, and click OK.
The emulator loads over the next few minutes, then automatically runs the app.
An emulator does not emulate everything an Android device can do. The Leader app’s Dialer and Browser buttons should work properly, but you might encounter problems with Maps.
The app also can be run on an Android phone, if you have one working with the Android SDK and the phone has been set to debugging mode. Click the arrow next to Debug and choose LeaderDebug, which definitely should be present this time. Select Choose a Running Android Device, select your phone in the list, and then click OK.
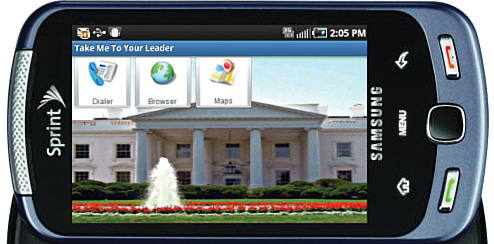
Figure 24.16 shows the app running on my phone. When the phone is shifted from portrait mode to landscape mode, the app shifts accordingly. (The figure also shows that I have 141 new voicemail messages. I probably should check those.)
Figure 24.16. Take me to your leader!
As you might have surmised, there’s a lot more to Android programming than can be covered in a single hour, even by an author of such remarkable experience, enormous talent, and unsurpassed humility as myself. Sams offers another book that takes the Java programming you’ve learned here and extends it with another 24 hours of Android-specific coverage: Sams Teach Yourself Android Application Development, 2nd Edition, by Lauren Darcey and Shane Conder (ISBN 978-0-13-278686-7). This hour was written to be fully compatible with how Darcey and Conder cover Android.
The Leader app also has been added to the phone’s applications with its own “Take Me to Your Leader” icon. It will stay on the phone even after you disconnect the USB cable.
Congratulations! The world now has one billion and one Android apps.
Summary
The goal of Sams Teach Yourself Java in 24 Hours has been to help you become comfortable with the concepts of programming and confident in your ability to write your own applications, whether they run on a desktop computer, web page, web server, or even a phone. Java has an approach that is somewhat difficult to master. (Feel free to scratch out the word “somewhat” in the previous sentence if it’s a gross misstatement of the truth.)
As you build experience in Java, you’re building experience that grows increasingly relevant, because concepts such as object-oriented programming, virtual machines, and secure environments are on the leading edge of software development.
If you haven’t already, you should check out the appendixes for additional useful information.
At the conclusion of this hour, you can explore Java in several different places. Programmers are discussing the language on the weblogs at http://weblogs.java.net. Numerous Java job openings are displayed in the database of employment websites such as http://www.careerbuilder.com. There’s also a website for this book at http://www.java24hours.com where you can send email to the author and read answers to reader questions, clarifications to the book, and (gulp) corrections.
One way to continue building your skills as a Java programmer is to read Sams Teach Yourself Java in 21 Days. I wrote that book also, and it expands on the subjects covered here and introduces new ones, such as JDBC, Java servlets, and network programming.
There’s also more coverage of Android.
If you didn’t skip ahead and have just completed all 24 hours, kudos. Please use your newfound programming skills to get a good job and rebuild the world economy.
Q&A
Q. Why is Eclipse used to create Android apps instead of NetBeans?
A. You can use NetBeans to develop apps, but it’s a more cumbersome and less well-supported IDE for Android programming. Eclipse has been designated by Google as the preferred Android IDE. The official documentation and tutorials on the Android Developer site at http://developer.android.com all use Eclipse.
Most programming books for Android also employ Eclipse. Although there’s a learning curve required to switch from NetBeans to Eclipse when you dive into Android, after you master the basics of writing, debugging, and deploying an app, you should find Eclipse easier to use because it’s so much better supported by programmers and technical writers.
Q. How does ProGuard make it harder for an app’s source code to be decompiled?
A. Java class files are susceptible to being reverse engineered, which is the process of taking executable code and figuring out the source code that was used to create it. Because the designers of Android apps might not want other developers to copy their source code in their own apps, ProGuard is available in every Android project you create.
ProGuard optimizes an app by removing unused code from its class files when they’re compiled. ProGuard also obfuscates code by changing the names of classes, fields, and methods to something meaningless and obscure. That way, even if someone decompiles the Java code, the source code is a lot harder to figure out.
The obfuscation feature only is applied when an app is built in release mode. Doing it earlier than that would make debugging much more difficult.
Q. Why do so many movies have the same exact sound of a man screaming in anguish?
A. That sound’s the Wilhelm scream, a sound effect that was heard first in the 1951 movie Distant Drums. It turns up most often when somebody falls from a great height, is shot by a gun, or knocked back by an explosion. Two famous uses are in the original Star Wars, when a stormtrooper is shot by Luke Skywalker and falls off a ledge, and in the animated movie Toy Story when Sheriff Woody knocks Buzz Lightyear out the window.
The sound was popularized by movie sound designer Ben Burtt, who found it in a Warner Brothers stock library when developing sound for Star Wars and included it in every Steven Spielberg and George Lucas movie he worked on. It has since become a tradition among sound designers and can be heard in more than 140 movies.
The voice actor who screamed is believed to be Sheb Wooley, an actor and singer who recorded the 1958 novelty song “Purple People Eater.”
The name Wilhelm comes from the third movie to use the sound effect. In the 1953 film The Charge at Feather River, Private Wilhelm yells in anguish as he’s shot by an Indian’s arrow.
Workshop
If you would like to dial up the knowledge you’ve just acquired in Android development, answer the following questions.
Quiz
1. Which of the following companies was not part of the Open Handset Initiative, the group that championed Android?
A. Google
B. Apple
C. Motorola
2. What tool makes it harder for developers to snoop on a Java program’s source code?
A. A decompiler
B. A recompiler
C. An obfuscator
3. Which of the following tasks can an Android emulator not perform?
A. Receiving an SMS message
B. Connecting to the Internet
C. Making a phone call
Answers
1. B. Apple, because Android was created in part as an open source, non-proprietary alternative to the Apple iPhone.
2. C. Trips off the tongue, doesn’t it? Say obfuscator five times fast.
3. C. Emulators can’t do everything an actual device can do, so they’re only part of the testing process for apps.
Activities
To make your Android knowledge go for longer distance, undertake the following activities:
• Change the text of the SalutonMondo app to “Hello, Android” and run the app in the emulator and on an Android device (if one is available to you).
• Create a new version of Take Me To Your Leader for a different world leader, customizing the phone, Web, and map destinations.
To see Java programs that implement these activities, visit the book’s website at www.java24hours.com.