
HOUR 8
Creating and Using Views and Folders
What You’ll Learn in This Hour
![]() Creating and naming a new field
Creating and naming a new field
![]() Creating views using the new field’s different values
Creating views using the new field’s different values
![]() Creating folders even though you should not use them
Creating folders even though you should not use them
To present the contents of a list or library to a user, you can use a view. Views are typically used for document libraries to divide the presentation of the library’s contents into subsections or to list them in a particular order.
A folder is the equivalent of a directory in the file system. You can add documents to a folder contained within a document library rather than to the document library’s main storage level.
Creating a Suitable Column for a View
Later in this hour, we create views. To do that, we need to have a column/field in the document library that we can use when creating those views. So in this section, we create a column called Company and populate it with the name of computer companies. This enables us to later create, for instance, a view where only IBM documents are listed for the user.
Follow these steps to create a column for a view:
1. Go to http://spf1 (or the TCP-IP address you are using) and select The Book Documents.
2. Select Library > List Settings. In the Column section of the page, select Create Column. Figure 8.1 appears.
FIGURE 8.1 Creating the Column page
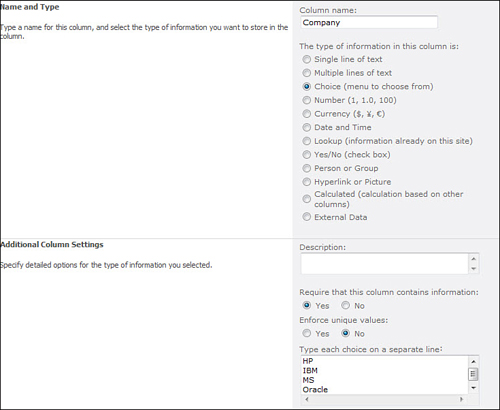
3. You have many different options for The Type of Information in This Column Is section.
It would be swamping you with too much information to go through all the options, so here are the ones I use most often on my sites:
![]() Single Line of Text
Single Line of Text
![]() Choice (which enables you to specify the possible contents of this field/column)
Choice (which enables you to specify the possible contents of this field/column)
![]() Date and Time (using the Date Only option for that column)
Date and Time (using the Date Only option for that column)
![]() Yes/No
Yes/No
4. We have the option to Add to Default View. Here, we leave it in.
5. Click OK. That takes us back to the Library Settings page, which is often useful because typically you add several columns before moving on to doing something else. Here, as we are only adding a single column, going back to this page is a minor nuisance.
6. Click The Book Documents at the top of the page (above the section of the page shown in Figure 8.1) in the breadcrumbs. Figure 8.2 displays.
FIGURE 8.2 No values in the column we just added
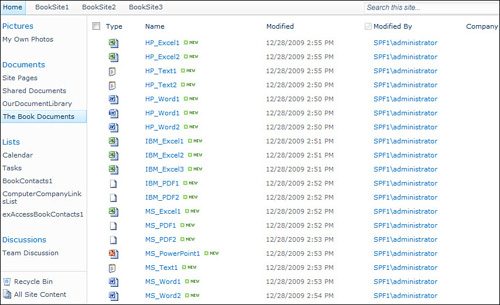
Can you spot the issue in Figure 8.2? We want to add a value in the Company column for each row in the list, and we don’t seem to be able to.
Here’s what seems to be a list of our present options:
![]() We can click the icon in the Type column to open the document.
We can click the icon in the Type column to open the document.
![]() We can click the field name (which is in the Title column) to open the document.
We can click the field name (which is in the Title column) to open the document.
Neither the icon nor the field name enables us to add a value to the Company column. However, as the next section shows, there are actually other less apparent options on that page.
Three Editing Solutions for a View
You have three ways of creating such a view. All three are detailed next.
Editing a View with a Drop-Down
One solution, which is editing a view with a drop-down, requires no changes to the list shown in Figure 8.2. To use this solution, follow these steps:
1. If you move your cursor to the first row under the Name column and then carefully move the cursor beyond the text, you see a box with an arrow at the end of it (see Figure 8.3). (In earlier versions of SharePoint, this worked only if your browser was Internet Explorer 5.5 and upward but now also works in browsers such as Safari for Windows and Firefox.)
FIGURE 8.3 One way of editing the contents of a row
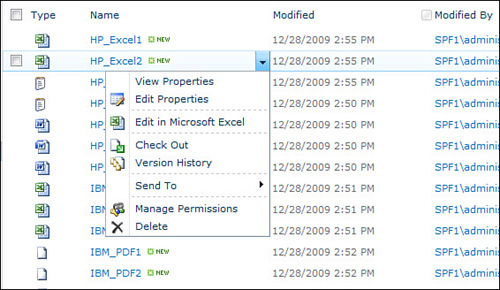
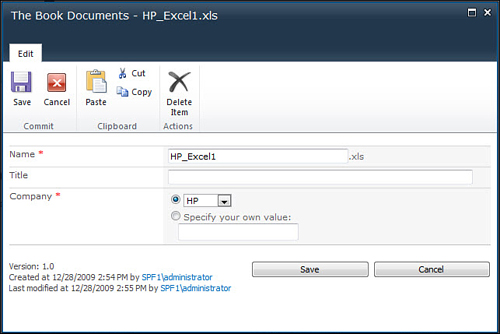
2. To add a value to Company, choose Edit Properties. I select HP from the Company drop-down (see Figure 8.4). Note that this was created as a required field—the star (*) next to the word Company in Figure 8.4 indicates this.
3. Then click Save.
FIGURE 8.4 Changing the contents of a row
Editing a View Using the Existing Edit Column
Another solution—editing a view by using the existing Edit column—works even if we have the Title field listed and not the Name field. This solution uses a view of the Document Library that includes an Edit field.
Despite the look of Figure 8.2. there actually is an Edit box. It’s just not visible. To make it appear, run your cursor over any of the lines in the main (right) section of Figure 8.2.
Figure 8.5 is a small section of the screen shown in Figure 8.2 including the edit box that appears on the left when the cursor is moved over the line containing the HP_Word1 file.
FIGURE 8.5 Seeing the existing Edit icon.

Select the box, and then all the options that were available via the drop-down in the earlier section are now available in the ribbon, as shown in Figure 8.6. (The dropdown is faster to use, which is why I showed it first).
Click Edit Properties to get the same screen you saw earlier (Figure 8.4).
FIGURE 8.6 Seeing the Edit options in the ribbon
Editing a View by Using Datasheet View
Both of these two options enable the addition of HP (or IBM, MS, or Oracle) text to the Company column for a single row at a time. The third option, to use Datasheet View, enables a quicker approach when an identical value needs to be added to several rows.
To do this we need to first create a Datasheet view: Go to Library > Library Settings > Create View > Datasheet View. I named this Datasheet view (Maintenance). The parentheses indicate that it’s not actually a view that users are expected to use in normal circumstances.
The key thing with a maintenance view is that it should contain all the columns you want to change the value of and sort on. In this case that means the Name field (for sorting and also for knowing which row this is); the Company field; and the Title field (it has no value yet, but we might later want to add one, so there’s no point in not including it). Make sure those views are selected. Do remove the x from the Modified and Modified By fields to deselect them because they are system fields that cannot be amended.
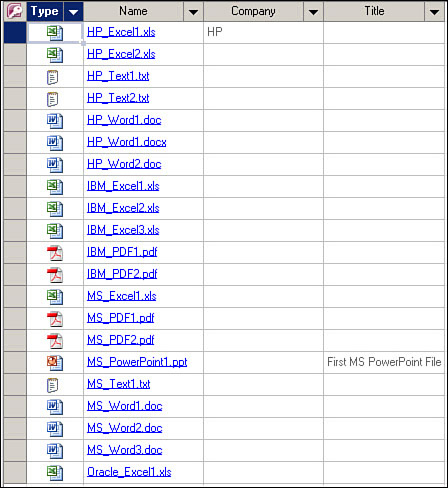
This time, as shown in Figure 8.7, I left the x next to the icon so that column is still listed. I’ve said that the view should be sorted by name (and that it will not be the default view). Not being the default view is default here. After clicking OK, you will usually see the screen shown in Figure 8.7.
FIGURE 8.7 Using a Datasheet View to add a value to the Company column
What you might instead see is a page with the columns you selected in Standard View, that is, the kind of view that we have seen before. At the bottom of that page in Standard View, there would then be the following text indicating the reasons why Datasheet View wasn’t possible.
The list is displayed in Standard view. It cannot be displayed in Datasheet view for one or more of the following reasons: A datasheet component compatible with Microsoft SharePoint Foundation is not installed, your browser does not support ActiveX controls, a component is not properly configured for 32-bit or 64-bit support, or support for ActiveX controls is disabled.
This message indicates the main possible problems, which are listed in the following bullet points:
![]() Your browser does not support ActiveX controls; it is not Internet Explorer.
Your browser does not support ActiveX controls; it is not Internet Explorer.
![]() A component is not correctly configured; Microsoft doesn’t know why it’s not working.
A component is not correctly configured; Microsoft doesn’t know why it’s not working.
![]() Support for ActiveX controls is disabled; it is possible that your ActiveX settings aren’t quite what the application expects them to be.
Support for ActiveX controls is disabled; it is possible that your ActiveX settings aren’t quite what the application expects them to be.
The first couple of these you can’t do much about. The first is a certain “No.” If you don’t have Internet Explorer you can’t fix it. The second is so unclear that it is impossible to trace.
That leaves the third one. You can try amending your ActiveX settings in IE for the security zone in which the SPF1 site is located. (Again, if you don’t have IE you don’t have ActiveX settings you can amend.)
If that doesn’t work you may have been hit by the mixed Office versions problem. Datasheet View requires a particular Office application to be installed in the client. If the client is running only one 2007 or 2003 Office application in addition to a full suite of Office 2010 applications, this may have confused Datasheet View into looking for the wrong application (version) and not finding it. If it can’t find it, Datasheet View won’t work.
The following bullet points give several reasons why using Datasheet view instead of Standard view can be advantageous:
![]() You can change several or all rows and then leave the page.
You can change several or all rows and then leave the page.
![]() You can use the drop-down in the column (row) to choose the value.
You can use the drop-down in the column (row) to choose the value.
![]() You can copy the values in cells just like you can in Excel (but only like to like).
You can copy the values in cells just like you can in Excel (but only like to like).
Doing a combination of these, we can complete the Company column with the appropriate values in all rows:
![]() There is no OK button, so you must ensure that the changes go through. To do this, select a different view after you fill in the values on the page. At this stage you may get a pop-up saying, “You Have Pending Changes.” If so, just click OK and wait until the pending changes are made. Figure 8.8. is the final result.
There is no OK button, so you must ensure that the changes go through. To do this, select a different view after you fill in the values on the page. At this stage you may get a pop-up saying, “You Have Pending Changes.” If so, just click OK and wait until the pending changes are made. Figure 8.8. is the final result.
FIGURE 8.8 The result of using Datasheet View to add a value to the Company column
Creating a View That Includes All Documents
Now that we have a Company value for each document, we can (finally) create a view that uses those values. To do this, follow these steps:
1. Choose Library > Library Settings > Create View > Standard View. This time, we focus on the second half of the screen.
2. Name this view HP. Then scroll down and complete the Sort and Filter fields (see Figure 8.9).
FIGURE 8.9 Setting sorting and filtering for a view
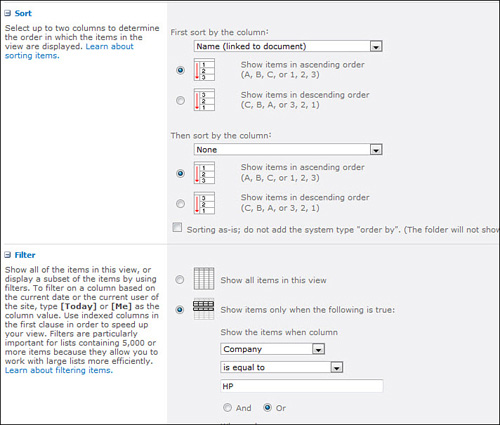
3. Click OK and repeat the whole thing for IBM, MS, and Oracle. You can speed things up by selecting the option to Start From an Existing View and always use the HP view as a model for your other views.
Creating a Grouped View
Next, let’s create a view that could be used if you want to split a single report into HP, IBM, MS, and Oracle sections:
1. Choose Library > Library Settings > Create View > Standard View. This time call it Grouped By Company. Remove the tick for Company and sort the view by name.
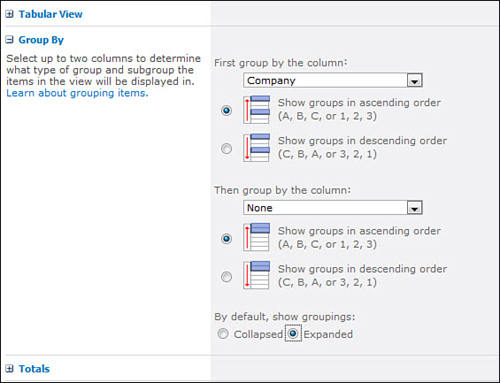
2. Do not enter a filter. Complete the rest of the page, as shown in Figure 8.10. (Note that I chose Grouping to be Expanded.)
FIGURE 8.10 Looking at the Group By element when specifying a view
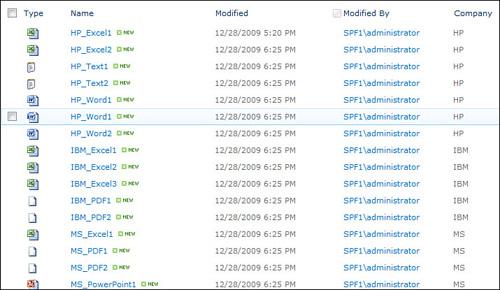
3. Click OK. Figure 8.11 shows the result.
FIGURE 8.11 A completed Grouped By view
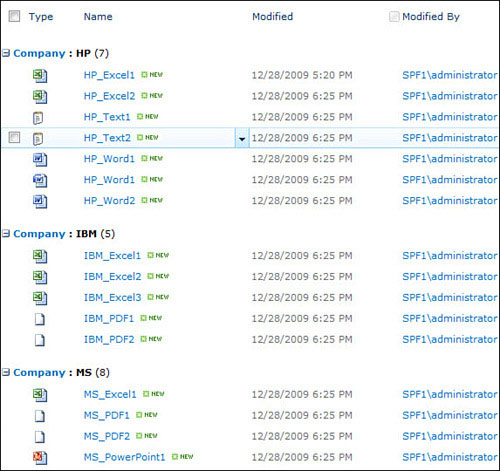
This is a useful overview of the contents of that document library.
Let’s say, however, for the purposes of our training here that we don’t need to see the date a document was modified and remove it from the view.
Deleting a Column from a View
To delete the Modified column, follow these steps:
1. Select Library > Library Settings in the menu line. Then scroll the screen to see a list of the views (see Figure 8.12).
FIGURE 8.12 Amending a view
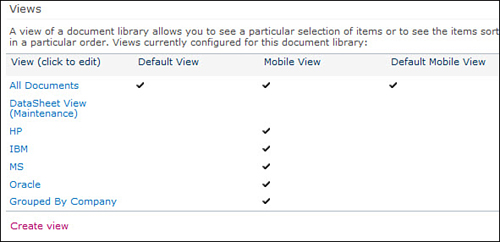
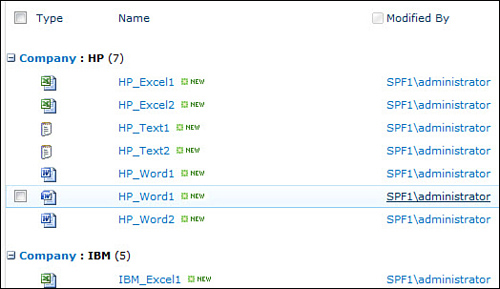
2. Select Grouped By Company, and you can remove the tick for Modified. Click OK to open the Book Documents page without the Modified column (see Figure 8.13).
FIGURE 8.13 A revised view
Using Folders
Now that you’ve seen how views can be used to separate the documents stored in a single document library into subdivisions, let’s look at folders, which are an alternative method of doing this.
However, we have two problems with folders:
![]() Implementation isn’t particularly good.
Implementation isn’t particularly good.
![]() Folders encourage bad habits—specified in more detail later in this hour–—when transferring data from “normal” systems (that is, from the file system).
Folders encourage bad habits—specified in more detail later in this hour–—when transferring data from “normal” systems (that is, from the file system).
A quick demonstration can show you a few problems with folder implementation:
1. Go to BookSite1 and open the document library.
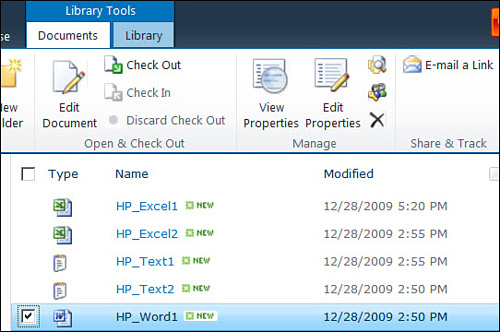
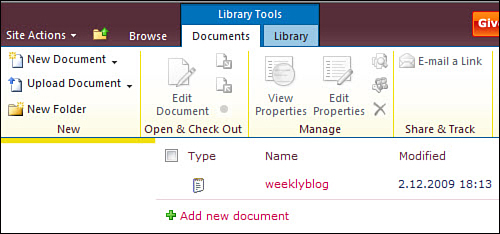
2. Select Documents in the menu line and then New Folder from the ribbon (see Figure 8.14). Name this folder HP.
FIGURE 8.14 Creating a folder
3. Repeat this process to create folders for IBM, MS, and Oracle. Figure 8.15 shows the result.
FIGURE 8.15 Folders are now available for use.
4. Populate the folders with the same test files we used earlier in this hour. To do so, click the folder icon before the word HP or on the word HP itself to open the folder. Then use the upload actions we’ve used before. Repeat this process for the IBM, MS, and Oracle files.
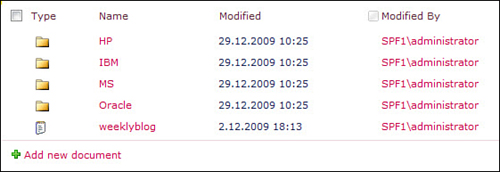
5. Now go back to the Document Library level and upload some other files (preferably with more appropriate names for your business than those shown in Figure 8.16).
FIGURE 8.16 A document library with both views and folders
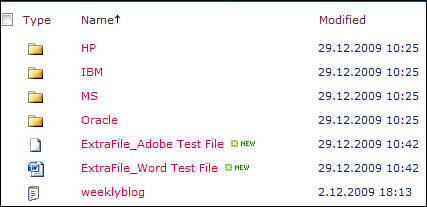
6. Click Name at the top of the column. This sorts the contents of the document library in name order (first ascending and after a second click on Name, descending).
7. The folders all come first, followed by all the files (see Figure 8.16). Click Name again, and all the files come first and then all the folders. That’s perhaps acceptable.
8. Now open the IBM Folder and create a file in Notepad and add it to the IBM folder.
9. Go back to the Document Library level and click Modified (twice).
After we click Modified, which sorts the date and time at which something in Share-Point was added or amended, we expect to first see the folder IBM, the contents of which have been modified last, followed by the individual files we uploaded, followed by the other folders. In fact, we see the screen shown in Figure 8.17.
FIGURE 8.17 Problems with sorting when folders are involved
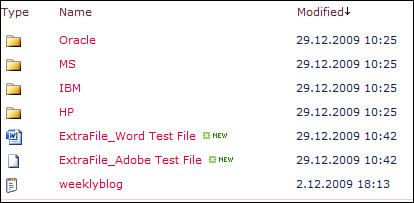
The software sorts only according to when the folder was created; when the contents of the folder were amended is completely ignored. In addition no matter when the folders or the files were created, the folders are always listed first.
That’s one of the functionality problems with folders. Another one, that was in earlier versions of SharePoint, no longer occurs. Do a search (click Browse in the menu line, and the search box appears at the top-right part of the screen), and the search now identifies the document itself even if it is stored in a folder. Earlier only the folder was specified and not the document itself.
However, the main problem with folders is that they encourage bad habits. They encourage you to copy your entire file system to a single SPF 2010 document library, which also means that you don’t bother getting rid of documents that no longer are relevant.
The process of creating a view, on the other hand, means that you need to analyze the files in the file system first (to create suitable views). This means that during the analysis process, you become aware of irrelevant files and sets of files and do not upload them to the SPF 2010 document library. You also divide your relevant files into different document libraries.
Summary
This hour showed you how to create views and folders. It showed you the benefits of using views to subcategorize the documents in a document library, and you learned some of the disadvantages of using folders.
Q&A
Q. I’ve heard that if I use folders I can have up to 4 million documents stored in a single document library. If that’s true, why are you recommending that I don’t use folders?
A. The recommended maximum limit for documents in a document library is 2,000 for document libraries without folders. However, that limit is 2,000 x 2,000 for document libraries with folders (2,000 folders and 2,000 documents per folder), and thus your 4 million documents when using folders. So that statement is technically correct.
Some papers say this limit is 5 million. This is a hard number, whereas the 2,000 number that leads to the 4 million total is a “recommended maximum” only. You can have 2,001 or 2,002 and so on.
There are many reasons why this wholesale transfer of files from the file system is not desirable, including the following:
![]() Ease of use when accessing the files
Ease of use when accessing the files
![]() The results of searches
The results of searches
![]() The storage space required (up to 80 percent more space can be needed for storage in the SharePoint databases than is require for the same files in the file system)
The storage space required (up to 80 percent more space can be needed for storage in the SharePoint databases than is require for the same files in the file system)
![]() Backup requirements
Backup requirements
Q. Are there, in your opinion, any good uses for folders?
A. In my opinion, just one.
You might want to consider folders if you have a copy of a website that was created by a fairly old tool, such as Site Sweeper. These old tools typically created a single index.htm file with links to files that were placed in folders one level below the index.htm file.
The index.htm file can be uploaded to the document library, and the files it references can be uploaded to a folder in the document library.
The reason this is a good use of folders is because it can’t be done any other way, given the way these Site Sweeper-type applications work.
Workshop
Quiz
1. When creating a view, which type of column do I use when I want to ensure that it always contains specific text strings?
2. With folders, what main functionality problem area is still there?
3. Why is it a bad idea to copy the file system to a SPF 2010 document library that uses folders?
Answers
1. I use the Choice type of field because in this field type I can specify a list of possible values (and, incidentally, a default value).
2. Sort.
3. It’s a bad idea to copy the file system because this encourages the mass copying of files, which means that no effort is made to weed out documents that are no longer relevant or active (or duplicates).