
HOUR 13
Using SPF 2010 Search and Installing Search Server 2010 Express
What You’ll Learn in This Hour
![]() How SPF 2010 Search works and how it compares to Search in SPS 2010
How SPF 2010 Search works and how it compares to Search in SPS 2010
![]() Adding Search Server 2010 Express to the SPF 2010 server
Adding Search Server 2010 Express to the SPF 2010 server
Here we look first at how the search that is built in to SPF 2010 works. Then, as preparation for Hour 14 (“Improving Searches”), we work through the installation of Search Server 2010 Express on top of SPF 2010. Hour 14 then uses that installation to show the additional search options that the combination of the two products make available.
SPF 2010 Includes a Basic Search Function
One of the main differences between the free versions of SharePoint and the expensive ones (previously mentioned in the book as the Services line and the Server line) has been in Search.
Just as in all the previous products in the Services line, SharePoint Foundation 2010 can search only data stored in its own databases. That is, it can search only data that has been added to the SharePoint sites created after SPF 2010 has been installed.
This means that when you are positioned in your browser at a site—perhaps, at the default page of a site—you can search only the site. This means that the search results will be matching items that come from all the Lists and Libraries that are part of the site. However you are positioned in your browser at a List or Library—perhaps you have just opened a Custom List in your browser—you can either decide to search just that List/Library, or you can decide to search the site that List/Library is a part of.
In addition to being restricted to searching only the content of its own sites, the search routine is also simple. You enter a value in the Search box and get a set of results. You cannot, for instance, use filters in any way to restrict what is searched and where you search. You also cannot search for people (users of the sites).
The “expensive” product SharePoint Server 2010, like its predecessors in the server line, also offers the possibility of, in addition to searching its own content, searching many other locations such as websites, file system, Exchange databases, etc., and People Search.
This hour discusses the basics of using the built-in SPF 2010 search function. You then learn how to install the Search Server 2010 Express function on top of SPF 2010. This is a necessary first step before reading Hour 14, about searching when Search Server 2010 Express has been added to SPF 2010. As we you see in that hour, the combination of two free products offers almost as much search functionality as the expensive SharePoint Server 2010 and yet with none of the CALs requirements that product has.
Using the Standard Search Function
We already have some documents stored in The Book Documents document library in the default site, so let’s start by going to the default site (http://spf1) and then going to the Search box at the top-right corner of the page.
As you can see in Figure 13.1, it’s not quite the top-right corner of the screen, but it’s actually the top-right corner of the menu section of the screen.
You can no doubt recognize the image as being the top-left corner of the standard image, so if reading this offline you should have a good idea of where you’ll find the Search this Site box. It’s a Search this Site box because we are located at site level and therefore have the option of only searching the site.
FIGURE 13.1 The Search this site box

Now enter MS in that box and click the magnifying glass. You can see in Figure 13.2 the first section of the search results.
FIGURE 13.2 The results of searching the site
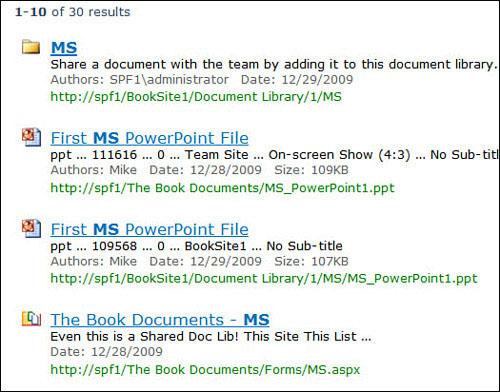
Here are some of the things to particularly notice in that list:
![]() A search of a site also searches all the subsites of that site. (There are hits from http://spf1 and from http://spf1/BookSite1.)
A search of a site also searches all the subsites of that site. (There are hits from http://spf1 and from http://spf1/BookSite1.)
![]() A search of a site will not only search the contents of lists and files, but it will also search folder names and View names:
A search of a site will not only search the contents of lists and files, but it will also search folder names and View names:
![]() Contents: First MS PowerPoint File (2,3)
Contents: First MS PowerPoint File (2,3)
![]() Folder: MS (1)
Folder: MS (1)
![]() View name: The Book Documents: MS (4)
View name: The Book Documents: MS (4)
Next we look at what happens when we move down to a document library in the default site. This time the process is a bit longer, so I use numbered steps to make it clearer:
1. Click Team Site to go back to the default page.
2. Click The Book Documents in the Quick Launch section.
As you can see in Figure 13.3, now the Search box really is at the top-right of the screen (or near enough). The reason is that this is a page of the Web Part Page type, and all sections of such a page always add up to 100% width, which makes the menu section here just as wide as the data part (unlike the page in Figure 13.1, which was a page of the Wiki Page type).
FIGURE 13.3 Searching a document library
At this point, if you’ve just read my introduction, you ought to be confused. You’ll be wondering why—when we are now at document library level—the Search box is still saying “Search this site . . .”. Well, this might be different in the version of SPF 2010 you have in front of you, but for now let’s assume that because we are located where we are (in a document library in http://spf1), we will not get the same results as we did when we were at the top of http://spf1.
3. Enter MS in the Search Box.
Do we see (in Figure 13.4) the same results that we saw in Figure 13.2?
FIGURE 13.4 Results of Searching a document library
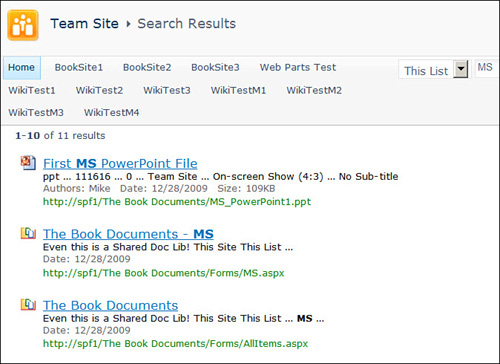
Instead of the 30 results we had in Figure 13.2, we now have only 11, and (if you scroll down the page, you can check this) all of them are from The Book Documents.
Now look at the top-right part of Figure 13.4, and you’ll see the reason. When we searched this site in Figure 13.3, we were actually searching This List, as shown in Figure 13.4.
There remains only one further test. What happens if we change that dropdown that is now showing This List?
4. Go to the drop-down and change it to (the only other option) This Site.
5. Click the magnifying glass again.
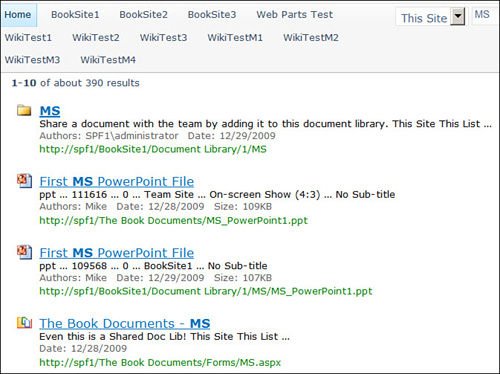
What you see, as shown in Figure 13.5, are the same first four hits that we had in Figure 13.2; so even though we are now located within a site, we are still getting hits from subsites to that site. It looks as if a search on a site is the same whether it’s down from the site (default page) or from within a List or Library. Well, it would except for one oddity. Figure 13.2 shows there were “about 30 results,” and Figure 13.5 shows there are “about 390 results.” What’s going on?
FIGURE 13.5 Results of searching the site from a document library (1)
6. Click 2 (at the bottom of the page) to go to the second page of hits. Figure 13.6 then indicates what the difference is.
Both these hits are from a different web application. They are from Central Administration that was created by the installation routine as a new web application (using the random port number 41170 here) and with its own (site collection) set of sites and subsites. That explains the difference in the number of hits. If you go back and redo the search when located in the default site, you can see that all 30 results are from that site and from its subsites; none of the hits are from any other web application.
FIGURE 13.6 Results of searching the site from a document library (2)
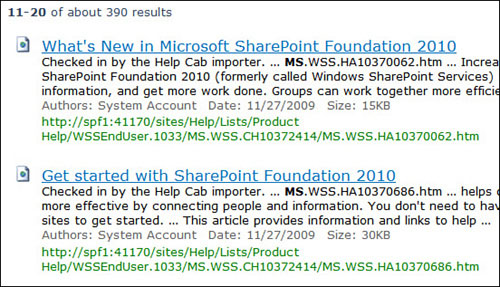
Another thing to notice in Figure 13.6 is that the two hits shown are both Help files. You might not want Help files to show up in your results, but when using SPF 2010 you can’t restrict the search apart from restricting it to site or list.
![]() Search site (1) (searches all web applications’ site collections)
Search site (1) (searches all web applications’ site collections)
![]() Search site (2) (searches the site and all its subsites)
Search site (2) (searches the site and all its subsites)
![]() Search list (searches the list or library)
Search list (searches the list or library)
But now we move on to installing Search Server Express 2010 on top of SPF 2010, so our searches even with SPF 2010 can be greatly improved.
Installing Search Server 2010 Express in a SPF 2010 Installation
The following steps install Search Server 2010 Express on top of an existing SPF 2010 installation:
1. Go to the server.
2. When there, search for the free download for Search Server 2010 Express at either http://www.microsoft.com/downloads or at my own site, http://wssv4faq.mindsharp.com, where it will be in the V4Articles section. Figure 13.7 shows the equivalent page for the public Beta version of the application, which is what I used when testing and writing the installation instructions.
FIGURE 13.7 The download page for Search Server Express 2010
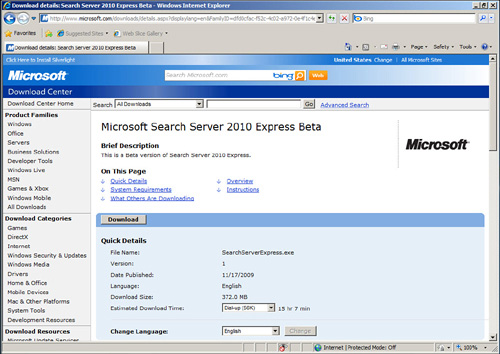
3. Click Download (making sure that English is selected in the Language section at the bottom of Figure 13.7). There is only a single (x64) version of Search Server 2010 Express available, so there is no decision to be made about whether to use a 32-bit or a 64-bit version.
You next see Figure 13.8. Here there is a decision to be made. If you think that you might want to repeat the Search Server 2010 Express installation (perhaps you’ve just made a snapshot of your VM, so you can go back to the situation before you started downloading Search Server 2010 Express), use Save and then run the downloaded file later from your hard disk. If you are optimistic that everything will go smoothly, just do step 4.
FIGURE 13.8 Run directly or Save first?
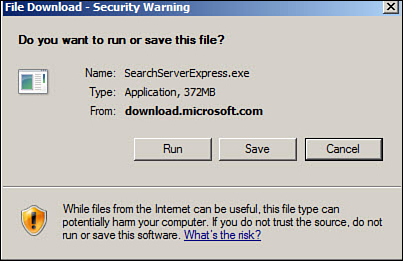
(The download takes quite a while, more than ten minutes, so only having to do it once might be a good idea.)
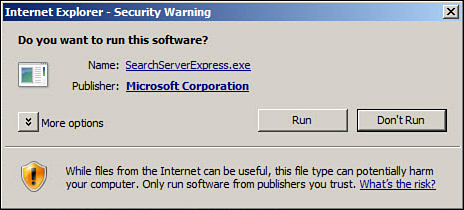
4. Click Run. After a long wait, you see another small screen (Figure 13.9).
FIGURE 13.9 A second Run
5. Click Run again. The screen you see after the second Run is Figure 13.10. It looks similar to a screen you would see when installing any SharePoint product.
FIGURE 13.10 The installation page for Search Server Express 2010
The reason that Figure 13.9 looks like a SharePoint screen is that Search Server Express 2010 is a SharePoint product. (So, yes, you can just install it and you have installed SharePoint).
Let’s now go back to our installation. Because Search Server 2010 Express is a SharePoint product, the hardware and software requirements and the software prerequisites are the same as they were for SPF 2010.
When installing always play it safe and never assume anything. In this case my tests showed that installations done without doing Install Software prerequisites looked fine, until I had created a new Search site and tried to search. Then it didn’t work. Don’t do as I did (once!)—don’t skip the install software prerequisites step.
6. Click Install Software Prerequisites. Accept all the screens that follow until the process is complete and you are back at Figure 13.10.
7. Click Install Search Server Express.
8. Click Continue after accepting the typical licensing requirement that follows.
The File Location page follows (see Figure 13.11).
FIGURE 13.11 The File Location page
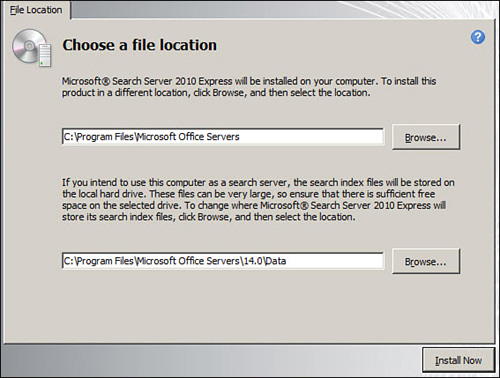
9. Click Install Now to accept the standard locations.
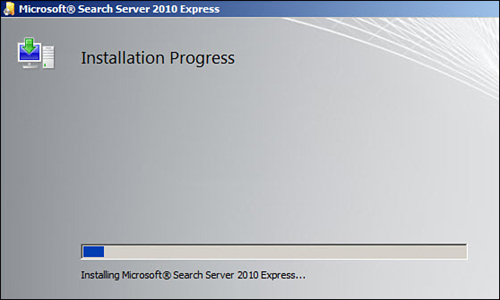
The next part of the installation takes quite a while, and you see Figure 13.12 before any progress is shown (in Figure 13.12 a small amount of progress is shown) for long enough to think something is wrong.
FIGURE 13.12 Waiting for the installation to progress
Finally, Figure 13.13 displays.
FIGURE 13.13 Run the Configuration Wizard

10. Leave the tick in place and click Close.
(In a single server installation, you can always run the Configuration Wizard at once. If you have a farm of different servers, wait until the SharePoint 2010 product is installed on all of them, and only then run the Configuration Wizard.
There will here be a brief pause between Figure 13.13 disappearing and Figure 13.14 appearing. Most likely you will then see Figure 13.10 again and think, “Oh, that was a quick installation,” and move to click Exit. Don’t! Just wait another few seconds.
FIGURE 13.14 The lower part of the Welcome to SharePoint products screen
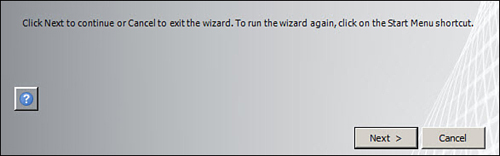
11. Click Next.
12. Approve the need to stop and start three services (screen not shown here) by clicking Yes. (Make 100% sure you only click once.)
Now with the next screen we are at a crucial stage of the installation. So be careful not to automatically click Next in Figure 13.15. (Figure 13.5 shows only the top half of the screen; Next is at the bottom of the screen).
FIGURE 13.15 Do not overwrite the existing site.
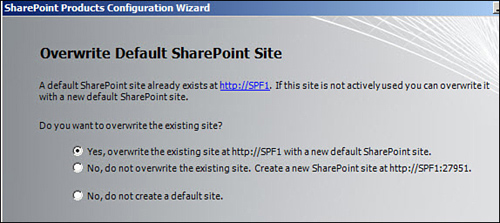
We already have data at http://spf1, so we definitely don’t want to use that default choice for Search Server 2010 Express. But do we need a new site for Search Server (the second choice) or no site (the third choice)? My preference is to keep things simple and to create a new site.
13. Be very careful! Select the section option No, do not overwrite the existing site.
14. Note the port number.
15. Now (and only now) click Next. But recheck first that you have selected the second option.
16. After the wizard has gone through its 11 steps, click Finish on the Configuration Successful screen (not shown here).
FIGURE 13.16 The Search Server search page
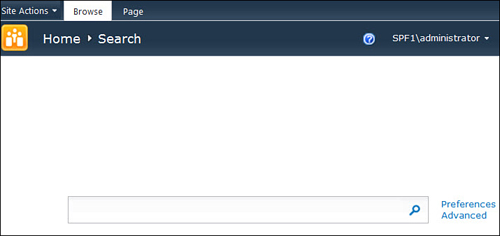
We’ll leave it there for this hour. The next hour looks at what new search possibilities are available and how to use them.
Summary
In this hour, we went through how the search function provided with SPF 2010 worked. We also installed Search Server 2010 Express on the same server as SPF 2010. The additional search functionality available in this free product (and the few restrictions associated with it) are covered in the next hour.
Q&A
Q. I heard that the SPF 2010 Search routine is powerful, yet you don’t indicate this. What’s the real story?
A. It depends what you are comparing. If you used the basic installation (free database system) of Windows SharePoint Services 2.0, Search didn’t work . To get Search, you had to either use SQL Server 2K (or later SQL Server 2005) and get only a simple full-text search or pay for a third-party search tool.
Since WSS 3.0, the search function provided with the free SharePoint product has been essentially the same as the search routine provided with the more expensive SharePoint products of the same version level. Only the ability to search outside the SharePoint sites was removed.
Search in the v4 products is even more powerful. Whereas search in WSS 3.0 was based on the rather under-performing Live.com search, SPF 2010 is based on Bing. You can see this improvement in the information provided in the page containing the hits.
Workshop
Quiz
1. What’s the usual recommendation about how long to wait after adding content to a site and doing a search, and is this wait really necessary?
2. If you are located in your browser at a list, which two search scope options do you have?
Answers
1. About 24 hours. In most cases, it isn’t necessary to wait that long.
2. This List and This Site (but only after you have done a search—your first search box says Search the Site but actually searches the list).