
HOUR 15
Using Different Versions of the Main Office Products with SPF 2010
What You’ll Learn in This Hour
![]() Stating the rules for the interaction of Office products with SharePoint products
Stating the rules for the interaction of Office products with SharePoint products
![]() Storing documents in document libraries
Storing documents in document libraries
![]() Creating document workspaces in Office 2003 and Office 2007
Creating document workspaces in Office 2003 and Office 2007
![]() Differentiating between the workspaces in Office 2003 and Office 2007
Differentiating between the workspaces in Office 2003 and Office 2007
![]() How files attached to Outlook 2003 and Outlook 2007 email messages can be stored in a SPF 2010 site
How files attached to Outlook 2003 and Outlook 2007 email messages can be stored in a SPF 2010 site
This is the first of a number of hours about the inter-relationship between SPF 2010 and Office products. At first glance, the bullet points at the start of this hour look out of place in a book written about a SharePoint 2010 product, which mostly considers the interaction between various Office 2010 products and SPF 2010. The explanation is a simple one—what is covered in those is functionality that has been removed from Office 2010. It is thus available only for users of previous Office products.
This book, unlike some others, does not start with the assumption that all the users accessing SPF 2010 systems are also using Office 2010 on their PCs; therefore, there is coverage in the book of both Office 2003 and Office 2007 where it is warranted. The now missing functionality was both important and useful, so I spend time in this hour covering it in depth.
Office Products and SPF 2010: The Rules
The interaction between an Office product and a SharePoint site varies depending on which version of Office and SharePoint you use. In this section, I define the “rules.”
The standard rule is that the full functionality available in each Office version works only with the equivalent SharePoint version:
![]() To get the most out of SharePoint Team Services (STS) 2001, you need to run Office XP on your client.
To get the most out of SharePoint Team Services (STS) 2001, you need to run Office XP on your client.
![]() To get the most out of WSS 2.0, you need to run Office 2003.
To get the most out of WSS 2.0, you need to run Office 2003.
![]() To get the most out of WSS 3.0, you need to run Office 2007.
To get the most out of WSS 3.0, you need to run Office 2007.
![]() To get the most out of SPF 2010, you need to run Office 2010.
To get the most out of SPF 2010, you need to run Office 2010.
The second rule is that all the Office versions are backward-compatible. If you use STS and Office 2010, Office 2007, or Office 2003, you have the same functionality you had with Office XP but no more. Whereas if you use WSS 2.0 and Office 2010 or Office 2007, you have the same functionality you had with Office 2003, but no more; naturally if you use WSS 3.0 with Office 2010, you get the same functionality you had with Office 2007 but no more.
There are also a couple of exceptions to the preceding rules: The first exception is that any Office application might offer no more functionality when used with Share-Point than an earlier version of that particular Office application. The second—and perhaps less-expected—exception is that a later Office application might offer less functionality with SharePoint than an earlier version. This is rare; although worryingly at the time of writing several Office 2010 applications have lost functionality when working with SharePoint sites compared to the equivalent Office 2007 product. (See the “Creation of Document Workspaces” and “Files Attached to Outlook” sections at the end of this hour for two examples of this).
This hour starts by looking at Word, Excel, and PowerPoint. Despite being principal Office applications, their functionality, when used with SPF 2010, has hardly changed since Office 2003 (or Office 2007).
Let’s investigate three main interaction areas of these Office products with SPF 2010:
![]() Storing documents in document libraries
Storing documents in document libraries
![]() Creating document workspaces
Creating document workspaces
![]() Adding attachments to Outlook messages
Adding attachments to Outlook messages
Storing Documents in Document Libraries
You might ask, “It’s obvious that you can store Word (and so on) documents in a document library, so why discuss that?” The answer is that when these documents are stored in a document library, some differences exist as compared to the way other document types are stored in document libraries.
These differences are
![]() Edit available in Microsoft Word/Excel/PowerPoint but not in Acrobat
Edit available in Microsoft Word/Excel/PowerPoint but not in Acrobat
![]() Standard Word/Excel/PowerPoint templates available for use (and more, see the “Available Templates” section)
Standard Word/Excel/PowerPoint templates available for use (and more, see the “Available Templates” section)
![]() SPF 2010 column information included with the Word/Excel/PowerPoint file
SPF 2010 column information included with the Word/Excel/PowerPoint file
Different Editing Options
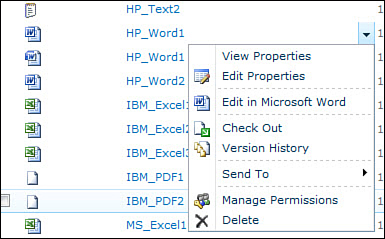
The most obvious difference is that there is an “Edit in Microsoft XXX” (where XXX is Word, Excel, or PowerPoint depending on what kind of file it is) entry in the dropdown when you click the area to the right of a Word, Excel, or PowerPoint document’s name in a view (see Figure 15.1).
FIGURE 15.1 Edit in Microsoft Word
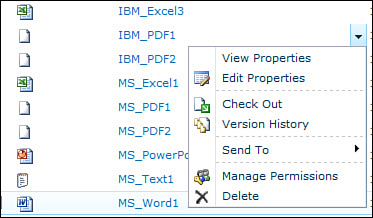
When selecting an Acrobat file in the same library, there is no equivalent Edit in Acrobat option (see Figure 15.2). This is true even if you have the commercial version of Acrobat that enables changes and saving.
FIGURE 15.2 No edit capability in Adobe Acrobat
Available Templates
A Document Library has a New Document function. When this is used an empty document is created that uses a template specified when the Document Library was created. The only applications for which templates are included in the SPF 2010 installation are all Office products.
To see the list of available templates, create a new document library by going to Site Actions in the menu line tab and then selecting More Options. If you want to create a document library, give it a name and then select More Options (in that screen this time).
The list of possible templates is displayed as in Figure 15.3.
FIGURE 15.3 List of document library templates
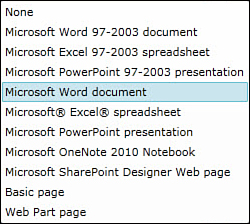
The four items at the end of the list were also available (the OneNote template was of course for 2007 and not for 2010) in the previous versions of SharePoint. It’s perhaps indicative of the usual use of templates—namely for Office products—that I thought at first were new features of the SPF 2010/SPS 2010 implementation!
Figure 15.4 shows what happens if you use New Document while in a document library that has the web part page template specified.
FIGURE 15.4 Creating a new web part page via a template of document library templates
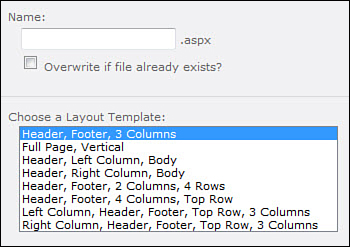
You have the full options that would be available to you if you went through the normal (and longer) process of Creating a web part page and then specifying this document library to contain it.
There are different templates in Figure 15.3 for the Excel/PowerPoint/Word file types for the 97–2003 format (.doc) and for the 2007–2010 file format (.docx). That isn’t a major problem because the administrator will know which file format he can use in his company. The problem with these templates is that they aren’t typically as straightforward as the web part page example was. There are a couple of reasons:
![]() Creating a New document using such a template often requires logging in to the server.
Creating a New document using such a template often requires logging in to the server.
![]() When you say that you are saving to a SharePoint site’s document library (see Figure 15.5), it works straightforwardly only if you have already done saves to that document library from the client PC. If the site and document library you want to save to isn’t already listed in the Recent Locations section that you see after clicking Save to SharePoint, as shown in Figure 15.5, you need to write in the http:// address of the server + document library (plus the filename you want to use) when saving the file. Some users won’t be happy having to do this.
When you say that you are saving to a SharePoint site’s document library (see Figure 15.5), it works straightforwardly only if you have already done saves to that document library from the client PC. If the site and document library you want to save to isn’t already listed in the Recent Locations section that you see after clicking Save to SharePoint, as shown in Figure 15.5, you need to write in the http:// address of the server + document library (plus the filename you want to use) when saving the file. Some users won’t be happy having to do this.
To avoid the possible need for manually entering the document library’s URL in the Save field following the use of New Document, encourage your users to create their documents in their own copies of Word (or other Office program) and then upload them to a SharePoint document library by accessing the SharePoint document library in their browsers. In most cases (using a noncustomized, blank template) the end result looks exactly the same. Only if you have created a special company template for your users does using the New Document function offer any advantages, and even those advantages can be reduced by making sure all the users can access that (Word and such) template in their own PCs’ copies of the Office product.
FIGURE 15.5 The first step in saving to Share-Point from an Office 2010 product
Missing from the list of templates in Figure 15.3 is a template for earlier versions of OneNote. The OneNote 2007 and 2010 formats are completely different, and OneNote 2007 cannot read OneNote 2010-formatted files. Unless you are sure that all your users have OneNote 2010, this would be a good reason for advising your users not to use the OneNote (2010) template and to create their OneNote files in the product (and specify when saving the OneNote 2007 file format).
SPF 2010 Column Information
A relationship exists between additional fields/columns in a document library and the properties of a Word/Excel/PowerPoint document that doesn’t exist with a non-Office document.
Here’s the situation in brief: A non-Office document (perhaps a PDF) has its own properties that are part of the document. When you add an Acrobat file to a document library, that document library might have extra columns/fields, and you will give those fields values. So you might have a Company field and give it the value HP.
Now let’s take that document offline so that we can edit it. The file is copied to our hard disk, and that Acrobat file includes both the document and the document’s properties. However, the (SPF 2010 document library) Company field no longer exists, so it no longer has a value. The information is lost.
Compare this with an Office document. One difference is that an Office document can be edited and then copied back to the SharePoint site. This naturally means that none of the column data is lost. However it is also possible to save a copy of an Office document to your hard disk, Even then the file you have on the hard disk contains the data from those SPF 2010 columns. They are not lost.
All this becomes clearer if we work through an example:
1. Create a new Document Library by clicking Site Actions > New Document Library.
2. The Document Library is Open. Click Library > Library Settings.
3. Add two new columns: Subject and Formula One Cars. These were carefully chosen. Subject is the name of a standard Property of a Word document. Formula One Cars clearly isn’t the name of a standard Property.
4. Create a simple document in Word 2010 (one line of text is enough), and upload it to the document library you just created. You will be asked to fill in the two new fields (columns), as shown in Figure 15.6.
FIGURE 15.6 Adding values to two document library columns

5. Save the document. This saves it to the document library.
6. Now (using IE) right-click the actual name of the document in the Document Library view and select Save Target As. This copies your amended document to a location in your client PC. The file is now completely separated from the document library.
7. Open the document in your client copy of Word 2010.
8. Select File > Info.
9. Go to the right of the screen and select Properties (Figure 15.7).
FIGURE 15.7 Where to check the properties of a Document
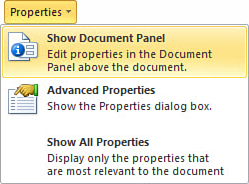
10. Click Show Document Panel. A document panel, Document Properties - Server, opens at the top of the document (see Figure 15.8).
FIGURE 15.8 Document Properties - Server

11. Click the drop-down arrow, as shown in Figure 15.8, and select Document Properties (see Figure 15.9).
FIGURE 15.9 Document Properties shows only standard properties.

As you can see in Figure 15.9, the standard document property Subject now contains the value we added in a document library column with the same name. (Actually the Title field does, too.) The Formula One Cars information is not listed in Document Properties. Instead it (and the Title and the Subject fields) are listed in Document Properties - Server, which is a list of those fields/columns included in the document library. Even if the document has been copied to the client PC’s hard disk and opened there, these fields still have values.
Following is a summary of the way this works between Office 2010/2007 and Office 2003:
![]() Office 2010 (and Office 2007)—If the column name is the same as an Office document property, the value entered into the column is transferred to the document property with the same name (accessed via Document Properties).
Office 2010 (and Office 2007)—If the column name is the same as an Office document property, the value entered into the column is transferred to the document property with the same name (accessed via Document Properties).
If the column name is not the same as an Office property, the value entered is retained as a server property (accessed via Document Properties - Server).
![]() Office 2003—If the column name is the same as an Office document property, the value entered into the column is transferred to the document property with the same name. (There are a few standard document properties for which this doesn’t apply, but we won’t discuss them here.)
Office 2003—If the column name is the same as an Office document property, the value entered into the column is transferred to the document property with the same name. (There are a few standard document properties for which this doesn’t apply, but we won’t discuss them here.)
If the column name is not the same as an Office property, a document property is automatically created with that value.
The exercise helped you see one advantage that can be gained by combining Office products (rather than non-Office products) with SPF 2010.
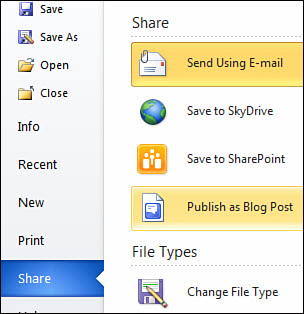
Another main function that is restricted to Office products is the capability to create websites to discuss a particular document. This is something that was available in Office 2007 and Office 2003 but has been removed from the Office 2010 products. See the “Q&A” section for brief information on what replaces it. Because it is a useful function, it is discussed next for both Office 2007 and Office 2003, both working with SPF 2010.
Creating SPF 2010 Document Workspaces in Office 2007
As previously mentioned in this hour, some kinds of interaction with SharePoint products that were in earlier Office products are no longer available in Office 2010. Creating Document Workspaces (in effect a site for storing and discussing a single document) were possible in both Office 2003 and Office 2007 when working with the 2007 and 2003 versions of SharePoint.
This section shows how to continue to create them with SPF 2010 if you have Office 2007 on your client systems. The following section gives the equivalent details for when you have Office 2003 on your client systems.
To create a document workspace in Office 2007, follow these steps:
1. Open Word and create a document. I use the text “Test document for a document workspace.”
2. When in Word 2007, click the (Office) icon at the top-left corner of the page; select Publish, and then select Create Document Workspace (see Figure 15.7).
Figure 15.10 appears on the rightmost side of the screen. As you can see, you have two choices:
![]() Specify a name for the document workspace. (Call it BookDocWS1.) Currently, it has the name of the document (which hadn’t been saved and was thus Document5).
Specify a name for the document workspace. (Call it BookDocWS1.) Currently, it has the name of the document (which hadn’t been saved and was thus Document5).
![]() Say where the document workspace should be created.
Say where the document workspace should be created.
FIGURE 15.10 Selecting a location and name for the document workspace
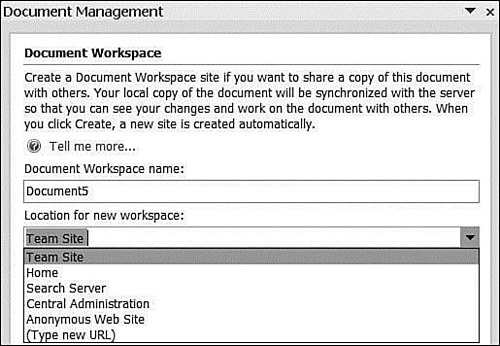
3. Accept the offered Team Site with Create.
If you aren’t offered a SharePoint site here, you’ll see only Type New URL. Type http:/SPF1 (or the TCP-IP equivalent). If you are told the site needs to be a trusted site, go to your browser’s Internet settings and add the address you just typed to the list of trusted sites in the security section. Then return here and click Create again.
4. If you haven’t saved the document, you’ll be asked to. Then, you’ll be asked for authorization with the typical Name/Password box.
5. The document workspace is created. You see Figure 15.11 in the rightmost panel.
FIGURE 15.11 The Document Management panel
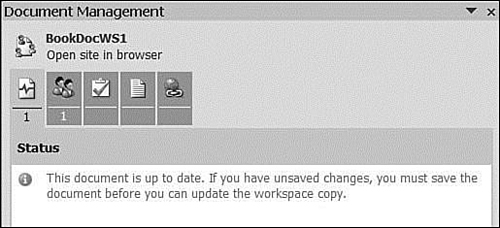
6. Select Open Site in Browser to see what we have.
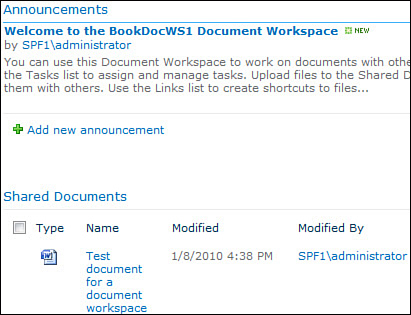
Figure 15.12 shows the site that has been created. The Navigate Up list shows that it is located under the default Team Site.
FIGURE 15.12 The default page of a document workspace
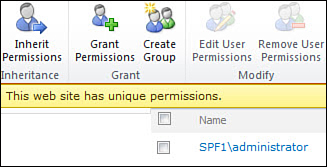
Unlike the subsites previously created, this site did not inherit by default permissions from the Team Site, and instead the only user at the moment is the administrator who created the document and decided to store it in a document workspace. (Figure 15.13 is obtained by clicking Site Actions > Site permissions.)
FIGURE 15.13 The only person with access rights is the administrator
Creating SPF 2010 Document Workspaces in Office 2003
Here are the details that were promised earlier for creating a document workspace when your users are running Office 2003 on their clients:
1. Create and save a document. Access Tools on the menu line and select Shared Workspace.
2. Team Site is selected (see Figure 15.14). The drop-down shows various Share-Point servers that this workstation running Office 2003 has been connected to in the past.
FIGURE 15.14 Selecting the site and document name in Office 2003
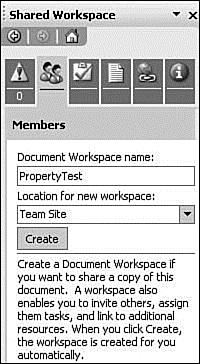
3. The default name of the document workspace comes from the document name, but it can be changed. We’ll change it to BookDoc2003WS1.
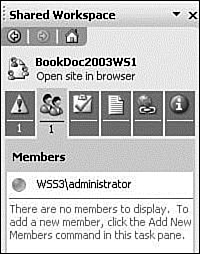
4. Accept the default value TeamSite by clicking Create. The result (shown in Figure 15.15) is similar to the Word 2007 equivalent. If you click Open Site in Browser, the website looks similar to that in Figure 15.12.
FIGURE 15.15 The Shared Workspace panel in Word 2003
Differentiating Between Office 2007 and Office 2003 Document Workspaces
Although creating a document workspace is a similar process in both 2003 and 2007, there are several differences. The main difference is that, in the Word 2003 version of the Shared Workspace panel, there is an extra icon.
If you click any icon and look at the bottom of the Shared Workspace panel, you see that it’s possible to do administration tasks directly from Word with this new (document workspace) site.
That missing icon on the right for Word 2007 means that these options are no longer available in Word 2007. The unavailable options are
![]() Restrict Permissions
Restrict Permissions
![]() Alert Me About This Document
Alert Me About This Document
![]() Version History
Version History
All are however—like all the other options here—available when accessing the document workspace in a browser (as administrator).
To summarize, there is little difference between Office 2003 and 2007 when creating document workspaces. The main differences are
![]() The creation of a document workspace fails often from Office 2003; it works better from Office 2007.
The creation of a document workspace fails often from Office 2003; it works better from Office 2007.
![]() In Office 2007, you don’t have to rely entirely on the list of sites available in the drop-down of where the document workspace is to be created; you can also specify a URL of a site or subsite.
In Office 2007, you don’t have to rely entirely on the list of sites available in the drop-down of where the document workspace is to be created; you can also specify a URL of a site or subsite.
Otherwise, the end result is the same. A site is especially created for a document, and it is possible to administer it with the Office product or by using a browser and accessing the site.
The default settings (when using both Word 2003 and Word 2007) are to be asked before changes made to a document (in either the website version of the document or in the Word version of it), which produces an updated document in the site. Automatic updates are possible but may lead to a better version being overwritten.
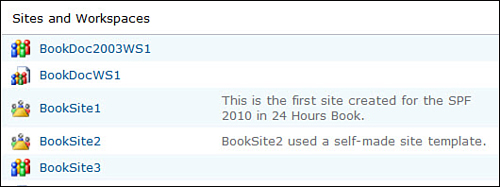
Although these new document workspaces are not listed in our default site (in the Sites section of the Quick Launch), you can select Site Actions > View All Site Content when at the Team Site. You then see a Sites and Workspaces section where they are listed (see Figure 15.16).
FIGURE 15.16 Sites and Workspaces
Storing Email Attachments in a SharePoint Site
Another function removed from Office 2010 that was available in Outlook 2007 is the capability to store email attachments in a SharePoint site rather than only as part of the email. In Outlook 2007, when you add an attachment, if you just select Attach File, the attachment is sent with the email. If the recipient opens the email, say, a few weeks later, the recipient may see an old version of the document because in the meantime you’ve updated it. There are, however, alternative ways to attach.
Click that strange icon to the right of Include. You get a new pane on the rightmost side of the screen (see Figure 15.17).
FIGURE 15.17 Attachment Options pane in Outlook 2010
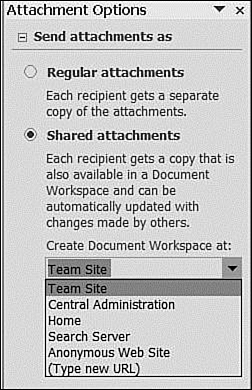
This Attachment Options pane looks familiar. It’s exactly the same list of sites as in Figure 15.10. However, Central Administration has moved two places up the list.
The point is that it’s the same technique. The attachment will now be stored in its own subsite of the Team Site, so the issue with the recipient opening the message two weeks after you sent is resolved. The recipient always sees the latest version upon opening the message.
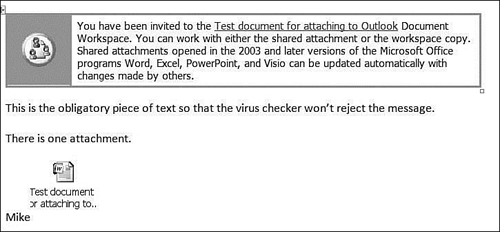
At the same time, anyone who receives the email including the message can see the info panel, as shown in Figure 15.18.
FIGURE 15.18 An email invitation to the document workspace
All the email recipients that can be added (see the following “By the Way”) are added to the list of users for the workspace that contains the document.
This list usually contains domain users. In this case, my Hotmail address couldn’t be recognized by the SharePoint site, and the sender got a message to that effect.
Summary
In this hour, we looked at some of the ways in which Office 2003, Office 2007, and Office 2010 documents combine with SPF 2010 systems and especially at the differences when non-Office document formats are used.
We concentrated on three main areas: storing and editing documents stored in document libraries; creating document workspaces, which are sites created for discussing a document; and adding attachments to Outlook emails so that the attachment is not just the version available at the time the message was sent but is (through being stored on a server) the latest version.
We discovered that unless Microsoft has reconsidered by the time you read this book and added functionality back, some functions for cooperation with SharePoint systems are missing from some Office 2010 products compared with the equivalent Office 2007 (and Office 2003 to a more limited extent) products.
Q&A
Q. How can I have both sites and workspaces listed on the default page?
A. To do this, all you have to do is add a tree view to the leftmost column (or perhaps better still, replace Quick Launch with it) with the following steps:
1. Go to the default site. Select Site Actions > Site Settings.
2. The fourth option in the second column is Tree View. Select it (see Figure 15.19).
In Figure 15.19, notice that I have selected the existing selection of Quick Launch and Enable Tree View. They are check boxes, so you can of course have both or one (or none) selected.
Now the leftmost side includes all the subsites of Team Site, including the two document workspaces (see Figure 15.20). I don’t know about you, but I think it’s much messier than Quick Launch.
FIGURE 15.19 Specifying Tree View
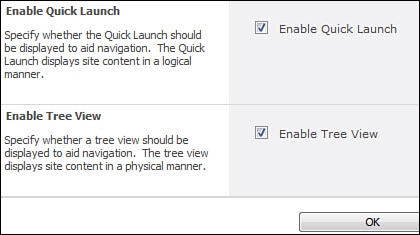
FIGURE 15.20 The look of Tree View
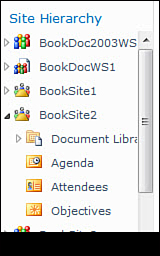
Tree View, which lists the entire structure of the site, is however more powerful. (You can go directly from this page to a library/list that’s in a subsite or workspace). It’s up to the site designer or the customer requirements to decide what is chosen.
Q. Earlier, we learned that Office 2010 applications no longer can create document workspaces. What has replaced this?
A. It wasn’t in the beta version of the Office 2010 products, but Microsoft expects to have something called Co-Authoring available by the time the applications go into production. It is only available for the users of Office 2010 products, however. That is fine if all your users run Office 2010, but if you have mixed Office 2007 and Office 2010 users, you have major problems because there are certain requirements (that is, compulsory checkout is not possible if you use Co-Authoring) to suit Co-Authoring that don’t suit Office 2007 users.
Workshop
Quiz
1. Are there any major differences between the interaction of Office 2003 or Office 2007 applications and the interaction of Office 2010 applications with SPF 2010?
2. Why is adding attachments to an Outlook email a SharePoint issue?
3. If you want to remove Quick Launch, do you go to the Quick Launch item in Central Administration?
Answers
1. There are major improvements when using Outlook 2010 (or Outlook 2007) and Access 2010 (or Access 2007) with SPF 2010 compared to using the 2003 versions. There are also (at the time of writing) several useful functions in some Office 2007 products that are not in the equivalent Office 2010 products.
2. Because one option using Outlook 2007 is to store the attachment in its own document workspace.
3. No, go to Tree View.