
HOUR 17
Sharing OneNote 2010 or OneNote 2007 Notebooks with SPF 2010
What You’ll Learn in This Hour
![]() Using OneNote 2010 with SPF 2010
Using OneNote 2010 with SPF 2010
![]() Using OneNote 2007 with SPF 2010
Using OneNote 2007 with SPF 2010
This hour looks at the various ways of using the OneNote product with SPF 2010. Because there are quite large differences between the usage with OneNote 2010 and with OneNote 2007, I cover each case separately.
Why Combine OneNote 2010 with SPF 2010
I’ve been a keen user of OneNote since its early days, and I hope by covering its use with SPF 2010 in this book encourages more people to start using it. OneNote 2010 is included in every version of Office 2010 except the Starter Edition, which should help.
OneNote is the modern equivalent of the Borland product Sidekick that was installed in many client systems in the early DOS days. It ran in the background, and you could use it for quickly copying text to and having it saved automatically.
I use OneNote (both OneNote 2007 and OneNote 2010 on different machines) as a structured location for keeping (private) copies of important sections of web pages and articles. Other people use it as a storage location for videos, slide shows, and so on. It’s a versatile product with imaginative developers, and its main strength is that you can copy and paste almost anything to it while not needing to explicitly save what you have copied.
For most OneNote users, the information they store in it is important to them, and therefore they want access to it wherever they are. Storing OneNote 2010 notebooks in SPF 2010 allows access to them from any PC running its own copy of OneNote 2010 (or OneNote 2007 if the Notebooks have been stored in that format).
There are three main ways to use OneNote 2010:
Option 1. Store and use them on a single client PC running OneNote 2010.
Option 2. Store them in a USB stick and use them from any client PC running OneNote 2010.
Option 3. Store them in an SPF 2010 (or SP 2010) server and use them from any client PC running OneNote 2010.
Option 1 is clearly a solution only when you can guarantee that you will have that PC available to you when you want to access your OneNote files. That won’t be the situation for most people.
Option 2 works all the time, provided the PCs where you are have USB ports that you have access to (and provided you don’t lose the USB stick!). In effect this means everywhere except an Internet café or other location where you can’t attach USB sticks.
Option 3 works all the time provided your SPF 2010 server is available to you via the Internet.
Unlike the situation with OneNote 2007 where it was only possible to share a new notebook, with OneNote 2010 you can also change an existing notebook to shared and thus can also move an existing OneNote notebook to a SharePoint site. So following are two slightly different sets of instructions for each of those two scenarios.
How to Create a OneNote 2010 Notebook and Store It in SPF 2010
Here are the steps for creating a new OneNote 2010 notebook and storing it in an SPF 2010 system:
1. Open OneNote 2010.
2. Select File > New > Network.
3. Fill out the new Notebook page in a similar way to Figure 17.1 (being careful with the Network Connection field).
FIGURE 17.1 Specifying the Name and Location of the new Notebook
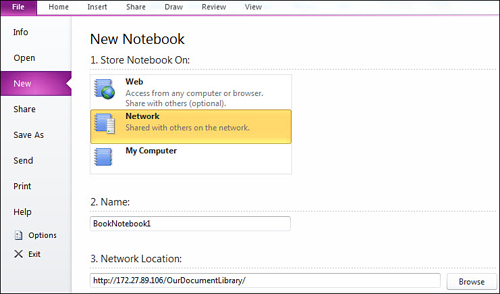
4. Click Create Notebook.
At this point, you typically see one or more boxes asking you to log in to the SPF 2010 site. Don’t forget the need to specify the full SPF1Administrator as the name.
You will probably see a temporary pop-up informing you that you are connecting to the site, and then you see Figure 17.2, which requires input.
FIGURE 17.2 Asking if an email is required
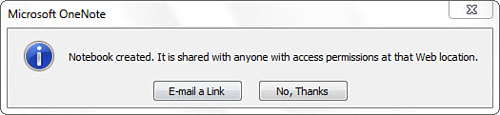
5. Select No, Thanks. (There’s no need to send an email to yourself as administrator.)
6. Scroll to the bottom of the Notebook column on the left (of OneNote 2010), and you see Figure 17.3. (If necessary, widen the column to see the full name.)
FIGURE 17.3 Checking the listing of the newly created shared Notebook

7. Right-click the name of the new Notebook and select Properties (see Figure 17.4).
FIGURE 17.4 Properties of the new shared Notebook
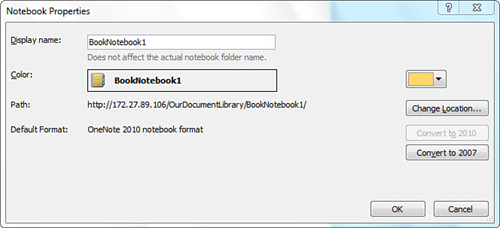
There is one possible problem. Without asking us the system has created a OneNote notebook that is in Office 2010 format. This is fine if you can be sure that all the people accessing it will be running OneNote 2010 on their client machines but is a disaster if some users are running OneNote 2007 because they can’t open the file and see the data.
8. To make sure that all our users can access this workbook, continue from Figure 17.4 and select Convert to 2007 (see Figure 17.5).
By the Way
It is possible to wait and do this later. There are two good reasons for doing it now:
![]() No user will get a message saying that he/she can’t access the data.
No user will get a message saying that he/she can’t access the data.
![]() A conversion done now before content is added will take less time.
A conversion done now before content is added will take less time.
FIGURE 17.5 List of features lost on conversion
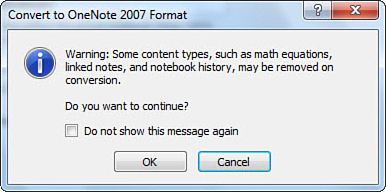
Figure 17.5 lists some of the features that are only available with the 2010 format and which therefore will be lost with this conversion. Because we have not yet added any data, we won’t lose any content, just the ability to uses these features.
9. Click OK.
To complete this exercise, open the website in your browser and access the document library where you stored the OneNote notebook (see Figure 17.6).
FIGURE 17.6 Document Library containing a OneNote 2010 notebook

How to Convert an Existing OneNote Notebook to Shared and Store It in SPF 2010
The following steps show how to share the OneNote 2010 Guide notebook that is installed as part of a standard OneNote 2010 installation. As part of the process of converting the notebook to shared, it will be stored in a SPF 2010 document library.
1. (In OneNote 2010) Select File > Information.
2. Click the Settings drop-down next to OneNote 2010 User Guide (see Figure 17.7).
FIGURE 17.7 First step in sharing an existing OneNote 2010 notebook
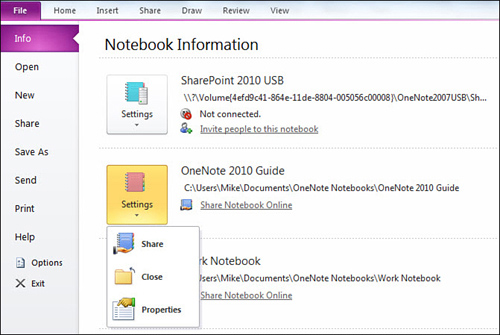
3. Click Share.
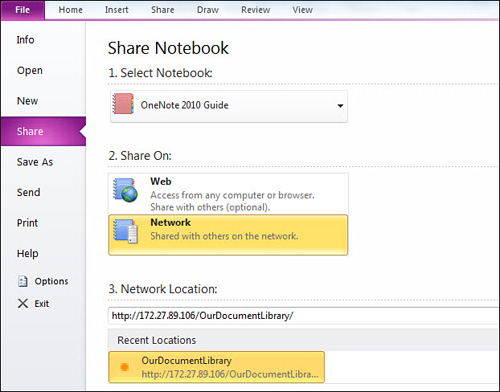
4. The Share Notebook page offers us the choice of Web and Network.
5. Select Network.
Figure 17.8 offers us the same location that we used last time we stored a notebook to an SPF 2010 document library. Then we were creating a new notebook; this time we are making a nonshared notebook shared and moving it to be stored in a location where shared makes sense. (Clearly making something shared and then leaving it in a place where only one person could access it wouldn’t make any sense.)
We want to store this newly shared notebook in the same location.
FIGURE 17.8 Prespecified Document Library for the shared notebook
6. Click Share Notebook.
You see Figure 17.9 for a short while followed by Figure 17.2 where again No, Thanks can be clicked.
FIGURE 17.9 OneNote is syncing changes.

If you want, you can check in two ways that this change of type and location has succeeded:
1. Check in OneNote 2010 the properties of the notebook after right-clicking the notebook name. The Path will be specified as http://172.27.89.106/OurDocumentLibrary/OneNote 2010 Guide/.
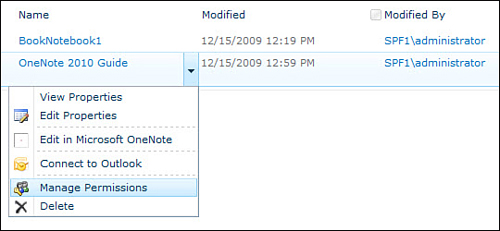
2. Open the OurDocumentLibrary document library in the browser and right-click OneNote 2010 Guide. Then select Manage Permissions (see Figure 17.10).
FIGURE 17.10 Checking the status of the formerly nonshared notebook
Accessing Permissions gives us the list of users who have access rights to the site and where these access rights have been inherited by the document library (as shown in Figure 17.11). If we want, we can then remove some of these users if the information in our shared OneNote notebook is particularly sensitive.
FIGURE 17.11 Possible to amend access permissions for a OneNote notebook
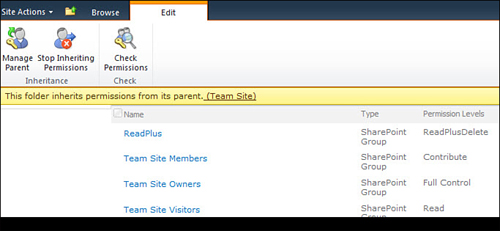
Because we can give this Notebook different access rights confirms that it is now shared, and the fact that we can access it using the browser in a document library confirms that it has been relocated.
The Basics of Using OneNote 2007 with SPF 2010
In this section, where we look at using OneNote 2007 with SPF 2010, we concentrate on creating a new shared notebook and storing it in an SPF 2010 document library.
Apart from a slightly less appealing user interface, OneNote 2007 users also lose out in one useful OneNote function that OneNote 2010 users have, even if OneNote 2007 format files are used. Figure 17.12 indicates this, using OneNote 2010 and one of the private notebooks that I use to keep track of useful SharePoint information.
FIGURE 17.12 One benefit of OneNote 2010 compared to OneNote 2007
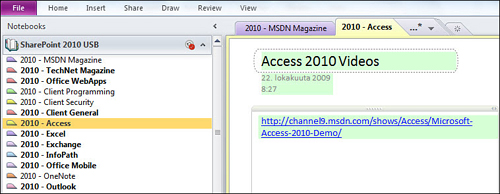
You’ll have noticed in Figure 17.12 that some of the sections in my SharePoint 2010 USB notebook (see the “Q&A” section for what this is) are bold and some aren’t.
OneNote 2010 indicates with bold a section that contains items that haven’t been accessed in this client system. This means that the items have been added in a different client system (that could have been running either OneNote 2010 or OneNote 2007) and then have later been synchronized with this client system. Similarly in the right column (further to the right than what you can see in Figure 17.12), the items in the section that haven’t been read are bold until read. This small change is amazingly useful in what might well be a common scenario.
At work you see an interesting web page, and you have time to copy/paste it into the copy of OneNote that you are using on the work machine but no time to read it. Throughout the days of the week, you do the same several times, and at the weekend you take the USB stick home and connect it to your home machine (and it syncs). Now, provided you had already read (or marked as read) everything that was already on that client system, you can see highlighted only those (sections and) items that you haven’t yet read, and you can read them at your leisure over the weekend.
Using OneNote 2007, you have to remember them and hunt for them, and you’ll probably forget where half of them are. However, the USB stick method is in the “Q&A” section, so the following section is a description of how to create a Shared Notebook when using OneNote 2007 and store that in a SPF 2010 document library. I’m well aware of the difficulties people working in (especially) large companies have in getting permission to upgrade their Office versions. (I can’t help OneNote 2003 users though, sorry).
Sharing a OneNote 2007 Notebook with SPF 2010
Here, we go through the process of creating a Shared Notebook in OneNote 2007, adding it to SPF 2010, and using the notebook from SPF 2010:
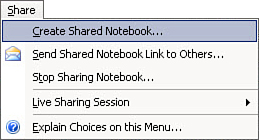
1. Open OneNote 2007 and select Share > Create Shared Notebook (see Figure 17.13).
FIGURE 17.13 Creating a Shared Notebook
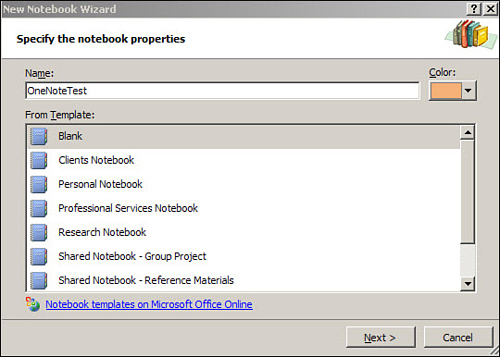
2. In Figure 17.14, I chose the Personal Notebook style to give it some built-in properties.
FIGURE 17.14 Specifying the notebook’s properties
3. Figure 17.15 shows the available options for sharing a notebook. Choose the default options. Click Next.
4. In the Confirm Notebook screen that follows, section http://spf1, click Create to display the screen shown in Figure 17.16.
5. Select Shared Documents.
6. Click Select.
This creates a folder called OneNoteTest in the Shared Documents document library, but first we need to confirm our choice of document library (see Figure 17.17).
FIGURE 17.15 Sharing a notebook
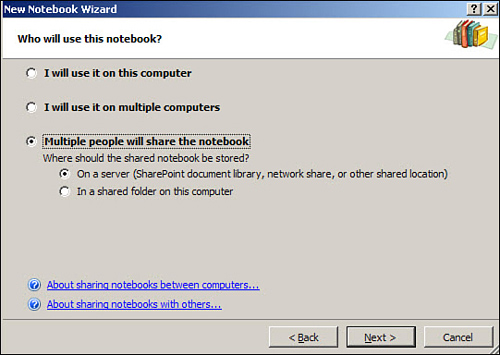
FIGURE 17.16 Specifying the document library for the notebook
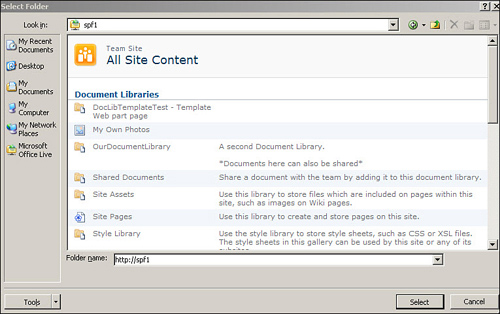
FIGURE 17.17 Sharing a notebook
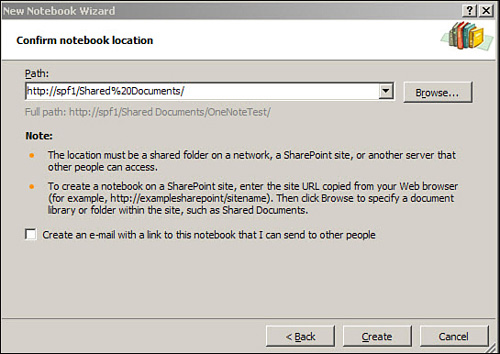
7. Deselect Create an e-mail . . .
8. Click Create. The notebook has been created in Shared Documents as a folder (see Figure 17.18).
FIGURE 17.18 The Shared Notebook in the document library
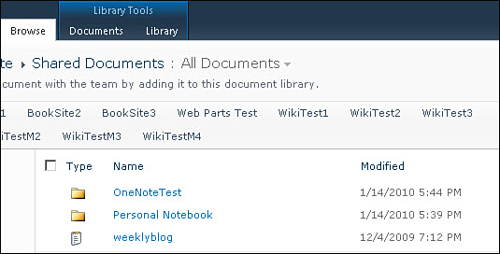
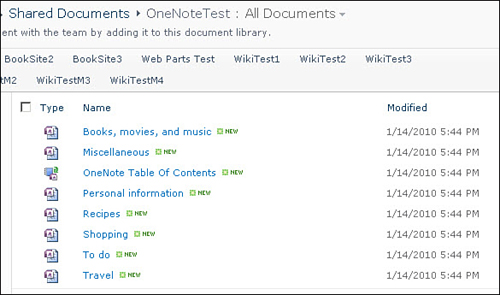
9. Open the folder and you see the sections and items that came standard with the Personal Notebook we selected in Figure 17.14 (see Figure 17.19).
FIGURE 17.19 Inside the Shared Notebook
10. Finally, click Books, movies, and music, and after a couple of warnings OneNote 2007 opens in your client machine at the first item in that section, as shown in Figure 17.20.
FIGURE 17.20 The first page of Books, movies, and music
Summary
In this hour, we’ve learned why it is useful to use OneNote 2010 and how to store its Notebooks in SharePoint Foundation 2010 document libraries so that they can be shared. We’ve done this for OneNote 2010 and (more briefly) for OneNote 2007.
Q&A
Q. What are the details of your preferred method of installing OneNote 2010 on a USB stick?
1. Make sure that you have an empty reasonably sized USB stick. (I used an 8GB stick, but I don’t store videos or PowerPoints in OneNote 2010.) One that is brightly colored and is the only USB stick you possess of that bright color is preferable. (I have mine on a small, black USB stick. I have misplaced it several times.)
2. Create a new Notebook using the following steps:
![]() Open OneNote 2010.
Open OneNote 2010.
![]() Select File > New > My Computer and Specify a name (for example, BookNotebook2) but don’t click OK yet!
Select File > New > My Computer and Specify a name (for example, BookNotebook2) but don’t click OK yet!
![]() Amend the storage location so that it points at your USB stick (in my case the F: drive).
Amend the storage location so that it points at your USB stick (in my case the F: drive).
![]() Click Create Notebook.
Click Create Notebook.
![]() BookNotebook2 opens at New Section 1; give it a different name and add some content.
BookNotebook2 opens at New Section 1; give it a different name and add some content.
3. Now pull the USB stick from the computer. Do not use Safely Remove Hardware and/or Eject.
4. (Later) Close OneNote 2010.
It is important that OneNote 2010 is still open on the computer when the USB stick is pulled from the computer. This means that the computer’s cache still contains the OneNote 2010 notebook, so when you next open OneNote 2010 (or if you have left it open), you can still see the contents of the notebook and add new content to it even with the USB stick not available.
Here are the steps for using this USB stick-based notebook on a second (or third . . .) computer. (Steps 1 and 2 can be done in any order.)
1. Open OneNote 2010 if not open.
2. Attach the USB stick.
3. In OneNote 2010, select File > Open >/ Open Notebook.
4. Select the Notebook folder on the USB stick.
5. Add content if you want.
6. Pull the USB stick.
7. Close OneNote 2010. (Again, this Notebook is available when the USB stick isn’t connected.)
Finally, here are the steps for synchronizing the USB-based notebook:
1. Open OneNote 2010 if not open.
2. Attach the USB Stick.
3. Go to the USB-based Notebook (BookNotebook2).
4. Right-click the Notebook itself and not on any item in it.
5. Select Synch This Notebook Now.
Q. What special precautions do I need to take if some of my computers are running OneNote 2007 and others are running OneNote 2010?
A. The problem is that OneNote 2010 files have a different format than OneNote 2007 files, and these naturally are not backward-compatible.
If you have both OneNote 2007 and OneNote 2010 installed on different PCs and cannot for various reasons (cost or company regulations, for example) upgrade all these copies to OneNote 2010, you should make sure that your notebooks are all OneNote 2007 format notebooks.
![]() You must either create your Notebook when using OneNote 2007 or convert any Notebook that you have created when using OneNote 2010.
You must either create your Notebook when using OneNote 2007 or convert any Notebook that you have created when using OneNote 2010.
![]() You must not convert an existing 2007 format Notebook to OneNote 2010 format when you access the Notebook for the first time when using that copy of OneNote 2010. (You will be asked, and the default is to convert, so be careful. Note too that you will be asked if you want to convert the notebook for every different computer running OneNote 2010 that opens this Notebook for the first time.)
You must not convert an existing 2007 format Notebook to OneNote 2010 format when you access the Notebook for the first time when using that copy of OneNote 2010. (You will be asked, and the default is to convert, so be careful. Note too that you will be asked if you want to convert the notebook for every different computer running OneNote 2010 that opens this Notebook for the first time.)
Provided you follow these rules, you will have no problems accessing and synchronizing (which in OneNote 2007 works as mentioned) your USB stick OneNote notebooks.