
HOUR 22
Using SharePoint Designer 2010 to Create Workflows
What You’ll Learn in This Hour
![]() Background of SharePoint Designer 2010
Background of SharePoint Designer 2010
![]() Creating workflows using SharePoint Designer 2010
Creating workflows using SharePoint Designer 2010
Although SPF 2010 includes a functional three-stage workflow solution, it is limited to that single scenario. As discussed in the first section of the previous hour, there are other ways of creating workflows for SPF 2010. The most common method is to create workflows in SharePoint Designer 2010 (SPD 2010). One reason this is common is because SPD 2010 is free, and thus most SharePoint workflow creators have access to it. The other reason is that it does a good job, which the following sections show.
Introducing SharePoint Designer 2010
SharePoint Designer (SPD) 2010 is a follow-up product to SharePoint Designer 2007, which was a follow-up product to FrontPage 2003. SPD 2010 is a tool for customizing SharePoint 2010 websites and only for customizing SharePoint 2010 websites; it will not work with SharePoint 2007 websites. This is a change from the usual behavior of Office products, and it could lead to problems if you need to maintain both Share-Point 2010 and SharePoint 2007 websites.
SPD 2010 is a free download. That doesn’t make it rubbish because it is a further development of SPD 2007, which until a year ago was a chargeable product. It’s also a fully supported product. The theory is that if the product is free (and restricted to use with SP 2010 sites and thus theoretically better), everyone who has a SharePoint site to maintain will use it for the things it is good at. Thus, sites using SharePoint 2010 will be better, and (finally) Microsoft will sell more SharePoint licenses and CALs. It’s a nice theory and certainly means that SharePoint Administrators no longer need to persuade their bosses that they need to buy it.
If you’re a SharePoint site administrator, you need a copy. The problem with the product being free is that a lot of people may download it, too, so you might need to consider ways of stopping some sets of people from using SPD 2010 with your Share-Point sites.
This hour concentrates on creating workflows using SPD 2010. Another SPD 2010 topic is covered in Hour 23, “Using SharePoint Designer 2010 to Solve Common User Requests.”
Key Facts About SPD 2010 Workflows
Following are useful things to know about SharePoint Designer 2010 workflows before you install SPD 2010:
![]() A SPD 2010 workflow, like the SPF 2010 built-in workflow we looked at in Hour 21, “Creating Workflows in SPF 2010,” can be a workflow only on a single list or library.
A SPD 2010 workflow, like the SPF 2010 built-in workflow we looked at in Hour 21, “Creating Workflows in SPF 2010,” can be a workflow only on a single list or library.
![]() All SPD 2010 workflows are created using a wizard. This makes them powerful, but at the same time, they are initially (*) restricted to doing what the wizard makers thought you—the user—would want to do. (*) The wizard generates code, and the code can be changed by hand later.
All SPD 2010 workflows are created using a wizard. This makes them powerful, but at the same time, they are initially (*) restricted to doing what the wizard makers thought you—the user—would want to do. (*) The wizard generates code, and the code can be changed by hand later.
![]() Through the wizard, SPD 2010 workflows are easy to create.
Through the wizard, SPD 2010 workflows are easy to create.
Where to Install SharePoint Designer 2010
The most common place to install SPD 2010 is on a client system (XP Pro, Vista, or Windows 7) from which you will be accessing a server system or a virtual machine (VM) running SPD 2010. This should be done only if the client system either has no Microsoft Office applications installed or only Office 2010 applications.
There is another alternative, but it’s not recommended for production use: Install SPD 2010 on the server (or VM) where you run SPD 2010. This might be handy for a testing environment on a portable (especially if that portable is not running XP Pro, Vista, or Windows 7 as its own Operating System—a MacBook for instance).
Starting to Use SharePoint Designer 2010
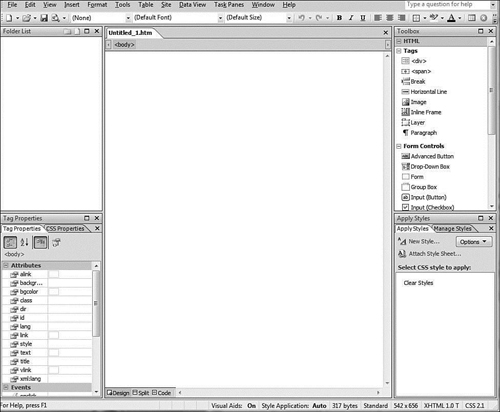
When you first opened SPD 2007, it had a clean look (see Figure 22.1), but it was a look that a Visual Studio user would feel more at home with than the typical user of Office products.
FIGURE 22.1 Opening SPD 2007 for the first time
Now look at what we get when we first open SharePoint Designer 2010 (see Figure 22.2).
FIGURE 22.2 Opening SPD 2010 for the first time
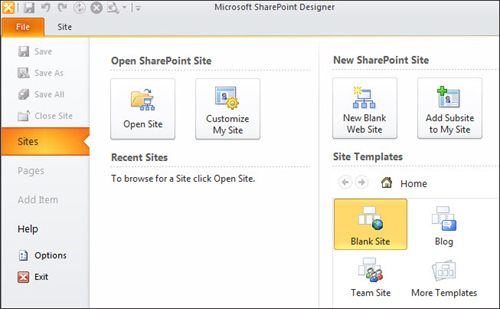
Quite a difference, isn’t it? Now that’s something that an Office user can feel at home with. The main problem that we now face is, “What is the difference between Open Site and Customize MySite? If we open a site in SPD 2010, we usually want to amend it in some way.
The answer for SPF 2010 users is that you can ignore the Customize MySite option entirely. MySite is a function that SPS 2010 has (which is usually written like that so you can tell it is not MySite or The Site That I Have), but which SPF 2010 does not have.
The problem is solved. To proceed we need to click the Open Site icon. You then need to write http://spf1 in the entry box in the screen that follows even if you run SPD 2010 in SPF1. You will be asked for credentials—in which case, use Administrator. In future accesses there will be an icon for the spf1 site that can be clicked after you use Open Site, but you then don’t even need to use Open Site in most cases because your site will be listed in the Recent Sites section of Figure 22.2. The page you now see (Figure 22.3) is too full of information.
Did you see that there is even a link to Change Site Theme here?
Creating a Workflow Using SPD 2010
Now that SPD 2010 is open, we can create a workflow. Figure 22.3 displays two direct links to two workflow possibilities: List Workflow (where the down arrow leads to the Lists in your site) and Reusable Workflow. To see all the Workflow alternatives, select File.
FIGURE 22.3 Opening the SPF 2010 site in SPD 2010
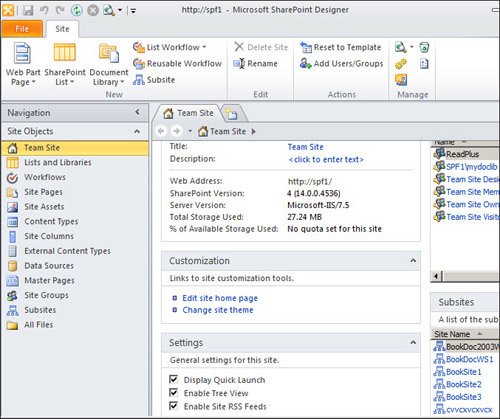
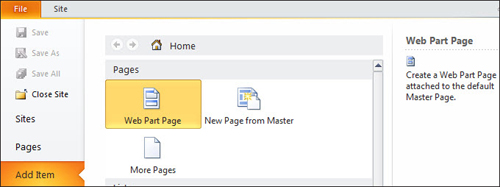
Figure 22.4 shows the top of the screen. People who have already used SPD 2007 will be surprised to see that there is no longer a File Open, but instead the default is to add a web part page to the default master page.
FIGURE 22.4 Selecting File, the default option
Doing anything with the master page is not something that we are going to do just for fun. (It’s a risky business that requires more knowledge than a couple of hours can give you, and typically it is safer to copy master pages and amend only the copies.) So we’ll move down the page to look at the Workflow section (see Figure 22.5).
FIGURE 22.5 The Workflows section of the File screen
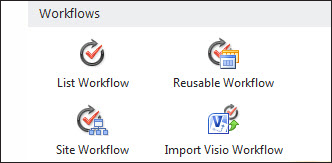
Here are two more options: Site Workflow and Import Visio Workflow. Now we create a List Workflow. (Yes, we could have also created one from the main page using the link there.).
Click List Workflow, as shown in Figure 22.5 (see Figure 22.6).
FIGURE 22.6 Defining the workflow, Step 1

The single-click extends the page to the right where a section enables you to specify the List on which this Workflow will work. Change that to The Book Documents list and click Create.
The Insert Group referred to in the step 1 box is visible above the step 1 section. There are four main options: Connection, Action, Step, and Parallel Block. Because we are just starting out with our first SPD 2010 workflow, it’s not a good idea to start typing.
Before we create any steps, we need to look at Workflow Settings.
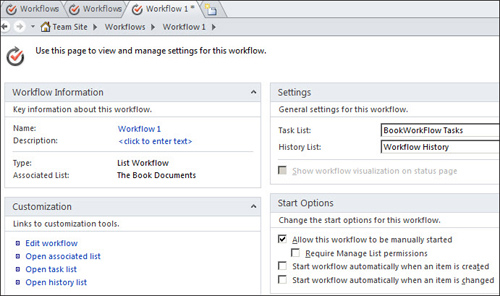
Click Workflow Settings (see Figure 22.7).
The left sections give basic information about the workflow. As you could see from the colors of the entries if this book had color images, the Name and Description fields (in blue) can be amended, but the Type and Associated List fields cannot.
The sections on the right are familiar because they are similar to the options we had in Hour 21 when we created a SPF 2010 three-stage workflow. Here are those three options (that are also partially visible at the bottom right of Figure 22.7):
![]() Manually started from an item
Manually started from an item
FIGURE 22.7 What does Workflow Settings tell us?
![]() Automatically started when a new item is created
Automatically started when a new item is created
![]() Automatically started when an item is changed
Automatically started when an item is changed
Here, make the same changes as in Hour 21: Specify that a New Task List should be created, deselect All This Workflow to Be Manually Started, and select Start Workflow Automatically When an Item Is Changed.
An example of this type of workflow can be something as simple as an administrator who wants to let people change the contents of documents within a document library, but he wants to stay informed about each change.
Let’s see how this scenario plays out for a document in The Book Documents document library. To do this, follow these steps:
1. Change the workflow name to SPD Workflow 1. Click Enter to get this value to stick.
2. Have the workflow automatically started when an item is changed. We could select all three options (or any two), but let’s suppose that only a changed item interests us.
3. Click Edit Workflow. This takes us back to Figure 22.6 again, only now the workflow name is SPD Workflow 1 and not Workflow 1.
4. Click the drop-down arrow under Conditions on the ribbon.
Figure 22.8 shows the list of possible conditions that you can apply to this workflow.
FIGURE 22.8 A list of conditions
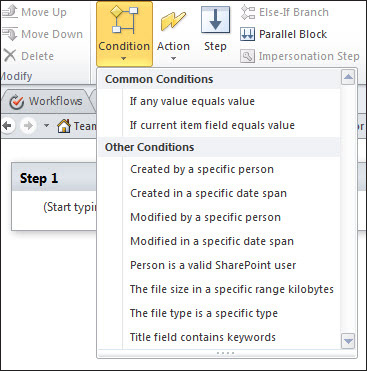
The Modified by a Specific Person option would be what our suspicious administrator is looking for.
5. Select Modified by a Specific Person.
6. Now select the drop-down button under the Action option on the ribbon.
Unlike the situation with SPD 2007, this is a long list because it shows all the items. (SPD 2007 had a short list that included an All Items option.) See Figure 22.9 for just the first items in the list.
7. Here select Create List Item (at the bottom of Figure 22.9 but not at the bottom of the drop-down on your screen).
In total, we have so far set the following:
Condition = Modified by a Specific Person
Action = Create List Item
FIGURE 22.9 A image showing some actions
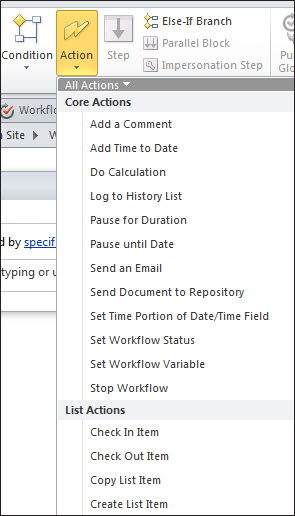
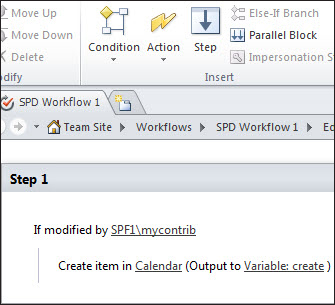
Figure 22.10 shows what we now have.
FIGURE 22.10 One condition and one action set
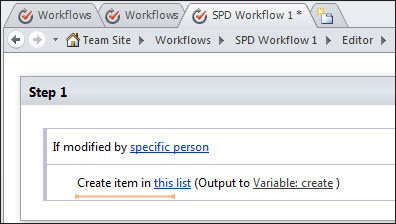
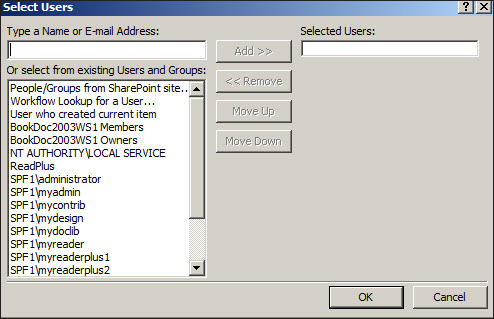
8. Click the underlined “specific person” to specify the person we want to monitor for modifying documents in the list. Click a name, and there’s a useful pop-up with a list of names to choose from (see Figure 22.11).
9. Select MyContrib. (There’s no point in selecting someone with only Read rights who can’t modify anything.).
10. Click Add to move that name over to the Selected Users column.
11. Click OK.
12. Click “this list.” (See Figure 20.9 where the user mycontrib is now specified.)
FIGURE 22.11 Choosing the user to monitor
13. After a momentary panic when there is no list of Lists visible, click in the Lists section of the screen, which gives you a drop-down with a list of Lists (see Figure 22.12).
FIGURE 22.12 Selecting the List the action goes to

14. Select Calendar from that list (see Figure 22.13). (I’m using Calendar just to show that you can use almost any list type when creating a workflow like this.)
FIGURE 22.13 Completing the information on the calendar item
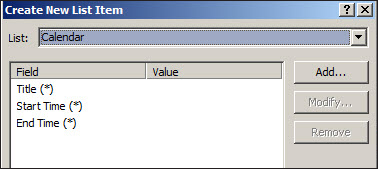
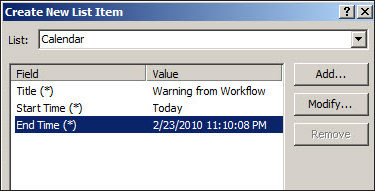
15. Double-click the Title, Start Time and End Time fields and enter the following values:
Title = Warning from Workflow
Start Time = Today
End Time = (a suitable time a few days after Today)
See Figure 22.14 for a set of suitable values; this was done on February 18, so the date chosen for End Time was five days later.
FIGURE 22.14 Appropriate values for the action
16. Click OK.
17. Click Save on the Ribbon (far left side of the ribbon).
We could at this point add another step (using Step in the ribbon, naturally) but let’s decide for now this is all we need.
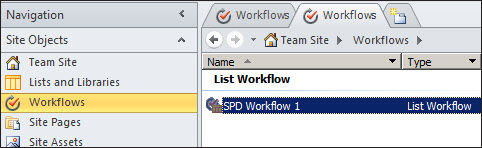
Creating the workflow is now finished, and after we close the workflow (which was already saved in step 16) by clicking the “x” at the top-right portion of the workflow part of the screen, you’ll see Figure 22.15 where this single workflow is listed.
FIGURE 22.15 The list of List Workflows
We can now abandon SPD 2010 for a while (leave it open though, as you will need it again soon), because we want to determine whether the workflow we just generated actually works.
Follow these steps to see if our workflow works:
1. Go back to our browser. Open the site there. Open the My Book Documents library. Change the user to MyContrib and then open a document. Amend it and save it back to the site.
2. Look now at the Calendar, and you will not see a new entry! So what did we do wrong? While in SPD 2010 we saved the workflow. All this meant was that we had created a workflow and saved it—an action that is roughly equivalent to saving a file for later use. What we now need to ensure is that the workflow is activated.
3. Go back to SPD 2010. (It was left open, as shown in Figure 22.15.)
4. Open SPD Workflow 1 again.
5. Next to the Save option on the ribbon is a Publish icon. Click it. Now we can repeat our small test.
6. Go back to our browser. Open the site there. Open the My Book Documents library. Change the user to MyContrib (if we are not already signed in as MyContrib) and then open a document. Amend it and save it back to the site.
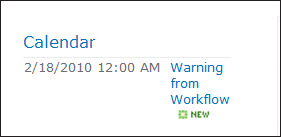
7. Look at the Calendar (refresh if you have left it open in a Tab), and you see a new entry (Figure 22.16).
FIGURE 22.16 A new entry in the Calendar
We’ve learned that using SPD 2010 to create workflows is more powerful and yet much easier to do than using the so-called “simple” three-stage workflow included in SPF 2010.
The SPD 2010 workflow wizards are powerful, relatively flexible, and will probably provide as much workflow as most people will want, so even if you are a Visual Studio expert, don’t discard the SPD 2010 option for workflows, but use it when you can and use Visual Studio 2010 for your workflows only when SPD 2010 workflows aren’t flexible or powerful enough for your needs.
Summary
Here we looked in general at SharePoint Designer (SPD) 2010, discussed its availability, and also considered where to install it.
SPD 2010 was used to create a workflow that enabled an administrator to be warned if a particular user did something he perhaps shouldn’t.
Q&A
Q. Once I’ve written a workflow in SPD 2010, can I modify it?
A. Yes, you can. Here’s how you amend the workflow we created to send a message to the Announcements list as an alternative (for a different user) to sending a message to a calendar:
1. Go back to SPD 2010 and if necessary select open the site (http://SPF1) and click Workflows. Open SPD Workflow 1 with double-click and then select Edit Workflow (see Figure 22.17).
FIGURE 22.17 Starting to modify an existing workflow
2. First select Step 1; then click Step on the ribbon, and an empty Step 2 is created below Step 1.
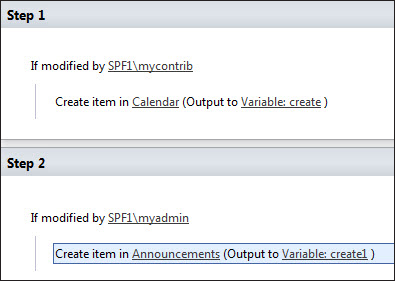
3. Let’s leave Step 1 there, but this time let’s say that we want something to happen when MyAdmin amends a document. We want to change the list that the message is sent to in this case, but we still want the message to be sent when something is amended (by MyAdmin). In Step 2 we also select the Announcements list and give Title a value. We then select Add and get a list of fields from the Announcements list. We select Body from that list and write some text in it. Click OK to display Figure 22.18.
FIGURE 22.18 Adding a second condition
4. We now click Save and then Publish. An item is created in the calendar if MyContrib amends something, and a different item is created in Announcements if MyAdmin amends something. (To remove Step 1, click the drop-down that appears to the right of the If Modified By SPF1Mycontrib Line and select Delete Condition.)
Q. How about Else If? How does that work?
A. Go again to the present workflow. There is an Else-If Branch option in the ribbon provided you first select (single-click) a condition or an Action. (It is not available if you select a step.)
Q. How about just adding an action to an existing condition?
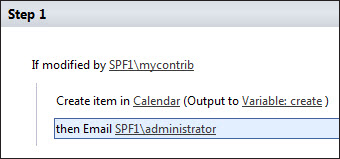
A. To do that, you need to select the action already listed. Then select Action from the toolbar. Select an action and fill in the rest of the information. As shown in Figure 22.19, after you select email, the system needs to know who to send the email to.
FIGURE 22.19 Adding a second action for the same condition
Workshop
Quiz
1. If you have a copy of Visual Studio 2010 (and development skills to match), why would you still use SPD 2010 for workflow?
2. Can you send messages to different people at the same stage in the workflow?
Answers
1. SPD 2010 can be used for prototyping or for workflows that don’t require Visual Studio 2010.
2. You can add a second action to the same step of a workflow (see Figure 22.19). Two or more of the actions belonging to a condition can be emails to different accounts and people.