
What You’ll Learn in This Hour:
Built-in commands for WPF
Creating your own custom commands
In modern applications, a user often can execute a command in more than one way. WPF provides a convenient facility for wiring multiple gestures to a single command in an application (such as cut or paste).
Consider a sophisticated application such as Microsoft Word. You can perform hundreds of functions with the application. A good number of those functions can be executed in more ways than one. If you want to bold some selected text, you could click the Bold icon on the toolbar, or you could press Ctrl+B on the keyboard, or (with Word 2007) you could right-click and select the Bold icon from the context menu. All three methods execute the same action—making the text bold. We call these user actions gestures.
Generally, a gesture is some way that a user provides input to an application. Most commonly, and especially in business applications, gestures are nothing more than mouse clicks or keyboard presses. Going back to the Word example, the action itself, making the text bold, could be implemented in the event handler for each of the gestures we listed. That would cause a lot of duplicated code, and if you began to add more gestures to support the same action, the maintainability would really suffer.
The action of making the text bold can be abstracted into a command. In WPF, a command is a function or action that can be bound to an input gesture. This declarative binding is similar to the technique of data binding and helps reduce the code that we need to maintain.
Aside from supporting the overall concept of commands, WPF has five built-in libraries of commands. We’ll be using a couple of these in our Text Editor. The libraries are listed in Table 10.1.
Table 10.1. Built-In Command Libraries in WPF
| This library contains commonly used commands such as |
| These are commands for moving around inside an application. These can easily be confused with some of the editing commands as well as navigation commands. The commands in this library are for more general use than the other two. Here you will find commands such as |
| This library is helpful for dealing with text. It includes commands for alignment, formatting, and the navigation of text. Some examples of command names are |
| These are commands for controlling audio and video in your applications. Some typical commands are |
| These commands are most useful for navigating in an application built around a web browser metaphor. Commands include |
The toolbar in our Text Editor application has several buttons for manipulating the text, but they don’t do anything yet. Let’s leverage the power of the built-in commands to extend our application.
Before we make any changes to the code, run the application, enter some text, and make it bold using Crtl+B.
WPF binds the
EditingCommands.ToggleBoldcommand to the keyboard gesture Ctrl+B by default. You can see the default binding for the built-in commands in the official documentation.We would like our Bold icon on the toolbar to execute the same command. Open
TextEditorToolbar.xaml, and locate theToggleButtonwe namedboldButton. Modify the opening tag to match the following:<ToggleButton x:Name="boldButton" Command="EditingCommands.ToggleBold" ToolTip="Bold">
We point the
Commandattribute of theToggleButtonto the static propertyEditingCommands.ToggleBold. Run the application again. You can make the text bold with either the keyboard or the toolbar now.Go ahead and add the bindings for
ApplicationCommands.Cut,ApplicationCommands.Copy,ApplicationCommands.Paste,EditingCommands.ToggleItalic, andEditingCommands.Underline. The complete markup forTextEditorToolbar.xamlis shown in Listing 10.1.Example 10.1. Markup for TextEditorToolbar.xaml
<UserControl x:Class="TextEditor.TextEditorToolbar"
             xmlns="http://schemas.microsoft.com/winfx/2006/xaml/presentation"
             xmlns:x="http://schemas.microsoft.com/winfx/2006/xaml"
             Loaded="UserControl_Loaded">
    <ToolBarTray>
        <ToolBar>
            <Button ToolTip="Open">
                <Image Source="Icons/folder_page.png" />
            </Button>
            <Button ToolTip="Save">
                <Image Source="Icons/page_save.png" />
            </Button>
        </ToolBar>
        <ToolBar>
            <Button Command="ApplicationCommands.Cut"
                    ToolTip="Cut">
                <Image Source="Icons/cut.png" />
            </Button>
            <Button Command="ApplicationCommands.Copy"
                    ToolTip="Copy">
                <Image Source="Icons/page_copy.png" />
            </Button>
            <Button Command="ApplicationCommands.Paste"
                    ToolTip="Paste">
                <Image Source="Icons/page_paste.png" />
            </Button>
        </ToolBar>
        <ToolBar>
            <ToggleButton x:Name="boldButton"
                          Command="EditingCommands.ToggleBold"
                          ToolTip="Bold">
                <Image Source="Icons/text_bold.png" />
            </ToggleButton>
            <ToggleButton x:Name="italicButton"
                          Command="EditingCommands.ToggleItalic"
                          ToolTip="Italic">
                <Image Source="Icons/text_italic.png" />
            </ToggleButton>
            <ToggleButton x:Name="underlineButton"
                          Command="EditingCommands.ToggleUnderline"
                          ToolTip="Underline">
                <Image Source="Icons/text_underline.png" />
            </ToggleButton>
            <Separator />
            <ComboBox x:Name="fonts"
                      MinWidth="100"
                      ItemsSource="{x:Static Fonts.SystemFontFamilies}"
                      ToolTip="Font"/>
            <ComboBox x:Name="fontSize"
                      MinWidth="40"
                      ToolTip="Font Size"/>
        </ToolBar>
    </ToolBarTray>
</UserControl>
Our toolbar is mostly functioning now, except for the open and save commands. However, our menu bar is pretty useless. We can bind the same commands to the menu bar with very little effort.
Open the
UserControlwe namedTextEditorMenu.xaml.Initially, we defined the menu items along these lines:
        <MenuItem Header="_Edit">
            <MenuItem Header="_Undo" />
            <MenuItem Header="_Redo" />
            <Separator />
            <MenuItem Header="Cu_t" />
            <MenuItem Header="_Copy" />
            <MenuItem Header="_Paste" />
            <MenuItem Header="_Delete" />
        </MenuItem>
This is only the Edit portion of the menu. We are going to replace this portion of the menu with the following:
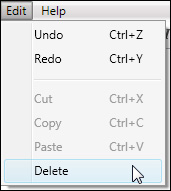
        <MenuItem Header="_Edit">
            <MenuItem Command="ApplicationCommands.Undo" />
            <MenuItem Command="ApplicationCommands.Redo" />
            <Separator />
            <MenuItem Command="ApplicationCommands.Cut" />
            <MenuItem Command="ApplicationCommands.Copy" />
            <MenuItem Command="ApplicationCommands.Paste" />
            <MenuItem Command="EditingCommands.Delete" />
        </MenuItem>
Run the application, and examine the Edit menu as shown in Figure 10.1. Notice that even though we removed the
Headerattribute fromMenuItem, the name of the command is displayed. Additionally, we see the corresponding keyboard shortcut displayed on each menu item. Both the name and the keyboard shortcut are provided from the command object to which we are binding. However, if you hold down the Alt key, you will see that we are no longer able to navigate the menu from the keyboard. We could correct this by providing the originalHeaderattributes along with theCommand.
You might be curious to know why we did not go ahead and add command bindings for the open and save commands on the toolbar or the menu. All the commands we have used so far are generic, whereas a command such as Open or New is specific to the application. We need to define what ApplicationCommands.New means in the context of our application.
Let’s define a few of these application specific commands. We’ll begin with New. We would like the New command to replace the document open in our Text Editor with a new instance of FlowDocument.
We decided earlier that the responsibility of managing the document would reside in the class
DocumentManager. Open the class in the editor and add the following method:public void NewDocument() { _currentFile = null; _textBox.Document = new FlowDocument(); }
This is a fairly simple method. Remember that _
currentFileis a string representing the path to a currently loaded document. We set it tonullbecause it does not yet exist on the disk. Then we provide a new instance ofFlowDocumentto theRichTextBox.Now we need a way to bind this new method to the
ApplicationCommands.Newcommand. Everything that derives fromUIElementhas a collection calledCommandBindings.CommandBindingsis a library of commands available toUIElementand any of its child elements. In our case, we’ll add a binding to theWindow, which means that the binding will be accessible in ourUserControlelements as well.Open
MainWindow.xaml, and immediately beneath the openingWindowelement add the following:<Window.CommandBindings> <CommandBinding Command="ApplicationCommands.New" Executed="NewDocument" /> </Window.CommandBindings>
The command binding must point to an event handler with an
ExecutedRoutedEventArgsparameter.NewDocumentwill be that event handler, but we have not yet implemented it.Open the code-behind for
MainWindow.xaml, and add the following method:private void NewDocument(object sender, ExecutedRoutedEventArgs e) { _documentManager.NewDocument(); status.Text = "New Document"; }
Here we call our
DocumentManager.NewDocumentmethod, as well as setting some text in the status bar to let users know what they did.At this point the command binding is ready for use, but we have not yet bound any gestures to it. If you run the application and place a breakpoint in the event handler we just added, you will discover that the keyboard shortcut Ctrl+N is bound to the
ApplicationCommands.Newby default.Let’s bind
ApplicationCommands.Newto a menu item. Close the application, and openTextEditorMenu.xamlin the editor. Find theMenuItemwhoseHeaderattribute is_Newand change it to<MenuItem Command="ApplicationCommands.New" />
You can now select File, New from the menu bar, in addition to using the Ctrl+N shortcut; both gestures execute the same code. Run the application and see.
Now that we have a feel for how commands and command bindings work, it will be very easy to flesh out some of the additional features of the Text Editor. In the following steps, we will not be doing anything new, but we’ll utilize both button and menu gestures.
Open the code-behind for
MainWindow.xamlin the editor. We’ll begin by adding the additional event handlers we will need for general document management. Here are the handlers to add:private void OpenDocument(object sender, ExecutedRoutedEventArgs e) { if (_documentManager.OpenDocument()) status.Text = "Document loaded."; } private void SaveDocument(object sender, ExecutedRoutedEventArgs e) { if (_documentManager.SaveDocument()) status.Text = "Document saved."; } private void SaveDocumentAs(object sender, ExecutedRoutedEventArgs e) { if (_documentManager.SaveDocumentAs()) status.Text = "Document saved."; } private void ApplicationClose(object sender, ExecutedRoutedEventArgs e) { Close(); }
The last handler isn’t really for managing documents, but it is convenient for us to take care of it at this time. The other handlers, aside from updating the status, delegate to the corresponding methods on
_documentManager. We’ve already implemented these methods in previous hours, so there is very little work for us to do here.Let’s add the markup to
MainWindow.xamlto map the command bindings to these event handlers. TheWindow.CommandBindingselement should look like this:<Window.CommandBindings> <CommandBinding Command="ApplicationCommands.New" Executed="NewDocument" /> <CommandBinding Command="ApplicationCommands.Open" Executed="OpenDocument" /> <CommandBinding Command="ApplicationCommands.Save" Executed="SaveDocument" /> <CommandBinding Command="ApplicationCommands.SaveAs" Executed="SaveDocumentAs" /> <CommandBinding Command="ApplicationCommands.Close" Executed="ApplicationClose" /> </Window.CommandBindings>
Now we need to tie these command bindings to specific gestures. We start by adding them to the toolbar. Open
TextEditorToolbar.xamlin the editor. The first child element of theToolBarTrayincludes buttons for opening and saving documents. Modify the childToolBarelement as follows:<ToolBar> <Button Command="ApplicationCommands.Open" ToolTip="Open"> <Image Source="Icons/folder_page.png" /> </Button> <Button Command="ApplicationCommands.Save" ToolTip="Save"> <Image Source="Icons/page_save.png" /> </Button> </ToolBar>
Open
TextEditorMenu.xamland change theMenuItemelements in the first part of the menu to look like this:<MenuItem Header="_File"> <MenuItem Command="ApplicationCommands.New" /> <MenuItem Command="ApplicationCommands.Open" /> <MenuItem Command="ApplicationCommands.Save" /> <MenuItem Command="ApplicationCommands.SaveAs" /> <Separator /> <MenuItem Command="ApplicationCommands.Close" /> </MenuItem>
That’s all. We’ve now mapped all our commands to at least one command binding.
It’s very common that at times, you won’t want a command to be available. For example, it doesn’t make sense for the Save command to be available when there is nothing to save. Of course, you will want to give a visual indication to the user that the command is not available. This is normally in the form of a menu or button being disabled.
Command bindings raise an event called CanExecute. We can handle this event and inform the binding if the command is available.
Open
MainWindow.xamland modify theCommandBindingforSaveto match the following:<CommandBinding Command="ApplicationCommands.Save" CanExecute="SaveDocument_CanExecute" Executed="SaveDocument" />
The
MainWindowwon’t know if the document is available for saving, so we’ll need to modifyDocumentManagerto provide this information. Add the following method toDocumentManager:public bool CanSaveDocument() { return !string.IsNullOrEmpty(_currentFile); }
In the code-behind for
MainWindow.xaml, we’ll need to add the following handler:private void SaveDocument_CanExecute(object sender, CanExecuteRoutedEventArgs e) { e.CanExecute = _documentManager.CanSaveDocument(); }
Run the application. If you examine the File menu, you will see that the
Savecommand is disabled. However, if you first perform a Save As, which sets a value for _currentFile, the command becomes available.
If you run the Text Editor as we’ve built it so far, and examine the shortcuts key listed under the File menu, you’ll notice that ApplicationCommands.SaveAs did not define a default shortcut. You can define your custom gesture for a command using an input binding. Input bindings are similar to the command bindings we discussed earlier in the hour. UIElement defines a collection of input bindings that are automatically available to all of the element’s children. Usually, you’ll create your input bindings at the Window level of your application.
There are two types of input bindings: KeyBinding and MouseBinding. As you might have guessed, KeyBinding is for activating commands with the keyboard, and MouseBinding is for activating them with the mouse.
It wouldn’t really be useful, but let’s bind a gesture with the mouse to the SaveAs command, perhaps turning the wheel while holding down control.
Open
MainWindow.xaml, and just after the command bindings add the following:<Window.InputBindings> <MouseBinding Gesture="Control+WheelClick" Command="ApplicationCommands.SaveAs" /> </Window.InputBindings>
Run the application. Hold down the Control key, roll your mouse wheel, and you’ll be presented with the Save As dialog.
The Gesture attribute of the MouseBinding element can be set to any combination of values from the MouseAction enumeration and the ModifierKeys enumeration; both enumerations are in the System.Windows.Input namespace. A value from MouseAction is required, but a ModifierKeys is optional. If both values are used, separate them with a +.
Using a KeyBinding is very similar; if we wanted to define Shift+S to invoke SaveAs, it would look like this:
    <Window.InputBindings>
       <KeyBinding Key="S"
                   Modifiers="Shift"
                   Command="ApplicationCommands.SaveAs" />
   </Window.InputBindings>
The primary difference is that we set these values for two different attributes, instead of just one. In this case, Key is the required attribute, whereas Modifiers is optional. Modifiers expects a value from the same ModifierKeys enumeration we used in the MouseBinding. However, the attribute Key expects a value from the Key enumeration also defined in the System.Windows.Input namespace.
You can also define multiple modifiers for a binding, for example, to include the Alt key along with the previous key binding:
    <KeyBinding Key="S"
                   Modifiers="Shift+Alt"
                   Command="ApplicationCommands.SaveAs" />
Watch Out!
There are a couple of “gotchas” that you might run into when defining gestures for your commands. First, the syntax for combining values in the ModifierKeys enumeration uses the plus (+) character. This is not the standard operator for combining flags. Usually, you would use the pipeline (|) character. In fact, everywhere else in WPF, the pipeline is what you use. ModifierKeys is the exception.
The second problem you might encounter is specifying an input binding with a gesture that is already in use elsewhere in the application. The gestures are all routed events, and if they are marked as handled before they arrive at the element where your event handler is defined, you’ll never see them.
Commands and command bindings are a powerful way to simplify your code. The libraries of built-in commands enable you to add rich functionality to your application declaratively. With command bindings you can reduce the complexity of your code while still giving users options for executing commands.
We were able to apply these ideas to our Text Editor, and we’ve seen how commands and their bindings operate in real working software.
Read over the various enumerations we have discussed in the
System.Windows.Inputnamespace. A basic knowledge of the values available will come in handy as you are building your own application.Read over the lists of built-in commands as well. Remember that there are five different libraries. The two most important ones are
ApplicationCommandsandEditingCommands.