
Hour 17. Attaching Big Data: Using Core Data in Your Applications
What You’ll Learn in This Hour:
• The terminology of Core Data
• How to create Core Data models
• How to access Core Data through Managed Objects
• How to Bind OS X interfaces to Core Data entities
Way back in Hour 3, “Understanding the MVC Design Pattern,” you learned about the model-view-controller design pattern as we walked through an application (Library) that demonstrated the principles of this pattern. That example showed a Core Data model that provides data to the views within an iOS application—linking authors with their books.
Why, now, are we returning to Core Data for an hour’s lesson? Because your authors believe that Core Data—although a large topic—is important enough to warrant a full formal introduction. Core Data can change the way you think about application design and the way you code. Instead of you having to laboriously write methods to interact with a database, Core Data can abstract the process for you, and, coupled with the Interface Builder editor, even create rather complex application functionality without you ever touching a line of code. This hour demonstrates exactly that.
Introducing Core Data
Core Data is a large, rather-intimidating framework that is easier to learn through use than from sitting down and reading a large reference manual. If you recall, Core Data provides high-performance persistent storage to your applications. The default implementation of this storage is through SQLite, but that, aside from being an interesting fact, is irrelevant. The back-end storage is abstracted from the user, and from you, the developer. In fact, the less you try to apply your knowledge of relational database systems to Core Data, the further ahead you’ll be.
Why Core Data?
Small iOS and OS X applications are well suited to use the defaults system available for storing simple key-value data. This approach does not scale well, however. It also does not allow (without tons of programming) a representation of real-world data. Core Data fills this need without the developer having to re-invent the wheel.
Did You Know?
OS X and iOS provide a system for storing key/value pairs called the defaults system. It is accessed through the NSUserDefaults class and provides persistent data storage for application preferences, settings, and other simple data structures.
Core Data also provides some speed-of-development benefits. Using the Xcode Core Data model editor, you can define, visually, what your data model looks like. No coding, no initializing and allocating: Just point and click. You can also create classes that map directly to that data model, which makes accessing information as easy as accessing a variable. Even more impressive, you can create OS X applications that display, sort, add, modify, and delete data without writing one single line of code. Not one.
Speaking the Core Data Language
If you have worked with databases, it isn’t hard to make the leap to using Core Data. What you have to do, however, is stop thinking about manually defining the bits and pieces that tie pieces of data together. Instead, you concentrate on the model itself, not how it is implemented. Let’s quickly review some of the language you’ll often encounter when working with Core Data. This will help you get away from the SQL mindset and start thinking in Core Data terms:
• Entity: A unique unit consisting of pieces of related data—like a company, a person, an address, and so on—similar to a database table. A Core Data entity can be mapped to an object.
• Attributes: The “pieces of related data” that make up an entity. Consider these the properties of the entity object. A person entity might have attributes like first name, last name, email address, and so on. In database terms, these are the columns within a table.
• Relationships: The defined connections between two entities. A person and address entity might be defined by a relationship that states “a person can have multiple addresses.” Unlike a database where columns are used to relate data, relationships are defined between entities and the implementation is handled behind the scenes.
• Properties: The attributes and relationships of an entity.
• Schema: The combination of entities, attributes, and relationships that make up a Core Data model.
• Object store: The “back-end” storage for a Core Data model. The object store maintains your data between application executions.
• Object graph: A representation of the relationship between objects as a directed graph.
• Managed object: An instance of the objects within a schema (NSManagedObject). Although roughly equivalent to a database record, you work with managed objects like other Objective-C objects and can walk the object graph using dot notation to deference across entities and attributes. You also use standard methods for modifying information within the model. Multiple objects (think the results of a search) are managed in an NSSet of NSManagedObjects.
• Managed object context: Working with a managed object requires a managed object context. The context ensures integrity within the managed object and the underlying object store (NSManagedObjectContext).
• Fetch request: An object that describes data to be retrieved from an object store. Fetch requests define the entity that will serve as the starting point in the object graph that is created by the request, the sort order for when multiple objects are returned, and a filter (called a predicate) to narrow the results.
• Predicate: A string that describes a means of limited the data returned by a fetch request. A predicate to select all Person objects with a last name of “Smith” might look like this: Person.lastName="Smith".
• Configuration: Core Data configurations provide a method of defining sets of entities so that you can define a master set of entities that you need and then use different configurations to target specific subsets of these entities.
• Fetched properties: A weak one-way relationship that is defined using a fetch request rather than a true defined relationship. You might define a relationship to “other people with the same last name” as fetched property for a Person entity. Made available as an array rather than a set.
• Binding: A defined relationship between an object and a Core Data entity or attribute. You learn how to bind UI objects directly to Core Data entities a bit later this hour.
Unfortunately, getting into the full scope of Core Data possibilities is beyond the scope of this book, but we do look at enough of the tools and functionality for you to gain an appreciation this valuable framework and toolset.
By the Way
At the time of this writing, Core Data does not support any UI bindings in iOS applications. Although I hope this changes, a great many of the wow features of Core Data are available only when doing OS X development.
Using the Xcode Core Data Model Editor
Your Core Data work begins with a Core Data model. The model is the Core Data schema, and is developed directly in Xcode with the Core Data model editor. Models get into your apps in one of two ways: You either add them during the project-creation process by clicking the Use Core Data check box, as shown in Figure 17.1, or you add a Data Model file (.xcdatamodeld) from the Core Data iOS/OS X file template categories in Xcode.
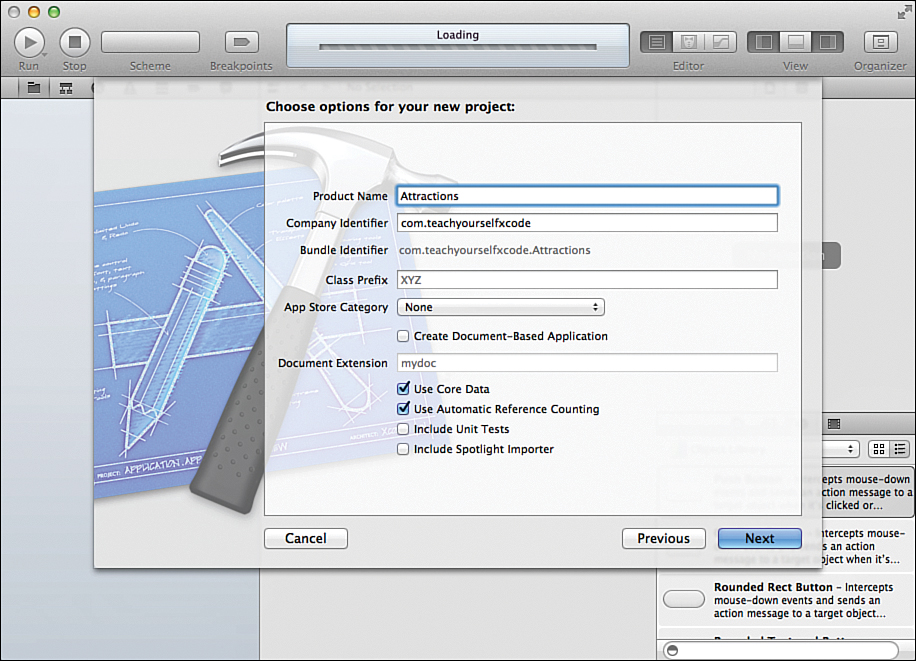
Figure 17.1. Add a Core Data model to your project during creation (or afterward).
In this hour, the walkthrough example creates a simple Core Data model and application that collects information about cities, and notable attractions within each city. If you want to follow along, create a new OS X Cocoa application named Attractions now. Be sure to choose to use Core Data during the project-creation process. If you would rather just read, don’t worry; the project files are included in this hour’s Projects folder.
The first step in creating a Core Data model is to open the model file for editing. To do this, select the .xcdatamodeld file in the Project Navigator. Your screen refreshes to show the Core Data model editor, as shown in Figure 17.2.
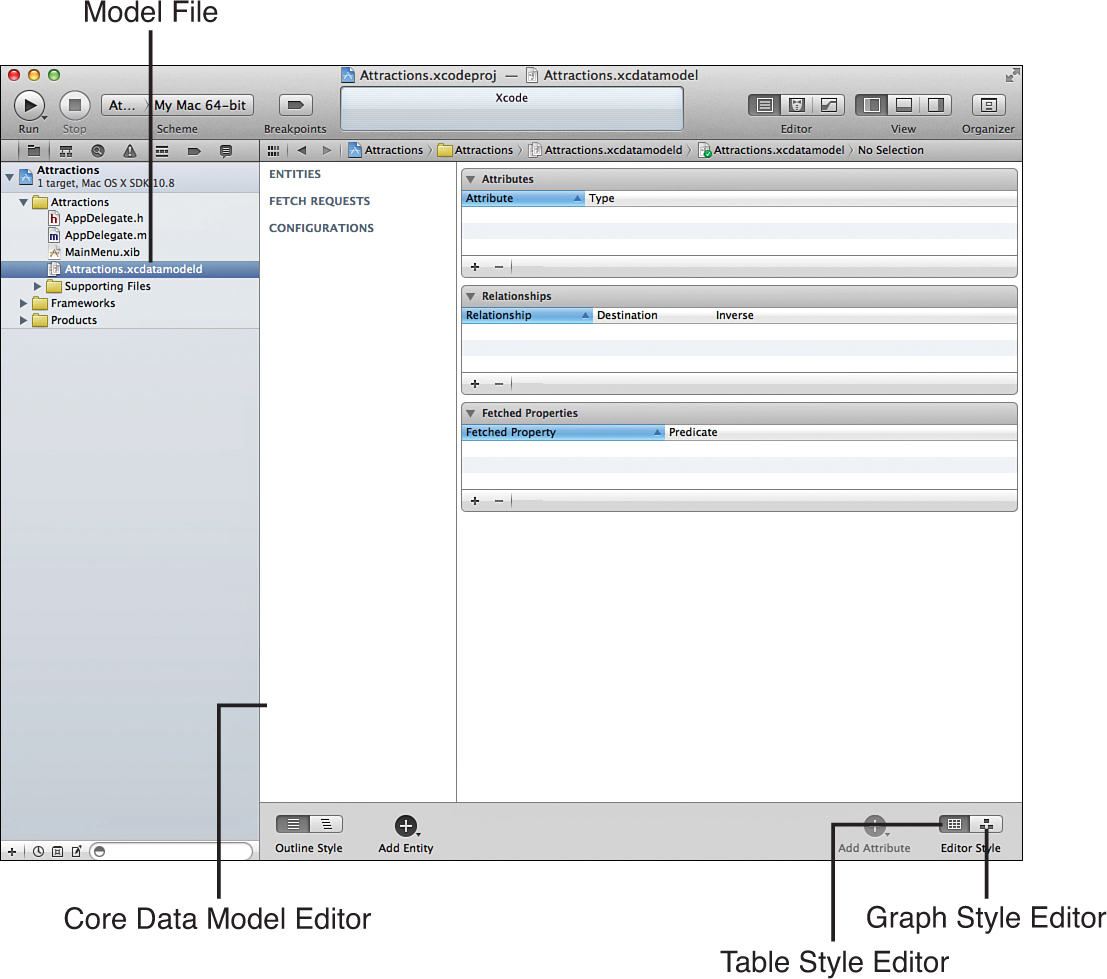
Figure 17.2. Click the model file to load the editor.
Use the editor style buttons in the lower-right corner of the Editor area to switch to the table-style display. The graph displays a visual representation of your data, but is not nearly as easy to use as the table style. This example demonstrates use of the editor with the table style.
In the left column of your editor, you’ll see headings for entities, fetch requests, and configurations. Because you haven’t created anything yet, these are empty—with the exception of a default configuration. To the right of the column are three sections titled Attributes, Relationships, and Fetched Properties. These contain information that describe/define your entities, once they are defined. Speaking of which, let’s create some entities.
Adding Entities
Everything in a model ties to an entity. To add an entity, follow these steps:
1. Click the Add Entity button.
2. A new entity with the name Entity is added to the entity list in the column on the right of the model editor.
3. The entity name is made available for editing. Begin typing to set it, as shown in Figure 17.3. You can double-click the name of the entity to change it at any time.
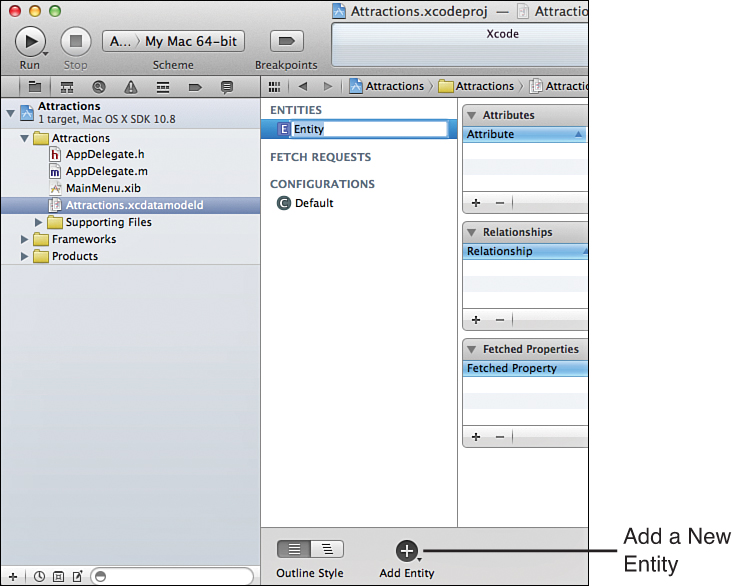
Figure 17.3. Add a new entity to your model.
Watch Out!: The Mysteriously Changing Interface
The Add Entity button is really a pop-up menu. If you click and hold, it has options for creating Fetch requests and configurations as well as entities. If it has been changed from the default, it will not show Add Entity in its label. Just click and hold to set it back to the Add Entity default.
This example shows two entities: Attraction (something fun to do) and Location. They are linked by two relationships: a one-to-many relationship between location and attraction (a location can have multiple attractions) and a one-to-one relationship between attraction and location (a specific attraction can only exist in one location.)
Using these steps, add two entities named Attraction and Location. They do not need to contain anything; they just need to exist. Once added, your display should resemble Figure 17.4.
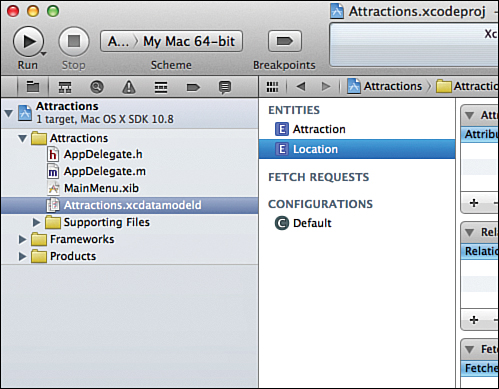
Figure 17.4. A model with two empty entities.
Obviously, entities are not much use without attributes that can store information. So, your next step is to add the attributes.
Adding Attributes
Attributes have two basic identifying properties: an attribute name and a type. To add an attribute to an entity, follow these steps:
1. Click to highlight the entity in the left column of the model editor.
2. Click the + button at the bottom of the Attributes section.
3. A new attribute is added to the list with the name attribute—ready to be edited. Type to change the name to whatever you want.
4. Finally, set the attribute type by clicking the pop-up menu immediately to the right of the attribute name, as shown in Figure 17.5.
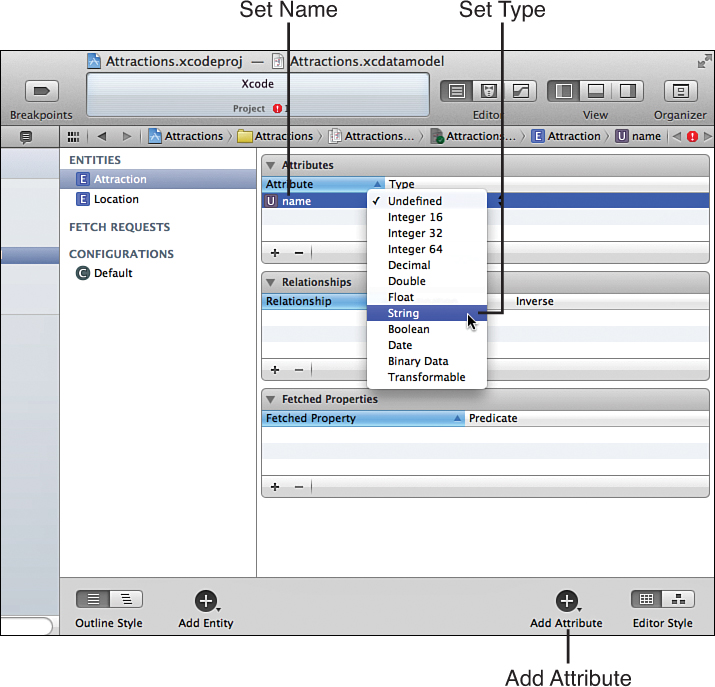
Figure 17.5. Add attributes to your entities.
For the Attractions project, I established a name attribute and an info attribute for the Attraction entity; and, for the Location entity, I established city, state, and zipcode. All of these are strings.
My Location entity, with all defined attributes, is shown in Figure 17.6.
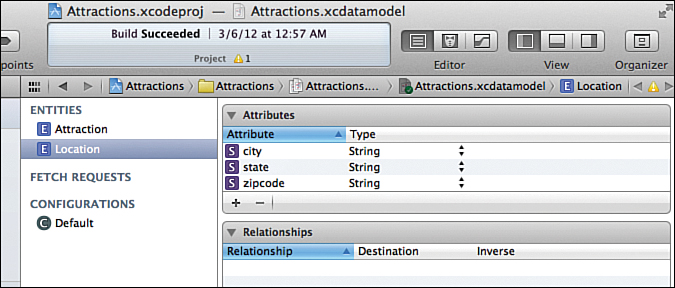
Figure 17.6. The Location entity with city, state, zipcode attributes.
By the Way
In addition to names and types, you can use the Data Model Inspector (Option+Command+3) to set attributes as indexed values, optional, and other esoteric settings. The Apple Guide “Getting Started with Core Data” in the Xcode documentation is a good place to begin exploring the options we cannot cover in depth here.
Defining Relationships
The last step in most data models is defining the relationships between entities. Relationships, although a very powerful part of a data model, are surprisingly simple to create. They are defined by the entities involved in the relationship, an arbitrary name of your choosing, and the cardinality of the relationship.
Relationships can also have an inverse relationship, which is nothing more than a second relationship that defines the reverse of any given relationship. In the case of the Attractions data model I’m working with, one relationship is that a location can have multiple attractions (a one-to-many relationship). The inverse of that relationship is that an attraction can have one location (a one-to-one relationship). Complicated terms for concepts that are common sense.
To add a relationship between entities, complete this process:
1. Select the entity that you want to relate to another from the left column of the editor.
2. Click the + button at the bottom of the Relationships section.
3. A new relationship is added to the list with the name relationship. Change the name to whatever you want.
4. Use the Destination pop-up menu to set the destination entity (the other side of the relationship). This is demonstrated in Figure 17.7.
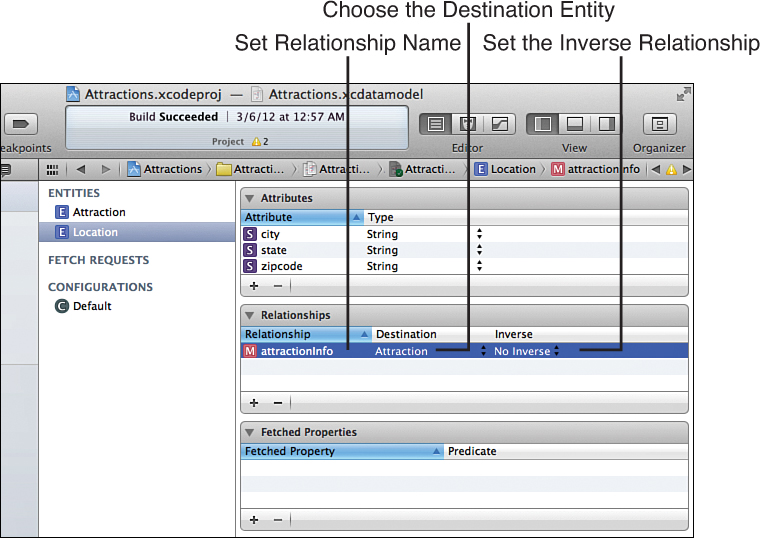
Figure 17.7. Name and set the destination for your relationship.
5. Use the Inverse pop-up menu to choose another relationship that has been defined (if any) that represents the reverse of the relationship you just created. If this is the first relationship you have added, you must add the second (inverse) relationship and then come back and set the inverse here.
These steps set the relationship between entities, but it defaults the cardinality of the relationship to one-to-one. To set a one-to-many relationship, you must open the Data Model Inspector (Option+Command+3) and check the Relationship settings Plural check box, as shown in Figure 17.8.
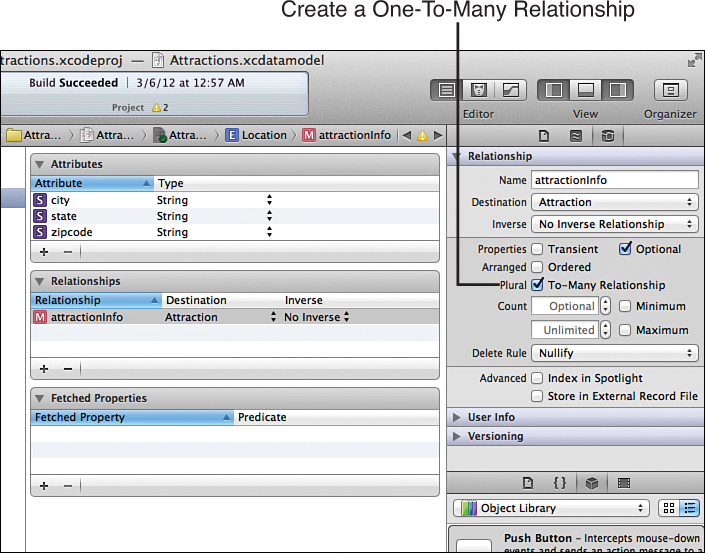
Figure 17.8. Check the Plural check box to configure a one-to-many relationship.
By the Way
You might also want to look at the options for the delete rule for the relationship. A cascading delete rule, for example, ensures that when an object in a data set is deleted, the deletion cascades across the relationship to the related objects. Often, this is the preferred behavior across related entities.
For the Attractions data model, define two relationships. The first, from the Attraction entity to the Location entity should be named locationInfo and set as a one-to-one relationship. The second, from Location to Attraction, named attractionInfo, should be configured as a plural (one-to-many) relationship. After both relationships are in place, they should be set to be each other’s inverse (the inverse of locationInfo is attractionInfo, and vice versa).
Using the Graph Editor Style
Creating your entities, attributes, and relationships using the table style of the Core Data model editor is great for focusing on a single entity at a time. The graph style, however, can give you a nice overview of all the entities, attributes, and relationships you have defined, as shown in Figure 17.9.
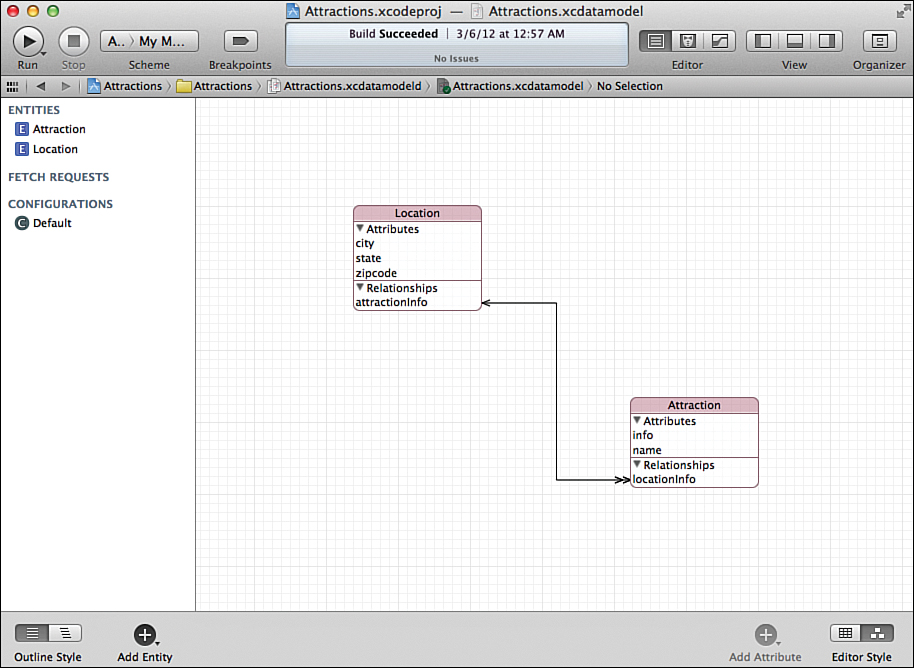
Figure 17.9. The graph style view of the Attractions data model.
In the graph view, you can drag individual entities around to arrange them in a way that is logical to you. Each entity lists its attributes and relationships, and connections are drawn between each entity to visually demonstrate the relationships. Cardinality is communicated by the number of arrowheads on a relationship connection. One arrowhead = a one-to-one relationship, two arrowheads = a one-to-many relationship.
Did You Know?
The graph style is actually a full editor for your model. You can click to highlight an entity, and then click the Add Attribute button (a pop-up menu with Add Relationship and Add Fetch Property options, as well) to add a new attribute to the entity. You can edit the names within the visual representation of the entities, and use the Data Model Inspector (Option+Command+3) to set the type. You can even define relationships by clicking and dragging from one entity to another.
I find this to be an extremely inefficient way of defining a data model, but if you want to give it a try, be aware that the tools are there, even if they are not readily apparent.
Binding a Data Model to a User Interface
After you have built a data model, you’ll want to do something useful with it. You can take two approaches when working with the data. First, you can write code to read and manipulate information. This is obviously an important skill, but, to be frank, it is also a bit boring. The second approach is to bind the data model to interface components, enabling quite advanced application functionality without writing a line of code. We start with the second approach in this part of the lesson, and then finish up with some code that can access the data model.
Because you can bind information to controls in Xcode in dozens of different ways, what we look at in this section is one approach for a small set of controls and a very simple data model. Core Data creates immense opportunities for your applications, but you need to spend more time with the Xcode documentation to familiarize yourself with all the intricacies of the binding system.
For this tutorial, we bind the Attractions data model to a user interface that enables the users to see, add, edit, and remove information from the Location and Attraction entities—all without typing one line of code. If you want to continue building the project from scratch, you can—but the UI might take a few minutes. If you want to get a quick start, open the Attractions (Disconnected) version of the project from this hour’s Projects folder. This contains the finished data model and a complete UI with no bindings in place. Otherwise, make sure your data model is wrapped up before continuing on.
Implementation Overview
The Attractions application presents, when complete, two windows: Attractions and Locations. The Locations window contains an interface for collecting and managing information about the cities that contain attractions. The Attractions window enables the user to create a new attraction and tie it to an existing location. Figure 17.10 shows the finished application in action.
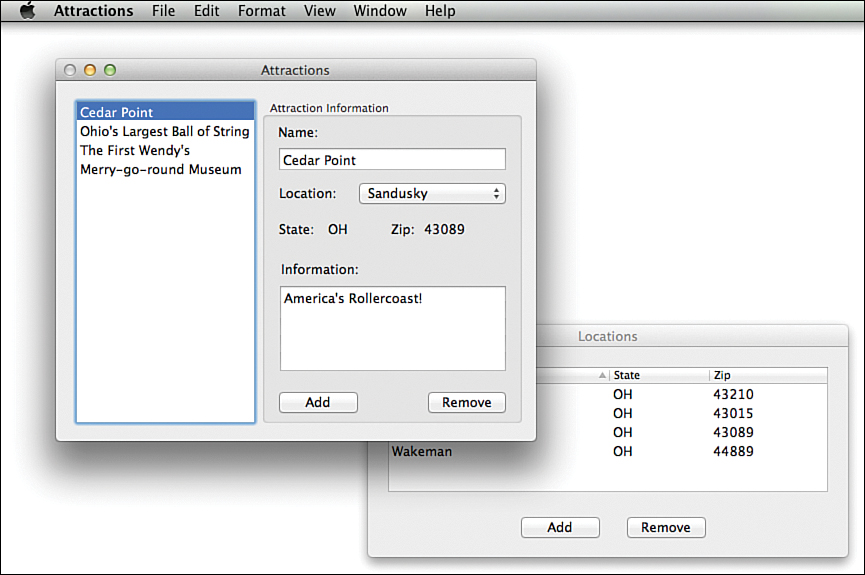
Figure 17.10. Manage attractions and locations.
To get our Core Data model connected to the interface, we need to add two Array Controller objects (NSArrayController) to the XIB file. These are special objects that manage collections of information and selections within these collections. For our purposes, the collections will be the Core Data entities we defined (Attraction and Location). After the array controllers have been configured, they can be bound to the interface elements. We use special controller keys to ask the controllers for information:
• selection: The selected objects within the collection. When the user clicks an attraction in the list, for example, it is represented by the selection key.
• arrangedObjects: An array of sorted objects. The arrangedObjects key populates our interface with the entity attributes for our entire entity, or for the selection.
The app delegate will serve as the managed object context, and we’ll use the array controller’s built-in actions of add and remove to add and remove data from the underlying data store. Let’s get started.
Creating the Interface
Open the XIB file in your new project or in the Attractions (Disconnected) project. Figure 17.11 shows the interface I created for the application.
Figure 17.11. A potential interface for the application.
If you want to create the interface as an exercise in using Interface Builder, these are the elements you want to add to the default Cocoa application XIB before moving on.
• For the Attractions window
A single-column table view to contain the list of attractions. In my example, the headers are turned off.
A text field to enter or edit an attraction name.
A pop-up button to choose from the locations that have been defined.
A wrapping text field to enter or edit a description of the attraction.
Two labels, initially set to NA, for the state and zip data. This will be populated when the user chooses a location.
Two push buttons (Add and Remove) for adding and deleting attractions.
You should add any labels that you want to help describe the UI elements (such as Name, Location, and so on). I placed most of my UI inside of a box element, but that is strictly a superficial design decision.
• For the Locations window
The second Window object itself; the default XIB has a single window.
A three-column table view with headers set to City Name, State, Zip.
Two push buttons (Add and Remove) for adding and deleting locations.
That’s it. There is nothing particularly special about the UI. Just add your objects and tweak them using the Attributes Inspector (Options+Command+4).
Adding Array Controllers
Once the interface is built, we’re ready to get down to work. As mentioned earlier, we need two Array Controller objects to provide our interface to the Core Data entities. Using the Object Library, drag two Array Controller objects into the Objects list for the application. They will appear as shown in Figure 17.12.
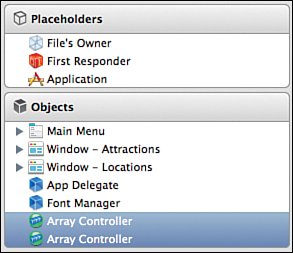
Figure 17.12. Add two array controllers to the XIB objects.
Labeling the Array Controllers
Now, to make it easy to tell the controllers apart, rename them. Select the first array controller and, using the Identity Inspector (Option+Command+3), set its label to Attractions, as shown in Figure 17.13.
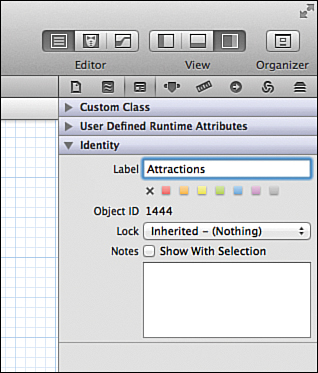
Figure 17.13. Set labels for the array controllers so that you can tell them apart.
Repeat this process for the second array controller, labeling it Locations. Xcode, for some reason, doesn’t seem to like updating the object list to show the labels until you save the XIB file and click off of it and then click back on. Do that now, and you should see the array controllers labeled after the Core Data entities we want them to represent.
Setting the Managed Object Context
Next we need to set the managed object context for the controller. Select the Attractions controller, and then open the Bindings Inspector (Option+Command+7).
Expand the Parameters section of the inspector and set the Bind To value to App Delegate and the Key Path value to managedObjectContext, as shown in Figure 17.14.
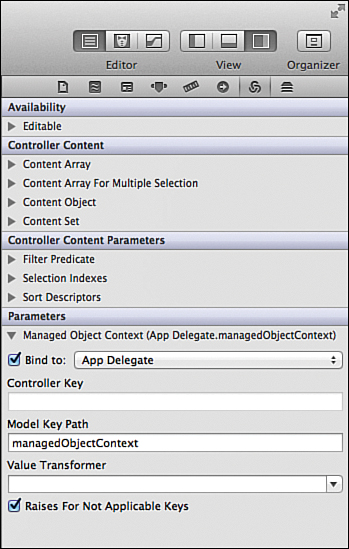
Figure 17.14. Set each controller’s managed object context.
Do the exact same thing for the Locations array controller object. Just one more step and we’ll be ready to bind data to the UI.
Setting the Controller Entity
The last thing we need to do with the array controllers is tell them what entity is going to be providing them with data. To do this, select the controller (starting with Attractions) and open the Attributes Inspector (Option+Command+4). Expand the Object Controller section and set the mode to Entity Name. Next, in the Entity Name field, type Attraction. Finally, check the Prepares Content check box, as shown in Figure 17.15. The array controller is now successfully configured to work with the Attraction entity.
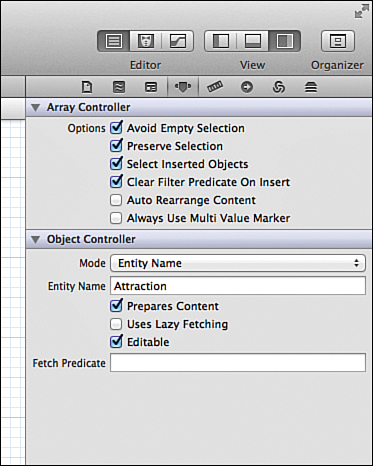
Figure 17.15. Configure the entity for each controller.
Rinse and repeat for the Location array controller. Congratulations, you have completed the steps to make the Core Data model accessible to the application UI.
Binding Data to the Attractions Window UI
To bind the data to the UI, we work through each UI element and various settings under the Bindings Inspector (Option+Command+7). Because this application has a number of different UI components, it is easy to overlook a step, so be sure to follow along closely until you get the hang of the process.
The Attractions Table Column
Let’s start with the single-column table that will list the contents of the Attractions entity. Expand the Scroll View—Table View object until you get to the entry for the Table Column. Select the Table Column object and open the Bindings Inspector. For this element, we want to set the bindings for its value, so expand the Value section of the inspector.
Click the Bind To check box and choose Attractions from the pop-up menu. Provide the controller key of arrangedObjects, and the model key path of name, as shown in Figure 17.16.
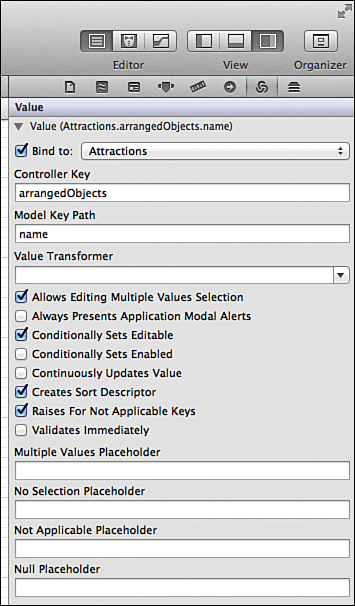
Figure 17.16. Set the bindings for the attractions table column.
This translates to “fill the table column with the name attribute from the Attraction entity” (by way of the Attractions array controller).
The Name and Information Fields
The name and information fields in the Attractions window should be used to edit the currently selected attraction. To set this functionality for the Name text field, select it and open the Bindings Inspector. Again, expand the Value section and set the Bind To option to bind to the Attractions array controller. This time, however, set the controller key to selection because we are interested in editing the currently selected item in the array controller. Set the Model Key Path field to name because the field should be changing the name attribute data in the Attractions entity. Figure 17.17 shows the completed configuration for the Name field.
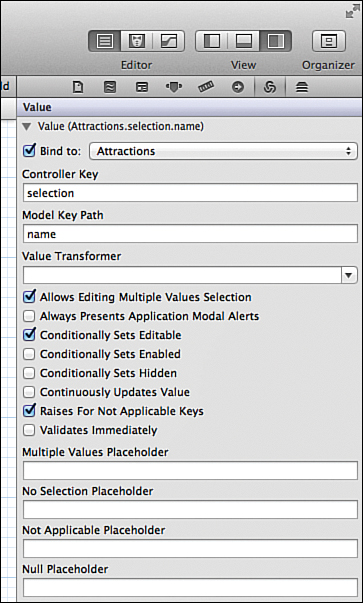
Figure 17.17. Set the bindings for the Name field.
Do the exact same thing for the wrapping text field, but instead of setting the model key path to name, set it to info—the entity attribute that will hold a description of the attraction.
The Location Pop-Up Menu (Pop-Up Button)
The pop-up menu of locations is a bit different because it requires that we access data from another source: the Locations array controller. Let’s walk through this setup.
Select the pop-up menu and open Bindings Inspector. You set your binding options in the Value Selection section of the inspector, but you need to make three separate settings, as follows:
1. Expand the Content entry. Bind the content to the Locations array controller, and set the controller key to arrangedObjects, as shown in Figure 17.18.
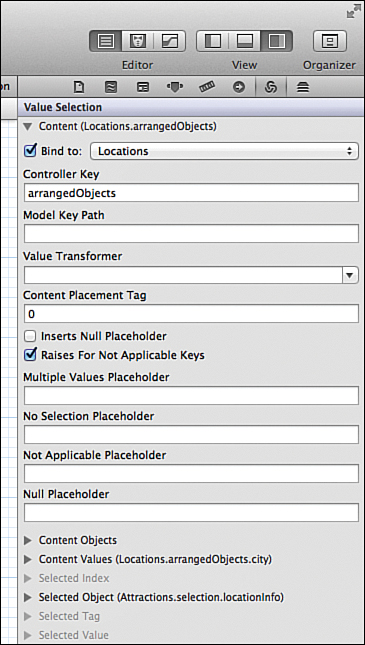
Figure 17.18. Set the content bindings.
2. Expand the Content Values entry and also bind it to the Locations array controller, using the controller key arrangedObjects and the model key path city.
This tells the pop-up menu to display the values from the city attribute of the Location entity—by way of the Locations array controller. Figure 17.19 shows the finished configuration.
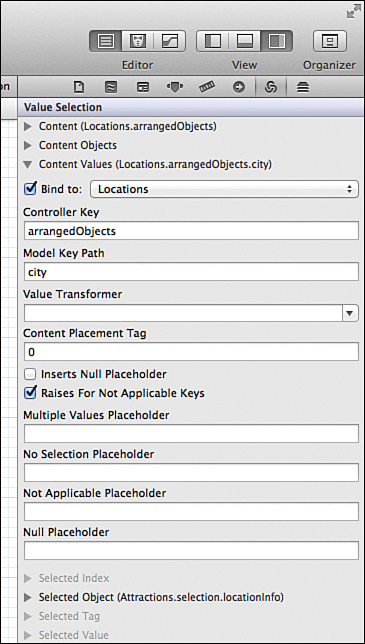
Figure 17.19. Set the content values.
3. Expand the Selected Object entry, and this time bind it to the Attractions array controller using the controller key selection and the model key path locationInfo, as shown in Figure 17.20.
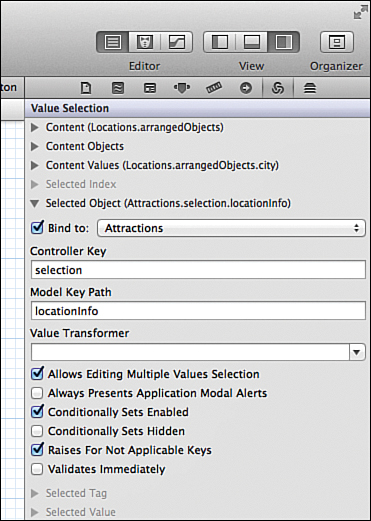
Figure 17.20. Set the selected object bindings.
Why are we now dealing with the Attractions array controller again? Because we want to store the selected location for the attraction using the locationInfo relationship established in the Core Data model.
Congratulations. This is the most complicated step you’ll encounter this hour, and you have made it through.
The State and Zip Labels
The state and zip labels are easy to configure, but will reveal a bit more of the power behind data bindings, because we will grab their values by traversing the relationship from Attributes to Locations. For example, select the label that should show the state, and then open the Bindings Inspector.
Expand the Value section, and bind the element to the Attractions array controller. Next, set the controller key to selection. Now, enter locationInfo.state for the model key path. What this tells the system is that for the currently selected Attraction in the array controller, use the locationInfo relationship to grab the Location attribute state that has been related to the attraction. Figure 17.21 shows this setup.
The zip label should now be configured the same way, but using the model key path of locationInfo.zipcode.
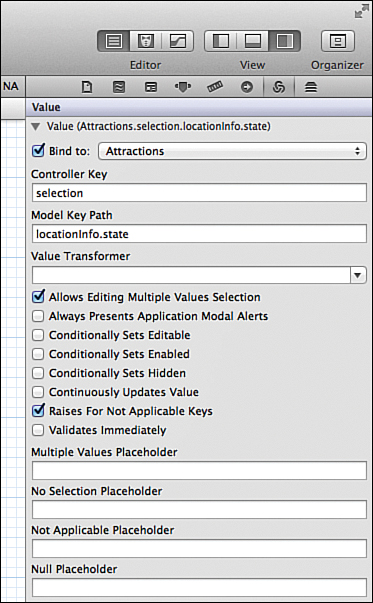
Figure 17.21. Traverse the relationship to access data across entities.
The Add and Remove Buttons
The final two UI features of the Attractions window are the Add and Remove buttons. These need to be connected to the add and remove actions on the Attractions array controller. To do this, Control-drag from the Add button to the Attractions array controller in the Objects list. When prompted, choose the add action. Do the same for the Remove button, connecting it to the remove action. Because this Control-drag process is almost certainly getting old by now, I’ll spare you the screenshots.
If you want, you should now be able to build and run the application and create new attractions. Use the Window menu to show the Attractions window if it is not visible. You won’t be able to choose any locations (because we haven’t added a way to do that yet), but everything else should “just work.”
Binding Data to the Locations Window UI
After what you have accomplished with the Attractions window bindings, the Locations window bindings are going to be a piece of cake. Each of the three table columns needs a binding, and the Add and Remove buttons need to connect to the add and remove actions on the Locations array controller.
The Table Columns
Start by selecting the city column within the table (the first column). Open the Bindings Inspector and expand the Value entry. Set the column to bind to the Locations array controller with the controller key arrangedObjects and the model key path city, as shown in Figure 17.22.
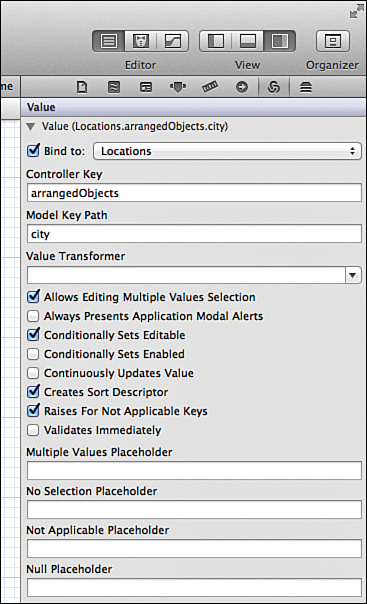
Figure 17.22. Bind the table columns.
Repeat this for the second column (state), but using the model key path of state and the third column (zip) with the model key path zipcode.
The Add and Remove Buttons
Finish up the application by connecting the Add and Remove buttons using the same procedure you followed for the Attractions window. The Add button should connect to the add action on the Locations array controller and the Remove button to the remove action.
Building the Application
The application is now complete. You should be able to build and run the application, add locations, add attractions, modify locations and attractions, and so on. If you did not build the application by hand, just use the Attractions (Complete) project to see the results.
After putting in a few values, try quitting and restarting the application—the data stays put. You have just created a simple database application that didn’t require any coding by hand.
Accessing Data Through Code
Now that you have seen the glamorous side of Core Data, let’s take a look at how you can work with the data directly in code. Using the data model that we created earlier for the Attractions application, let’s review some of the methods you can use to read and write data.
Open the Attractions (Code) project file to view the completed examples or just follow along with Attractions project that you finished in the preceding section.
Creating NSManagedObject Subclasses
One of the nice things about Core Data is that after you have created a model you can map the entities of the model directly to objects in your code. You do this through the creation of NSManagedObject subclasses—typically one for each entity. The best part? This is something that Xcode does for you.
To create a managed object class for each of the entities in Attractions, follow these steps:
1. Click the .xcdatamodeld file to open the Core Data model editor.
2. Select the Location and Attraction entities in the left column by pressing Shift and clicking each.
3. Choose File, New, New File from the menu.
4. Select the NSManagedObject subclass from the Core Data file template category, as shown in Figure 17.23.
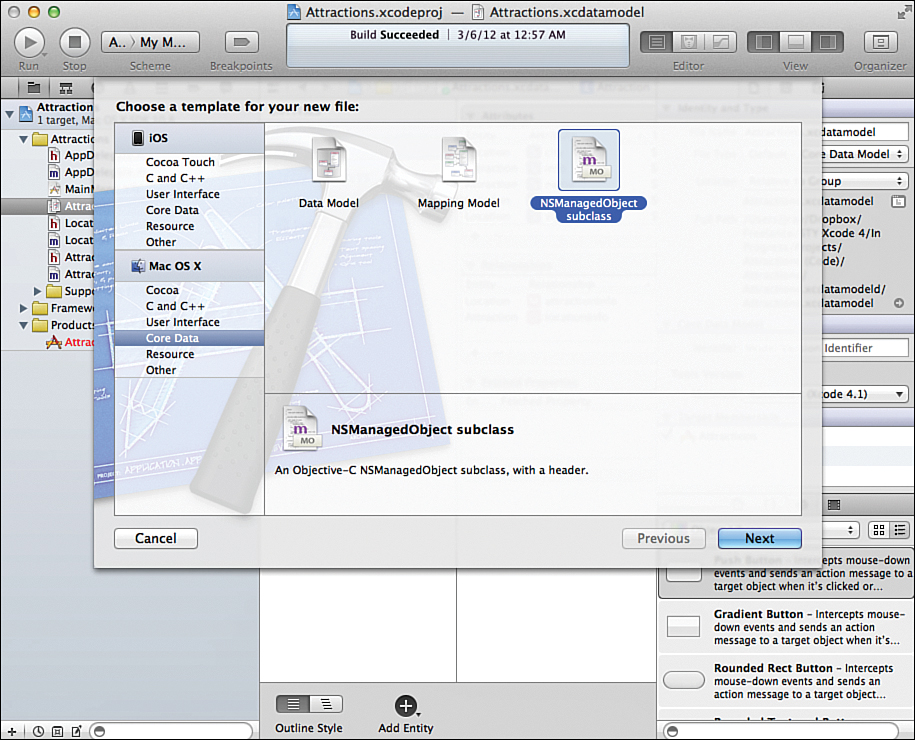
Figure 17.23. Choose the NSManagedObject subclass when prompted.
5. Click Next.
6. Make sure the Attractions code group is specified and the Options check box is unchecked.
7. Click Create.
Notice that classes Attraction and Location are added to your project, as shown in Figure 17.24. You use instances of these classes to work with data in the Core Data model.
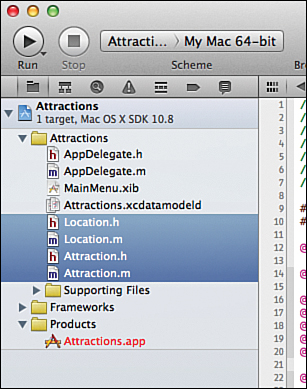
Figure 17.24. Classes for each of your entities are added to the project.
When you add entities to your Core Data model, they are, by default, instances of the class NSManagedObject. When you use this technique to create your NSManagedObject subclasses, the entities are automatically set to the appropriate subclass name. You can check this by selecting an entity in the model editor and viewing the Entity section of the Data Model Inspector (Option+Command+3).
Writing Data
Now that you have created classes to represent the Core Data entities you want to work with, storing data is as simple as initializing and populating new Attraction and Location objects. To initialize a new object that will be added to the data store, you use the NSEntityDescription class method insertNewObjectForEntityFor
Name:inManagedObjectContext:.
To see this in action, let’s add some code to the AppDelegate class’s applicationDidFinishLaunching method to store a new city and attraction. Before we can write the code, we need to update AppDelegate.m to import the interface files for the Attraction and Location classes. Add this code to the top of the file, after the existing line #import "AppDelegate.h":
#import "Location.h"
#import "Attraction.h"
Now, update applicationDidFinishLaunching by adding the code in Listing 17.1.
Listing 17.1. Write Data to the Core Data Store
1: - (void)applicationDidFinishLaunching:(NSNotification *)aNotification
2: {
3:
4: NSManagedObjectContext *objectContext = [self managedObjectContext];
5:
6: Location *location = [NSEntityDescription
7: insertNewObjectForEntityForName:@"Location"
8: inManagedObjectContext:objectContext];
9: location.city=@"Birmingham";
10: location.state=@"OH";
11: location.zipcode=@"44889";
12:
13: Attraction *attraction = [NSEntityDescription
14: insertNewObjectForEntityForName:@"Attraction"
15: inManagedObjectContext:objectContext];
16:
17: attraction.name=@"Woolly Bear Drive-in";
18: attraction.info=@"A tiny restaurant with great burgers";
19: attraction.locationInfo=location;
20:
21: NSError *error;
22: [objectContext save:&error];
23:
24: // Insert code here to initialize your application
25: }
In line 4, we grab the managedObjectContext object that we can use to work with our data model. Recall that an object of this type is required for accessing a Core Data model. If you scroll through the AppDelegate.m file, you’ll see how this object comes into existence. Because this application is based on a Core Data template, lots of supporting setup code is added to the app delegate, including an instance of a managed object context.
Line 6 creates a new Location object named location based on the Location entity.
Lines 9–11 populate the new object with data.
Lines 13–18 create and populate a new attraction object.
Line 19 sets the relationship between the attraction and the location objects; notice that it uses the locationInfo relationship that we defined in the model.
Line 22 saves the data back to the store.
As you can see from this example, writing data is not difficult. In fact, it is almost as easy as assigning values to variables/properties.
Reading Data
Reading data is actually easier than writing it—even across relationships. To read data, we must create an NSFetchRequest object and use it to execute a fetch request. From that, we are given an array of results that we can loop through. Consider the code snippet in Listing 17.2.
Listing 17.2. Loop Through All the Locations, Outputting All Their Attractions
1: NSFetchRequest *fetchRequest = [NSFetchRequest
2: fetchRequestWithEntityName:@"Location"];
3: NSArray *fetchedLocations = [objectContext
4: executeFetchRequest:fetchRequest
5: error:&error];
6: for (Location *aLocation in fetchedLocations) {
7: for (Attraction *anAttraction in aLocation.attractionInfo) {
8: NSLog(@"%@ %@",anAttraction.locationInfo.zipcode,anAttraction.name);
9: }
10: }
Here, we start in lines 1 and 2 by creating a fetch request using the NSFetchRequest class method fetchRequestWithEntityName.
The results are stored in the fetchedLocations array in lines 3–5.
Lines 6–10 loop through each of the fetchedLocations, declaring each item as a Location object stored in the variable aLocation.
Because a location can contain multiple attractions, we know that aLocation.attractionInfo points to an NSSet of Attraction objects. This means we can loop over that set (as we do in lines 7–9), accessing each successive attraction object through the variable anAttraction and outputting its attributes with NSLog().
By the Way
Note that you insert this code at the end of the method defined in Listing 17.1. It depends on the declarations in lines 4 and 21.
If you want to run it by itself, make sure you declare the objectContext and error variables at the top of the listing.
As you know, this is not a book that is intended to teach you how to code. I have included these examples, however, so that you get a sense of what working with Core Data is like, beyond just defining a model.
Summary
This hour introduced a powerful framework—Core Data—that can greatly expand the capabilities of the applications you develop and the speed at which you develop them. Core Data provides persistent data storage that you can use in iOS and OS X applications. Xcode includes visual tools for defining Core Data models as simple as a single entity or consisting of dozens of entities and relationships.
Accessing data from a Core Data model can be done through code or by way of interface bindings (currently OS X only). You can create interfaces that add, delete, and update data without ever writing a single line of code. Even when code is required, you can access your data through NSManagedObject classes, which is very similar to working with any other collection of objects. The use of Core Data does entail a learning curve, but the benefits to your applications make it worth the effort.
Q&A
Q. If Core Data, by default, sits on top of SQLite, why can’t I just use SQLite directly?
A. The benefit of Core Data is that you do not have to worry about the underlying implementation—it manages your data for you. Stop thinking in relational database terms and let Core Data do its job.
Q. Why would I use Fetched Properties rather than a real relationship?
A. Fetched Properties are used when a real relationship is not important. Your data model should be as lean and structured as possible. Defining relationships that you may not need or that are rarely used is unnecessary overhead.
Q. Why can’t I use data binding in iOS?
A. Apple just hasn’t implemented it yet. In the meantime, read the documentation for the NSFetchedResultsController class. It can streamline the use of Core Data with iOS table views.
Workshop
Quiz
1. Core Data is a requirement for OS X and iOS applications. True or false?
2. iOS and OS X support UI data bindings. Yes or no?
3. In a one-to-many relationship that is dereferenced, how do you access the objects on the “many” side?
Answers
1. False. Core Data is a great feature for working with large or complex data sets. For simple key/value data storage, using the application defaults system is a perfectly acceptable solution.
2. No. Only OS X supports UI data bindings at this time. It is possible (as you learned in this hour) to build functional applications using Core Data and no code. In iOS, this is not yet an option.
3. When you dereference across a one-to-many relationship, you are handed an NSSet of the “many” objects. You can then loop through the set to work with each individually.
Activities
1. Build the Attractions (or a similar) app from scratch. I know it was easy to follow along with the same project, but doing this from scratch exposes you to Core Data and many aspects of the Interface Builder editor—important skills to practice.
2. Return to the BeeLine application and create a data model to store the points used in the application. Update the application code to read the points from a Core Data implementation.