
MISSION 12
Mobile Alarm for Your Devices
Now we can’t always be near our room or the cookie jar to keep them safe. We can set up a system where one device sends a message to another one to alert you to a problem.
For the micro:bit and the Circuit Playground Express, we need another device. On the Raspberry Pi, we’re going to send an email.
Algorithm
This is the algorithm for the micro:bit and the Circuit Playground Express. For the Raspberry Pi, it’s not too different. We’re just sending an email on device 1 and receiving it on device 2.

micro:bit
Build
Build your cookie jar or door sensor as shown in previous missions. The second micro:bit needs to be in range of the first. You will need to experiment to figure out how far apart your micro:bits can be.
I’d recommend labeling your micro:bits somehow with a sticker to know which is which.
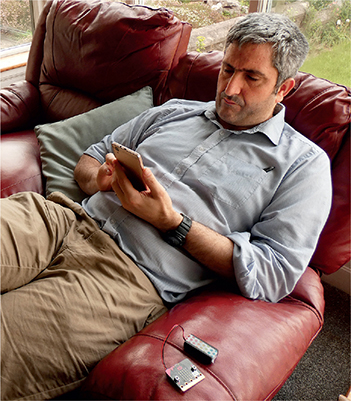
Figure 12.1 His cookies are safe and sound with his micro:bit alarm.
Code
Cookie Jar micro:bit
Let’s start with the micro:bit that is attached to the cookie jar. Here is the code from Mission 10:
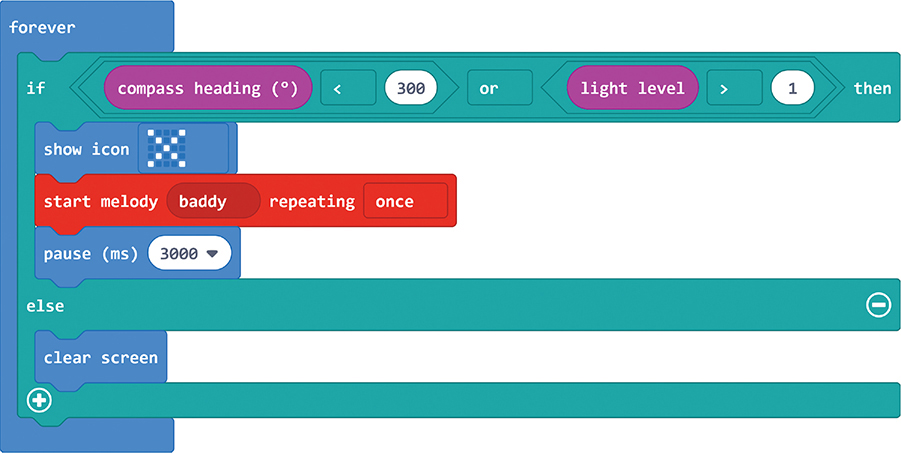
Figure 12.2 Cookie alarm.
We need to set up the radio group under on start.
RADIO GROUPS
Radio Groups make sure that your messages only go to the micro:bit you want it to go to. Keep this number safe from other micro:bit owners nearby.
In the cookie jar code, where the alarm goes off, add the radio code to send a number.

Figure 12.3 Set the group number.

Figure 12.4 Send a number.
That’s it for the cookie jar micro:bit. If you don’t want an alarm on the jar, you can remove the melody block.
Door micro:bit
The same goes for the door micro:bit from Mission 8.
1. Add the radio group to on start.
2. Send a number when the alarm is meant to go off.

Figure 12.5 Door alarm.
Alarm micro:bit
Now let’s set off the alarm on the second micro:bit that doesn’t have to be next to the cookie jar or your room door. You could just carry it with you!
I’m learning my lessons here. I’ve put in an icon in case the speaker disconnects, and I’m clearing the screen after 3 seconds.
If you have three micro:bits, what you could do is have a different tune and letter for each alarm that might go off. Create condition statements to check which alarm went off. To get the variable receivedNumber drag it down from the block on radio received receivedNumber. The cookie sent the number 0, and the door sent the number 1.
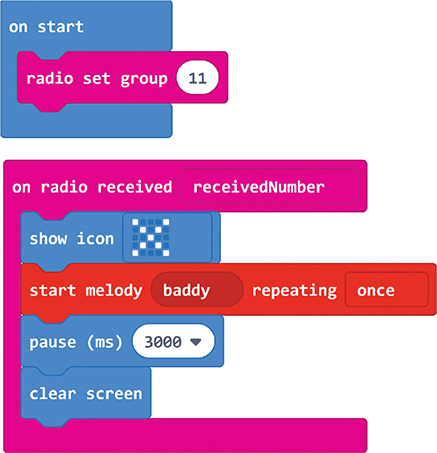
Figure 12.6 Set off the alarm.

Figure 12.7 What alarm went off?
Debug
My code worked really well the first time. I know a lot of people get the block set radio group wrong. This has to be in on start, or nothing will happen.
Other debugging problems will come with the distance between the two devices. How far away can your alarm be? Will your alarm work on different floors? Will it work through closed doors? Experiment with the alarm to see what the limit of the range of your micro:bit is.
Expert Level
A friend has entered the house. You don’t want to give him or her the cookie jar password, but you do want to let him or her have a cookie. Send a message to the cookie jar to turn off the alarm for 5 seconds.
Circuit Playground Express
Build
Build your cookie jar or door sensor as in previous missions. How close does your second Circuit Playground Express need to be? You’ll need to experiment.
The Circuit Playground Express uses infrared to send messages from itself to the other Circuit Playground Express. Infrared works by line of sight. The two Circuit Playground Expresses need to be in the same room. Think about how far away your remote control for your TV works—this uses the same technology.

Figure 12.8 Circuit Playground Express cookie jar ready.
Code
Cookie Circuit Playground Express
Let’s start with the Circuit Playground Express that is attached to the cookie jar. Here is the code from Mission 10.
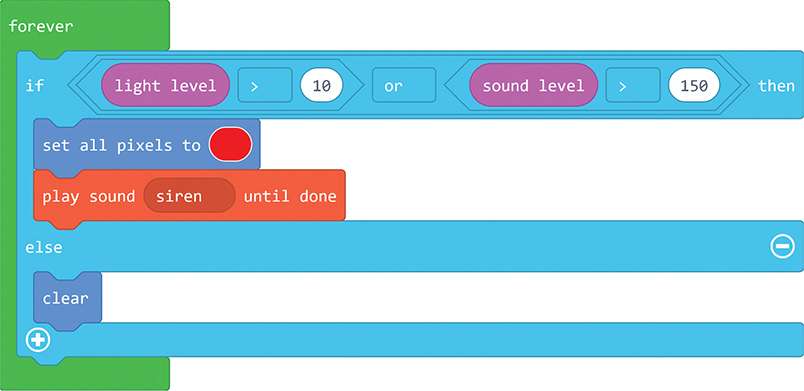
Figure 12.9 Cookie alarm.
In the cookie jar code, where the alarm goes off, add the code to send a number.

Figure 12.10 Send a number.
That’s it for the cookie Circuit Playground Express! If you don’t want an alarm on the cookie jar, you can remove the play sound block. But you should replace it with a pause block so that only one signal is sent every 2 or 3 seconds. You don’t want hundreds of signals being sent!
Door Circuit Playground Express
The same goes for the door with the Circuit Playground Express. Send a number when the alarm is meant to go off. And don’t forget to set the pin to pull up when the Circuit Playground Express starts.

Figure 12.11 Door alarm.
Alarm
Now let’s set off the alarm on the second Circuit Playground Express that doesn’t have to be next to the cookie jar or your room door. You could just carry it with you!
I’m learning my lessons here. I’ve changed all the pixels to red in case the speaker disconnects, and I’m clearing the screen after 3 seconds.
If you have three Circuit Playground Expresses, what you could do is have a different tune and color for each alarm that might go off. Create condition statements to check which alarm went off. The cookie jar sent the number 77, and the door sent the number 88.
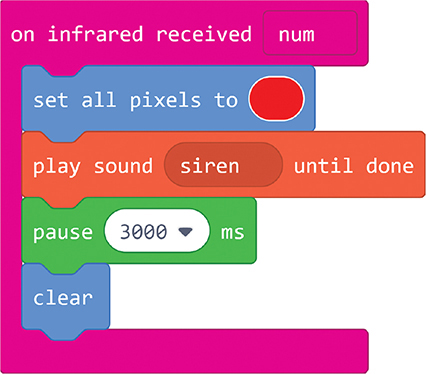
Figure 12.12 Set off the alarm.

Figure 12.13 Which alarm went off?
Debug
This is a physical debug. How far will your alarm go? Do the Circuit Playground Expresses need to be pointing at each other? Experiment with the alarm to see what the limit of the range of your Circuit Playground Express is.
Expert Level
Sometimes I’m lazy and I want someone else to get me a cookie. I don’t want to give that person the password so that he or she can steal a cookie every time. I just want to open the jar for 5 seconds. Send a message to the cookie jar to turn off the alarm for 5 seconds.
Raspberry Pi
Build
Follow the build steps in Mission 8 to create the door alarm. The Raspberry Pi needs to be connected to the internet to be able to send an email. Disconnect the Raspberry Pi from the door; plug it into a monitor, keyboard, and mouse to code; and test it.
Code
You will need access to an email address to get this mission working. I’ve tested this mission with a Gmail account that I set up just for coding projects. I find it’s easier to have a separate email address from my main personal email for coding projects. You will need an adult to help you set up and get the app password for a Gmail account.
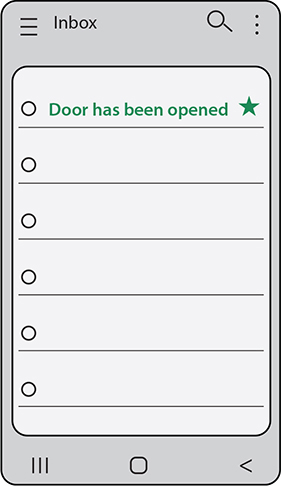
Figure 12.14 Email alert.
Get the Code from Gmail
1. Sign up for a Google account at https://accounts.google.com/signup.
2. Log into your Gmail account at https://gmail.com/.
3. Select your profile picture in the top right, and select Manage Your Google Account.
4. Select Security.
5. Under Signing in to Google, select App passwords. Note: Two-step authentication has to be turned on.
6. Click on Select app, and choose Other (custom name).
7. Type in a name. I chose “Door alarm.”
8. Copy down the password you’re given.
Create and Test the Python Code for Emailing
1. Here’s the Python code to send an email. Change the following:
a. From_email to your email address
b. To_email to your email address
c. Password to the app password you got in the earlier steps

Figure 12.15 Setup.
You need the savetheworld library to get this code working. Learn how to download it from Mission 1.
PYTHON STRING
The variable message is a really long string of text. To see it better in my code, I spread it over several lines. To do this, I used three quotation marks at the start and end of the variable (“””variable”””).
2. This code will send an email to you. Run the code to test it.
Remember that the password is not your normal email password; it’s the app password you got from Google. You can use a different email address for the to_email variable.
Add to the Door Code
In the door code from Mission 8, we had a function called soundTheAlarm. That function played a siren sound. This is where we will put our email code.
1. Don’t forget to import the libraries we need to send email and set up the variables:
a. gpiozero
b. signal
c. os
2. Set up the door variable.
3. Change your message text to something about a door being opened.
4. Add the function soundTheAlarm and its code from Mission 8.
5. Place the email code in soundTheAlarm. I also put a print in here so that I know something has happened when I’m testing it.
6. Call the function soundTheAlarm when the door is released.

Figure 12.16 Code.
Be careful with this code. If you start sending hundreds of automatic emails, Gmail will not be happy and might suspend your account. Only use your programming powers for good.
Debug
This code just worked like magic for me! If you’re having problems, check that your Raspberry Pi is connected to the internet, your email addresses are right, and you’ve got the app password right. Long passwords can be tricky to type out.
Expert Level
Add the code to Mission 11. If you enter the wrong lock code, send a different email: “Intruder alert!”