
The Seam Framework provides facilities to enable applications to be secured using user authentication and user authorization facilities. In this chapter, we will discuss how security is implemented within a Seam application, highlighting the most common features that are used to secure Seam applications. We'll also highlight some of the more advanced security features that can be used. In particular, we'll pay attention to:
User authentication
User roles
Auditing security events
CAPTCHAs
The Seam identity manager API
Open ID
Note
Much of the functionality described within this chapter was added to Seam in the 2.1 release of the framework.
It is therefore recommended that this should be the minimum version of Seam that is considered when reading this chapter.
User authentication is the process of establishing user credentials within an application, and verifying that a user is who they claim to be. Typically, within most desktop and web applications, this is performed via a combination of a username and a password that is known only to the user.
Typically, within a Java EE application, JAAS (Java Authentication and Authorization Service) is used to validate user credentials. JAAS is a very powerful framework, but that can come at a cost, as using JAAS can be complicated for novice developers, and can be quite complicated to develop against.
Whilst JAAS is a standard, the method of deploying it on different application servers is different; hence, if you develop an application that uses JAAS on the JBoss Application Server, you will need to make modifications to enable your application to run on the GlassFish application server or on Oracle's Weblogic server. Seam security, on the other hand, can be deployed to different application servers without the need for configuring different security providers.
To enable Seam security, we need to specify an authenticator method. This method performs user authentication and validates usernames and passwords in order to grant users access to your applications.
The Seam security authenticator is defined using EL within the components.xml file of a Seam application.
The Seam security authenticator is specified within the authenticate-method of the <security:identity /> element within the components.xml file.
<security:identity
authenticate-method="#{authenticator.authenticate}"
/>
This tag is defined within the Seam security namespace, which must be defined within the components.xml file.
<?xml version="1.0" encoding="UTF-8"?>
<components
xmlns="http://jboss.com/products/seam/components"
xmlns:security="http://jboss.com/products/seam/security"
xsi:schemaLocation=
"http://jboss.com/products/seam/core
http://jboss.com/products/seam/core-2.1.xsd
http://jboss.com/products/seam/security
http://jboss.com/products/seam/security-2.1.xsd>
…
<security:identity
authenticate-method="#{authenticator.authenticate}"
remember-me="true"/>
…
</components>
This defines that the authenticate method on the authenticator Seam component will be called to enable users to be authenticated. This method returns a Boolean, either true or false, indicating whether the username and password are correct. If true is returned from this method, the user will be allowed to log in to the application—they will be denied access if false is returned.
To implement a security mechanism, we need to store the list of usernames and passwords in a database table. The easiest way to do this is using JPA. We can implement a list of users in a single database table. Typically, when storing this type of information, we will hold the following fields for each user:
User name
Forename
Surname
Password
Date of birth
Account enabled flag
We can easily implement these fields in a JPA Entity class as follows:
package com.davidsalter.seamsecurity.entity;
import java.util.Date;
import javax.persistence.Column;
import javax.persistence.Entity;
import javax.persistence.GeneratedValue;
import javax.persistence.Id;
import org.jboss.seam.annotations.Name;
import org.jboss.seam.annotations.security.management.UserEnabled;
import org.jboss.seam.annotations.security.management.UserFirstName;
import org.jboss.seam.annotations.security.management.UserLastName;
import org.jboss.seam.annotations.security.management.UserPassword;
import org.jboss.seam.annotations.security.management.UserPrincipal;
import org.jboss.seam.annotations.security.management.UserRoles;
@Entity
@Name("user")
public class User {
private Integer id;
private String userName;
private String password;
private String forename;
private String surname;
private boolean enabled;
private Date dateOfBirth;
@Id
@GeneratedValue
@Column(name="USER_ID")
public Integer getId() {
return id;
}
public void setId(Integer id) {
this.id = id;
}
@UserPassword(hash="none")
public String getPassword() {
return password;
}
public void setPassword(String password) {
this.password = password;
}
@UserPrincipal
public String getUserName() {
return userName;
}
public void setUserName(String userName) {
this.userName = userName;
}
@UserEnabled
public boolean isEnabled() {
return enabled;
}
public void setEnabled(boolean enabled) {
this.enabled = enabled;
}
@UserFirstName
public String getForename() {
return forename;
}
public void setForename(String forename) {
this.forename = forename;
}
@UserLastName
public String getSurname() {
return surname;
}
public void setSurname(String surname) {
this.surname = surname;
}
public Date getDateOfBirth() {
return dateOfBirth;
}
public void setDateOfBirth(Date dateOfBirth) {
this.dateOfBirth = dateOfBirth;
}
}
This User class represents a fairly standard JPA entity (note that it is annotated with @Entity), however there are a few specific Seam annotations, as shown below:
|
Annotation |
Description |
|---|---|
|
|
The name of the Seam component that we are creating. This annotation is used in the same fashion as discussed earlier in this book. |
|
|
This field is used to store the user's password using the hashing algorithm specified by the Seam supports both MD5 and SHA1 hashing algorithms, as well as no password hashing for unencrypted passwords.
|
|
|
This field is used to store the user's username. |
|
|
This field stores a Boolean flag indicating whether the user account is enabled ( |
|
|
This field stores the user's first name. |
|
|
This field stores the user's Surname. |
These annotations are used by the Seam identity manager API which we will discuss later in this chapter. For the moment, it is sufficient to understand that these are Seam annotations and they are applied to the fields specified in the table.
Now that we have created a database schema and Java entity to persist user objects, we can write an authenticator that will validate usernames and passwords, and that can be used to grant users' access to our applications.
In the previous section, we noted that a Seam authenticator must have the following signature:
public boolean authenticator() {}
By using this signature, we can write an authenticator method that uses JPA to query the username, password, and enabled fields, in order to verify if a user is allowed access to our applications.
package com.davidsalter.seamsecurity;
import com.davidsalter.seamsecurity.entity.User;
import javax.persistence.EntityManager;
import org.jboss.seam.annotations.In;
import org.jboss.seam.annotations.Logger;
import org.jboss.seam.annotations.Name;
import org.jboss.seam.log.Log;
import org.jboss.seam.security.Credentials;
import org.jboss.seam.security.Identity;
@Name("authenticator")
public class Authenticator {
@Logger
private Log log;
@In
private Credentials credentials;
@In
private EntityManager entityManager;
private final String query="from User where username=:username and password = :password and enabled=true";
public boolean authenticate() {
log.debug("Authenticating username:"+ credentials.getUsername());
try {
User result = (User)entityManager.createQuery(query) .setParameter("username", credentials.getUsername())
.setParameter("password", credentials.getPassword())
.getSingleResult();
log.debug("Authentication successful:"+credentials.getUsername());
return true;
} catch (Exception e) {
log.debug("Failed to authenticate user:"+ credentials.getUsername());
return false;
}
}
}
This code shows a class called Authenticator, with a public method authenticate(), which is called to perform the authentication. By using the @Name annotation, our class is declared as a Seam component called authenticator.
Within this class, there are three Seam components that are injected—log, credentials, and entityManager.
|
Seam component |
Description |
|---|---|
|
|
This injects the Seam logger component into our class so that we can perform Log4J/Java logging style logs within our application. Using this annotation is shorthand for creating a Log4J or Java Logging class, and makes logging easier to implement within Seam components. |
|
|
This injects the Seam credentials component into our class. The Seam credentials component stores the username and password that have been entered by the user at the application's login prompt.
|
|
|
This injects the JPA entity manager into our Seam component so that we can perform the database lookup, in order to validate the user's logon credentials. |
The rest of the code of this class is a fairly standard JPA query to retrieve a user from the database where the username and password are as specified and the user is set to enabled.
private final String query="from User where username=:username and password = :password and enabled=true";
The class simply checks for any exceptions thrown during the execution of the method. If no exceptions are thrown, then a single user has been found, indicating that the username and password are correct and the user is enabled within the system. If an exception is thrown, then the user is not allowed access to the system.
Note
In this class, we are not taking into account any hashing of the user's password. We are performing a query based upon the raw password that the user enters at the application's login screen. This is in line with the @UserPassword(hash="none") defined within the user class.
For a real application we would have to use some sort of hashing algorithm (MD5or SHA1) so that plain text passwords are not stored within the database.
Now that we have defined how to create a simple security mechanism where users are identified by a username and password and accounts have to be active before users can log on, we need to specify what pages within our applications require authentication.
To define pages that require authentication, we can add a login-required attribute to the page element within the pages.xml file for an application. Here, we can use wildcards to represent an entire set of pages, or we can add the login-required attribute to any number of specific pages.
<page vide-id="/userList.xhtml" login-required="true" />
<page view-id="/secure/*" login-required="true" />
When a user attempts to access a secured page, Seam will check whether the user has already been logged onto the application. If they have not already been logged on to the application, we want Seam to show a login page first.
The login page is defined within the pages.xml file, within the login-view-id attribute of the pages element.
<pages xmlns= "http://jboss.com/products/seam/pages"
xmlns:xsi= "http://www.w3.org/2001/XMLSchema-instance"
xsi:schemaLocation= "http://jboss.com/products/seam/pages
http://jboss.com/products/seam/pages-2.1.xsd"
login-view-id="/login.xhtml">
In this code sample, the login page is defined as /login.xhtml.
Now that we have explained how to specify which pages within an application require authentication, the final step is to define the logon page.
To define a logon page, we need to define a standard Facelets form by using the <h:form /> tag. Within the form, we need to add edit boxes for the username and password and optionally, a checkbox that will allow us to automatically log onto the application when we load it in the browser—many web sites offer this facility, but be aware of the security implications of this. Finally, we need a Logon button.
Within a Seam application, we need to use the following EL to represent the individual fields.
|
EL |
Description |
|---|---|
|
|
The username entered by the user must be stored in this field so that it is accessible from the Seam credentials component. |
|
|
The password entered by the user must be stored in this field so that it is accessible from the Seam credentials component. |
|
|
This field must be bound to a Boolean checkbox so that the user can select the checkbox if they wish the application to "remember" them. |
|
|
This action is performed when the user wants to log on to the application. This action is typically bound to a |
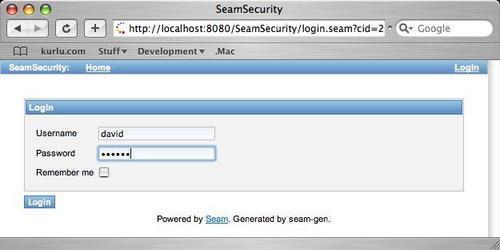
Putting all of these fields together will allow us to create the following logon form:
<h:form id="login">
<rich:panel>
<f:facet name="header">Login</f:facet>
<h:panelGrid columns="2">
<h:outputLabel for="username">Username</h:outputLabel>
<h:inputText id="username"
value="#{credentials.username}"/>
<h:outputLabel for="password">Password</h:outputLabel>
<h:inputSecret id="password"
value="#{credentials.password}"/>
<h:outputLabel for="rememberMe">Remember me</h:outputLabel>
<h:selectBooleanCheckbox id="rememberMe"
value="#{identity.rememberMe}"/>
</h:panelGrid>
</rich:panel>
<h:commandButton value="Login" action="#{identity.login}"/>
</h:form>
After creating and executing the form, we will get the following screenshot:
In the previous section, we specified how, if a user attempts to access a secured page without being logged into the application, the login page is displayed. In such a situation, we would want the initial requested page to be displayed after displaying the logon page.
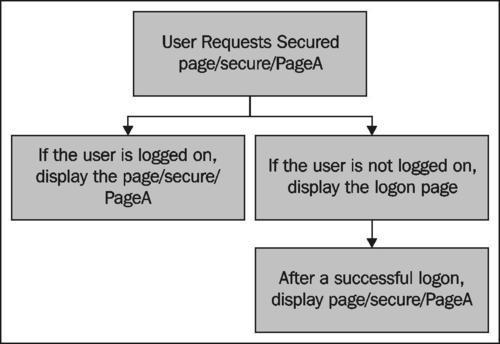
Seam does not automatically perform this redirect after accessing a logon page; however we can add a set of event handlers to the components.xml file to:
Store the requested page before a secure page is accessed when the user is not logged on
Restore the requested page after a successful logon
To achieve this, the following event handlers need to be added into the components.xml file:
<event type="org.jboss.seam.security.notLoggedIn">
<action execute="#{redirect.captureCurrentView}"/>
</event>
<event type="org.jboss.seam.security.loginSuccessful">
<action execute="#{redirect.returnToCapturedView}"/>
</event>
So far, we have shown how to add simple user-based security into an application so that only authorized users (that is, those with a valid username and password) can log in to the system.
However, in real world systems, we need a finer level of granularity so that certain sets of users can perform certain sets of actions, and indeed certain sets of users cannot perform certain actions.
A system of user roles allows this type of functionality, where a role is a set of permissions or actions that a user can achieve.
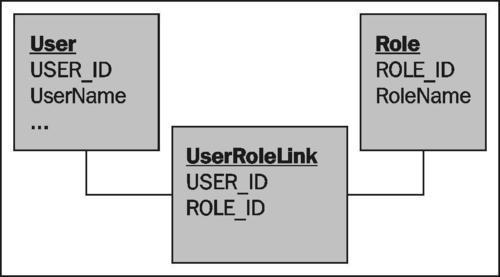
To implement user roles within Seam, we can store the user roles within a relational database using JPA. To implement user roles, we need to follow a similar process to that of defining users:
Implement a role class
Add required Seam annotations
Assign a set of roles to a user
A role is basically a textual name for a set of permissions that are assigned to a user; for example, we may have the following roles within an application.
Admin
User
Guest
To implement this as a Java class is a simple matter of creating a JPA entity.
package com.davidsalter.seamsecurity.entity;
import javax.persistence.Column;
import javax.persistence.Entity;
import javax.persistence.GeneratedValue;
import javax.persistence.Id;
import org.jboss.seam.annotations.security.management.RoleName;
@Entity
public class Role {
private Integer id;
private String name;
@Id
@GeneratedValue
@Column(name="ROLE_ID")
public Integer getId() {
return id;
}
public void setId(Integer id) {
this.id = id;
}
@RoleName
public String getName() {
return name;
}
public void setName(String name) {
this.name = name;
}
}
In this Role class, we can see that we have defined a name for the role and a prime key so that we can persist it to the database.
Within the Role class, we need to add a Seam annotation to specify which field represents the role name. This is achieved by adding the appropriate field with the @RoleName annotation.
Now that we have defined a Role class, we need to assign a set of roles to a user. To achieve this, we must add a Set<Role> property to the User class. Note that we use a Java Set here rather than a generic Collection or List, as we do not want duplicate roles being assigned to a user.
package com.davidsalter.seamsecurity.entity;
import java.util.Date;
import java.util.Set;
import javax.persistence.Column;
import javax.persistence.Entity;
import javax.persistence.GeneratedValue;
import javax.persistence.Id;
import javax.persistence.JoinColumn;
import javax.persistence.JoinTable;
import javax.persistence.ManyToMany;
import org.jboss.seam.annotations.Name;
import org.jboss.seam.annotations.security.management.UserEnabled;
import org.jboss.seam.annotations.security.management.UserFirstName;
import org.jboss.seam.annotations.security.management.UserLastName;
import org.jboss.seam.annotations.security.management.UserPassword;
import org.jboss.seam.annotations.security.management.UserPrincipal;
import org.jboss.seam.annotations.security.management.UserRoles;
@Entity
@Name("user")
public class User {
/// … omitted for brevity.
private Set<Role> roles;
// … omitted for brevity
@UserRoles
@ManyToMany
@JoinTable(name="UserRoleLink",
joinColumns =@JoinColumn(name="USER_ID",
referencedColumnName="USER_ID"),
inverseJoinColumns = @JoinColumn(name="ROLE_ID",
referencedColumnName="ROLE_ID"))
public Set<Role> getRoles() {
return roles;
}
public void setRoles(Set<Role> roles) {
this.roles = roles;
}
// … omitted for brevity
}
Within the User class, we have added a Set<Role> property and annotated it with the @UserRoles annotation. We have also added some JPA annotations to the roles, to model a many-to-many relationship between the user and the roles.
This many-to-many relationship says that:
Each user can have many roles
Each role can be assigned to many users
By using JPA annotations, we have defined that the many-to-many relationship will use a link table called UserRoleLink, which contains the USER_ID and ROLE_ID fields. The database schema for the user and roles components is therefore as follows.
Now that we have created a schema for storing roles, we need to assign roles to users. This is achieved when a user logs on to our applications; so the best place for this to happen is within the authenticator.
Within Seam, the current logged on user is represented by the identity component, which can be injected into other Seam components via the @In annotation.
@In
private Identity identity;
Once we have an instance of the user's identity component, we can invoke the addRole() method to add roles to the user account. Within our JPA authenticator class, this can be achieved as follows:
public boolean authenticate() {
try {
User result = (User)entityManager.createQuery(query)
.setParameter("username", redentials.getUsername())
.setParameter("password", credentials.getPassword())
.getSingleResult();
if (result.getRoles() != null) {
for (Role role : result.getRoles()) {
identity.addRole(role.getName());
}
}
return true;
} catch (Exception e) {
return false;
}
}
In this class, we simply iterate over all of the roles that are assigned to the user and add them to the user's identity reference.
To enhance the user's experience when running our applications, we want to keep the user interface relevant to the roles that the currently logged on user has. For example, we don't want to provide the ability to delete or ban users to guest accounts.
We can achieve this in the Facelets presentation layer by using the {s:hasRole} EL within the rendered attribute of JSF tags. The {s:hasRole} EL evaluates to true if the specified role is held by the logged on user and false if it is not.
If we have a static list of roles, we can easily output what roles a user has, using this EL.
<h:outputText rendered="#{s:hasRole('admin')}">
You have the <i>admin</i> role.<br />
</h:outputText>
<h:outputText rendered="#{s:hasRole('user')}">
You have the <i>user</i> role.<br />
</h:outputText>
<h:outputText rendered="#{s:hasRole('guest')}">
You have the <i>guest</i> role.<br />
</h:outputText>
In this code sample, we can output text that easily indicates which of the admin, user, and guest roles a user may have.
We can also use the rendered attribute in this way to display more complex components, such as forms. In the following example, the create user form will only be shown if the user has the admin role.
<h:form class="createUser" rendered="#{s:hasRole('admin')}">
… Form contents omitted for brevity …
</h:form>
So far, we've looked at how to configure a Seam-based application to have secured pages that can have dynamic content that is available based upon different user roles. However, in most enterprise systems, it's useful to audit security events such as logging on and off.
Seam provides easy-to-use support for auditing security events via Seam events. At key stages during a user's security lifecycle (logging on, failing to log on, logging off, and so on), Seam events are triggered, and these can be captured within custom Seam components via the @Observer annotation. Seam events are discussed further in Chapter 11.
To capture an event, we must develop a method that will be invoked when the event occurs, and then annotate the method with the @Observer annotation and the name of the event being captured.
@Observer("event name")
public void handleEvent() {
}
In Seam, the following common security events are raised.
|
Event name |
Description |
|---|---|
|
|
The user has successfully logged in to the application |
|
|
The user has failed to log in to the application |
|
|
The user has attempted to log in to the application when they are already logged in |
|
|
The user has attempted to access a secured resource and is not logged in |
|
|
The user is logged in and has attempted to access a secured resource but does not have the appropriate role |
|
|
The user has logged out of the application |
To audit these types of events within a Seam application, we need to create two classes. First we need an @Entity class that can be persisted to the database, and that details the event being audited. Next, we need an @Observer class that will be invoked when the events are raised.
The following classes show how we can audit logins and failed logins to the database.
To audit events in the database, we need to store the date that the event occurred, the username that caused the event, and the status of the event (for example, logged in or failed to login). We can implement this in a simple JPA entity class, as shown in the following example.
package com.davidsalter.seamsecurity.entity;
import java.util.Date;
import javax.persistence.Column;
import javax.persistence.Entity;
import javax.persistence.GeneratedValue;
import javax.persistence.Id;
@Entity
public class LoginAudit {
private Integer id;
private Date loginDate;
private String userName;
private String status;
public LoginAudit() {
setLoginDate(new Date());
}
@Id
@GeneratedValue
@Column(name="AUDIT_ID")
public Integer getId() {
return id;
}
public void setId(Integer id) {
this.id = id;
}
public Date getLoginDate() {
return loginDate;
}
public void setLoginDate(Date loginDate) {
this.loginDate = loginDate;
}
public String getStatus() {
return status;
}
public void setStatus(String status) {
this.status = status;
}
public String getUserName() {
return userName;
}
public void setUserName(String userName) {
this.userName = userName;
}
}
Once we have an Entity class that can be persisted to the database, we can write a manager component that will observe the Seam security events.
package com.davidsalter.seamsecurity;
import com.davidsalter.seamsecurity.entity.LoginAudit;
import javax.persistence.EntityManager;
import org.jboss.seam.annotations.In;
import org.jboss.seam.annotations.Logger;
import org.jboss.seam.annotations.Name;
import org.jboss.seam.annotations.Observer;
import org.jboss.seam.log.Log;
import org.jboss.seam.security.Credentials;
@Name("auditManager")
public class AuditManager {
@Logger
private Log log;
@In
private Credentials credentials;
@In
private EntityManager entityManager;
@Observer("org.jboss.seam.security.loginSuccessful")
public void onSuccessFulLogin() {
LoginAudit audit = new LoginAudit();
audit.setStatus("Success");
audit.setUserName(credentials.getUsername());
entityManager.persist(audit);
}
@Observer("org.jboss.seam.security.loginFailed")
public void onFailedLogin() {
LoginAudit audit = new LoginAudit();
audit.setStatus("Fail");
audit.setUserName(credentials.getUsername());
entityManager.persist(audit);
}
}
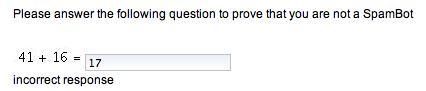
A CAPTCHA (Completely Automated Public Turing test to tell Computers and Humans Apart) allows a challenge-response input to be provided by the users to enable computer systems to validate that a "live" user is accessing the system rather than a computer.
A CAPTCHA shows a question to the user of a system, (typically when creating user accounts) that only a human being can answer and an automated system would not be able to answer. Usually these questions are in the form of simple mathematics or a set of obscured letters to be repeated, both of which would be difficult for a computer application to respond with.
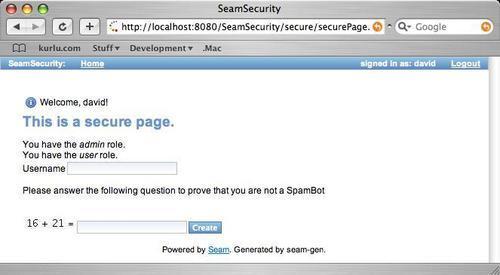
The previous example uses Seam's default CAPTCHA configuration that asks a simple mathematical question to the user (in this case, what is the value of 16+21).
To implement this type of CAPTCHA support in a Seam application, we need to ensure that the Seam resource servlet (org.jboss.seam.servlet.SeamResourceServlet) is configured for our application. If you are using a SeamGen generated application, this is automatically configured for you. If not, refer to Chapter 9, where we provided details on how to configure this servlet.
After defining the resource servlet, we need to add the challenge and response components to our web page.
The challenge is represented on the form as a graphic image. This is displayed using the <h:graphicImage /> tag.
<h:graphicImage value="/seam/resource/captcha"/>
This tag uses the Seam resource servlet to generate the required challenge image, which can then be displayed within the browser.
The response is represented on the form as an input text box and is displayed using the <h:inputText /> tag. This tag must be bound to Seam's CAPTCHA infrastructure by setting the value attribute to #{captcha.response}.
<h:inputText id="captchaInput" value="#{captcha.response}" required="true">
<s:validate />
</h:inputText>
To complete the CAPTCHA form, we need to add a message component that can inform users when they have supplied an incorrect answer. When a correct answer is entered, the form completes as normal and no CAPTCHA specific response is needed.
<h:message for="captchaInput"/>
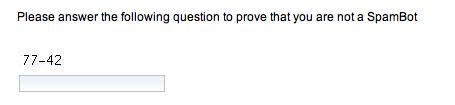
The challenge message displayed by the CAPTCHA component can be changed to display any message that you wish, within your application. To change the CAPTCHA challenge, we need to override the init() method within the org.jboss.seam.captcha.Captcha class.
The Seam Captcha class has the setChallenge() and setCorrectResponse() methods which can be used to specify the new challenge and response values for the CAPTCHA.
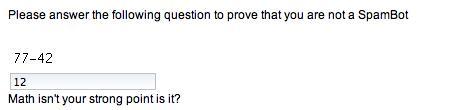
The response message that is displayed to users when the CAPTCHA challenge is answered incorrectly can also be modified by annotating the getResponse() method with the @CaptchaResponse annotation. This allows different messages that are appropriate to the challenge used in your application to be returned to the user.
package com.davidsalter.seamsecurity;
import java.util.Random;
import org.jboss.seam.annotations.Create;
import org.jboss.seam.annotations.Name;
import org.jboss.seam.captcha.Captcha;
import org.jboss.seam.captcha.CaptchaResponse;
@Name("org.jboss.seam.captcha.captcha")
public class SubtractCaptcha extends Captcha {
@Override
@Create
public void init() {
Random random = new Random(1234567890);
int firstNum = random.nextInt(100);
int secondNum = random.nextInt(100);
this.setChallenge(firstNum+"-"+secondNum);
this.setCorrectResponse(""+(firstNum-secondNum));
}
@Override
@CaptchaResponse(message="Math isn't your strong point is it?")
public String getResponse() {
return super.getResponse();
}
}
After adding and executing this code, you will get the following output:
If you enter an incorrect answer, your customized new message will be displayed, as shown in the following screenshot:
The Seam identity manager API provides a standard interface for identifying management functionality, for example, creating users or assigning roles to users, irrespective of the security-backing store. The security-backing store may be implemented as either database tables via JPA or via LDAP (Lightweight Directory Access Protocol).
The Seam identity manager is new to Seam 2.1, and provides fine-grained security access permission on top of security roles. We will discuss the identity manager API briefly in this section, so that we have a good understanding of what it can achieve. In particular, we'll pay attention to how to create users and assign roles to them by using a JPA-based security-backing store.
To use the Seam identity manager with a JPA backing store, we need to specify which JPA classes represent our user and role entities. This is achieved by using the <security:jpa-identity-store> element within an application's components.xml file. To use the User and Role classes that we defined earlier in the chapter, we would need to add the following code to the components.xml file:
<security:jpa-identity-store
user-class="com.davidsalter.seamsecurity.entity.User"
role-class="com.davidsalter.seamsecurity.entity.Role"
/>
Once we are done with this configuration, Seam is able to use the correct entities for creating or editing users and roles. Note that for the Seam identity manager to use these classes correctly, the classes have to be annotated with the identity manager annotations (@UserPrincipal, @UserPassword, and so on), as detailed earlier in this chapter.
After configuring Seam to use the JPA identity manager, we can create an instance of the identity manager by injecting it into a manager class such as a Session Bean. The identity manager provides many methods for managing both users and roles. However, we are looking at the createUser() and grantRole() methods, which will enable us to create a new user and then assign a set of roles to the user.
IdentityManager.createUser(String username, String password);
IdentityManager.grantRole(String username, String rolename);
Note
Full details of the Seam identity manager API can be found at:
http://docs.jboss.com/seam/2.1.1.GA/api/org/jboss/seam/security/management/IdentityManager.html
The Seam identity manager requires certain security privileges in order to be able to manage users and roles. These privileges can be added to specific roles by using JBoss Drools. We won't cover here how to use JBoss Drools, as that could cover a whole book in itself. Instead, we will take a look at a couple of simple examples of how to assign security privileges to a user role.
JBoss Drools allows business rules to be defined within a script file that can then be used at an application's run time.
JBoss security rules are configured within files with .drl extension. For Seam to bootstrap these rules, the components.xml file must be configured with the name of the rules file to use. This is a two phase approach. First we must tell Seam that we wish to use a Drools-based permission system, and then we must configure the file that contains the rules.
Configuring Seam to use a Drools-based permission system is a matter of configuring the <security:rule-based-permission-resolver /> element within the components.xml file, and specifying the name of a rule-based component.
<security:rule-based-permission-resolver security-rules="#{securityRules}"/>
The name of the rule-based permission resolver references the Drools configuration files that are also defined within the components.xml file.
<drools:rule-base name="securityRules">
<drools:rule-files>
<value>/security.drl</value>
</drools:rule-files>
</drools:rule-base>
These code examples show that we wish to use a rule-based permission resolver called securityRules, which is in turn defined within the /security.drl file, that is the entire configuration that is required in the components.xml file. However, to complete the Drools-based security configuration, we must add a couple of rules that will allow our admin role full access to be able to create users and assign roles to those users.
The following Drools code will create two business rules—UserPermissions and RolePermissions. These rules will check whether the seam.user and seam.role permissions are granted to the current user and will add them, if necessary, as long as the current user has the admin role.
package Permissions;
import java.security.Principal;
import org.jboss.seam.security.permission.PermissionCheck;
import org.jboss.seam.security.Role;
rule UserPermissions
when
check: PermissionCheck(name == "seam.user", granted == false)
Role(name == "admin")
then
check.grant();
end
rule RolePermissions
when
check: PermissionCheck(name == "seam.role", granted == false)
Role(name == "admin")
then
check.grant();
end
The seam.user and seam.role permissions are required to use the identity manager user and role creation methods discussed in this example.
Finally, after granting the relevant permissions to the admin role, we can write a manager class that will allow users to be created from a given Facelets form.
<!DOCTYPE composition PUBLIC "-//W3C//DTD XHTML 1.0 Transitional//EN"
"http://www.w3.org/TR/xhtml1/DTD/xhtml1-transitional.dtd">
<ui:composition xmlns="http://www.w3.org/1999/xhtml"
xmlns:s="http://jboss.com/products/seam/taglib"
xmlns:ui="http://java.sun.com/jsf/facelets"
xmlns:f="http://java.sun.com/jsf/core"
xmlns:h="http://java.sun.com/jsf/html"
xmlns:rich="http://richfaces.org/rich"
template="../layout/template.xhtml">
<ui:define name="body">
<h1>This is a secure page.</h1>
<h:outputText rendered="#{s:hasRole('admin')}">
You have the <i>admin</i> role.<br />
</h:outputText>
<h:outputText rendered="#{s:hasRole('user')}">
You have the <i>user</i> role.<br />
</h:outputText>
<h:outputText rendered="#{s:hasRole('guest')}">
You have the <i>guest</i> role.<br />
</h:outputText>
<h:form class="createUser" rendered="#{s:hasRole('admin')}">
<h:outputLabel for="username">Username</h:outputLabel>
<h:inputText id="username"
value="#{user.userName}"/>
<p>Please answer the following question to prove that you are not a SpamBot</p>
<br />
<h:graphicImage value="/seam/resource/captcha"/>
<br />
<h:inputText id="captchaInput" value="#{captcha. response}" required="true">
<s:validate />
</h:inputText>
<br />
<h:message for="captchaInput"/>
<br />
<h:commandButton value="Create" action= "#{newUserManager.createUser}"/>
</h:form>
</ui:define>
</ui:composition>
package com.davidsalter.seamsecurity;
import com.davidsalter.seamsecurity.entity.User;
import org.jboss.seam.annotations.In;
import org.jboss.seam.annotations.Name;
import org.jboss.seam.security.management.IdentityManager;
@Name("newUserManager")
public class NewUserManager implements NewUser {
@In
private IdentityManager identityManager;
@In
User user;
public String createUser() {
identityManager.createUser(user.getUserName(), "password");
identityManager.grantRole(user.getUserName(), "user");
return "created";
}
}
The complete code for this example is included in the download bundle for this book.
If you want to use a security mechanism in your applications, but don't want to be responsible for managing lists of users and passwords, then OpenID may be the answer.
OpenID is an open standard authentication scheme that allows users to log onto many different web sites using the same identity on each of the web sites. There are many different providers of OpenID (for example, Google, Yahoo!, and so on), and also many different web sites that allow users to authenticate using OpenID (http://dzone.com, http://livejournal.com, http://sourceforge.net, and so on). When a user logs on to an OpenID-enabled application, they are redirected to their OpenID provider for authentication. If the user authenticates correctly with their OpenID provider, they are redirected back to the originating application and are automatically authenticated. Using a provider for authentication removes the need for all of the authentication code within a web application, as this is all managed by the OpenID provider.
OpenID can be a powerful yet simple authentication mechanism that is easily integrated into Seam applications. For further details about OpenID, check out http://openid.net
To configure a Seam application to support OpenID, we need to perform the following actions:
Configure an OpenID phase listener
Ensure that the correct JAR files are on the application's classpath
Write a logon form
Configure page redirection after an OpenID logon
An OpenID phase listener is required to allow authenticated users' access to applications after they have been authenticated by the OpenID provider.
To configure an OpenID phase listener, we need to add the OpenIDPhaseListener into an application's faces-config.xml file.
<lifecycle>
<phase-listener>
org.jboss.seam.security.openid.OpenIdPhaseListener
</phase-listener>
</lifecycle>
In order to support the OpenID protocol, we need to ensure that the following JAR files are on the application's classpath.
htmlparser.jaropenid4java.jaropenxri-client.jaropenxri-syntax.jar
If you are using SeamGen, all of these files will be located within the lib folder of your generated project structure. However, note that SeamGen does not alter your application's classpath to include these files—that has to be performed manually.
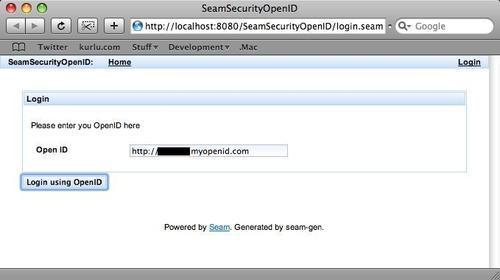
In order to invoke a user's logon to an application via OpenID, we need to develop a logon form. For OpenID, all we need is an edit box to take the user's OpenID and a button to invoke the logon process. With OpenID, users' IDs are represented in a URL-like syntax such as http://MySeamID.myopenid.com, without a password. When a user invokes the logon process, the OpenID provider is contacted and it is at this point that the user has to verify their credentials, for example, with a password. All that is required for web applications is that we develop the OpenID logon form.
A simple OpenID logon form would look similar to the following:
<h:outputLabel for="username">Open ID</h:outputLabel>
<h:inputText id="openid" value="#{openid.id}"/>
<h:commandButton value="Login using OpenID" action="#{openid.login}"/>
In this simple code fragment, we can see the important aspects of an OpenID logon form.
The OpenID entered by the user must be bound to the
idparameter on theopenidSeam component (#{openid.id})To invoke an OpenID logon process, we must execute the
loginaction on theopenidSeam component (#{opened.logon})
After we've entered an OpenID into a Seam application and confirmed our identity with an OpenID provider, the OpenID provider will redirect the user to the /openid.xhtml page within our application. This is a virtual page that is generated by Seam, and does not need to be written by the application developer. However, we can configure which page is shown after an OpenID logon by configuring navigation rules for the /openid.xhtml view.
To manage a successful and failed logon, we need to define two page navigation rules for this page as shown in the following code example:
<page view-id="/openid.xhtml">
<navigation evaluate="#{openid.loginImmediately()}">
<rule if-outcome="true">
<redirect view-id="/secure/securePage.xhtml">
</redirect>
</rule>
<rule if-outcome="false">
<redirect view-id="/home.xhtml">
</redirect>
</rule>
</navigation>
</page>
You can see from this code example that we have defined two navigation rules for the /openid.xhtml view. The navigation rules are based on the result of evaluating the #{openid.loginImmediately()} expression, that is, confirming that the OpenID authentication was successful. In this example, if the expression is evaluated to true we have successfully authenticated via OpenID, and the user is redirected to the /secure/securePage.xhtml. If the #{openid.loginImmediately()} expression evaluates to false, then the user did not successfully authenticate with OpenID and the user is redirected to a non-secure page at /home.xhtml.
Once a user is authenticated via OpenID and logged into a Seam application, the authenticated OpenID can be obtained from the validatedId property of the openid Seam component (#{openid.validatedId}).
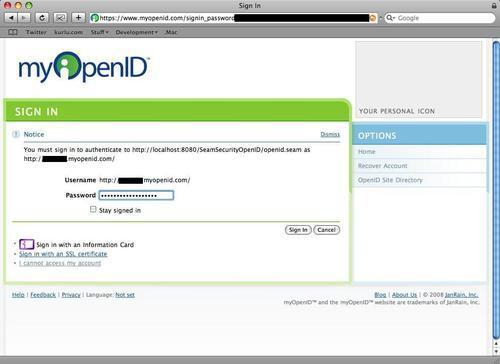
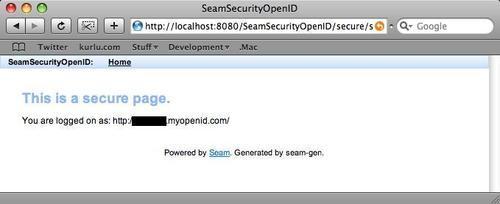
The OpenID logon process is shown in the following screenshots.
When an unauthenticated user attempts to access a secured page, the OpenID logon screen is first displayed.
After entering an OpenID and clicking on the Login using OpenID button, the user is redirected to their OpenID authentication provider, where they must authenticate themselves. In the following screenshot, http://www.myopenid.com is the authentication provider.
After the authentication has taken place, the user is redirected back to the originating web application as an authenticated user.
In this chapter, we've taken a look at Seam-based security and in particular how Seam supports a JPA backing store for security-related functions. We've noted that Seam also supports LDAP instead of JPA as a backing store.
We have looked at creating an authentication method, the database tables, and entities that are required for backing security information into a relational database.
Next, we examined role-based security and saw how to secure pages based upon user roles.
We then looked at CAPTCHAs and saw how it is possible to include challenge-response security mechanisms within a Seam web application, and how Seam allows us to easily change the content of the challenge and responses.
Next, we took a brief look at the new Seam identity management API and saw how this can be used to create new users within a JPA-based backing store by using JBoss Drools to grant security permissions.
Finally, we looked at the OpenID authentication scheme and saw how it is possible to add OpenID authentication into Seam applications.