
So far, we've looked at the basics of Seam and learned how to build web applications using the Seam Framework. In all of the examples that we've seen so far, we've used JSP as our view technology, and custom build ant scripts for building and deploying the applications. However, the JBoss recommended view technology is Facelets rather than JSP. In this chapter, we will look at why Facelets is recommended, and what it offers over JSP. We'll also look at the SeamGen tool and see why this is a much better way of creating Seam applications and build scripts. SeamGen generated build scripts provide many advantages over the custom build scripts that we have seen so far, including support for advanced testing of web applications. Finally, we'll bring both SeamGen and Facelets together and re-create the Vacation Planner project that we wrote in Chapter 3 (realizing, in the course of doing so, how much easier and more advanced it is), using these technologies. In the subsequent chapters of this book, we'll build on this Vacation Planner application and see how Seam can be used to build modern web applications.
Facelets (https://facelets.dev.java.net) is a framework that provides an alternative view technology to JSP, and is one of the supported view technologies of Seam. Seam 2.1 introduced support for Apache Wicket (http://wicket.apache.org) as a Seam view technology, but that is not covered in this book.
With JSP, suppose that a client requests a page from the server. The first time this page is accessed, it is converted into a servlet. This servlet is then responsible for generating the HTML that is returned to the client.
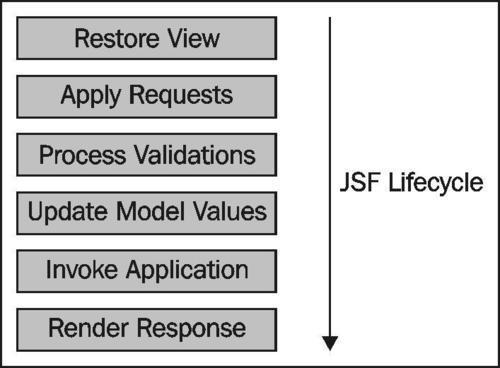
Java Server Faces works in a different manner, by building up a tree of components that are rendered to the view as necessary (note that JSF does not necessarily have to render HTML). Each JSF page has a life cycle consisting of several stages, as shown in the following diagram. Facelets is responsible for managing the Restore View and Render Response phases within the JSF life cycle.
Note
You can read all about the JSF life cycle in Sun's Java EE 5 tutorial at: http://java.sun.com/javaee/5/docs/tutorial/ doc/bnaqq.html.
Facelets offers several advantages over using JSP as our view technology for web applications. The following are some of these advantages:
Templating
Performance
EL functions
XHTML
No scriptlets
Let's take a look at each of these.
Probably the main benefit in using Facelets over JSP is that Facelets offers a template approach to building web pages. This makes a component-based design much easier to implement.
Facelets provides several tags that allow templates to be defined and populated with different markup:
<ui:composition /><ui:insert /><ui:define />
These tags are defined within the xmlns:ui="http://java.sun.com/jsf/facelet" namespace.
Facelets has the concept of a template and a template client. Typically, the <ui:insert /> tag is used within a template and the <ui:composition /> and <ui:define /> tags are used within a template client.
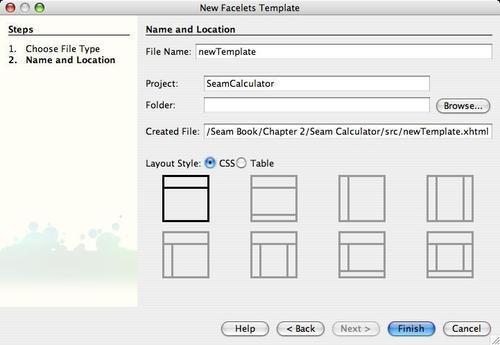
The <ui:composition /> tag specifies which Facelets template will be used for a page. This tag is therefore very powerful, as it allows the look and feel of a web site to be changed. By changing the <ui:composition /> tag, we could easily change a web site, for example, from having a single header and a body to having a single header and two columns in the body. Many different layouts of a web application can be achieved by changing this value. Using NetBeans, for example, we can easily create eight different layouts for a web application, as shown in the following screenshot:
The <ui:insert /> tag defines place holders within a template file that can be overwritten by different Facelets pages.
The <ui:define /> tag defines JSF markup that will be placed within a <ui:insert /> tag. If a <ui:define /> tag is not specified for a particular <ui:insert /> tag, then the default value of the <ui:insert /> tag will be used.
To get a better understanding of these tags, let's take a quick look at a sample Facelets page and see how all of these tags are used.
As we mentioned earlier, the <ui:insert /> tag defines insertion points within a template where Facelets components can be placed. This can be seen in the example template.xhtml file shown here:
<!DOCTYPE html PUBLIC "-//W3C//DTD XHTML 1.0 Transitional//EN" "http://www.w3.org/TR/xhtml1/DTD/xhtml1-transitional.dtd"> <html xmlns="http://www.w3.org/1999/xhtml" xmlns:ui="http://java.sun.com/jsf/facelets" xmlns:h="http://java.sun.com/jsf/html" xmlns:f="http://java.sun.com/jsf/core" xmlns:s="http://jboss.com/products/seam/taglib">
<head>
<meta http-equiv="Content-Type" content="text/html; charset=UTF-8" />
<title>BugTime</title>
<link href="../stylesheet/theme.css" rel="stylesheet" type="text/css" />
<body>
<div class="body">
<ui:insert name="body"/>
</div>
<div class="footer">
<ui:insert name="footer"/>
</div>
</body>
</html>
Within this file, we can see that the namespace for Facelets has been defined (xmlns:ui="http://java.sun.com/jsf/facelets"), and that we have defined two template insertion points, called body and footer.
The following templateclient.xhtml file shows how the <ui:composition /> and <ui:define /> tags are used to take advantage of the templating features of Facelets to replace the body and the footer sections defined within the template.xhtml file.
<!DOCTYPE composition PUBLIC "-//W3C//DTD XHTML 1.0 Transitional//EN"
"http://www.w3.org/TR/xhtml1/DTD/xhtml1-transitional.dtd">
<ui:composition xmlns="http://www.w3.org/1999/xhtml"
xmlns:ui="http://java.sun.com/jsf/facelets"
xmlns:f="http://java.sun.com/jsf/core"
xmlns:h="http://java.sun.com/jsf/html" template="../layout/template.xhtml">
<ui:define name="body">
… HTML Content Defined Here
</ui:define>
<ui:define name="footer">
… HTML Content Defined Here
</ui:define>
</ui:composition>
This file is defined as a standard XML file with the <ui:composition /> tag as the root node. As with the template itself (template.xhtml), this file also specifies that we are using the Facelets UI library (xmlns:ui="http://java.sun.com/jsf/facelets"). However, because this file is referencing a template, we must specify which template to reference, by using the template attribute within the <ui:composition /> tag.
<ui:composition
template="../layout/template.xhtml" >
The sections within the template file that are to be replaced are then specified by using the <ui:define /> tag.
The <ui:composition />, <ui:define />, and <ui:insert /> tags allow us to build complex page layouts by defining a template and replacing page fragments within the template.
The <ui:param /> tag adds to this templating functionality of Facelets by allowing objects to be passed into templates that are included via the <ui:include /> tag. The <ui:param /> and <ui:include /> tags are defined within the standard Facelets namespace as described earlier.
The <ui:include /> tag specifies an attribute, src, that specifies another Facelets document to be included into the page. In the following example, the Facelets document footer.xhtml is included.
<ui:include src="footer.xhtml" />
The <ui:param /> tag can be used in conjunction with the <ui:include /> tag to specify objects within the included document. This parameter takes two attributes, name and value. The name attribute specifies the literal or name of the variable to pass to the template, whereas the value parameter specifies the EL expression value of the variable to pass.
<ui:include src="footer.xhtml" >
<ui:param name="vacation" value="#{vacation}">
<ui:param name="vacationPlanner" value="David">
</ui:include>
When a JSP page is accessed for the first time, it is compiled into a servlet, which consumes resources, both in terms of time and memory. For large applications, it is often useful to precompile JSP pages so that there is no performance hit the first time a user accesses a page. With Facelets, however, this precompilation is not necessary as a component tree of all of the JSF components on a page is built. The JSF component tree is comprised of Java objects (for example, edit boxes or buttons) that contain attributes that describe the object being displayed.
Typically, within a JSF page, we would make use of JSF Expression Language (EL). However, within Facelets, we can use JSF Expression Language functions in addition to Expression Language. So, for example, we could define some JSF code as shown in the following code snippet:
<h:inputText id="#{someText}" value="#{trim[someText]}">
</h:inputText>
In this example, a <h:inputText /> text box is defined with a value equal to the result of invoking the trim() function on the contents of the text box.
The Expression Language supported by Facelets is called Unified Expression Language. Complete details of Unified Expression Language can be found at the following URL:
http://java.sun.com/products/jsp/reference/techart/unifiedEL.html
Facelets pages are defined as Extensible HTML (XHTML), with the .xhtml file extension.
As XHTML documents are fully XML compliant, they can be parsed by software, usually your Java IDE, which helps to ensure that Facelet files are always valid, and will therefore be better supported by browsers.
XHTML allows namespaces to be used within the web page, which allows easy identification of different libraries for different user controls. The Facelets library is defined within the xmlns:ui="http://java.sun.com/jsf/facelets" namespace. The standard JSF HTML and Core libraries are represented by the xmlns:h="http://java.sun.com/jsf/html" and xmlns:f="http://java.sun.con/jsf/core" namespaces respectively.
A typical Facelets file would have a header similar to the following header:
<!DOCTYPE html PUBLIC "-//W3C//DTD XHTML 1.0 Transitional//EN" "http://www.w3.org/TR/xhtml1/DTD/xhtml1-transitional.dtd">
<html xmlns="http://www.w3.org/1999/xhtml"
xmlns:ui="http://java.sun.com/jsf/facelets"
xmlns:h="http://java.sun.com/jsf/html"
xmlns:f="http://java.sun.com/jsf/core">
…
</html>
By default, with Facelets, comments within XHTML are processed by the framework and will therefore show up within the rendered pages. Putting comments around a section of code is not sufficient to comment out code. If you wish to use comments within Facelets XHTML files, you need to configure Facelets to skip comments. This can be achieved by setting the facelets.SKIP_COMMENTS property to true within the web.xml file for the application.
<context-param>
<param-name>facelets.SKIP_COMMENTS</param-name>
<param-value>true</param-value>
</context-param>
It is very easy to write scriptlets within the body of a JSP page, for example:
<% if validate() { %>
<b> Valid </b>
<% } else { %>
<b> Invalid</b>
<% } %>
Facelets does not allow such scriptlets to be written inside a page. This has the effect of forcing the separation of view and application logic, making it much easier to have coherent business logic with different pluggable user interfaces.
Facelets version 1.1.15 is provided with Seam 2.1.1.GA. At the time of writing (early 2009), this is the latest available version of both Seam and Facelets.
Facelets can be independently downloaded from the Facelets web site (https://facelets.dev.java.net).
To use Facelets within a Seam application, we need to make sure that jsf-facelets.jar is in the classpath for the web application. For the example applications we have looked at so far, we need to place the jsf-facelets.jar file within the lib directory of our project structure. When we look at SeamGen we will see that we do not need to download or explicitly configure Facelets for use within SeamGen generated applications. This entire configuration is taken care of for us automatically by the SeamGen tool.
If you wish to use Facelets outside of a Seam application, several different JAR files, which are not included with the Facelets download, are required to allow Facelets to operate correctly.
JSF Reference Implementation, or
My Faces JSF Implementation
JSF 1.2 API
In order to use Facelets within a JSF application, we need to make several configuration changes to the web.xml and faces-config.xml files.
Within the web.xml file, we need to configure the default suffix for our web pages to be .xhtml. This is achieved by setting the javax.faces.DEFAULT_SUFFIX initialization parameter. A minimal web.xml file would look similar to the following:
<?xml version="1.0" ?>
<web-app xmlns="http://java.sun.com/xml/ns/javaee" xmlns:xsi="http://www.w3.org/2001/XMLSchema-instance" xsi:schemaLocation="http://java.sun.com/xml/ns/javaee http://java.sun.com/xml/ns/javaee/web-app_2_5.xsd" version="2.5">
<listener>
<listener-class>
org.jboss.seam.servlet.SeamListener
</listener-class>
</listener>
<context-param>
<param-name>javax.faces.DEFAULT_SUFFIX</param-name>
<param-value>.xhtml</param-value>
</context-param>
<servlet>
<servlet-name>Faces Servlet</servlet-name>
<servlet-class>
javax.faces.webapp.FacesServlet
</servlet-class>
<load-on-startup>1</load-on-startup>
</servlet>
<servlet-mapping>
<servlet-name>Faces Servlet</servlet-name>
<url-pattern>*.seam</url-pattern>
</servlet-mapping>
</web-app>
In this file, you will also notice that a listener, org.jboss.seam.servlet.SeamListener, has been declared. In Java EE applications, listeners are used to hook into the servlet life cycle so that initialization and destruction events can be managed. The SeamListener class is responsible for internally managing Seam components and must therefore be properly declared within the web.xml to allow Seam to manage component life cycles correctly.
Within the faces-config.xml file, we need to configure JSF so that Facelets is used within the Restore View and Render Response phases of the JSF life cycle. This is achieved by adding com.sun.facelets.FaceletViewHandler as a view handler.
<?xml version='1.0' encoding='UTF-8'?>
<faces-config version="1.2" xmlns="http://java.sun.com/xml/ns/javaee" xmlns:xsi="http://www.w3.org/2001/XMLSchema-instance" xsi:schemaLocation="http://java.sun.com/xml/ns/javaee http://java.sun.com/xml/ns/javaee/web-facesconfig_1_2.xsd">
<lifecycle>
<phase-listener>
org.jboss.seam.jsf.SeamPhaseListener
</phase-listener>
</lifecycle>
<application>
<view-handler>
com.sun.facelets.FaceletViewHandler
</view-handler>
</application>
</faces-config>
In this sample faces-config.xml file, we can see that we have declared a class to manage Seam component life cycles. In Java EE applications, a Phase Listener hooks into the JSF life cycle events and is invoked before and after each of the phases in the JSF life cycle (Restore View, Apply Requests, Process Validations, Update Model Values, Invoke Application, and Render Response). The SeamPhaseListener is responsible for internally managing Seam components, and must therefore be declared within the faces-config.xml file.
Now that we've taken a look at Facelets and the benefits it offers over standard JSP, let's convert the Seam Calculator application we wrote in Chapter 2 into a Facelets application. The source code for this application can be found in the folder named Chapter 4 within the source code download bundle for this book.
The first stage of converting this application to use Facelets is to configure the web.xml and faces-config.xml files within the resources/WEB-INF folder. These files are practically the same as shown in the previous section, and haven't been repeated.
There are two XHTML Facelets pages for the application. The template file (template.xhtml) and the template client file (calc.xhtml).
<!DOCTYPE html PUBLIC "-//W3C//DTD XHTML 1.0 Transitional//EN" "http://www.w3.org/TR/xhtml1/DTD/xhtml1-transitional.dtd">
<html xmlns="http://www.w3.org/1999/xhtml"
xmlns:ui="http://java.sun.com/jsf/facelets"
xmlns:h="http://java.sun.com/jsf/html"
xmlns:f="http://java.sun.com/jsf/core"
xmlns:s="http://jboss.com/products/seam/taglib">
<head>
<meta http-equiv="Content-Type" content="text/html; charset= UTF-8" />
<title>Seam Calculator</title>
<link href="styles.css" rel="stylesheet" type="text/css" />
</head>
<body>
<div class="header">
<ui:insert name="header">Seam Calculator</ui:insert>
</div>
<div class="body">
<ui:insert name="body"/>
</div>
<div class="footer">
<ui:insert name="footer"/>
</div>
</body>
</html>
In this template file, we can see that we have the following three template insertion points that can be populated from within a template client:
<ui:insert name="header">Seam Calculator</ui:insert><ui:insert name="body" /><ui:insert name="footer" />
The first of these <ui:insert /> tags contains the data, Seam Calculator. This is a default value for the template section header. If a template client does not specify an insertion point to be inserted, then the default value will be used. In our simple application, we do not define the header within the client file (calc.xhtml) so the default value is used.
We've also defined a minimal amount of CSS styling to template.xhtml so that we can distinguish the different sections within the file. The CSS is stored in styles.css.
body {
margin: 0px;
font-family: Arial,sans-serif;
color: #616161;
}
header {
font-family: Arial,sans-serif;
text-align: left;
font-size: 28px;
margin: 20px;
}
footer {
font-family: Arial,sans-serif;
text-align: center;
font-size: 10px;
}
Finally, we need to define a file that references the template and contains the HTML for our calc.xhtml page.
<!DOCTYPE html PUBLIC "-//W3C//DTD XHTML 1.0 Transitional//EN"
"http://www.w3.org/TR/xhtml1/DTD/xhtml1-transitional.dtd">
<ui:composition xmlns="http://www.w3.org/1999/xhtml" xmlns:ui="http://java.sun.com/jsf/facelets" xmlns:h="http://java.sun.com/jsf/html" xmlns:f="http://java.sun.com/jsf/core" template="template.xhtml">
<p>This is our first Seam application using Facelets.</p>
<ui:define name="body">
<f:view>
<h:form>
<h:panelGrid columns="2">
Value 1: <h:inputText value="#{calculator.value1}" />
Value 2: <h:inputText value="#{calculator.value2}" />
Add them together gives: <h:outputText value="#{calculator.answer}"/>
</h:panelGrid>
<h:commandButton value="Add" action="#{calcAction.calculate}"/>
</h:form>
</f:view>
</ui:define>
<ui:define name="footer">
Seam Facelets Application
</ui:define>
</ui:composition>
This page looks very similar to the previous simple JSP page, except that we have now broken it down into body and footer <ui:define /> tags. We can also see that this file has no <HTML> or <BODY> tags, as these are taken care of in the template. The root tag of this file is the <ui:composition /> tag, which specifies, via the template attribute, which template file to use.
To verify that our application still works, we can build and deploy it to a running instance of JBoss, by using ant.
ant deploy
To run the application, we need to point the web browser to:
http://localhost:8080/SeamCalculator/calc.seam
If all goes well, we should see the familiar calculator application displayed in the browser, as shown in the following screenshot.
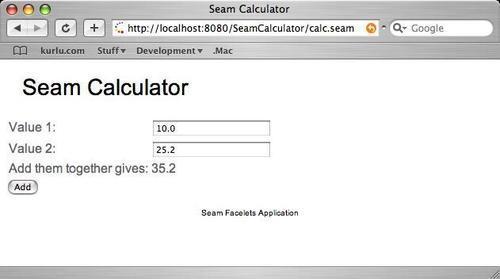
We can see that the CSS stylesheet and the template file now define the layout of the application. From this, we can see the template benefits of Facelets, and can easily see how we can change these files to give the application a completely different look and feel.
You may have noticed that in the template client file, calc.xhtml, we have added the following line, which should output the HTML This is our first Seam application using Facelets.
<p>This is our first Seam application using Facelets.</>
<ui:define name="body">
If you have a look at the preceding screenshot of the working application, this piece of text isn't displayed anywhere on the page. This is because we entered the text within the template client file, outside of one of the <ui:define /> tags. Facelets is clever enough to work out that this text isn't a part of the template client and therefore doesn't display it. If we wanted this text to be rendered within the browser, we would need to add it to the template file itself, template.xhtml.
In the previous section, we introduced Facelets, the recommended view technology for Seam applications. So far, all of our applications have been written manually, without any kind of computer assistance. We've even had to write the ant scripts manually. This can be time consuming, particularly in large projects. Fortunately, the Seam Framework is supplied with a command line tool called SeamGen that can automatically generate projects, even ones including Eclipse and NetBeans project files, for us.
SeamGen is an ant script that asks the developers questions about the project they wish to develop, and then, based upon the responses to those questions, builds project templates that can be managed using either Ant, NetBeans, or Eclipse.
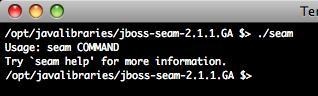
The SeamGen application is invoked by executing the <SEAM_HOME>/seam.bat command in Windows, or the <SEAM_HOME>/seam command on Linux or Mac.
Note
If you are running SeamGen on Linux/Mac, you may have to make the Seam application executable before you can run it. This is achieved by using the following chmod command.
chmod u+x seam
The SeamGen application takes different command line parameters and allows all aspects of the project life cycle to be managed. The following table lists the different options available to the application.
|
Option |
Description |
|---|---|
|
setup |
Runs the setup wizard, which asks the user about the project that they are working on, such as which database drivers to use, the package name for classes, and so on. The answers are stored within the |
|
create-project |
Creates a Seam project using the definitions stored within the |
|
update-project |
Updates the current project to use the latest Seam JAR files. |
|
delete-project |
Deletes the current project. |
|
archive |
Builds the current project as either a WAR or a EAR file, depending upon the project configuration options. |
|
deploy |
Deploys the current project to JBoss. |
|
undeploy |
Undeploys the current project from JBoss. |
|
explode |
Deploys the current project to JBoss as an exploded archive. |
|
restart |
Restarts the currently-exploded project. |
|
unexploded |
Undeploys the currently-exploded project. |
|
new-action |
Creates a new Seam action class. |
|
new-form |
Creates a new Seam action form and action class. |
|
new-conversation |
Creates a new Seam conversation. |
|
new-entity |
Creates a new Seam entity class. |
|
generate-model |
Reverse engineers the current project's database, and generates JPA entity classes from it. |
|
generate-ui |
Creates entity management pages (create, update, delete) for existing Seam entity classes. |
|
generate |
Creates entity management pages and JPA entity classes by reverse engineering the current project's database. |
SeamGen can be used to manage all aspects of a project's life cycle, from originally creating a new project through to adding new actions, reverse engineering database schemas into JPA entities, and deploying applications to the application server. Let's take a look at using SeamGen.
To get a better picture of the SeamGen application, let's generate the Vacation Planner application that we created in the previous chapter, but instead of manually creating the project and building scripts, this time we'll use SeamGen.
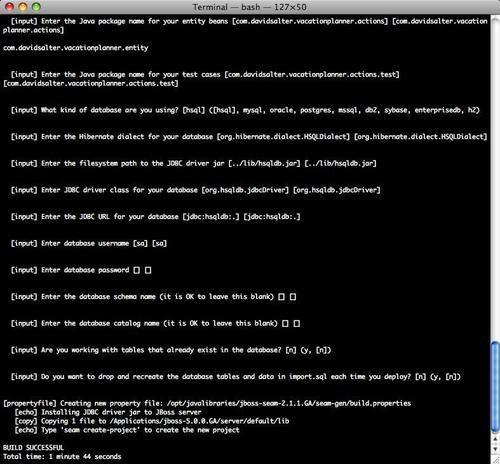
The first stage in using SeamGen is to run the setup option. When you run the setup option, the application asks questions about the different facets of the application, such as—do we want to deploy as an EAR or a WAR, what package names do we want to use, and so on. The following screenshots show the output of the SeamGen application for creating the Vacation Planner application.
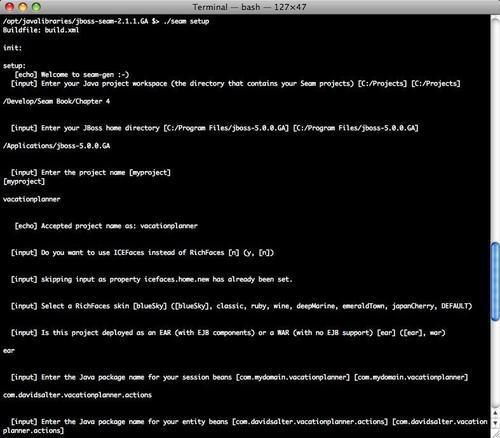
Running the SeamGen application project wizard gathers information from the user by asking relevant questions. You can see that these questions have default values that can be accepted by pressing the Enter key.
During the running of the SeamGen application, you will notice that the user is asked whether they wish to use ICEFaces or RichFaces. ICEFaces and RichFaces are two JSF frameworks that provide different widgets that can be placed on HTML pages (such as list selectors, tree controls, or calendars). RichFaces is a JBoss project (just as Seam is), and is the framework that we will use throughout this book. When using RichFaces, we are asked which skin we wish to use (blueSky, ruby, and so on). These skins allow the look and feel of RichFaces applications to be changed easily. We will discuss this later in the book. For now, it is sufficient to know that we can use either RichFaces or ICEFaces—both of which are competing JSF component toolkits.
When all of the answers have been entered, they are stored within the <SEAM_HOME>/seam-gen/seam.properties file. If you open up this file in a text editor and take a look at the contents, you can see all of these answers. The contents of this file are not shown here as you probably won't need to manually edit the file. You may want to open the file and take a quick look at its contents, just for information.
After running the setup option, we can tell SeamGen to generate a new Seam project using all of the information we have entered. This is achieved by using the seam create-project command.
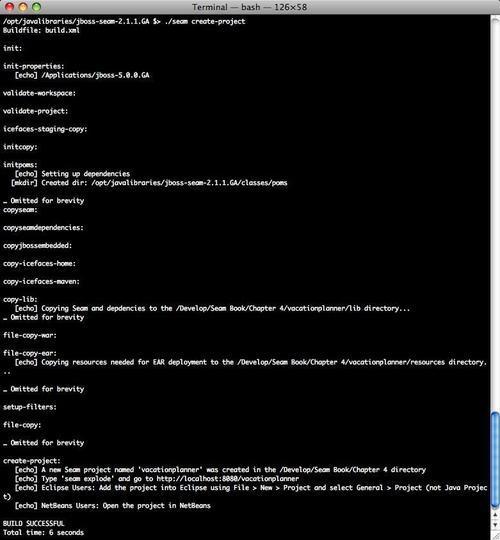
The seam create-project command creates the project structure for our application, complete with:
Ant scripts for project build/deploy
Embedded JBoss for effective unit testing of web pages and Seam actions
Support for database deployment descriptors for both development and production
Configuration to use Facelets
Internationalization support for the web application
Security support for the web application
To build and deploy the application to JBoss, we can execute the ant deploy target.
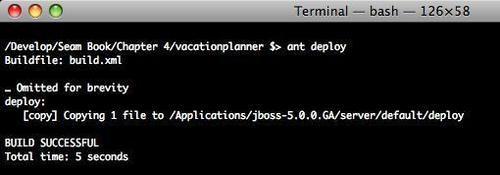
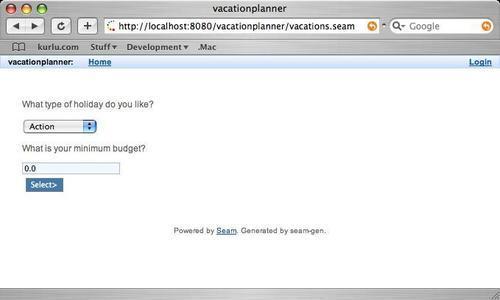
To run the application, open your browser and type in the following URL: http://localhost:8080/vacationplanner/home.seam

To complete converting the Vacation Planner application into a Facelets application, we need to do several tasks:
Add the JSP files and convert them into
.xhtmlfilesAdd the Seam components (
VacationManager.javaand others)Configure the
pages.xmlfile
All of these files can be found in the Chapter 4/vacationplanner folder of the download bundle for this chapter.
When these tasks have been completed, we can run the application and check out the new functionality. We can test the functionality similar to how we did in the previous chapter.
One of the benefits of using the entire Seam Framework in this manner is that we have full access to all of the facilities provided by Seam, including the Seam debug page. If an unknown exception is thrown within our application (that is, we have not catered for it within the pages.xml file), then the Seam debug page will be displayed. This page can also be accessed at any time by browsing to http://localhost:8080/vacationplanner/debug.seam.
The seam-debug.jar file provides the Seam debug page functionality. Therefore, this type of debug functionality is available only if the JAR file is on the application's classpath. SeamGen automatically adds this JAR file into projects, however, if you are not using SeamGen, you will need to manually add the JAR file into your project's classpath to gain this functionality. The JBoss Seam Debug Page is shown in the following screenshot:
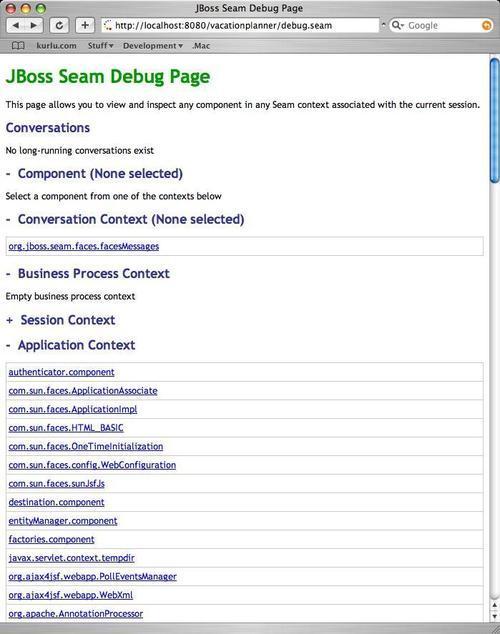
The Seam debug page shows all of the Seam components that are available within the application, including the components that you have developed, as well as the built-in components developed by the Seam team. The debug page can be very useful when you are trying to track down problems with components that you have developed, or stack traces that are thrown at you.
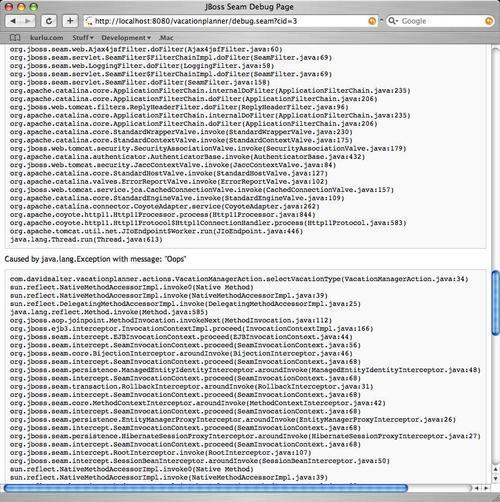
It can be useful during development to turn off nice error handling within pages.xml to try and help track down any error conditions. If we turn off error handling within the Vacation Planner application and throw an exception (for example, if we don't select a vacation type), then the following debug window is displayed, showing full details of the Java stack trace, enabling us to locate and identify the error.
In this chapter, we looked at the Facelets framework and saw the different advantages that it provides over using JSP, as the view technology in our web applications. We've looked in detail at the template support in Facelets and seen how to change the calculator application that we developed in the previous chapter into a Facelets application.
After examining Facelets, we just saw the SeamGen application and saw how this allows us to easily create a skeleton application that supports a range of Seam features, including Facelets support. We also saw the Seam debug page, which can be used to provide details of all of the Seam components in an application, together with error stack traces.