
1.6. Secure the Scaffolding
The scaffolding exposed by Dynamic Data is a set of very powerful screens. Effectively you are granting full create, read, update, and delete (CRUD) capabilities to anyone who navigates to these pages. Obviously there are many techniques available to restrict the behavior of the scaffolding, but many times the "admin screens" that Dynamic Data provides are necessary at least to site developers and administrators. Therefore, securing the scaffolding early in the development cycle is advised.
There are two obvious methods available to secure these pages. Many developers choose to create a Dynamic Data site separate from the production application that points to the database to provide "admin" screens. Project-level separation ensures that the scaffold files may not even be deployed on the same server as the production web site.
Alternatively, you may choose to keep the scaffold pages among your web application, but simply lock down the scaffolding pages using Windows or Forms Authentication. The following exercise will demonstrate how to secure the scaffolding with your sample application using Forms Authentication.
1.6.1. Add ASP.NET Membership Services
Before you can lock down the pages, you need to have at least one user added as a member to this web site. Begin by locating the ASP.NET SQL Server registration utility found in the following path: C:WindowsMicrosoft.NETFrameworkv2.0.50727aspnet_regsql.exe.
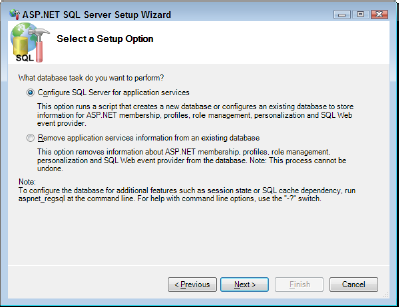
When you run this utility, it will ask you whether you want to add or remove ASP.NET Application Services to your database. Select "Configure SQL Server for application services" (see Figure 13).
Figure 13. Figure 13
Clicking on the "Next" button will display a dialog where you point the utility to your database. Set the dialog to point to the DDIntro database on the machine where you created it (see Figure 14).
Figure 14. Figure 14

When you click on the "Next" button and then the "Finish" button, the ASP.NET Application Services table, views, and stored procedures are added to your database. Before you can proceed to adding a user, there are a few adjustments to the web.config that are required. Open your site's web.config and update the membership section to match the following:
<membership defaultProvider="CustomizedProvider">
<providers>
<clear/>
<add name="CustomizedProvider"
type="System.Web.Security.SqlMembershipProvider"
connectionStringName="DDIntroConnectionString"
applicationName="RealWorldDD"
requiresQuestionAndAnswer="false"
minRequiredPasswordLength="5"
minRequiredNonalphanumericCharacters="0"/>
</providers>
</membership>
If the membership section is not currently in your web.config, place the preceding code directly after the authentication node.
Most ASP.NET developers will immediately recognize these settings that set up membership in your application. Make sure you assign the connection string name as it exists in your application (yours may be different). Also, be aware of the applicationName attribute. You want to make sure to assign your own custom application to avoid any user account collisions in the future if an application is added to this database with the default application name.
Next, launch the ASP.NET Configuration utility found in Solution Explorer (see Figure 15).
Figure 15. Figure 15

Navigate to the Security tab and under Users, click on the link titled "Select authentication type." Choose the "From the Internet" option and click "Done." This operation updates your web.config to use Forms Authentication.
The configuration manager has returned to the Security tab, where you must now click on the "Create user" link. Fill out the Create User form, and click on the "Create User" button.
Finally, return to Visual Studio and add a new folder off the root named Login. Inside the Login folder, create a new page and name it Default.aspx. Include the following markup in the new page:
<body>
    <form id="form1" runat="server">
    <asp:Login runat="server" />
    </form>
</body>
1.6.2. Secure Scaffold Pages
Now that ASP.NET Membership Services are enabled for your web site, you may proceed to changing the configuration of the site's files to take advantage of the security layer.
Begin by creating a new folder off the root of the site and name it admin. Next move the default.aspx and default.aspx.cs files from the root of the web site to the admin folder. The page you are moving here houses the code to list the tables modeled in the system with links to the Edit pages.
Next create a new default.aspx and place it at the root of the site with the following markup:
<body>
    <a href="admin/">Table List</a>
</body>
Now open the Global.asax file and locate the code that configures the Dynamic Data routing. Update the code to route the location of the scaffolding files from being directly off the root to being prefixed by the admin folder:
routes.Add(new DynamicDataRoute("admin/{table}/{action}.aspx") {
    Constraints = new RouteValueDictionary(new { action = "List|Details|Edit|Insert" }),
    Model = model
});
This code forces the URLs generated for scaffold pages to include the admin folder, which is locked down via Forms Authentication.
Next you will update the security context to challenge all unauthenticated users who attempt to access the admin folder of the site. Open the web.config file and update the authentication element to include a pointer to the login page:
<authentication mode="Forms">
  <forms loginUrl="~/login/default.aspx" name=".DDSite" />
</authentication>
In order to keep the main part of the web site available to any user but lock down any requests to the admin folder, you must add a location element set to deny access to the unauthenticated. Immediately after the closing tag for </system.web>, enter the following markup:
<location path="admin">
  <system.web>
    <authorization>
<deny users="?"/>
</authorization>
</system.web>
</location>Now run the web site and verify that any attempt to access the scaffolding pages requires authentication through the login screen.