

Since much of recording has moved from the analog studio, with all outboard analog equipment, into the world of digital audio workstations (DAWs), companies have been working on moving the outboard analog equipment into these DAWs. Emulated effects are not new to digital technology; for example, Tech 21 has been making the SansAmp, which contains all analog circuitry to emulate guitar amplifiers, for years. However, today there are many pieces of software that are designed to emulate their analog counterparts. These include equalizers, compressors, guitar rigs, keyboards, and reverb units. Sometimes these software plug-ins are general emulations, and other times they are licensed emulations from the original manufacturer.
These emulated effects can be more processor intensive than a general equalizer found in your DAW. They can also vary significantly from the actual sound of their analog counterparts. As technology has progressed, so has the quality of these emulated effects. While they may not accurately represent their analog counterparts, they can be very close.
GUITAR CABINET EMULATORS
One of the most powerful emulations available for use in a DAW is the emulation of a guitar cabinet. Guitar amplifier emulation is not new to DAWs or even in the analog domain. Before the proliferation of computer-based recording, there were several analog guitar cabinet simulators, and the quality of these varied greatly. This holds true for their digital counterparts, although the quality has dramatically improved over the years.
Guitar cabinet emulators can function well for both clean and distorted sounds. As mentioned previously, when you are recording, it can be a good idea to capture a direct sound from the guitar as well as a microphone on the guitar cabinet. Since guitar rigs can be very complicated with different cabinets, pedals, and other effects, guitar cabinet emulators can vary in their capabilities.
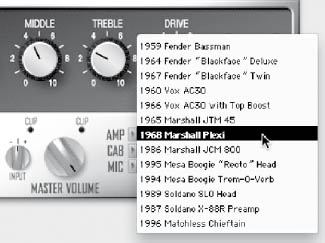
FIGURE 5.1
Line 6’s Amp Farm with licensed names of guitar amplifier models.
Some guitar cabinet emulators are designed to emulate a specific type of guitar amplifier. Some manufacturers may have actually licensed the names of the guitar amplifiers that they are emulating (Figure 5.1), while others have more generic names. Since a basic guitar rig consists of an amplifier and speaker cabinet, these two have the ability to be changed independent of one another.
Using a plug-in such as Line 6’s Amp Farm or Digidesign’s Eleven, there are knobs on the emulator to mimic those of their real-life counterparts. This can include any tremolo or vibrato added by the amplifier. Using an emulation such as this can accurately represent the feel of a guitar amplifier at least in terms of the way you would dial in the settings.
Some guitar cabinet simulators can opt to output the signal as mono or stereo. With a traditional input such as a guitar direct input (DI), the input is, of course, mono. Having a guitar cabinet emulator’s output set to stereo will not necessarily lead to a dramatic width in the stereo image. However, there are stereo effects that can be added through the use of these emulators. These include phasing, flanging, and chorusing. If you are going to be using a separate plug-in for these types of effects, then you can merely select a mono output. If the plug-in that you are using creates these stereo effects, then select a stereo output.

FIGURE 5.2
Digidesign’s Eleven guitar cabinet simulator.
One common feature among guitar cabinet emulators is a noise gate. This is designed to eliminate any hum that goes through your direct input. Sometimes a DI box or guitar output can be susceptible to noise. This noise can create a constant stream of distorted noise coming out of your guitar cabinet simulator.
Some guitar cabinet simulators also allow you to adjust the type of microphone used on a cabinet, as well as it’s positioning. This is a good opportunity to hear how an emulated version of this microphone will sound on a guitar cabinet (Figure 5.3). Many of these different microphone emulations are close to how their real-life counterparts would sound on a guitar cabinet.
You can oftentimes select whether to put a microphone “on axis” or “off axis.” Having a microphone placed “on axis” means that it is perpendicular to the guitar cabinet. This will have a brighter sound as opposed to placing the microphone “off axis,” which will have the microphone angled in toward the speaker cone. Many guitar cabinet simulators will also have the ability to place the guitar microphone in a room. This will give the guitar sound more space, but it will ultimately not be as present in the mix. See Figure 5.4 for an example.
Guitar cabinet simulators can also contain effects that can be obtained through the use of other plug-ins. These include compression and equalization. If the equalization is part of the sound of a guitar cabinet, then use that equalizer as it may be designed for that particular guitar tone. A compressor, on the other hand, can easily be emulated with a separate plug-in. This may give you more options for the compression, as well as having a variety of different choices sonically.

FIGURE 5.3
The different emulations of the microphones placed on the guitar cabinet.
Guitar cabinet emulators can also have a reverb that can be used. This reverb can easily be added through a different reverb plug-in. The difference is that there may be some reverbs that are tailored specifically to guitar cabinets. Any reverb that is built in a guitar cabinet is a spring reverb, and this can be considered part of the classic guitar sound. Many of the standard reverb plug-ins on the market may not have a spring reverb setting. Utilizing the spring reverb emulation from a guitar cabinet simulator can help achieve the desired classic guitar amplifier sound.
Guitar cabinet emulators can vary in their complexity. Some of them will even provide the option of adding chorusing, tremolo, and wah effects. These can be part of the plug-in itself or an additional option to add as a separate plug-in. McDSP’s Chrome Tone comes with these additional options (Figure 5.5). You also have the ability to open up every available effect of this plug-in by selecting the Chrome Stack. The Chrome Stack gives the option of using any of Chrome Tone’s modules and turning them on and off as necessary.

FIGURE 5.4
Tone, demonstrating different general cabinet emulations and microphone positions.
Doubling a guitar using a guitar cabinet emulator
If you plan ahead when you are tracking the guitars, you can choose to capture the direct input in addition to the microphone on an actual guitar cabinet. You can then run the direct input sound through the guitar cabinet emulator. You can do this for one of two reasons. The first is to create a stereo sound using two different guitar sounds.
FIGURE 5.5
McDSP’s Chrome Tone guitar amplifier emulator.

Start by placing the direct input into the guitar cabinet simulator; you can then dial in a similar setting to the guitar player’s amplifier. Hard panning both of these tracks can give you a wider sound than if you just place two microphones on the guitar cabinet. You may need to do some creative equalization on both of the tracks in order to get them to sound close enough so that they are believable as a stereo instrument.
You can also choose to layer two different guitar sounds with the same performance. This gives you more freedom when dialing in the simulated guitar tone as opposed to trying to create a stereo sound (Figure 5.6). You can choose a completely different sound for the simulated guitar cabinet. For instance, you can use a twangy Fender Twin sound on top of a warmer and rounder clean tone to get the guitar to cut through the mix more.

FIGURE 5.6
A guitar cabinet emulator placed across a direct input track, doubling the microphone on the actual amplifier.
Using guitar cabinet emulators on vocals
Since guitar cabinet emulators give you the ability to place a plug-in across any track, it has become commonplace to use a guitar cabinet emulator on other instruments to create a specific distortion effect. You can run into a whole separate set of issues when running a vocal track through a guitar cabinet simulator. The added gain that a guitar amplifier applies to the input signal is what creates the distortion to begin with; it can make even the quietest sounds on that track very audible once you place the track through a guitar cabinet emulator.
To prepare a nonguitar track to run through a guitar cabinet emulator, you can adjust the noise gate of the plug-in itself, or give yourself more flexibility by using a separate gate prior to the guitar cabinet simulator. Using a gate will let you adjust the attack, hold, and release times in order to make enough of the vocal track come through distorted, while not having every breath that the singer takes as loud and distorted as the actual words.
If you are planning on having a guitar cabinet emulator across part of the vocal track, it is helpful to have the distorted part on a separate track rather than automate the distortion to turn on and off. Since running distortion across any track can drastically affect the gain, you may find yourself doing more work to adjust the levels as well as the settings on any other plug-ins to accommodate the change in tone added by the guitar cabinet emulator.
Having experience running guitar cabinet emulators across the vocal track can give you more tools for production while making a record. You can plan in advance to have the lead vocal doubled with a separate distorted sound. This can create an interesting effect in the mix. The guitar cabinet emulator can also be placed in parallel with a clean vocal track. This will create a distorted, yet intelligible, vocal sound.
Guitar cabinet emulators on bass
Since guitar amplifiers and bass amplifiers sound different from each other, and you are looking to emulate the bass cabinet with a guitar cabinet simulator, you may find that it is difficult to do. You certainly can get some of the grit from the amplifier by using a guitar cabinet emulator, but it will not be the same as an actual bass amplifier. You can, however, create interesting distorted bass tones by using these plug-ins.
Guitar cabinet emulators on drums
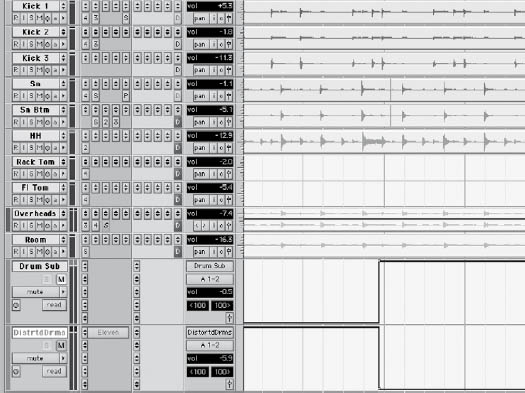
Placing distortion across the drums using a guitar cabinet emulator can produce a trashy effect on the drums. Since drums can span several tracks as opposed to one track for a guitar or bass, it becomes tricky to apply distortion on all the tracks. The best way to have distortion across the drum tracks is to set the output of each track to go out a separate bus (Figure 5.7). This also gives you the added benefit of being able to control the gain of the entire drum kit up and down with that single master drum output.

FIGURE 5.7
The routing of drums through a distortion on a separate bus.
Once the drums are dialed in the way you want it to sound, you can create a separate output to the drums by creating an auxiliary send across each of the drum tracks. Set each of the auxiliary sends to zero and make sure that they are all set to be postfader. This will ensure that the level of the auxiliary send that will be going to the distortion is the same as the drum subgroup. Create an auxiliary master track, which will serve as the distorted drum track. Now you automate back and forth between these two tracks and create a distorted effect, which can be used in different places in the song.
Once you have all the drums running into the distortion, you may find that the cymbals, hi-hat, and perhaps other drums may be making the distortion too piercing. This is due to the nature of the way distortion works. Since we have the tracks that are through the distortion coming from an auxiliary send, you can adjust the balance or even mute certain tracks to remove these sounds from the distortion. Again, there is an issue of the perceived loudness of distorted drums versus undistorted drums. This can be dealt with by adjusting the levels between the drum subgroup and distorted drums auxiliary master.
FIGURE 5.8
The automation of the drum distortion, going from clean to distorted.
Once you have the balance set between these two faders you can then automate the muting of each fader so one turns on when the other one turns off (Figure 5.8). This may not happen on the downbeat in your grid, so you may need to nudge the mutes earlier or later in the timeline.
EMULATED COMPRESSORS
Emulated compressors were some of the first plug-ins to emulate their hardware counterparts. This was due to engineers making the transition from working in an analog studio to working in a DAW. There was always a need for them to adapt something they were using in the analog domain to the digital domain. So much of a mix’s sound is the type of equipment that is used for compression and equalization.
There are many more classic compressors made in the 1960s and 1970s that have a very high value in the studio today. Being able to have these compressors in a plug-in format rather than spending the thousands of dollars it would take to own one of these pieces of gear is one of the best money-saving benefits of a DAW. You also have the ability to use that plug-in on as many tracks as your DAW will allow. If you own one of these classic pieces of hardware in your studio, you can only put them across one track. See Figure 5.9 for an example.
The problem with modeling vintage analog equipment is that seldom are there two pieces of the same model that sound exactly alike today. In addition, there are oftentimes different versions of the same piece of equipment that were released in different years. These may look identical, but certain versions have the more “classic” sound.
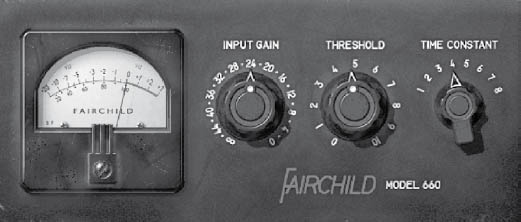
FIGURE 5.9
Bomb Factory’s Fairchild 660 compressor emulator.
The quality and accuracy of many of these plug-ins is a matter of debate. Some manufacturers go through the process of modeling every signal component inside of the compressor. This can be a time-consuming process, but it will yield the most accurate results. In addition to modeling the electronics inside a compressor, these plug-in companies will also faithfully reproduce the look and behavior of the compressor. Some manufacturers will release their own version of their compressors in plug-in format, such as Universal Audio. Others, like API, will license the use and name of their equipment to a plug-in manufacturer, such as Waves.
A good plug-in compressor emulation will emulate the way that a VU meter moves as well as making sure that the controls are familiar. In addition, the anomalies of the different compressors are modeled. For example, an emulation of the UREI 1176 will model what has been deemed the “British mode” (Figure 5.10). This is an interesting setting for the compressor where all four of the ratio buttons are pushed simultaneously. Once these buttons are pressed, the needle of the VU meter pegs all the way to the right. This has become such a unique effect that even analog compressors, such as the Empirical Labs’ Distressor, can emulate this mode.
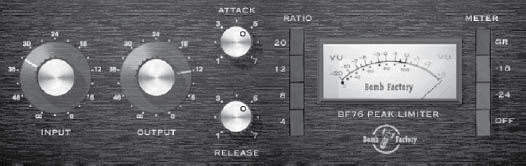
FIGURE 5.10
Bomb Factory’s BF76 modeled compressor in the “British mode” with all four ratio buttons pressed.
FIGURE 5.11
McDSP’s CB4 demonstrating the emulation of many different compression types.

Some compressors may not have the licensed emulations or possess the ability to emulate many different compressors with the same plug-in. An example of this would be McDSP’s Compressor Bank CB4. This plug-in models the different mechanisms used in a variety of compressors including optical, solid-state, and tube styles of compression (Figure 5.11). Since there are many different mechanisms for compression, this allows you to choose the sound that works best for the track.
EMULATED EQUALIZERS
Equalizers are modeled in the same fashion as compressors. There are certain equalizers that are much sought-after pieces of gear in the studio. Just because equalizers are designed to mainly alter the frequencies across a track does not mean that there is not a difference in sound from one equalizer to another. Equalizers will have their own response as it relates to the Q and boost/cut. The electronics inside an analog equalizer will also play a role in the equalizer’s sound. Some equalizers, just like compressors, are either tube or solid state. A modeled equalizer will reproduce the sonic characteristics of these components. See Figure 5.12 for an example.
MODELED DELAYS
There are different types of modeled delays. Since there are different methods of achieving delay in the analog domain, and each one has its own unique sound, these different methods of creating a delay are modeled in the various plug-ins. One of the first technologies for creating an analog delay was the tape machine. These tape delays record the audio on the record head and playback off the playback head. The difference in time between when the audio hits the record head and when it is played back from the playback head is a difference between the distance as well as the speed of the tape.
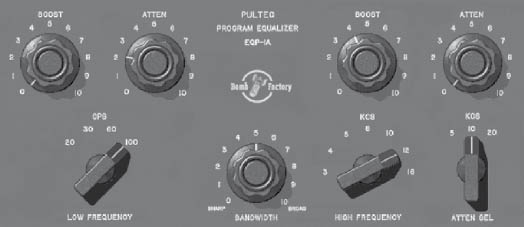
FIGURE 5.12
The Pultec EQP-1A program equalizer manufactured by Bomb Factory.
The other main form of analog delay that is modeled by plug-ins is the solid-state, bucket-brigade style of delay. This delay is created by bucket-brigade chips that pass the signal from one to the other, with each pass taking a short amount of time. The more of these chips in the device, the longer the delay will be. This type of delay creates a low-pass filtering effect on the delayed signal. This delay is emulated by Bomb Factory’s Moogerfooger plug-in.
Delay emulation is not as common as equalizer or compression emulations, but there are some companies that create plug-ins that will emulate tape delays as well as bucket-brigade delays.
CONVOLUTION SIGNAL PROCESSING
Convolution, in DAWs, is one of the most powerful tools for emulating acoustical sounds. It can take the actual sounds of an acoustic space such as a cathedral or gymnasium, and allow you to reproduce them accurately. This gives you the power of bringing these acoustic spaces into your DAW. Convolution can also reproduce sounds from outboard equipment. You can sample an equalizer, preamp, delay, or reverb and place that sound across any track inside your DAW. Convolution processing uses an impulse response (IR), which can be derived from an acoustic space or piece of outboard equipment. There are specific software applications that are designed to create these impulse responses by deconvoluting the output of a piece of equipment or the recorded sound of a space.
Convolution is a fundamental process of digital signal processing. Convolution processing of audio is very processor intensive, and the results need to be output in near–real time. Convolution can be used to create any combination of equalization filtering, delay, and reverb. What convolution does essentially is take an input signal and process it through an impulse response to create a convoluted output.
There are limitations to convolution. With convolution processing in audio, you cannot adjust the pitch or create harmonic content that is not present in the original audio. It works best on capturing and reproducing the delay and frequency response of different equipment and environments. There are numerous web sites where impulse responses can be found from various pieces of equipment, spaces, and other odds and ends such as telephones and tiny speakers. There are many different convolution plug-ins available across any platform. Since convolution is a very CPU-intensive process, it is only in recent years that convolution plug-ins have been available for DAWs.
Convolution, simplified, is a multiplication of signals; the input signal is multiplied by the time and frequency content of the impulse response. The output is the frequency spectrum over time of the impulse response multiplied against the input. If the impulse response contains only low-frequency information and the input signal contains high-frequency information, with no overlap of the frequency content, then there will be no audible sound from the output. See Figure 5.13.

FIGURE 5.13
A frequency “waterfall” demonstrating the time and frequency composition of an impulse response.
Acoustic spaces through convolution
Using a convolution processor to create reverb is the most common usage for a convolution plug-in. Oftentimes convolution plug-ins are marketed as a reverb convolution processor. This does not mean that these processors are only useful for creating reverbs; however, most of the added features of convolution plug-ins are designed to tailor the sound of a reverb in much the same way you would modify settings with a stand-alone digital reverb unit. You have the ability to equalize the convoluted sound, adjust the decay time and early reflections, and adjust many other reverb settings you would find in a conventional reverb plug-in.
Since convolution processing is very processor intensive, you may find that you may not be able to add many instances of the plug-in before running out of horsepower. The longer the impulse response, the more processing the convolution plug-in will use up.
Many of the impulse responses used with convolution signal processing are created from actual sampled acoustic spaces. There can be many variations as to where the microphones were placed, what types of microphones were used, and what the distance was between microphones. Convolution plug-ins come with their own set of impulse responses, but the nice thing about using a convolution processor for your reverb is that you can always add new sounds, as opposed to using a stand-alone reverb unit that may be limited. In addition to the sounds distributed with the plug-in, most convolution processors have the ability to import other impulse responses that are in the form of an audio file.
Since the impulse responses are merely audio files, convolution reverbs make excellent choices for surround sound. There are many impulse responses that are available in 5.1 channels. This can be accomplished by sampling the space with four, five, or six microphones. See Figure 5.14.
Filtering using convolution
Because impulse responses can map the frequency resonances of a particular piece of equipment, you can easily use a convolution processor to mimic the sound of audio going through a telephone, speaker, or any other device that filters the sound (Figure 5.15). Utilizing impulse responses of these different devices is the best way to mimic their sound. There are many times when a client may want to have his or her vocals sound as if they were coming from a radio. You can accomplish this with some high-pass and low-pass filtering, but the end result does not have the same resonances as it would if you had actually used an impulse response created from a radio.

FIGURE 5.14
The Altiverb convolution processor displaying the impulse response as well as the various adjustable parameters.
Even if you are not looking to sample your own devices and spaces, there are plenty of resources on the Internet where users will post their own impulse responses. You can quickly sort through these with your convolution plug-in to determine which ones are good and which ones are not.
Convolving impulse responses of external equipment
In much the same way that you can use convolution to reproduce the sound of an acoustic space, it can be used to reproduce the sound of any outboard reverb or delay. There are many classic sounds such as a plate or spring reverb that have a unique characteristic. Most nonconvolution reverb plug-ins will be able to emulate a plate reverb, but with a sampled plate reverb you can achieve more realistic results. Most home studios do not have the space for a plate reverb as many of them take up several feet worth of space.
Many different reverb processors have been removed from studios so they can be sampled and used with a convolution reverb plug-in. This also gives the flexibility of creating more than one instance of that same reverb.

FIGURE 5.15
An impulse response made from a telephone, equalizing the audio to sound like it is coming from a telephone.
Creating your own impulse response
Most of the higher-end convolution plug-ins will come with a utility to sample your own acoustic space or outboard equipment. The process for sampling your own space begins with creating a source for the impulse response. The recorded response of the room or outboard equipment is then run through a deconvolution utility, which creates the impulse response based on the source material.
There are a couple different methods of capturing the sound of an acoustic space. The first of which is to use a starter pistol. This creates a burst of noise that reverberates throughout the room and is captured in the microphones. The other method is to use a generated swept sine wave. The sine wave is then played back off a CD into a speaker placed in a room. The microphones capture the sound of the echoed frequencies, and that recording can then be deconvolved into an impulse response.
GENERATING YOUR OWN SWEPT SINE WAVE
Convolution programs that come with their own deconvolution utility will also come with a utility to create a swept sine wave (Figure 5.16). There are often-times different formats for swept sine waves. If you are looking to create a high-resolution sample that goes above 44.1 kHz, then you need to select a sine wave that will go above 44.1 kHz. The sound file can be played back from a DAW or CD and then recorded into a portable recorder or back into the DAW. The more accurate your playback system is, the more accurate the final impulse response will reflect the sound of the room. The reason for this is that you will also be capturing the frequency response of the playback system. Having a playback system with small speakers that will not produce low frequencies means that there will be no low frequencies played back in the room from the swept sine wave, and so there will be no low frequencies to deconvolve.
RECORDING THE SINE WAVE
Recording the output of a swept sine wave does not create the impulse response directly. The recorded output of that swept sine wave, which can be a stereo or multichannel file for surround sound, is then sent through a deconvolution utility. The convolution utility is then set to identify the input source, whether it be a swept sine wave or a starter pistol. You may also have the ability to apply an equalization curve to the input file. This is to compensate for any playback issues of the original sine wave. Perhaps you used a playback system that did not have a flat-frequency response.

FIGURE 5.16
Altiverb’s swept sine wave generator to create an audio file to sample a space.
The swept sine wave can be played through a playback system in the room where you are looking to capture an impulse response. The microphones should be placed in a location away from the sound source, where you will be capturing the best ambience. The polar pattern of the microphones used should be set up to capture the most ambience possible. This can include setting the microphones to an omni polar pattern, or directing a cardioid polar pattern toward the walls that would have the most reflections. The sweep can be captured from various locations in the room to create multiple impulse responses with varying audible distances.
When recording a swept sine wave, make sure that you are recording longer than the actual duration of the sound file, as you are looking to capture the complete decay of the audio in the room. The deconvolution software will be able to truncate the sound into the appropriate length.
Recording a swept sine wave, through outboard equipment, is easier than capturing an acoustic space. You can do all of the capturing through a DAW. The swept sine wave is placed in an audio track and then output into the piece of outboard gear. The output of the outboard gear is then recorded into a separate audio track in the DAW.
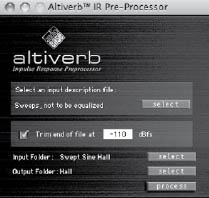
FIGURE 5.17
The Altiverb IR Pre-Processor, which derives the impulse response from the recorded space.
DECONVOLVING THE SAMPLED SPACE
The end result of recording the swept sine wave is the creation of the impulse response. This can be accomplished by importing the recorded sound into a deconvolution signal processor (Figure 5.17).
FIGURE 5.18
The swept sine wave, above the recorded result of a sampled reverb effects processor.

You can compare the sound and quality of deconvolution by deconvolving a standard reverb plug-in. This gives the ability to run a single source through both the convoluted signal processor and the original reverb source. This will give you an idea of how close convolution comes to capturing the sound of an authentic acoustic space. Of course, you can sample different presets for your other plug-in reverbs, however, you will find that a convolution plug-in will take up more CPU power than the original reverb plug-in. See Figures 5.18 and 5.19.
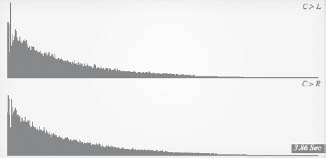
FIGURE 5.19
The final impulse response, derived from the recorded sine wave run through the preprocessor.
A FINAL WORD ABOUT USING EMULATED EFFECTS
Despite the quality of emulated effects today, these software plug-ins are around because of the innovation and quality of their analog counterparts. There still is something to be said about being able to place a high-quality compressor or equalizer across the track, even if it is coming from a DAW. This is what keeps some of the larger studios in business. As technology progresses, the outboard racks of these larger studios will continue to shrink, but there will always be a market for high-quality analog equipment for the discerning engineer.