

CREATING PERCUSSIVE AND RHYTHMIC LOOPS
Incorporating MIDI tracks into a recording session can be a professional addition to many recorded projects. If done right, it can help a recording sound like a record as opposed to a demo. Even if the band does not have a “keyboard player,” MIDI tracks can be added to supplement the song. You can reinforce chords, harmonically, by adding a low-level keyboard pad. Adding drum loops in a few sections can add an interesting element to the music.
Adding drum and percussion loops to a song
There are many software plug-ins that can add drum and percussion loops to a recording. These loops can be sequenced in time to the tempo map of the song (refer to Chapter 1 to read how to create a tempo map for a song by using Beat Detective). When selecting where to add these percussive loops, select a section that is not as busy rhythmically and could use an additional element. When placing a drum loop across a track that already contains drums, an added loop should not sound like the drum track; otherwise, it will sound as if there are two drummers playing. Instead, select an element that does not sound like real drums, but will add a complementary percussive sound for the specific section. Loops that contain a lot of low-frequency information can clutter up the bottom end of the frequency range. Percussive elements that are mostly high-frequency content will stand out in the mix more.
Rhythmic sequences using Stylus RMX
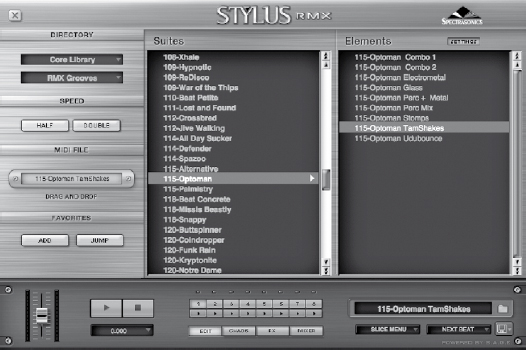
Stylus RMX is a software-based instrument, made by Spectrasonics, specifically designed for creating percussive loops. It has many different loops to choose from, as well as several ways to modify these elements (Figure 6.1). Many of the grooves that it comes with are broken down into the various elements. The main window of Stylus RMX allows you to select loops based on their original tempo. These loops will be played at the tempo of the session, therefore, regardless of what the original tempo is it will play back in time to match the song. There are editing features in Stylus RMX that will allow randomization of various parameters for these loops. The Chaos Designer module allows you to adjust and randomize the pitch and dynamics of the selected loop (Figure 6.2). For each loop there is an associated MIDI file.
FIGURE 6.1
Selecting percussive loops in Stylus RMX.
Once a loop has been selected, the associated MIDI file can be dragged from the plug-in and dropped into an MIDI track of the digital audio workstation (DAW). This will allow the copying and pasting of the MIDI file for the specific sections for the loop. Stylus RMX does not utilize the MIDI note data as other programs do, by denoting a note on and note off for each percussive element. Rather, it divides the loop up into 16th-note slices. These slices are assigned a specific MIDI note, and the MIDI data are a note on for that particular slice. It increments up a chromatic scale to give each slice a unique note number. See Figure 6.3.
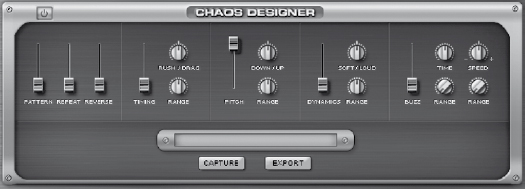
FIGURE 6.2
Stylus RMX’s Chaos Designer creates randomization of different parameters.
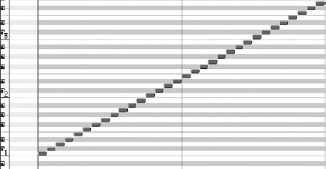
FIGURE 6.3
The MIDI file from Stylus RMX indicating the different slices triggered by each note.
Rhythmic sequences using Reason
Sequenced loops can also come from devices connected through Rewire. Propellerhead’s Reason can use several of its devices to create a rhythmic sequence. The Dr.REX Loop Player module can be used to playback loops. These loops can be sequenced either in Reason or the host DAW.
When highlighting a selection in the DAW, the same selection also gets highlighted in Reason. This allows you to select a region in the DAW where you want to place the loop and then paste the MIDI sequence data from the Dr.REX Loop Player directly into the MIDI sequencer of Reason (Figure 6.4). This MIDI data file can then be exported from Reason, imported into the DAW, and then assigned to that device as an MIDI output destination. Since Reason needs to be open anyway, rhythmic sequences are best left in Reason’s internal sequencer. Dr.REX uses the same means of MIDI sequencing as Spectrasonics’ Stylus RMX, and it has a specific consecutive MIDI note message for each slice of the loop.
Reason can also be used to program your own drum patterns using the Redrum Drum Computer module. This module can load preset groups of sounds, individually selected sounds, or sounds that come from your own sample library. Programming a pattern this way allows the sequencing of the loop to be done while the song is looping over in the appropriate section. With the sound looping, in context with the song, you can hear the contribution of the different elements added from the programmed drum loop. The overall pitch, level, and panning can be adjusted to balance the loop to fit the song. The pattern can then be exported to Reason’s sequencer so that it can be copied and pasted to the appropriate sections of the song.

FIGURE 6.4
The sequence from Dr.REX copied into the MIDI sequencer.
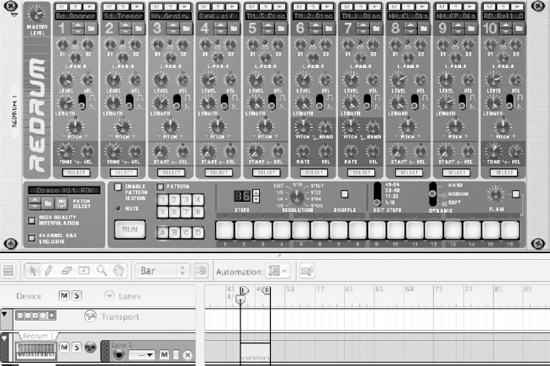
FIGURE 6.5
The drum pattern from the Redrum module pasted into the sequencer of Reason.
In order to transfer the sequence from the Redrum Drum Computer sequencer track in Reason to its MIDI sequencer, right-click the Redrum unit and select “Copy Pattern to Track.” This MIDI sequence has the standard note on and note off for each percussive element. Once the sequence has been transferred into a sequencer track, deselect the “Enable Pattern Selection” button of the Redrum module so that the sequence data are coming directly from the MIDI track and not the internal pattern sequencer of the drum module (Figure 6.6).
If multiple modules are used with Reason, be sure each one is patched to an individual output so that each one will show up on a different track of the host DAW (Figure 6.7). Make sure that each instance of the Rewire plug-in in the DAW is selected to the separate output from Reason (Figure 6.8).
FIGURE 6.6
Deselecting the “Enable Pattern Selection” button to allow for the playback from the MIDI sequencer.


FIGURE 6.7
The back of the Reason hardware, to create multiple outputs in the host DAW.
ADDING RHYTHMIC MELODIC ELEMENTS
An interesting combination of rhythm and melody is the addition of melodic keyboard parts that have rhythmic elements that are synchronized to the tempo of the song. This can be used for pads that are carrying the chord changes of the song to make them more interesting, rather than just functioning as a standard pad. Most software synthesizers have the ability to synchronize some modulations to the tempo map. These sounds do not necessarily replace a drum loop, but they can add a rhythmic texture to the song. These tempo-synchronized sounds can come from software instrument plugins or a software synthesizer that connects via Rewire, as Rewire transmits tempo and song position information. Oftentimes, the individual patches in the software instrument will be categorized inside the software instrument itself, making them easier to find.
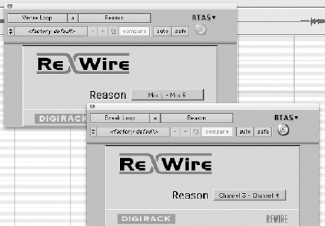
FIGURE 6.8
The different Rewire plug-in instances outputting the different outputs from the Reason hardware.
When trying to find these tempo-sequenced sounds, make sure that the software instrument supports tempo synchronization. Many software instruments that emulate vintage analog synthesizers will not have this type of synchronization, as it was never a feature of the original synthesizer.
These synthesizer sounds can have a variety of parameters synchronized to the tempo. The most common parameter that is synchronized is the low-frequency oscillator (LFO), which can be used to modulate any number of parameters of the synthesizer patch. For instance, it can be attached to the filter, which will create a changing texture, or it can be attached to the amplifier, which will create a more rhythmic sound. In order for the LFO’s rhythm to be noticeable, it is usually set to a stepped modulation, such as a square wave, or any number of proprietary LFO patterns.
When sequencing these parts with Reason, the MIDI sequencing can be recorded in the host DAW. Once it has been created, the output of the MIDI track needs to be assigned to the appropriate device in Reason. There are two devices that do this inside of Reason. The first is the Malstrøm—it features a modulator that can be synchronized to the tempo of the song (Figure 6.9). The second device is the Thor polyphonic synthesizer; this instrument features many parameters that can be synchronized to the tempo map (Figure 6.10).
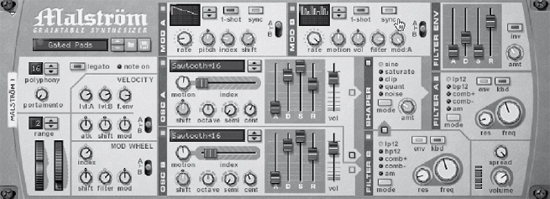
FIGURE 6.9 The Malstrøm synthesizer with the Mod B synchronized to the host tempo map.
Learning more about music synthesis and the signal flow synthesizers will help to fine-tune the settings of a particular instrument patch to accentuate the synchronization to the tempo map (Figure 6.11).
Once the MIDI data of the sequenced parts have been recorded in the DAW, the tracks need to be quantized at 100 percent to the beginning of each beat. Depending on the performance, it may be necessary to also quantize the durations of the MIDI notes so there is no audible gap when changing chords.

FIGURE 6.10
The Thor synthesizer with the delay and LFO 1 synchronized to the host tempo map.
EMULATED INSTRUMENTS
Using emulated software instruments is a way of adding acoustic or electric sounds that would otherwise be inconvenient or expensive to add to a recording. There are many different software synthesizers available to create any sort of additional instrumentation on a recording. Software emulation of instruments falls into two categories: emulating acoustic instruments and emulating synthesized instruments. In addition to emulations, there are also completely original instruments available with software synthesizers.
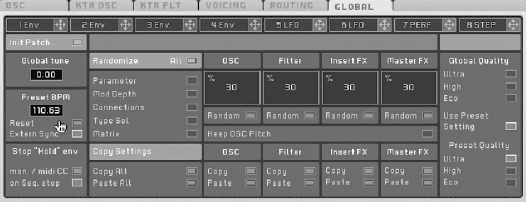
FIGURE 6.11
Massive by Native Instruments, reading the tempo fluctuations from the host DAW.
Emulated sounds, such as an organ or an acoustic piano, are helpful additions to any studio, as it can become expensive in time, money, and space to have these instruments available and to keep them properly maintained. For faster processors and larger hard drive capacities, there are sample-based instruments that can sample multiple notes in stereo and at different velocities. This can help recreate a natural orchestra or piano sound, which are generally difficult to artificially synthesize with any credible accuracy.
When adding an emulated instrument it is best to understand the instrument as much as possible. When adding an organ emulator it helps to understand how an organ works. These software synthesizers will emulate the controls of the different instruments and it would be helpful to know what the drawbars and presets do to the sound. When working with an emulated synthesizer, it helps to understand the different functions of the instrument being emulated.
As with any software instrument, each one will add additional usage to your computer’s processing. The more emulated instruments that are added, the less processing that is left over for mixing plug-ins. If the project has multiple software instruments open prior to mixing, it may be best to bounce those instruments as audio tracks to free up some space on your computer’s CPU.
Organ emulation
An organ is one of the most common sounds used in the studio. It can serve to function as a pad, rhythm, or lead instrument. There are a wide range of tones that can be generated with a Hammond B3 organ, which is the most common organ used in recordings. Most small studios do not have the budget or the space to have a Hammond B3 organ with the required Leslie 122 cabinet (Figure 6.12).
Synthesizing an organ itself is not difficult. There are many different simple harmonics that can be added, mimicking the tone wheels inside the organ. The most important feature of an organ emulation is the accuracy of the rotary speaker emulation. This is the sound that has become synonymous with the organ.
FIGURE 6.12
The upper rotating horns of a Leslie 122 cabinet.

The rotary speaker consists of two upper horns and a lower horn that rotate, creating a tremolo and Doppler effect; see, for example, Figure 6.12. The rotary cabinet also has the ability to change speeds from slow to fast. The time that the rotary cabinet takes to make these speed accelerations and decelerations is part of the organ sound. It is the emulation of this rotary speaker that becomes crucial to the quality of any emulated organ sound. Additionally, vintage rotary speakers have tube amplifiers that can be overdriven to create a distorted sound.
Some organ emulators go beyond the standard Hammond B3, and they will emulate other popular organs such as the Harmonium, Farfisa, or Vox Continental. These different emulations allow the creation of tones similar to those used by The Doors or The Beatles.
Native Instruments’ B4 II is a commonly used organ emulator (Figure 6.13). The front panel looks like that of an actual Hammond B3 organ, with drawbars, presets, and dual registers. Additionally, you can go to the expert page, which will allow for more fine-tuning of the instrument. As with all vintage instruments, no two organs will sound exactly alike. There are many different fine-tuning adjustments of the rotary speaker as well as calibration of the organ itself. Moving to the expert page of the B4 II instrument will allow you to adjust the speed at which the rotary cabinet accelerates from slow to fast. See Figure 6.14.
Acoustic piano emulation
In addition to the organ, having an acoustic piano in a studio is a luxury in this day and age. A good acoustic piano is very expensive to purchase and requires regular tunings to make it useful in the studio. An acoustic piano is an instrument that is best emulated with samples rather than synthesis. There are many different software pianos available that are comprised of many different layers of stereo-recorded samples. Samples can be recorded of each note with different velocities to create a realistic piano sound.
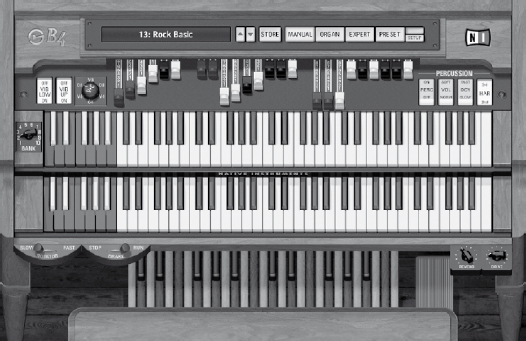
FIGURE 6.13
Native Instruments’ B4 II instrument, modeling the controls and layout of a Hammond B3.
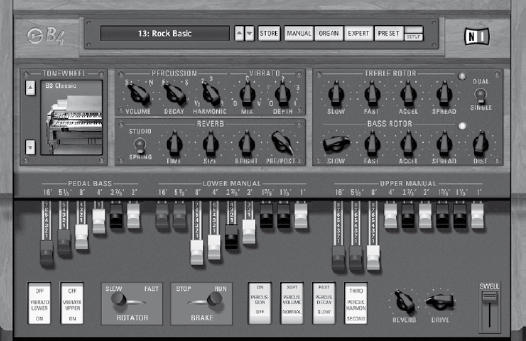
FIGURE 6.14
The advanced editing features of the B4 II, allowing modifications of the rotary cabinet parameters.
To the dedicated pianist, this sampled piano may not be suitable for solo work, but in the context of a pop recording, it can be very convincing. Since the standard piano has 88 keys, sampling the full duration of each string with the different velocity layers can take up a tremendous amount of hard drive space. Until the past few years, this quantity of hard drive space was expensive. With today’s larger hard drives, it is possible to have many different sample libraries on the same drive. Since many of these sample libraries can be 50 gigabytes or more, getting the largest hard drive you can afford will help you be better off for obtaining and creating additional sound libraries.
When recording a pianist, it is best to have a suitable MIDI controller that feels as close to a piano as possible. A cheap MIDI controller may not have the weighted action that piano players are used to, as well as the familiar 88-key range. It is also helpful to have a sustain pedal for the MIDI controller so the piano player can play with a sustain pedal as if he or she was playing a real piano.
An acoustic piano does not have near the options that other emulated instruments have. There are no knobs or buttons on a piano, only pedals. There can be some adjustments to the sound, such as the amount of reverb, which should be turned off if there is a suitable reverb plug-in available.
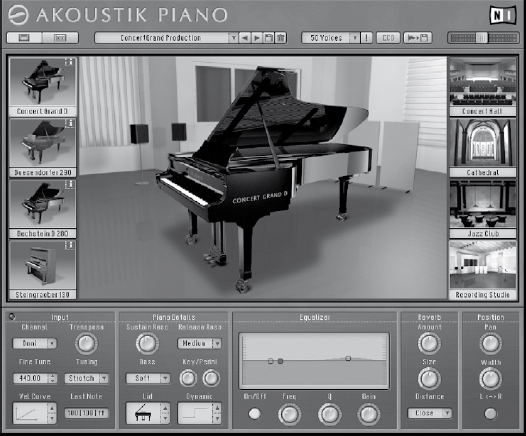
An acoustic piano does not necessarily need to be emulated by a dedicated piano plug-in. There are many different sample libraries that will work with different types of stand-alone sample playback plug-ins. The libraries that contain the largest amount of individual samples will generally sound the most realistic. See, for example, Figure 6.15.
FIGURE 6.15
The Akoustik Piano from Native Instruments, featuring multiple sampled pianos and a few parameters to modify.
Electric piano emulation
Emulating an electric piano, such as a Rhodes, Wurlitzer, or Clavinet, are also valuable additions to a studio. The Rhodes piano is a classic sound that was used on many recordings in the 1960s and 1970s, including The Beatles’ “Get Back.” The Wurlitzer electric piano, which has a grittier sound than the Rhodes, was also frequently used during that time period on records like “Dreamer” by Supertramp. A Clavinet, which has a distinctive plucked sound, was used in many funk records, such as Stevie Wonder’s “Superstition.”
There are single plug-ins that will emulate each of these different instruments separately, such as Logic’s EVP88 and EVD6, as well as stand-alone plug-ins, which will potentially emulate all three, like Native Instruments’ Elektrik. Many different sample libraries will have sample banks for these different instruments. See Figures 6.16 and 6.17 for examples.
Analog synthesizer emulation
The emulation of analog synthesizers is common with many software plug-ins. There are dedicated plug-ins that will emulate specific synthesizers. Some may be licensed, such as Arturia’s Minimoog V, but others will be general analog subtractive synthesis emulators. Having an understanding of subtractive synthesis, as well as the different software instruments, will help you make the best use of these modules.
FIGURE 6.16
The Elektrik piano module from Native Instruments, visually resembling a Rhodes piano.

FIGURE 6.17
The NN-XT module from Reason playing back samples from a Wurlitzer electric piano.

Some software synthesizers will go beyond the original functionality of the instrument they are emulating. An example of this would be Native Instruments’ FM8. This is originally an emulation of the Yamaha DX7 FM synthesizer. It goes beyond the capabilities of the original synthesizer, and adds more operators, as well as the ability to create your own algorithms (Figure 6.18). For a specialized synthesizer, such as the FM8, it helps to gain an understanding of the principles of FM synthesis, and the way that operator pairs work.
Drum emulation
Emulating drum sounds can be a difficult task. There are many different types of drum sounds used in audio production. There is the emulation of electric drum machine sounds, as well as acoustic drums.
The emulation of electric drums is fairly straightforward. Most drum machines have a limited amount of sounds they can output, especially vintage drum machines. These drum machines are easily re-created by sample playback instruments. There are several libraries of these electric drum machine sounds that can be purchased, as well as some that users post on the Internet for free. Some analog drum machines, such as the Roland 808, are analog drum synthesizers. The pitch and envelope of some of these analog drum machine sounds can be adjusted, so a sample library would need to have many different variations of the individual sounds in order to best re-create the sound of the instrument.
Emulating an acoustic drum kit is far more complicated than that of the electric drum machine. When recording an acoustic drum kit in the studio, every microphone picks up every drum in the room. The individual drums will also resonate when the other drums are struck. This can create a difficulty in just playing back individually recorded drum samples to recreate the sound of a drum kit.
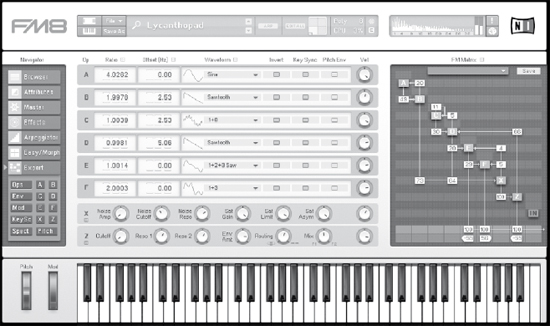
FIGURE 6.18
The FM8 synthesizer that can model the FM synthesis of a Yamaha DX7, but with more capabilities.
In addition to emulating the sounds of a drum kit, the technique that a drummer uses to play the drums needs to be emulated as well. Drums may sound different when they are hit with the left or right stick. They even sound different, depending on where they are struck. A snare drum struck toward the side of the drum head will sound different than if it is struck on the side. The ride cymbal will sound different if it is struck on the main part of the cymbal than if it was struck on the bell. Additionally, the drums will sound different with each hit, so an instrument with just a single sample will have a “machine gun” sound to it when playing back that same sample in succession.
There are currently different software plug-ins that allow for the emulation of both the way the acoustic drums sound, as well as the manner in which the drummer plays the drums. FXpansion’s BFD and Toontrack’s Superior Drummer and EZdrummer offer a sample-based solution that covers all of these bases. These plug-ins will have multiple samples for each drum hit, as well as different velocity layers, similar to a dedicated sampled acoustic piano. These plug-ins are also expandable with different sample libraries that can be purchased from the manufacturer.
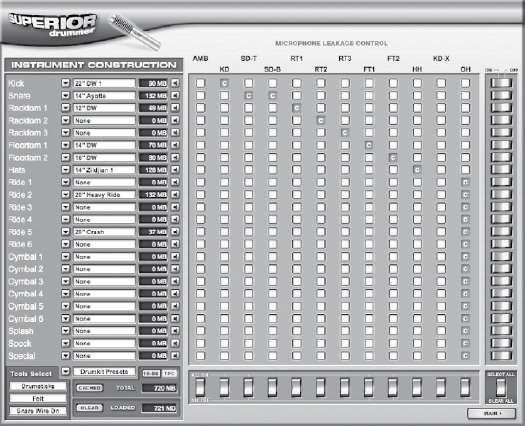
These different drum plug-ins allow for a tremendous amount of control over what is heard on each track. You have the ability to control whether or not the individual microphone will pick up the other instruments, as well as how the drums will appear in the overheads and ambient room microphones. This helps to create a realistic-sounding drum kit. Since these instruments are sample based, the more you have the drums bleeding into the other microphones, the more memory is required for that plug-in. This will require a computer with a fast processor and expanded memory. See Figure 6.19.
FIGURE 6.19
Toontrack’s Superior Drummer adjusting the bleed from the different drum tracks into the different microphones.
Emulating instruments with a sampler
Utilizing plug-in samplers is a way of emulating any instrument that can be recorded. These can be used to create additional orchestration for a song, adding any exotic percussion sounds, or even playing back sampled synthesizers. The quality of software samplers has increased tremendously over the years, as they have more memory available and hard drive storage.
A sampler can be used to recreate any instrument possible, provided that there are those samples in the library. A sampler can be used to create your own instruments, as well as playback those that were created by others. Software samplers will come with their own sound banks and the ability to import sample banks of different formats. These instruments can vary in the amount of layers and processing they can apply to the sounds. Some software samplers are easier to use, but less flexible, while others are more complicated, but can do a tremendous amount of processing, as well as allow for several layers of samples.
FIGURE 6.20
The Kontakt sampler plays back various sample banks from an orchestra.

The quality of the sampled instrument depends on the person who created it. Of all the software instruments available, having a large selection of realistic, high-quality samples can be very expensive. If you take, for instance, an orchestra, there are many different ways a string section can play a note. For example, it can be played pizzicato, or it can slide from note to note, so all of these different possible variations need to be captured. The best string sample libraries can cost thousands of dollars. If you are looking to be a film scorer, then this may be a worthwhile investment; however, if you are just looking to add some good string sounds to a pop recording, then the standard samples that come with a sampler may be sufficient (Figure 6.20).
A FINAL WORD ABOUT ADDING MIDI TRACKS TO RECORDINGS
Being able to add a few synthesized parts, whether they are drum loops, emulated instruments, or just a pad to carry the harmonic content, will help expand the tools available in a home or project studio. It is possible to go overboard and overtake the main instruments with the synthesized sounds. Always work with the client to determine how many extra synthesized parts should be added.