

All of the work done throughout the recording process leads up to the final mixing stage. Many producers and engineers believe that this is the most important stage of making a record, so it is very important to make sure that you and your client allocate enough time and budget to mix the song(s) properly. Mixing a track can be a time-consuming process. All of the tracks need to be equalized, balanced, effected, and placed in their appropriate position in the sonic spectrum. This is where the engineer will add compression to contain the dynamic range, reverb to give the recording a sense of space, and any other appropriate effects. It can be a daunting task combining many tracks into a single stereo pair. The more tracks that have been recorded, the longer the mixing process will take. Since mixing is an additive process, in that you are combining tracks, many of the steps that are taken are designed to make room for all the tracks.
PREPARING THE SESSION
Throughout the overdub process you may have found yourself adding compression, equalization, and other effects. Sometimes it is best to start with a clean slate. Unless you are married to a particular sound, such as a guitar cabinet simulator, which creates the main sound of a track, you may find that removing all the plug-ins with the exception of any pitch correction, sound replacing, and instrument emulation is a good way to build the mix up from the raw tracks. This way you are not biased in the way that a particular track sounds from hearing the same settings over and over again. Most of the editing, such as timing correction and arranging, hopefully has been done before you start your mix. During the mixdown, you may find that you need to edit some parts, as you will hear that certain parts may not work in the mix as well without some additional editing or pasting.
FIGURE 7.1
Saving the separate mix session.
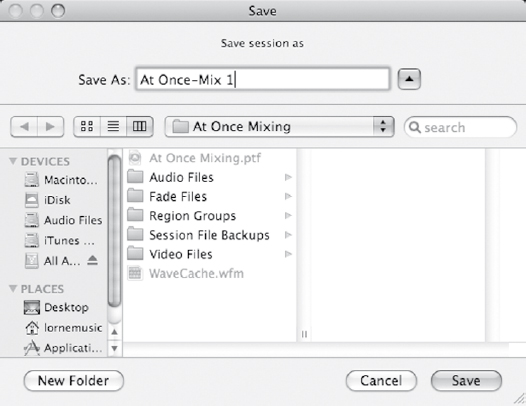
Since mixing oftentimes requires revisions based on listening to the mix in different listening environments, as well as fulfilling the client’s wishes, it is helpful to save a separate version of the mix each time you do an update (Figure 7.1). This way you can always go back and reference what you have done previously. For each different mix made of a particular song, it is a good practice to keep track of notes detailing the difference of each version so that you can easily go back and re-create or extract the differences for a newly updated mix. Suppose the client likes the way that the vocals sound in mix one, but is happy with the way the rest of the tracks sound in mix three, you can transfer the settings from mix one into mix three and create an entirely new mix four.
Oftentimes when mixing, you may find yourself bringing levels up more than you bring levels down, so it is a good idea to start with lower levels for all of the tracks. That way you have the flexibility to bring tracks up before clipping the stereo mix bus. If your digital audio workstation (DAW) does not automatically give you a stereo master fader, make sure you start with one so you can monitor the levels throughout the mixing process. You can temporarily group all of the tracks and bring each level down at once by a specified amount of decibels. Once compression is added to the tracks, you will see the overall level start to climb up.
Organizing your tracks
It is important to begin a mix with all of your tracks organized. You will find it helpful to have all the guitars, vocals, and background vocals in the same visible area, as oftentimes, you will be working with tracks of a similar instrument. If there are doubled guitar tracks, make sure they are next to each other so that you can easily copy and paste settings between the different tracks. Another feature of DAWs is the ability to group tracks in such a way that you can adjust the volume level on one track and have it adjust the level of the other tracks in the same group. This is helpful if you want to bring the distorted guitars or drums up or down overall in the mix.
Another helpful feature is the ability to subgroup the tracks into their own stereo output. This has the advantage of increasing or decreasing the volume of those similar tracks in the mix, even though you may have volume automation on the individual tracks. An added benefit to having each of the instruments go through a stereo submix is that you place a compressor across all of those tracks. This is helpful if you want to compress all of the guitars with a single stereo compressor so that the guitars will have a common compression across their dynamic range.
In many DAWs you have the ability to label and name the different output and input buses. This helps to keep track of your different stereo submixes. You can create a stereo submix by selecting the output of each of the drum tracks to be Bus 1 and 2. You can then create a stereo auxiliary input with the input being set to Bus 1 and 2, and the output being set to the stereo mix. If there are multiple files for a particular sound source, such as a bass that may have a microphone and a direct input signal, you can create a mono subgroup. With all these different submixes, you can easily mute entire instrument types with the click of a button. See Figures 7.2 and 7.3.
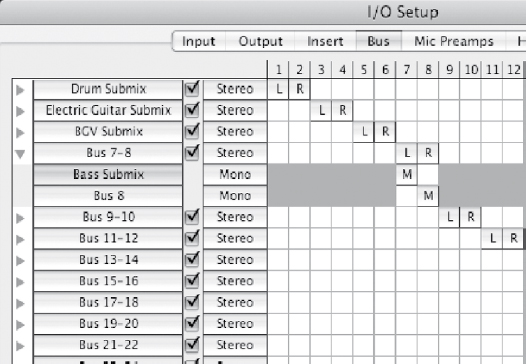
FIGURE 7.2
Naming the separate output of the buses so that the names appear on the outputs.

FIGURE 7.3
The name of the buses appear on the submixes.
When working with submixes, make sure that their output is set to be “solo safe” so that when you solo tracks that are contained within the submix, you are able to hear them.
Beginning the mix
There are many different techniques on how to begin a mix. Some engineers like to start with the drums and work their way up. Others prefer to start with the vocals as they are the key instrument to build everything around. There is no right or wrong way to begin a mix; each engineer is different. The most common technique, however, is to begin with the drum tracks. It is a good idea to have a generic level set for all the tracks that are in the song. In this way, you can hear how the tracks you are focusing on work in the context of all the other instruments. In Pro Tools this is easily accomplished by Command-clicking (Mac) or Control-clicking (PC) the solo button.
PANNING AUDIO
Manipulating tracks in the stereo spectrum through the use of panning is a means to build a wide stereo mix. Many engineers when they are starting out make the mistake of recording everything in stereo and thinking this will create a wide mix. This is a mistake, however, because if everything is recorded in stereo, and hard panned left and right, the sound completely occupies the center of the stereo spectrum. If you listen to commercial recordings, you will hear that most of the audio tracks are coming across as mono and panned in a particular location in the stereo spectrum. If there is a particular instrument that is recorded stereo, do not be afraid to either eliminate one of the sides of the recording so that it is a mono track, or pan both tracks into a single mono position.
Certain instruments, such as an acoustic guitar, piano, or some electric guitars, work well as a stereo instrument. This is determined by the style of music. If the focus of a song is on the acoustic guitar, then it most likely should remain a stereo instrument. If acoustic guitar is used as a rhythm instrument, it may be better to have a doubled mono track as opposed to a single stereo track. This gives the engineer the ability to hard pan both mono acoustic tracks, but it also leaves a hole in the center for the other focal instruments.
MIXING DRUM TRACKS
When mixing drum tracks, it helps to have an understanding of what should be present in the mix. When most people think of drums and they hear drums on a recording, the majority of the time the bulk of the drums consists of the kick and snare. The hi-hat carries high-frequency information and subdivisions of the beats. The cymbals are generally used to accent certain beats, as well as to keep time with the ride cymbal. The ride cymbal and the hi-hat often go hand-in-hand in carrying the rhythmic subdivisions of a drumbeat. If the drummer’s focus is on the hi-hat, then there will be little ride cymbal played and vice versa. These instruments are separated in the stereo spectrum by their physical placement on the drum kit. The hi-hat is on the drummer’s left side and the ride cymbal is on the drummer’s right side. Toms can carry the beat during certain sections of the song, but they can also be used for drum fills into the different sections of the song or to accent certain beats.
Before you begin mixing the drums, decide how you want them panned in the stereo field. The two choices are either drummer’s perspective or audience perspective. With drummer’s perspective, the drums are panned as if the listener were the drummer. If the drums are panned with audience perspective, the drums come across the stereo spectrum, panned to where the listener would see the drummer play, as if he or she were standing in front of the drum kit. There is certainly no right or wrong way, and as you listen to commercial recordings, you will hear both panning styles being used. The important thing is to be consistent. If the drums are panned to the drummer’s perspective the tom fills will go from left to right. The hi-hat will be on the left side and the ride cymbal on the right. Make sure the overheads are also panned accordingly. The drums are panned oppositely if the drums are panned to the audience’s perspective.
When putting plug-ins across the drum tracks, make sure that you place them in the optimal order. If there is any gating to be done, make sure that this is the first plug-in across the track, with the exception of any high-pass filtering. Otherwise, a compressed dynamic range will make the drum track more difficult to gate after the compressor. Equalization is generally next in the signal chain. One of the advantages of using plug-ins over outboard equipment is that you have the ability to save commonly used presets. These presets can give you a great starting point and can be useful for making some subtle adjustments to tailor the sound to the recorded material.
kick drum
When equalizing a kick drum, the focus is usually on the attack as well as the low end. You can focus the equalizer in on the attack by creating extreme boost on the high frequencies and adjusting the frequency in such a way that you hear more of the attack from the kick drum (Figure 7.4). This equalizer can then be adjusted by lowering the boost to where it sounds best for that drum. The key low frequencies of the kick drum are usually around the 100-Hz vicinity. You can use the same process to find where to boost the low frequencies in order to get the most thump out of the kick drum. The low to mid frequencies between the attack and low thump can be reduced, as there is not much viable sound in this region to define the kick drum. Make sure that with any equalizing you do while mixing, you A/B the equalizer in and out to make sure you are achieving the desired results.

FIGURE 7.4
An equalizer placed on the kick drum, accentuating the attack and subfrequencies.
Snare drum
When working with a snare drum in a mix, you need to decide whether to gate the snare drum. Applying a gate across the snare drum can eliminate some of the background noise that may be brought up when adding compression. If the drummer is playing ghost notes on the snare drum, then gating may be impossible, as the gate will remove the ghost notes. If the drummer does not play ghost notes throughout the entire song, you can use a gate in the sections where there are no ghost notes.
There are two methods for incorporating a gate on a snare drum track with ghost notes (Figure 7.5). The first is by duplicating the track and deleting the respective regions on each track so that the original track uses the gate, while the duplicated track contains only the audio regions with the ghost notes and has the gate removed. The other, easier method to use a gate would be to automate the gating plug-in so that the gate is only active during the sections without ghost notes. When applying a gate to the snare drum, make sure that you have the fastest attack setting available or some of the transient attack will be lost. The hold and release times should be set in such a way that you hear the body of the snare drum, but it decays enough before hearing any substantial sound from the drums in the background, such as the kick drum.
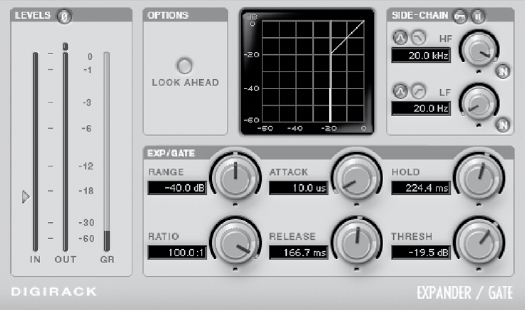
FIGURE 7.5
A gate placed across the snare drum to eliminate background bleed.
Equalizing the snare drum can be achieved by bringing out some of the body of the drum as well as some of the attack. If a dynamic microphone was used on the snare drum, you may need to boost the high frequencies to get the sound of the snares to come through. A condenser microphone will capture the high frequencies better than a dynamic microphone will, so you may not need to use as much high-frequency equalization as you would with a dynamic microphone. If you want more body from the snare drum, a boost, around the 250-Hz vicinity, can make a fuller-sounding snare drum.
Snare drums are one of the more frequently compressed instruments during a mix. You can create a flatter-sounding snare drum with less attack but longer sustain by using a compressor with a fast attack and release time. You can accentuate the attack of a snare drum by having a longer attack time and longer release time. This will allow the attack to come through uncompressed, while the decay of the snare drum is compressed. As with equalization, you should A/B the compression to make sure that the compression works for the sound in the track.
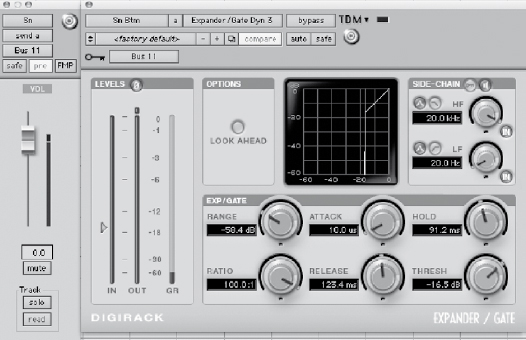
If there is a snare-bottom microphone, then it can be gated similarly to the snare-top microphone. The only difference is that there may be more bleed from the other instruments in the snare-bottom microphone, which can make gating the snare-bottom microphone more difficult. One way to accurately gate the snare-bottom microphone is to key it from the snare-top microphone. This can be done by using an auxiliary send, prefader to the key input of the snare-bottom gate. This way, the gate will be acting on the input received from the snare-top microphone as opposed to audio input from the snare-bottom microphone (Figure 7.6). If there is considerable bleed from the kick drum into the snare-bottom microphone, consider placing a high-pass filter on the snare-bottom track in order to filter out the kick drum. There is not much low-frequency information coming from the bottom snare drum, so this is an easy way to clean up the track.
Hi-hat
Mixing the hi-hat microphone as well as any other additional cymbal tracks is different from the kick and snare tracks. The sound you hear in a mix of the hi-hat is generally not entirely from that microphone. The overhead microphones pick up the hi-hat as well. When soloing the hi-hat microphone, any equalization that you do will not represent the way that the cymbal will sound in the mix. The individual track will need to be balanced with the overhead tracks as well to get the optimal hi-hat sound. Since the hi-hat consists of mostly high frequencies, a high-pass filter can be placed across the track to eliminate any bleed from the kick or other drums. Careful equalization of the hi-hat microphone can be done to bring out the crispness of the track and make it stand out in the mix. If there is substantial hi-hat in the overheads, then bringing up the hi-hat track can make it sound overpoweringly loud in the mix. Juggling the sound of a single cymbal in multiple tracks can be a delicate balancing act, and reflective on the microphone placement during basic tracking.
FIGURE 7.6
Snare-bottom microphone keyed off of the input from the snare-top track.
Toms
Oftentimes in a song, there may not be very many tom hits. This is where working in a DAW has a distinct advantage over its analog counterparts. You can loop the sections with the tom hits in order to accurately equalize them. Toms can have a very full sound, with a solid attack and substantial low end. These can be accentuated with the equalizer. Boosting the high attack and low body of the toms, as well as eliminating some of the midrange of the sound, can make them shine in a mix. Toms can also be compressed, either separately or together through a stereo submix.
Overheads
The overhead microphones are primarily there to capture the cymbals. Depending on their placement in proximity to the cymbals, the other drums in the room may be captured louder in the overhead microphones than the actual cymbals. A high-pass filter placed across the overhead tracks can help eliminate much of the room sound and allow you to hear the overhead tracks louder in the mix without bringing the other drums up. Just because cymbals consist primarily of high-frequency content does not mean that all the focus should be on these frequencies. If the high frequencies are boosted too much, in combination with a high-pass filter, then the cymbals can come across as sounding too thin.
Drum room
Oftentimes during basic tracking, there is a drum room microphone. A stereo microphone setup can also be used to create an additional width, but a mono track is used most often. This microphone can be either disregarded completely or incorporated as part of the ambient drum sound. The drum room track can be used to give the drums a sense of space in the room. If you are looking to have a cleaner drum sound in the mix, then do not hesitate to mute this track.
When using a drum room track in a mix, it can be processed in a couple of different ways for different desired effects. Generally, the drum room microphone has heavy compression placed across it. This accentuates the ambient sound of the drum room microphone. You can then equalize the track appropriately to create an added ambience to the sound.
A useful trick with the drum room track is to compress it and then to gate that track with the triggered input of the snare drum. This utilizes the drum room track as a means of creating a fuller, more ambient snare drum sound. Gating the room track is done in a similar fashion as the snare-bottom microphone. Just add the gate across the drum room track and then set it to be keyed off an auxiliary send from the snare-top microphone, which should be sent prefader. The hold and release times can be adjusted to accommodate the sound and tempo of the song.
Drum reverb
Most mixes will have a separate drum reverb set up for certain drum tracks. Not every drum track has reverb applied across it. There can be reverb that is only applied to the snare drum. Oftentimes, toms are added to the reverb well. Different ambiences, as well as plates, are used for the sound of the drum reverb.
The most important setting when creating a reverb for the drum tracks is a decay time. This is adjusted to accommodate the drummer’s performance as well as the speed of the track. You will want to make sure that the decay is mostly completed before the next drum hit, otherwise the sound of the drum tracks will be muddied with the added reverb. Reverb is generally not added to the kick drum track unless you are going for a specific sound for that track. The kick drum track will lose some of its definition with added reverb. Adding reverb to overhead cymbals essentially adds a reverb to everything, as the cymbal tracks record every drum in the room. Reverb can be added to the hi-hat track to make it a little more ambient in the mix.
Bass
When working with the drums in the mix, the next tracks that should be added are those from the bass, as the bass instrument functions rhythmically with the drums. There can be multiple tracks on the bass instrument. There can be a direct input as well as a microphone on the bass cabinet. When mixing, you need to decide whether to use one or both of these tracks. The direct-input sound will have more attack from the bass. The microphone on the bass cabinet will contain more grit to the sound and potentially more low-frequency information.
Since the kick drum and bass carry most of the very low–frequency information, some equalization can be done to make sure that these instruments are not fighting for space in the frequency spectrum. Since the kick drum cuts through the mix at 100 Hz, adding a slight dip to the equalization in the bass track will make more room for the kick to come through the low-frequency range (Figure 7.7). If you are looking to hear more of the attack of the notes, as well as the picking or fingering of the bass notes, a boost in high frequencies where the attack is present can create more definition and differentiation between the notes. Depending on the bass sound that you are trying to achieve for your mix, you may find that you want to reduce the attack frequencies. This all varies depending on the track as well as the musician and instrument itself.
The bass can be compressed in a couple of different ways. Since the natural performance of the bass can be very dynamic, a compressor is almost always applied to the bass. You can use a standard single-channel compressor to compress the bass, generally with a 4:1 ratio. The attack time can be adjusted to control how much of the initial attack of the bass you want to come through the mix. The longer the attack time, the more the attack from the bass is going to come through. Instead of using a standard compressor across the bass track, a multiband compressor can be used to compress only the low end. This allows for some variation on the attack, while helping to create a consistent low end.

FIGURE 7.7
Snare-bottom equalizer set to accentuate the attack and dipped to make room for the kick drum.
GUITARS
If your mixing style is to gradually build your mix up from the bottom beginning with the drums and bass, the next step would be to add the rhythm guitars. There could be several guitar tracks in a song, so it is best to start with the most crucial elements of the rhythm performance. Some songs may be acoustic guitar driven and some songs may be electric guitar driven. If the main element of the song is acoustic guitar, then begin by adding these tracks. A song may be piano or keyboard driven, in which case these should be the next instruments added to the mix, before the guitars.
Distorted guitars
Working with distorted electric guitars is different from clean electric guitars. Most distorted guitars and a commercial recording are not as dense sounding since they are captured in the studio. The distorted guitars generally carry more low-frequency information than a clean guitar track. Distorted guitars will also not carry the attack that a clean guitar will. The distorted guitars maintain a more consistent level throughout the performance, however, compression can be used to warm up the sound, as well as to level the dynamic range. Equalizing these distorted guitars can consist of removing some of the low-to mid-range frequencies to make room for other instruments, as well as adding more edge if necessary. A high-pass filter can be useful on a distorted guitar in order to eliminate any unnecessary low-frequency information. These guitars can be compressed slightly to maintain a dynamic consistency.
Clean guitars
A clean guitar track is much more dynamic than a distorted guitar track. Equalization can be done to bring out the attack of the clean guitar, as well as fatten or thin the guitar as required by the mix. Any compression added to the clean guitars can be used to create a consistent dynamic range. Lengthening the attack time of a compressor will allow more of the attack to come through, and shortening it will remove some of the attack, depending on your needs.
You may also choose to add additional effects to the clean guitar parts. Depending on how they function in the song, adding a clean delay to the guitar track can give it some depth. A slight chorusing to the sound can also create a thicker clean guitar sound.
Acoustic guitars
Working with acoustic guitars in a mix with several tracks requires some work with an equalizer to get them into their appropriate space. The actual acoustic guitar instrument is usually designed to be a very full-sounding instrument. Acoustic guitars are generally played by a musician as a solo instrument, so they have a very wide–frequency range. Equalizing an acoustic guitar track to fit in a mix generally involves thinning the acoustic guitar sound so that it fits better in the song. Oftentimes, acoustic guitars are recorded in stereo to capture the wide sound of this instrument. If you are working with a stereo acoustic guitar track, and the part is doubled, you can feel free to eliminate one side of the acoustic guitar, preferably the microphone part that has the least amount of sound from the strings.
KEYBOARD PARTS
Working with different keyboard parts in a mix requires just as much effort in equalization and compression as the other tracks. Synthesizer sounds are generally very dense, as that is the sound that helps sell the synthesizer. The tracks need to be equalized to fit within the mix, which usually means carving out some of the dense overlapping frequencies in the low and mid ranges. There can also be many dynamic elements for different keyboard synthesizer sounds. A single-band or multiband compressor can work well to contain the dynamics of these synthesizer tracks. Most MIDI sounds are designed to be stereo, and so there can be a lot of stereo movement in these tracks. As with any stereo track, you can make the elements more functional in a mix by summing them into a mono track. These tracks can be panned around without occupying too much space in the stereo spectrum.
If the MIDI tracks you are using are coming from software instruments, be sure to turn off any effects processing that is not necessary for the actual sound. This can further clutter the mix with inferior-sounding effects, such as a bad reverb or compressor. The separate plug-ins in your DAW will work much better for reverb, equalization, and compression.
LEAD VOCALS
The lead vocals are the central focal point in almost every pop recording. Even though the lead vocals may consist of only a single track, there should be ample time spent working with them to make sure that they sit just right in the mix. Any number of effects and plug-ins can be applied onto the lead vocals. Of course there is a standard equalization and compression, but there can also be echo, pitch shifting, chorusing, and any other effect under the sun. All of these other special effects can be used subtly to make the lead vocals stand out in the mix. If there are too many effects placed across the vocal track, the sound can be overly processed and unnatural. There can be times when you may want this processed sound, but in most situations it can be distracting.
Equalizing vocals
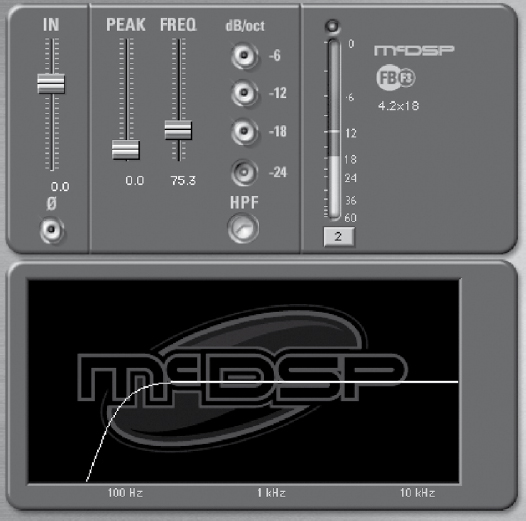
There are many things the engineer can do using equalization to enhance the vocals. The first step is to determine whether there are any unnecessary rumbles in the microphone. Depending on how and where the vocals were recorded, there can be excess noise from the control room, air-conditioning, etc. A high-pass filter can eliminate a lot of this unnecessary low-frequency rumble (Figure 7.8). Depending on the lead vocalist, you can usually safely filter out anything below 75 Hz.
FIGURE 7.8
A high-pass filter to eliminate any excessive pops.
Equalizing the vocal track can consist of adding more air to the vocals. A high-frequency shelf that is boosted can put more air and breath back into the vocals. The rest of the equalization is determined by the sound of the vocal track. Sometimes there will be a range of the vocalist’s sound that can come across as a piercing sound in the mix. You can utilize a parametric equalizer to reduce these frequencies. You can warm up a vocal track by boosting some of the low range where the vocalist’s fundamental for frequencies are.
Compressing vocals
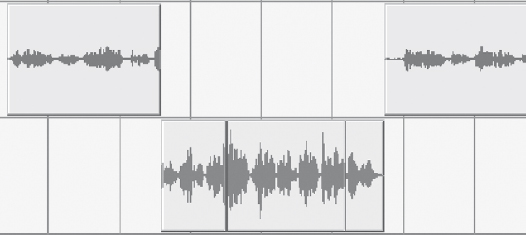
The lead vocals are also the most compressed track in the recording. Compression of the vocals needs to be done carefully so there is no audible pumping and breathing of the compressor. Lead vocals can have a tremendous amount of dynamic range. The vocalist can have verse sections that are much quieter than the choruses. There are two main methods for dealing with this dynamic range discrepancy. The first is to create a separate track that will function as the louder lead vocals track. This newly added track will consist of the choruses where the lead singer is much louder, so the compressor can be set for those vocals only. The original track can have its compressor set to control the dynamic range of the softer sections. See Figure 7.9.
FIGURE 7.9
The vocal track separated into two tracks, one for the softer sections and one for the louder sections.
The other method is to use two compressors in series with each other. The first compressor is used to control the dynamic range of the louder sections. A second compressor is placed after the first, and will then be able to control the dynamic range of both sections, because the louder section is much closer to the softer section in perceived volume after the first compressor.
Removing sibilance in the vocal tracks
After running the vocals through an equalizer and compressor, the added signal processing, along with the vocalist’s microphone and technique, may have accentuated the sibilance of the vocal track. Sibilance is the sound of “s” and “t” being overly present in the vocal track. These are high frequencies that range from 3 to 10 kHz. Usually, they are present in a single high-frequency range depending on the vocalist.
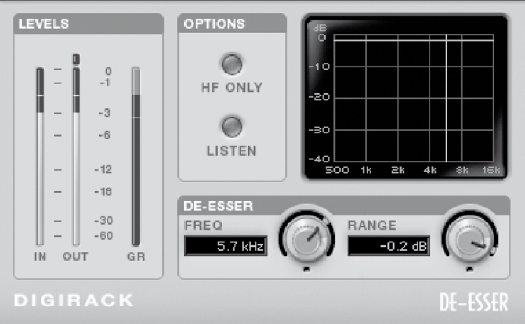
Equalization can be used to eliminate sibilance; however, the equalization will also remove the same high frequencies when the sibilance is not present. This is where a specialized effects processor known as a de-esser is valuable since it is designed for situations such as this. A de-esser is specifically created to eliminate sibilance. It is designed to function only when the sibilance crosses a certain threshold. Once the sibilance has crossed the specified threshold, the de-esser will either compress the track or the high frequencies to eliminate the sibilance (Figure 7.10). The method in which a de-esser functions varies by the manufacturer.
Dialing in a de-esser requires precise adjustment so that the singer does not come across as if he or she has a lisp. Most de-essers will have a setting where you can listen to the detection. This is helpful when trying to find the specific frequency of the singer’s sibilance. Once the frequency of the sibilance has been found and selected, then you can adjust the amount of reduction where the sibilance is present.
FIGURE 7.10
A de-esser compressing when detecting sibilance.
Effects on lead vocals
Most vocal tracks require some reverb to make the vocals sound more natural. People are used to hearing vocals, even spoken vocals, in a room with reflections. Dry vocals are what is captured in a microphone and sound somewhat unnatural. Adding a reverb to the vocals will put them in a specific space. It will smooth out the vocals and help them blend into the track better, especially if there is added reverb on some of the tracks in the mix. There are other effects that can be added to the vocals to make them stand out more in the mix and give them a better sense of depth.
Reverb on vocals
When selecting a reverb for the vocals, determine what type of reverb best suits the vocalist and style of song. The amount of reverb on vocals varies over time. In the 1980s, most of the instruments had a lot of reverb on them. However, in the past decade, vocals have become much drier. Having a drier vocal sound does not necessarily mean that there is any reverb on it; it can just be a much shorter reverb and have a lower level in the mix. Currently, there is a variety as to how much reverb is on the vocals.
If your DAW has the capability of opening up multiple reverb instances on top of the plug-ins that you are already using, it is best to have a vocal on its own reverb. With the lead vocal track sent to its own reverb, you can tailor the type and duration of the reverb to suit the vocals without having to worry about how the reverb parameters are affecting the drum ambience. A separate reverb will also put the vocals in their own space as opposed to the same space that the drums are in. A short plate style of reverb can help smooth out the vocal sound without giving it the sound of a particular room. A small club setting will put the vocals in a specific room.
When selecting a reverb plug-in to place across vocals in your DAW, be sure that you are using a send for the reverb as opposed to using the reverb plug-in as an insert. This will give you the flexibility of adding the background vocals, or doubled lead to the same reverb as the lead vocals if you choose. A send can be created by using an auxiliary send from the vocal track and putting that send through an auxiliary track with the reverb plug-in set up as an insert. The reverb plug-in should be set to output 100 percent of the wet mix (Figure 7.11).
Most reverb plug-ins will have great presets to help you get a starting point with your reverb sound. However, some of the parameters will require an adjustment for that preset to work for the mix. The width and early reflections can be adjusted, but the most important parameter is the decay time. The decay time should be short enough so that you can hear the decay in between vocal lines. It should be long enough for the vocals to sound smoother. The slower the song, the longer the reverb decay time usually is.

FIGURE 7.11
A reverb plug-in with a plate setting for the vocals.
Vocal delay/echo
A delay or echo can be added to the vocal track to create a sense of depth. This has the advantage of overutilizing reverb for depth, as it will not make the overall tracks sound as washy. Delay is often added as an extra send in addition to the reverb that is already placed on the track. Many different engineers have their own tricks as to how much delay they add to the lead vocals.
The difference between a delay and an echo is that an echo will have frequency adjustments to the repeated sound. The high frequencies can be attenuated with a low-pass filter at a specified frequency. Most delays have the ability to adjust this low-pass filter.
There are two main ways to use a delay on vocals. The first is to create a short delay to add some wetness to the vocals. This will have a short delay time. Depending on the style of the vocals, it can be around the 200-ms range. With a stereo delay, you have the ability to adjust the delay times on the left and right sides. You can have slightly different delays on either side of the vocals, which will create a widening effect to the vocal sound. These delays should have the low-pass filter engaged anywhere around the 4-kHz vicinity so that the transients and consonants are not as audible on the delayed track. Without a low-pass filter engaged, it will make your subtle delay track more noticeable (Figure 7.12).
A good method to determine the amount of this delayed signal to maintain in the mix is to set it so that you do not specifically hear the delay in the track but notice it when it is muted. Even if you are using a delay to make the vocal track sound wetter, adding the same vocal reverb to the delayed sound will make the delay fit in better with the song, as it will be in the same space as the lead vocals.
FIGURE 7.12
A stereo delay on the vocals to create a subtle stereo effect.

The other method of delay for use with the vocals, which can be used in conjunction with the previously mentioned delay, is to set up an echo of a particular vocal word or phrase that you may want to stand out in the mix. These echoes should repeat in time with the song. The repeats can be set for quarter notes, half notes, whole notes, etc. Most delay plug-ins give you the ability to select one of these musical durations for the delay time. The plug-in then adjusts its delay time according to the tempo from the host DAW. If your plug-in does not support the selection of rhythmic subdivisions as a delay time, it can be easily calculated. Just divide 60 by the beats per minute, multiply that number by 1000, and that will be the delay time for a quarter note in milliseconds. After you have the quarter-note delay time, you can double it in order to get the time for a half-note delay, or halve that number for an 8th-note delay. See Figure 7.13 for an example.
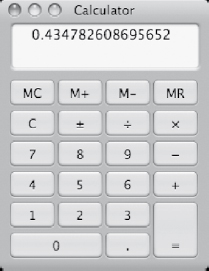
FIGURE 7.13
Quarter-note delay calculated by dividing 60 by the beats per minute, indicating a 435-ms delay for a tempo of 138 beats per minute.
Once the echo has been created and placed in a new auxiliary input, the send feeding that echo can then be automated. Begin by muting this send to the echo. You can then automate the mute of the send to be turned on and off at the locations during the vocal track where you want to hear the echo (Figure 7.14).
Widening vocals with a pitch shifter
Adding a pitch shifter to vocals has been a technique used for years to create a thicker sound. This pitch shifter does not necessarily change the pitch dramatically—only by a few cents. Creating a send from the vocal track to a pitch shifter and then adjusting the pitch slightly on either side can create a wide sound. The pitch shifter can make the vocals stand out more in a mix but should be used subtly so that they do not sound artificial. Vocals can be pitch shifted anywhere from 1 to 20 cents on either side. For instance, you can lower one side by 9 cents and raise the other side by 9 cents (Figure 7.15). The pitch shift can also be delayed slightly, in the range of 20 ms, to create more depth to the shifted sound. Do not add the pitch shifting beyond the point where the effect becomes noticeable on the lead vocals. Again, like the delay on the vocals, you should not specifically hear it, but you should notice that it is missing.
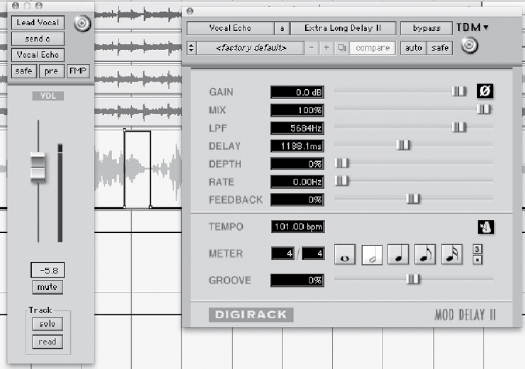
FIGURE 7.14
An echo with its send automated for a single word.
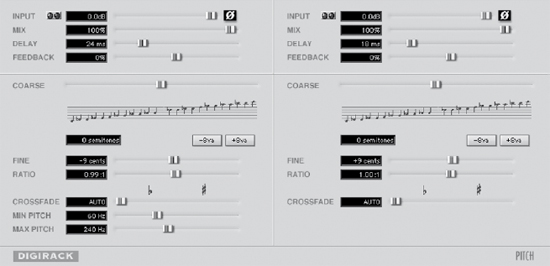
FIGURE 7.15
A pitch shifter added to the lead vocals with ± 9 cents on either side along with a slight delay.
Doubled vocals
One of the most common record production techniques is to have doubled lead vocals. When mixing in doubled lead vocals, they should be treated similarly to the lead vocals, with the exception of a thinner sound. Doubled vocals should sound like they support and are part of the lead vocals, but they should not sound as if the vocalist was singing the same part twice.
A double to the lead vocal track should sit below the lead vocals in terms of level. There can be more compression on the doubled vocals since they are not the focal point, but merely a supporting player. Increased compression will make them sit in a single dynamic range better and not jump out above the lead vocals in certain places. When listening to doubled vocal parts sing the exact same line, the sibilances have an additive effect. They become much more pronounced. This can be compensated by lowering the threshold of the detector on the de-esser that is placed across the doubled vocals. With this doubled track, it is not going to be noticeable if the doubled track sounds a little bit lispy; however, it will be noticeable when there are very strong “s” and “t” sounds.
FIGURE 7.16
The upper equalizer is on the lead vocals, and the lower equalizer is on the doubled part with low to mid frequencies dipped.
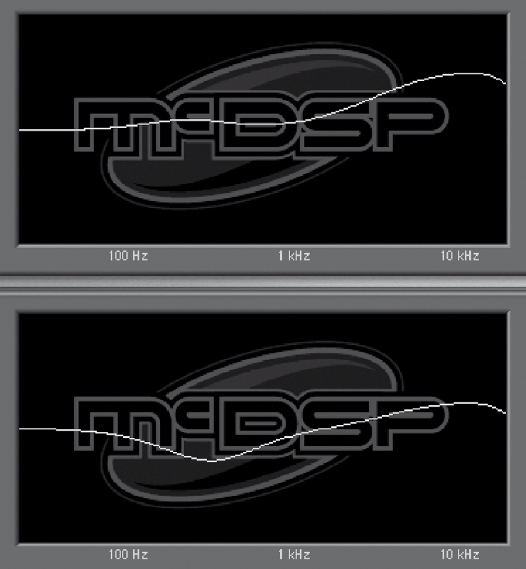
Equalization on the doubled vocal track can be thinner in the low to mid range (Figure 7.16). This will prevent the lead vocals from becoming noticeably overly dense, because many times the entire lead vocal track might not necessarily be doubled, rather only certain sections of the song.
Harmony vocals
Harmony vocals are a vocal track in which the vocalist sings the harmony part in time with the vocal melody. This functions similarly to the doubled vocal track, and as such, the harmony vocals can be processed in much the same way. The harmony vocals are there as a supporting role, rather than the point of focus. These harmonized tracks can be compressed the same as the lead vocals, but thinned out with the equalizer so that the vocals do not suddenly come across as being too dense.
There should be at least similar auxiliary sends from the harmonized vocal part as there are on the lead vocal track. You should have at least the same amount of reverb as on the lead vocal track so that it blends. It does not necessarily have to have the same delay or pitch shifting as the lead vocals may have, but at least must be placed in the same acoustic space.
Background vocals
There can also be background vocal parts that do not specifically harmonize with the lead vocals but create a part of their own. These background vocal tracks can be treated as their own instrument. They work with the lead vocals but do not specifically contribute to their sound. Many times these background vocals consist of “oohs,” “ahs,” or a separate melody from the lead vocals. These backup vocals can be placed in a separate space from the lead vocals by using a separate reverb. This reverb can have a longer decay time and be in a slightly bigger room in order to make these background vocals sound as though they are physically behind the lead vocalist. There can be multiple tracks of these background vocals in order to make them sound more ethereal. These tracks can be compressed and equalized so that they have a consistent dynamic range yet are thinner than the lead vocals sound. If there are many tracks of these background vocals, it may be a good idea to bus them all through a single submix so that they can be compressed together and use a single reverb send from the submix.
AUTOMATION
Automation in mixing is used to create consistent levels with different instruments, as well as to accentuate parts during certain sections of a song. Even though compressors may be used to control the dynamic range of an instrument, the arrangement may dictate that certain instruments need to come up or down during particular sections of a song. A rhythm electric guitar that may seem loud enough during a softer verse may not be loud enough once more instruments come in during the chorus. Automating a vocal track will help bring up softer phrases and the ends of notes as the singer’s volume can get buried in the mix. Automation can extend beyond levels and panning to where you can automate parameters of the different plug-ins.
Before beginning automation, make sure that the levels for all the tracks are in a good general position. It is best to set the levels of the faders for where they will be at for most of the song. In Pro Tools and other DAWs, you can choose to the view the track’s volume in the Edit window.
Automating sections
Entire sections of a track may be automated up or down without having to go through the entire process of writing the automation with the fader (Figure 7.17). In Pro Tools, it is easy to just separate regions where you want to automate a change in the Edit window so that you can bring the different regions up or down individually. Double-click in the region where you want to adjust the volume, and select the Grabber tool. While looking at the volume level of the track you can move the volume line up with the mouse, and Pro Tools will display the starting level as well as the difference of your volume adjustment. This technique comes in handy when you are trying to bring specific guitars up or down during the choruses.
FIGURE 7.17
An entire section of a guitar track is automated up with a single adjustment.

Fader riding automation
The fader riding method of automation, borrowed from analog consoles, is where you ride the fader, and the fader will then be automated to move according to your fader adjustments that can then be recorded.
There are different types of automation in DAWs as well as their analog counterparts. Before you are able to write any automation with the fader, the automation needs to be set to be recorded. In Pro Tools the default for the automation is to be read. This means if you draw any automation in the volume track the fader will respond accordingly. The other modes of automation vary in what they do to the fader once you are playing back the audio.
Touch automation
The most common method of automation in mixing is touch automation. This will only record automation data when you touch the fader with your mouse or control surface. It will stop recording once that figure is released, and then it will continue playing back any automation that is on the track. If there are no other automation data on the track, it will snap back to its original starting position. Once touch automation is selected, the automation status will be lit red, which indicates that it will be recorded. With the automation adjustments that you make using touch automation, you can easily make adjustments by rerecording the automation data. This is similar to overdubbing a part, only with automation data as opposed to audio data. If there is only one word that needs adjustment, only touch the fader during that word and make the appropriate fader moves. Then release the fader, which will prevent the DAW from writing over previously recorded automation data. See Figures 7.18 through 7.20 for an example.
FIGURE 7.18
The track’s automation is set to “touch,” which will record when the fader is moved.
Once all the automation data have been recorded to the track, turn off the touch automation and switch it to read. This way there is no accidental automation recorded if you happen to grab the fader while the song is playing back. If you need to listen to the track without the automation, then switch the automation to be off and the fader will then move freely regardless of where the automation is set.
Write automation
Write automation will constantly be recording on the tracks when it is enabled and the song is playing. After the first pass of recording in Pro Tools, this mode automatically reverts to latch mode. The write mode of automation is not as useful as the touch automation, as you will be erasing previously written automation data regardless of whether or not you move the fader. This method of automation is useful if you want to apply automation data across many tracks at once and move the faders on a control surface as if they were a mixing console. This can give you a good initial first pass of automation; otherwise, it is best to stick with the touch automation.
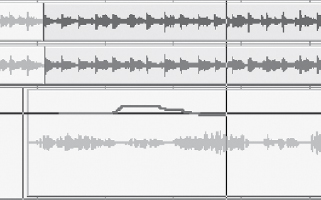
FIGURE 7.19
The automation is being recorded when the fader is moved.
Latch automation
Latch automation functions similarly to touch automation. The only difference is that once you touch the fader and make any automation moves, that fader will always be writing as long as the song is being played back. This is handy in situations where the last level of the fader is where you want it to stay as long as you allow the song to play back.
Trim automation
Trimming automation is a means of adjusting the automation data as a whole. While in trim mode, you can raise a fader so it increases the volume of the automation data by 1 dB. This maintains any previously written automation data, but increases the overall level by the amount that you raise or lower the fader. This can be very useful if you have already made detailed automation moves, but a section as a whole needs to come up by a specified amount of decibels.
FIGURE 7.20
The automation after it has been recorded.
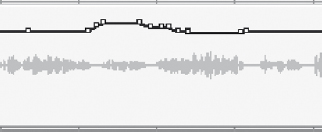
Trimming can be done manually if there are certain sections with automation data that you want to bring up and down. This can be done in the same way that the automation of sections was done as previously mentioned: Double-click with the Selector tool inside a separated region that contains the data that you wish to trim, then switch to the Grabber tool and raise it up or down the amount that you wish to trim the automation data (Figure 7.21). You may need to add a break point at either end of the region, as Pro Tools will only trim automation break points and not the actual volume line itself. This can be accomplished by using the Grabber tool and clicking on the volume level line where you wish to add a break point.

FIGURE 7.21
A section of the vocal, with automation recorded, being trimmed down 3.5 dB.
COMPLETING THE MIX
Even though you may go through and work on the mix track by track, there are constant adjustments made to all of the tracks as the mix progresses. If after the guitars are added you find that the snare drum is not loud enough or needs to have a crisper sound, then these are the types of adjustments that are constantly done throughout the mixing process. These adjustments continue until the client and engineer are happy with the mix.
Creating multiple mixes
It is common to make different versions of a mix for the client to choose. These are generally different levels of the lead vocals. The lead vocals can be raised by 1 dB for a “vocal-up” mix. A “vocal-down” mix can also be created by lowering the overall level of the lead vocals. There can also be what is known as a “TV mix,” which is a mix of all of the instruments with the exception of the lead vocals and perhaps the background vocals. This mix can be used for soundtracks or even to rerecord the lead vocals onto this mix in the future.
Mixing can be a very intensive process, so ear fatigue can set in depending on the listening levels. Always give yourself a break periodically to rest your ears. When you come back, you may hear different things in the mix that you did not notice before, or something that may have been bothering you before may sound fine after giving your ears a break.
Listening to the mixes
Take the time to bounce a mix to a CD and listen to it in different listening environments. Most people listen to music in their car, so many reference mixes are compared on a car stereo. If it seems that you are spending a lot of time on minute details in a mix, take a break from listening to that song for a day or two. Coming back with completely fresh ears and without the biases of having listened to the track repeatedly will allow you to hear things differently, and you can make adjustments according to what you hear after approaching the mix at a different time.
Remixing
Coming back to a mix to make adjustments is very common. Oftentimes, there may only need to be a few adjustments made to a few tracks. When approaching a new mix, make sure to save the remix as a different session so that you can always go back to the original if the remix does not wind up being any better than the original.
Archiving the project
Once all the mixing has been completed and the project has been mastered, the project needs to be archived in such a way that it can be remixed in the future. DAWs change over the course of time, so there is no guarantee that the project will play back as it is now in the distant future. Whatever DAW is common at that time may not be able to read the session file that points to where all the regions begin. Software instruments will certainly change over the course of time. Companies may go out of business, and there may be no way to re-create the exact sound used in a recording. This is where archiving the project so it has the best chance to be revisited in the future becomes important.
The best way to ensure compatibility in the future is to make sure that all of the audio files can be imported into any DAW. In order to ensure future compatibility, all of the tracks need to be audio tracks. The session should be saved separately so that you can leave the original final mixed file intact. It can be named something along the lines of “Song 1-Archive.” To turn all of your tracks into audio files, begin by recording any software synthesizers that were used as audio files. These software synthesizers then become audio files that can be read in the future (Figure 7.22). This can be done by setting the output of the software synthesizer to zero, deactivating any plug-ins that were used, and setting the output to be an unused bus in the DAW. A new audio track can then be created with input set to the output bus of the software synthesizer. This track can then be recorded as an audio file.
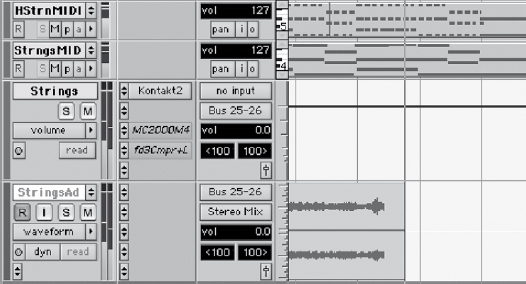
FIGURE 7.22
String parts from a soft synthesizer being recorded as an audio file.
FIGURE 7.23
A selection of audio set to be consolidated from a single start point with the rest of the tracks.

FIGURE 7.24 Selecting the “Consolidate” menu in Pro Tools.

The same process should be done for any tracks that have Melodyne across them, as the audio coming from the Melodyne plug-in is being read from a separate audio file.
All of the audio files should then be exported in such a way that each one starts in the exact same location on the timeline. This can involve rewriting the audio file over the course of an audio selection. Some DAWs such as Logic will give you the option of automatically exporting all of the audio files so that they begin in the same spot for easy archiving and transferring.
If the song has a consistent tempo map, select a starting point for the audio files that falls directly on the downbeat of one of the measures. This will allow the files to be in sync in a different DAW by merely adjusting the tempo to the tempo of the original recording. In Pro Tools this can be done by selecting the beginning of a bar prior to any of the audio and placing a memory location at that point. This is easily done by pressing the “Enter” key. Then you can go track by track and rewrite the audio file from the start point to the end of the audio regions in that track (Figure 7.23). In Pro Tools this can be accomplished by highlighting a section to rewrite and going to the Edit menu and selecting “Consolidate” (Figure 7.24). The end result is a single audio file without any breaks in the regions (Figure 7.25).
Once all of the audio tracks to be consolidated have been selected, the audio files can all be highlighted and exported. DAWs will give the option as to what file type, sample rate, and bit depth to export the files as. There should be no change as to the sample rate as this can create sound-quality loss inherent with any sample rate conversion. The file type should be the most commonly read file type by DAWs, which currently is the WAV file type. Export all of these files into a separate folder, and then transfer a copy of that folder to at least a couple of different types of media. DVDs can be easily read by computers, as can hard drives. CDs or DVDs tend to be the most universally read formats, and they can be read cross-platform. Hard drive formats can change over the years with the changing of operating systems and interfaces. Be sure there are at least two different copies of the archive. These archives should then be stored in two different locations away from the elements.
FIGURE 7.25
The final consolidated selection beginning at the same start point as the other tracks.

A FINAL WORD ON MIXING TECHNIQUES
Mixing a recording is a skill that takes years to develop. Being able to hear the different tracks and how the frequencies interact with each other takes time to develop. With today’s DAWs it gets much easier to be able to go back to a mix and make revisions. It becomes easier to learn from your previous mistakes by being able to go back and analyze the way that you have previously mixed to a track. Remixing is a very common process, so do not hesitate to go back and make changes at the client’s request. Sometimes it may help to scrap all of the previous work on a mix and start from scratch.