
INTRODUCTION TO TIMING CORRECTION
Correcting the timing of a piece of music, whether it be the drums, percussion, or merely tightening up doubled vocal parts, is one of the most important things that can be done to improve the quality of a recording. If faced with the choice of having a track be out of pitch or out of time in a recording, it is less appealing to the ear to have something out of time. Having parts that are out of time denotes a sloppiness to the performance, which translates to a sloppy recording. The ear is generally more forgiving to pitch, within reason, than timing.
In the world of editing tracks visually, it becomes easy to edit the timing so that tracks “look right.” It is important to realize that there is musicality to the slight fluctuations of timing as an artistic license. Some parts sound better slightly behind the beat. When professional musicians are playing together, they know which side of the beat to be on for the style of music and their particular instrument. This is another instance where studying the style of music that you are recording will make you a better engineer.
There are two main types of timing correction. The most common method creates edits in the audio regions and moves them so that the transients are then on the appropriate beats. This can be done either manually or through software features that automate this process, such as Digidesign’s Beat Detective.
The other main type of timing correction will actually stretch or compress the time of regions to make them fit the tempo of the song. This can create problems with artifacts created by the digital processing that is used to expand or contract the pitch.
Tools for timing correction
Most timing-correction software tools are proprietary to their host digital audio workstation (DAW) software. Most plug-ins used in this book are available across multiple platforms, as they function as an insert across a track. With timing correction, it is more a feature of the workstation software, as most of the handling of the audio does not take place in real time; they are merely editing features. This chapter will give you an overview of the main features used in this book.
Time compression and expansion
Depending on the algorithms used by a particular time-compression and -expansion feature, there may be artifacts created by the process. This is particularly more noticeable in time expansion as opposed to compression.
Percussive sounds have a specific transient that denotes the beginning of the sound. When these percussive sounds are stretched, oftentimes the transient can be smeared or even replicated to create the lengthened sound. A short time expansion can create a smeared transient. If the transient is smeared, the percussive nature of the sound can be diminished. With even longer time expansion, the transient can be replicated, creating a flam in the sound.
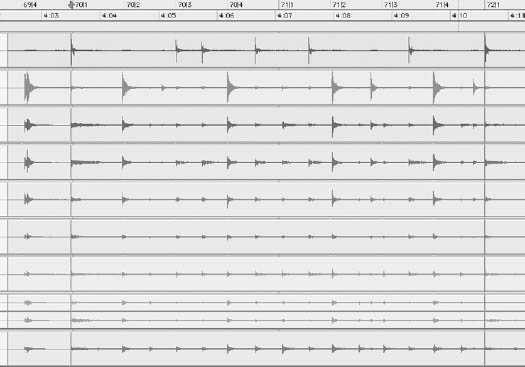
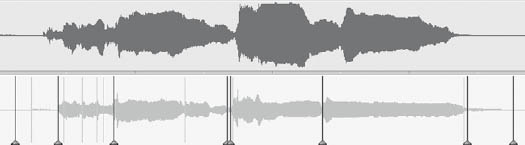
In Figure 2.1, there are five versions of the same audio file, which is a snare drum. It has a solid transient but a moderate decay to the sound. The upper track is the original track. The second version is time expanded by 100 percent, where you can see a double transient created. The third version of the snare drum is time expanded by 50 percent, where you can see a smearing of the transient. Take note that this will create problems in the sound, as it will not cut through the mix as a snare drum should. The fourth version has the snare drum expanded by 100 percent, but with an algorithm that is specifically designed for percussive sounds. This will maintain the transient of the sound but increase the decay. The fifth version of the snare drum is time compressed by 50 percent, and you can see little effect to the transient.

FIGURE 2.1
Five tracks, displaying the effect of time compression and expansion with different algorithms.
Manual timing correction
When correcting the timing of a performance, there are a couple of different ways that various DAWs can handle the job. The first method that you will usually encounter is manually correcting the timing of a performance. This works well for subtle mistakes, such as the bass player hitting a note slightly earlier. A simple edit and nudging of the audio region will take care of this.
In Figure 2.2, you can see that the second note of the lower track, which is the bass, is behind the beat when compared to the kick drum hit above it. This is a classic example when a simple region nudge edit will correct this issue.
In Figure 2.3, you can see that the region of that note is separated from the surrounding notes, allowing for the region to be nudged to its appropriate position.
The region has been nudged, as seen in Figure 2.4; however, there is a gap between the end of the note and where the next note begins. This is where you will need to make a decision as to how to correct the empty space. In some situations, the way that the edit is nudged, without any region adjustment, will sound just fine among all of the other tracks. The best way to make that determination is to listen to all of the other tracks playing at the same time to determine if the gap is noticeable or not.
FIGURE 2.2
Kick drum (top), and bass line with the second note out of time when compared to the kick drum (bottom).
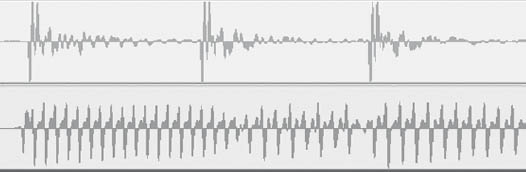

FIGURE 2.3
The region in the bass track has been separated in order to shift the note.
FIGURE 2.4
The region of the bass note has been nudged to be in time with the kick drum.

Sometimes it is best to err on the side of caution and to correct the empty space. This will cover the edit, in the event that the song undergoes some rearranging in the future that would make the empty gap more apparent to the listener.
The first method of correcting this gap is to appropriately drag the end of the note to the right of the edit, back into the edited region. This edit will only work if the edited region has sufficient duration so that the dragged region can overlap during the sustained portion of the region. This is a good place to keep in mind the principles of utilizing zero-crossings for the edit. You may have to slightly nudge the timing of the initial region to create an overlap of the edited region in order to create the appropriate zero-crossing of the edit. In Figure 2.5, you will see that the third note has had its beginning region trimmed into the sustain of the corrected region, creating a longer, sustaining note.
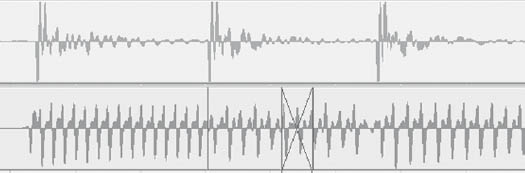
Once the final edit has been made, you can determine whether or not you wish to crossfade the tracks to create a more transparent edit. This is not necessary to do in the beginning of the edited region, since it begins on an attack of the note, but in Figure 2.6, you will see that the edited region has had its sustain edited over the duration of one period of the waveform on either side.

FIGURE 2.5
The corrected bass note has had the end region nudged earlier to correct the gap.
FIGURE 2.6
The nudged end region has been crossfaded to create a smoother edit.
BEAT DETECTIVE
One of the most powerful automated editing features added to Digidesign’s Pro Tools in recent years is Beat Detective. Originally only available for the HD system, it is now available as a single-track feature in Pro Tools LE, or as the multitrack version found in HD. You can add the multitrack feature to Pro Tools LE with the purchase of the Music Production Toolkit, which also adds a whole host of other features, such as SoundReplacer and the ability to have a session with 48 audio tracks.
Beat Detective is a powerful editing tool that is used to tighten up rhythmic tracks according to the tempo map in Pro Tools. It can also be used to generate a tempo map from an existing performance.
Beat Detective accomplishes this editing by cutting up the regions according to where it detects the transients. It then moves the regions that it has created and places them in the correct time according to the tempo map in Pro Tools.
Steps of Beat detective
When editing drum tracks with Beat Detective, there are basically three steps, with an optional fourth in the operation of the software to create the appropriate tracks.
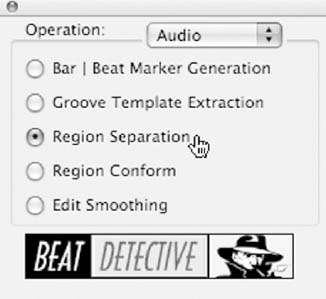
![]() Region separation. Region separation will identify the beats performed by the drummer and separate them at the beginning of each selected transient.
Region separation. Region separation will identify the beats performed by the drummer and separate them at the beginning of each selected transient.
![]() Region conform. Region conform then takes these separated regions and moves them to the appropriate bar, beat, or sub-beat in the measures.
Region conform. Region conform then takes these separated regions and moves them to the appropriate bar, beat, or sub-beat in the measures.
![]() Edit smoothing. Edit smoothing can then move the ends of the regions to the adjacent edit so that there will not be any silence between some of the edits. In addition, you have the option of adding a crossfade at each of the edit points.
Edit smoothing. Edit smoothing can then move the ends of the regions to the adjacent edit so that there will not be any silence between some of the edits. In addition, you have the option of adding a crossfade at each of the edit points.
![]() Consolidation of the tracks (optional).
Consolidation of the tracks (optional).
At the end of each of these steps, you need to listen to the tracks being edited in order to check for accuracy. Beat Detective is not a completely automated process, but a user-guided process. Careful listening will help to avoid artifacts that may crop up due to misdiagnosed transients.
When you should use Beat detective
Beat Detective can be used to generate a tempo map, as mentioned in Chapter 1, and it can also be used to put performances in time with an existing tempo map. Beat Detective is great for putting drums in time with the click track or locking a percussion track in time with the drums.
Beat Detective should be used right after basic tracking, before any of the overdubs have been recorded. If the other instruments are following the drum tracks, and you tighten the drum tracks to the tempo map of the song, by correcting the timing of the drums, the other instruments will sound out of time. Keep this in mind when planning your session so that you do not have parts that are out of time, in which case you will need to rerecord over-dubs again.
Saving a new session
When doing any semidestructive editing, it is always good to save a new session file in your session folder. Also, it is a good habit to get into to save a new session file every time you do something major in Pro Tools, from editing to mixing. A helpful method would be to increment a number and add a note as to what is contained in the new session. If you are working on “Song A 1,” save a new version as “Song A 2-Beat Detective.” This will help you go back at any point in the future in case something gets messed up along the line.
Grouping the drum tracks
Beat Detective will work across multiple drum tracks if you have the multitrack Beat Detective with your software. In order for it to work across all of the drum tracks, they all need to be selected. The easiest way of doing this is to put them all in one group by selecting the names of all of the tracks, then selecting “Group . . .” from the Track menu.
Duplicating the playlist
It is always good to create a safety net for yourself when doing semidestructive editing to your tracks. This can be accomplished by duplicating the playlist in Pro Tools so that you can always go back to an unedited version. It will be helpful to duplicate the playlist at the beginning and before starting each phase of using Beat Detective. This way, if you make a mistake, it is easy to copy and paste a previously unedited version on top of your active playlist.
To duplicate the playlist, make sure that the tracks you are using in Beat Detective are in a single group. Click on the triangle to the right of one of the track names and select “Duplicate Playlist.” This will create a duplicate of the playlist so that you can now always go back to the original. The name of the playlist increases the name by.01, so keep track of what playlist you are working on. See Figure 2.7 for an example.
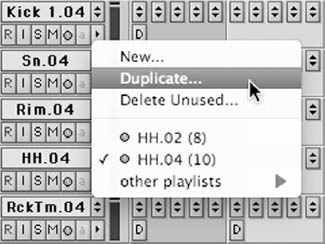
FIGURE 2.7
Duplicating the playlist in Pro Tools.
Creating sections to edit
In much the same way that we created a tempo map from the drummer’s performance in Chapter 1, using four or eight bars at a time, we will use the same smaller sections to correct the timing of the drums here.
The reason to choose shorter selections is that Beat Detective gives you a wealth of options for resolution. You can adjust the resolution from a single bar down to 32nd notes. Since not every measure that the drummer plays will contain the same rhythmic resolution, it is best to break up these sections into the exact rhythm performed in the bar. A simple drum groove may only contain quarter notes or 8th notes, but when a drum fill is played, there can be 16th notes in the bars that contain the fills. Beat Detective will work best when given the most accurate rhythmic information according to the content of the track.
In the example in this book, the tempo of the session is 68 beats per minute. With a slower tempo, inexperienced drummers have a tendency to rush the beat, so the use of Beat Detective will be important in creating a solid and steady feel to the song. Because of the slow tempo, we will be selecting two measures to edit at a time.
Selecting sections works well by separating the two-bar region precisely. This is done by zooming in and placing the cursor right before the first hit of the kick drum as it hits right on the downbeat.
Selecting the region for editing
When you run the “Region Separation” phase of Beat Detective, it will automatically separate the region for you; however, it can be helpful to manually select the beginning and end points of the measures you are working with in small chunks to keep track of the small sections as you work through the session.
In Figure 2.8, you can see that the region has been manually separated at the beginning of bar 70, where the drums begin. The region can be manually separated by pressing “Command-E” (Mac) or “Control-E” (PC). If single-key shortcuts are enabled, simply pressing “B” will create the appropriate edit.
FIGURE 2.8
The drum tracks’ regions have been separated precisely before the first transient.

The beginning of bar 72 is then separated in the same way so that we have the exact two bars selected that the drummer played. Now we want that section to conform in time to the same corresponding four bars in Pro Tools.
In Figure 2.9, you will see the region for the two bars, as performed by the drummer, separated but not edited yet. Make sure those regions are selected by double-clicking in the middle of the separated region. From this section, we can either manually enter in bars 70 and 72 for the Start Bar and End Bar, or we can take the highlighted tracks and click on “Capture Selection.”
To begin the editing process, we will need to make sure that “Region Separation” is selected under “Operation” on the left (Figure 2.10). Upon listening to the track, determine the shortest rhythm that is contained in the performance. Beat Detective will be more accurate with the longest timing selection that is used in the performance.
FIGURE 2.9
Two measures of the drum tracks have been separated.
Tabbing to transients
Pro Tools has a “tab to transients” feature that you may be tempted to use, as it will advance the cursor to the next transient that it detects. Even though this is given as an option, it is more accurate to do this manually, as “tab to transients” can place the cursor in the middle of the transient, and you will usually want to place your edit point right before the transient.
FIGURE 2.10
Selecting the Region Separation operation in Beat Detective.
Selecting the appropriate resolution for selection, analysis, and separation
After you have the appropriate measures separated and selected, it is now time to get Beat Detective to automatically separate the regions (Figure 2.11).
In this selection you can see that the two bars contain 16th notes, so we will select “Contains” and set it to 16th notes. Any setting shorter than that can identify mistimed 16th notes as being 32nd notes. Additionally, if the selection contains 16th notes, and you have selected that it only contains 8th notes, then Beat Detective can possibly identify 16th note transients and place them on an 8th note beat when it comes time to conform.
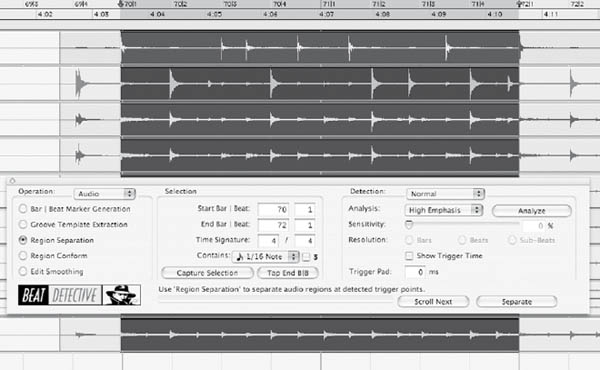
FIGURE 2.11
The two-measure region, ready to be analyzed and separated.
Choosing the detection method
On the right side of the Beat Detective window, you will see three potential options under the “Analysis” selection: “High Emphasis,” “Low Emphasis,” and “Enhanced Resolution.” Selecting either high or low emphasis will focus on either high or low frequencies, respectively. “Enhanced Resolution,” found only in Pro Tools 7.4 and higher, has a more complex method of analysis and should be used as your default setting when editing drum tracks with Beat Detective.
Analyzing the audio
Once you have the settings and selection that you need when using Beat Detective, the software will need to analyze the audio, and then you can adjust the sensitivity and resolution accordingly. This is done by pressing the “Analyze” button, and the previously grayed-out sensitivity bar and resolution buttons will become active.
Adjusting the sensitivity for the material
You have the choice in adjusting the sensitivity of Beat Detective by selecting the appropriate option under the detection menu. The sloppier the performance, the higher you are going to want your resolution to be. There are three choices for setting the resolution of Beat Detective.
1. The first is using “Bars,” which will place a thick indicator, called a beat trigger, over the selected audio-denoting bars. If you are looking to just tighten up the downbeat of each measure, without affecting the beats in the middle of the bar, then select “Bars.”
2. The second choice is “Beats,” which will allow Beat Detective to add quarter notes, in addition to bars. These are denoted by a thinner line than the bar triggers, which makes it easier to visualize where Beat Detective will separate the regions.
3. The third choice for resolution is “Sub-Beats,” which will then include 8th notes through 16th notes, depending on the selection you have chosen from the “Contains” menu.
After you have selected the appropriate resolution for your selection, you can bring the sensitivity slider up until you see all of the beats in the performance selected with a beat trigger. If you are not seeing all of the beats indicated by Beat Detective, then you may need to choose a smaller selection.
If you have the “Show Trigger Time” button selected, you will see what beats that Beat Detective is identifying the transients to be. These numbers are in the form of Bars | Beats | Sub-Beats, with the Sub-Beats being shown as Pro Tools’ MIDI resolution. This MIDI resolution indicates what type of sub-beat is being identified on a scale of 960 ticks per quarter note. If Beat Detective is showing 480 ticks, then it is indicating that it identifies that sub-beat as being an 8th note. A display of 720 ticks would indicate that Beat Detective is identifying that beat as being the fourth 16th note of that particular beat.
Accurately selecting the sensitivity
In general, the lowest that you can bring the sensitivity slider up to where you can see all of the bars, the more accurate it will be. There may be a point when you keep raising the sensitivity, and you will see all of the bars and beats jump to an inaccurate portion of the performance. Increasing the sensitivity will detect softer transients such as hi-hat hits.
In Figure 2.12, you can see that with a sensitivity setting of 19 percent, all of the beats, bars, and sub-beats have been identified. If you look at Figure 2.13, you will see that raising the sensitivity higher, up to 71 percent, indicates that it is inaccurately picking up a 16th note in the decay after the downbeat of the second bar. This can create an audible glitch to the sound after everything has been snapped to its new accurate location.
At this point, it is good to play back the selection to make sure that the beats that you are hearing in the drum parts are indicated by Beat Detective before separating the regions. If everything sounds correct, then press “Separate,” and Pro Tools will put edits in all of the regions that it has indicated, and it will adjust them to the correct timing.
Adjusting the beat triggers
The beat triggers that Beat Detective places in the selected region, once the sensitivity has been raised, can be edited. If there are false triggers placed in the selection, those can be deleted by using the Grabber tool and Alt-clicking (PC) or Option-clicking (Mac) them. In turn, if the transients are not detected as accurately as you may want, you can move the beat triggers by using the Grabber tool and dragging them left or right to the beginning of the transient.

FIGURE 2.12
The region separation markers accurately detecting the beats.
Conforming the regions
After Beat Detective has placed edit points on all of the beats that you are wishing to correct, it is then time to move on to the Region Conform operation by clicking on that button on the left screen (Figure 2.14). Here we have a new set of options on the right side of Beat Detective’s window. With “Conform” set to “Standard,” which is the correct setting for timing correction, you will see three sliders.
DETERMINING HOW MUCH TO CONFORM
If you want precise accuracy to the drum parts, check the “Strength” box and slide it all the way up to 100 percent, leaving the “Exclude Within” and “Swing” boxes unchecked (Figure 2.15). This will move the separated regions precisely to the tempo map. If you want to maintain some of the tempo fluctuations, you can lower the strength as you see fit.
MAINTAINING SOME OF THE PERFORMANCE
It should be noted that, if you use a setting lower than 100 percent, any sequencing will follow the tempo map and not the drummer’s performance. If you want to maintain some of the imperfections and still have loops follow the drummer’s performance, you will need to adjust the tempo map according to the performance after all of the timing corrections have been made. This is explained in detail in Chapter 1.
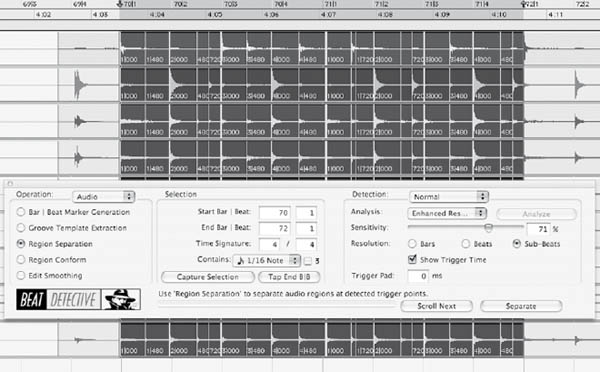
FIGURE 2.13
The region markers have a few noticeable inaccurate detections, due to an increased sensitivity.
THE FINAL CONFORMATION OF THE REGIONS
When you are conforming the selections, the edited selections are moved to their new precisely timed location. In Figure 2.16, you will see that the regions have been conformed. This is a good time to listen to the drum parts with the click track added to the mix so that you can hear if everything has been conformed accurately. You will hear the sounds cut out in the spaces where Beat Detective has created gaps by shuffling the regions around. Do not worry about this, as this will be cleared up in the “Region Conform” stage of using Beat Detective.
FIGURE 2.14
Selecting the Region Conform mode of operation.


FIGURE 2.15
The conforming strength set to 100 percent for maximum accuracy.
CONTINUING ON WITH BEAT DETECTIVE
Now that you have successfully edited the drum parts for a small section of the track, move on to the next small section throughout the piece. Do not use the “Edit Smoothing” feature until all of the regions have been separated and conformed.
After you have edited this first section, the remaining sections are much easier, as Beat Detective keeps the settings of “Region Separation” and “Region Conform.” You may need to make slight adjustments to the sensitivity slider and resolution in a few places, but most similar sections should be easily edited.
SELECTING THE NEXT SET OF BARS
Since we separated the beginning and end of the first Beat Detective regions, the end region is now the first region edit of our next section. We just need to place a region separation at our next chosen end point and continue on, using the same process that we did in the first section.
After the first region separation and conforming, the process will go much faster. After selecting the end point for the next section, double-click in this new section, so that it is all highlighted in Pro Tools, and click “Capture Selection” in Beat Detective. This should have adjusted the Start Bar | Beat and End Bar | Beat appropriately, but double check to make sure.

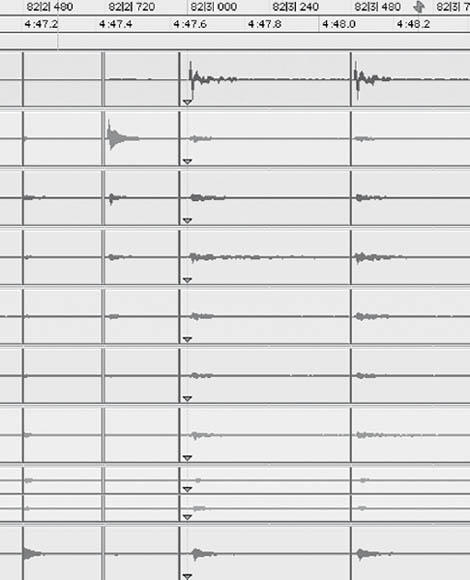
FIGURE 2.16
The separated regions have been conformed at 100 percent strength, with gaps between the adjusted regions.
Continue on with the separation and conforming as you did before until you reach the end of the drum tracks that you are using Beat Detective on.
A NOTE ABOUT CONFORMING
Sometimes when conforming regions with Beat Detective, it will shift the last region to the right, which will cover up the transient of the downbeat of the next bar. This happens when the drummer is ahead of the beat. This is easily rectified by using the Trim tool on the unedited track and trimming the unedited region on the right to the left until you see the transient of the downbeat for the next bar.
As you can see in Figure 2.17, the transient downbeat is covered up by the conformed region at the beginning of bar 74. In Figure 2.18, the transient on the right has been brought back by trimming the region on the right over until it has reappeared.
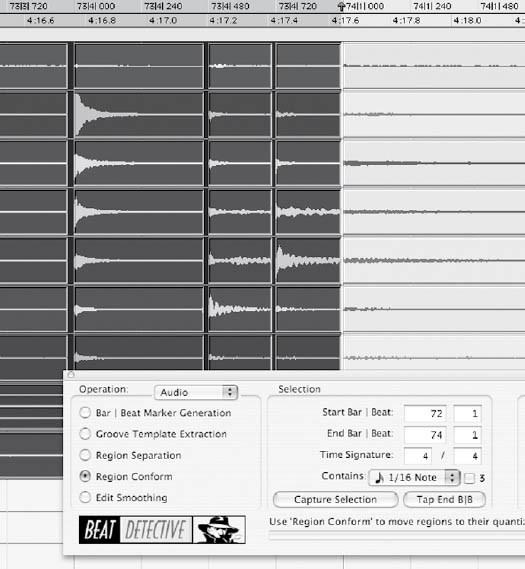
FIGURE 2.17
The transient for the downbeat of bar 74 has been covered up by the conformed regions.
FIGURE 2.18
The transient for bar 74 has been revealed using the Trim tool to drag the start earlier.

LISTENING TO THE NEWLY CONFORMED TRACK
After you have run Beat Detective across the entire track, make sure that you have listened to it to make sure that everything has been adjusted accurately. If there is a bar that does not sound quite right, you may need to individually correct the timing of that bar. This is where the duplicated playlist comes in handy. You can easily paste an unedited bar into the newly conformed playlist.
In order to do this, select the correct playlist number, which will then select all the tracks in the group and adjust them to that playlist as well. Next, highlight the bar that you want to paste over the newly conformed track, and go to “Edit and Copy.” This will put the selection into the clipboard. Be sure you do not click anywhere else in the timeline after this.
Select the playlist with the conformed tracks. You will see that the same section has been highlighted. You can just go to “Edit and Paste,” and that portion of the original playlist will fall onto the new one.
FIGURE 2.19
A previous unedited playlist has been pasted on top of a section previously edited with Beat Detective.

In Figure 2.19, you can see the unedited version pasted into the conformed version. This gives you the ability to always go back to an unedited version if you ever change your mind in the future about having used Beat Detective to do the edits.
Edit smoothing
Before you move on to any edit smoothing, this is another good time to duplicate the playlist of the conformed tracks, so now you have three versions of the drum tracks: an unedited version, a conformed version, and a smoothed version.
Edit smoothing consists of only two choices: “Fill Gaps” and “Fill and Crossfade.” When selecting “Fill and Crossfade,” you will also have the option to adjust the crossfade length in milliseconds.
FIGURE 2.20
Selecting “Fill and Crossfade” for the edit smoothing operation.

SELECTING THE ENTIRE REGION
Make sure that you have not put any crossfades in the middle of the conformed tracks. Beat Detective will not perform its smoothing operation if there are any crossfades, because the smoothing operation will adjust the boundaries of the regions, and crossfades have no additional boundaries to adjust.
“FILL GAPS” VERSUS “FILL AND CROSSFADE”
Selecting “Fill Gaps” will adjust the boundaries of all of the regions so that they touch the next adjacent region. This will eliminate the dropouts that you hear when there are no regions in between some of the transients, due to the audio that has been moved.
The second selection of “Fill and Crossfade” will additionally place a short cross-fade with the length of your choosing at each of these region edits. This can create issues when transients are crossfaded into another transient, creating a false hit, so be sure that you listen to the track right after you have smoothed them.
The first thing you can do is to try and fill gaps without crossfading them. This will give you the ability to make sure that there are no false double transients. If the drummer’s performance is way off, there is the possibility of these false transients showing up in the smoothed version that you did not hear in the conformed version. You can eliminate these false transients by manually adjusting the edit with the Trim tool.
After you fill the gaps, you can optionally try to crossfade them as well, using the “Fill and Crossfade” feature, as it will only add the crossfades after the selection has already been filled.
FILLING THE GAPS
Filling the gaps is a quick process. Make sure that you listen to the tracks to confirm that there is nothing wrong with the adjusted regions.
In Figure 2.21, you can see the drum tracks that have not been smoothed. In Figure 2.22, you will see that the gaps between the regions have been smoothed by having their boundaries adjusted.

FIGURE 2.21
Regions separated and conformed, but not yet smoothed.
FIGURE 2.22
The conformed regions have been smoothed, eliminating any gaps between regions.

CROSSF ADES
Adding a crossfade to the selection actually writes a new audio file that consists of that crossfaded region. This saves processing by eliminating the need for the software to perform the crossfading in real time and takes up only a little bit of hard disk space. Crossfading can eliminate any pops and clicks that you may hear due to non-zero-crossing edits of the audio.
Choosing to use the crossfade feature requires listening to the sound to see if it smoothes the sound out better, or if it is creating more artifacts, with the added bonus of making the sound smoother. If you are using the crossfade, you have the option of pasting in an unsmoothed version from the previously used playlist in order to eliminate any artifacts.
Choosing a very small crossfade length such as 1 ms will have less of a chance to blend in a false transient, but it will eliminate any pops and clicks that may arise from conforming the regions.
In Figure 2.23 of the same selection, the crossfade feature was added to the same previous selection. You can see the very small crossfades that are over each of the edit points.
Consolidating the edited tracks
Once you have run all the phases of Beat Detective and there are no artifacts to the audio, you can choose to consolidate the selection. Before you do this, be sure that you duplicate the playlist so that you can always go back to this version in case you missed an added false transient, or the track is not smoothed the way that you want.
FIGURE 2.23
The conformed regions with a 1-ms crossfade added in between.
Consolidating the tracks rewrites all the selected audio into a continuous audio file. Since Beat Detective generates hundreds of edits and crossfades, there are many files that Pro Tools is trying to read in real time as you play through the track. This will take up processing as well as bandwidth reading from your hard drive. Consolidation is the solution to this issue.
In order to consolidate the tracks, highlight all the contents from beginning to end. Go to the Edit menu and select “Consolidate,” and Pro Tools will begin consolidating all of the highlighted audio regions. Since this is writing new audio tracks, it will take up more hard disk space and will add additional files to your Audio Files window.
Speeding up the beat with Beat detective
One of the more interesting tricks that you can do with Beat Detective is to use it to adjust the speed of a performance.
An easy thing to do is to take a two-measure selection and convince Beat Detective that it is a one-measure selection. In this example, we will use the first two measures that we originally applied Beat Detective to. When going to the Region Separation operation, tell Beat Detective that the End Bar | Beat is bar 71, even though you have through bar 72 highlighted.
In Figure 2.24, you will see that the “Contains” has been adjusted so that it halves the length of the previous resolution from 16th notes to 32nd notes. This is because we are going to trick Beat Detective into thinking that these two bars are actually one bar.
Go through the analysis and separation like you did before. You may need to increase the sensitivity and do some manual editing of the beat triggers if you are going to try and capture the softer hi-hat notes. Then conform the selection as you have done previously.

FIGURE 2.24
Forcing Beat Detective to recognize a two-measure selection as one measure.
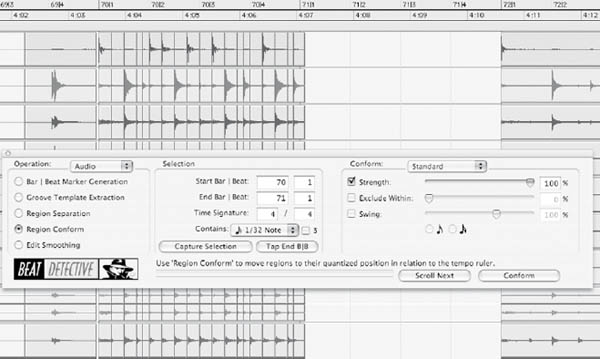
FIGURE 2.25
The two-measure selection has been separated and conformed onto one measure.
In Figure 2.25, you will see that now we have the time-compressed version, but rather than using a time-compression algorithm, Beat Detective has simply doubled the performance through the use of edits to the regions.
This can be an interesting way to accomplish time compression. The sounds can come across as being gated, as the decays are being cut off with each subsequent edit in an unnatural way; however, this can be one of the more interesting sound design methods in your toolbox.
ELASTIC TIME
Elastic Time is one of the main features of Digidesign’s Pro Tools 7.4. It allows for the manipulation of time and pitch through the use of various selectable algorithms. It has some of the same functionality as the time-compression and -expansion algorithms; however, it works in real time, which allows for nondestructive adjustments to be made in the audio tracks.
The two most powerful editing functions of Elastic Time that can be used in record production are the alignment of timing of vocals or other pitched instruments, and the correction of the drum and percussion tracks. It may seem redundant to use Elastic Time to correct the drums when you have the use of Beat Detective, but it merely becomes a different tool at your disposal.
Beat Detective works differently than Elastic Time. Beat Detective automatically splices and aligns audio based on the transients detected. Elastic Time is able to stretch and compress the audio based on detected transients. This has the advantage of allowing you to not worry about crossfades and extra transients being created through the smoothing process in Beat Detective.
Elastic Time has different means of analyzing audio. In order to make the most out of Elastic Time, selecting the appropriate algorithm is important. Since Elastic Time functions in real time, it uses up processing for each of the tracks on which it is applied. In essence, it is an optional real-time plug-in with the option of rendering the performance as audio files on your hard drive so that you are not taxing your computer processing unit (CPU).
FIGURE 2.26
Selecting the different algorithms for Elastic Time from the Edit window.

There are three main algorithms in Elastic Time that are used to correct and adjust timing: polyphonic, rhythmic, and monophonic. There is also a varispeed algorithm that can create different effects on the audio by speeding up and slowing down the audio based on the tempo changes of the tempo map in relation to the warp markers.
Engaging Elastic Time is as simple as clicking a selector tab underneath the track’s name at the bottom of each track in the edit window. In order to best use Elastic Time, you need to select the algorithm that is best suited for your material (Figure 2.26).
Elastic Time algorithms
POLYPHONIC MODE
The polyphonic algorithm is best suited for tracks that have more than one note playing simultaneously. This algorithm is useful on guitar or keyboard tracks.
RHYTHMIC MODE
The rhythmic algorithm is best suited for drums and percussion. It will keep the transient attacks intact while still being able to manipulate and stretch the audio. This algorithm would not be the best choice for any specifically pitched audio.
MONOPHONIC MODE
The monophonic algorithm will work on a track that has only one note playing at a time. This is best suited for lead and background vocals or individual horn parts.
VARISPEED MODE
The varispeed algorithm will create special effects to the audio. When the audio is being stretched, Elastic Time will slow down the audio track as if it were an analog tape machine. When the audio is being compressed, the sound will be pitched up.
Analyzing the audio track
Elastic Time, once engaged by selecting an algorithm, will then analyze the audio on the track. If there are multiple tracks in a group it may take some time for Elastic Time to complete its analysis. The track will be grayed out until the analysis is complete.
This analysis does not analyze the frequency content of the audio track, rather it merely analyzes the track for transients. This is used if you are specifically going to quantize the track to the tempo map.
WARP VIEW
Once an algorithm has been selected and the audio track has been analyzed, you now have the option of switching to view the track in warp and analysis view (Figure 2.27). Looking at the track in warp view, you now have the ability to insert warp markers, and can now go about stretching and compressing the audio.

FIGURE 2.27
Adjusting the view of the track to create and edit warp markers.
Aligning vocals using Elastic Time
Anytime you are recording with multiple vocal tracks, there may be a time in which you will need to align either background vocals or a doubled vocal part to the lead vocal. Elastic Time makes a great tool for manually adjusting the timing of these vocal parts to the lead vocal.
In order to align vocal parts using Elastic Time you will need to insert warp markers. If you are editing a track in the warp view, you can either select the Pencil tool and add them in manually or use the Grabber tool and Start-click (PC) or Control-click (Mac). It is easiest to use the Grabber tool, as this is the same tool that is used to drag the warp markers in warp view. Additionally, warp markers can be deleted by simply pressing the Option key and clicking on the warp marker with either the Pencil tool or the Grabber tool.
Elastic Time will stretch and compress any audio on either side of the warp markers. A good habit to get into would be to place a warp marker at the beginning and end of the selection that you are adjusting. This will prevent Elastic Time from compressing or expanding the entire audio track (Figure 2.28).
When using Elastic Time for vocal manipulation, it is best to go and edit the vocals phrase by phrase. Placing a warp marker at the beginning and end of each phrase or note will allow for just the time compression and expansion of those individual phrases (Figure 2.29).
FIGURE 2.28
Inserting warp markers before and after a selection to prevent accidental adjustment of regions to the left and right.
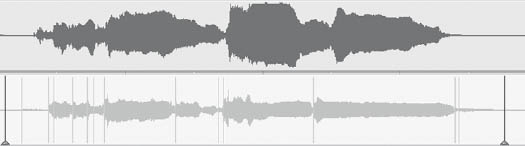
FIGURE 2.29
The warp markers placed at the beginning and ending of each phrase.
After the markers have been placed, select the Grabber tool. From here, it is merely a matter of dragging the markers in such a way that they will line up the beginning and ending of each of the notes or phrases. You may find that you may need to add an extra warp marker in a few locations to get the timing to be exactly what you want. See Figure 2.30.
Using Elastic Time to quantize drum parts
Elastic Time has the ability to effectively quantize drum parts in much the same way that you would quantize MIDI tracks. Pro Tools will analyze the drum parts for transients and then align the transients to the grid based on the resolution that you choose. This works only if the tempo map is accurate to the recorded tracks. If you recorded to a click track from inside Pro Tools, then the tempo map will match up with your editing.

FIGURE 2.30
The warp markers have been adjusted to make the doubled vocal match the original.
Sample-based tracks versus tick-based tracks
There is a difference between working with MIDI tracks and audio tracks in your DAW. MIDI tracks contain only data and no audio, while the audio tracks are all sample based. When making tempo changes in Pro Tools, MIDI tracks will follow the tempo changes while the audio tracks remain fixed in their location in the timeline.
Since Elastic Time has the ability to compress and expand audio tracks, it now has the ability to expand and contract those tracks to follow any tempo changes that you may make. In essence, this means that you can treat audio tracks in the same way as you treat MIDI tracks. You gain the ability to quantize the parts in the same way as you would quantize MIDI data.
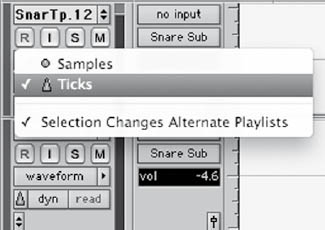
FIGURE 2.31
Selecting the track to go from sample based to tick based.
In order to get the audio tracks to function the same way as MIDI tracks, you need to change the audio tracks from sample-based tracks to tick-based tracks. This will lock the audio data into their bar locations as opposed to their position in the timeline. The audio between transients will then be compressed or expanded to adjust to the tempo changes. To switch a track from sample based to tick based, click on the box below the view in the Edit window of the track and change your selection appropriately (Figure 2.31). With all the drum tracks in a group, you can switch them all at once.
Engaging Elastic Time
To engage Elastic Time, all you need to do is select the rhythmic algorithm in order for it to begin its analysis. Once all the tracks have been analyzed for their transients, the initial quantization of the parts becomes easy. Throughout the course of correcting the time in the drum tracks, you will find it helpful to turn on a click track so that you can make sure that any quantization done is accurate.
QUANTIZING THE DRUM TRACKS AS EVENTS
As with any editing process, duplicate the playlist of the drum tracks so that you can always go back to the starting point. To begin quantizing the drum tracks, start by switching the view to “Analysis.” From here you will see that Elastic Time has placed black markers on any of the transients that it detects (Figure 2.32).
Once you have the selection highlighted that you want to quantize, go to the Events menu and select “Event Operations” and then “Quantize” (Figure 2.33). This will treat these tick-based tracks similarly to the way that Pro Tools treats MIDI tracks.
FIGURE 2.32
Transients detected by Elastic Time as black lines.

FIGURE 2.33
Selecting “Quantize” from the Events menu.

The “Event Operations” window will then give you the same options that it does if they were MIDI tracks. Select the quantized grid based on the drummer’s performance and then the strength of the quantization. You have the option of not quantizing it 100 percent to the tempo map; however, if you want a very precise performance, increase the strength as high as you feel comfortable (Figure 2.34).
FIGURE 2.34
Quantize settings for Elastic Time to snap the audio to the nearest 16th note.

MANUALLY ADJUSTING ANY QUANTIZING MISCALCULATIONS
Once you have applied the quantization across the tracks, Elastic Time places warp markers and adjusts those warp markers according to the tempo map (Figure 2.35). You will find that Elastic Time may not be 100 percent accurate over the entire performance, and you may need to correct a few single hits here or there. Switch to view the tracks in warp, and you can now make the annual adjustments as necessary.
Making corrections to the quantization using Elastic Time is very easy to do. Correcting these errors is merely a matter of manually removing and placing a new warp marker (Figure 2.36). Warp markers can easily be deleted by selecting the Grabber tool and Option-clicking on the misplaced warp marker.

FIGURE 2.35
The warp markers have been moved after quantizing the tracks.

FIGURE 2.36
Warp markers that have missed the transient and need manual adjustment.
FIGURE 2.37
Warp markers that have been adjusted to be on the kick drum hit, and then manually snapped to the correct beat.

Control-clicking, while still in the Grabber mode, will create the new warp marker that you need to correct the quantization. In order to lock the new hit on time, switch Pro Tools from Slip mode to Grid mode, making sure that the grid is set up to the appropriate resolution of the beats as necessary. This will make the newly created warp marker snap to grid when you drag it to its corrected location (Figure 2.37).
Rendering the audio files
Depending on your computer’s processing, you may find that running Elastic Time across several tracks may use up too much of your computer’s CPU power. Elastic Time makes it easy to compensate for this by rendering the tracks as opposed to processing them in real time.
Rendering tracks will rewrite the audio files with the warp adjustments. This will add audio files to your hard disk but save in processing (Figure 2.38). Rendering the audio files is best done after you have completed all of your major editing of the warp markers. While in rendered mode, you still have the ability to manipulate warp markers; however, each adjustment you make will cause Pro Tools to rerender each of those tracks. This may not be suited for a situation where you are trying to work quickly, but it is not a big deal if you are only going to need to make a few adjustments to the warp markers.
After you have done several corrections using Elastic Time, if you turn off Elastic Time from the tracks, Pro Tools gives you the option of committing those warp markers to the audio tracks. Unless you are completely done with the project and are archiving the recording, it would be best to keep the tracks in rendered mode so you can still make adjustments easily up until the very end.
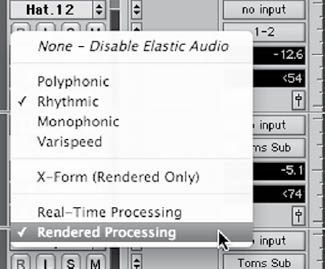
FIGURE 2.38
Selecting “Rendered Processing” to write the audio file and save the computer’s CPU.
A FINAL WORD ABOUT TIMING CORRECTION
Correcting any timing issues is important to do before moving on to other production techniques. Since everything will be based on the rhythm of the basic tracks as well as the overdubs, imperfections and timing will have a cumulative effect on the recording. If the overdubbing is taking place on top of mistimed drums or other instruments, it becomes more difficult to recognize whether these overdubbed parts are in time with the track.