As soon as you add features to your application that are meant for privileged or registered users, you need some kind of authentication system. This is how users log in to their account on your application, prove that they are who they say they are, and are given privileges that anonymous or unregistered users don’t get. In this chapter, we put together a relatively simple, yet secure, authentication system for our sample guestbook.
There are two primary goals for any user authentication scheme:
• To ensure that users actually are who they say they are (or are actual humans rather than automated scripts)
• To ensure that users have the ability to access the resources they are entitled to and are denied access to resources for which they do not have sufficient privileges
These are actually two separate functions. User authentication ensures that users are who they say they are. User authorization gives authenticated users access to the resources to which they are entitled. Functionally, we accomplish both within the same system, so for simplicity we’re lumping them together under one term.
Web developers use a variety of tools to accomplish these two goals. The most common, and the tool that you probably think of first when considering user authentication, is the username and password combination. What makes this combination so ubiquitous and so useful is the fact that it is a relatively hassle-free test for the user, yet it can provide a strong element of security to an application.
The username and password scheme falls into the category of authentication commonly known as “what you know.” It relies on knowledge that—theoretically—only a unique individual would know. Of course, this security system relies on users to keep their passwords secret and unguessable. We’ll go into more detail on how to choose secure passwords later in this chapter.
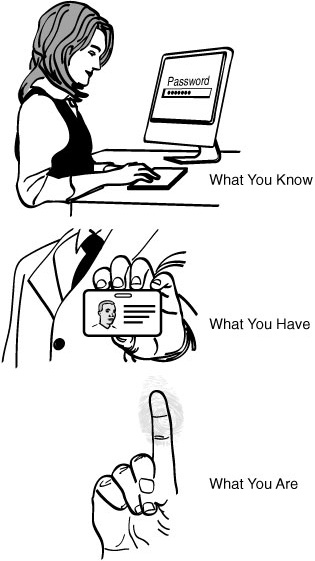
Other authentication methods, such as security badges, swipe cards, and VPN tokens, fall into the category of methods based on “what you have.” They rely on the individual being in possession of a specific object. These methods are most often used as a secondary security measure, after an individual has already passed a “what you know” test. Used on their own, “what you have” authentication methods are the equivalent of carrying cash. Cash enables you to purchase the items you need (or in the case of a VPN token, access the resources you need) but makes no guarantee that you are who you say you are. There is another security method, based on biometric analysis, generally termed “what you are.” Since both of these methods are almost impossible to implement in a Web application, we won’t spend any more time on them here. Figure 7.1 shows all three types of authentication methods.
There are two main ways for a Web application to authenticate users based on what they know:
• The username and password combination
• Image recognition
We’ll discuss all three types of Web application authentication in the next sections.
You’re already familiar with usernames and passwords; you use them every day when you send and receive e-mail or take cash out of the ATM. The basic concept behind implementing password-based authentication is quite simple: If the username and password combination entered by the user matches what the application has stored, the user is granted access. If the username isn’t one the application recognizes, or the password supplied by the user doesn’t match the one associated with that username, access is denied, as shown in Figure 7.2.

This method works only if the user knows and remembers the password and keeps it secret. The whole thing falls apart if either of those two conditions is not met. Users who don’t know or have forgotten their password will be treated as though they were not entitled to access or privileges. On the other hand, if a user doesn’t keep his or her password secret, the original point of authenticating in the first place is lost, because access will be granted to anyone who knows the user’s password.
We’ll use the ATM concept to demonstrate these two issues. If you forget your ATM PIN, you won’t be able to take cash out of your account without going into the bank and speaking with a teller, who will ask you to prove your identity some other way. The teller will probably initiate the process of resetting your PIN at the same time. The whole process is inconvenient, but not a crisis.
On the other hand, imagine what could happen if you told your ATM PIN to a coworker or a neighbor. Of course, these people are trustworthy and wouldn’t empty your bank account—but what if someone less trustworthy overheard the conversation? Or if your coworker wrote down your PIN and then lost the scrap of paper? The PIN alone probably wouldn’t do a thief any good without your ATM card (the equivalent of your username), but it’s not impossible to find your bank account number and program a duplicate ATM card—or simply steal your wallet.
In an ideal world, we’d like to believe that users will memorize their passwords and keep them secret, but realistically this isn’t always the case. There are two issues you’ll need to deal with when it comes to users and their passwords:
• Lost passwords
• Compromised passwords
Dealing with a stolen, guessed, or otherwise compromised password is pretty straightforward: The compromised password must be changed as soon as possible. However, when a user loses or forgets a password, you’re left with two options:
• E-mail the password to the user, or display it in the browser.
• Reset the password to a random string.
The first option is the least secure, but it’s also the easiest to implement and the most convenient for the user. When users try to access your application and can’t remember their password, they really aren’t all that concerned with security. They just want to be let in. Unfortunately, simply giving the user the password would allow a hacker to type in any username. If that username happened to exist in your application, the forgotten password mechanism would supply the password associated with the guessed username. The strength of the username/password combination lies in the fact that a hacker would need to guess two associated pieces of information. If you hand out passwords anytime users forget theirs, a hacker needs only to know or guess a valid username in order to get access to your application. This is why most programmers require users to provide a secondary piece of identifiable information, such as the e-mail address stored by the application, before they will send a forgotten password.
The more secure way to deal with a lost password is to allow the user to request a reset. When the reset request is received, the system should send a confirmation to the e-mail address on file for that user. This prevents a malicious user from resetting someone else’s password, locking that user out of the application. If the confirmation is returned by the user, the system can then reset the password to a random string and encourage the user to either change the random password to something that’s easy to remember, or memorize the random password.
So far we’ve assumed that the primary goal of user authentication is keeping unknown or unauthorized users out of our applications. We also need to keep out automated scripts that hackers use to create legitimate accounts. Most of the time hackers use scripts to create accounts that will allow them to send spam, so they target applications with some kind of mail feature. How are you, the programmer, supposed to tell the difference between a hacker who creates an account within your application and a legitimate user? Short of asking, “Do you plan to use your account to send spam?” and then trusting the user to tell you the truth, you can’t tell whether any given account was created by a legitimate user or a hacker—except that hackers don’t create one account. They create thousands of accounts, assuming that you’ll probably delete each account once you notice that it’s being used to send spam. And because they use automated scripts to submit your account application form, they can create new accounts a lot faster than you can delete them.
The good news is, there’s a fairly simple way to defeat these automated scripts. You simply require a user to perform a task that is simple for a human to complete, but extremely difficult to automate. The most common of these tasks is the CAPTCHA, or Completely Automated Public Turing Test to tell Computers and Humans Apart. A CAPTCHA requires the user to recognize a series of characters that are tilted, fuzzy, crossed out, or randomly aligned, as shown in Figure 7.3.

The distortion doesn’t really confuse a human reader, but it makes it very difficult for computers to accurately identify the characters.
There are some accessibility issues with CAPTCHAs. Visually impaired people would not be able to accurately identify the characters encoded in the CAPTCHA image and would be unable to access your application. To get around this problem, most programmers who employ CAPTCHAs also include an audio file of the distorted characters. This reduces the effectiveness of the CAPTCHA somewhat, because voice-recognition software is better at filtering out distortion than OCR, or optical character reader, software. OCR is the technology used to try to defeat CAPTCHAs.
Although audio files reduce the security afforded by CAPTCHAs, they are worth including. Any CAPTCHA that is clear enough for a human to read easily has been defeated in tests. However, experience shows that even the simplest CAPTCHA, with virtually no distortion at all, eliminates the vast majority of problems caused by automated scripts. How is even the most insecure CAPTCHA so effective? It works because there are so many applications that don’t implement any kind of CAPTCHA at all. Remember, hackers—especially spammers—are fundamentally lazy. They focus on the quick, easy targets. If you use CAPTCHAs, you make the account creation process slightly more difficult for human users and significantly more difficult for a hacker to automate. Odds are, the hackers won’t bother. They’ll move on to an easier target.
There are several off-the-shelf CAPTCHA libraries available for PHP through PEAR, the PHP Extension and Application Repository at http://pear.php.net. If you’re not familiar with PEAR, read the introduction to PEAR in the Appendix.
The concept of user privileges is based upon restricting access to functionality within the application to various classes of users. Most applications have two classes of users:
• Visitors, or anonymous users
• Registered and authenticated users
Some applications also support a third class of administrative users who have access to back-end maintenance functions within the application.
Most visitors to any Web site are anonymous. They come looking for information and don’t need to access any kind of privileged functionality. The guestbook application we are developing in the course of this book is a good example of this. In most cases there is no real need for a user to become authenticated. We don’t need to restrict access to the capability to post to the guestbook—in fact, we want to encourage visitors to leave a message, so we’ll make it as simple as possible. Most people won’t spend the two or three minutes it takes to register on a Web site just to leave a simple guestbook message.
For purposes of demonstration, we’re going to add some special privileges to users who create an account in the guestbook application, and we’ll add an administrative area. Note that if you plan to ask visitors to register, you have to offer them something worthwhile in return, as well as plenty of assurances that your application will keep their information secure.
In the guestbook application, we will add administrative functionality that we don’t want the average visitor to see. Administrative users will be able to edit and delete posts and perform basic database maintenance. Clearly, allowing an anonymous user to edit or delete posts is a bad idea. This is one case where we need to determine which functions a user can access, based on what type of user he or she is.
Now that you know why you may want to ask Web site visitors to prove their identity, let’s move on to ways you can verify the information they provide.
The simplest way to store username and password information in an Apache Web Server is in an .htaccess file. This method is based on directory access restrictions in the UNIX (and its descendants, Linux and Mac OS X) operating systems. In order to give a user access to a particular directory, the system administrator would place the username and password in a text file named .htaccess. When UNIX machines started being used as Web servers, administrators kept using this system to control which users could access certain parts of a Web site. Restricted areas of a Web site were placed in separate physical directories, each with its own .htaccess file.
This method is still in use, although it’s not the best choice. It restricts the design of the Web site, because restricted areas must be sequestered in their own directories, and it is very difficult to maintain the list of users as the Web site grows. Every time a new user registers, a username and password must be manually added to the appropriate .htaccess files. This can get cumbersome fast if you have dozens or hundreds of new user accounts every day. It also slows the server down, because every time a user requests a page from your site, the server has to check for an .htaccess file. If it’s not there, the server travels up the directory tree until it either finds an .htaccess file or hits the top level of the Web root directory.
Managing access in an IIS environment utilizes the built-in Windows users, groups, and permissions. To create a secure Web site, we will need to create a Windows user for every Web user. Controlling all of those users can get difficult, so it is recommended that you create a group, so that you can manage that group’s permissions and add users to it as needed.
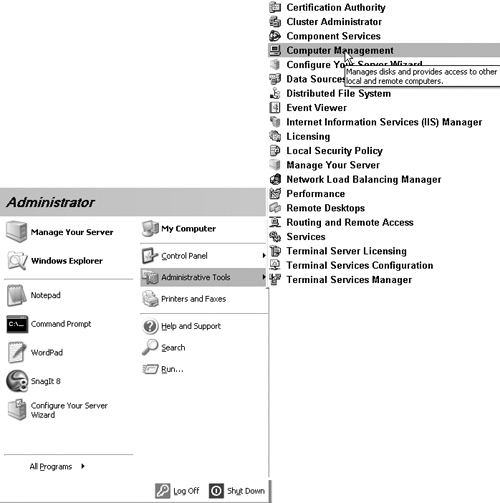
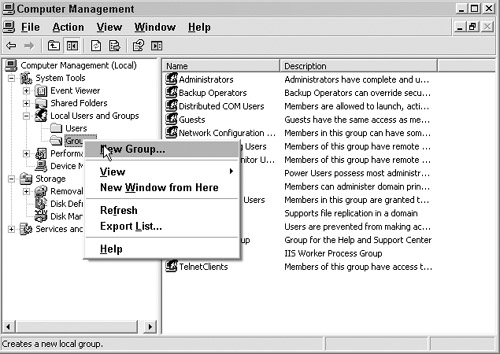
To create a group, open Computer Management in the Administrative Tools folder, as shown in Figure 7.4.
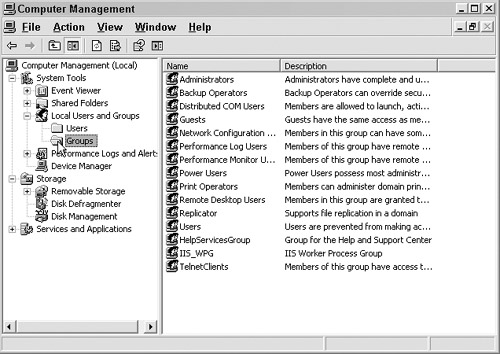
Open the Groups folder under Users and Groups, as shown in Figure 7.5.
Right-click on the Groups folder and select New Group, as shown in Figure 7.6.
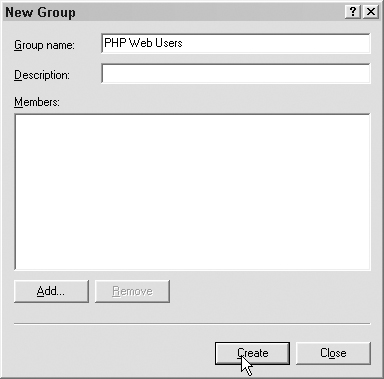
Name the group and click Create, as shown in Figure 7.7.
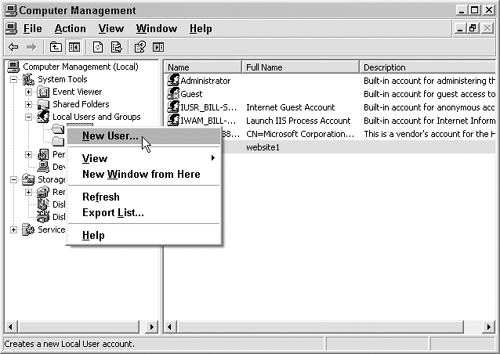
Next, we need to create users. In the same window, right-click on the Users folder and select New User, as shown in Figure 7.8.
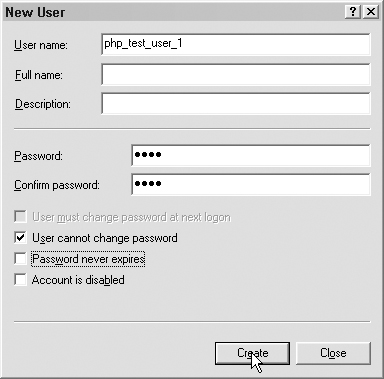
Add all of the relevant user information and click Create, as shown in Figure 7.9.
Some configuration is needed for our new user. Right-click on the user and go to Properties, as shown in Figure 7.10.
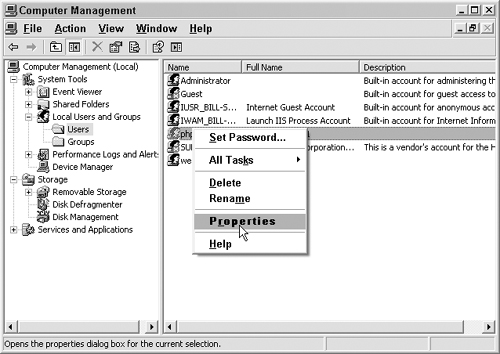
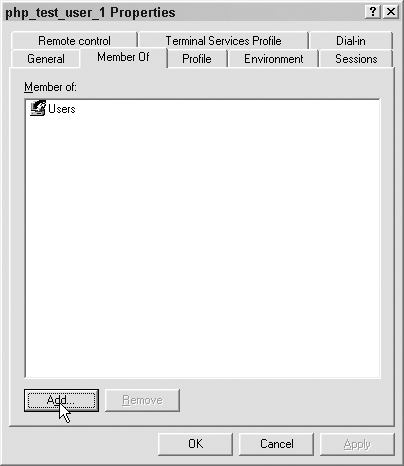
Add the user to the Web group. First select the Member Of tab and click Add, as shown in Figure 7.11.
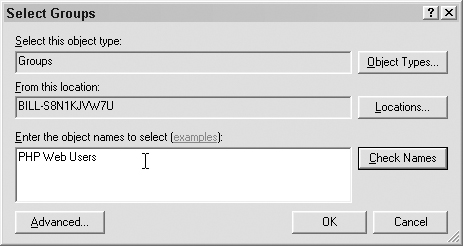
In the window that pops up, type in the name of the appropriate group and click OK, as shown in Figure 7.12.
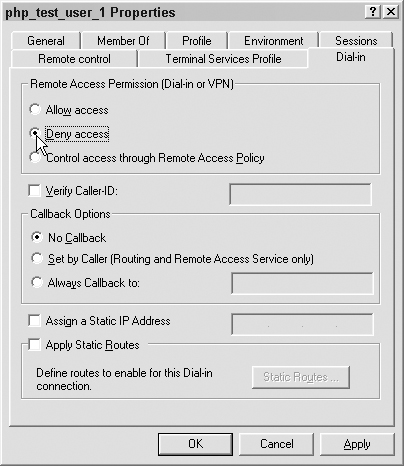
Now we need to restrict the user’s rights a little. We could also remove the user from the “users” group for further restriction, but if you do that, make sure your Web user group has proper access to the Windows directory and PHP directories.
For now, we will leave the user in the “users” group and remove individual permissions that the new Web user shouldn’t have. On the Dial-in tab, select Deny access, as shown in Figure 7.13.
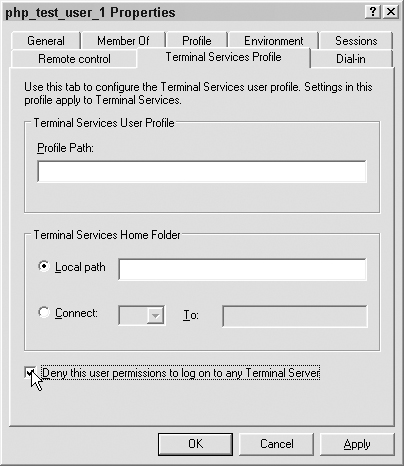
On the Terminal Services Profile tab, check the “Deny …” checkbox, as shown in Figure 7.14.
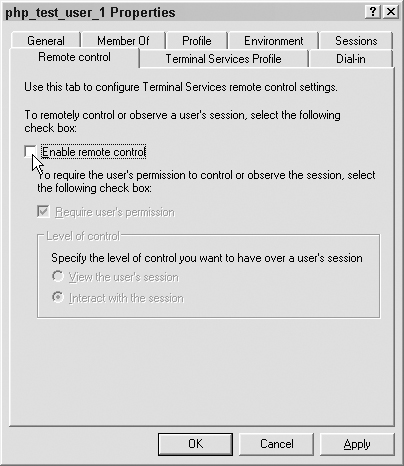
On the Remote control tab, uncheck the “Enable remote control” option, as shown in Figure 7.15.
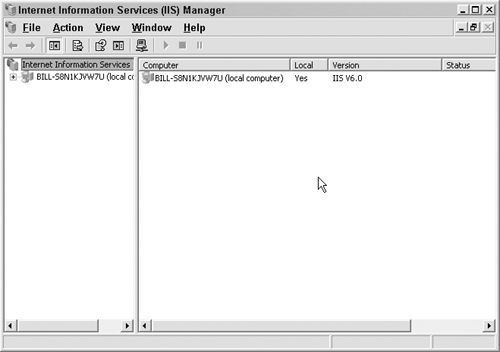
At this point, we have a new user account. Now it’s time to do something with it. Go to Start Administrative Tools and select the IIS manager, as shown in Figure 7.16.
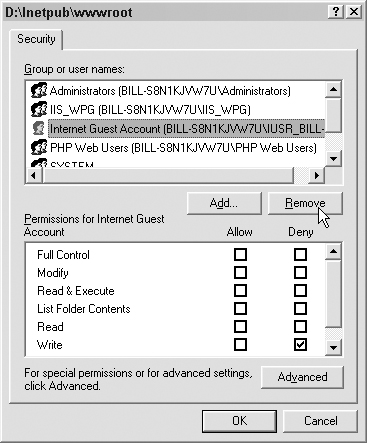
We will discuss creating sites and securing IIS itself in Chapter 12, “Securing IIS and SQL Server.” For now we are just setting up permissions on existing Web sites. Right-click on your Web site and select Permissions, as shown in Figure 7.17.

Click Add to add the group we just created. Depending on the access you want to the site you, may also want to remove the anonymous Web user at this point, as shown in Figure 7.18.
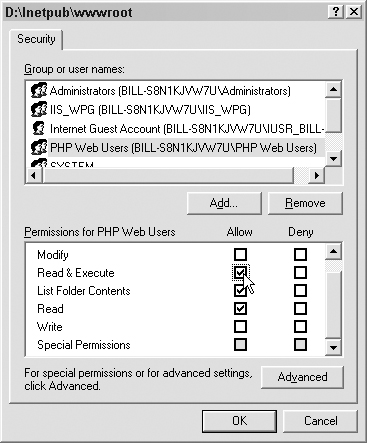
Next, add the permissions appropriate for our group. This works exactly like the folder permissions discussed in Chapter 6, “Filesystem Access: Accessing the Filesystem for Fun and Profit.” In this case, we are adding the Read & Execute permission, as shown in Figure 7.19.
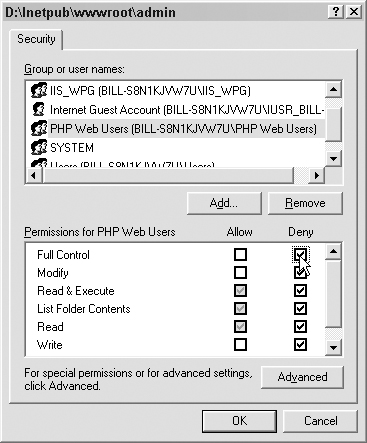
Setting permissions on subdirectories and virtual directories works in the same manner. In our case, we have an admin directory that we want to deny access to, as shown in Figure 7.20.
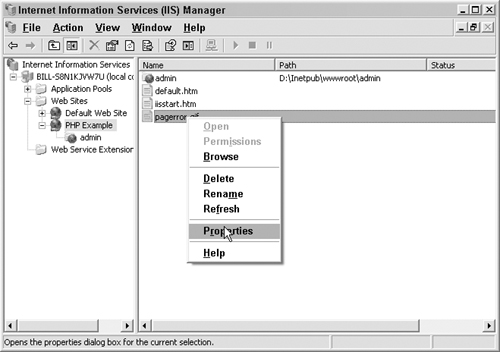
Web file access works a little differently from Windows file access. In the IIS manager, right-click on the file and select Properties, as shown in Figure 7.21.
Navigate to the File Security tab and select Edit under “Authentication and access control,” as shown in Figure 7.22.
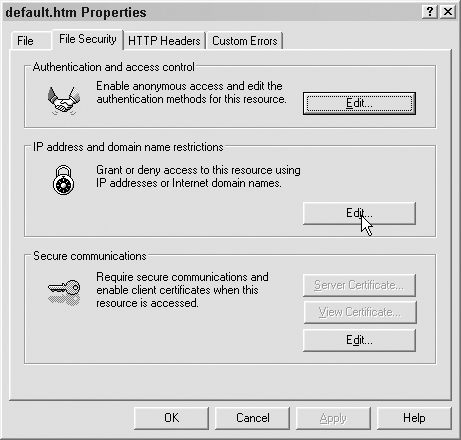
We have a number of options here, as shown in Figure 7.23.
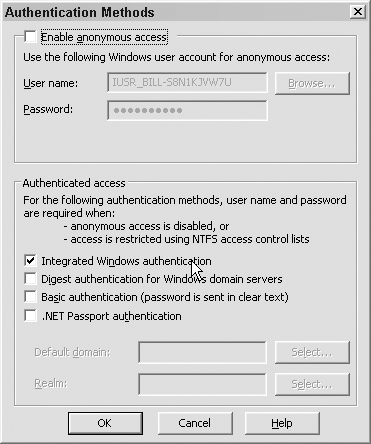
We can enable or disable anonymous access for a specified user. We can also select an authentication type here. The authentication will initiate in only two cases: when anonymous access is turned off, or when the anonymous user doesn’t have access to the file on the filesystem due to the NTFS permissions that we set up earlier. Integrated or digest authentication is our best bet here. Basic will always work, but it sends the password as plain text. This is not an option if we are trying to create secure code. If you do restrict access, remember what we discussed in Chapter 6, “Filesystem Access: Accessing the Filesystem for Fun and Profit,” and set appropriate NTFS permissions for your group on those files.
We can access the filesystem by right-clicking the Web site and selecting Explore, as shown in Figure 7.24.

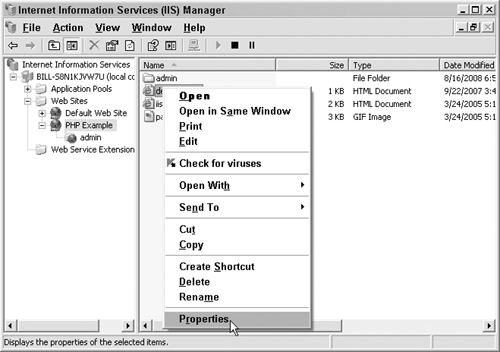
Right-click on the file and select Properties, as shown in Figure 7.25.
Now when the user tries to access your site, he or she will be challenged for a Windows username and password.
As we noted before, as your application’s user base grows, you could end up spending hours each day just creating new users on the server. This is also a security risk, because now you have hundreds or thousands of people who have login rights to your Web server, not just your application.
A more modern approach to storing authentication information is the user database table. In this method, usernames and passwords are stored in a table in the application database, along with any other account information that is unique to that user. When users log in to the application, their usernames and passwords are sent back to the database, which responds with a TRUE or FALSE—either the username and password combination matches an entry in the table or it doesn’t. Note that both the username and password must match the same row in the database for the condition to be true.
This is the method we will demonstrate in the rest of this chapter. The user database for the guestbook application is very simple, with only five columns (see Table 7.1).
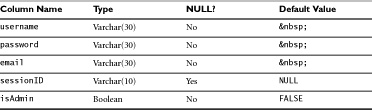
The sessionID column will hold the user’s session information. We’ll cover sessions in more detail in Chapter 9, “Session Security,” but for now it’s enough to note that we’ll need to add sessions to our application because that’s how we’ll keep track of authenticated users as they move around the application. We’re storing the value as the default value in the username, password, and email columns because we’ve decided they cannot be NULL, so we have to store something in those columns. We chose because that will display as a whitespace character in a Web browser.
In this case, we aren’t storing a lot of personal information about the users. We don’t need their addresses or phone numbers for a guestbook. If you need this information, it’s best to store it in a separate table keyed on username. That way your user authentication table is kept small to optimize retrieval time.
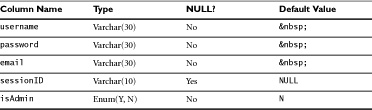
The isAdmin column will hold a Boolean value—TRUE if the user has administrative privileges in the application, FALSE for nonadministrative users. In MySQL, the Boolean data type is actually a synonym for tinyint. Zero is evaluated as FALSE; one evaluates to TRUE. So we could set up the isAdmin column as shown in Table 7.2.
But its meaning is much clearer to us human readers if we use the Boolean data type.
Now that we’ve got our database table set up, we’ll talk about how to store usernames and passwords securely.
Anytime you store usernames and passwords, keeping that information secure is vital. After all, a password that anyone can access and use is hardly worth the storage space.
Encryption is the best way to ensure that your users’ passwords aren’t easily accessible to anyone other than your application. Encryption is the grown-up version of the secret codes we all used as kids. Luckily, you don’t need to understand the gruesome details of how the various encryption schemes work; we’ll leave that to folks with a Ph.D. in computer science. All you need to know is which encryption schemes work best for any given situation and how to put them to use in your application. We’ll cover encryption in more detail in Chapter 8, “Encryption.”
Think of encrypting passwords as a second line of defense, after encouraging users to create strong passwords and implementing database security. If you have administrative control over your database, be sure to read Chapter 11, “Securing Apache and MySQL,” or Chapter 12, “Securing IIS and SQL Server” (depending on whether your Web server runs Windows or UNIX/Linux/Mac).
You can store user data in the most secure, encrypted database on Earth and all your efforts will be a complete waste of time if your users choose passwords that are easy to guess. One user with a weak password can be the gateway for a full server breach. In theory, you would like to enforce strict password security policies with the users of your application. If the application simply won’t accept a weak password and requires users to change their passwords every month, you are guaranteed a certain level of password security. Unfortunately, you are also virtually guaranteed a list of annoyed users who don’t remember their passwords and are frustrated with trying to create new ones that meet your stringent password requirements.
This doesn’t mean you should give up on trying to enforce any kind of password strength. It just means that you have to balance user experience with the importance of the data you are protecting. The information stored in our guestbook is probably not all that crucial. An attack on this application would cause headaches, but not at the same level as if the same hackers attacked a major online banking or e-commerce site. Here is a list of common password requirements—pick and choose the ones that make the most sense for your application:
• Avoid dictionary words, in any language.
• Use a combination of upper- and lowercase letters.
• Use a combination of letters, numbers, and other characters.
• Create passwords of at least six to eight characters in length, preferably more.
• Create a passphrase instead of a password.
Concerning that last requirement, a passphrase is kind of like an acronym. For example, a passphrase might be “I do my best work at 3 a.m.” Take the first letter of each word of the phrase to create a hard-to-guess password that is still relatively easy for the user to remember: “Idmbwa3am.” This method also gives us a combination of letters and numbers, and of upper- and lowercase letters.
The period at the end gives us a non-alphanumeric character; we’ve got a combination of uppercase, lowercase, and numeric characters; and our resulting password is ten characters long, fulfilling all of the basic requirements for a strong password.
It is a good idea to change passwords periodically, in case the old one has been compromised without the user’s knowledge. This is one of the most frustrating requirements for most users, because it requires them to go through the process of creating and rememorizing passwords every few weeks or months. You will have to decide if the data stored in your application is important enough to require users to change their passwords. If not, you may still want to send users a reminder to do so, even if you don’t explicitly require it.
Now that you understand how to secure stored passwords in the theoretical sense, it’s time to take a look at your application and decide just how vulnerable it is to attacks that could compromise stored passwords. Use the following checklist to assess your application’s user authentication vulnerability:
![]() Do you require users to create strong passwords, with the characteristics discussed in the previous section?
Do you require users to create strong passwords, with the characteristics discussed in the previous section?
![]() Do you require users to change their passwords regularly?
Do you require users to change their passwords regularly?
![]() Do you store user authentication information in a database rather than a flat file?
Do you store user authentication information in a database rather than a flat file?
![]() Is your database secure?
Is your database secure?
![]() Do you store passwords in an encrypted format?
Do you store passwords in an encrypted format?
![]() If user accounts within your application can be used to send e-mail, or in the case of our guestbook post public messages, have you implemented a CAPTCHA to filter out mechanically created accounts?
If user accounts within your application can be used to send e-mail, or in the case of our guestbook post public messages, have you implemented a CAPTCHA to filter out mechanically created accounts?
If you’ve answered yes to most or all of these questions, congratulations. Your user authentication system is reasonably secure. If not, keep reading to see how we’ve created a secure user authentication system for our guestbook application.
The key point to remember is that the most common attack on stored usernames and passwords is SQL injection targeting the user database. In this scenario, an attacker injects a bit of SQL into an otherwise harmless form input. The application processes the input and displays or e-mails the entire contents of the user database to the attacker. With that data in hand, the attacker can easily log in to the application as any user without raising concerns that an intrusion has taken place.
Adding user authentication to the guestbook application will happen in two steps:
1. Add the user table to the database and double-check database security.
2. Create the authentication API.
Breaking the task into discrete steps helps ensure that we can consider each part of the problem carefully and avoid introducing security holes into our application.
First we’ll double-check the security of our database installation by verifying the following items:
• The database directory is owned by the mysql user and group, and the privileges are set to 700, or full privileges for the owner, no privileges for anyone else.
• The default root users and sample databases have been removed.
• A consistent backup plan is in place. See Chapter 11, “Securing Apache and MySQL,” and Chapter 12, “Securing IIS and SQL Server,” for more information on choosing and implementing a backup plan.
Next, we’ll create the back-end database table where we’ll store user information, as shown in Table 7.3.
We could have left the default value blank for username, password, and email. The database will store an empty string as the default value if we don’t specify one. For clarity, we’re explicitly defining the HTML value for a nonbreaking space as the default value for those columns. That way, anyone looking at the database schema will instantly recognize that the default value is a whitespace character. The column hasn’t been left blank. Once we’re finished with the database, we’ll tackle the application code.
Just as we have throughout the book, we’ll create API functions to encapsulate the variable sanitation element of authenticating users. We’ll also create a wrapper that will call the API functions and return a simple Boolean—TRUE if the user is authenticated and should be allowed access to the rest of the application, FALSE otherwise.
Our authentication wrapper will start out by calling the validateUsernamePassword() function to validate the username and password variables, then it will pass them to the login() function in the user object. It will return either a populated user object, or FALSE. The code for the authentication function looks like this:
function authenticateUser($tainted_username, $tainted_password) {
// Set up our variables
$username = NULL;
$password = NULL;
if (validateUsernamePassword($tainted_username, $tainted_password)) {
// At this point we can safely assume that both $username and $password
// are legitimate
$username = $tainted_username;
$password = $tainted_password;
}
// The login() function will return either a user object (if the username and
// password are found in the database) or FALSE. If $username and
// $password are false at this point, they won't be found in the database, so
// login() will return FALSE.
return login($username, $password);
}
Our validation code is fairly simple:
function validateUsernamePassword($tainted_username, $tainted_password)
{
// Set up our variables
if (strlen($tainted_filename) > 256 || (strlen($tainted_password) > 256 && strlen($tainted_password) < 8)) {
//return FALSE; //Bail
}
$username = NULL; // This will hold the validated username
$password = NULL; // This will hold the validated password
// Validate username
if(preg_match("/^[A-Za-z0-9]*$/", $tainted_username)) {
$username = $tainted_username;
if(preg_match("/^[A-Za-z0-9@*#_]{8,}$/"), $tainted_password) {
$password = $tainted_password;
} else {
return FALSE; //Bail
}
} else {
return FALSE; // Bail
}
return TRUE;
}