
The greatest thrill in programming is pounding out code and watching your idea come to life on the screen. As fun as it is to pound the keyboard in a rush of inspiration, the cold, hard reality is that a lot of really bad code gets created that way. If you’re planning to release your code into the wild—even if it’s just on your own Web site—you’ll save yourself a lot of time and headaches if you slow down and do some pencil-and-paper work before you hit the keyboard. That’s what this chapter is all about: guiding you through the preliminary work so that your application is secure from day one. After all, how would you rather fix a security hole—on paper, before you’ve written any code, or later, in the aftermath of a security breach?
It is a popular notion in software development process circles these days that you don’t want to do all your planning and design work up front and get stuck building something that doesn’t work or doesn’t really meet requirements. Although there certainly is truth to the notion that designs need to be flexible and adaptable enough to implement needed change, security will greatly benefit from all the up-front planning you can do.
You’ve got a great new idea—so get it down on paper, pronto. You’re not going to remember all the little details, so grab a notebook and pencil and start jotting down notes. At this point, you’re not worried about implementation details or even security. This is where you can let your imagination have free rein. Here are a few questions to answer in your concept summary:
• What is the primary purpose of this application?
• Who will use it?
• How will it fit into your existing Web site (if applicable)?
Getting something down will prime the pump and the rest will come more easily. Let’s look at an example, though, just to make sure you have a good feel for it.
Figure 16.1 shows the concept summary for the application we’ve been building and securing throughout the book.
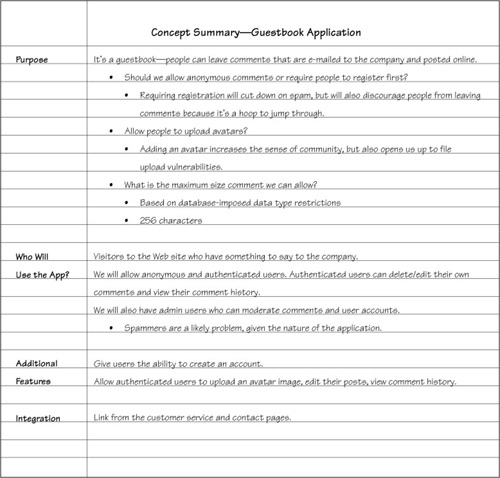
It’s not the prettiest thing ever produced, but it does what it needs to do:
• Records the overall concept behind the application
• Lists features we may possibly incorporate
• Notes questions we need to answer in the design phase
• Includes a statement about the typical user of the application as well as secondary user types
If you don’t think you have time to do a formal (or even semiformal—no black tie required) design phase, you’re probably living in a constant state of crisis. There are probably five or ten high-priority bugs sitting on your desk right now, aren’t there? Not counting all the little “we ought to fix that someday” bugs. No wonder your gut instinct tells you to just pound out some code and get it off your desk. Here’s the problem with that tactic: The reason you have all those crisis-level bugs on your desk is that the application wasn’t thoroughly designed (probably by the programmer before you!) in the first place. Good, solid design saves you time and headaches on the maintenance end.
The concept summary took about 15 minutes to write up, including notes about which features to include and which to leave out. Skip reading Slashdot for one day and concentrate on design—you’ll have plenty of time to catch up once the application is finished and you’re staring at a nice, empty bug queue.
Now that we’ve established that skipping the design phase isn’t a good idea, let’s tackle the other extreme—spending six weeks producing reams of beautiful design documents that no one will ever read for a quick little system administration script. It’s called stalling, not good design. The key is to spend just enough time on design to be confident that you’ve wiped out all your problems on paper before they take up residence in your code. Then put it aside for a day, work on something else, and give it one last look a day or two later. Or better yet, have someone else on your design team look at what you’ve got. If neither of you finds any problems, you’re ready to start coding.
Back to the concept summary for a moment. How long and how detailed should it be? It depends on your application. For the simple guestbook we’ve created in this book, a page is sufficient. If you’re writing an e-commerce application from the ground up, you’ll probably need more space than that to get all the details written down. Take as much time and paper as you need—but no more—to get the job done.
Once you’ve written up a free-form summary of your concept, you’re ready to move on to the next step: the workflow diagram.
In the concept summary, you wrote a description of what the application needs to do. Next, take a look at it from a different angle. What does the user of the application need to do? We’re even going to put down the lined notebook, grab a piece of plain scratch paper, and draw pictures. In the workflow diagram, you follow your user through the program, creating a map of the application. This diagram is all about choices and options. On screen one, what options do the users have? They have to choose a path. Once they’re on a given path, what choices do they have? And so on, until they log out. Figure 16.2 is the workflow diagram for the guestbook application.
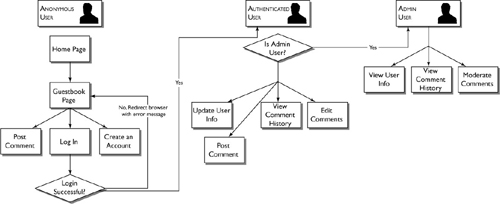
If your application will serve more than one type of user—for example, an anonymous user, a registered user, and an administrator—you’ll want to keep track of which features and areas of the application are available to each type. You can write this up separately, or simply note it on the workflow diagram, as we have done in Figure 16.3.
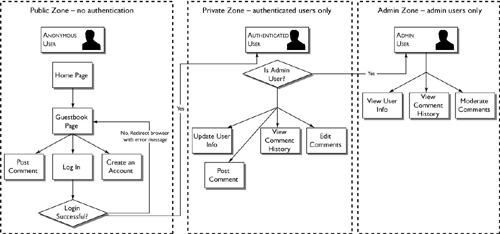
Notice that as users move through the application, their roles change. An administrative user, for example, begins as an anonymous visitor. Once logged in, the administrative user is an authenticated user; moments later the authenticated user becomes an admin and is granted access to the administrative area as well.
If you’re wondering if we’re going to start beating drums around a campfire, hang on. Designing a solid, secure application isn’t all about waxing poetic about your concept and drawing pretty pictures. The next step is designing your data structures and setting up your data dictionary.
You’re going to deal with a lot more data than you think you will—even for a simple application. Being a good programmer, you’re going to name your variables intelligently and avoid code like this:
function errorHandler ($a, $b, "Please don't do that.", $h);
Right?
But is intelligent naming enough? If you’re writing anything larger than a 200-line admin script, the answer is probably not. In an application of any size, you’ll be dealing with more than simple variables—you’ll have arrays and objects running around, too. This is the time to decide how best to store and work with your data.
For the guestbook, we know that we want to display the ten most recent entries, collect a handful of registration information, and allow users to enter their name, a comment, and possibly an image. The nature of the data suggests three types of data structures:
• An associative array to store the ten most recent comments (pulled from the database), keyed on datestamp
• An object to store user registration information
• Individual variables to store comments
Why choose these data structures? Why not keep things simple and store everything in an individual variable? Storing those ten comments in an array makes sense, because we know we can pull them from the database that way in one round trip. Storing them as comment1, comment2, etc., would require us to make ten round trips to the database—slowing our application to a crawl. An object is the natural choice for user registration information because it enables us to encapsulate that data and pass around one variable—$user—and still have access to all the details. So why not create an object to store comment information? We could, but in this case it’s probably overkill. Since we’re dealing with only three bits of data—the user’s name, a comment, and optionally an image file—and we’ll be processing each bit separately, there’s no real benefit to bundling them together.
We’ve decided how to work with our data within the application, but what about long-term storage? We still have to decide how to assemble the data in the database. The goal here is to store each bit of data intuitively, so that we can retrieve it without jumping through complicated SQL hoops. For the guestbook application, it makes the most sense to create two tables:
• Users—to store user registration information; keyed on username.
• Comments—to store comments; also keyed on username. We’ll create an index on datestamp also.
Notice that both tables are keyed on username. This is so we can quickly and easily cross-reference users with their comments. But we know that we’ll be searching for the ten most recent comments, so we want to create an index on the datestamp as well.
The decisions we’ve made so far get recorded in the data dictionary. The data dictionary is the place to keep track of the basics—the variable name and a description of its contents—as well as notes on where each is validated, which functions use them, and how they are stored in the database. You’ll start your data dictionary during the design phase, but odds are you’ll add to it as you develop. That’s OK, as long as you keep it up to date. This is one of those artifacts you’re going to want to keep around even after the application is finished. It will be invaluable when you update or maintain the code. In the beginning, your data dictionary may contain only data you’re storing in the database. As you develop the application, you may decide to keep track of internal variables as well. The key here is to store the important data, but only as much as you need to. If you enter every counter variable in your data dictionary, it will be so bloated that you’ll never find what you need in six months when you have to remember what you called the datestamp variable.
You’ll notice that your data dictionary looks a lot like a database table. In fact, most databases allow you to export the data schema. Table 16.1 presents the initial data dictionary for the guestbook application.
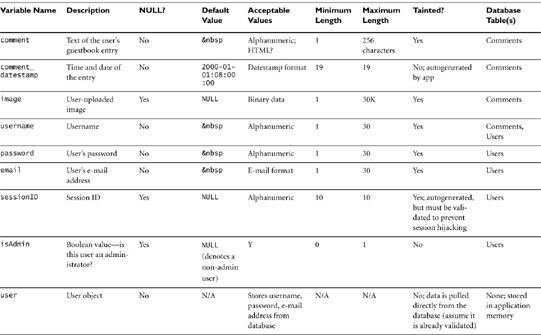

Notice that we’ve recorded all the data we’re storing in the database, our two complex data structures (the user object and the associative array to store comments), and the individual variables we’ll use to store user input.
Another interesting thing to note: Originally, we had planned to simply call the variable that stores the username when a user enters a comment as $user or $username. Nice, simple, tells it like it is. In the process of creating the data dictionary, we realized that we were also planning to create an object called User (which will probably be instantiated as $user). That User object will contain a piece of private data called $user->username. It’s vitally important that we keep those two pieces of data separate. The username stored in the object comes from the database, so we can assume it’s legitimate. The username entered by the user is tainted, at least until we validate it. To clarify which username we’re dealing with at any given moment, we named each piece of data coming in from the user new_variable. This way, if we try to get lazy and process user input without validating it first, we’ll either get a warning (because we tried to use something called $username without declaring it first), or we’ll have to do some extra typing, which should give us a clue that we’re doing something we shouldn’t.
As you design your application, you’ll find that there are certain functions you’re going to need more than once—database insert and retrieval, for instance. These are the things you want to write first, because they are the foundation of your application. Once they’re done, you can forget about them. Here are the infrastructure functions we wrote for the guestbook application:
• getDatabaseHandle(): Handles connecting to the database. Returns a database handle.
• getDisplayComments($numComments): Retrieves the most recent comments from the database. Takes the optional parameter $numComments that governs how many comments to retrieve. This defaults to ten. Returns an associative array keyed on datestamp.
• storeComment($comment, $image, $username): Stores comments in the database. Inserts the comment, image, and username (if available) directly in the Comments table.
• User::new($username, $password, $email): Constructor for the User object. Returns a reference to the instantiated object. Does not store data in the database. Call the update() function to store user data.
• User::load($username): Retrieves user data from the database and uses the constructor to instantiate a User object. Returns a reference to the instantiated object or NULL on failure.
• User->update(): Inserts or updates the database with the data stored in the object. Returns a Boolean—TRUE on success, FALSE on failure.
• User->isAdmin(): Returns TRUE if the user is an administrative user, FALSE otherwise.
• User->makeAdmin(): Stores the value Y in the local $user->isAdmin variable. Calls User->update() to store the information in the database. Returns TRUE on success. Calls errorHandler() on failure and returns FALSE.
• errorHandler($message, $user): Logs errors to the log file and to the local $user->errormsg variable (if available). Returns $message formatted for output to the browser or $user object, if available.
• Login($username, $password): Authenticates the user and instantiates a User object.
• Logout($username): Invalidates the session ID associated with the username and redirects the browser to the public side of the Web site.
Now that we’ve identified the infrastructure upon which we’ll build our application, this is also a good time to think about the automated tests we should develop alongside the application and the testing framework we’ll use. (Refer to Chapter 14, “Introduction to Automated Testing,” for more details on testing frameworks.)
At a minimum, we want to be sure that all of our functions return what we expect, so we’ll write our unit tests first. Since we haven’t really written the code for most of those functions yet, we’ll just create stubs:
function login($username, $password) {
if($username && $password) {
return TRUE;
}else {
return FALSE;
}
}
Obviously, this is pretty useless on its own. But for testing purposes, it works because our initial test will look like this:
if(!login()) { pass; } else {fail; }
If(!login("username") { pass; } else {fail; }
If(!login(,"password") { pass; } else { fail; }
If(login("username","password")) { pass; } else { fail; }
Later on we can come back and test with real data, but for now this lets us know the function is there and returning predictable values. It’s returning FALSE for every combination of inputs except both a username and a password.
By this point, you’ve created a couple of solid design documents that will be your guide as you continue to develop your application. But don’t rush over to the keyboard just yet! There’s one last task to complete before you can claim with any certainty that your application is well designed. It’s time to look critically at your concept summary, your workflow and actors diagram, and your data dictionary. Thus far, you’ve been designing—creating features and other elements of your application on paper. Now you’re looking for points of failure and design flaws that hackers can find and exploit.
Next, we’ll look at four areas that almost always have hidden problems:
• Login and logout
• File upload
• User input
• Filesystem access
Authentication systems are prime candidates for exploitation because they are powerful. Within the authentication system, users are granted privileges to which anonymous users do not have access. If hackers can infiltrate your authentication system, they can grant themselves access and privileges to which they are not entitled.
What types of vulnerabilities should you look for in your authentication system? The following is a list of the most common authentication problems:
• Weak passwords
Users have a strong interest in using weak passwords; short passwords or passwords based on dictionary words are easy to remember and easy to type. Unfortunately, that convenience also makes them inherently insecure. You need to balance the application’s need for security with your users’ need for convenience.
• Password storage
It’s a bit easier for you as a developer to store user passwords in the database just like any other piece of data, but keep in mind that databases aren’t necessarily reinforced strongholds. It isn’t that much more work to encrypt passwords, so there’s no reason to store them as plain text. Refer to Chapter 7, “Authentication,” for more information on enforcing password security.
• Buffer overflows in username and/or password fields
Just like any other input field, username and password fields are vulnerable to buffer overflow attacks. Refer to Chapter 4, “Buffer Overflows and Variable Sanitation,” to learn how to prevent buffer overflows.
• SQL injection
Because the authentication system is typically attached to the back-end database, SQL injection attacks are likely. You can store authentication information in the filesystem, but since most applications use the database, hackers know that a login field is a prime candidate for SQL injection. Refer to Chapter 5, “Input Validation,” for a more thorough explanation of SQL injection attacks and how to prevent them.
• Session hijacking
Typically, a session ID is generated within the authentication system because this is the first place that it becomes important to track a user individually. Sessions allow users to navigate through restricted areas of the application without having to re-authenticate on every page load. Knowing this pattern, hackers will target the authentication system to try to hijack sessions. Refer to Chapter 9, “Session Security,” for how to keep session IDs safe.
Anytime you allow users to upload files—such as the image allowed by the guestbook application—you introduce vulnerability into your application. Users can upload a virus, rootkit, or other malicious script just as easily as an innocuous image file. Unfortunately, it’s difficult to reliably verify the actual contents of a file, so be sure you weigh the risks against the benefits to your application.
This risk is the reason it’s important to examine your design before you start writing code. If you decide a given feature just isn’t worth the risk, it’s much easier to eliminate a feature on paper than it is to get rid of it after you’ve just spent two days beating out code for that feature. If you decide to keep the file upload feature, refer to Chapter 6, “Filesystem Access: Accessing the Filesystem for Fun and Profit,” to learn how to secure file uploads.
Whenever you allow user input, you’re risking buffer overflows and injection attacks. Unfortunately, if you don’t allow user input, you’re not writing an application; you’re writing a movie. Since you have to accept a certain level of risk here, make sure you identify every point where you ask for user input and ensure that you validate that input to prevent exploits.
There are times when the easiest way to get a job done is to hand it off to the operating system. Unfortunately, linking your application that closely with the operating system can also open up opportunities to exploit more damaging features of the operating system—rm -rf * on a UNIX or Linux system, for example. To safeguard your server from unintended filesystem access, refer to Chapter 6, “Filesystem Access: Accessing the Filesystem for Fun and Profit.”
Don’t stop with this list. Every application has its own potential exploits. Examine your design from a hacker’s point of view—if you were trying to break into this application, how would you do it? Mark those areas on your workflow and actors diagram, and make a special point of inserting security features into those areas.
Figure 16.4 presents the final workflow and actors diagram for the guestbook application.
