
Regarding SharePoint as both a platform and a framework presumes that you can create any kind of application on top of it. In this chapter we cover some advanced techniques you can use when you create such applications. These include
Using application pages to create SharePoint applications
Localization techniques for globalized applications
Using the event model at a feature and site level to create interactive solutions
Sending e-mail from custom code
Creating managed extensions for SharePoint applications and using LINQ
Creating SharePoint applications, and particularly application pages, combines almost everything you know from ASP.NET, and adds the SharePoint API together with some special features and controls. We assume that you're familiar with ASP.NET and can create ASPX pages, and add controls and code.
Application pages are the most powerful way to program and extend SharePoint. In theory, it is easy to add ASPX pages and write anything at all within the scope of ASP.NET. However, isolated pages that run in their own context do not integrate seamlessly with SharePoint. To create and deploy application pages we recommend you use the appropriate project template within Visual Studio 2010. The pages can be deployed either directly into a subdirectory of the _layouts folder or as a component in a feature. As part of a feature they are copied to the very same folder when the feature is activated. Regardless of the deployment scenario, we explain the basics of application pages in this section. There are two fundamental requirements for creating application pages:
The page should derive from the correct base class.
The page should use the appropriate master page.
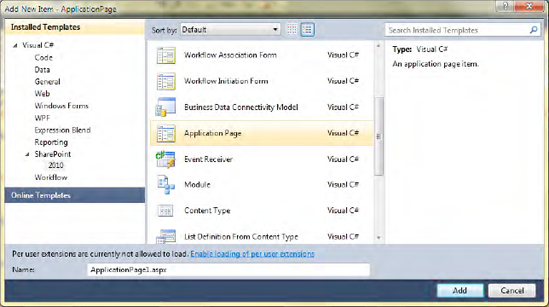
Visual Studio 2010 has an item template specifically for SharePoint application pages (see Figure 8-1). It supports the conventional settings, including master pages and basic references.
In the following exercise you'll create a new SharePoint project and add an application page to add sophisticated functionality using Visual Studio 2010.
CREATING A PROJECT USING APPLICATION PAGES
Choose Empty SharePoint Project from the New Project dialog. Enter a name and click OK.
In the ensuing SharePoint Customization wizard, select Deploy as a Farm Solution, and click Finish. The project will be empty and there should be no editing area visible.
Right-click the project in Solution Explorer and choose Add

In the subsequent dialog, select Application Page, and name the page appropriately.
Click Add. This may take a little while, but Visual Studio will add the SharePoint "Layouts" Mapped Folder and create in it a subfolder named after your project. The new application page will be saved within this subfolder. The page will open in the editor, and you can start working on it.
Application pages deploy into the _layouts folder—that is, under the SharePoint root (the 14 hive within the TEMPLATE folder). Consequently, you cannot choose a sandboxed solution because the usage of shared areas of the installation violates the conditions for sandboxed solutions.
You can check the settings first using the Properties window (F4). To get the instant F5 experience—that is, launching directly into the debugger by pressing the F5 key—you should set the Startup Item property to the application page of your choice (see Figure 8-2).
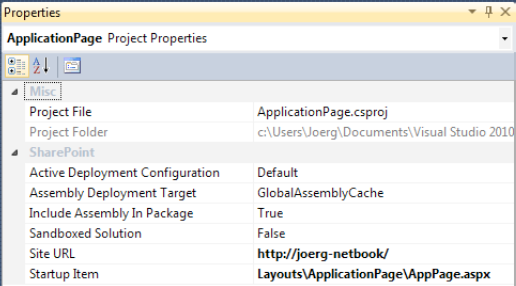
Check that Sandboxed Solution is set to False and Startup Item is set to a suitable ASPX page to start debugging. Active Deployment Configuration will be set to Default as long as you don't create other configurations. You can find a comprehensive description in Chapter 9 regarding how to set and configure customized deployment settings.
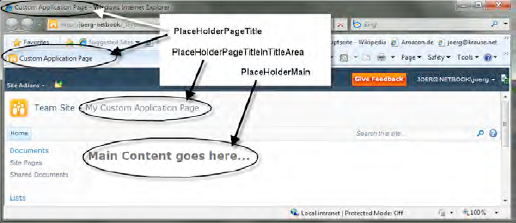
Each new application page is created with at least these placeholder sections to edit in the master page:
PlaceHolderAdditionalPageHead: The<head>element where you can add script references, styles, inline script, meta tags, and the likePlaceHolderMain: The main area for contentPlaceHolderPageTitle: The page title that appears in the browser's Window title barPlaceHolderPageTitleInTitleArea: Page title in the title area
There are many more placeholders (see Figure 8-3) available to modify individual parts of the master page.
This page is not yet part of the navigation tree and must be either linked somewhere or manually added. If it is part of an application, consider adding custom navigation or add the page's structure programmatically to the site. (The section entitled "The Event Model" later in the chapter thoroughly explains the use of events to manipulate a site when adding and activating a feature. You can find more about master pages in Chapter 10.)
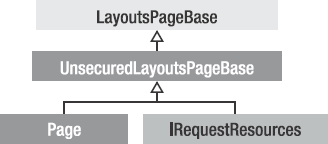
ASP.NET pages usually derive from the Page class. Even though it is feasible to continue using the Page class within SharePoint, another base class is more appropriate: LayoutsPageBase. This type is defined in the Microsoft.SharePoint assembly and found in the Microsoft.SharePoint.WebControls namespace. Internally, it ultimately derives from Page, so as an ASP.NET developer you should find this class familiar. The full class diagram is shown in Figure 8-4.
The base class performs security checks and provides access to the fundamental objects. In particular, from the UnsecuredLayoutsPageBase base class, the properties Site and Web are vital. Site returns an object of type SPSite that represents the site, and Web returns an object of type SPWeb. All internal layout pages derive from this base class. While it is not necessary to do so for private application pages, we recommend that you adhere to the same practice to ensure that your pages match with the SharePoint environment.
As mentioned, the LayoutsPageBase class provides several security checks. You should derive your pages from this class if the pages are accessible only by authenticated users. For pages intended for unauthenticated users, the parent class UnsecuredLayoutsPageBase is appropriate.
When deriving from either class, you have to decide whether to program inline or with code-behind. Listing 8-1 shows how to create a simple layout page with inline code.
Example 8.1. An Application Page with Inline Code
<%@ Assembly Name="Microsoft.SharePoint, ..." %>
<%@ Page Language="C#" MasterPageFile=" ˜masterurl/default.master "
         Inherits="Microsoft.SharePoint.WebControls.LayoutsPageBase" %>
<%@ Import Namespace="Microsoft.SharePoint" %>

<script runat="server">
   ... inline code goes here
</script>
<asp:Content id="main" ContentPlaceHolderID="PlaceHolderMain" runat="server"> ... </asp:Content> <asp:Content> ... <asp:Content> </asp:Content> ... </asp:Content>
There are two crucial things here. First, the Inherits attribute of the @Page directive ensures the right base class. Second, the @Assembly directive is required, and it needs to point to the assembly that contains the base class type.
Furthermore, the MasterPageFile attribute is used to load the default master page and supply Content controls for the content you will furnish. (In the "Using the Master Page" section later in the chapter, you'll find out more about the appropriate settings for the MasterPageFile attribute.) Note that the example in Listing 8-1 shows three Content controls. The master page contains several placeholders for placing content on the page. This includes but is not limited to the main area, the page's title, and page title's description.
The script block shown is simply to give the page a modicum of dynamic output. It makes use of the Site and Web properties derived from the base page. The access is equivalent to the static methods of the SPControl class. Both use the current context of the request internally to retrieve the objects.
As mentioned previously, the base classes provide different support for user access rights. LayoutsPageBase overrides the OnPreInit method and calls the CheckRights method internally, which performs several checks. If any check fails, an Access Denied exception is thrown. The UnsecuredLayoutsPageBase class does not perform these checks, and lets anyone requesting the page execute it.
Table 8-1 shows several important and useful properties and methods provided by the base classes.
Table 8.1. Properties and Methods Available from the Page Base Classes
Name | Base Class | Description |
|---|---|---|
|
| Returns an internal resource from SharePoint, defined with the leading ID |
|
| Same as the static method in the |
|
| Returns the current site of type |
|
| Returns the current web of type |
|
| Checks whether the current user has appropriate rights |
|
| Adds |
The other virtual properties and methods are inconsequential unless you override them. Some control the minimum rights required to execute the page. For example, you can require the user to have the right to access the _layouts folder by overriding the RequireDefaultLayoutRights property to return true. Via the RequireSiteAdministrator property you can restrict the page to administrative usage only. On the opposite end of the spectrum, you can set AllowAnonymousAccess to open the page to everybody.
When developing ASP.NET pages you may prefer using the code-behind approach. The separation of markup and code is the key to a clean and maintainable project structure. To use code-behind you simply need to provide the right attributes to the @Page directive. However, SharePoint 2010 also supports the code-behind method. Instead of deriving from one of the base classes, you can inherit from your own base class. As shown in the following code snippet, a private class, MyPageBase, is used.
<%@ Assembly Name="Microsoft.SharePoint, ..." %>
<%@ Page Language="C#" DynamicMasterPageFile=" ˜masterurl/default.master "
         Inherits="Apress.SP2K10.ApplicationPages.MyPageBase" %>
<%@ Import Namespace="Microsoft.SharePoint" %>
The definition of MyPageBase is straightforward:
namespace Apress.SP2010.ApplicationPages
{
   class MyPageBase : LayoutsPageBase
   {
   }
 }
If you examine the markup portion, it's almost identical to the previous example. However, the Inherits attribute points to the private class, and this in turn derives from one of the base classes. The assembly that contains the MyPageBase type must be compiled and installed in the GAC (Global Assembly Cache).
SharePoint 2010 also supports the common pattern of attaching a code file to an application page to add code-behind. Instead of inheriting a type, the CodeBehind attribute in the application page defines a path to the file that contains the code. If you follow the standard ASP.NET pattern, which is strongly recommended, the file is named after the markup file, with an appended .cs extension to indicate a C# file.
<%@ Assembly Name="Microsoft.SharePoint, ..." %>
<%@ Page Language="C#"
         MasterPageFile=" ˜masterurl/default.master "
         CodeBehind="Page1.aspx.cs" %>
<%@ Import Namespace="Microsoft.SharePoint" %>
The page parser recognizes the file, reads its contents, and compiles the code on the fly. In a precompiled project it would create a hidden assembly and make it available. That happens behind the scenes and is no different from any other kind of ASP.NET application. The only disparity here is the base page: the LayoutsPageBase class is used instead of the Page class.
The previous examples already refer to a master page. The default master is managed on a per-site basis. It's crucial to use this master. If the administrator or an end user with suitable permissions changes the master page, your application pages must reflect that change. Hard-coding the markup or adding navigation controls or other functionality that's typically part of the master page directly into your own application pages is not recommended. Creating pop-up dialogs that are based on ASPX pages a special base class and another master is the preferred method. Coding a whole page without one of the built-in master pages is not permitted.
In Chapter 10 we explain in depth how to work with master pages and what options are available to use in application pages. For now, the reference to the ˜masterurl/default.master token is the best way to accomplish the integration of your pages within a SharePoint site. The reference is made using the DynamicMasterPageFile attribute. You might wonder where this comes from, as ASP.NET does not support it. The @Page directive can be extended simply by adding public properties to the base class. Once an attribute is used, the value is stored against the base property. To understand how to deal with the property, a further examination of the DynamicMasterPageFile property in the UnsecuredLayoutPageBase class will be helpful. See the section "Master Page Tokens for Application Pages" in Chapter 10 for more details.
In order for you to work with application pages, they need to be reachable, usually within the context of the site. That means you must provide a way for the pages to be called. In addition, the caller may supply context variables, such as the ID of the item or list initiating the call.
Linking to an application page is easy. Either you create a direct link on another page or you add an entry to the navigation control. More sophisticated methods include adding a custom action to the Site Actions menu or to a list's context menu.
New in SharePoint 2010 is the ribbon-style menu, which is extensible. Adding a menu item is usually part of a feature. A feature definition might contain a custom action item. In the section "The Event Model" later in this chapter, we elaborate on this further.
Custom application pages can supply features that are intended for administrators only. As you saw earlier, the base classes provide support to either authenticated or unauthenticated users. If authenticated, you can distinguish users with administrative rights. Application pages often extend the administration of a site, and thus it is desirable to have an easy way to restrict access. SharePoint takes care of the menu item by adding the RequireSiteAdministrator attribute to the custom action definition:
<CustomAction RequireSiteAdministrator="true">
 ...
</CustomAction>
However, this does not prevent users from calling the page directly. It only removes the menu item if the current user does not have sufficient permissions. To ensure that your application page is locked down well, you need to override the virtual property RequireSiteAdministrator:
class MyPageBase : LayoutsPageBase
{
    protected override bool RequireSiteAdministrator
    {
        get { return true; }
    }
}
If the page is called by users that are curious about hidden pages, a security exception is thrown, and the Access Denied page will appear.
Multilanguage support, localization with culture-specific resources, and centralized resource management are key concepts for globalization, localization, and localizability. Resources include everything that supports the basic content stream (HTML), such as replaceable text portions, images, and scripts. By making those parts dynamic you can replace them with language-specific versions. It's also common practice to support target device–specific content, such as for devices that are connected via a low-bandwidth connection.
In this section you will learn about the common .NET techniques for handling resources that have evolved since the first release of ASP.NET within the context of Web Parts and SharePoint. (However, this section is not intended to provide basic information about resource management).
In this section we cover
Using the
ResourceManagerclass to retrieve resourcesUsing resources to deploy static data within an assembly
Localizing properties and other parts of a Web Part
Using resources for linked (external) data to be consumed by a Web Part
In countries where English is not the native tongue, localization can be important. Localization within SharePoint is achieved using resources and resource files in a similar manner to ASP.NET sites. Although the use of resources is not mandatory, it's usually best practice to incorporate them anyway. Hard-coding strings is generally undesirable, whether or not you plan to support localization. However, setting up and using resources within SharePoint can be confusing.
Resources are stored within XML-based RESX files. Usually you can equate "resource" with "string." Nonetheless, a resource file can store any serializable data, including images and other binary data converted into a Base64-encoded stream. Windows forms in particular utilize such embedded data. For web pages, it's more involved to extract data from resources using handlers.
Every resource in a resource file is identified by a fixed name. A typical RESX file looks like this:
<root>
  <data name="FieldManagerPageDescription">
    <value>Manage the field of this application.</value>
  </data>
</root>
For every culture your localization project supports, you need a unique RESX file with the same key names. Usually, you simply copy the original RESX file and translate the original values within each value tag into the new language. The new resource file has to be named as follows: <original_name>.<culture>.resx. Several example names follow:
The culture's name is either the complete combination of language and country, or simply a language-specific fallback to the parent culture. The reason is that in several countries people speak more than one language, and the same language is spoken in several countries. It depends on your project's requirements whether the parent culture will suffice.
SharePoint defines two kinds of resource files: runtime resources (also called application resources) and provisioning resources. Application resources are used within the normal execution of a SharePoint application. Normal SharePoint execution includes application pages, Web Parts, and controls, as discussed in this chapter. SharePoint also distinguishes between application resources used in normal web applications and those used in Central Administration. Provisioning resources, on the other hand, are used when provisioning elements. You use them within features, site definitions, and list definitions. This means you need to be aware of the deployment and usage scenarios.
Provisioning Resources
Provisioning resources are used to localize solutions. This includes
Descriptions for solutions, features, Web Parts, lists, sites, and so on
Options presented in choice fields (
SPFieldChoicecontrols)Base names of files used in the solution, such as "images" and "template"
String resources used in the definition files
Resources encapsulate and abstract data from logic and design. This makes sense in larger projects involving many developers. Resources are mainly, but not exclusively, used for localization. Localizing all this data can be a challenging task. It makes sense to think about what parts really need to be localized. Remember that in addition to the various kinds of resource files, the localized version requires you to include one file for each supported culture for each of these files. Such projects tend to have an exploding number of files requiring maintenance and deployment.
Resource Locations
Resource files in SharePoint are located in different folders, including these:
C:InetpubwwwrootwssVirtualDirectories<port>App_GlobalResources$SharePointRoot$14Resources$SharePointRoot$14CONFIGResources$SharePointRoot$14CONFIGAdminResources$SharePointRoot$14TEMPLATEFEATURES<feature>Resources
The target folder you use depends on what kind of resource you want to deploy. Every type of resource has its own folder. Provisioning resources are part of either a solution package or a feature. They land in these folders:
$SharePointRoot$14TEMPLATEFEATURES<feature>Resources Resources.<culture>.resx$SharePointRoot$14TEMPLATEFEATURES<feature>Resources$SharePointRoot$14Resources
Every feature uses the resources file located in its Resources folder. You can, however, use another resource file or even shared resources. To share resource files you have to put them in the 14Resources folder. This is the default option that is used when you add an item of type Global Resource File to your current solution. Site definitions and list definitions also get their resources from this folder.
Application resources can appear in these folders:
$SharePointRoot$14CONFIGResourcesC:InetpubwwwrootwssVirtualDirectories<port>App_GlobalResources
Application resources are located in the CONFIGResources folder. For a web application to use those resources, they must be copied to their own App_GlobalResources folder. This is standard practice for global resources in any conventional ASP.NET project. On creation of the web application, the resources are initially copied to the App_GlobalResources folder. When you add new resources to the CONFIGResources folder, the resources need to be copied to existing web applications. You can do this manually or use the stsadm command copyappbincontent. Alternatively, you can automate this by including the following in your FeatureActivated event in your feature receiver. For Central Administration resources and site maps, call
SPWebService.AdministrationService.ApplyApplicationContentToLocalServer();
For regular application page resources and site maps, this code snippet applies:
SPFarm.Local.Services.GetValue().ApplyApplicationContentToLocalServer();
Tip
Refer to the section "The Event Model" for more information about how to add and activate event receivers for features.
For administrative purposes, application resources use different folders. Administrative extensions add UI elements for features to Central Administration, allowing administrators to manage your code. Chapter 17 contains more information regarding these tasks. The appropriate folders are
$SharePointRoot$14CONFIGAdminResourcesC:InetpubwwwrootwssVirtualDirectories<port>App_GlobalResources
Application resources for Central Administration work the same way as normal application resources, except that the base folder is CONFIGAdminResources.
Now you need to know how to use resources within SharePoint elements. It doesn't really matter which kind of resource you are using. SharePoint will retrieve the data from any of the resources available through the current context. A global resource for an application page can be read from the current context:
HttpContext.GetGlobalResourceObject("MyResource", "MyName").ToString();Any property within a markup file can use the expression builder syntax:
<%$Resources:MyResource, MyName%>
For a regular ASP.NET or SharePoint element, this would read
<asp:literal runat="server" Text="<%$Resources:MyResource, MyName%>" />
In XML configuration files (CAML) that SharePoint can read, you use this syntax:
$Resources:MyResource, MyName
In XML features, you use the default resource of the feature and access it like this:
$Resources:MyName
The next section contains a more detailed description of common usage scenarios in Web Parts and application pages.
To localize properties such as FriendlyName, Title, and Description, the attributes can be localized. Resources can be part of any .NET assembly. You can create either an assembly dedicated to resources only or add the resources to the current assembly. Assemblies that contain resources for a specific culture only are called satellite assemblies. An assembly can contain any kind of resources for any number of cultures. Using satellite assemblies allows you to add more languages to the project later without having to recompile the core assembly. It also allows language packs to be updated independently of the project assemblies. Using resources is the best practice for localization; however, they can be used to hold any static content used in the control too. It's better to use a dedicated technique to deal with such data than to use constants spread throughout your code.
Access to resources always follows the same strategy; content declared as a resource in the project is added to the assembly and becomes part of the manifest. If the source is an XML file with a .resx extension, then the content is compiled into a .resource file—a binary representation of the content. A naming scheme is used to address the content in a unique way:
Namespace.Folder.File.Element
The namespace is defined in the project's properties. If the content is in a folder structure, the folders define the middle part. A folder chain such as ResourcesGlobalWebparts translates into Resources.Global.Webparts. Then the RESX file name follows. The complete name will look like this, for example:
Apress.SP2010.Resources.Global.Webparts.MenuItems
In this example the namespace is Apress.SP2010, the folder chain is as shown before, and the name of the files is MenuItems.resx. Such an element is resolved by the ResourceManager class.
Static data can be defined at the assembly level and per element or class within an assembly, such as a Web Part class.
Defining a Static Resource per Solution
For static data you need a resource file. Visual Studio 2010 provides an item for this in the General section of the Installed Templates window. Simply add a resource file by using the Resources File project template (see Figure 8-5). The name must be unique within the project. The RESX file is compiled internally into a .resource file and stored in the assembly as part of the metadata. It does not become part of the package or feature definition files.

Defining a Static Resource per Item
To create a global resource that is dedicated to supporting a specific Web Part within your solution, you can choose the project item template Global Resources File from SharePoint

The result is much the same as with the common resource item—a RESX file. After choosing this template, you'll be asked whether you wish to create a culture-invariant file or a culture-specific file. This simply affects whether a culture shortcut is included within the file name (such as en-us for US culture) or whether one is omitted altogether.
SharePoint has its own resource management. This does not prevent you from using the common ASP.NET model, but it's useful to know what the differences are and why they exist. If you add a global resource file to any item in the project, Visual Studio adds the resource to the package at a global level. That's confusing, as the relative path to the file in the solution does not match the position in the SharePoint root. Moreover, resources that are created for SharePoint this way are not compiled. They become part of the package as original files. They are deployed to the Resources folder directly under the 14TEMPLATE folder. Let's examine first how this works internally before looking into modification options.
When you add a global resource file, it is assigned the deployment type RootFile and placed directly under 14TEMPLATEResources, as shown in Figure 8-7.
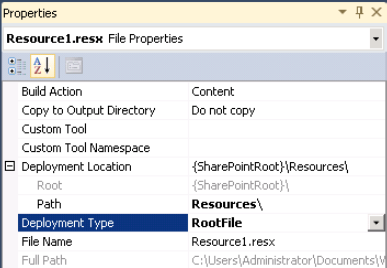
In the package this looks like this:
<Solution ...>
   <RootFiles>
      <RootFile Location="ResourcesVisualGlobalResource.resx" />
   </RootFiles>
</Solution>
Changing the properties of the file changes the package definition, too. There are good reasons that this is the case. Placing all files into the root can cause naming conflicts with other packages. Such resources are accessible through the resource expression builder syntax. You may be familiar with the $Resources: core... snippets, which access the internal resources. The core.resx file, together with the installed language packs, is stored in the Resources folder, too. Consequently, you can access your own global resource files the same way from any markup file, including visual Web Parts and ASPX application pages, and within CAML markup files.
After choosing either template, you can assign the file to a specific culture, or leave it culture invariant. If you simply wish to store static data, use the invariant culture. Once added, you can edit the file with the resource editor. Alternatively, use the XML editor to edit the data directly.
You can access the resources from markup using expressions if you create a visual Web Part. That uses expressions based on the Resources expression builder:
<%$ Resources:StaticResources,Help.Text %>
The expression must appear within a specific attribute, such as
<asp:label runat="server" Text="<%$ Resources:StaticResources,Help.Text %>" />
The name StaticResources is the resource's file name. Nonvisual (regular) Web Parts don't have any markup. To use the data in code, you can use the ResourceManager of the current Page that is available through any Web Part.
Using resources for localization requires some preliminary work, as described in the following exercise.
The RESX files are similar to the following XML snippet (the schema and type definition have been omitted for clarity):
<data name="Button.Text" xml:space="preserve">
    <value>Click me</value>
</data>
<data name="Button.Tooltip" xml:space="preserve">
    <value>Click me tooltip</value>
</data>
The following code can be used to retrieve the resource:
protected override void CreateChildControls()
{
Button b = new Button();
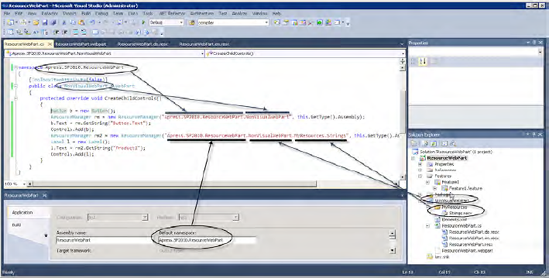
ResourceManager rm = new ResourceManager("Apress.SP2010.WebParts.
ResourceWebPart.NonVisualWebPart",
this.GetType().Assembly);
b.Text = rm.GetString("Button.Text");
b.OnClientClick = "ShowAlert(this)";
Controls.Add(b);
base.CreateChildControls();
}The ResourceManager class is defined in the System.Resources namespace and stored in the System.Configuration.dll assembly, which must be referenced in the project. The resource manager requires a string that defines the full name to the embedded resource. As shown in Figure 8-8, you can attach RESX files directly to the Web Part itself (the first constructor call of ResourceManager) or use any folder structure that's appropriate (the second call; rm2).
The GetString method uses the current culture, if one is specified, to retrieve the correct resource. There is an overloaded GetString method that also accepts a CultureInfo object to force a specific culture.
If you are building a reusable Web Part, localization for the content is straightforward, as shown previously. However, localizing the attributes is not supported the same way. In all the previous examples, the strings were hard-coded:
[WebBrowsable]
[Category("Look and feel")]
[WebDisplayName("Use custom palette")]
[WebDescription("Check this to use a custom palette")]
[Personalizable(PersonalizationScope.Shared)]
public bool UseCustomPalette {
   get;
   set;
}
All these attribute values are hard-coded into your assembly, and you have to build different assemblies for different languages. Fortunately the .NET Framework is extensible, allowing these attributes (Category, WebDisplayName, and WebDescription) to be extended to take advantage of the localization features. To do so, create derived classes, such as LocalizedCategoryAttribute, LocalizedWebDisplayNameAttribute, and LocalizedWebDescriptionAttribute.
They essentially look the same. Code for the LocalizedWebDisplayNameAttribute looks like this:
[AttributeUsage(AttributeTargets.Property, AllowMultiple = false, Inherited = true)]
public sealed class LocalizedWebDisplayNameAttribute
    : WebDisplayNameAttribute
{

     bool m_isLocalized ;

     public LocalizedWebDisplayNameAttribute(string displayName)
         : base(displayName)
     {
     }

     public override string DisplayName
     {
         get
         {
             if (!m_isLocalized)
             {
                 this.DisplayNameValue =
                     Resources.ResourceManager.GetString(
                         base.DisplayName, Resources.Culture);
                 m_isLocalized = true;
             }
             return base.DisplayName;
         }
     }
}
To change the attributes' behavior, this code overrides the DisplayName property; and instead of only returning the value, it uses the ResourceManager object to retrieve the value from your localized resources. Subsequently, you can change the original property code to something like this:
[WebBrowsable]
[LocalizedCategory("LookAndFeel")]
[LocalizedWebDisplayName("UseCustomPalette")]
[LocalizedWebDescription("UseCustomPaletteDesc")]
[Personalizable(PersonalizationScope.Shared)]
public bool UseCustomPalette
{
   get;
   set;
}
To make this work, simply add the three attribute values (LookAndFeel, UseCustomPalette, and UseCustomPaletteDesc in this example) to resource files—one for each language you want support.
In addition to the resources retrieved from an assembly, some elements of an HTML page may require file-based data. JavaScript files are usually linked this way. Assuming your Web Part needs some custom JavaScript, it makes sense to hold it in a separate file. The browser caches this file, and if the Web Part is added several times, the script is only loaded once.
ASP.NET has a concept dedicated to this situation, called web references. Similar to the resources explained previously, web references add resources to the project's assembly. These resources are global, and there is a specific way to call them directly using an HTTP GET request. There is a handler responsible to resolve such calls. The handler is bound to the file name WebResource.axd. In HTML, such a call would look like this:
<script src="WebResource.axd?d=SbXSD3uTnhYsK4gMD8..." />The unique parameter d provided in the request is built dynamically during the render process. Additionally, a time stamp using the parameter t can be set to allow the resource to time out. This happens when a new assembly is built, to force reloading of the cache.
To support the web resource, you need to prepare the project with the steps shown in the following exercise.
PREPARING WEB RESOURCES
Note the namespace of your project.
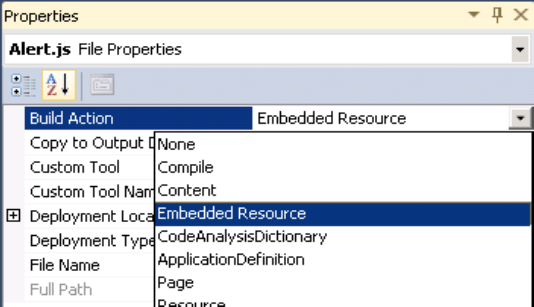
Add your resources in a dedicated folder, such as
/Resources/Alert.js.Right-click your resource file and set Build Action to Embedded Resource, as shown in Figure 8-9.
Add the following code line in the
AssemblyInfo.csfile (replaceNameSpacewith the namespace of the project, as noted in step 1):[assembly: System.Web.UI.WebResource("NameSpace.Resources.Alert.js", "text/javascript")]Recompile the project.
The file is now part of the assembly and can be used using the WebResource.axd syntax.
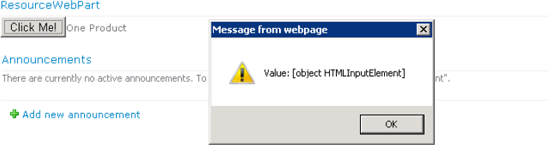
To use the file, you must retrieve the ID that's created dynamically for each request. Depending on what kind of file is used, you need to add the appropriate HTML element to your Web Part. The next example uses a simple JavaScript file. It adds a button dynamically to the Web Part and invokes a method in that file. First, here's the JavaScript snippet that's responding to the button's click:
function ShowAlert(val) {
    alert("Value: " + val);
}
The Web Part itself makes use of the embedded resource, as shown in Listing 8-2.
Example 8.2. The Complete Web Part Code
using System;
using System.Runtime.InteropServices;
using System.Web.UI;
using System.Web.UI.WebControls;
using System.Web.UI.WebControls.WebParts;
using Microsoft.SharePoint;
using Microsoft.SharePoint.WebControls;

namespace SimpleWebPart.ResourceWebPart
{
    public class ResourceWebPart : WebPart
    {
        public ResourceWebPart()
        {
        }

        protected override void OnInit(EventArgs e)
        {
            base.OnInit(e);
            string script = "Apress.SP2010.
                             ResourceWebPart.NonVisualWebPart.MyResources.
                             Alert.js";
            if (!Page.ClientScript.IsClientScriptBlockRegistered(script))
            {
                Page.ClientScript.RegisterClientScriptResource(this.GetType(),
                                                               script);
            }
        }

        protected override void CreateChildControls()
        {
            Button b = new Button();
            b.Text = "Click me!";
            b.OnClientClick = "ShowAlert(this)";
            Controls.Add(b);
            base.CreateChildControls();
        }

    }
}
ResourceWebPart.NonVisualWebPart.MyResources.
Alert.js";
if (!Page.ClientScript.IsClientScriptBlockRegistered(script))
{
Page.ClientScript.RegisterClientScriptResource(this.GetType(),
script);
}
}
protected override void CreateChildControls()
{
Button b = new Button();
b.Text = "Click me!";
b.OnClientClick = "ShowAlert(this)";
Controls.Add(b);
base.CreateChildControls();
}
}
}The script variable contains the string defined in the AssemblyInfo.cs file shown in the previous instruction. The code registers a script block on the page and ensures that the script is linked only once. When you now build, deploy, and add the Web Part to a page, the HTML code is produced and creates the output shown in Figure 8-10.
The resource manager loads the resources from files and retrieves the desired element for a specific culture. A culture is a combination of a country and a language. The country defines the currency—for instance, while the language defines the number format and month names. Several types can be formatted dynamically using different cultures. Cultures are defined in a language-country format, such as En-Us or De-de. Cultures form a hierarchy. If the current culture is not found (e.g., De-de), then the resource manager tries to fall back to the parent—De in this case. If this fails, a default resource is used instead. If there is no default resource, an exception is thrown.
Note
If the ResourceManager is used in the default way, it will always retrieve resources from the assembly's embedded files.
The explicit usage of file-based resources is not the common way to provide such additional data. However, under specific circumstances it may make sense to have resources distributed separately. Adding the files as a module to the package makes the deployment easier. Extracting the data from those files requires two steps:
Adding a reference to the
System.Configurationassembly to your projectCalling the
System.Resources.ResourceManagerclass
The resource manager reads the contents of the .resources files (compiled RESX files) and provides instant access:
System.Resources.ResourceManager rm;
rm = ResourceManager.CreateFileBasedResourceManager("Global", "ResourceDir", null);
lbl.Text = rm.GetString("Help.Text");
The parameters require a base name as the first parameter—usually the name of the compiled file. If the file name is Global.en-us.resx, then it compiles to Global.en-us.resources (the base name is Global). The resource manager is smart enough to look for all files of that name in the target folder (ResourceDir) whether or not they have a culture segment in their name. The resulting type is ResourceSet by default—that's what the third parameter specifies. In advanced scenarios you could create a type that behaves differently here in the way it is reading the resources. If set to null the default type is used. The resource manager accesses resources by their key, using the GetString or GetObject method. In the case of an object, you need to determine the type and cast the returned value appropriately.
While Web Parts are very common and usually the only part of your application that requires localization, you might occasionally need to localize a feature, too. This means that the feature's description and common resources would get localized.
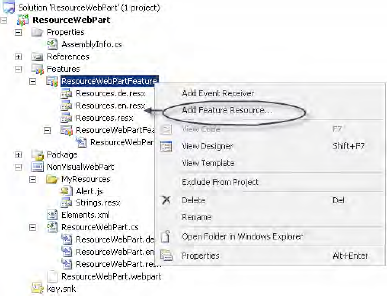
Using Visual Studio 2010 you can easily add a feature resource. Simply right-click the feature in Solution Explorer and choose Add Feature Resource... (see Figure 8-11). The resulting dialog asks for the culture of the new resource. Choose Invariant Culture if you only need to create a fallback file. A fallback file is used if the resource manager cannot resolve the currently active culture—for this reason such a file is strongly recommended. If there is no fallback, an exception is thrown instead.
Tip
If you need to handle all supported cultures explicitly and there is no fallback strategy, you should still create a fallback file. Add error information to every resource—for example, include an error message such as "ERR:" as a prefix to all data. Then, if you mistype a resource's name (key) accidentally, the message will appear somewhere on the page, and you can fix it.
Using these files follows the standard pattern that SharePoint uses for its internal resources stored in the core.resx files:
$Resources:ResourceKey
The $Resources part calls the expression builder. Everything after the colon defines the resource. The file's base name is Resources by default, whereas ResourceKey is the key within the file. The resource manager evaluates the correct language depending on the current context. For a feature definition, this looks like
<feature xmlns:dm0="http://schemas.microsoft.com/VisualStudio/2008/DslTools/Core"
dslVersion="1.0.0.0" Id="244d3ced-8f88-49ac-8846-ebc8de430e0f"
description="$Resources:Description"
featureId="244d3ced-8f88-49ac-8846-ebc8de430e0f"
imageUrl=""
scope="Site"
solutionId="00000000-0000-0000-0000-000000000000"
title="$Resources:Title"
version=""
deploymentPath="$SharePoint.Project.FileNameWithoutExtension$"
xmlns="http://schemas.microsoft.com/...">
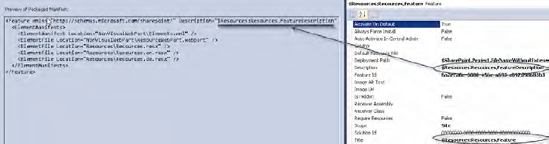
</feature>To change the settings in Visual Studio, open the Feature Designer, click in the manifest definition section, and open the Properties pane (by pressing F4) (see Figure 8-12).
Simply create and deploy the package, and you'll have a localized feature. The content of the files deployed with the feature is shown in Figure 8-13.
Events are a core concept for SharePoint developers. SharePoint is a user-driven platform. Users work with the sites, pages, lists, items, and more. Monitoring their activities and launching actions when a particular condition arises is flexible and enhances the capabilities immensely. Instead of writing whole applications, you merely hook into internal events and modify the behavior to suit your specific needs.
Events occur on several levels and under many conditions. In this section, we extensively cover the feature and site levels.
Tip
See Chapter 4 for list- and item-level events in more detail.
The following introduction gives an overview and has several references to the events explained later.
Event handling is based on event receiver base classes. You inherit from those base classes and override the event handlers you need to invoke specific tasks. The base classes are public in the object model. A reference to Microsoft.SharePoint.dll is required. Visual Studio even supports feature receivers with particular tasks.
Events appear at virtually all levels of SharePoint objects. Table 8-2 shows the base classes for the event definitions. Handlers that receive event notifications are not simply event handler methods, but predefined methods you can override within the inheriting class.
Table 8.2. Basic Event Classes
Description | |
|---|---|
| Provides events when users add, change, or remove columns for a list definition |
| Provides events when users modify items within a list or documents within a document library |
| Provides events when users move or delete a site collection or a site |
| Provides events when users send e-mail to an e-mail–enabled list |
| Provides access to events that occur when a user activates or deactivates a feature |
In this chapter we cover the more global, deployment-aware events at a feature level.
A feature receiver allows you to control a significant moment in the deployment process. Any time a user with appropriate rights activates or deactivates a feature, the associated event receiver is called. Table 8-3 shows the available events.
Table 8.3. Feature Receiver Events
Event | Description |
|---|---|
| Invoked when the user activates a deactivated feature. Remember that the feature is active by default after installation (if the settings are left unmodified) and therefore the event is invoked after installing the first time. |
| Invoked before the feature gets deactivated. |
| Invoked after installation. |
| Invoked before uninstallation. This includes the deactivation. |
| Invoked if a new version of the feature is deployed through the upgrade option. |
All methods receive a parameter of type SPFeatureReceiverProperties, which gives access to the underlying feature by exposing SPFeatureDefinition, SPFeature, and SPSite via the Definition, Feature, and UserCodeSite properties, respectively.
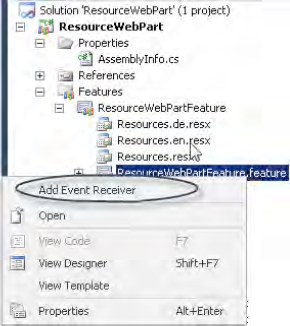
CREATING A FEATURE RECEIVER PROJECT
A feature receiver project creates an assembly that deploys into the GAC and adds the necessary registration files to connect the event with the receiver class. To create a feature receiver, you first of all need a feature.
Select your feature in Solution Explorer and right-click it.
Select Add Event Receiver from the context menu (see Figure 8-14).
The class will be created in the feature definition tree near the XML files. Within the created file, uncomment the events you'd like to implement.
Feature receivers are named after the feature. For example, if the feature is called "Feature1," the name is "Feature1EventReceiver." We recommend you name the feature appropriately before creating any dependent objects.
Typical examples for features are the creation of lists, adding default data to existing lists, and adding application pages to the navigation. The next example shows how to hook into the navigation and add an application page structure there. This requires two steps. First, when activating, the items must be added. Second, when deactivating, the items must be removed. Because something could go wrong, you must check in both steps whether the expected conditions are fulfilled—in this example, the expected items must exist after activating and must not exist after deactivating.
A feature can contain items published to the configuration database (e.g., lists, data, and event receivers). It cannot contain elements copied to a target folder. These items must be part of the package. In the example, the navigation is defined in a web.sitemap file that is common for ASP.NET projects. To edit it easily, you can add an XML file to the current project and name it web.sitemap. Then add the correct schema to it, and IntelliSense will support you (see Figure 8-15).
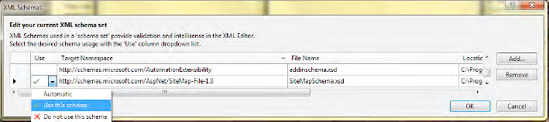
Once IntelliSense is operating you can edit the file, as shown in Figure 8-16.
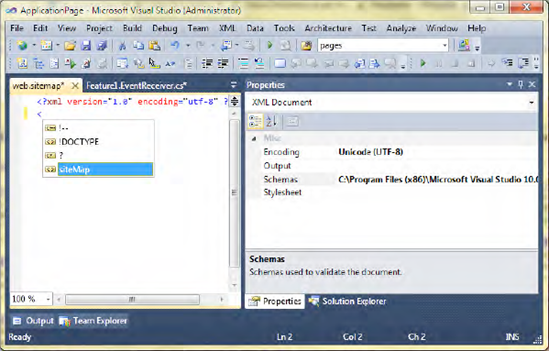
The web.sitemap file in this example is embedded in the assembly by setting Build Action to Embedded Resource. This makes deployment easier and prevents users from modifying the contents.
Next, the feature receiver can be added to the project. Listing 8-3 shows the complete code.
Example 8.3. A Feature Receiver Class
using System;
using System.Runtime.InteropServices;
using System.Security.Permissions;
using Microsoft.SharePoint;
using Microsoft.SharePoint.Security;
using Microsoft.SharePoint.Navigation;
using System.Xml.Linq;
using System.Linq;
using System.IO;
using System.Xml;
using Microsoft.SharePoint.Utilities;

namespace ApplicationPage.Features.Feature1
{
    [Guid("9f3e821a-1e27-425f-b3f6-93a2847f6544")]
    public class Feature1EventReceiver : SPFeatureReceiver
    {

        string PATH = @"/_layouts/";

        public override void FeatureActivated(
                             SPFeatureReceiverProperties properties)
        {
            if (properties.Feature.Parent is SPSite)
            {
                // Cannot activate this feature at site level
                return;
            }
            SPWeb web = (SPWeb)properties.Feature.Parent;
            SPNavigationNodeCollection topNavi = web.Navigation.TopNavigationBar;
            // Check existing top element. If present remove first
            CheckAndRemove(topNavi);
            // Read navigation instruction
            using (Stream st = GetType().Assembly.
                         GetManifestResourceStream("ApplicationPage.web.sitemap"))
            {
                using (XmlReader tr = new XmlTextReader(st))
                {
                    try
                    {
                        XElement siteMap = XElement.Load(tr);
                        // Add nodes
                        var root = from r in siteMap.Descendants()
                                   where r.Attribute("title").
                                           Value.Equals("HR Department")
                                   select r;
                        // Found
                        if (root.Count() == 1)
                        {
                            XElement rootElement = root.First();
                            string rootPath = web.Url + PATH;
// Create and add root node
SPNavigationNode rootNode = new SPNavigationNode(
rootElement.Attribute("title").Value,
rootPath + rootElement.Attribute("url").Value,
true);
SPNavigationNode topNode = topNavi.AddAsLast(rootNode);
AddNodes(rootElement, topNode, rootPath);
}
}
catch (Exception ex)
{
}
}
}
}
private void AddNodes(XElement currentFrom, SPNavigationNode currentTo,
string rootPath)
{
foreach (XElement r in currentFrom.Elements())
{
SPNavigationNode n = new SPNavigationNode(
r.Attribute("title").Value,
rootPath + r.Attribute("url").Value);
SPNavigationNode newnode = currentTo.Children.AddAsLast(n);
if (r.HasElements)
{
AddNodes(r, newnode, rootPath);
}
}
}
private void CheckAndRemove(SPNavigationNodeCollection topNavi)
{
var nodes = from n in topNavi.Cast<SPNavigationNode>()
where n.Title.Equals("HR Department")
select n;
if (nodes.Count() == 1)
{
topNavi.Delete(nodes.First());
}
}
public override void FeatureDeactivating(
SPFeatureReceiverProperties properties)
{
SPWeb web = (SPWeb)properties.Feature.Parent;
SPNavigationNodeCollection topNavi = web.Navigation.TopNavigationBar;
CheckAndRemove(topNavi);
}
}
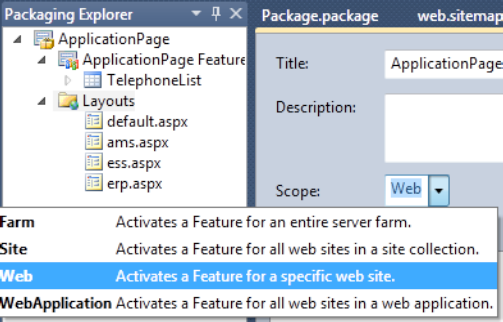
}This code checks first whether the parent object is an SPSite or SPWeb. This feature receiver supports SPWeb only, and therefore does nothing if SPSite appears. This is because there is no navigation object at the site level. You should set the feature's properties appropriately, as shown in Figure 8-17.
There are two private methods to create the node collection and remove it later. The creation method is recursive to allow for an unlimited number of node levels. The elements in Top Navigation and Quick Launch are SPNavigationNode objects. These objects require valid paths before being added to the parent node's collection. The URL is set to the URL of the current web, and the _layouts folder is hard-coded. This example also assumes that the root folder is named HRDepartment, and even this is hard-coded. You can easily extend the code to be more flexible. The options available for the navigation are explained in more detail in Chapter 10.
The feature you deploy must contain the information about the receiver. This requires two settings:
If you create the feature and feature receiver as explained previously using Visual Studio 2010, the necessary information is built automatically. If you plan to create your feature's manifest file manually or edit it later, you will need to define this information. Such a file looks like this:
<Feature xmlns="http://schemas.microsoft.com/sharepoint/"
         Title="ApplicationPage Add Menuitems"
         Id="4e8fed7b-0acf-48f9-9b60-4584b5bcd4bc"
         ReceiverAssembly="ApplicationPage, Version=1.0.0.0, Culture=neutral,
                           PublicKeyToken=791a6f2c4cde1076"
         ReceiverClass="ApplicationPage.Features.Feature1.Feature1EventReceiver"
         Scope="Web">
</Feature>
The ReceiverAssembly and ReceiverClass tags must be set to the appropriate values. The receiver class entry must define the whole namespace. The feature itself may be used only to transport the event receiver information—meaning that you can leave it empty if you don't have anything to add there.
The feature.xml file has several more properties that also influence the receiver:
Hidden: Set totrueto make the feature invisible in the Site Properties dialog. This prevents users from activating or deactivating the feature. This is usually an option that helps to manage dependent features, such as base features used by others. The default value isfalse.ActivateOnDefault: Set tofalseto prevent the feature from activating immediately. The default value istrue.AlwaysForceInstall: Forces the feature to install even if code execution fails. The default value isfalse.
Please refer to Chapter 9 to read more about the various settings.
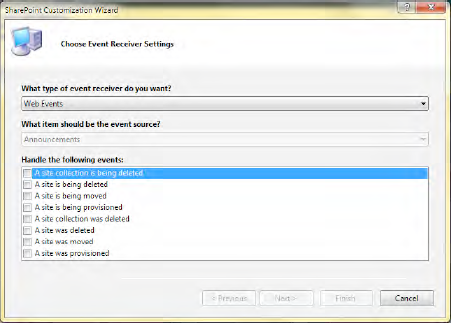
SharePoint 2010 supports events fired when you add, move, or delete a site or site collection. You can add these events as event receivers through a project template (see Figure 8-18).
Event receivers are usually deployed at a site or site collection level as part of a feature. Therefore it doesn't make sense to have site collection events such as adding. For site collections there are two events (the corresponding terms used in the wizard are in parentheses):
These and several more events available for sites are defined in SPWebEventReceiver:
WebDeleted: Fired after the site is deleted (asynchronous)WebMoving: Fired before the site has been renamed or moved (synchronous)WebMoved: Fired after the site has been moved to another collection (asynchronous)WebAdding: Fired before the site has been created (synchronous)WebProvisioned: Fired after the site has been created and is fully provisioned (asynchronous)
The provisioning procedure is—as all "after" events—asynchronous by default. This means that when the event executes, the site is probably not yet completely installed. To ensure that the event fires synchronously, you must set the Synchronization attribute to true.
The event receiver manifest file elements.xml controls this behavior. An example is shown in Listing 8-4.
Example 8.4. Definition of Site Receivers
<?xml version="1.0" encoding="utf-8"?>
<Elements xmlns="http://schemas.microsoft.com/sharepoint/">
  <Receivers >
    <Receiver>
      <Name>SiteEventReceiverWebDeleting</Name>
      <Type>WebDeleting</Type>
      <Assembly>$SharePoint.Project.AssemblyFullName$</Assembly>
      <Class>WebProvisioning.SiteEventReceiver.SiteEventReceiver</Class>
      <SequenceNumber>10000</SequenceNumber>
    </Receiver>
    <Receiver>
      <Name>SiteEventReceiverWebAdding</Name>
      <Type>WebAdding</Type>
      <Assembly>$SharePoint.Project.AssemblyFullName$</Assembly>
      <Class>WebProvisioning.SiteEventReceiver.SiteEventReceiver</Class>
      <SequenceNumber>10000</SequenceNumber>
    </Receiver>
    <Receiver>
      <Name>SiteEventReceiverWebProvisioned</Name>
      <Type>WebProvisioned</Type>
      <Assembly>$SharePoint.Project.AssemblyFullName$</Assembly>
      <Class>WebProvisioning.SiteEventReceiver.SiteEventReceiver</Class>
      <SequenceNumber>10000</SequenceNumber>
      <Synchronization>Synchronous</Synchronization>
    </Receiver>
  </Receivers>
</Elements>
For elements that support asynchronous behavior, you can force a synchronous call by using the <Synchronization> element. The receiver itself needs the assembly where the class is stored, the full class name including the namespace, a name that's used internally only, and the type, which is the internal event name listed in the preceding bullet points.
If there are several event handlers attached to the same event, you can use the sequence number element to define the order. If you create the file using Visual Studio 2010, the $SharePoint.Project.AssemblyFullName$ placeholder is used to reference the current project's assembly. If you create the file manually, you must enter the fully qualified assembly name in the <Assembly> element.
The event receiver for sites and webs is defined in the Microsoft.SharePoint.SPWebEventReceiver class. The example in Listing 8-5 modifies the title of the created site after provisioning.
Example 8.5. A Web Event Receiver
using System;
using System.Security.Permissions;
using Microsoft.SharePoint;
using Microsoft.SharePoint.Security;
using Microsoft.SharePoint.Utilities;
using Microsoft.SharePoint.Workflow;
namespace WebProvisioning.SiteEventReceiver
{
public class WebEventReceiver : SPWebEventReceiver
{
public override void WebDeleting(SPWebEventProperties properties)
{
try
{
if (properties.Web.Lists["Data"] != null)
{
properties.Cancel = true;
}
}
catch
{
}
base.WebDeleting(properties);
}
public override void WebAdding(SPWebEventProperties properties)
{
base.WebAdding(properties);
}
public override void WebProvisioned(SPWebEventProperties properties)
{
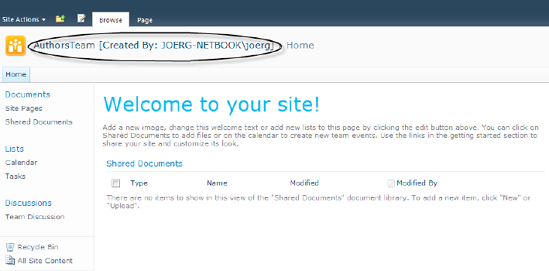
properties.Web.Title += String.Format(" [Created By: {0}]",
properties.UserDisplayName);properties.Web.AllowUnsafeUpdates = true;
properties.Web.Update();
base.WebAdding(properties);
}
}
}The code simply adds the current user's full name (including the domain) to the site's title (see Figure 8-19). In the web-deleting event it tries to prevent the action from being processed if a list named Data still exists. This is a common technique to prevent users from accidentally removing a site along with crucial data. Imagine backing up this data before the user will be able to remove the site and all containing lists. To abort the process, simply set the Cancel property to true.
If you don't want to let users deactivate a feature that's dedicated to such basic tasks, you can set the feature state to "hidden." While it is invisible, it is still working. When the feature is deployed as a solution, normally administrators will still be able to remove the solution to deactivate and remove the feature.
The cancellation of the web deletion is probably not obvious to the user, because from their perspective nothing happens. You can write to the event log or in some private log, but an end user with limited rights is unlikely to access either of those. To force SharePoint to display a message, you can throw an exception, as demonstrated in the following modified WebDeleting method:
public override void WebDeleting(SPWebEventProperties properties)
{
   try
{
if (properties.Web.Lists["Data"] != null)
{
properties.Cancel = true;
}
}
catch
{
throw new SPException("Cannot delete the site because it
has user data in it");
}
base.WebDeleting(properties);
}Now the exception is caught at a higher level and presented via an error message box. (It's not very aesthetic, but the text is communicated (see Figure 8-20).
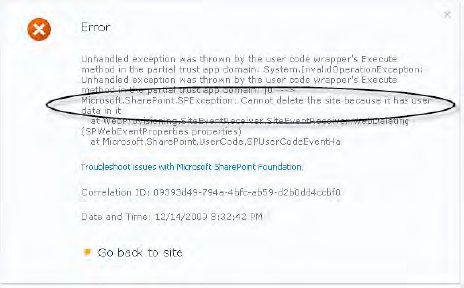
The exception aborts the procedure internally, so you don't need to explicitly set the Cancel property.
Transmitting messages via e-mail is widely supported in SharePoint. While .NET supports SMTP, you also have the option of choosing a delivery framework. Using SharePoint ensures that the required settings are maintained by Central Administration. However, both techniques have their specific pros and cons. Hence we show two examples.
Sending e-mail via ASP.NET uses the SmtpClient class, as shown in Listing 8-6.
Example 8.6. Sending E-Mail Using .NET
public static bool SendMail(string Subject, string Body,
              bool IsBodyHtml, string From, string To, string Cc, string Bcc)
{
    bool mailSent= false;
    try
    {
        SmtpClient smtpClient = new SmtpClient();
        smtpClient.Host = SPContext.Current.Site.WebApplication.
                          OutboundMailServiceInstance.Server.Address;
        MailMessage mailMessage = new MailMessage(From, To, Subject, Body);
        if (!String.IsNullOrEmpty(Cc))
        {
            MailAddress CCAddress = new MailAddress(Cc);
            mailMessage.CC.Add(CCAddress);
        }
        if (!String.IsNullOrEmpty(Bcc))
        {
            MailAddress BCCAddress = new MailAddress(Bcc);
            mailMessage.Bcc.Add(BCCAddress);
        }

        mailMessage.IsBodyHtml = IsBodyHtml;
        smtpClient.Send(mailMessage);
        mailSent = true;
    }
    catch (Exception) { return mailSent; }

    return mailSent;
}
Note that the code retrieves the SMTP host's address from the SharePoint configuration database. This ensures that you get the advantages of.NET-style mail delivery while keeping your configuration in Central Administration.
If you are not working in a SharePoint context, you can get the SPWebApplication reference from a new SPSite object:
public static string GetSharePointMailService(string mysite)
{
    string address;
    using (SPSite site = new SPSite(mysite))
    {
      address = site.WebApplication.OutboundMailServiceInstance.Server.Address;
    }
    return address;
}The embedded SharePoint function has fewer capabilities, but is as straightforward as possible, and is the preferred approach if you simply want to send e-mail:
SPUtility.SendEmail(web, useHtml, htmlEncode, to, subject, htmlBody)
The static method has three more overloads. One has an additional Boolean parameter that adds a footer. The other two use a StringDictionary to add additional headers to the mail. An example is shown in Listing 8-7.
Example 8.7. Sending E-mail Using SendMail from a Layout Page
try
{
   SPWeb thisWeb = this.Web;  // Requires LayoutsPageBase
   string to = "[email protected]";
   string subject = "Book Message";
   string body = "A message from SharePoint";
   bool success = SPUtility.SendEmail(thisWeb, true, true, to, subject, body);
}
catch (Exception ex)
{
  // Exception handling skipped for clarity
}
The parameters are shown in Table 8-4.
Table 8.4. Parameters of the SendMail Method
Name | Type | Description |
|---|---|---|
|
| An object that represents the site |
|
| A collection of additional headers |
|
| Used to append an HTML tag to the message ( |
|
| Encodes the message and replaces characters in HTML tags with entities |
|
| The address to which to send the e-mail |
|
| Contains the subject for the e-mail message |
|
| Contains the body of the e-mail message |
|
| Used if there is a footer to be appended to the e-mail |
The headers parameter is used instead of the to and subject parameters. It allows you to set all possible mail headers and forces you to add at least the to header that way. An example follows:
StringDictionary headers = new StringDictionary();
headers.add("to","[email protected]");
headers.add("cc","[email protected]");
headers.add("bcc","[email protected]");
headers.add("from","[email protected]");
headers.add("subject","Send an EMail from SPUtility");
headers.add("content-type","text/html");
string bodyText ="This is an <b>html</b> formatted message.";
SPUtility.SendEmail(web, headers, bodyText);Note that StringDictionary is defined in the System.Collections.Specialized namespace.
Sending an e-mail from a service when SPContext is not available could fail. As a workaround, you have to prevent the mail function from reading the current context by using HttpContext.Current = null. If it can't, it will retrieve the right context and it will then work. The example in Listing 8-8 shows this.
Example 8.8. Sending E-mail Using SendMail from a WCF Service
try
{
   using (SPSite site = new SPSite("http://sharepointserve"))
   {
     SPWeb thisWeb = site.RootWeb;
     {
        string to = "[email protected]";
        string subject = "Book Message";
        string body = "A message from SharePoint";
        HttpContext curCtx = HttpContext.Current;
        HttpContext.Current = null;
        bool success = SPUtility.SendEmail(thisWeb, true, true, to, subject, body);
        HttpContext.Current = curCtx;
     }
   }
}
catch (Exception ex)
{
  // Exception handling skipped for clarity
}
The current context is set to null to force the context to be retrieved again. Saving the current context ensures that the service works properly after the method has been executed.
Note
ASMX Web Services require the same procedure.
Aside from the utilities and helper classes included within the SharePoint namespaces, it's useful to encapsulate some functions. In particular, there are common object access methods that are used often in an application. If you decompose the helper classes into the subjects they address, you arrive at four areas, each encapsulated into its own manager class:
DataManagerSiteManagerSecurityManagerExtensions
We suggest using at least two of these classes for your projects to include your own useful methods. In this section we show some examples of functions that such classes might contain. We focus only on the DataManager and Extensions classes here, as these two are usually the most helpful.
A data manager encompasses all functions required to access sites, webs, and lists. These functions are nondeterministic and therefore declared static.
In previous chapters we explained how to raise the access rights by elevating privileges. It makes sense to encapsulate this in a method that returns an elevated web, as shown in Listing 8-9. Note that the caller is responsible for disposing the object afterward to free up memory properly.
Example 8.9. Creating an SPWeb Object with Elevated Privileges
public static SPWeb GetElevatedWeb()
{
    SPWeb web = null;
    try
    {
        SPSecurity.RunWithElevatedPrivileges(
            () =>
            {
                if (SPContext.Current != null)
                {
                    using (SPSite site = new SPSite(SPContext.Current.Web.Url))
                    {
                        web = site.OpenWeb();
                    }
                }
            });
    }
    catch
    {
        if (web != null)
        {
web.Dispose();
web = null;
}
}
return web;
}The code uses the current context to retrieve the current web and returns the same web with the System Account as the current user.
You can obtain a list instance from the current SPWeb via the Lists property. A custom method results in cleaner code. Listing 8-10 demonstrates one way to make small improvements to simplify the higher-level calling code.
Example 8.10. Two Overloads of a Method That Retrieves a List
public static SPList GetList(string title, SPWeb web)
{
    return web.Lists.Cast<SPList>().FirstOrDefault(list => list.Title == title);
}

public static SPList GetList(Guid id, SPWeb web)
{
    return web.Lists[id];
}
As well as using either the list's Title or its Guid to get the list instance, you can modify this code to use any other property to select a list, such as RootFolder.Name to use the internal name.
When working with list data you should use a strongly typed data model. With SPMetal you can create a LINQ to SharePoint layer for existing lists. In a distributed environment, however, this is not generally the best solution. A "self-made" data context and a hand-written data model are sometimes better options than using SPMetal. Such a data layer is thin, easy to create, and fast.
First, assume you want to get a list instance, not just as an SPList object, but as something more type-safe. Such a method could look like this:
public static SPList GetList<T>(SPWeb web) where T : BaseSPListItem
{
    return GetList(ApplicationResources.ResourceManager.GetString(typeof(T).Name),
                   web);
}
The GetList call leads to the method shown in Listing 8-11. The lists the application actually uses are stored in an application resource. The crucial thing is the type T and the base class used to constrain the generic. The SPWeb object is used explicitly to allow the caller to decide whether it's a regular object or one with elevated privileges.
Second, the BaseSPListItem class plays a vital role. It encapsulates access to a list item and provides serialization. Serializing SharePoint objects can be messy, because the underlying COM objects prevent you from doing so. The base class in Listing 8-11 uses methods for direct SharePoint object access to avoid serialization. Serializing here means that the object is destroyed on serializing—only the list's ID and item's ID survive. The deserializer calls the default constructor and re-creates the object.
Example 8.11. Serializable Base Class with Standard Fields
public static class BaseSPListItemFields
{
    public const string ID = "ID";
    public const string UniqueID = "UniqueID";
    public const string Title = "Title";
    public const string Name = "Name";
    public const string Author = "Author";
    public const string Editor = "Editor";
    public const string Created = "Created";
    public const string Modified = "Modified";
}

[Serializable()]
public abstract class BaseSPListItem
{

    private SPListItem _item;

    public SPListItem GetListItem()
    {
        return _item;
    }

    public void SetListItem(SPListItem item)
    {
        _item = item;
    }

    public SPList GetBaseList()
    {
        return _item.ParentList;
    }

    protected BaseSPListItem()
    {
        if (ID != Guid.Empty)
        {
            SPList list = DataManager.GetList(ParentList, SPContext.Current.Web);
            _item = list.GetItemByUniqueId(ID);
        }
    }

    protected BaseSPListItem(SPListItem listItem)
        : this()
    {
        this._item = listItem;
        this.ParentList = _item.ParentList.Title;
        this.ID = _item.UniqueId;
this.ParentWeb = _item.Web.Title;
}
public Guid ID
{
get;
set;
}
public string ParentList
{
get;
set;
}
public string ParentWeb
{
get;
set;
}
/// <summary>
/// Internal ID of the ListItem
/// </summary>
public int GetID()
{
return _item.ID;
}
public Guid GetUniqueID()
{
return _item.UniqueId;
}
public String Title
{
get { return (String)GetValue(BaseSPListItemFields.Title); }
set { SetValue(BaseSPListItemFields.Title, value); }
}
public String Name
{
get { return (String)GetValue(BaseSPListItemFields.Name); }
set { SetValue(BaseSPListItemFields.Name, value); }
}
public SPFieldLookupValue GetAuthor()
{
return new SPFieldLookupValue(
(String)GetValue(BaseSPListItemFields.Author));
}
public SPFieldLookupValue GetEditor()
{return new SPFieldLookupValue(
(String)GetValue(BaseSPListItemFields.Editor));
}
public DateTime? GetModified()
{
return GetValue(BaseSPListItemFields.Modified) as DateTime?;
}
public DateTime? GetCreated()
{
return GetValue(BaseSPListItemFields.Created) as DateTime?;
}
public virtual void EnsureTitle()
{
}
public object GetValue(Guid fieldID)
{
object retVal = null;
if (_item != null)
{
try
{
retVal = _item[fieldID];
}
catch { }
}
return retVal;
}public void SetValue(Guid fieldID, object value)
{
if (_item != null)
{
_item[fieldID] = value;
}
}
public object GetValue(String propertyName)
{
object retVal = null;
if (_item != null)
{
try
{
retVal = _item[propertyName];
}
catch { }
}
return retVal;
}
public void SetValue(String propertyName, object value)
{
if (_item != null)
{
_item[propertyName] = value;
}
}
public bool DoesFieldExist(String fieldName)
{
return _item.Fields.ContainsField(fieldName);
}
public override string ToString()
{
StringBuilder sb = new StringBuilder();
String del = "";
sb.Append(this.GetType().Name + "[");
foreach (PropertyInfo pi in this.GetType().GetProperties())
{
if (pi.GetGetMethod() != null)
{
object obj = pi.GetValue(this, null);
sb.Append(del + pi.Name + "=" +
((obj == null) ? "NULL" : obj.ToString()));
del = ", ";
}
}
sb.Append("]");
return sb.ToString();
}
public void Update()
{
if (_item != null)
{
_item.Update();
}
}
public void UpdateUnsafe()
{
if (_item != null)
{
using (SPWeb web = this._item.Web)
{
bool allow = web.AllowUnsafeUpdates;
web.AllowUnsafeUpdates = true;
_item.Update();
web.AllowUnsafeUpdates = allow;
}
}
}
public void SystemUpdate(){
if (_item != null)
{
_item.SystemUpdate();
}
}
public void SystemUpdateUnsafe()
{
if (_item != null)
{
using (SPWeb web = this._item.Web)
{
bool allow = web.AllowUnsafeUpdates;
web.AllowUnsafeUpdates = true;
_item.SystemUpdate();
web.AllowUnsafeUpdates = allow;
}
}
}
public void Delete()
{
if (_item != null)
{
_item.Delete();
}
}
public void DeleteUnsafe()
{
if (_item != null)
{
using (SPWeb web = this._item.Web)
{
bool allow = web.AllowUnsafeUpdates;
web.AllowUnsafeUpdates = true;
_item.Delete();
web.AllowUnsafeUpdates = allow;
}
}
}
}Several methods give direct access to common operations, such as saving and deleting. This is all possible using the "unsafe" operation (AllowUnsafeUpdates).
Using this base class is straightforward. Any class in the data model simply implements this class and adds the field access properties. This can look like Listing 8-12.
Example 8.12. Sample Class That Provides Type-Safe ListItem Access
public static class RequestListFields
{
    public const string MainCategory = "MainCategory";
    public const string SubCategory = "SubCategory";
    public const string DetailCategory = "DetailCategory";
}

[Serializable]
public class RequestList : BaseSPListItem
{
    public RequestList() : base() { }
    public RequestList(SPListItem listItem) : base(listItem) { }

    public SPFieldLookupValue ParentRequest
    {
        get { return new SPFieldLookupValue(
              base.GetValue(RequestListFields.ParentRequest) as string); }
        set { base.SetValue(RequestListFields.ParentRequest, value); }
    }

    public string MainCategory
    {
        get { return base.GetValue(RequestListFields.MainCategory) as string; }
        set { base.SetValue(RequestListFields.MainCategory, value); }
    }
    public string SubCategory
    {
        get { return base.GetValue(RequestListFields.SubCategory) as string; }
        set { base.SetValue(RequestListFields.SubCategory, value); }
    }
    public string DetailCategory
    {
        get { return base.GetValue(RequestListFields.DetailCategory) as string; }
        set { base.SetValue(RequestListFields.DetailCategory, value); }
    }
}
This is merely a suggestion of how to deal with data. You could also extend existing classes using extension methods to simplify the access.
Sometimes you need to get a list by its internal name. This requires retrieving the complete collection of lists and checking the RootFolder.Name property. Using LINQ makes this easy, and using an extension method hides the implementation from the developer. This method reads the complete collection of lists into memory, but not the lists' items.
public static SPList GetListByInternalName(this SPWeb web, string internalname)
{
return web.Lists.Cast<SPList>().FirstOrDefault(
list => list.RootFolder.Name == internalname);
}Once you have a list, you can do many things with it and its items. Extending the SPList object is a clever way of encapsulating common operations within simple method calls. The CanCreateItems method checks whether the current user has the appropriate permissions to add items to the list:
public static bool CanCreateItems(this SPList list)
{
    return list != null && (list.EffectiveBasePermissions &
           SPBasePermissions.AddListItems) != SPBasePermissions.EmptyMask;
}
The next two methods perform a similar check to determine whether the user has read or write permissions, respectively:
public static bool CanReadItems(this SPList list)
{
    return list != null && (list.EffectiveBasePermissions &
           SPBasePermissions.ViewListItems) != SPBasePermissions.EmptyMask;
}
public static bool CanWriteItems(this SPList list)
{
    return list != null && (list.EffectiveBasePermissions &
           SPBasePermissions.EditListItems) != SPBasePermissions.EmptyMask;
}
The CanDeleteItems method retrieves all the items of a list as an enumerable collection, enabling you to run LINQ to Object queries against the items. However, use this method with caution, as the entire list is read into memory, even if a subsequent LINQ clause extracts a single item.
public static bool CanDeleteItems(this SPList list)
{
    return list != null && (list.EffectiveBasePermissions &
           SPBasePermissions.DeleteListItems) != SPBasePermissions.EmptyMask;
}
The next method performs a query first and then returns the list of items. This call does not read the complete list in case of GetItemsByFieldEquals. The CAML instructions ensure that it's the fastest way to get a filtered list of items. GetItems does not use any filter, and returns all items.
public static IEnumerable<SPListItem> GetItems(this SPList list)
{
    return list.GetItemsByQuery(String.Empty);
}
public static IEnumerable<SPListItem> GetItemsByFieldEquals(this SPList list,
                                                             string value,
                                                             string field)
{
    var query = new XElement("Where",
                    new XElement("Eq",
                        new XElement("FieldRef",
                            new XAttribute("Name", field)),
                        new XElement("Value", value)
                        )
                    );
return list.GetItemsByQuery(query.ToString(SaveOptions.DisableFormatting)); }
The next method closely corresponds to the previous one, but it uses the Contains operator instead of Eq:
public static IEnumerable<SPListItem> GetItemsByFieldContains(this SPList list, string value, string field)
{
var query = new XElement("Where",
new XElement("Contains",
new XElement("FieldRef",
new XAttribute("Name", field)),
new XElement("Value", value)
)
);
return list.GetItemsByQuery(query.ToString(SaveOptions.DisableFormatting));
}Lookup fields need slightly different treatment. Setting the LookupId="true" attribute ensures that the CAML query works as expected:
public static IEnumerable<SPListItem> GetItemsByFieldLookupId(this SPList list,
                                                               int lookupId,
                                                               string field)
{
    var query = new XElement("Where",
                    new XElement("Eq",
                        new XElement("FieldRef",
                            new XAttribute("LookupId", "true"),
                            new XAttribute("Name", field)),
                        new XElement("Value", value)
                        )
                    );
    return list.GetItemsByQuery(query.ToString(SaveOptions.DisableFormatting));
}
If a simple Eq or Contains operator is inadequate, you can pass a query. The following example accepts CAML as a string:
public static IEnumerable<SPListItem> GetItemsByQuery(this SPList list, string caml)
{
    if (list != null)
    {
        if (list.ItemCount <= Constants.PaginationThreshold)
        {
            SPQuery query = new SPQuery();
            query.ViewAttributes = "Scope="Recursive"";
            query.Query = caml;
            SPListItemCollection items = list.GetItems(query);
            foreach (SPListItem item in items)
            {
                yield return item;
            }
        }
        else
{
SPQuery query = new SPQuery();
query.ViewAttributes = "Scope="Recursive"";
query.Query = caml;
query.RowLimit = Convert.ToUInt32(Constants.RowLimit);
do
{
SPListItemCollection items = list.GetItems(query);
foreach (SPListItem item in items)
{
yield return item;
}
query.ListItemCollectionPosition = items.ListItemCollectionPosition;
} while (query.ListItemCollectionPosition != null);
}
}
}This code assumes you have a constant defined in Constants.PaginationThreshold, which determines from what number of items the method starts using paging. (For more information about paging, refer to Chapter 4.)
The following method uses a similar approach to return just one item. If the query returns more items, the first in the collection is taken.
public static SPListItem GetItemByQuery(this SPList list, string caml)
{
    SPQuery query = new SPQuery();
    query.ViewAttributes = "Scope="Recursive"";
    query.Query = caml;
    query.RowLimit = 1;
    SPListItemCollection items = list.GetItems(query);
    return items.Cast<SPListItem>().FirstOrDefault();
}
Creating an item is easy. This extension simply improves code readability:
public static SPListItem CreateItem(this SPList list)
{
    return list.Items.Add();
}
While the methods shown previously create or return items, the subsequent methods deal with existing items. These two methods set and get a value using a field's internal name:
public static void SetValue(this SPListItem item, string internalname, object value)
{
    SPField field = item.Fields.GetFieldByInternalName(internalname);
    item[field.Id] = value;
}
public static object GetValue(this SPListItem item, string internalname)
{
    SPField field = item.Fields.GetFieldByInternalName(internalname);
    return item[field.Id];
}
Getting a lookup value is often a pain, because the object type cannot be cast directly. Instead, a constructor call is required. This is what the GetLookup method encapsulates:
public static SPFieldLookupValue GetLookup(this SPListItem item)
{
    return item != null ? new SPFieldLookupValue(item.ID, String.Empty) : null;
}
Updating an item can either be done by the Update method, which sets the current user and processes attached workflows and events, or by SystemUpdate, which internally sets the system account and suppresses security validation on GET requests. Quite often, internal checks need to be suppressed, and to do so the AllowUnsafeUpdates property must be set to true.
public static void UpdateUnsafe(this SPListItem item)
{
    if (item != null)
    {
        bool allow = item.Web.AllowUnsafeUpdates;
        item.Web.AllowUnsafeUpdates = true;
        item.Update();
        item.Web.AllowUnsafeUpdates = allow;
    }
}

public static void SystemUpdateUnsafe(this SPListItem item)
{
    if (item != null)
    {
        bool allow = item.Web.AllowUnsafeUpdates;
        item.Web.AllowUnsafeUpdates = true;
        item.SystemUpdate();
        item.Web.AllowUnsafeUpdates = allow;
    }
}
public static void DeleteUnsafe(this SPListItem item)
{
    if (item != null)
    {
        bool allow = item.Web.AllowUnsafeUpdates;
        item.Web.AllowUnsafeUpdates = true;
        item.Delete();
        item.Web.AllowUnsafeUpdates = allow;
    }
}
The two extension methods shown next are simplifications for lazy coders. They replace the LookupId and LookupValue properties of the SPFieldLookupValue type with Id and Value properties:
public static int Id(this SPFieldLookupValue lookup)
{
    return lookup != null ? lookup.LookupId : 0;
}
public static string Value(this SPFieldLookupValue lookup)
{
    return lookup != null ? lookup.LookupValue : String.Empty;
}
Caching is a common technique to avoid unnecessary calls to a database. The previous examples showed that it is possible to extend SharePoint types to support LINQ to Objects. Remember that this will consume a lot of memory if you have very large lists. Most projects do not have more than a few thousand items in a list, and with a dozen gigabytes of memory or more available on a server, it seems a good idea to store lists in RAM. Using the Cache object, the requested data is shared between the users, and the list is retrieved once only.
public static class LinqCacheExtensions
{
    public static IEnumerable<T> Cache<T>(this IEnumerable<T> source,
                                           string key,
                                           DateTime absoluteExpiration)
    {
        var items = HttpRuntime.Cache.Get(key) as List<T>;
        if (items == null)
        {
            items = source.ToList();
            HttpRuntime.Cache.Add(key, items, null, absoluteExpiration,
                                  System.Web.Caching.Cache.NoSlidingExpiration,
                                  CacheItemPriority.Normal, null);
        }
        foreach (var item in items)
        {
            yield return item;
        }
    }

    public static IEnumerable<T> Cache<T>(this IEnumerable<T> source, string key,
                                          TimeSpan slidingExpiration)
    {
        var items = HttpRuntime.Cache.Get(key) as List<T>;
        if (items == null)
        {
            items = source.ToList();
            HttpRuntime.Cache.Add(key, items, null,
                                  System.Web.Caching.Cache.NoAbsoluteExpiration,
                                  slidingExpiration,
                                  CacheItemPriority.Normal, null);
        }
        foreach (var item in items)
        {
            yield return item;
        }
    }
}
A LINQ query that uses the Cache<T> method will be cached using the HttpRuntime.Cache store. The method extends IEnumerable, a type that the method GetItemsByQuery will return, for example.
In this chapter, you were introduced to a powerful aspect of SharePoint programming: the application page programming style. Programming application pages extends the world of SharePoint to whatever you like. Any ASP.NET-like application can run in the context of SharePoint and get instant access to the object model's API.
SharePoint programming is mostly ASP.NET programming. However, regarding resources and localization, there are some differences. In this chapter, this was covered along with several usage scenarios.
Furthermore, the event model is an outstanding programming area. Events fired at the site and feature levels were explained in this chapter. Such global events allow developers to have comprehensive influence on what happens if end users activate or deactivate features, or create new sites somewhere deep in the structure.
Sending e-mail is a vital part of any collaboration solution. In this chapter, you saw how to use the standard .NET mail function properly, as well as how to use the dedicated mail function that SharePoint provides.
For real-life applications, extension methods make your life as a developer easier. Custom helper classes encapsulate repetitive operations into extensions. In particular, LINQ queries are well supported by LINQ to Object operations, if LINQ to SharePoint is not appropriate for some reason.