
While most of the features you need for programming SharePoint are part of the SharePoint Foundation, eventually you will encounter advanced matters that require SharePoint Server. Programming enterprise features is another vast conglomerate of assemblies, namespaces, and classes. Describing all these features thoroughly would fill an entire book. In this chapter, we will give a brief introduction to some subjects that SharePoint Server adds to the mix.
This chapter includes the following:
Search: Query the index and present search results.
My Sites and personalization: Create and maintain My Sites and personalization settings.
Publishing webs: Publish content and documents and work with Publishing webs.
Advanced document features: Learn to check documents in and out, understand versions, and program against the taxonomy API.
Records management: Understand records management and how to deal with documents under the surveillance of the records store.
This chapter merely provides some ideas and entry points. You may need more information to create real applications. We have provided several links to the MSDN documentation and other sources for your further research.
SharePoint as a collaboration platform can access information stored in SharePoint lists and libraries or throughout the enterprise as external content. To search this information, SharePoint offers various options. With SharePoint 2010, the importance of search is elevated, as indicated by the large number of search products available with this release.
Starting with SharePoint Foundation 2010 and its basic support for searching, you can choose from a variety of tools to implement enterprise search in SharePoint:
SharePoint Foundation 2010: Basic search functionality is already available in SharePoint Foundation. Although the functionality and performance are limited in this edition, the basic setup is similar to all other search versions. With SharePoint Foundation 2010, search is limited to only one site at a time—you cannot search across multiple sites.
Search Server 2010 Express: This is the free edition of Search Server 2010; it allows crawling and indexing of content.
Search Server 2010: This offers improved scalability and performance for enterprise search in SharePoint. While the Express edition only supports up to a maximum of 10 million indexed items, the Search Server 2010 supports up to 100 million entries.
SharePoint Server 2010: In the SharePoint Server edition, searching is supported with similar features as those in Search Server 2010. In addition, people search and social components as well as taxonomies are available in this edition.
FAST Search Server 2010 for SharePoint: This will meet the most sophisticated needs for enterprise search in SharePoint with a rich set of APIs and connectors.
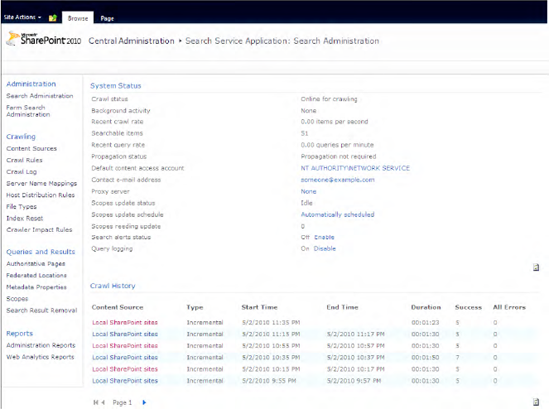
Before you can search in SharePoint, you need to configure the search service and the crawler that builds the index. You can manage the service applications for search in Central Administration, under Application Management
To access the index from code to retrieve the search results in SharePoint Server 2010, you can choose between two object models:
Federated search object model: This object model allows you to gather information from multiple search engines or repositories. You can query against SharePoint Server search, FAST Search Server 2010 for SharePoint, and custom search runtimes. This object model actually calls the query object model to execute the search for SharePoint Server search and FAST search.
Query object model: You can use the query object model to build custom search Web Parts and search applications. You can use this object model to query against SharePoint Server search and FAST Search Server 2010 for SharePoint. The class
FullTextSqlQueryallows you to build complex search queries based on SQL syntax. TheKeywordQueryclass can be used to issue search queries based on simple query syntax. With Fast Search Server 2010, this class can also be used to run queries based on the Fast Query Language (FQL), which supports advanced queries in enterprise environments.
Both object models are implemented in the Microsoft.Office.Server.Search.Query namespace and require references to the following DLLs:
Microsoft.Office.Server.dllMicrosoft.Office.Server.Search.dllMicrosoft.SharePoint.dll
Working with SharePoint Foundation, there is another namespace available that contains a subset of the SharePoint Server functionality. It is called Microsoft.SharePoint.Search.Query, and it comprises the query object model with reduced functionality. It is contained in Microsoft.SharePoint.Search.dll.
As an example of how to use custom search queries, Listing 18-1 demonstrates using the query object model to issue a search query based on a keyword search with the KeywordQuery class. This example is built as an application page with a text input field called txtSearch, a button for submitting the query called btnSearch, and an SPGridView called searchGrid.
The OnClick handler for the button creates a KeywordQuery object and passes the text from the text field to the QueryText property. After calling Execute, the results are available through the ResultTable at the index ResultType.RelevantResults in the returned ResultTableCollection. Using a DataTable, these results are bound to the SearchGrid for display. The relevant table columns are bound using the SetGridColumns method during Page_Load.
Example 18.1. Custom Search with the Query Object Model
using System;
using Microsoft.SharePoint;
using Microsoft.SharePoint.WebControls;
using System.Data;
using Microsoft.Office.Server;
using Microsoft.Office.Server.Search;
using Microsoft.Office.Server.Search.Query;

namespace Apress.SP2010.Layouts.CustomSearch
{
    public partial class ApplicationPage1 : LayoutsPageBase
    {
        protected void Page_Load(object sender, EventArgs e)
        {
            if (!IsPostBack)
            {
                SetGridColumns();
            }
        }

        // The event is called when the search button is pressed
        protected void btnSearch_Click(object sender, EventArgs e)
{
DataTable search = new DataTable();
using (SPSite site = new SPSite(SPContext.Current.Web.Site.Url))
{
KeywordQuery query = new KeywordQuery(site);
query.ResultsProvider = Microsoft.Office.Server.Search.Query.
SearchProvider.Default;
query.ResultTypes = ResultType.RelevantResults;
query.KeywordInclusion = KeywordInclusion.AllKeywords;
query.QueryText = txtSearch.Text;
ResultTableCollection results = query.Execute();
if (results.Count > 0)
{
ResultTable relevant = results[ResultType.RelevantResults];
search.Load(relevant);
DataView view = new DataView(search);
// Fill the SPGridView defined in the page markup
searchGrid.DataSource = search;
searchGrid.DataBind();
}
}
}
private void SetGridColumns()
{
SPBoundField fieldTitle = new SPBoundField();
fieldTitle.HeaderText = "Title";
fieldTitle.DataField = "Title";
SearchGrid.Columns.Add(fieldTitle);
SPBoundField fieldPath = new SPBoundField();
fieldPath.HeaderText = "Path";
fieldPath.DataField = "Path";
SearchGrid.Columns.Add(fieldPath);
SPBoundField fieldAuthor = new SPBoundField();
fieldAuthor.HeaderText = "Edited";
fieldAuthor.DataField = "Write";
SearchGrid.Columns.Add(fieldAuthor);
}
}
}Before you can run search queries, you also need to specify the search server that should be used for indexing in Central Administration, under Application Management
This basic example indicates how to search in SharePoint. Particularly when using FAST Search, there are numerous additional features that enable you to implement feature-rich enterprise search in SharePoint.
When working with SharePoint Foundation, you need to use the Microsoft.SharePoint.Search.Query namespace (instead of Microsoft.Office.Server.Search.Query) in the previous example. SharePoint Foundation provides only a subset of the search functionality available to SharePoint Server or FAST Search Server. Table 18-1 compares some of the search capabilities for different SharePoint products.
Table 18.1. Comparing Search Capabilities
Feature | SharePoint Foundation 2010 | SharePoint Server 2010 | FAST Search Server 2010 |
|---|---|---|---|
Basic search | Yes | Yes | Yes |
Document preview | No | No | Yes |
Indexing sites | Yes | Yes | Yes |
Indexing external content | No | Yes | Yes |
People search | No | Yes | Yes |
Query federation | No | Yes | Yes |
UI-based administration | Limited | Yes | Yes |
Visual best bets | No | Limited | Yes |
Tip
You can find detailed information about the different search capabilities at www.microsoft.com/downloads/details.aspx?FamilyID=d7c0091e-5766-496d-a5fe-94bea52c4b15&displaylang=en.
Using data from user profiles and My Sites enables you to enrich your SharePoint 2010 application with user-specific content. You can work with all the data that the user profiles and My Sites contain. The following sections show you how to do the following:
Use data from a user profile and work with it
Create a My Site programmatically and work within its context
Personalize a user's settings
Each section contains examples that give you the basic ideas for creating real applications.
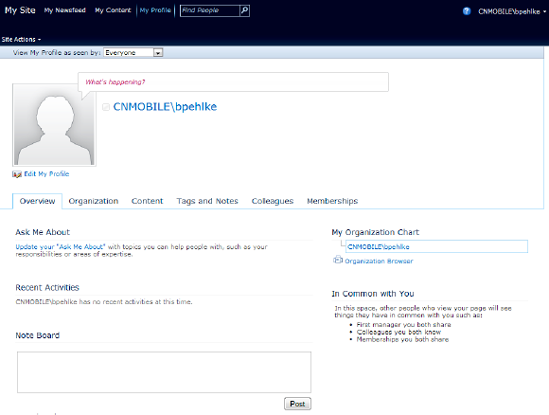
The user profile page (see Figure 18-2) in SharePoint Server 2010 is laid out like many social networks such as Facebook or LinkedIn. A profile page contains the following:
Information about the user
A note board
The latest activities
Organization chart and colleagues
Tags, membership in groups, and so on
On the code side, the basic class for working with user profiles is the UserProfileManager class in the Microsoft.Office.Server namespace.
With the UserProfileManager class, you can basically create, get, and remove user profiles. If you want to maintain the user profile metadata such as properties, you should use the UserProfileConfigManager class because the UserProfileManager class's metadata access is meant to be read-only.
Listing 18-2 shows you how to create a user profile and display the colleagues of the current user in a ListBox control. It's supposed to run on a web form and put output in a ListBox control named lbCollegues.
Example 18.2. Display Colleagues of the Given User
public void GetColleaguesFromUserProfile()
{
   // Get the current site context
   strUrl = "http://localhost";
   SPSite site = new SPSite(strUrl);
   SPServiceContext serviceContext = SPServiceContext.GetContext(site);

   // Initialize the user profile manager
   UserProfileManager upm = new UserProfileManager(serviceContext);

   // Create a user profile
   string sAccount = "domain\bpehlke";
   if (!upm.UserExists(sAccount))
        upm.CreateUserProfile(sAccount);

   // Get the colleagues from user profile
   UserProfile u = upm.GetUserProfile(sAccount);
   foreach (var colleague in u.Colleagues.GetCommonColleagues())
   {
      lbColleagues.Items.Add(colleague.DisplayName);
   }
}
You can extend this example by displaying the latest changes of the current user's profile, for instance, in a custom Web Part that you can put on a Team Site home page. Listing 18-3 shows you how to retrieve these changes for a given user. It's supposed to run on a web form and put output in a Label control named lblOutput.
Example 18.3. Display Latest Changes of the Specified User Profile in a Label Control
public void GetChangesForUserProfile()
{
   //get current service context
   strUrl = "http://localhost";
   SPSite site = new SPSite(strUrl);
   SPServiceContext serviceContext = SPServiceContext.GetContext(site);

   //initialize user profile manager
   UserProfileManager upm = new UserProfileManager(serviceContext);

   //get the changes for the user profile
   string sAccount = "domain\bpehlke";
   UserProfile u = upm.GetUserProfile(sAccount);
   foreach (var change in u.GetChanges())
   {
    lblOutput.Text += "<br>" + change.ChangeType + " "
                             + change.ChangedProfile + " "
                             + change.EventTime.ToShortDateString();
   }
}To create and work with My Sites, you need the user profiles and the UserProfileManager class. Listing 18-4 shows you how to create a My Site and work within the context of this site.
Example 18.4. Display Latest Activities of the Current User
public void CreatePersonalSite()
{
   //get current service context
   SPServiceContext serviceContext = SPServiceContext.Current;

   //initialize user profile config manager
   UserProfileManager upm = new UserProfileManager(serviceContext);
   string currentUser = "domain\bpehlke";
   UserProfile up = upm.GetUserProfile(currentUser);
   up.CreatePersonalSite();
   SPSite mysite = up.PersonalSite;

   using (SPWeb web = mysite.OpenWeb())
   {
     //do something in the My Site context
   }
}
This way, it is very easy to work with the My Sites programmatically.
A lot of information is stored in the user profile properties, including the following:
Name, address, and telephone number
E-mail, department, job title, and so on
With the UserProfileConfigManager class, you can maintain properties like these easily. Whereas this class lets you add, edit, and remove properties, the properties itself can be read and set by the user profile object.
Listing 18-5 shows you how to work with the properties and use the data stored in it. It's supposed to run on a web form and put output in a Label control named lblOutput.
Example 18.5. Using User Profile Properties
public void CreatePersonalSite()
{
   //get current service context
SPServiceContext serviceContext = SPServiceContext.Current;
//initialize user profile manager
UserProfileManager upm = new UserProfileManager(serviceContext);
string currentUser = "domain\bpehlke";
UserProfile u = upm.GetUserProfile(currentUser);
//get a list of all user profile properties
foreach (var prop in u.Properties)
{
lblOutput.Text += "<br>" + prop.DisplayName;
}
//set the department property
string department= "IT-Services";
u[PropertyConstants.Department].Add(department);
u.Commit();
//read the new department value
lblOutput.Text += "<br>" + "New department value: "
+ u[PropertyConstants.Department].Value.ToString();
}SharePoint 2010 ships with a rich set of functions for developing professional web content management (WCM) solutions. From configuration, customization, page authoring, and deployment to optimization and web analytics, SharePoint offers a broad range of WCM features.
This section provides an overview of the most important WCM functions and includes the entry points to the API for developers.
Tip
You can find a good entry point for working with the WCM API in MSDN at http://msdn.microsoft.com/en-us/library/ff512785(office.14).aspx.
The WCM programming model is also known as the Publishing API. Table 18-2 describes several important namespaces when working with this API.
Table 18.2. Important Namespaces of the Publishing API
Description | |
|---|---|
Source: | |
| Provides the fundamental publishing infrastructure for web content management. |
| Provides content deployment configuration, path, and job functionality. |
| Code to support PowerShell cmdlet object model used for publishing features. |
| Contains the fields, field values, and field behavior, including base types, the content type ID, HTML fields, tags, and validation, as well as image fields and field values, the publishing schedule start dates and end dates, summary link fields, and field values. |
| Provides classes that represent the node, type, collection, data source, provider, and proxy functionality to support navigation. |
| Supports the structure, appearance, and behavior of SharePoint Server web controls. These include types such as base fields, selectors, and other containers, along with the display types, fields, panels, state objects, and Web Parts. |
To work with the Publishing API, there is a class called PublishingWeb. This class is a wrapper class for the SPWeb object. Listing 18-6 shows how to check whether an SPWeb instance has the SharePoint Publishing feature activated. For this, the static method PublishingWeb.IsPublishingWeb is used, passing in an SPWeb instance as a parameter. To obtain a PublishingWeb instance, you can use the static method PublishingWeb.GetPublishingWeb (see Listing 18-6).
Example 18.6. Using the PublishingWeb Class
PublishingWeb publishingWeb = null;
if (PublishingWeb.IsPublishingWeb(web))
{
    publishingWeb = PublishingWeb.GetPublishingWeb(web);
}
else
{
throw new System.ArgumentException(
"The SPWeb " + web.Title + " is not a PublishingWeb", "web");
}With the PublishingWeb class, you can access the various page layouts (GetAvailablePageLayouts) and also all the publishing pages residing in the site (GetPublishingPages). Listing 18-7 demonstrates how to use those methods to add a new page to the site pages library.
Example 18.7. Adding a New Publishing Page to the Site Pages Library
PublishingWeb publishingWeb = PublishingWeb.GetPublishingWeb(web);
string pageName = "MyTestPage.aspx";

PageLayout[] pageLayouts = publishingWeb.GetAvailablePageLayouts();
PageLayout currPageLayout =  pageLayouts[0];

PublishingPageCollection pages = publishingWeb.GetPublishingPages();
PublishingPage newPage = pages.Add(pageName,currPageLayout);

newPage.ListItem[FieldId.PublishingPageContent] = "This is my content";
newPage.ListItem.Update();
newPage.Update();
newPage.CheckIn("This is just a comment");
In this code, a PageLayout instance with index 0 is selected from all the available page layouts. By using the PageLayout instance, a new page of type PublishingPage is added to the site pages library. Afterward, the content of a field, identified by FieldId.PublishingPageContent, is set to a HTML text value, followed by an update and check-in.
The deployment of content from source to destination is a common task in web publishing scenarios. Therefore, SharePoint provides a rich deployment API under the namespace Microsoft.SharePoint.Publishing.Administration. The deployment process always follows these three steps:
Export content from the site collection of a source farm.
Transport content from the source farm to the destination farm.
Import content into a site collection of a destination farm.
Note
Content deployment always proceeds one-way (from source to destination). More complex scenarios, such as deploying from several sources to one destination, are not supported.
In a common content deployment scenario, the content of site collection SC1 in farm A will be deployed to site collection SC2 in farm B. To do so, content deployment uses the classes ContentDeploymentPath and ContentDeploymentJob:
An instance of the class
ContentDeploymentPathis a connection between the site collection of a source farm and the site collection of a destination farm. It also contains information about authentication on the destination farm.The class
ContentDeploymentJobis associated with an instance of typeContentDeploymentPath. It defines the schedule and the sites for the deployment and thus when and what (sites/SPWebs) should be deployed.
Listing 18-8 shows how to deploy content between servers; a site collection from URL http://serverA/sites/SC1 is deployed to a destination site collection at URL http://serverB/sites/SC2.
Example 18.8. Console Application to Deploy Content Between Servers
using System;
using System.Collections.Generic;
using System.Text;
using Microsoft.SharePoint.Publishing.Administration;

namespace Apress.Sp2010.DeploymentAPI
{
    public class Program
    {
        static void Main( string[] args )
        {
            Example example = new Example();
            example.Invoke();
        }
    }

    public class Example
    {
        public void Invoke()
        {
            // Path settings
            string pathName = "My Deployment Path";
            Uri sourceServerUri = new Uri( "http://serverA" );
            string sourceSiteCollection = "/sites/SC1";

            Uri destinationAdminUri = new Uri( "http://serverB:50000" );
            Uri destinationServerUri = new Uri( "http://serverB" );
            string destinationSiteCollection = "/sites/SC2";

            // Job settings
            string jobName = "My Content Deployment Job";

            ContentDeploymentPath path = null;
            ContentDeploymentJob job = null;

            try
            {
                // Note: the DESTINATION farm must be configured
                // to accept incoming deployment jobs.
                ContentDeploymentConfiguration config =
                            ContentDeploymentConfiguration.GetInstance();
config.AcceptIncomingJobs = true;
config.RequiresSecureConnection = false;
config.Update();
// Create a deployment path.
ContentDeploymentPathCollection allPaths =
ContentDeploymentPath.GetAllPaths();
path = allPaths.Add();
path.Name = pathName;
path.SourceServerUri = sourceServerUri;
path.SourceSiteCollection = sourceSiteCollection;
path.DestinationAdminServerUri = destinationAdminUri;
path.DestinationServerUri = destinationServerUri;
path.DestinationSiteCollection = destinationSiteCollection;
path.Update();
// Create a job associated with the path
job = ContentDeploymentJob.GetAllJobs().Add();
job.JobType = ContentDeploymentJobType.ServerToServer;
job.Name = jobName;
job.Path = path;
job.Update();
job.Run();
}
catch ( Exception ex )
{
Console.Error.WriteLine( ex.StackTrace );
throw;
}
finally
{
// Delete the job that was created.
if ( job != null ) job.Delete();
// Delete the path that was created.
if ( path != null ) path.Delete();
}
}
}
}On top of the PublishingWeb and ContentDeplyment classes, compared to older versions, SharePoint 2010 offers many great user interface improvements. This section gives a short overview of the most conspicuous points.
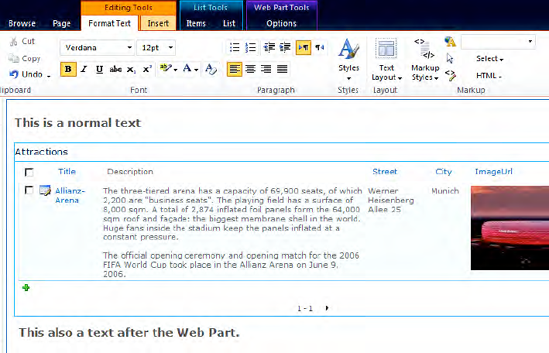
SharePoint 2010 provides a modern AJAX-based in-page web-editing experience. The ribbon UI makes it easy for authors to maintain their content, and the rich-text editor supports multiple browsers without the need to install any third-party controls, such as ActiveX controls. The complete UI implementation of SharePoint is no longer table-based. It uses CSS for element positioning, which reduces the complexity and size of the HTML output. Furthermore, the markup code is fully XHTML compliant and supports the Web Content Accessibility Guidelines (WCAG) 2.0 out of the box. Another interesting feature is that Web Parts can be inserted just like normal content (see Figure 18-3).
SharePoint 2010 makes it very easy for users to embed rich media content, such as videos. Featuring contextual options in the ribbon, there is picker functionality to assist in easily loading video content on a SharePoint page, up to and including preview functionality on mouse-over. You can choose whether all videos begin to autoplay when the page is rendered. Video has quickly become a very important component of managed content sites. There is considerably more support in SharePoint Server 2010 for video and rich media, including a skinnable Silverlight player and various storage options.
Another great improvement in the WCM area is the new version of the Content Query Web Part (CQWP). The new CQWP simplifies working with item styles by introducing slots. A slot is a marker in the item-style template that is filled with the content at runtime. The Content Query Web Part allows you to set the mappings between the slots and the fields using the property pane—allowing you to create more semantic and reusable item style templates.
Another great feature of the new Content Query Web Part is the content-to-content concept. Content-to-content introduces two tokens that can be used in the Content Query Web Part filters. The PageQueryString token allows you to include in the query a value from a query string parameter, and the PageFieldValue token gives you the option to filter the query results using a value of another field on the same page. This makes it very easy to provide functionality such as related content.
SharePoint's Web Analytics feature contains several new reports, the ability to schedule alerts and reports, and the What's Popular Web Part. Replacing the usage analysis in the previous version of SharePoint, the new Web Analytics service application provides a good overview of your site, via such measures as most-hit pages, size, and so forth. Note that this isn't a comprehensive analytics package with sophisticated trending analysis of the paths people are taking through your site. Instead, you can set up alerts and use included Web Parts to show your users the most popular pages in the site.
While SharePoint has been widely recognized as a content management system in the past, its usage as a document management system (DMS) is not as popular. This was affected by the lack of several standard DMS features in SharePoint 2007, but SharePoint 2010 has addressed those shortcomings.
The integration with Microsoft Office client applications enables users to create high-value, easy-to-use knowledge repositories. SharePoint 2010 document management is built on the success of that integration and around several key ideas including the following:
Unstructured silos are an answer to the meandering taxonomies and strongly structured hierarchy that rarely reflects reality. The rise of powerful search engine appliances provides users with their web's search experience through Google or Bing, even on local enterprise content management systems.
A core concept is the document set, which allows users to group related documents and share metadata, workflows, home pages, and archiving processes. (We described this earlier in Chapter 4.) The document management features such as document sets can be very rigid, concerning regulatory submissions, policies, and archiving, and they can also be informal to allow teams to simply assemble a few documents together.
However, unstructured silos of documents are not the final answer. Using metadata, users can supply additional information to construct a form of taxonomy without the rigid requirement to store documents in very specific places. SharePoint allows a consistent metadata management through content types and document libraries.
The creation of web sites, pages, and content is a core feature SharePoint users engage in every day. Creating and working with documents is part of a document management solution. SharePoint 2010 supports this through the integration with Office 2007 and Office 2010 as well as the Office web applications. The Content Query Web Part is an integrated module that allows users to retrieve a set of related documents very easily.
Note
Here's the definition of managed metadata from Microsoft TechNet: "Managed metadata is a hierarchical collection of centrally managed terms that you can define, and then use as attributes for items in Microsoft SharePoint Server 2010."
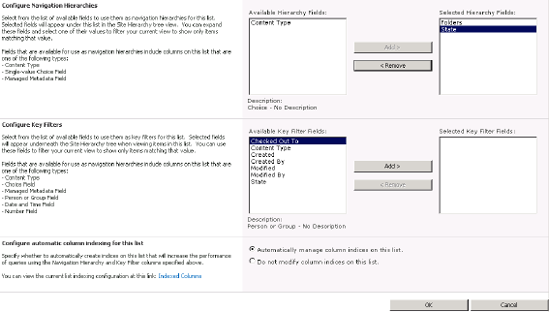
Metadata-based navigation can be based on the managed metadata as well as other list properties, such as content type or choice fields.
You can administer this navigation through the Library Settings page entitled "Metadata navigation settings" (see Figure 18-4). Essentially, you can define three things here:
Navigation hierarchy: You can set navigation fields based on content type, choice, or managed metadata.
Key filters: SharePoint can give users not only a tree-view style of navigation but also navigation via typing in fields in order to make navigation easier.
Indices: You can define indices for metadata-based navigation in order to improve performance.
Taxonomies is a term used in SharePoint to express metadata support. Through Site Settings
Before exploring sample code, you need to understand a few terms that are used when working with taxonomies:
Term: A word or phrase that can be associated with an item in SharePoint Server.
Term set: A collection of related terms.
Keyword: A word or phrase that has been added to SharePoint Server items. All managed keywords are part of a single, nonhierarchical term set called the keyword set.
Label: A name for a term used on the UI layer.
Term store: A database that stores both managed terms and managed keywords.
Group: In the term stores, all term sets are created within groups. Hence, a group is the parent container for term sets.
To manage or access the term store settings through code, you must reference Microsoft.SharePoint.Taxonomy.dll. Listing 18-9 shows how to read the current taxonomy settings.
Example 18.9. Retrieve the Current Term Store
using System;
using System.Collections.Generic;
using System.Linq;
using System.Text;
using Microsoft.SharePoint;
using Microsoft.SharePoint.Taxonomy;
namespace Apress.SP2010.DocumentManagement
{
class Program
{
static void Main(string[] args)
{
using (SPSite site = new SPSite("http://sharepointserve"))
{
using (SPWeb web = site.OpenWeb())
{
TaxonomySession tx = new TaxonomySession(site, true);
TermStore store = tx.DefaultSiteCollectionTermStore;
Group group = store.Groups["SiteGroup"];
TermSet set = group.TermSets["Metadata"];
Term t = set.Terms["Department"];
foreach (Label label in t.Labels)
{
Console.WriteLine(label.Value);
}
}
}
Console.ReadLine();
}
}
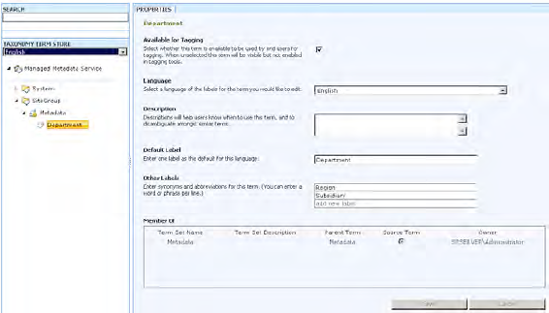
}Refer to Figure 18-5 regarding the Groups, TermSets, and Terms names used in the example. The output of this console application consists of three labels: Department, Region, and Subsidiary. It should look like Figure 18-6.

Several methods such as CreateGroup, CreateTermSet, and CreateTerm let you create taxonomies through code. The corresponding delete methods are available, too. After performing write operations, you need to call CommitAll. The taxonomy API is transactional—once committed, all changes (or no changes, if there's an error) are applied.
While dealing with high-level taxonomies, don't forget that some very basic features of a document management environment are available, too. Usually users can check out and check in documents through the UI. The user currently locking a document is stored automatically (CheckedOutBy field), and the handling from workflows is as straightforward as from the user interface.
Listing 18-10 shows how to check out, change, and check in a document programmatically.
Example 18.10. Check Out, Retrieve the Current State, and Check In
using System;
using System.Collections.Generic;
using System.Linq;
using System.Text;
using Microsoft.SharePoint;

namespace Apress.SP2010.CheckinCheckout
{
    class Program
    {
        static void Main(string[] args)
        {
            using (SPSite site = new SPSite("http://sharepointserve"))
            {
                using (SPWeb web = site.OpenWeb())
                {
                    SPDocumentLibrary docs =
                           (SPDocumentLibrary)web.Lists["DocumentSilo"];
                    foreach (SPFile file in docs.RootFolder.Files)
                    {
                        if (file.CheckOutType == SPFile.SPCheckOutType.None)
                        {
                            file.CheckOut();
                        }
                    }
                    // Added, but not yet checked in.
                    foreach (SPCheckedOutFile file in docs.CheckedOutFiles)
{
Console.WriteLine(file.LeafName);
}
// Checked out regularly.
var checkedout = from f in
docs.RootFolder.Files.OfType<SPFile>()
where f.CheckOutType ==
SPFile.SPCheckOutType.Online
select f;
foreach (var file in checkedout)
{
Console.WriteLine(file.Name);
}
// Check in and add a comment.
foreach (SPFile file in docs.RootFolder.Files)
{
if (file.CheckOutType != SPFile.SPCheckOutType.None)
{
file.CheckIn("Programmatically Checked In");
}
}
}
}
Console.ReadLine();
}
}
}This code assumes you have document library called DocumentSilo and at least one document stored there. CheckedOutFiles returns files that are added by a user but not yet checked in for the first time. CheckOutType is the property the SPFile type provides to check the current state of a regular check-out.
You can activate versioning for each list or library. This allows you to track changes made by users and roll back to a previous version for any reason. The versions are stored as a collection of items; the collection is also accessible through code.
Assuming that versioning is activated for a particular list, you can use the code shown in Listing 18-11 to retrieve version information.
Example 18.11. Retrieve the File's History from Version Store
using System;
using System.Collections.Generic;
using System.Linq;
using System.Text;
using Microsoft.SharePoint;

namespace Apress.SP1010.Versioning
{
    class Program
    {
static void Main(string[] args)
{
using (SPSite site = new SPSite("http://sharepointserve"))
{
using (SPWeb web = site.OpenWeb())
{
SPList docs = web.Lists["DocumentSilo"];
Console.WriteLine("Versioning is active: ",
docs.EnableVersioning);
foreach (SPFile file in docs.RootFolder.Files)
{
Console.WriteLine("File {0} has next
version {1}. Version History:",
file.Url,
file.UIVersionLabel);
foreach (SPFileVersion v in
file.Versions.Cast<SPFileVersion>().Reverse())
{
Console.WriteLine(" Version {0} checked in
at {1} with this comment: '{2}'",
v.VersionLabel,
v.Created,
v.CheckInComment);
}
}
}
}
Console.ReadLine();
}
}
}This code assumes you have a document library called DocumentSilo that has documents in it and versioning enabled. The outer foreach loop inspects all the files, while the inner loop retrieves all the versions for each file. The Reverse method reverses the order to process the most recent version first. Access to file details is obtained through the SPFileVersion type. This type supports all typical file operations, such as Recycle to send the file to the recycle bin or OpenBinaryStream to retrieve the file contents. VersionLabel is the property that contains the version as displayed in the SharePoint UI. Because versions for files are usually created by a check-in procedure, it makes sense to retrieve the comment by using CheckInComment.
Companies of every size need to preserve information in a secure and reliable way, not only as a standard practice within the company but also to meet regulatory requirements.
Records management refers to documents and other content that exists in an official, stable state. These are documents that the organization has declared as records and should not be changed. Records are often archived, tracked, and audited. The most common scenario for records management is legal or regulatory compliance, ensuring that the document is retained, unchanged, and purged according to a designated schedule.
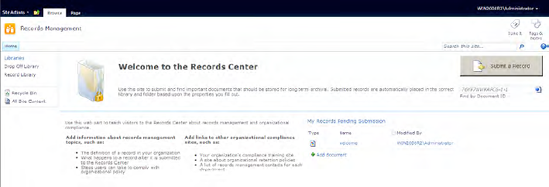
Records management in SharePoint Server 2010 enables you to create a repository to retain business documents that are necessary for regulatory compliance and business continuity. SharePoint Server 2010 provides a site template called Records Center, which is located within the enterprise site templates. This template enables you to create a site collection with features that help manage records within your organization, as shown in Figure 18-7.
Note
When you create your Records Center, we recommend you create a new web application that will enable you to manage your records separately from your "everyday" documents.
The SharePoint API and its web services can be used to write your own code to interact with the Records Center. You will find the necessary classes for records management programming in the following six namespaces:
Microsoft.Office.RecordsManagement.HoldsMicrosoft.Office.RecordsManagement.InformationPolicyMicrosoft.Office.RecordsManagement.PolicyFeaturesMicrosoft.Office.RecordsManagement.RecordsRepositoryMicrosoft.Office.RecordsManagement.ReportingMicrosoft.Office.RecordsManagement.SearchAndProcess
Note
A complete reference to the necessary classes for records management is on MSDN at http://msdn.microsoft.com/en-us/library/ff465318%28v=office.14%29.aspx.
The central function of the object model in the Records Center is to send documents programmatically to the Records Center and to hold and unhold them. These documents can be used, for example, in workflows and event handlers in libraries.
To upload a document to the Records Center using the object model, you can use code similar to Listing 18-12 (the routine can be used in a console application directly or, by modifying the output, in any other type of application).
Example 18.12. Move a Document to the Records Center Using the API
static void MoveDocumentToRecordsCenter()
{
   try
   {
      string additionalInformation = string.Empty;
      OfficialFileResult operationResult;

      using (SPSite mySite = new SPSite("http://ServerName"))
      {

  using(SPWeb myWeb = mySite.OpenWeb())
  {
                     SPFile myDoc = myWeb.GetFile("DocLib/DocName.docx");
            operationResult =
                 myDoc.SendToOfficialFile(out additionalInformation);

            Console.WriteLine("Operation State: " + operationResult);

  }
      }
   }
   catch (Exception ex)
   {
      Console.WriteLine("Error - " + ex.ToString());
   }
}
Two objects, of types SPSite and SPWeb, respectively, are created to make a reference to the document (myDoc, of the SPFile type) to be uploaded to the center. The SendToOfficialFile method of the SPFile class takes care of the upload procedure and returns the results of the action to the variable operationResult, indicating its successful completion or whether there was an error (the valid values can be FileCheckedOut, FileRejected, InvalidConfiguration, MoreInformation, NotFound, Success, or UnknownError). You can examine the value of the additionalInformation parameter to find out what went wrong.
Tip
If the object model cannot be used, SharePoint has a default web service to upload documents to the Records Center; see http://ServerName:port/_vti_bin/officialfile.asmx.
A retention policy specifies operations on documents at certain points in time. The defined actions require little involvement from users, because policies are automatically and transparently enforced.
Policies enable administrators to control who can access information and how long to retain information and also to evaluate how effectively people are complying with the policy. You can apply policies to manage your content according to business processes and legal or regulatory reasons. Each policy is a collection of sets of instructions for one or more policy features. A policy feature is an assembly that provides certain content management functionality such as expiration or auditing. An extensibility framework enables you to create, customize, and deploy your own policies and policy features. For example, you can implement your own retention policies within a feature and deploy it as a solution. Create a feature with a feature receiver, as shown in Listing 18-13. The scope of the feature should be web application, so your records management policy is scoped to everywhere your content may be located.
Example 18.13. Feature Receiver
using Microsoft.Office.RecordsManagement.PolicyFeatures;
using Microsoft.Office.RecordsManagement.InformationPolicy;

public override void FeatureActivated(SPFeatureReceiverProperties properties)
{
   string xmlManifest;
   TextReader policyStream = new
       StreamReader(Assembly.GetExecutingAssembly().GetManifestResourceStream(
                   "Apress.SP2010.RMPolicies.policy.xml"));
       xmlManifest = policyStream.ReadToEnd();
       PolicyResource.ValidateManifest(xmlManifest);
       PolicyResourceCollection.Add(xmlManifest);
}
The feature receiver adds a policy.xml definition to your web application. Listing 18-14 shows the file's content.
Example 18.14. The policy.xml File
<PolicyResource
      xmlns="urn:schemas-microsoft-com:office:server:policy"
      id = "CustomExpiration.CustomExpirationFormula"
      featureId="Microsoft.Office.RecordsManagement.PolicyFeatures.Expiration"
      type = "DateCalculator">
  <Name>Apress Filtered Expiration</Name>
  <Description>Items expires based on a filtered critereon.</Description>
    <AssemblyName>Apress.RMPolicies, Version=1.0.0.0,
       Culture=neutral,PublicKeyToken=44050b881185bf1b</AssemblyName>
   <ClassName>Apress.RMPolicies.FilteredExpiration</ClassName>
</PolicyResource>
Each policy is implemented in a class method (such as the example shown in Listing 18-15). The method name is declared in the ClassName element of the policy.xml file.
Example 18.15. Custom Policy Code
public class FilteredExpiration : IExpirationFormula
{
   #region IExpirationFormula Members
   public DateTime? ComputeExpireDate(SPListItem item,
                                       System.Xml.XmlNode parametersData)
{
if (item["DeleteNow"].ToString().Equals("Yes"))
{
return DateTime.Now;
}
else
{
return null;
}
}
#endregion
}Search is an important part of almost every SharePoint installation. A number of products and features are available to support different requirements. This chapter covered what assemblies you need to reference to program against the features and extend or customize their behavior.
The section "User Profiles and My Sites" explained how to work with user profiles and My Sites. It demonstrates how easy it is to retrieve user-specific data from a user profile in order to use it for different purposes. These purposes can include custom Web Parts and application pages and reports or even extending the social network features in SharePoint 2010.
Web content management consists mainly of the Publishing feature. This allows users to create and publish content. You can even deploy content from farm computers to other farms or servers. SharePoint 2010 provides many new features that support content creation and content management for end users.
Document management is another complex feature that consists of several functions supported by the API. In addition to the libraries and document sets described in Chapter 4, you can work with document versions and lock documents automatically during editing sessions using check-in and check-out actions. Organizing documents in data silos requires adding metadata to aid search engines to quickly find the right document. Programming against the taxonomy API allows you to create hierarchies of metadata and keywords to organize data instead of placing them into a strict hierarchy.
Records management is another crucial subject in the enterprise. Each document has a life cycle, and records management ensures that documents are retained or archived at the right time. The API allows you to construct custom rules for policies that control the document's life cycle.