
Now that you are familiar with the layout and makeup of the different types of SharePoint sites, it is time to see how to work with and manage sites and site resources. There are many capabilities available within SharePoint site. This chapter will discuss how to use and manage these site features and capabilities, including the following:
Navigating the environment
Using the ribbon
Managing security
Managing navigation
Updating the look and feel
Working with site and site collection features
Navigating the SharePoint Environment
Several methods can be used to navigate between sites within a SharePoint site collection hierarchy and among the elements within a single site. This section discusses the available navigation approaches.
Navigating Within a Site
As mentioned previously, sites created underneath other sites are called subsites. It is very common for sites of various types to contain subsites. For example, a human resources site might have a subsite dedicated to providing HR benefit details and a separate subsite to manage payroll. A client site containing individual project sites for the client would be another example. There are four main ways to navigate a site’s subsites.
The first method leverages the navigation bar. This bar, shown in Figure 3-1, contains the list of navigation links created by site owners. They may include the following:
Defining the navigation items within the site, which can be configured to include the subsites and pages within the current site, as well as custom links defined by a site manager.
Configuring the navigation to inherit the navigation from the parent site, which provides navigation consistency between sites.
Configuring the navigation to use a navigation term set to define the items presented.

Figure 3-1. Navigation bar
The SharePoint navigation management options determine the approach used for determining details available in the navigation bar. Navigation management is discussed later in this chapter.
The second method to navigate a site’s subsites is to use the Site Contents page. This page is accessed by clicking the Site Contents link in the Quick Launch menu. Once you’re on the Site Contents page, you can navigate to a subsite by clicking on its name in the Subsites section of the page (see Figure 3-2).

Figure 3-2. Site Contents page
You also use the Site Contents page to navigate to lists and libraries in the current site. These are found in the Lists, Libraries, and other Apps section of the page.
The third method is to navigate via the Settings menu. This menu can be used to access the Site Contents page just mentioned. This navigation option is available only to users having access to that menu. You access the Site Contents page using the Settings menu as follows:
Navigate to the site containing the subsite you want to access.
Click the Settings icon to present the Settings menu, as shown in Figure 3-3.
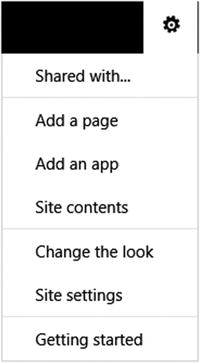
Figure 3-3. Settings menu
On the Settings menu, click the Site Contents link.
On the Site Contents page, click the name of the subsite you want to view. This will present the selected subsite’s home page.
The fourth method used to navigate to a subsite is to use a web part that lists subsites on a site page. SharePoint Server has web parts that can be used to list subsites. Some of the most commonly used default web part s used to list sites include the following:
Site Aggregator: This web part allows identification of a set of subsites to display.
Sites in Category: This web part lists sites registered in the site directory associated with a selected category.
Table of Contents: This web part lists the items displayed in the site’s navigation, including any listed subsites.
Also available are many third-party web parts that provide site and content roll-up capabilities within SharePoint. Adding web parts to pages and configuring them are discussed in Chapter 9.
Navigating Sites with Mobile Devices
SharePoint allows users with mobile devices , such as tablets and smart phones, to use the environment. There are three options for accessing SharePoint from mobile devices.
Contemporary view: The contemporary view renders the SharePoint environment resources through an HTML5 mobile view. This view provides access to the SharePoint lists and libraries within the environment in a form compatible with mobile devices. Figure 3-4 shows the HTML5 mobile view.

Figure 3-4. Contemporary mobile view
PC view: The standard SharePoint interface can be accessed from a mobile device by choosing to switch to PC view. It provides the same layout and functionality on the mobile device as are available when the site is accessed from a standard web browser.
Channels: Alternative access interfaces can be defined for specific devices and web browser versions. These interfaces can be created for a mobile device or any other browser/device. When channels are used, an alternative master page is identified for use on the device, allowing a tailored display for that device. Channels are discussed in more detail later in this chapter.
The approach or approaches used to access the SharePoint environment from mobile devices are managed by a technical SharePoint administrator.
Note
Accessing sites using a mobile device requires configuring the SharePoint environment to make it available from the network the mobile device is connected to or connecting the mobile device to the network the SharePoint environment is connected to. Also, to open a document on a mobile or tablet device, there must be a program on it that can open the file.
Using the Ribbon
The ribbon is the main management interface for working with site resources. The ribbon provides context-centric options based on what is being viewed and the rights you have to the item. The available commands are organized under ribbon tabs. When a tab is selected, the associated commands are displayed on the ribbon. In the standard SharePoint layout, the ribbon commands appear over the navigation bar and title area. The ribbon always has a Browse tab that, when selected, hides the ribbon, making the navigation and title area visible again.
Ribbon tabs and options presented are context-sensitive based on the type of information displayed on the page. For example, if you select the Page tab while viewing a team site home page, the list of page management commands appears (see Figure 3-5). When you finish working with the ribbon commands, clicking the Browse tab will hide them, allowing the site title and navigation to be displayed.

Figure 3-5. Page tab on the ribbon
Creating Sites
Discussing the creation and management of sites in SharePoint 2016 needs to be broken down into two parts:creating root, or top-level, sites and creating subsites. A root site, the topmost site in a site collection, is created as part of the creation of the overall site collection. A subsite is a site created under an existing site. Sites can be nested to create any desired hierarchy. Subsites are created as needed by people with appropriate rights.
SharePoint root sites are typically created by a SharePoint technical administrator as part of creating a site collection. This discussion focuses on creating SharePoint subsites, which any individual having the Create Subsite right can do. By default, users with the Manage Hierarchy and Full Control permissions have this right.
Subsites can be created within any SharePoint root site or subsite. By default, Owners and Hierarchy Managers groups have the appropriate permission levels to create subsites. Managing permissions and groups is discussed later in this chapter.
To create a new subsite follow these steps:
Navigate to the site under which the new subsite is to be created.
Navigate to the Site Contents page, by selecting either the Site Content link from the Quick Launch area or the Site Contents option from the Settings menu, as shown in Figure 3-3.
On the Site Contents page, click the New Subsite option in the Subsites section.
On the New SharePoint Site page, execute the following steps:
In the Title and Description section, enter the title to use for the site. This is the name that will be displayed in any reference to the site. You can also enter an optional description for the site.
In the Web Site Address section, enter the URL for the site.
Note It is considered a best practice to exclude spaces and special characters from the URL name of the site and for the URL and the site title to be similar. For example, if your site title is Human Resources, the URL name should be either HumanResources or HR.
In the Template Selection section , select the site template from which the new site should be created; the default site templates are grouped by type and have the features and layout detailed in Chapter 2.
In the Permissions section , specify whether the user access permissions for the site being created are to be the same as those of the parent site or whether unique permissions are to be used. If you choose to use the same permissions as the parent site, security will be inherited from the parent site (changing site permissions in the Managing Site Security section is discussed later in this chapter).
In the Navigation Inheritance section , select whether the new site’s navigation bar is to inherit the options listed in the parent site’s navigation bar or is to be managed within the subsite directly (managing the site navigation bar is discussed later in this chapter).
Once all of the necessary information has been entered or selected, click the Create button.
The subsite is created, and you are taken to the home page of the new subsite.
Deleting Sites
Anyone who has Hierarchy Manager or Full Control permissions within a site has the ability to delete the site. There are two ways to delete an existing SharePoint site. The first way is to delete it within that site’s Site Settings page by performing the following steps:
Navigate to the site you want to delete.
From the Settings menu, select the Site Settings option.
On the Site Settings page, in the Site Actions section, click the Delete This Site link.
On the Delete This Site page, click the Delete button.
On the deletion confirmation window, click the OK button.
The site is deleted, and you are taken to the Your Web Site Has Been Deleted page.
The second way to delete a site is found on the Sites and Workspaces page of the site’s parent; that is, the site is deleted within its parent. This method can be used to delete only subsites, not the top-level site within a site collection. To delete a subsite within the Sites and Workspaces page, do the following:
Navigate to the site containing the subsite you want to delete.
From the Settings menu, select the Site Settings option.
On the Site Settings page, in the Site Administration section, click the Sites and Workspaces link.
On the Sites and Workspaces page, click the Delete icon for the subsite to be deleted.
On the Delete This Site page, click the Delete button.
In the deletion confirmation window, click the OK button.
The site is deleted, and you are returned to the Sites and Workspaces page. Sites can be deleted only when they do not contain subsites. If subsites are nested under the site being deleted, an error message will appear if you try to delete the site.
Managing Site Security
Management of security for a site is the responsibility of the site owner, who is responsible for assigning rights to users within their own sites. Rights are assigned either directly to a user or group (managed, by default, within an organization’s Active Directory) or through SharePoint that users or groups are members of.
Security must be configured for every root site within SharePoint. By default, when a new root site is created, the user who created it will specify who the site collection administrators for the site will be, and these individuals will be the only people with access to the new site. These site collection administrators will then identify the users who are to be granted rights to the site and provide these users with the appropriate levels of access.
Subsites will either inherit their rights from the site in which they are contained or have unique permissions. The security approach used in a subsite is determined by the permission settings configured within the site. If security for a subsite is configured to be inherited from the parent site, security is not managed for the site directly; instead, security will be based on rights assigned in the parent site. If security for the subsite is configured to be unique, a site administrator will be required to assign the appropriate rights to individuals needing access to the site.
When you create your own site, it is important to understand the security needs of the individuals who will be using the site and to assign users the appropriate security to allow them to work with materials within the site.
Managing SharePoint Groups
SharePoint groups are used to combine user and group accounts to make security assignment easier. By default, user and group accounts are Active Directory users and Active Directory groups. However it is possible for your SharePoint system administrator to configure SharePoint to use an alternate user and group source. User and group accounts will be assigned to SharePoint groups, and the SharePoint groups are then used to assign rights within sites. SharePoint groups can be used throughout a site collection hierarchy to assign rights within the various sites within the collection and can also be used to assign rights to lists and librar ies contained within the site. By default, when a new root site is created, a set of default SharePoint groups is also created. These groups are listed with their default permission levels in Table 3-1. Other SharePoint groups are created automatically when certain site collection or site features are enabled.
Table 3-1. Default Security Groups
Site Group | Default Permission Level | Purpose |
|---|---|---|
Site Name Owners | Full Control | Contains users who can administer the site |
Site Name Members | Edit, Contribute | Contains users who can create and edit content within the site’s libraries and lists |
Site Name Visitors | Read | Contains users who need the ability to view site content but not make changes |
Approvers | Approve | Contains uses who have the ability to perform content approval for materials published within the site requiring approval |
Designers | Design | Contains users who have the right to manage pages within the site, as well as the look and feel aspects of the site |
Hierarchy Managers | Manage Hierarchy | Contains users who can create subsites below the current site |
Restricted Readers | Restricted Read | Contains users who can view site content but not look at previous versions or security information |
Translation Managers | Restricted Interfaces for Translation | Contains users who can open lists and folders and use the remote interfaces |
Excel Services Viewers | View Only | Contains users who can view the site but not interface with its contained content |
Style Resource Readers | None in the site | Contains users who have read access to the Master Page Gallery and Style library, which are required to browse the site |
SharePoint groups can be created and customized to meet specific security needs within the SharePoint environment. The next sections discuss how to manage SharePoint groups.
Creating SharePoint Groups
To create new SharePoint groups within SharePoint, do as follows:
Navigate to the site in which the group will be used.
On the site’s home page, select the Site Settings option from the Settings menu.
On the Site Settings page, click the Site Permissions option from the Users and Permissions section.
On the Permissions page, select the Create Group command from the Permissions ribbon tab (see Figure 3-6).

Figure 3-6. Permissions page
On the Create Group page, enter the following:
In the Name and About Me Description section, enter the name for the new SharePoint group. You can also enter an optional About Me description. The About Me information is presented next to the name when the SharePoint group is presented.
If necessary, in the Owner section, update the group owner information. The owner has the right to update the site’s group information. The owner defaults to the user creating the SharePoint group.
In the Group Settings section , specify whether only group members or everyone has the ability to view group membership information. You can also define whether only the group owner or all group members can add and remove group members.
In the Membership Requests section , specify whether users can request to join or leave the group and whether requests are to be automatically accepted. The e-mail address that requests should be sent to is also listed. This address can be changed when the Auto-Accept Requests option is set to No. By default, the e-mail address will be set as the e-mail address of the user creating the group.
If the current site does not inherit permissions from its parent, in the Give Group Permission to this Site section, select the permission level, if any, to grant the group in the current site.
Once all of the necessary information has been entered, click the Create button.
The new SharePoint group is created, and you are taken to the new group’s page, where you can add members.
Editing SharePoint Groups
To edit an existing SharePoint group, follow these steps:
On a site’s home page, select the Site Settings option from the Settings menu.
On the Site Settings page, click the People and Groups option from the Users and Permissions section.
On the People and Groups page, do one of the following:
Click the name of the group to edit in the Groups list located in the right navigation area, click the Settings link, and select the Group Settings option.
Alternatively, on this page, click the Groups header in the Groups list to present all groups, and click the Edit link next to the desired group name.
On the Change Group Settings page,
In the Name and About Me Description section, you can update the group name or About Me details.
In the Owner section, you can update the group owner.
In the Group Settings section, you can update who can view the membership of the group, so that either only group members or everyone can view the group membership information; you can also update who can edit the membership of the group, so that either only the group owner or all group members are permitted to update the group membership.
In the Membership Requests section, you can update whether people can request to join or leave the group and whether requests are to be automatically accepted; you can also update the e-mail address that requests are sent to.
Once all the information has been appropriately updated, click the OK button.
The SharePoint group is appropriately updated, and you are taken to the group’s members page, where you can manage group members.
Deleting SharePoint Groups
Follow these steps to delete an existing SharePoint group:
On a site’s home page, select the Site Settings option from the Settings menu.
On the Site Settings page, click the People and Groups option from the Users and Permissions section.
On the People and Groups page, do one of the following:
Click the name of the group to delete in the Groups list located in the left navigation area, click the Settings link, and select the Group Settings option.
Alternatively, on this page, click the Groups header in the Groups list to present all groups and click the Edit link next to the desired group name.
On the Change Group Settings page, click the Delete button.
On the deletion confirmation screen, click the OK button.
The SharePoint group is deleted, and you are taken to the Home Members group page.
Adding Users to SharePoint Groups
Add users to SharePoint groups as follows:
Navigate to a site where the group is used.
On the site’s home page, select the Site Settings option from the Settings menu.
On the Site Settings page, in the Users and Permissions section, click the People and Groups link.
On the People and Groups page, do one of the following:click the name of the group from the Groups list, or click the Groups header and then the name of the group.
On the People and Groups page, the membership will be displayed for the selected group. Click the arrow next to the New link to present the New menu.
Select the Add Users option from the New menu.
On the Share window:
Enter the Active Directory users and groups to be added to the SharePoint group. As you type in the user or group information, matching entries, any of which can be selected, are listed below the entry box.
Once all users have been selected, click the Share button.
With users and groups added to the SharePoint group, you are returned to the group’s page, where the members are listed.
Removing Users from a SharePoint Group
Use these steps to remove users from a SharePoint group.
Navigate to a site where the group is used.
On the site’s home page, select the Site Settings option from the Settings menu.
On the Site Settings page, in the Users and Permissions section, click the People and Groups link.
On the People and Groups page, do one of the following:click the name of the group from the Groups list or click the Groups header and then the name of the group.
On the People and Groups page, the membership will be displayed for the selected group. Check the boxes in front of the users you want to remove from the group, and click the Actions link to present the Actions menu.
Select the Remove Users from Group option from the Actions menu.
Confirm the removal of the users from the SharePoint group by clicking the OK button.
The selected users are removed from the SharePoint group, and the People and Groups page is updated to reflect the change.
Viewing SharePoint Group Permissions
Since SharePoint groups can be used across sites within a site collection, the ability to see all resources to which a group is assigned rights is very valuable. To view a group’s permissions assignments, take the following steps:
On a site’s home page, select the Site Settings option from the Settings menu.
On the Site Settings page, click the People and Groups option from the Users and Permissions section.
On the People and Groups page, click the name of the desired group in the Groups list located in the right navigation.
On the People and Groups page, the membership will be displayed for the selected group. Select the Settings link to view the Settings menu options.
Select the View Group Permissions option from the Settings menu.
The View Site Collection Permissions window appears; it displays the sites, lists, and libraries where the group is assigned permissions and the permission levels assigned.
Changing Permission Inheritance for a Site
As discussed, when you create a subsite, you have the ability to decide whether the subsite is to have unique permissions defined or whether it will inherit permissions from its parent site. After the site has been created, you can change this setting if security requirements for the subsite change. To change the permission inheritance settings for a subsite, do the following:
Navigate to the site in which you need to change permission inheritance.
On the site’s home page, select the Site Settings option from the Settings menu.
On the Site Settings page, click the Site Permissions option from the Users and Permissions section.
On the Permissions page, above the permission listings is a message identifying whether the site inherits permissions from its parent.
Update the permission inheritance as follows:
If the site currently inherits permissions, the inheritance message will state “This web site inherits permissions from its parent.” To stop inheriting permissions:
Select the Stop Inheriting Permissions option from the Permissions ribbon tab.
Click the OK button on the confirmation message box.
On the Set Up Groups for this Site page, identify the default Visitor, Member, and Owner SharePoint groups for the site. For each, either select an existing SharePoint group or elect to create a new group. If you select to create a new group, identify a name for the new group and the accounts to become members of the group.
Click the OK button to save.
If the site does not currently inherit permissions, the inheritance message will state “This web site has unique permissions.” To start inheriting permissions:
Select the Delete Unique Permissions option from the Permissions ribbon tab.
Click the OK button on the confirmation message box.
The site permission inheritance settings are updated, and the Permissions page is refreshed to reflect the changes.
Managing Permission Levels
As discussed previously, SharePoint groups and individual users can be assigned permissions within SharePoint sites. When users are added, they are either assigned to a SharePoint group or granted rights through direct permission level assignments. How to manage permission level assignments of SharePoint groups was discussed in the “Managing SharePoint Groups” section.
Permission levels are sets of permissions grouped together to provide a specific set of rights, or class of rights, within a site. There are twelve default permission levels in SharePoint. These default permission levels include the following:
Full Control: This permission level includes all available permissions and grants assigned users administrative-level access to the site and all of the site’s resources. This permission level cannot be changed or deleted.
Design: The Design permission level provides the ability to manage lists, libraries, and pages within a SharePoint site, as well as approve content and manage the site’s look and feel. This permission level can be edited but it cannot be deleted.
Edit: This permission level allows the creation and management of libraries and lists and their contained content. This permission level can be edited but it cannot be deleted.
Contribute: This permission level provides the ability to manage content in a site’s lists and libraries. This permission level can also be edited but not deleted.
Read: The Read permission level provides read-only access to site resources. This permission level can be edited but not deleted.
Limited Access: This permission level is designed to be combined with list or library permissions to provide access only to specific lists and libraries within a site without granting rights to any of its other resources. This permission level cannot be changed or deleted from SharePoint. Nor can it be manually set. It is assigned by SharePoint automatically on the basis of other rights configurations.
View Only: As with the Read permission level, with this permission users can view pages, list items, and documents. However, with View Only permission, users can view these files only with an online viewer, such as viewing Microsoft Office documents through Office Online Server. Files cannot be downloaded.
Approve: The Approve permission level grants the ability to edit and approve pages, list items, and documents when content is configured to require approval.
Manage Hierarchy: This permission level, which is similar to Contribute, allows the management of site content but adds the ability to create and manage subsites.
Restricted Read: The Restricted Read permission level limits Read access in a site to viewing of pages, documents, and list items only—not viewing of item version history details or permissions information.
Restricted Interface for Translation: This permission level is used when individuals or systems need only rights to translate content. It allows lists and folders to be opened and allows access by remote interfaces.
Record Center Web Service Submitters: This permission level allows submittal of content to a site without providing higher levels of access, such as reading or editing, to the site.
Permission levels can be assigned to site users or groups as well as SharePoint groups. To assign permission levels to a site user or group , do the following:
Navigate to the site where permissions need to be assigned. This should be a site where permissions are not inherited from the parent site.
On the site’s home page, select Site Settings from the Settings menu.
On the Site Settings page, select the Site Permissions option from the Users and Permissions section.
On the Permissions page, click the Grant Permissions command on the Permissions tab of the ribbon.
In the Share window, enter the following information:
Select the users and groups to be assigned rights.
If you do not want to add the entered users to the site’s Members SharePoint group, click the Show Options link to select a different group or permission level to which to assign rights.
Once all the information has been selected, click the Share button to save the rights.
The users and groups are assigned to the selected permission level or SharePoint group and you are returned to the Permissions page.
Adding Permission Levels
Additional permission levels can be created when you need a customized set of security rights. For example, you may want to give users the ability to create and edit content in a site or specific library but not delete anything, or you may want to give someone the ability to add information but not edit or delete it. To create a new permission level do the following:
Navigate to a site with unique permissions and where you are the administrator.
On the site’s home page, select Site Settings from the Settings menu.
On the Site Settings page, select the Site Permissions option from the Users and Permissions section.
On the Permissions page, select the Permission Levels option from the Permissions ribbon tab.
On the Permission Levels page, click the Add a Permission Level link.
On the Add a Permission Level page, enter the following:
In the Name and Description section, enter the name of the new permission level. You can also enter an optional description. The description is presented next to the name when the permission level is listed for selection.
In the Permissions section, check the boxes for all permissions that the new permission level should include. Choose the Select All option to add all the listed permissions.
Once all of the necessary information has been entered, click the Create button.
The new permission level is created, and you are returned to the Permission Levels page.
Note
It is recommended to create new permission levels when permission level changes are needed. The default permission levels should not be edited.
Creating a New Permission Level As a Copy of an Existing Permission Level
When there is the need for a new permission level that closely mirrors an existing permission level, you can make a copy of the existing item you want to use as a starting point in creating the new permission level. For example, if you want a permission level that is the same as the Contribute level but without the delete permission, you can create the new permission as a copy of the existing contribute permission level and then remove the delete permission right from the copy. Create a new permission level as a copy of an existing permission level as follows:
Navigate to a site with unique permissions and where you are the administrator.
On the site’s home page, select Site Settings from the Settings menu.
On the Site Settings page, select the Site Permissions option from the Users and Permissions section.
On the Permissions page, select the Permission Levels option from the Permissions ribbon tab.
If the current site is not the root site in the site collection, a link will be available in the Quick Launch, under the See Also header, called Manage Permission Levels on Parent Web Site. Click this link.
On the Permission Levels page, click the name of the permission level to copy.
On the Edit Permission Level page, click the Copy Permission Level button.
On the Copy Permission Level page, enter the following:
In the Name and Description section, enter the name for the new permission level. You can also enter an optional description.
In the Permission section, update the permissions set for the permission level as appropriate.
Once all of the necessary information has been entered and updated, click the Create button.
The new permission level is created, and you are returned to the Permission Levels page.
Edit Existing Permission Levels
To edit an existing permission level, do as follows:
Navigate to a site with unique permissions and where you are the administrator.
On the site’s home page, select Site Settings from the Settings menu.
On the Site Settings page select the Site Permissions option from the Users and Permissions section.
On the Permissions page, select the Permission Levels option from the Permissions ribbon tab.
If the current site is not the root site in the site collection, a link will be available in the Quick Launch, under the See Also header, called Manage Permission Levels on Parent Web Site. Click this link.
On the Permission Levels page, click the name of the permission level to update.
On the Edit Permission Level page, update the following:
In the Name and Description section, edit the permission level name and optional description text.
In the Permissions section, update the permissions set for the permission level as appropriate.
Once all of the necessary updates have been made, click the Submit button.
The permission level is updated, and you are returned to the Permission Levels page.
Deleting Existing Permission Levels
To delete an existing permission level, take these steps:
Navigate to a site with unique permissions and where you are the administrator.
On the site’s home page, select Site Settings from the Settings menu.
On the Site Settings page, select the Site Permissions option from the Users and Permissions section.
On the Permissions page, select the Permission Levels option from the Permissions ribbon tab.
If the current site is not the root site in the site collection, a link will be available in the Quick Launch, under the See Also header, called Manage Permission Levels on Parent Web Site. Click this link.
On the Permission Levels page, check the boxes for all permission levels you want to delete, and click the Delete Selected Permission Levels link.
On the delete confirmation screen, click the OK button.
The permission level is deleted, and the Permission Level page is updated to reflect the change.
Managing Site Collection Administrators
The discussion so far has focused on how to manage SharePoint groups and permission levels to control the rights individuals have in the SharePoint environment. Defining site collection administrators extends security management by allowing identification of the individuals responsible for managing the overall environment. These individuals are automatically given administrative rights across the entire site collection hierarchy.
Follow these steps to manage site collection administrators :
Navigate to the top-level site in the site collection.
On the site’s home page, select Site Settings from the Settings menu.
On the Site Settings page, in the Users and Permissions section, click the Site Collection Administrators link.
On the Site Collection Administrators page, enter and remove users.
To remove a user, click the x following the name of the account to remove.
To add a user, type the name to be added and select the correct account from the type-ahead listing presented.
Once the list of users is correct, click the OK button to save the information.
The site collection administrators are updated, and you are returned to the Site Settings page.
Changing Site Details
There are several aspects of a SharePoint site that the site administrator can update as the need arises. For example, updatable information includes the title and description entered when the site was created. Being able to update site details is important as the site’s needs change over time.
Updating the Site Title, Description, Logo, and URL
You can update the site title, description, and URL entered when the site was created. You can also replace the site logo, which is the image that appears at the top of the created site (which defaults to the SharePoint logo ). This allows the site to be properly branded for the organization or group it is created to support. To update the site title and description information entered when the site was created and the logo appearing at the top of the site, take these steps:
Navigate to the site to be updated.
On the site’s home page, select Site Settings from the Settings menu.
On the Site Settings page, in the Look and Feel section, click the Title, Description, and Logo link.
On the Title, Description, and Logo page, update the following information:
In the Title and Description section, update the site title and description information as needed.
In the Logo and Description section, select a logo either from your computer or from SharePoint. Selecting the From Computer option allows you to upload a file to SharePoint for use as the site logo. Selecting a file in this way uploads the file to the site’s Site Assets library and references it as the logo. Selecting the From SharePoint option opens the Select an Asset page, where you can choose a logo already in SharePoint for the site. You can also enter a description to use as alternative text for the logo. The description is displayed when you hover the mouse over the logo.
When you update information for a site other than the root site in the site collection, the Web Site Address section is listed. In this section the URL entered when the site was created can be updated.
Once all updates have been made, click the OK button to save the changes.
The updates are applied to the site, and you are returned to the Site Settings page.
Configuring Regional Settings for a Site
SharePoint sites are designed for use throughout an organization. As a result, there are times when a site created within SharePoint is primarily used in time zones other than the one where the SharePoint server is located. For example, a team located in California might use a SharePoint site to manage a project’s resources, but the SharePoint servers are located in the company’s New York office. In such a case, site managers might want to update the site’s regional settings so that date and time displays are based on the users’ locale instead of the server’s location. To change a site’s regional settings , do as follows:
Navigate to the site where the settings need to be changed.
From the site’s home page, select the Site Settings option from the Settings menu.
On the Site Settings page, select the Regional Settings link from the Site Administration section.
On the Regional Settings page, update the following as appropriate:
Time Zone: Select the standard time zone to use for determining date and time for activities performed.
Locale: Specify the site’s default location to determine how numbers and dates are presented.
Sort Order: Identify sorting preferences to be used within the site.
Calendar: Determine the calendar format for the site and whether week numbering is displayed in the date navigator.
Enable an Alternate Calendar: Specify, if needed, a secondary calendar format to make this alternate information available in the site.
Define Your Work Week: Specify the days of the workweek, the first day of the week, the first week of the year, and the start and ending time of the workday.
Time Format: Specify the time format to be displayed ( 12- or 24-hour).
Once all other information has been appropriately updated, click the OK button to save the settings.
Updated settings will be saved, and you will be returned to the Site Settings page.
Defining the Welcome Page
The welcome page is the initial page displayed when you navigate to a site. The default page, defined as the site welcome page, does not have to remain as the site’s welcome page. Any other page within the site can be the entry page. In fact, the welcome page for most SharePoint site templates is a Home.aspx page in the Site Pages library. Having the default page located in a site library lets you apply content approval and management rules to this page as you would to other site content. To allow the ability to change a site’s welcome page, the SharePoint Server Publishing site feature must be active. Activating this feature adds the Welcome Page management options to the Site Settings area.
To update the default welcome page for a site, follow these steps:
Navigate to the site where you want to change the welcome page.
From the site’s home page, select the Site Settings option from the Settings menu.
On the Site Settings page, in the Look and Feel section, click the Welcome Page link.
On the Site Welcome Page screen, enter the URL for the welcome page for the site, or click the Browse button to locate the appropriate page. Once the page is identified, click the OK button.
The site’s welcome page is updated, and you are returned to the Site Settings page.
Managing Site Navigation
SharePoint sites contain two areas of navigation options, the Quick Launch and the navigation bar. The Quick Launch, located by default to the left of the site’s content area, is typically used to list resources located in and under the current site:key lists, libraries, subsites, and so on. The navigation bar, by default, is located at the top of the content area. It is typically used to provide the site’s global or standard navigation options, and it provides consistency in navigation within the site collection. This section discusses these navigation resources and describes how to manage the options contained within them.
Customizing Quick Launch Navigation for Sites
The Quick Launch menu, which typically includes navigation options within a site, can be managed by users with Design or Full Control rights. Management of Quick Launch navigation varies based on whether the SharePoint Server Publishing Infrastructure site collection feature has been activated within an environment.
Configuring the Quick Launch Display:Tree View and Standard View
The Quick Launch area has two displays that can be presented:standard view and tree view. Quick Launch view settings are managed through the Tree View options available in the Look and Feel section of the Site Settings page, which let you determine which of the views is included in the Quick Launch area. By default, the standard Quick Launch is enabled, displaying a set of links that access specified site lists, libraries, and subsites, as well as identified custom links. Standard Quick Launch is shown in Figure 3-7. If this option is disabled, Quick Launch links are removed from the area, leaving only the Site Contents link.

Figure 3-7. Quick Launch standard view
When tree view is enabled, the Tree View tool is used in the Quick Launch area. The Tree View tool lists all sites, libraries, and lists within the current site. The tool provides the ability to expand any listed subsites to view the lists, libraries, and subsites contained within those subsites as well. Tree view is shown in Figure 3-8.

Figure 3-8. Quick Launch tree view
Standard and Tree views for the Quick Launch menu can be managed as follows:
Navigate to the site to be updated.
On the site’s home page, select Site Settings from the Settings menu.
On the Site Settings page, in the Look and Feel section, click the Tree View link.
On the Tree View page, update the following:
In the Enable Quick Launch section, check or uncheck the Enable Quick Launch option to enable or disable the Quick Launch standard view.
In the Enable Tree View section, check or uncheck the Enable Tree View option to enable or disable the Quick Launch tree view.
Once all options are properly set, click the OK button.
The updates to the site are applied, and you are returned to the Site Settings page.
Configuring Quick Launch Options
While you can use the Tree View options discussed previously to determine which views are made available within Quick Launch, the available links in the Quick Launch can also be managed. Items can be reordered, and listed headings and links can be added, updated, or removed tailoring Quick Launch to help meet the navigation needs of your site.
Changing the Order of Quick Launch Items
Three options are available for managing Quick Launch menu items. The options differ based on whether the SharePoint Server Publishing Infrastructure feature is active. The first option, which is always available in SharePoint, allows navigation items to be managed directly in the Quick Launch menu.
To manage Quick Launch navigation items directly from the home page of the site, do the following:
Navigate to the site where you want to manage the Quick Launch menu.
On the site’s home page, click the Edit Links option at the bottom of the Quick Launch area to place the links in Edit mode (see Figure 3-9).

Figure 3-9. Quick Launch Edit mode
To reorder the listed items, drag and drop them into the appropriate order.
Once all items are in the appropriate order, click the Save option to save the changes made.
The changes to the Quick Launch menu are saved, and the Quick Launch menu returns to its standard view.
The second way to reorder Quick Launch options is through the Quick Launch management page, which is available in the Site Setting area when the SharePoint Server Publishing Infrastructure feature is not enabled. To edit the order of Quick Launch items through the Quick Launch management page, do as follows:
Navigate to the site where you want to manage the Quick Launch menu.
Select the Site Settings option from the Settings menu.
On the Site Settings page, select the Quick Launch option from the Look and Feel section.
On the Quick Launch page, select the Change Order option.
On the Quick Launch Change Order page, select the order numbers in front of the listed options to the desired order.
Once all items are set to the appropriate order, click the OK button to save the changes.
The changes to the Quick Launch order are saved and you are returned to the Quick Launch page.
When SharePoint Server is used with the SharePoint Server Publishing Infrastructure feature enabled, the Quick Launch management option is not available in the Site Settings page. Instead, the Navigation option is available. This option is used to manage both the Quick Launch options and the navigation bar. To manage the order of Quick Launch through the Navigation option, do the following:
Navigate to the site where you want to manage the Quick Launch menu.
Select the Site Settings option from the Settings menu.
On the Site Settings page, select the Navigation option from the Look and Feel section.
On the Navigation Settings page, in the Structural Navigation Editing and Sorting section, highlight the options to be reordered and select the Move Down and Move Up options to reorder them.
Once the items are in the proper order, click the OK button to save the changes.
The changes will be saved, and you will be returned to the Site Settings page.
Adding New Headings and Links to the Quick Launch
As with reordering Quick Launch options, you can add new headers and links in three different ways. The first way to add new headers and links to Quick Launch is from within the Quick Launch area itself. To update the Quick Launch options in this way, do the following:
Navigate to the site where you want to manage the Quick Launch menu.
On the site’s home page, click the Edit Links option at the bottom of the Quick Launch area to place the links in Edit mode (see Figure 3-9).
Click the + Link option at the bottom of the Quick Launch area.
In the Add a Link window, enter the following:
In the Text to Display field, enter the text to appear in Quick Launch to represent the item.
In the Address field, optionally enter the URL for the item to navigate to when clicked. When a URL is not entered, the item will be a header that cannot be clicked as a link.
Click the OK button to save the information.
Click Save at the bottom of the Quick Launch to save the changes.
The changes to the Quick Launch menu are saved, and the Quick Launch menu is returned to the standard view.
The second way to add new headings and links to Quick Launch is through the Quick Launch management page. As described earlier, this page is available through the Site Setting area when using SharePoint without the SharePoint Server Publishing Infrastructure feature enabled. To edit the order of Quick Launch items through the Quick Launch management page, do as follows:
Navigate to the site where you want to manage the Quick Launch menu.
Select the Site Settings option from the Settings menu.
On the Site Settings page, select the Quick Launch option from the Look and Feel section.
On the Quick Launch page, do the following:
To add a new link:
Select the New Navigation Link option.
On the New Navigation Link page, enter the URL and description for the new link, select the header under which the link should be created, and click the OK button to save the new link.
To add a new header:
Select the New Heading option.
On the New Heading page, enter the optional URL and the description for the new header, and then click the OK button to save the new header.
The new header or link is saved, and you are returned to the Quick Launch page.
When the SharePoint Server Publishing Infrastructure feature is enabled, navigation options are managed through the Navigation Settings page. To add items to the Quick Launch through the Navigation Settings page, do the following:
Navigate to the site where you want to manage the Quick Launch menu.
Select the Site Settings option from the Settings menu.
On the Site Settings page, select the Navigation option from the Look and Feel section.
On the Navigation Settings page, in the Structural Navigation:Editing and Sorting section, do the following:
To add a new link:
Click the Add Link option.
On the Navigation Link menu, enter the Title and URL for the link, specify whether the link is to open in a new window, and enter an optional description for the link. You can also specify the audiences (users or groups) the link is targeted to. If you target a link to a user or group, the link is presented only to that user or group. Once all the information has been entered, click the OK button to save the new link.
To add a new header:
Click the Add Heading link option.
On the Navigation Heading menu, enter the title for the heading, specify whether the link is to open in a new window, and enter an optional URL and description for the header. You can also specify the audiences (users or groups) the header is targeted to. If you target a header to a user or group, the header is presented only to that user or group. Once all the information has been entered, click the OK button to save the new header.
On the Navigation Settings page, click the OK button to save the changes to the navigation.
The changes will be saved, and you will be returned to the Site Settings page.
Editing Headings and Links in Quick Launch
The first way to edit existing headers and links to the Quick Launch can be done from within the Quick Launch area itself. To update the Quick Launch options in this way do the following:
Navigate to the site where you want to manage the Quick Launch menu.
On the site’s home page, click the Edit Links option at the bottom of the Quick Launch area to place the links in Edit mode (see Figure 3-9).
Click the item you want to edit to highlight it. Then with the item highlighted, click the Edit Link icon that’s displayed, as shown in Figure 3-10.

Figure 3-10. Quick Launch with highlighted item
In the Edit Link window, update the Text to Display and Address information as appropriate.
Once all the information is updated, click the OK button to save the changes.
Click Save at the bottom of Quick Launch to save the changes.
The changes to the Quick Launch menu are saved, and the Quick Launch menu returns to the standard view.
The second way to edit Quick Launch headings and links is through the Quick Launch management page. As described earlier, this page is accessible from the Site Setting page when using SharePoint Foundation or using SharePoint Server without the SharePoint Server Publishing Infrastructure feature enabled. To edit Quick Launch items, do the following:
Navigate to the site where you want to manage the Quick Launch menu.
Select the Site Settings option from the Settings menu.
On the Site Settings page, select the Quick Launch option from the Look and Feel section.
On the Quick Launch page, click the Edit icon in front of the item you want to edit (see Figure 3-11).

Figure 3-11. Quick Launch management page
In the Edit Navigation Link window, update the web address and description information as appropriate, and click OK to save the item.
Once all the information is updated, click the OK button to save the changes.
The updated header or link is saved, and you are returned to the Quick Launch page.
When the SharePoint Server Publishing Infrastructure feature is enabled, the navigation options are managed through the Navigation Settings page. To edit items in Quick Launch through the Navigation Settings page, do the following:
Navigate to the site where you want to manage the Quick Launch menu.
Select the Site Settings option from the Settings menu.
On the Site Settings page, select the Navigation option from the Look and Feel section.
On the Navigation Settings page, in the Structural Navigation:Editing and Sorting section, highlight the item you want to edit and click the Edit option.
In the opened Navigation Heading or Navigation Link window, update the details as appropriate, and click the OK button.
On the Navigation Settings page, click the OK button to save the changes to the navigation.
The changes will be save, and you will be returned to the Site Settings page.
Delete Headings and Links in Quick Launch
The first way to delete existing headers and links from Quick Launch is to do so within the Quick Launch area. To delete existing Quick Launch options in this way, do the following:
Navigate to the site where you want to manage the Quick Launch menu.
On the site’s home page, click the Edit Links option at the bottom of the Quick Launch area to place the links in Edit mode (see Figure 3-9).
Click the x following the listed header or link.
Click Save at the bottom of the Quick Launch to save the changes.
The changes to the Quick Launch menu are saved, and the Quick Launch menu returns to the standard view.
The second way to delete Quick Launch headings and links is through the Quick Launch management page when the SharePoint Server Publishing Infrastructure feature is not enabled. To delete Quick Launch items, do the following:
Navigate to the site where you want to manage the Quick Launch menu.
Select the Site Settings option from the Settings menu.
On the Site Settings page, select the Quick Launch option from the Look and Feel section.
On the Quick Launch page, click the Edit icon in front of the item (see Figure 3-11).
In the Edit Navigation Link window, click the Delete button to delete the item.
In the confirmation window, click OK to confirm deletion of the item.
The selected header or link is deleted, and you are returned to the Quick Launch page.
When the SharePoint Server Publishing Infrastructure feature is enabled, navigation options are managed through the Navigation Settings page. To delete items in Quick Launch from the Navigation Settings page, do the following:
Navigate to the site where you want to delete the Quick Launch item.
Select the Site Settings option from the Settings menu.
On the Site Settings page, select the Navigation option from the Look and Feel section.
On the Navigation Settings page, in the Structural Navigation:Editing and Sorting section, highlight the item you want to delete and click the Delete link.
On the Navigation Settings page, click the OK button to save the changes to the navigation.
The changes will be saved, and you will be returned to the Site Settings page.
Customizing the Navigation Bar
The SharePoint navigation bar is the main navigation tool for a SharePoint portal. Navigation can be based on either a site’s structure or a customized set of metadata terms managed through a term set. In talking about creating sites, we discussed how to choose whether the navigation bar should inherit its options from the parent site, list its own options based on the structure under the site, or based options on a term set. These settings can be updated and the navigation bar can be further customized through the site’s navigation management tools.
Updating Navigation Bar Inheritance Settings
As with the Quick Launch, how you update the navigation bar within a SharePoint site depends on whether the SharePoint Server Publishing Infrastructure site collection feature is enabled. The inheritance settings for the navigation bar determine the options presented in global navigation. To change the navigation bar inheritance settings when the SharePoint Server Publishing Infrastructure feature is disabled, do the following:
Navigate to the subsite where you want to update the navigation bar’s inheritance settings.
Select the Site Settings option from the Settings menu.
On the Site Setting page, select the Top Link Bar option from the Look and Feel section.
On the Top Link Bar page, update the inheritance settings as follows:
If the site is currently inheriting its options from the parent site, click the Stop Inheriting Links option. The navigation bar will become manageable within the current site.
If the site is currently managing its own navigation options, click the Use Links from Parent option, and then click OK on the confirmation screen. This will cause the navigation bar to inherit its options from the parent site.
The navigation inheritance settings will be updated. If the SharePoint Server Publishing Infrastructure feature is enabled, the navigation bar inheritance options are managed as follows:
Navigate to the subsite where you want to update the navigation bar’s inheritance settings.
Select the Site Settings option from the Settings menu.
On the Site Settings Page, in the Look and Feel section, select the Navigation option.
On the Navigation Settings page, in the Global Navigation section, select the desired display option:
If you want the site to inherit navigation options from the parent site, select the “Display the same navigation items as the parent site” option. You can also specify whether subsites or pages are included in the navigation bar.
If you want the site to manage its own navigation options, select the “Structural Navigation:Display the navigation items below the current site” option. You can also specify whether subsites and pages are included in the navigation bar.
If you want the site to use a set of terms in a term store as the navigation options, select “Managed Navigation:The navigation items will be represented using a Managed Metadata term set”, and then, in the Managed Navigation:Term Set section, select the term set to use.
Once the navigation inheritance options have been selected, click the OK button to save the settings and return to the Site Settings page.
The navigation inheritance settings will be updated, and you are returned to the Site Settings page.
Changing the Order of Navigation Bar Items
The order of navigation bar items can be managed directly on the site’s navigation bar or through the navigation management tools, which include the Top Link Bar options when the SharePoint Server Publishing Infrastructure feature is disabled or the navigation settings options when the SharePoint Server Publishing Infrastructure feature is enabled.
To update navigation item order directly on the navigation bar, do the following:
Navigate to the site where you want to manage the navigation items.
On the site’s home page, click the Edit Links option to the right of the navigation bar items to place the links in Edit mode (see Figure 3-12).

Figure 3-12. Navigation bar management options
To reorder the listed items, drag and drop them into the appropriate order.
Once all items are in the appropriate order, click Save to save the changes made.
The changes to the navigation menu are saved, and the menu returns to the standard view.
The second way to reorder navigation bar options is through the Top Link Bar management page, which is available in the Site Setting area when the SharePoint Server Publishing Infrastructure feature is disabled. To edit the order of navigation bar items through the Top Link Bar management page, do the following:
Navigate to the site where you want to manage the navigation menu.
Select the Site Settings option from the Settings menu.
On the Site Settings page, select the Top Link Bar option from the Look and Feel section.
On the Top Link Bar page, select the Change Order option.
On the Top Link Bar Change Order page, set the link order numbers for each navigation link listed.
Once all items are set to the appropriate order, click the OK button to save the changes.
The changes to the navigation bar order are saved, and you are returned to the Top Link Bar page.
When the SharePoint Server Publishing Infrastructure feature is enabled, the Top Link Bar management option is not available in the Site Settings page. Instead, all navigation options are managed through the Navigation Settings page. To manage the order of navigation bar items through the Navigation option, do as follows:
Navigate to the site where you want to manage navigation menu options.
Select the Site Settings option from the Settings menu.
On the Site Settings page, select the Navigation option from the Look and Feel section.
On the Navigation Settings page, in the Structural Navigation:Editing and Sorting section, highlight the options you want to reorder and select the Move Down and Move Up options to reorder the items.
Once the items are in the proper order, click the OK button to save the changes.
The changes will be saved, and you will be returned to the Site Settings page.
Note
When headers are available, moving items up and down will also allow moving links under available headers.
Adding New Headings and Links to the Navigation Bar
When the navigation bar is not inherited from the parent site and not based on a term set, you can customize options to meet your site’s navigation requirements. There are three different ways to add new headings and links to the navigation bar. The options available also depend on whether the SharePoint Server Publishing Infrastructure site collection feature is enabled.
The first way to add options to the navigation bar is directly from the navigation bar itself. To add new heading and links to the navigation bar using the navigation bar management tools, do the following:
Navigate to the site where you want to add navigation options.
Click the Edit Links option to show the editing options for the navigation bar (see Figure 3-12).
Click the +Link option to add a new link.
In the Add a Link window, enter the Text to Display as the option and the optional address information, and then click the OK button.
Click the Save button to save the navigation updates.
The new header or link will be added, and the navigation bar will return to the standard view.
A second way to add options to the navigation bar is available when the SharePoint Server Publishing Infrastructure feature is disabled. This method leverages the Top Link Bar management options as follows:
Navigate to the site where you want to add navigation options.
On the site’s home page, choose the Site Settings option from the Settings menu.
On the Site Settings page, select the Top Link Bar option from the Look and Feel section.
On the Top Link Bar page, select the New Navigation Link option.
On the New Navigation Link page, enter the web address and description for the new option and click the OK button.
The new link will be added, and you will be returned to the Site Settings page.
A third approach to add options to the navigation bar is used when the SharePoint Server Publishing Infrastructure feature is enabled. In this case, the navigation bar is managed through the navigation management options. To add headers and links to the navigation bar in this way, do the following:
Navigate to the site where you want to add navigation options.
On the site’s home page, choose the Site Settings option from the Settings menu.
On the Site Settings page, select the Navigation option from the Look and Feel section.
On the Navigation Settings page, in the Structural Navigation:Editing and Sorting section, do the following:
To add a new link to the navigation bar:
Highlight the Global Navigation item.
Click the Add Link option.
On the Navigation Link menu, enter the title and URL for the link, specify whether the link is to open in a new window, and enter an optional description for the link. You can also specify the audiences (users or groups) the link is targeted to. If you target a link to a user or group, the link is presented only to that user or group. Once all the information has been entered, click the OK button to save the new link.
To add a new header to the navigation bar:
Highlight the Global Navigation item.
Click the Add Heading link option.
On the Navigation Heading menu, enter the title for the heading, enter an optional URL, and if the link is to open in a new window, and enter an optional description for the header. You can also specify the audiences (users or groups) the header is targeted to. If you target a header to a user or group, the header is presented only to that user or group. Once all the information has been entered, click the OK button to save the new header.
On the Navigation Settings page, click the OK button to save the changes to the navigation.
The changes will be saved, and you will be returned to the Site Settings page.
Edit Headings and Links to the Navigation Bar
As with adding items, editing items in the navigation bar is available when the navigation bar is not inherited from the parent site and not based on a term set. The three different options for editing headings and links in the navigation bar depend on whether the SharePoint Server Publishing Infrastructure site collection feature is enabled.
The first way to edit options in the navigation bar is directly from the bar itself. Only custom links and headers can be edited directly from this view. Site and page references listed here cannot be edited. To edit the navigation bar’s heading and links using navigation bar management tools, do the following:
Navigate to the site where you want to edit navigation options.
Click the Edit Links option to show the edit options for the navigation bar (see Figure 3-12).
Click the custom link or header to edit to show the Edit Link option, as shown in Figure 3-13.

Figure 3-13. Navigation bar Edit Link option
Click the Edit Link option for the navigation item you want to edit.
In the Edit Link window, update the Text to Display and Address information as appropriate, and click the OK button.
Click the Save button to save the navigation updates.
The header or link is updated, and the navigation bar returns to the standard view.
A second method for editing options in the navigation bar is available when the SharePoint Server Publishing Infrastructure feature is disabled. Edit through Top Link Bar management options by doing the following:
Navigate to the site where you want to edit navigation options.
On the site’s home page, choose the Site Settings option from the Settings menu.
On the Site Settings page, select the Top Link Bar option from the Look and Feel section.
On the Top Link Bar page, select the Edit icon for the navigation item to be edited.
On the Edit Navigation Link page, update the item’s web address and description as appropriate, and click the OK button.
The link will be edited, and you will be returned to the Site Settings page.
A third approach to edit options in the navigation bar is available only if the SharePoint Server Publishing Infrastructure feature is enabled. In this case, navigation management is handled through the Navigation Settings. The only editable options are custom headers and links, not those representing sites and pages within the current site. To edit navigation bar headers and links, do as follows:
Navigate to the site where you want to edit navigation options.
On the site’s home page, choose the Site Settings option from the Settings menu.
On the Site Settings page, select the Navigation option from the Look and Feel section.
On the Navigation Settings page, in the Structural Navigation:Editing and Sorting section, do the following:
Highlight the custom link or header to be edited.
Click the Edit option.
In the Navigation Link or Navigation Heading window, update the information as appropriate, and click the OK button to save the changes.
On the Navigation Settings page, click the OK button to save the changes to the navigation.
The changes will be saved, and you will be returned to the Site Settings page.
Deleting and Hiding Headings and Links on the Navigation Bar
As with the other navigation management activities, there are three approaches to deleting and hiding links in the navigation bar. Not all links can be deleted. Items representing sites and pages must be hidden to remove them from the navigation bar.
The first way to hide or delete navigation options is directly from the navigation bar itself. To remove or hide headings and links in the navigation bar with navigation bar management tools, do the following:
Navigate to the site where you want to remove navigation options.
Click the Edit Links option to show the Edit options for the navigation bar (see Figure 3-12).
To the right of the navigation option is either the hide option (an eye) or the delete option (an x). To hide or delete the listed item, click the hide or delete option.
If hiding the item, the hide option changes from an eye to a hyphen (-).
If deleting an item, the item is removed completely from the navigation bar.
Click the Save button to save the navigation updates.
The navigation bar returns to the standard view.
A second method for deleting or hiding options in the navigation bar is available when the SharePoint Server Publishing Infrastructure site collection feature is disabled. To delete the options through Top Link Bar management options, doing the following:
Navigate to the site where you want to delete navigation options.
On the site’s home page, choose the Site Settings option from the Settings menu.
On the Site Settings page, select the Top Link Bar option from the Look and Feel section.
On the Top Link Bar page, select the Edit icon for the navigation item to be edited.
On the Edit Navigation Link page, click the Delete button.
Click the OK button on the delete confirmation window.
The link will be deleted, and you will be returned to the Top Link Bar page.
A third approach to remove options in the navigation bar is available when the SharePoint Server Publishing Infrastructure site collection feature is enabled. In this case, the navigation bar is managed through the navigation management options. As with editing directly from the navigation bar, items representing sites and pages can be hidden but not deleted. Only custom links and headers can be deleted. To hide or delete headers and links from the navigation bar in this way, do the following:
Navigate to the site where you want to delete navigation options.
On the site’s home page, choose the Site Settings option from the Settings menu.
On the Site Settings page, select the Navigation option from the Look and Feel section.
On the Navigation Settings page, in the Structural Navigation:Editing and Sorting section, do the following:
Highlight the item you want to hide or delete.
Click the Hide or Delete option.
Click the OK button to save the changes made.
The changes will be saved, and you will be returned to the Site Settings page.
Configuring Managed Navigation for the Navigation Bar
The navigation bar can be configured to use a term set to govern navigation options. When the navigation is configured to use a term set, navigation is based on the items included in the term set. In order to support use of a term set to define the navigation options of a site, the term set must first be created, and then the navigation must be configured to leverage the term set.
Creating a Navigation Term Set
To create a term set to manage navigation, do the following:
Navigate to the root site in the site collection.
On the site’s home page, choose the Site Settings option from the Settings menu.
On the Site Settings page, select the Term Store Management option from the Site Administration group.
On the Term Store Management Tool page, check the list of names in the Term Store Administrators section to verify you are an administrator. If you are not listed, do the following to add your account:
Enter your account information in the Term Store Administrators box, and click the Check Names option to verify the account.
Click the Save button to save the account.
Create a new term set for managing the navigation options.
Select the desired term store group under which to create the new term set and select the New Term Set option from the drop-down menu.
Enter the name for the new term set.
Configure the term set for managed navigation by doing the following:
Click the Intended Use tab in the Term Store Management tool (see Figure 3-14).

Figure 3-14. Term Store Management Tool Intended Use page
On the Intended Use page, select the Use This Term Set for Site Navigation option and click the Save button.
Create terms for the term set. A term is created by doing the following:
Select the term set and select the Create Term option from the drop-down menu.
Enter the name for the new term.
Highlight the name of the new term and select the Navigation tab in the main area of the Term Store Management tool.
In the Navigation Node Type section of the page, select Simple Link or Header to create a standard navigation link and enter the URL for the link or click the Browse button to browse to the desired URL. Then click the Save button.
Note
You can also use the term-driven page option to navigate to a page with options for defining content to be presented.
Configuring the Navigation Bar to Use the Term Set
Once a navigation term set is available the navigation bar can be configured to use the term set if the SharePoint Server Publishing Infrastructure site collection feature is enabled. To configure a site to use a term set for navigation do the following:
Navigate to the site where the term set will be used.
On the site’s home page, choose the Site Settings option from the Settings menu.
On the Site Settings page, select the Navigation option from the Look and Feel section.
On the Navigation Settings page, do the following:
In the Global Navigation section, select the Managed Navigation option.
In the Managed Navigation Term Set section, select the created term set.
Click the OK button to save the changes.
The navigation is updated to include the options listed in the term set.
Note
This section described using a term set created within the site collection for managing navigation options. A SharePoint administrator can create a term set in SharePoint Central Administration for use across site collections. In this scenario, the term set would be created in the Central Administration Managed Metadata Service, and then the site would be configured to use the navigation options, just as described in the “Configuring the Navigation Bar to Use the Term Set” section.
Using the Recycle Bin
SharePoint 2016 includes recycle bin capabilities that can be used to review and, if necessary, restore items previously deleted from SharePoint. Items that can be restored include documents, list items, document libraries, lists, and sites. Deleted items are placed in the recycle bin for a set number of days, a period defined by the SharePoint technical administrator. Figure 3-15 depicts the recycle bin.

Figure 3-15. The recycle bin
The SharePoint recycle bin has two levels of functionality . The first is the site recycle bin. When items are deleted from the current site, they are listed in the site recycle bin until they are manually deleted or until the deletion date exceeds the purge period, defined as the number of days an item is retained before it is purged from the recycle bin. The second level of recycle bin functionality is the site collection recycle bin. This bin lists all items deleted from any site in the site collection, including items purged from the site recycle bins before the purge period ends. It gives site collection administrators a higher degree of control over managing deleted items and helps ensure information is properly protected from inappropriate deletion.
Viewing Items in the Recycle Bin
Users can view items placed in a site’s recycle bin by doing the following:
Navigate to the site where you want to access the recycle bin.
On the site’s home page, click the Site Contents link in the Quick Launch area or from the settings menu.
On the Site Contents page, click the Recycle Bin link, located to the right of the Lists, Libraries, and Other Apps header.
You will be navigated to the Recycle Bin page for the site. This page lists all items in the recycle bin.
Site collection administrators are also provided the ability to view all items deleted across the site collection. This is done as follows:
Navigate to the root site in the site collection.
On the site’s home page, click the Site Settings option from the Settings menu.
On the Site Settings page, select the Recycle Bin option from the Site Collection Administration section.
Restoring Items from the Recycle Bin
To restore items from the site recycle bin or the site collection recycle bin, follow these steps:
Navigate to the Recycle Bin page or the site collection Recycle Bin page, as described previously.
On the Recycle Bin or site collection Recycle Bin page, check the box for each item you want to restore and click the Restore Selection link.
The items are restored, and the Recycle Bin page is refreshed to reflect the change.
Deleting Items from the Recycle Bin
A site administrator has the ability to purge, or remove, items from the site’s recycle bin so that other users will not have access to restore them. This is useful when a document was added to a library inappropriately and should be removed without letting library users access the item. Deleting the item from the library will remove it from general user access but does not protect against users with the ability to access the recycle bin from restoring the item. To protect against this a site collection administrator can remove the item from the site recycle bin. To delete an item from either the site or site collection recycle bin, do the following:
Navigate to the Recycle Bin page or the Site Collection Recycle Bin page, as described previously.
Delete items in either of the following ways:
To delete select items from the recycle bin or site collection recycle bin, check the box for each item you want to delete and click the Delete Selection link.
In the site collection recycle bin, all items in the recycle bin can be deleted by selecting the Empty Recycle Bin link.
On the deletion confirmation window, click the OK button.
The selected items are deleted from the recycle bin, and the Recycle Bin page is updated to reflect the changes.
Managing Site Design and Layout
The layout and look of the SharePoint environment can be tailored to meet an organization’s design structure and layout. Several methods can be used to update the look of a SharePoint environment. They include the following:
Selecting a theme for the environment that changes the colors and imagery of the existing layout.
Creating new page layouts and master pages to create new layouts for the SharePoint environment.
Creating alternative master pages for specific devices.
Updating Site Themes
A site theme in SharePoint 2016 defines the colors, imagery, fonts, and page layout for the SharePoint environment. Individuals granted the Design or Full Control permission level have the ability to change site themes. There is a default set of site themes available for selection and update, and a SharePoint interface designer, in conjunction with a site collection administrator, has the ability to create and deploy custom themes as well.
To update the theme for a site, do the following:
Navigate to the site where you want to change the theme.
On the site’s home page, select the Site Settings option from the Settings menu.
On the Site Settings page, select the Change the Look option from the Look and Feel section.
On the Change the Look page, select the theme to use as the starting point for the new site layout.
On the Change the Look configuration page, shown in Figure 3-16, the selected theme can be adjusted to meet virtually any needs. The changes that can be made to the theme include the following:
The background image can be changed or removed. Click the Change link below the image thumbnail and select a new image to use as the background for the theme. If your browser supports HTML5 you can also drag the new image over the thumbnail to upload the file. If you want to remove the background image entirely, click the Remove link below the thumbnail image.
The color scheme for the theme can be updated. Use the Colors drop-down and select the desired color combination.
The site layout can be selected. The site layout identifies the page layout the site will use. By default, there are two available page layouts:Oslo and Seattle. The Oslo layout does not include the Quick Launch area and has the navigation bar positioned below the site title. The Seattle layout includes the Quick Launch area and places the navigation bar above the site title.
The font family for use in the site can be selected. Select the font listing from the Fonts drop-down list.

Figure 3-16. The Change the Look configuration page
Once any changes to the theme’s background image, colors, site layout, and fonts have been made, the theme can be tested by clicking the Try It Out link. Clicking this link will generate a preview of the look. You see the layout as it will appear within the site.
On the Preview page, decide whether the look is complete.
Clicking the No, Not Quite There option returns you to the Change the Look configuration page, where additional alterations to the look and feel can be made.
Clicking the Yes, Keep It option saves the theme as the new look for the site and returns you to the Site Settings page.
Working with Design Manager
Design Manager organizes the SharePoint layout management tools in a single place to make it easier to manage the look and feel of the SharePoint environment. Design Manager becomes available when the SharePoint Server Publishing site feature is active within a site and allows the following to be managed:
Manage Device Channels: Allows you to define master pages to use with specific browsers and devices.
Upload Design Files: Provides instructions for uploading design resources to the site collections master page gallery.
Edit Master Pages: Lists the master page library view of the master pages available in the system for edit. This area also provides links that will allow an HTML file to be selected for conversion to a master page and to create a new minimal master page.
Edit Display Templates: Provides access to a library view of the display templates available within the master page gallery. Display templates define the layout of elements within the environment.
Edit Page Layouts: Provides access to a library view of the page layouts available for use in the master page gallery. Page layouts are used to define the configuration of pages within the SharePoint environment. This page includes a link to create new page layouts.
Publish and Apply Design: Lets you select master pages for use within the site for both the Site Master Page, used in standard pages, and the System Master Page, used in SharePoint system pages, such as the Site Settings page.
Create Design Package: Allows you to package design assets into a file for easy transport to other site collections.
The next section discusses these Design Manager resources.
Managing Device Channels
Device channels give the ability to define master pages for use with specific browser versions and devices. For example, you would create a channel when you want a different layout or design when viewing the site from a mobile device. To create a device channel, do the following:
From the Settings menu, select the Design Manager option.
From the Design Manager: Welcome page, select the Manage Device Channels option from the left navigation.
On the Manage Device Channels page, click the Create a Channel link.
In the Device Channels New Item window, enter the following information:
Name: Specifies a name for the channel
Alias: Specifies a single word to identify the channel for access through code. It is advisable to make the Alias similar to the Name for identification purposes.
Description: Lists an optional description that can be used to describe the new channel.
Device Inclusion Rules: Includes the set of rules that specify when the channel should be used to identify when the alternate master page should be used.
Active: Specifies whether the channel should be actively used. Inactive channels do not impact the master page used in the environment.
Once all the information is entered, click the Save button to save the new channel.
The new device channel will be created, and you will be returned to the Manage Device Channels page. You can then edit existing device channels by doing the following:
On the Manage Device Channels page, click the Edit or Reorder Existing Channels link.
On the Device Channels page, click the item you want to edit from the list of device channels, and select the Edit Item option from the Items ribbon.
On the Device Channel Edit Item screen, make any needed changes to the device channel details, and click the Save button to save the changes made.
The specified changes are made to the channel, and you are returned to the Device Channels page.
Once a new device channel is created a master page can be associated with the channel. To do this you can use the Publish and Apply Design option in Design Manager. To be able to apply master pages to specific device channels, you must first deactivate the Mobile Browser View site feature. You do this using the following steps:
Within the site where the channels will be applied, select the Site Settings option from the Settings menu.
On the Site Settings page, select the Manage Site Features option from the Site Actions section.
On the Site Settings Site Features page, click the Deactivate option for the Mobile Browser View feature.
With the Mobile Browser View feature disabled, master pages can be defined for active device channels. This is done as follows:
From the Settings menu on the site where the device channel should be applied, select the Design Manager option.
From the Design Manager:Welcome page, select the Publish and Apply Design option from the left navigation.
On the Design Manager:Publish and Apply Design page, select the Assign Master Pages to Your Site Based on Device Channel link.
On the Site Master Page Settings window, select the desired master pages for the listed channels and click the OK button.
The master pages are defined for the channels.
Selecting a New Site Design
Design Manager can be used to select and configure new site designs . Design Packages include layouts created by designers using other design tools, such as Dreamweaver to use as a basis for creating a new master page. To upload a new design package, do the following:
Navigate to the Site Settings page from any site within the site collection.
On the Site Settings page, select Design Manager from the Look and Feel section
On the Design Manager page, select the Upload Design Files option from the Quick Launch area.
On the Upload Design Files page, follow the instructions to map a drive to the site collection’s master page gallery.
Use the mapped drive to upload design files into the master page gallery.
Edit an Existing Site Design
Master page designs that already exist in the environment can be edited through Design Manager by doing the following:
Navigate to the Site Settings page from any site within the site collection.
On the Site Settings page, select Design Manager from the Look and Feel section.
On the Design Manager page, select the Edit Master Pages option from the Quick Launch area.
On the Edit Master Pages page, click the ellipsis (...) next to the name of the page and select the Open option from the document’s hover window.
In the Page Preview window, the layout of the master page is presented. On this page you can update the preview page, view the status of the master page configuration (including identification of any configuration and layout errors), and access the Snippet Gallery to configure SharePoint objects for injection into the master page. To access the Snippet Gallery, do the following:
In the Page Preview window, click the Snippets option from the top of the page (see Figure 3-17).

Figure 3-17. Page Preview window
On the Component Configuration page, shown in Figure 3-18, select the needed component from the Design ribbon tab. This will show the component details in the preview window on the page.

Figure 3-18. Component Configuration page
In the component customization section, make the appropriate selections to set the configuration of the selected component.
Once all needed changes have been made to the component, click the Update button to refresh the component preview and preview the changes made.
Once the preview is confirmed, clicking the Copy to Clipboard button below the HTML Snippet section will copy the component with the current configuration to the clipboard for copying into the master page.
Snippet code can be copied into a master page to inject the SharePoint components into the master page file.
Managing Page Layouts
Page templates are used to define the layout of pages within a site. They define the zone configuration of the content and whether standard items, such as Quick Launch navigation, are included. Page layouts are dependent on the site’s master page, which dictates the overall style and layout of the site. To manage page templates, do the following:
Navigate to the Site Settings page from any site within the site collection.
On the Site Settings page, select Design Manager from the Look and Feel section.
On the Design Manager page, select the Edit Page Layouts option from the Quick Launch area.
On the Edit Page Layout page, do the following:
To create a new page layout:
Select the Create a Page Layout option above the master page listing.
In the Create a Page layout window, enter a name for the new layout; then select the master page the layout will be associated with and the content type identifying the page layout type to create. Click the OK button to create the page.
To edit an existing page layout, open the page layout to edit it and make any necessary changes.
Reset ting Site Definitions
Over time, many customizations may be made to a site and the pages within the site. Some of these customizations are made to the site’s look and feel to meet specific needs. Tools, such as SharePoint Designer, are available to make these changes. When tools are used to make changes directly to a site’s pages, the pages can become unghosted—that is, the edited pages are no longer based on the site definition that defines the page’s standard configuration and layout. Resetting the site definition allows you to reset the pages to leverage the site definition allowing the site pages to again conform to the standard configuration and layout of the environment.
Use the following steps to reset, or reghost, a page or site previously customized.
Navigate to the site containing the pages to be reset.
On the site’s home page, click the Site Settings option in the Settings menu.
On the Site Settings page, in the Site Actions section, click the Reset to Site Definition link.
On the Reset Page to Site Definition page:
To reset a specific site page, select Reset Specific Page to Site Definition Version, and type the URL of the page to reset.
To reset all pages in the site, select Reset All Pages in This Site to Site Definition Version.
Once the appropriate options are selected, click the Reset button.
The site page or entire site is reset, or reghosted, and you are returned to the Site Settings page.
Controlling Access to Page Layouts and Site Templates
SharePoint gives site owners the ability to control page layouts and site templates used for creating pages and subsites within a site when the SharePoint Server Publishing site collection feature is enabled. You can let people create new pages from any available layout or allow only specific page layouts to be made available for use within a site. If you limit a site to only allow use of specific page layouts, you can then decide whether subsites under that site will also be limited to the specified page layouts. This capability is useful in situations where the site should contain only a specific type of content, such as press releases.
Site templates can be managed similar to page layouts in that you can decide whether subsites created under a site can leverage any available site templates or just specified ones. You can also determine whether this setting is inherited by the current site’s subsites. These capabilities are useful if you need to delegate site creation rights to users but want to restrict their options—for example, if you have an Enterprise Projects site under which users create a site to manage each project. You create a template for project sites that includes resources that are to be part of a project site. Then you restrict the available site templates in the Enterprise Projects site to the template you created. This ensures all project sites created will be based on the appropriate template.
Lastly, you can specify default settings to use when new pages are created in a site. This includes the default page template and URL. You have the ability either to inherit the settings from the parent site or to select them for the current site. While the site layout and URL can be changed after a site is created, it is good practice to set these defaults appropriately to minimize changes needed as new pages are created.
Follow these steps to update page layout and site template settings:
Navigate to the Site Settings page for the site where you want to update the page layout and site template settings.
On the Site Settings page, in the Look and Feel section, click the Page Layouts and Site Templates link.
On the Page Layout and Site Templates Settings page, do the following:
In the Subsite Templates section, select “Subsites inherit site templates from parent site”, “Subsites can use any site template”, or “Subsites can only use the following site templates” and choose the templates that should be made available. You can also indicate whether you want to reset all subsites to inherit the preferred subsite template settings.
In the Page Layouts section, select “Pages inherit preferred layouts from parent site”, “Pages in this site can use any layout”, or “Pages in this site can only use the following layouts” and choose the layouts to be made available. You can also indicate whether you want all subsites reset to inherit the preferred page layout settings.
In the New Page Default Settings section, select “Inherit default page layout from parent site” or “Select the default page layout” and select the appropriate layout from the list. If you want, you can also reset all subsites to inherit these new page settings and identify if blank spaces in page names should be converted to dashes when new pages are created.
Once all options are appropriately updated, click the OK button.
The page layout and site template settings are saved, and you are returned to the Site Settings page.
Identifying Master Pages and Style Sheets for a Site
As discussed, master pages define the general structure and layout of SharePoint sites. SharePoint pages are designed to leverage master pages so that sets of pages can have the same overall structure and layout and so that any changes to this structure and layout can be made in a central place. The changes made will apply to all associated pages. When you alter a master page, such as by adding a logo or changing the page format, that change is reflected across all pages of the site associated with that master page.
Style sheets are used in conjunction with master pages to define color scheme, fonts, backgrounds, translations, and other aspects used in site pages. Site managers are able to modify a site’s style sheet to change page attributes. Thus, site managers can update SharePoint to conform to their organization’s corporate identity.
The master page and style sheet for a site with the SharePoint Server Publishing site feature enabled can be updated by doing the following:
Navigate to the Site Settings page for the site where you want to update the master page or style sheet.
On the Site Settings page, in the Look and Feel section, click the Master Page link.
On the Site Master Page Settings page, make the following selections:
In the Site Master Page section, either inherit the master page from the parent site (available in subsites only) or choose a master page for this site, and select whether all subsites of the current site will inherit this master page setting.
In the System Master Page section, either inherit the master page from the parent site (available in subsites only) or choose a master page for form and view pages within the site, and select whether all subsites will inherit this system master page setting.
In the Theme section, identify whether subsites of the current site will inherit the current site’s theme.
In the Alternate CSS URL section you can determine if an alternate CSS will be used. You can choose to inherit the alternative style sheet from the parent site (available in subsites only), use the default style sheet or specify an alternate style sheet for the current site. If you specify an alternative style sheet, you must specify the file to reference and whether you want to reset all of the current site’s subsites to use the defined alternate. An alternate style sheet alters the styling defined in the master page.
Once all the necessary changes have been made, click the OK button
The changes you made are saved, and you are returned to the Site Settings page.
Managing Site Templates
As discussed earlier in this chapter, when creating a new site or subsite, you select a template as part of the creation process. The site template defines the initial set of components, such as lists and libraries, included in the new site and defines the layout of these components.
Creating Site Templates
The templates discussed in Chapter 2 are the default templates provided in SharePoint Standard and Enterprise. Once you create a new site based on one of the available templates and tailor it to meet your specific needs, you can save the updated site as a new template to be used when additional sites are created. Any user assigned the full control permission level in a site can create templates from the site. The templates you create will be available for selection when sites are created within the same site collection where the site template was created.
Here is an example of how site templates are used. Say that you have a site called Budget Planning that contains a subsite called 2017 Budget. You update the 2017 Budget site to reflect the layout needed to support yearly budget planning. (Creating components and editing page layouts are discussed in Chapters 4 through 12.) Once the 2017 Budget site includes the desired structure and content, you save it as a template called Budget Planning. This Budget Planning template is then available when other new sites are created. By saving the 2017 Budget site as a template, you save yourself and others the effort of duplicating the customizations made to the 2017 Budget site when additional yearly budget sites are required. Also, you provide others a starting point for creating yearly budget sites that include the layout and components they will need in their sites. This helps ensure that all yearly budget sites have a consistent structure and contain the resources needed to properly support the budget planning process.
Note
If your SharePoint environment contains multiple site collections, templates created within a site collection will be available only within that collection unless a SharePoint technical administrator registers the template for use across collections or unless the template is copied into each site collection’s solutions gallery.
To create a site template for use in the current site collection, follow these steps:
Navigate to the site you want to save as a site template.
On the site’s home page, click the Site Settings option from the Settings menu.
On the Site Settings page, in the Site Actions section, click the Save Site as Template link.
On the Save Site as Template page, enter the following:
In the File Name section, enter the filename to use to save the template.
In the Name and Description section, enter the template name. This is the name that will appear on the templates tab when a new site is created. You can also enter an optional description for the template.
In the Include Content section, specify whether content within the selected site is to be included in the template. Content includes any documents and list data that exists in the selected site. To include the content in the template, check the Include Content check box.
Once all necessary information is entered, click the OK button.
On the Operation Completed Successfully page, click the OK button.
A copy of the site is saved as a template, and you are taken to the site’s home page. The new site template is added to the Solutions gallery and activated, making it available to users creating sites.
Note
The Save Site as Template option is not available in a site where the SharePoint Server Publishing Infrastructure site collection feature is enabled. When this feature is enabled in a site collection, the Save Site Template page can be accessed in only sites where the SharePoint Server Publishing site feature is not active by manually navigating to the /_layouts/15/SaveTmpl.aspx page within the site.
Editing Site Templates
To edit a site template, simply edit the site you originally used to create the site template or create a new site from the existing template and make the edits to that site. Once the changes have been made to the site, create the new template by following the steps described previously. Then deactivate and delete the old template from the Solutions Gallery. Deleting templates is discussed in the next section.
Deleting Site Templates
While you cannot remove the default site templates provided, by executing the following steps, you can delete any custom site templates created in a site collection:
Navigate to the root site in the site collection.
On the site’s home page, click the Site Settings option from the Settings menu.
On the Site Settings page, in the Web Designer Galleries section, click the Solutions link.
On the Solution Gallery page, hover over the template to delete, click the down arrow to present the item’s context menu, and select Deactivate.
In the Deactivate Solution window, click the Deactivate command from the View ribbon tab.
On the Solution Gallery page, hover over the template to delete again, click the down arrow to present the item’s context menu, and select Delete.
On the delete confirmation window, click the OK button.
The template is deleted, and the Solution Gallery is updated to reflect the deletion.
Managing Site Content and Structure
SharePoint includes administrative tools that allow site owners to view their SharePoint site, list, and library resources in a single tree structure. These resources can also be managed directly from this same location. This is done from the Site Content and Structure management screen shown in Figure 3-19.

Figure 3-19. The Site Content and Structure page
Access the Site Content and Structure page as follows:
Navigate to the Site Settings page for the site you want to manage.
On the Site Settings page, in the Site Administration section, click the Content and Structure link.
You are taken to the Site Content and Structure page. This page, which provides a comprehensive tree view of the site collection hierarchy. All sites, lists, and libraries within the environment are included. From here, you can manage the following site activities:
Navigate to any of the listed sites.
Create new subsites, lists, or libraries within a specific site.
Delete a listed site.
Copy a listed site to a specified location.
Move a listed site to a specified location.
View the site’s recycle bin.
Access the site’s management resources, including Site Settings, People and Groups, Advanced Permissions, and General Settings.
All of these options are available as selections on the listed site’s drop-down menu, as shown in Figure 3-20.

Figure 3-20. The site’s drop-down menu on the Site Content and Structure page
From the Site Content and Structure page, there are also several management options available for managing lists and libraries:
Navigate to the default view of the list or library.
Create a new entry in a list, upload a new document in a library, or create a new folder in a library.
Delete a list or library.
Access a list’s or library’s properties page.
All of these options are available as selections on the list’s or library’s drop-down menu, as shown in Figure 3-21.

Figure 3-21. The list’s drop-down menu on the Site Content and Structure page
Managing Site and Site Collection Features
Along with all of the other site capabilities discussed, you can also enable and disable specific site features within the SharePoint sites and enable and disable specific site collection features in the overall site collection. (The features available in SharePoint Foundation and SharePoint Server Standard and Enterprise are discussed in Chapter 2.)
Managing Site Features
Site features are made available within a site by activating them. Activating a feature makes the functionality associated with the feature available. To activate or deactivate site features, do the following:
Navigate to the site where the feature needs to be managed.
On the site’s home page, click the Site Settings option from the Settings menu.
On the Site Settings page, in the Site Actions section, click the Manage Site Features link.
On the Site Features page, click the Activate/Deactivate button associated with the site feature you desire to activate or deactivate.
The feature status is changed, and the associated feature capabilities are enabled or disabled.
Managing Site Collection Features
Site collection features are capabilities that, when activated, make capabilities available across all sites in the collection. To activate or deactivate site collection features, do the following:
Navigate to the root site in the site collection where the feature needs to be managed.
On the site’s home page, click the Site Settings option from the Settings menu.
On the Site Settings page, in the Site Collection Administration section, click the Site Collection Features link.
On the Site Collection Features page, click the Activate/Deactivate button associated with the site collection feature to activate or deactivate.
The feature status is changed, and the associated feature capabilities are enabled or disabled.
Managing Content Variations
Organizations that operate globally often need to publish resources in several languages to properly support all users. The process of creating the various translations, or variations, of the content can be time consuming and difficult to manage.
SharePoint gives site owners the ability to define site variations and define primary and variation locations for content needing to be translated. Changes made to the primary location can be automatically or manually propagated to the associated variations. The variation capabilities can be integrated with SharePoint workflows that drive the updating process for variations. These workflows can also be integrated with the SharePoint 2016 translation services to automate the actual creation of the translated versions.
When users access a site that participates in a variation set, they are automatically taken to the variation supporting their language. SharePoint makes this determination based on the web browser’s language preferences. If no variation supporting the user’s browser language preferences exist, the user is taken to the primary site page for the variation set.
To use the SharePoint variation capabilities, configure the variation settings within the site collection. These settings include identifying the source location where variations are to be created and configuring variation creation management and notification settings. To configure the variation settings for the site collection , follow these steps:
Navigate to the Site Settings page for the root site in the site collection.
On the Site Settings page, in the Site Collection Administration section, click the Variations Settings link.
On the Variations Settings page, follow these steps:
In the Site, List, and Page Creation Behavior section, specify whether variations are to be created for all new elements or the user will choose which language sites, if any, the new content should be synchronized to.
In the Recreate Deleted Target Page section, specify whether target pages are to be re-created when the source page is republished.
In the Update Target Page Web Parts section, indicate whether changes to web parts in the source page are to carry through to the target pages.
In the Notification section, specify whether an e-mail will be sent to the contact person for the target when a new subsite or page is created or when a target page is edited.
Once all settings have been properly configured, click the OK button to save the information.
The information is saved, and you are returned to the Site Settings page.
Variation Labels
You can create multiple variations of information in SharePoint. Variation labels are the names given to the variants of an item so that they can be uniquely identified. For example, if you have a site that contains information that needs variants created in Spanish and French, each of these alternative versions will be provided a label uniquely identifying it. Follow these steps to create a new variation label .
Navigate to the Site Settings page for the root site in the site collection.
On the Site Settings page, in the Site Collection Administration section, click the Variation Labels link.
On the Variation Labels page (see Figure 3-22), click the New Label link.

Figure 3-22. The Variation Labels page
On the Configure Your Target Label page, enter the following:
In the Language section, identify the language for the site template.
In the Locale section, select the locale for the variation.
In the Variations Home section select the location where the source and target variations will be created.
In the Label Name and Description section, enter a name for the label (you can also enter an optional description).
In the Display Name section, enter the display name for the label. The display name is the friendly name used in displaying the label.
In the Publishing Site Template section, select the template that will be used to create variations.
In the Label Contact section, contacts for the source variation site.
Click the OK button.
The variation label is created, and you are returned to the Variation Labels page.
You can edit the variation labels by hovering over a listed label and selecting the Edit option from the drop-down menu. To delete variation labels, hover over a label and select the Delete option.
After the variation settings are configured and variation labels have been created, you need to create the variation hierarchy. The variation hierarchy is the tree structure needed under the identified root variation site to store and manage the site variations. To create the variation hierarchy, click the Create Hierarchies link on the Variation Labels page, as shown in Figure 3-22. Clicking this link will cause SharePoint to create the necessary site hierarchy to support the variant configuration under the root variation site.
Translatable Columns
Site collection administrators are able to identify list and library columns that need to be translated when they appear in a variant site. This identifies elements to translate as part of the variation management workflow process. To update the translatable column settings, do the following:
Navigate to the Site Settings page for the root site in the site collection.
On the Site Settings page, in the Site Collection Administration section, click the Translatable Columns link.
On the Translatable Column Settings page, check the box in front of each column name that must be translated and click the OK button.
The translatable column settings are saved, and you are returned to the Site Settings page.
Variation Logs
The variation log presents an operational log listing the variation process details. This log can be used to review the status and health of the variation process. To view the variation logs, do as follows:
Navigate to the Site Settings page for the root site in the site collection.
On the Site Settings page, in the Site Collection Administration section, click the Variation Logs link.
The Variation Logs page lists the logged events for the variation process.
Managing Help Information
SharePoint 2016 allows site collection administrators to identify the help collection to be used when help links are clicked within a site. By default, only one help collection is listed. This collection contains the standard SharePoint help details. To replace this default collection, a SharePoint developer or administrator must create a new collection and make it available for selection.
To manage help collections, do the following:
Navigate to the root site in the site collection.
On the site’s home page, click the Site Settings option from the Settings menu.
On the Site Settings page, in the Site Collection Administration section, click the Help Settings link.
On the Help Settings page, do the following:
Select the help collections to be made available.
Once the appropriate selections have been made, click the OK button.
Using SharePoint Designer for Site Management
SharePoint Designer is a client tool that can be used to create, extend, and deploy SharePoint solutions. SharePoint 2016 includes the ability to identify whether SharePoint Designer can customize site collection components. Through the SharePoint Designer settings, you can specify the following:
Whether to allow SharePoint Designer to be used to edit the site collection.
Whether site administrators can detach pages from the original site definitions and unghosting the pages.
Whether site administrators can customize master pages and page layouts through SharePoint Designer.
Whether site administrators can change the hidden URL structure of their sites through SharePoint Designer.
To update SharePoint Designer settings for a site collection, do as follows:
Navigate to the root site in the site collection.
On the site’s home page, click the Site Settings option from the Settings menu.
On the Site Settings page, in the Site Collection Administration section, click the SharePoint Designer Settings link.
On the SharePoint Designer Settings page, specify the SharePoint Designer management preferences, and click the OK button.
The SharePoint Designer settings are updated, and you are returned to the Site Settings page.
Note
In the past, new versions of SharePoint Designer were created to work with a new version of SharePoint. For example, SharePoint Designer 2010 was used to manage resources in SharePoint 2010 and SharePoint Designer 2013 was created to manage resources in SharePoint 2013. No new version of SharePoint Designer is being created to manage resources in SharePoint 2016. Instead, SharePoint Designer 2013 will continue to be used to manage resources in SharePoint 2016.
Summary
This chapter discussed how to manage and configure SharePoint sites. We demonstrated how to create and delete sites and how to manage site security and navigation. We also reviewed the recycle bin showing how to review items that had been deleted and how to restore these items. We then looked at the tools that are available to change the style and layout of a site. We also delved into site templates discussing how to create, edit and delete them. Lastly, we discussed site and site collection features.
In the next chapter we will look at pages, apps, and web parts, which are key components needed to configure your SharePoint sites. We will discuss the various types of pages that can be created within a SharePoint environment and review how to create and manage them. We will then detail how to add and manage web parts and app parts within the pages you create.