Chapter 3: Testing Complex Components with React Testing Library
In Chapter 2, Working with React Testing Library, we learned how to test presentational components. However, most features are designed to allow user actions that result in changes to the state and resulting output. Testing as many user action scenarios as possible is essential for reducing risk before sending code to production for end users. By the end of this chapter, you will learn how to simulate user actions with the fireEvent and user-event modules. You will learn how to test components that interact with web service APIs. Finally, you will learn how to use test-driven development as a workflow for building your features.
In this chapter, we're going to cover the following topics:
- Performing actions on components with the fireEvent module
- Simulating Document Object Model (DOM) events with the user-event module
- Testing components that interact with APIs
- Implementing test-driven development with React Testing Library
The skills you gain in this chapter will provide you with a solid understanding of testing the outcomes of user behaviors. You will also gain a different approach to building components from start to finish.
Technical requirements
For the examples in this chapter, you will need to have Node.js installed on your machine. We will be using the create-react-app CLI tool for all code examples. Please familiarize yourself with the tool before starting the chapter if needed. Although not a requirement, it may help if you review the material from the previous two chapters before beginning this chapter.
You can find code examples for this chapter here: https://github.com/PacktPublishing/Simplify-Testing-with-React-Testing-Library/tree/master/Chapter03.
Testing user events
In this section, we will learn how to simulate user events and test the resulting output. To test component interactions, similar to the case with users, we need methods to simulate DOM events in our tests. Numerous events caused by users can occur on the DOM. For example, a user can perform a keypress event by entering text into an input box, a click event by clicking a button, or they can view drop-down menu items with a mouseover event. The DOM Testing Library provides two libraries to simulate user actions, fireEvent and user-event, which we are going to see in the following sections.
Simulating user actions with fireEvent
We can use the fireEvent module to simulate user actions on the resulting DOM output of components. For example, we can build a reusable Vote component that renders the following DOM output:
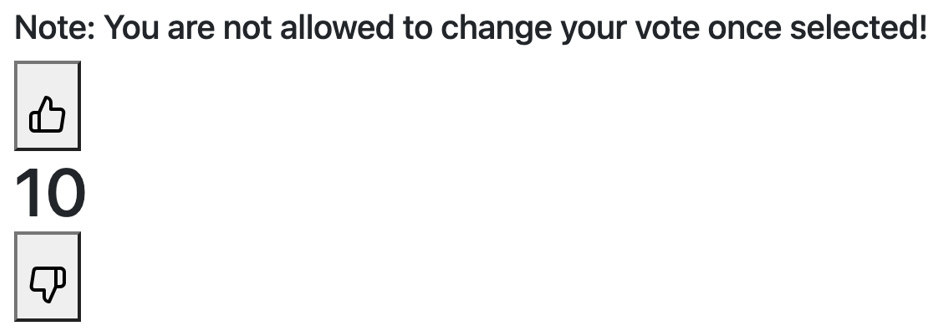
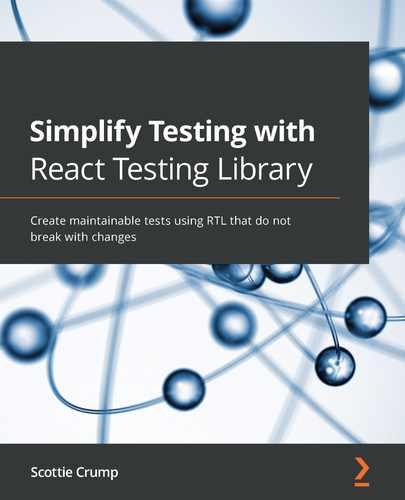
Figure 3.1 – Vote component
In the preceding screenshot, the number 10 represents the likes rating. We have two buttons that a user can click to place a vote and change the likes rating: a thumbs-up button and a thumbs-down button. There is also a disclaimer letting the user know that they are only allowed to vote once. When a user clicks the thumbs-up button, they will see the following output:
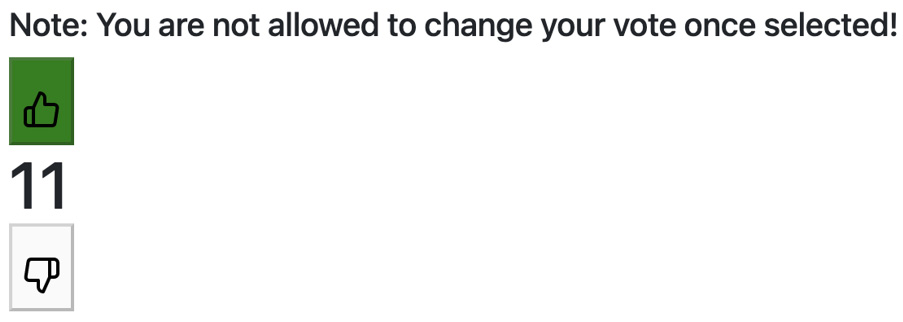
Figure 3.2 – Thumbs-up vote
In the previous screenshot, the likes rating increased from 10 to 11. When a user clicks the thumbs-down button, they will see the following output:
Figure 3.3 – Thumbs-down vote
In the previous screenshot, the likes rating has decreased from 10 to 9. The act of clicking the button is an event we can simulate with fireEvent. In the code implementation for the Vote component, an event handler is called inside the component with logic to update the likes we see on the screen:
const handleLikeVote = () => dispatch({ type: 'LIKE' })
const handleDislikeVote = () => dispatch({ type:
'DISLIKE' })
return (
<div className="h1">
<h5>Note: You are not allowed to change your vote
once selected!</h5>
<button
onClick={handleLikeVote}
disabled={hasVoted}
style={clickedLike ? { background: 'green' } :
null}
>
<img src={thumbsUp} alt="thumbs up" />
</button>
In the preceding code block, the button has an onClick event handler attached. When the like button is clicked, the event handler calls the handleLikeVote method, which calls another method, dispatch, which updates the likes rating.
Important Note
Please refer to the Chapter 3, Testing Complex Components with React Testing Library, code samples, found in the Technical requirements section, to see the component in its entirety.
We can write a test to assert the output of making a vote:
import { fireEvent, render, screen } from '@testing-library/react'
import Vote from './Vote'
test('increases total likes by one', () => {
render(<Vote totalGlobalLikes={10} />)
In the preceding code block, we import the fireEvent, render, and screen methods from React Testing Library. Next, we import the Vote component to test. Then, we arrange our test code in the test method and use the render method to render the Vote component with the value 10 for the totalGlobalLikes property passed in to the component.
The totalGlobalLikes property is the number we initially see on the screen when the component is rendered and represents the application-wide state for the likes. In a fully completed application, we would pass the totalGlobalLikes value down to the Vote component via a parent component. Next, we will interact with and assert the output of the rendered component:
expect(screen.getByText(/10/i)).toBeInTheDocument()
fireEvent.click(screen.getByRole('button', { name:
/thumbs up/i }))
expect(screen.getByText(11).toBeInTheDocument()
expect(screen.getByRole('button', { name: /thumbs up/i
})).toHaveStyle(
'background: green'
)
})
In the preceding code block, first, we assert that the Vote component's local version of totalGlobalLikes is in the document with a value equal to 10. Next, we use the click method of fireEvent to click the button with the name thumbs up. Next, we assert that the value of totalGlobalLikes updates in the document to 11. Finally, we assert that the thumbs up button's background color has changed to green.
In many cases, using fireEvent is completely fine. However, it does have some limitations. For example, when a user performs an action such as entering text into an input box, many events occur, such as keydown and keyup. Now, fireEvent has methods to achieve these individual actions, but it doesn't have one way to handle them all together in sequence.
Next, we will learn about using the user-event library to address the fireEvent module's limitations.
Simulating user actions with user-event
The user-event library is an enhanced version of fireEvent. In the previous section, we learned that fireEvent has methods to simulate various events that occur when a user enters text into an input box. The user-event library has many methods, such as click or type, that automatically simulate all the events that occur when a user performs actions on the DOM. The advantage is that user-event methods provide more value compared to fireEvent methods.
create-react-app comes with user-event already installed. For projects not using create-react-app, use the following command to install:
npm install --save-dev @testing-library/user-event
We can update the previous section's Vote component test with user-event:
import { render, screen } from '@testing-library/react'
import user from '@testing-library/user-event'
import Vote from './Vote'
test('increases total likes by one', () => {
render(<Vote totalGlobalLikes={10} />)
expect(screen.getByText(/10/i)).toBeInTheDocument()
user.click(screen.getByRole('button', { name: /thumbs
up/i }))
expect(screen.getByText(/11/i)).toBeInTheDocument()
expect(screen.getByRole('button', { name: /thumbs up/i
})).toHaveStyle(
'background: green'
)
})
In the previous code, we imported the user-event library as user. Finally, we used the click method of user-event to click the thumbs up button. Our test provides more value because we are more closely simulating user DOM actions. The React Testing Library team recommends using user-event as much as possible, so we will not use fireEvent in any more examples throughout the remainder of this book.
When we introduced the Vote component in the previous section, we mentioned that a user could only vote once. We can write a test to handle that scenario:
test('A user can only vote once', () => {
render(<Vote totalGlobalLikes={10} />)
const thumbsUpBtn = screen.getByRole('button', { name:
/thumbs up/i })
const thumbsDownBtn = screen.getByRole('button', { name:
/thumbs down/i })
expect(screen.getByText(/10/i)).toBeInTheDocument()
user.click(thumbsUpBtn)
user.click(thumbsUpBtn)
expect(screen.getByText(/11/i)).toBeInTheDocument()
user.click(thumbsDownBtn)
expect(screen.getByText(/11/i)).toBeInTheDocument()
})
In the preceding code, first, we grab the thumbs up and thumbs down buttons. Then, we verify the current total likes is 10 and click the thumbs up button twice. Next, we verify the total likes is 11. Finally, we click the thumbs down button and assert that the total likes count is still 11. As another test case, we can also verify that the local version of totalGlobalLikes decreases by one when a user clicks the thumbs down button:
test('decreases total likes by one', () => {
render(<Vote totalGlobalLikes={10} />)
expect(screen.getByText(/10/i)).toBeInTheDocument()
user.click(screen.getByRole('button', { name: /thumbs
down/i }))
expect(screen.getByText(/9/i)).toBeInTheDocument()
expect(screen.getByRole('button', { name: /thumbs down/i
})).toHaveStyle(
'background: red'
)
})
We click the thumbs down button and verify the total likes decreased from 10 to 9, and the background color changed to red in the preceding code.
When we run all the tests for the Vote component, we get the following results indicating all tests passed:
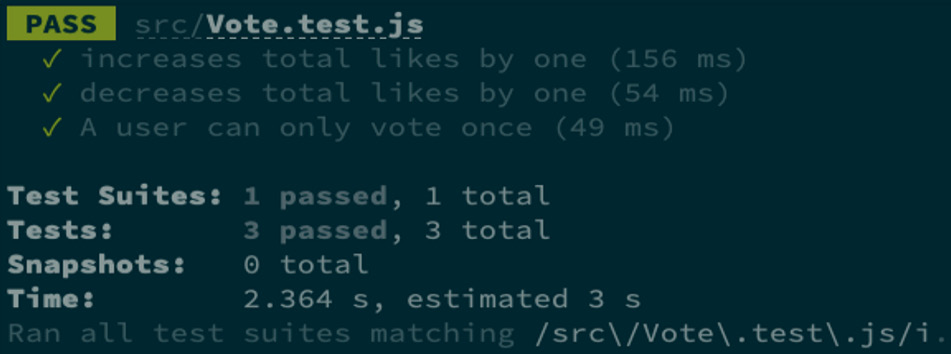
Figure 3.4 – Vote component test results
The preceding screenshot shows that the increases total likes by one, decreases total likes by one, and A user can only vote once tests have passed in the Vote.test.js file.
In another example, we might create an input component for employees that accepts their name:

Figure 3.5 – Employee email input
When the employee enters their name, the component appends it to the company's website name and displays the result to the screen:

Figure 3.6 – Completed employee email input
If the employee enters a first and last name separated by a space, the name is concatenated with a .:

Figure 3.7 – Concatenated employee email input
We can use the type method of user-event to simulate typing into the employee email component and make an assertion on the result as follows:
import { render, screen } from '@testing-library/react'
import user from '@testing-library/user-event'
import EmployeeEmail from './EmployeeEmail'
test('it accepts a username and displays to the screen', ()
=> {
render(<EmployeeEmail />)
const input = screen.getByRole('textbox', { name: /enter
your name/i })
user.type(input, 'jane doe')
expect(screen.getByText(/jane.doe@software-
plus.com/i)).toBeInTheDocument()
})
We import the render, screen, and user-event modules in the previous code. Then, we import the EmployeeEmail component. We render the component on the screen. Then, we grab the input element and store it in the variable input. Next, we use the type method from user-event to enter jane doe into the input. Finally, we assert that the text [email protected] is in the DOM.
When we run our test, we get the following output indicating the scenario passes as expected:
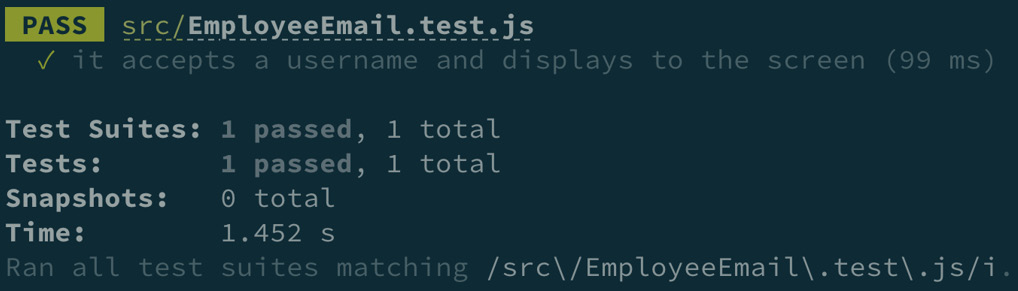
Figure 3.8 – Employee component test results
The previous screenshot shows that the it accepts a username and displays to the screen test passed in the EmployeeEmail.test.js file. Now you know how to simulate user actions using the user-event module. The skills learned in this section are essential because most of our tests typically will need to involve some type of user action.
Next, we will learn how to test components that call event handlers in isolation.
Testing components that call event handlers in isolation
It is very common to create child components that invoke methods passed down to them from parent components. In the previous section, we had a Vote component that included two buttons in the same component, which can be seen in the following code block:
<button
onClick={voteLike}
disabled={hasVoted}
style={clickedLike ? { background: 'green' } :
null}
>
<img src={thumbsUp} alt="thumbs up" />
</button>
<div>{totalLikes}</div>
<button
onClick={voteDislike}
disabled={hasVoted}
style={clickedDislike ? { background: 'red' } :
null}
>
<img src={thumbsDown} alt="thumbs down" />
</button>
We could decide to extract the button code into its own file to become a reusable component:
const VoteBtn = props => {
return (
<button onClick={props.handleVote}
disabled={props.hasVoted}>
<img src={props.imgSrc} alt={props.altText} />
</button>
)
}
In the preceding code block, we have a VoteBtn component that accepts handleVote, hasVoted, imgSrc, and altText properties passed to the props object. The parent component would pass down the props. For this section's purposes, our primary focus is the handleVote property. The handleVote method is called when a click event fires due to clicking the button. When this method runs inside the Vote component, the result is updating the local version of totalGlobalLikes. The resulting screen output of the button is as follows:

Figure 3.9 – Vote button
In the preceding screenshot, we see a Vote component with a thumbs up image. To test the VoteBtn component in isolation, we need to provide properties to the component since it's no longer wrapped in a component that provides them automatically. Jest provides functions that serve as test doubles to replace the real versions of methods inside our tests.
A test double is a generic term used to represent an object that replaces a real object for testing purposes. Test doubles used as placeholders for dependencies such as an API or database are known as stubs. However, when a test double is used to make assertions against, it is known as a mock. For example, we can use the jest.fn function to replace handleVote inside our test:
import { render, screen } from '@testing-library/react'
import user from '@testing-library/user-event'
import thumbsUp from './images/thumbs-up.svg'
import VoteBtn from './VoteBtn'
test('invokes handleVote', () => {
const mockHandleVote = jest.fn()
render(
<VoteBtn
handleVote={mockHandleVote}
hasVoted={false}
imgSrc={thumbsUp}
altText="vote like"
/>
)
In the preceding code block, first, we import the render and screen methods from React Testing Library. Next, we import the user-event module. Then, we import the thumbsUp image and the VoteBtn component we want to test. Then, inside the test method, we create a jest function to use as a mock and assign it to the mockHandleVote variable.
Next, we render the VoteBtn component into the DOM and pass mockHandleVote and other properties to the component. Now that our test code is arranged, we can perform actions and make assertions:
user.click(screen.getByRole('button', { name: /vote
like/i }))
expect(mockHandleVote).toHaveBeenCalled()
expect(mockHandleVote).toHaveBeenCalledTimes(1)
})
In the previous code, we click the button with the name vote like. Finally, we make two assertions. The first assertion verifies the mockHandleVote method is called when a user clicked the button. The second assertion confirms the mockHandleVote method was called exactly one time. The mockHandleVote assertions can be important when you need to be sure the function is used correctly. When we run our test, we get the following output indicating the scenario passes as expected:
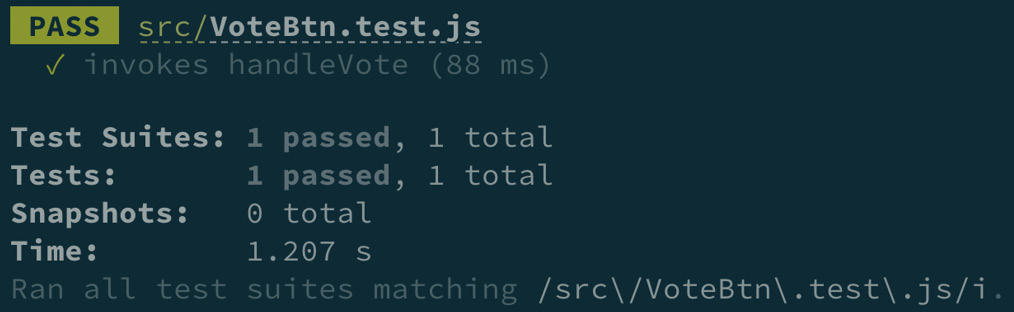
Figure 3.10 – Vote button component test results
The previous screenshot shows that the invokes handleVote test passed in the VoteBtn.test.js file. It should be noted that although we were able to verify that the event handler is called, we are not able to confirm whether the button state changes to disabled after being clicked. We would need to include the parent component and write an integration test to verify that behavior. We will learn how to approach these scenarios in Chapter 4, Integration Testing and Third-Party Libraries in Your Application.
Now you know how to test event handlers in isolated components with test doubles. In this section, we learned how to simulate and test user interactions. We learned how to mimic actions with fireEvent and user-event. We also learned how to use test doubles to test event handlers. The skills learned in this section will help you in the next section when we learn how to test components that interact with APIs.
Testing components that interact with APIs
This section will build on our knowledge of testing event handlers from the previous section by looking at how to test components that send and receive data from APIs. In our component unit tests, we can reduce application risk with our testing efforts by using tools that act as test doubles in place of real APIs. Using test doubles in place of the actual API, we can avoid slow internet connections or receive dynamic data resulting in unpredictable test results.
We will learn how to install and use Mock Service Worker (MSW) as a test double in tests to capture API requests initiated by our components and return mock data. We will test a component designed for users to search for drinks data from an API. We will also learn how to use MSW as a development server. The concepts in this section will help us understand how to verify communication between the frontend and API servers.
Requesting API data with fetch
We can create a component that allows a user to search for drinks from TheCockTailDB (https://www.thecocktaildb.com), a free open source service that will play the backend API's role. Our component will access the service and request data. When the component first renders, the user sees an input field and a Search button:
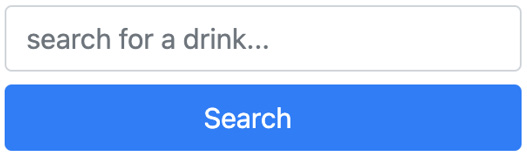
Figure 3.11 – Drink search component
When a user searches for drinks, the API returns drink data similar to the following:
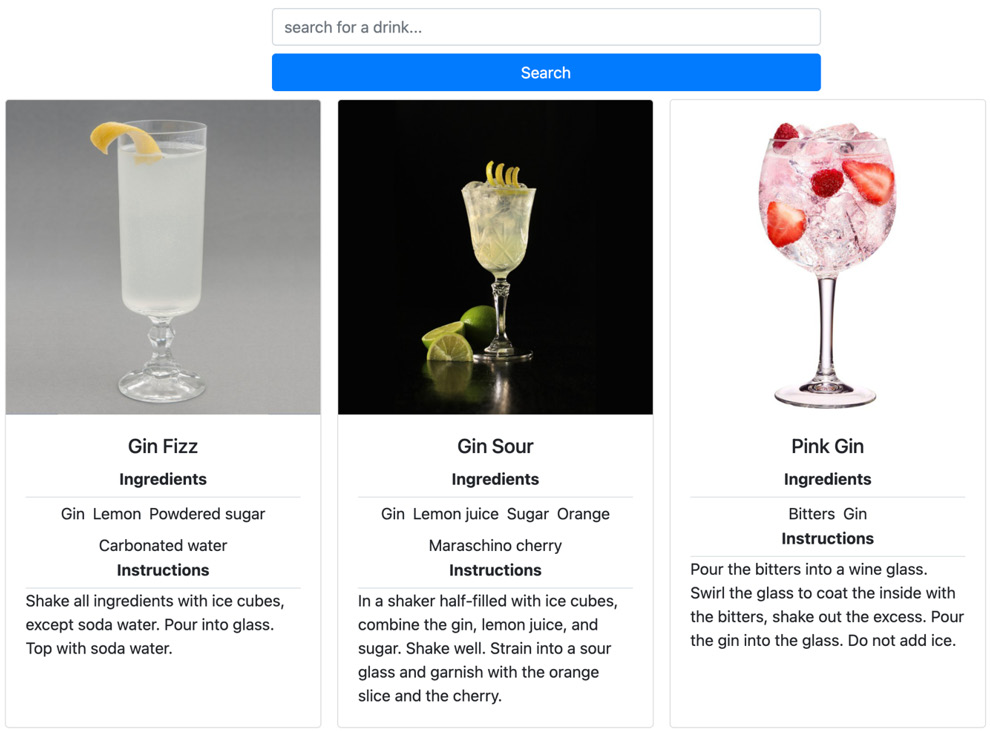
Figure 3.12 – Drink search results
In the preceding screenshot, a user searched for gin and received an array of results from the API. If a user searches for drinks that don't return results, a No drinks found message is displayed on the screen:

Figure 3.13 – No drink search results
If a user attempts a search and the API server is inaccessible, a Service unavailable message is displayed:

Figure 3.14 – Drink search request error
Our component will use an HTTP request module designed to request drink data from the API using the fetch method, a tool included in browsers to make HTTP requests:
const fetchDrinks = async drinkQuery => {
const response = await fetch(
`https://www.thecocktaildb.com/api/json/v1/1/search.php?s=$
{drinkQuery}`
)
const data = await response.json()
return data.drinks
}
export default fetchDrinks
In the preceding code block, fetchDrinks accepts a drinkQuery parameter representing the search data and makes an API request to return drinks data.
The Drink Search component has a form that, when submitted, will call the handleDrinkQuery method, which ultimately invokes the request module with the drinks to search:
<form onSubmit={handleDrinkQuery}>
<input
placeholder='search for a drink...'
type='search'
value={drinkQuery}
onChange={(event) => setDrinkQuery(event.target.value)}
/>
<button type='submit'>Search</button>
</form>
When the request module sends a response that includes an array of drinks, the Drink Search component will call drinkResults, a method that renders drinks on the screen:
{drinks && <div>{drinkResults()}</div>}
If the response does not return any drinks, then the No drinks found code is rendered:
{!drinks && <h5> No drinks found </h5>}
If there is an error communicating with the server, then the Service unavailable code is rendered:
{error && <h5>![]() Service unavailable
Service unavailable ![]() </h5>
</h5>
Now we understand how the Drink Search component behaves based on user interactions. Next, we will learn how to create mock API data to test the component.
Creating mock API data with MSW
MSW is a tool we can use to capture API requests initiated by our components and return mocked responses. When our frontend React application makes an HTTP request to an API server, MSW will intercept the request before it reaches the network and respond with mock data. Use the following command to install MSW into your project:
npm install msw --save-dev
To get started using MSW, first, we will create a mock response route handler to override matching calls to specific URLs by our component:
import { rest } from 'msw'
export const handlers = [
rest.get(
'https://www.thecocktaildb.com/api/json/v1/1/search.php',
(req, res, ctx) => {
return res(
ctx.status(200),
ctx.json({
drinks: [
{
idDrink: 1,
strDrinkThumb: './images/thumbs-down.svg',
strDrink: 'test drink',
strInstructions: 'test instructions',
strIngredient1: 'test ingredient'
}
]
In the preceding code block, we imported rest from msw. The rest object allows us to specify the request type to mock. Inside the get method, we specify the route we will override when a GET request is made. In the callback parameter of the get method, three parameters are accepted –the req parameter provides information about the request, such as the data sent in the request. The res parameter is a function used to make the mocked response. The ctx parameter provides a context for the response functions to send.
Inside ctx, we create a 200 response status code indicating a successful request, and lastly, we create JSON data to return, which will be an array of drinks. You may notice that the GET request route does not match the entire URL used in the HTTP request module from the previous section. MSW will pattern match URLs, making the need to use the exact URL string unnecessary.
Next, we will create our mock server and pass in the mock response route handler:
import { setupServer } from 'msw/node'
import { handlers } from './handlers'
export const mockServer = setupServer(...handlers)
In the previous code, first, we import setupServer from msw/node, which will be used to intercept requests made to the route handler created in the previous code snippet. We use msw/node because our test code will run in a Node.js environment. Next, we import the route handlers. Finally, we pass the handlers to setupServer and export the code via the mockServer variable. Now that we have our server set up, we can write a test for the DrinkSearch component.
Testing the DrinkSearch component
To get started testing the component, first, we will import the required code and start our mock server:
import { render, screen} from '@testing-library/react'
import user from '@testing-library/user-event'
import DrinkSearch from './DrinkSearch'
import { mockServer } from './mocks/server.js'
In the preceding code block, first, we import render and screen from React Testing Library. Next, we import the user-event module. Then we import the DrinkSearch component we want to test. Finally, we import mockServer, our mock server. Next, we need to start our mock server and set it up to perform specific actions at different points in the test life cycle:
beforeAll(() => mockServer.listen())
afterEach(() => mockServer.resetHandlers())
afterAll(() => mockServer.close())
In the preceding code block, first, we set up our mock server to listen to HTTP requests before running any of our tests. Next, we make our mock server reset after each test, so no tests are affected by previous tests. Finally, we shut down our mock server after all tests are finished running. Next, we will create the main test code:
test('renders mock drink data, async () => {
render(<DrinkSearch />)
const searchInput = screen.getByRole('searchbox')
user.type(searchInput, 'vodka, {enter}')
In the preceding code block, we render the DrinkSearch component. Next, we grab the search input and enter vodka as the drink to search. That {enter} after vodka simulates pressing the Enter key on a keyboard. Next, we will make assertions on the outcomes of user actions:
expect(
await screen.findByRole('img', { name: /test drink/i })
).toBeInTheDocument()
expect(
screen.getByRole('heading', { name: /test drink/i })
).toBeInTheDocument()
expect(screen.getByText(/test
ingredient/i)).toBeInTheDocument()
expect(screen.getByText(/test
instructions/i)).toBeInTheDocument()
})
In the preceding code, we use the findByRole query method to grab the image element. In previous examples, we solely used getBy* queries. The getBy* queries can be used in most situations when you expect elements to be available in the current state of the DOM. However, in the previous code, we use a findBy* query because the process of communicating with the API is asynchronous, so we need to give our application time to receive a response and update the DOM before attempting to grab an element.
When a getBy* query is used to select elements, an error is thrown, and our test fails if the element is not found in the current DOM:

Figure 3.15 – No drink search failing test results
The preceding screenshot shows that the renders mock drink data test failed in the DrinkSearch.test.js file. The test result output also provides more context for the failure by letting us know it couldn't find an image element with the name test drink. The findBy* queries will also throw an error when elements are not found, but only after a few seconds, allowing time for the element to appear on the screen.
We can also write a test to verify the output when no results are returned from the API server for our drink search. We can modify the response of our MSW server to set up the scenario:
test('renders no drink results', async () => {
mockServer.use(
rest.get(
'https://www.thecocktaildb.com/api/json/v1/1/search.php',
(req, res, ctx) => {
return res(
ctx.status(200),
ctx.json({
drinks: null
})
)
}
)
)
In the preceding code block, we use the use method to override our default mock values to return null. As mentioned in the Requesting API data with fetch section, our component will return the No drinks found message when the server does not return an array of drinks. Now that we have our test set up to send the right data, we can write the main test code:
render(<DrinkSearch />)
const searchInput = screen.getByRole('searchbox')
user.type(searchInput, 'vodka, {enter}')
expect(
await screen.findByRole('heading', { name: / no
drinks found /i })
).toBeInTheDocument()
})
We render the DrinkSearch component and search for vodka as in the last test in the preceding code. However, instead of expecting an array of drinks, we expect to see the No drinks found message.
For our next test, we will verify the output when the API server is unavailable. Like we did in the previous test, we will modify the response of our MSW server to set up the test scenario:
test('renders service unavailable', async () => {
mockServer.use(
rest.get(
'https://www.thecocktaildb.com/api/json/v1/1/search.php',
(req, res, ctx) => {
return res(ctx.status(503))
}
)
)
We override our default mock values in the previous code to respond with a 503 status code indicating the API is not available. As mentioned in the Requesting API data with fetch section, our component will return the Service unavailable message when the server is offline. Now that we have our test set up to send the right response, we can write the main test code:
render(<DrinkSearch />)
const searchInput = screen.getByRole('searchbox');
user.type(searchInput, 'vodka, {enter}');
expect(
await screen.findByRole('heading', { name: /Service unavailable/i })
).toBeInTheDocument()
Like code in the previous test, we render the DrinkSearch component and search for vodka as in the last test. However, now we expect Service unavailable to be in the document due to the server sending the 503 error code.
The last test we write will verify that no request is made when a user attempts to submit a blank search query:
test('prevents GET request when search input empty', async
() => {
render(<DrinkSearch />)
const searchInput = screen.getByRole('searchbox')
user.type(searchInput, '{enter}')
expect(screen.queryByRole('heading')).not.toBeInTheDocument()
})
In the previous code, we press the Enter key without typing in a search string. When the application first loads, we only see the input field and the button used to search. The application is designed to display additional content that includes heading elements when a search query is submitted to the API. We expect no element with the role of heading on the screen using a queryBy* query. The queryBy* query is preferred when you want to verify that specific elements are not on the screen.
Unlike the getBy* and findBy* queries, queryBy* queries do not throw an error and fail the test when an element is not found. queryBy* queries return null when an element is not found, allowing you to assert the expected absence of elements in the DOM without test failure. When we run our tests, we should receive the following output indicating our test suite passed:

Figure 3.16 – No drink search passing test results
The preceding screenshot shows that the renders mock drink data, renders no drink results, renders service unavailable, and prevents GET request when search input empty tests all passed in the DrinkSearch.test.js file. Now you know how to create a mock server with MSW to test components that request API data.
Next, we will learn how to use MSW in development.
Using MSW in development
In addition to using MSW to mock HTTP responses in our tests, we can also create mock responses in development. The benefit of having a mock development server is building and testing the frontend even if the backend API is not complete. We need to know what the communication and data exchange will look like between the frontend and backend API to create the right mock responses.
First, we need to add the service worker file to intercept HTTP requests made by our frontend and respond with mock data. The MSW documentation states we should install the file in the public directory of your project. Run the following command from the root of your project to install:
npx msw init public/
The previous command automatically downloads the service worker file to the public folder. If you are using create-react-app to build your project, the public directory is located at the project's root. We do not need to do anything extra in the file once it's downloaded. Next, we need to create a file in the src/mocks/ directory to set up and start the service worker, similar to what we did in the Creating mock API data with MSW section in this chapter.
However, for the mock development server, we will make slight changes to how we set up the server:
import { rest, setupWorker } from 'msw'
const drinks = [
{
idDrink: '11457',
strDrink: 'Gin Fizz',
strInstructions:
'Shake all ingredients with ice cubes, except soda
water. Pour into glass. Top with soda water.',
strDrinkThumb:
'https://www.thecocktaildb.com/images/media/drink/
drtihp1606768397.jpg',
strIngredient1: 'Gin',
strIngredient2: 'Lemon',
strIngredient3: 'Powdered sugar',
strIngredient4: 'Carbonated water'
},
]
In the preceding code, we import rest and setupWorker from msw. In the Creating mock API data with MSW section in this chapter, we imported modules from msw/node because our tests run in a Node.js environment. The mock development server will run in the browser, so we do not need to import the Node.js version. Next, we create a drinks array of drink data. Then, we set up the routes and responses for the server:
export const worker = setupWorker(
rest.get(
'https://www.thecocktaildb.com/api/json/v1/1/search.php',
(req, res, ctx) => {
return res(
ctx.status(200),
ctx.json({
drinks
})
)
}
)
)
We create a route handler in the preceding code to handle GET requests made to the URL attempting to access the cocktail API. We pass in the array of drinks as the response data. In the Creating mock API data with MSW section in this chapter, we split the server setup code and route handlers into separate files. We will keep all the server setup code in the same file for the mock development server to achieve the same result. The last thing we need to do is set up our application to run the mock server in the development environment:
if (process.env.NODE_ENV === 'development') {
const { worker } = require('./mocks/browser')
worker.start()
}
ReactDOM.render(
<React.StrictMode>
<App />
</React.StrictMode>,
document.getElementById('root')
)
In the preceding code, we set up the server to start when the NODE_ENV environment variable is set to development before rendering the App component into the DOM. Applications built with create-react-app already set NODE_ENV to development, so all we need to do is start the application with the npm start script, typical when building create-react-app applications.
Now you know how to create a mock server with MSW to test components that request API data. You also made an MSW server to respond with fake responses in development. Furthermore, you now know when to use the findBy* and queryBy* queries in addition to getBy* queries.
In this section, we learned how to install and use MSW. We tested a component used for searching drinks data from an API. Finally, we learned how to use MSW as a development server. Next, we will learn how to use the test-driven development approach to writing tests.
Implementing test-driven development
Test-Driven Development (TDD) entails writing unit tests first and then building the code to pass. The TDD approach allows you to think about whether the code is correct for the tests you want to write. The process provides a perspective that focuses on the least amount of code needed to make tests pass. TDD is also known as Red, Green, Refactor. Red represents failing tests, Green represents passing tests, and as the name says, Refactor means refactoring the code while maintaining passing tests. A typical TDD workflow would be the following:
- Write a test.
- Run the test, expecting it to fail.
- Write the minimum amount of code to make the test pass.
- Rerun the test to verify it passes.
- Refactor the code as needed.
- Repeat steps 2 through 5 as needed.
We can use React Testing Library to drive the development of React components using the TDD approach. First, we will use TDD to build the Vote component we introduced in a previous section in this chapter. Then, we will use TDD to create a Registration component.
Building the Vote component using TDD
In the Testing components that call event handlers in isolation section, we built a Vote Button component by first building the component and then writing tests. In this section, we will use TDD to build the component. First, we plan out how the component should look when rendered into the DOM and the actions a user should take. We decide the component will be an image button. The parent component should pass the image source and image alt text into the component as props.
The component will also accept a Boolean value passed for the hasVoted prop to set the button's state to enabled or disabled. If hasVoted is set to true, a user can click the button to invoke a method that will handle updating the vote count. Next, we write tests based on our design. The first test will verify the component renders to the screen with the props passed in:
test('given image and vote status, renders button to
screen', () => {
const stubHandleVote = jest.fn()
const stubAltText = 'vote like'
render(
<VoteBtn
handleVote={stubHandleVote}
hasVoted={false}
imgSrc={stubThumbsUp}
altText={stubAltText}
/>
)
const image = screen.getByRole('img', { name:
stubAltText })
const button = screen.getByRole('button', { name:
stubAltText })
In the preceding code, first, we create jest functions and assign them to the stubHandleVote and stubAltText variables. We prepend the variable names with stub because we are only using them as dependency placeholders in the test. The variable names also provide more context for their purpose in the test.
Next, we render the component with props values passed in. Then, we grab the image and button elements and assign them to associated variables. Next, we will make assertions:
expect(image).toBeInTheDocument()
expect(button).toBeInTheDocument()
expect(button).toBeEnabled()
})
In the preceding code, we assert that the image and button elements are on the DOM. We also assert that the button state is enabled, meaning a user can click it. We create a file for the Vote Button component like so:
const VoteBtn = props => {
return null
}
export default VoteBtn
We create a VoteBtn component that doesn't currently return any code to render in the DOM in the preceding code. We also export the component to be used in other files. When we run the test, we get the following output from the test results:

Figure 3.17 – TDD Vote Button test step 1
In the preceding screenshot, the given image and vote status, renders button to screen test failed. The failure output provides context for the failure that occurred when the test did not find an image element with the name vote like in the DOM. Since we know the image should be a child of a button element, next we will resolve the error by creating the button element with a child image element and pass in the required properties in the VoteBtn component file:
const VoteBtn = props => {
return (
<button disabled={props.hasVoted}>
<img src={props.imgSrc} alt={props.altText} />
</button>
)
}
export default VoteBtn
In the previous code, we create a button element with the child image element and required props for the image source, alt text, and disabled attributes. Now when we run our test, we receive the following output:
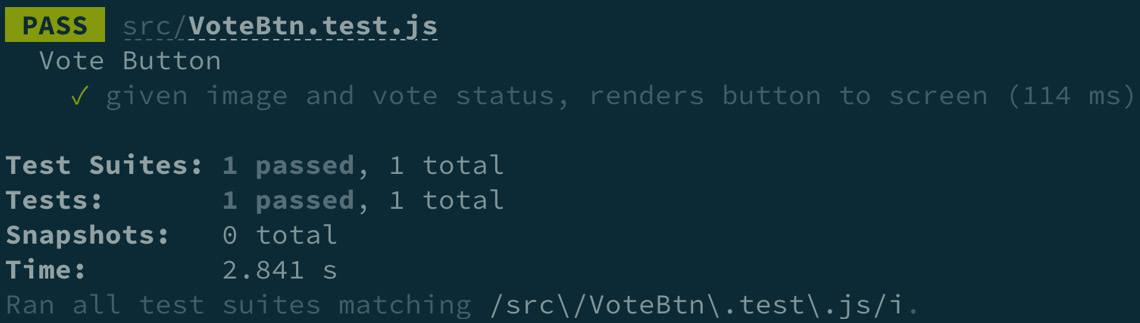
Figure 3.18 – TDD Vote Button test step 2
In the preceding screenshot, the given image and vote status, renders button to screen test now passes. For the next piece of Vote Button, we will write the code allowing a user to click the button to invoke a method that will handle updating the vote count when hasVoted is set to true. First, we will create another test to target the functionality:
test('given clicked button, invokes handleVote', () => {
const mockHandleVote = jest.fn()
render(
<VoteBtn
handleVote={mockHandleVote}
hasVoted={false}
imgSrc={stubThumbsUp}
altText="vote like"
/>
)
In the preceding code, first, we create a jest function and assign it to the variable named mockHandleVote. We prepend the variable name with mock because we will assert against the variable later in the test. Next, we render the VoteBtn component into the DOM and pass in the required properties. Notice that we pass in mockHandleVote for the handleVote property. Next, we will click the button and make assertions:
user.click(screen.getByRole('button', { name: /vote
like/i }))
expect(mockHandleVote).toHaveBeenCalled()
expect(mockHandleVote).toHaveBeenCalledTimes(1)
})
In the preceding code, first, we click the button inside the component. Then, we assert that mockHandleVote was called and called precisely one time. Verifying if and how mockHandleVote was called is essential. If mockHandleVote is not called or is called more than once per click, we know the component will not correctly communicate when integrated with the parent component. We receive the following output when we run the test:

Figure 3.19 – TDD Vote Button test step 3
In the preceding code, the given clicked button, invokes handleVote test fails. The test expected the jest function passed in the component to be called at least once, but it was never called. Next, we will resolve the error by adding the implementation to the component:
<button onClick={props.handleVote} disabled={props. hasVoted}>
In the preceding code, we added an onClick event handler that will invoke the handleVote method passed into the component as a property when the button is clicked. Now when we run the test, we get the following output:

Figure 3.20 – TDD Vote Button test step 4
In the preceding screenshot, the given clicked button, invokes handleVote test passes. Now that all our design plans for Vote Button have been implemented and tested, we have finished building the feature using the TDD approach.
In the next section, we will use TDD to create a registration component.
Building a registration form using TDD
In the previous section, we used TDD to build a Vote component. In this section, we will use TDD to build a component used to create user accounts for a website. Then, once we build the minimal functionality to make the test pass, we will also refactor the component's implementation and verify the test continues to pass. The component will have a Register here heading element, email and password fields, and a Submit button. When the form is submitted, a handleSubmit method should be invoked. The final version of the component should look like the following:
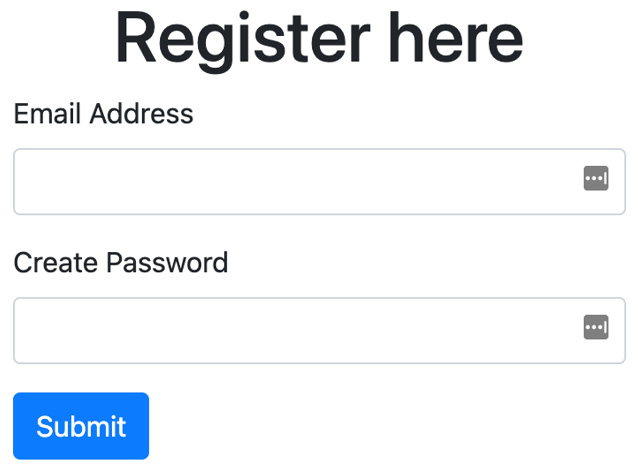
Figure 3.21 – Registration form
In the preceding screenshot, we have a form allowing users to submit an email and password to register an account for a website. Now that we understand how the final version should look on the screen, we will write a test based on our design. For purposes of this section, we will verify that a handleRegister method is called when the form is submitted:
test('given submitted form, invokes handleRegister', ()
=> {
const mockHandleRegister = jest.fn()
const mockValues = {
email: '[email protected]',
password: '123'
}
render(<Register handleRegister={mockHandleRegister} />)
In the preceding code, we create mockHandleRegister and mockValues variables. The variables will be asserted against later in the test. Then, we render the component under test into the DOM and pass in mockHandleRegister. Now, mockHandleRegister will allow us to test the Register component in isolation from the handleRegister dependency. Next, we will enter values in the form fields:
user.type(screen.getByLabelText('Email Address'),
mockValues.email)
user.type(screen.getByLabelText('Create Password'),
mockValues.password)
user.click(screen.getByRole('button', { name: /submit/i }))
In the preceding code, we enter values from the mockValues object into the email and password fields. Notice the use of string values passed into the getByLabelText queries. String values are another option for queries when you do not want to use a regular expression. Next, we will make assertions:
expect(mockHandleRegister).toHaveBeenCalledTimes(1)
expect(mockHandleRegister).toHaveBeenCalledWith({
email: mockValues.email,
password: mockValues.password
})
})
In the preceding code, we expect mockHandleRegister to be called once. Finally, we expect values from the mockValues object to have been included as arguments when mockHandleRegister was called. Verifying the arguments passed to mockHandleRegister is important because it helps reduce the risk that form values will not be passed to handleRegister.
Next, we will create a file for the Register component like so:
export default class Register extends React.Component {
render() {
return null
}
}
We create and export a Register component that doesn't currently return any code to render in the DOM in the preceding code. When we run the test, we get the following output from the test results:

Figure 3.22 – TDD registration test step 1
In the preceding screenshot, the given submitted form, invokes handleRegister test failed. The failure output provides context for the failure that occurred when the test did not find an email field element in the DOM. Next, we will resolve the error by creating the email field. We will also create the password field and the Submit button:
state = {
email: '',
password: ''
}
handleChange = event => {
const { id, value } = event.target
this.setState(prevState => {
return {
...prevState,
[id]: value
}
})
}
In the preceding code, first, we create a state object to store values entered for the email and password fields. Next, we create a handleChange method that will be called anytime a user enters a value into a form field. The handleChange method will update state values based on the form field that is changed. Next, we create the heading element and an email field:
<main>
<h1>Register here</h1>
<form>
<div>
<label htmlFor='email'>Email Address</label>
<input
value={this.state.email}
onChange={this.handleChange}
type='email'
id='email'
/>
</div>
In the preceding code, first, we create a main element to wrap the heading and form elements. Inside main, we create the Register here heading. Then, we create a form element and add a field for users to enter an email address. When a user enters a value into the field, an onChange event handler is invoked to call handleChange to update the state object's associated value. The field's value attribute always displays the current value stored in the state object's associated key. Next, we will create a field for users to enter a password and a button element to submit the form:
<div>
<label htmlFor='password'>Create Password
</label>
<input
value={this.state.password}
onChange={this.handleChange}
type='password'
id='password'
/>
</div>
<button type='submit'>Submit</button>
</form>
</main>
In the preceding code, first, we create a password field. The field has the same event handler methods as the email field. Finally, we make a Submit button to allow a user to submit values entered in the form. Now when we run the test, we get the following output:
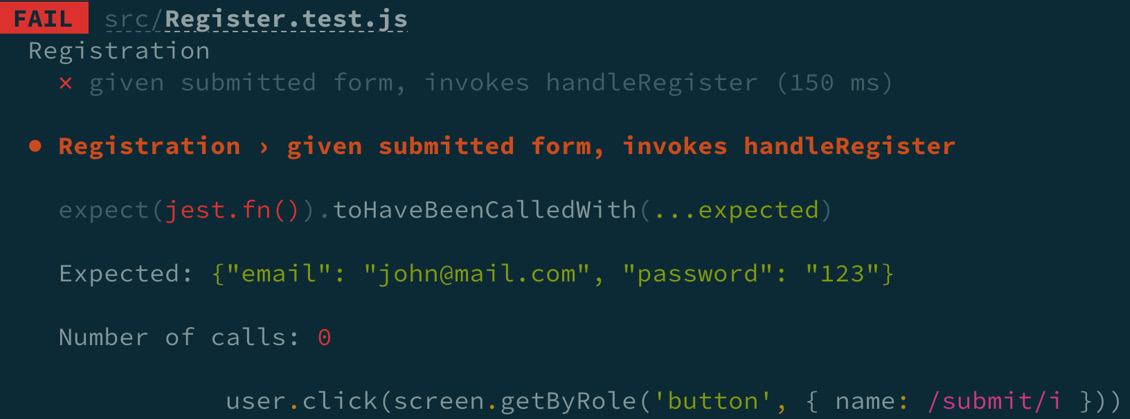
Figure 3.23 – TDD registration test step 2
In the preceding code, our test is still failing, but for a different reason. Now the test can enter values and submit the form, but mockHandleRegister was not called with the submitted values. The failure happened because we have not yet implemented an onSubmit event handler to call our mockHandleRegister method and any other desired behavior when the form is submitted.
Next, we will resolve the error by adding an onSubmit handler to the form and have it call a handleSubmit method that we will create:
handleSubmit = event => {
event.preventDefault()
this.props.handleRegister(this.state)
}
In the preceding code, we create the handleSubmit method. When handleSubmit is invoked, the browser event that triggered the method is passed into it. Next, we prevent the browser's normal behavior of refreshing the page after submitting a form using the preventDefault method. Finally, we call handleRegister, provided to the component as props, and pass in the form values stored in the state object. Next, we will attach handleSubmit to the form:
<form onSubmit={this.handleSubmit}>
In the preceding code, we add an onSubmit event handler and pass in handleSubmit. When the form is submitted, handleSubmit will be called, resulting in handleRegister being called, with the form values as arguments. Now when we run the test, we get the following output:

Figure 3.24 – TDD registration test step 3
The preceding screenshot shows that our test is finally passing. Technically, we could stop here since our code makes our test pass. However, we can make our component code cleaner by converting it from a class component into a function component. As long as the behavior remains the same, our test should continue to pass. We can refactor the component like so:
const Register = props => {
const [values, setValues] = React.useState({
email: '',
password: ''
})
In the preceding code, first, we convert the class into a function. Then, we use the useState hook to manage the form value state. Next, we will refactor our handleChange and handleSubmit methods:
const handleChange = event => {
const { id, value } = event.target
setValues({ ...values, [id]: value })
}
const handleSubmit = event => {
event.preventDefault()
props.handleRegister(values)
}
In the previous code, the handleChange class and handleSubmit methods are converted to function expressions. The handleChange method calls setValues to update the state for each entered form value. The implementation of handleSubmit is virtually the same as the class version. Next, we will refactor the returned code that renders as HTML in the browser:
<main className="m-3 d-flex flex-column">
<h1>Register here</h1>
<form onSubmit={handleSubmit}>
<div>
<label htmlFor="email">Email Address</label>
<input
value={values.email}
onChange={handleChange}
// the rest of the component code ...
In the preceding code, first, we remove the render method required in class components. The remainder of the code is very similar to the class version. However, the value attribute uses the values object, and the handleChange method passed in to the onChange event handler does not need to include the this keyword. When we rerun our test, we get the following result:
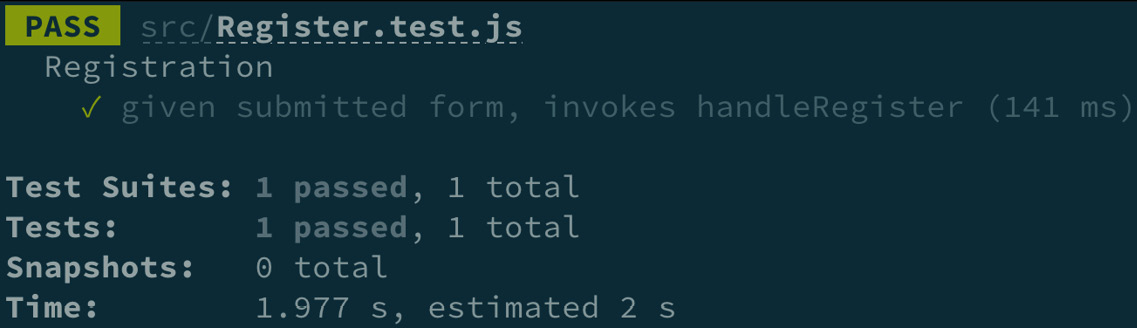
Figure 3.25 – TDD registration test step 4
In the preceding screenshot, our test still passes after the refactor. The refactor component made our code a lot cleaner. Now you understand how to build a component using TDD with React Testing Library. In this section, we used TDD to drive the creation of vote and registration features. The test result feedback that React Testing Library provides makes for a pleasant experience to guide development.
Summary
In this chapter, you learned how to install and use a module to simulate user actions on the resulting DOM output for components. You can now install and test features that interact with APIs with a user-friendly tool. You understand how to test components in isolation from event handler dependencies with mock functions. Finally, you learned how to implement the TDD approach to building features combined with React Testing Library.
In the next chapter, we will dive deeper by learning the benefits of integration testing. We will also learn how to test React components that utilize popular third-party libraries.
Questions
- Why should you favor user-event over fireEvent to simulate user actions in your tests?
- Explain how MSW allows you to test components that make requests to APIs.
- What is a mock function?
- Explain the application risk associated with testing components in isolation with mock functions.
- In your own words, describe the TDD workflow.
- Explain when to use a getBy*, findBy*, or queryBy* query to select an element.