Chapter 2. Creating and Managing Snowflake Architecture Objects
Within Snowflake, all data is stored in database tables logically structured in collections of rows and columns. This chapter focuses on the logical structure of databases and database objects, such as tables and views.
In this chapter, we will cover topics in specific order because the series of examples in each topic build upon each other. The code is provided for you here in the chapter as well as on Github. These are the topics we will work through together:
-
Databases
-
Schemas
-
Information Schema & Account Usage
-
Tables
-
Views
-
Stages, File Format Included
-
Stored Procedures, Task included
-
IDFs
-
Pipes, streams, and sequences
Code Cleanup & Test Your Knowledge
Our initial discussion of databases, tables, views, stages, pipes, and streams lay the foundation for following chapters where we do a deeper dive into these objects. We will conduct a deep dive for the User Defined Function (UDF) and Stored Procedure objects in this chapter. One advanced deep dive example includes using a file format object and another example uses a task object. Pipes, streams, and sequences are briefly introduced and covered in more detail in later chapters.
Creating and Managing Snowflake Databases
In the relational world, database objects such as tables, views, and more, are maintained within databases. In Snowflake, the database logically groups the data while the schema organizes it. Together, the database and schema comprise the namespace. In the examples throughout this chapter, whenever we work with database objects, we’ll need to specify a namespace unless the schema and database we want to use are the active objects or unless we include the “USE” command. That way it is clear to Snowflake the location where objects are to be created or which specific object is being referenced in the commands.
There are two main types of databases we can create – permanent (persistent) and transient databases. At the time we create a database, the default will be a permanent database, if we don’t specify which of the two types we want to create. Transient databases have a maximum one-day time-travel period and do not have a fail-safe period.
The Snowflake time travel period is the time during which databases and database objects can be cloned or “undropped”, to allow historical data to be restored. The default time travel period is one day but can be up to 90 days for permanent databases or a user could set the time travel period to zero days, if no time travel period is desired.
Snowflake’s fail-safe data recovery service provides a seven-day period during which data may be recoverable by Snowflake. The service is only available for databases and database objects that are permanent. It is important to note that data storage costs are incurred for those seven days. That is one consideration when deciding about the database type you want to create.
These are the basic SQL commands for Snowflake databases that we will be covering in this section:
-
CREATE DATABASE
-
ALTER DATABASE
-
DROP DATABASE
-
SHOW DATABASES
CREATE DATABASE is the command used to create a new database, clone an existing database, create a database from a share provided by another Snowflake account, or to create a replica of an existing primary database (i.e., a secondary database).
We can create databases from the User Interface (UI) or by using SQL code in the Snowflake worksheet. We created a database and database objects in Chapter 1 using the Web User Interface. We’ll be using SQL commands in the Snowflake Worksheet for this chapter.
Note
For all exercises in this chapter, make sure you have your role set to SYSADMIN throughout the chapter unless otherwise directed.
Let’s go ahead and get started. We’ll create one permanent database and one transient database.
USE ROLE SYSADMIN;
CREATE
OR REPLACE DATABASE CHAPTER3_PDB1 Comment = "Permanent Database 1 used for Exercises in Definitive Guide";
CREATE
OR REPLACE TRANSIENT DATABASE CHAPTER3_TDB1 Comment = "Transient Database 1 used for Exercises in Definitive Guide";
Notice above that we used the word “OR REPLACE” optional keyword in the command. That way, an error would not be returned if the database already exists. Whenever you create a new database, that database is automatically set as the active database for the current session. It’s the equivalent of using the “USE DATABASE” command. If we needed or wanted to use a database, other than the one we just created, we’d have to include the “USE DATABASE” command in the worksheet to select the appropriate database.
If you navigate to the Databases UI, as shown in Figure 2-1, you will see that it shows the two databases we just created plus three out of the four databases that automatically come with the Snowflake account.

Figure 2-1. Web User Interface displaying a list of active Databases, based on the user’s SYSADMIN role
Note
The SNOWFLAKE database isn’t shown to those not using the ACCOUNTADMIN role.
Let’s switch back to the Worksheets and change our role to ACCOUNTADMIN and see if we can view the SNOWFLAKE database. Once in the worksheet:
USE ROLE ACCOUNTADMIN;
SHOW DATABASES;
Notice in Figure 3-2 that all databases, including the ones we just created, have a 1-day retention time. Data retention time (in days) is the same as the time travel number of days and specifies the number of days for which the “CLONE” and “UNDROP” commands can be performed on the database.

Figure 2-2. Worksheet displaying a list of active Databases, based on the user’s ACCOUNTADMIN role
We can change the data retention time for a permanent database but not for a transient one. We can change the retention time up to 90 days for permanent databases. We’ll go ahead and change the retention time for our permanent database to 10 days by using the “ALTER DATABASE” command. Be sure to change your role back to SYSADMIN before issuing the commands.
USE ROLE SYSADMIN;
ALTER DATABASE CHAPTER3_PDB1
SET
    DATA_RETENTION_TIME_IN_DAYS = 10;
If you attempt to change the data retention time for a transient database, you’ll receive an error telling you that the value “10” is an invalid value for the parameter. That is because a transient database can have a maximum 1-day data retention. You could change the retention time to 0 days but then you wouldn’t be able to “CLONE” or “UNDROP” that database if you do that.
We’ll be covering tables in more detail in a later section, but for now, it is important to mention a few things about tables as they relate to permanent versus transient databases.
Snowflake uses a hybrid approach when it comes to permanent databases but not transient databases. A permanent database type is not limited to the different types of objects that can be stored within them. For example, you can store transient tables within a permanent database but not permanent tables within a transient database. Below is an example of creating a table in our transient database.
USE ROLE SYSADMIN;
CREATE
OR REPLACE TABLE "CHAPTER3_TDB1"."PUBLIC"."SUMMARY" (
    CASH_AMT number,
    RECEIVABLES_AMT number,
    CUSTOMER_AMT number
);
Notice we didn’t specify the type of table as either permanent or transient. By default, Snowflake creates a permanent table unless you indicate otherwise when you are creating the table. The exception would be when you are creating a table within a transient database. In that case, the table would also have to be transient. By default, all tables created in a transient schema are transient. We can see that is the case by using the “SHOW TABLES” command which gives us the following result, shown in Figure 2-3, for the table we just created.

Figure 2-3. Worksheet results of the “SHOW TABLES” command
Note
There is no limit to the number of database objects, schemas, and databases that can be created within a Snowflake account.
Each Snowflake account also comes with certain databases, schemas, and tables already included as shown in Figure 3-4 below. As shown, there are four databases that initially come with a Snowflake account:
-
SNOWFLAKE database
-
UTIL_DB database
-
DEMO_DB database
-
SNOWFLAKE_SAMPLE_DATA database
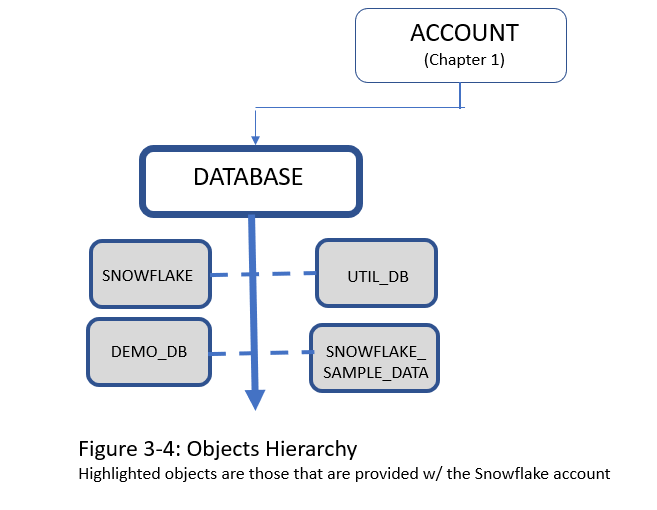
Figure 2-4. Highlighted objects are those that are provided with the Snowflake account
The SNOWFLAKE database is owned by Snowflake Inc. and is a system-defined, read-only shared database which provides object metadata and usage metrics about your account. Unlike the other three databases imported into your account at the time of setup, the SNOWFLAKE database cannot be deleted from your account.
The UTIL_DB database and DEMO_DB database, also imported into your account at the time of setup, contains no data and, as such, there is no storage charges for those databases, and they can be dropped at any time.
Upon first look, the SNOWFLAKE_SAMPLE_DATA database appears to be something similar to what you might create in your Snowflake account. However, the sample database is actually one that has been shared from the Snowflake SFC_SAMPLES account and the database is read-only in your account which means that no DDL commands can be issued. In other words, database objects cannot be added, dropped, or altered within the sample database. In addition, no DML commands for actions such as cloning can be performed on the tables. You can, however, view the sample database and execute queries on the tables.
We’ll be using the SNOWFLAKE_SAMPLE_DATA database in some of our examples in this chapter. In Chapter 10, we’ll be learning about shared databases but, for now, what is important to know is that while we don’t incur any storage costs for the shared sample database, we do need a running warehouse to run queries and so there will be an associated compute cost for running those queries on the Snowflake sample database.
One final important thought, when deciding which type(s) of storage objects to create and how to architect them, is that there is a monetary cost for storing data in Snowflake, as well as a potential cost in terms of possible degraded performance. This chapter is intended to give you the necessary understanding of Snowflake databases and database objects as a foundation for later chapters which address improving performance and reducing costs, data recovery, and data loading and unloading.
Creating and Managing Snowflake Schemas
When we created databases, we didn’t have to specify the account because there is only one account. But when we create a schema, we need to let Snowflake know which database we want to use. If we don’t specify a particular database, then Snowflake will use the one that is active.
Just like databases, schemas can be either permanent or transient with the default being permanent. Just like databases, we have available the same SQL commands. However, for schemas, we have something unique called a managed access schema. In a managed access schema, the schema owner manages grants on the objects within a schema, such as tables and views, but doesn’t have any of the USAGE, SELECT, or DROP privileges on the objects.
There are different ways to create a schema that will achieve the same result. Here below are two examples that accomplish the same thing. In this first example, the “USE” command lets Snowflake know for which database the schema will be created.
USE ROLE SYSADMIN;
USE DATABASE CHAPTER3_PDB1;
CREATE
OR REPLACE SCHEMA BANKING;
In the second example, we simply use the fully qualified schema name.
USE ROLE SYSADMIN;
CREATE
OR REPLACE SCHEMA CHAPTER3_PDB1.BANKING;
If we use the “SHOW SCHEMA” command as demonstrated in Figure 3-5, we notice that the retention time of the new schema also has a retention time of 10 days, just like the database in which it was created, rather than the default 1-day retention.

Figure 2-5. Worksheet results of the “SHOW SCHEMA” command.
However, we can always change the retention time to one day for the schema.
USE ROLE SYSADMIN;
ALTER SCHEMA CHAPTER3_PDB1.BANKING
SET
    DATA_RETENTION_TIME_IN_DAYS = 1;
Now, run the “SHOW SCHEMAS” command again and you’ll see the retention time has been changed for the schema.
If we’d like to create a schema with managed access, we need to add the “WITH MANAGED ACCESS” command.
USE ROLE SYSADMIN;
USE DATABASE CHAPTER3_PDB1;
CREATE
OR REPLACE SCHEMA MSCHEMA WITH MANAGED ACCESS;
Now, when you run the “SHOW SCHEMAS” command, you’ll notice that “Managed Access” will be displayed under the options column for the schema named MSCHEMA.
As discussed in Chapter 5, for regular schemas the object owner role can grant object access to other roles and can also grant those roles the ability to manage grants for the object. However, in managed schemas, object owners are unable to issue grant privileges. Instead, only the schema owner or a role with the MANAGE GRANTS privilege assigned to it can manage the grant privileges.
Note
The SECURITYADMIN and ACCOUNTADMIN inherently have the “MANAGE GRANTS” privilege, thus, they can manage the grant privileges on all managed schemas, in addition to the schema owner.
There are two database schemas, as shown in Figure 2-6, that are included in every schema that is created:
-
INFORMATION_SCHEMA
-
PUBLIC schema

Figure 2-6. Objects hierarchy: Highlighted objects are those that are provided by the Snowflake account.
The PUBLIC schema is the default schema and can be used to create any other objects whereas the INFORMATION_SCHEMA is a special schema for the system that contains all metadata for the database. The Information Schema will be discussed in the next section.
INFORMATION_SCHEMA and Account Usage
As we just learned, the Snowflake INFORMATION_SCHEMA is included within every database created in Snowflake. The Information Schema, also known as the “Data Dictionary”, includes metadata information about the objects within the database as well as account-level objects like roles. More than 20 system-defined views are included in every Information Schema and can be divided between account views and database views.
Information Schema Account Views:
- Applicable_Roles
Displays one row for each role grant
- Databases
Displays a row for each database defined in your account
- Enabled_Roles
Displays a row for each currently-enabled role in the session
- Information_Schema_Catalog_Name
The name of the database in which the information_schema resides
- Load_History
Displays one row for each file loaded into tables using the COPY INTO <table> command. Returns history for past 14 days except no history for data loaded using Snowpipe,
- Replication_Databases
Displays a row for each primary and secondary database (i.e., database for which replication has been enabled) in your organization
You may want to look at what is within each of these views. You’ll notice that for some of them, all views in the account contain the same information. Try the SQL statements below. What do you notice?
SELECT
    *
FROM
    "SNOWFLAKE_SAMPLE_DATA"."INFORMATION_SCHEMA"."DATABASES";
SELECT
    *
FROM
    "DEMO_DB"."INFORMATION_SCHEMA"."DATABASES";


SELECT
    *
FROM
    "SNOWFLAKE_SAMPLE_DATA"."INFORMATION_SCHEMA"."APPLICABLE_ROLES";

SELECT
    *
FROM
    "DEMO_DB"."INFORMATION_SCHEMA"."APPLICABLE_ROLES";
Information Schema Database Views:
- Columns
Displays a row for each column in the tables defined in the specified (or current) database
- External_Tables
Displays a row for each external table in the specified (or current) database
- File Formats
Displays a row for each file format defined in the specified (or current) database
- Functions
Displays a row for each user-defined function (UDF) or external function defined in the specified (or current) database
- Object_Privileges
Displays a row for each access privilege granted for all objects defined in your account.
- Pipes
Displays a row for each pipe defined in the specified (or current) database
- Procedures
Displays a row for each stored procedure defined the specified (or current) database
- Referential_Constraints
Displays a row for each referential integrity constraint defined in the specified (or current) database
- Schemata:
Displays a row for each schema in the specified (or current) database
- Sequences
Displays a row for each sequence defined in the specified (or current) database
- Stages
Displays a row for each stage defined in the specified (or current) database
- Table_Constraints
Displays a row for each referential integrity constraint defined for the tables in the specified (or current) database
- Table_Privileges
Displays a row for each table privilege that has been granted to each role in the specified (or current) database
- Table_Storage_Metrics
Displays table-level storage utilization information, includes table metadata, and displays the number of storage types billed for each table.
Note
Rows are maintained in this view until the corresponding tables are no longer billed for any storage, regardless of various states that the data in the tables may be in (i.e. active, Time Travel, Fail-safe, or retained for clones)
- Tables
Displays a row for each table and view in the specified (or current) database
- Usage_Privileges
Displays a row for each privilege defined for sequences in the specified (or current) database
- Views
Displays a row for each view in the specified (or current) database
There are different ways to look at some of the metadata in Snowflake, some of which do use the Information Schema. If you try each of the commands below, you’ll see that there are two ways we can get the information about schemas within the Snowflake sample database.
SELECT
    *
FROM
    "SNOWFLAKE_SAMPLE_DATA"."INFORMATION_SCHEMA"."SCHEMATA";
SHOW SCHEMAS IN DATABASE "SNOWFLAKE_SAMPLE_DATA";
However, one thing you will notice is that the metadata contained with the INFORMATION_SCHEMA is much more complete with several more columns of information than when you simply use the “SHOW” command.
If you try the following SQL statement, what happens?
SELECT
    *
FROM
    "DEMO_DB"."INFORMATION_SCHEMA"."TABLE_PRIVILEGES";
You will notice that no rows are returned in the results. The reason is because there are no tables in the database, thus, there will be no table privileges.
The INFORMATION_SCHEMA, one of the two schemas that are included with every Snowflake database, has a great many uses. The Information Schema provides a great deal of information about an account’s object metadata and usage metrics. There is also another place within Snowflake where object metadata and usage metrics are stored.
The SNOWFLAKE database, viewable by the ACCOUNTADMIN, includes an ACCOUNT_USAGE view that is very similar to the INFORMATION_SCHEMA but with three differences. First, the SNOWFLAKE database ACCOUNT_USAGE view includes records for dropped objects whereas the INFORMATION_SCHEMA does not. The ACCOUNT_USAGE view also has a longer retention time for historical usage data. Whereas the INFORMATION_SCHEMA has data available ranging from seven days to six months, the ACCOUNT_USAGE view retains historical data for one year. Finally, there is no latency when querying the INFORMATION_SCHEMA but the latency time for ACCOUNT_USAGE could range from 45 minutes to three hours.
One of the common uses for the ACCOUNT_USAGE view is to keep track of credits used over time by each warehouse in your account (month-to-date):
USE ROLE ACCOUNTADMIN;
USE DATABASE SNOWFLAKE;
USE SCHEMA ACCOUNT_USAGE;
SELECT
    start_time::date AS USAGE_DATE,
    WAREHOUSE_NAME,
    SUM(credits_used) AS TOTAL_CREDITS_CONSUMED
FROM
    warehouse_metering_history
WHERE
    start_time >= date_trunc(Month, current_date)
GROUP BY
    1,
    2
ORDER BY
    2,
    1;
The SNOWFLAKE database, which includes the Account Usage view, is only available to the ACCOUNTADMIN role, unless the ACCOUNTADMIN grants data sharing privileges.
Introduction to Snowflake Tables
As previously mentioned, all Snowflake data is stored in tables. In addition to permanent and transient tables, it is also possible to create temporary and external tables as shown in Figure 2-7. Like database and schemas, we can use the CREATE, ALTER, DROP, and SHOW TABLES commands. In addition, we’ll need to use INSERT INTO or COPY INTO to place data in a table. For Snowflake tables, we can also use the TRUNCATE command to remove data from a table but not remove the table object itself.

Figure 2-7. Object hierarchy
As we saw in the database section, Snowflake assumes it should create a permanent table if the table type is not specified, unless the table is created within a transient database. Transient tables are unique to Snowflake and have characteristics of both permanent and temporary table. One of the biggest differences is that the fail-safe service is not provided for transient tables. They are designed for transitory data that needs to be maintained beyond a session but doesn’t need the same level of data recovery by permanent tables. As a result, the data storage costs for a transient table would be less than a permanent table.
It isn’t possible to change a permanent table to a transient table by using the ALTER command because the TRANSIENT property is set at table creation time. Likewise, a transient table cannot be converted to a permanent table. If you would like to make a change to a transient or permanent table type, you’ll need to create a new table, use the “COPY GRANTS” clause, and then copy the data.
It was mentioned that the default for creating tables is that a permanent table would be created unless otherwise specified. If it makes sense to have new tables automatically created as a transient type by default, you can first create a transient database or schema. As we saw in the databases section, all tables created afterward will be transient rather than permanent.
Transient tables can be accessed by other users who have the necessary permissions. On the other hand, temporary tables exist only within the session in which they are created. This means they are not available to other users and cannot be cloned. Temporary tables have many uses including being used for ETL data and for session-specific data needs.
Tip
The temporary table, as well as its data within, is no longer accessible once the session ends. During the time a temporary table exists, it does count toward storage costs; therefore, it is a good practice to drop a temporary table once you no longer need it.
Warning
Interestingly, you can create a temporary table that has the same name as an existing table in the same schema since the temporary table is session-based. No errors or warnings will be given. It is also a best practice to give temporary tables unique names to avoid unexpected problems given that the temporary table takes precedence.
We will now create some tables that we’ll use later in the chapter:>
USE ROLE SYSADMIN;
USE DATABASE CHAPTER3_PDB1;
CREATE
OR REPLACE SCHEMA BANKING;
CREATE
OR REPLACE TABLE CUSTOMER_ACCT (
    Customer_Account int,
    Amount int,
    transaction_ts timestamp
);
CREATE
OR REPLACE TABLE CASH (
    Customer_Account int,
    Amount int,
    transaction_ts timestamp
);
CREATE
OR REPLACE TABLE RECEIVABLES (
    Customer_Account int,
    Amount int,
    transaction_ts timestamp
);
After creating this table, the active role is the “SYSADMIN” role, the active database is “CHAPTER3_PDB1” and the active schema is “BANKING”. Thus, a newly created table will be located within the BANKING schema if you create a new table without specifically using a different namespace. Let’s try that now:
USE ROLE SYSADMIN;
CREATE
OR REPLACE TABLE NEWTABLE (
    Customer_Account int,
    Amount int,
    transaction_ts timestamp
);
In Figure 2-8, we can see that NEWTABLE was created in the active namespace.

Figure 2-8. List of the tables in the Banking schema of the CHAPTER3_PDB1 database
Let’s now drop the new table we just created. We want to use the fully qualified table name. Type in “DROP TABLE” with a space afterward. Then, double click on the table name and Snowflake will insert the fully qualified table name. Be sure to put a semi-colon at the end and then run the statement.
USE ROLE SYSADMIN;
DROP TABLE "CHAPTER3_PDB1"."BANKING"."NEWTABLE";
We didn’t have to use the fully qualified table name because we were in the active space where we wanted to drop the table. We could have just used the command “DROP TABLE NEWTABLE;”. However, it is best practice to use a table’s fully qualified name or the “USE” command, which achieves the same goal.
At this point, Figure 2-9 shows what your Account should look like.

Figure 2-9. Databases and tables created thus far in this chapter
Creating and Managing Views
Along with tables, Snowflake views are the primary objects maintained in database schemas as shown in Figure 2-10. Views are of two types, materialized and non-materialized. Whenever the term “view” is mentioned and the type is not specified, it is understood that it is a non-materialized view.

Figure 2-10. Object hierarchy (* possible to have Secure view)
A “view” is considered to be a virtual table created by a query expression; something like a window into a database. Let’s create a new view by selecting one column from the Snowflake sample data.
Warning
We’ve mentioned the importance of using fully qualified names for tables. The importance of using a fully qualified name for the table is even more important when creating views because the connected reference will be invalid if the namespace of the base table is not used and this table or the view is moved to a different schema or database later.
CREATE
OR REPLACE VIEW CHAPTER3_TDB1.PUBLIC.NEWVIEW AS
SELECT
    CC_NAME
FROM
    (
        SELECT
            *
        FROM
            SNOWFLAKE_SAMPLE_DATA.TPCDS_SF100TCL.CALL_CENTER
    );
One purpose of views is to display selected rows and columns from one or more tables. This is a way to provide some security by only exposing certain data to specific users. There is the ability for views to provide even more security by creating a specific secure view of either a non-materialized or materialized view. Most secure views are materialized views. Creating materialized views require Snowflake Enterprise Edition. Let’s create a materialized view using the same query as before.
CREATE
OR REPLACE MATERIALIZED VIEW CHAPTER3_TDB1.PUBLIC.NEWVIEW_MATERIALIZED AS
SELECT
    CC_NAME
FROM
    (
        SELECT
            *
        FROM
            SNOWFLAKE_SAMPLE_DATA.TPCDS_SF100TCL.CALL_CENTER
    );
You can run a “SHOW VIEWS” command and both views will be returned in the results. If you run a “SHOW MATERIALIZED VIEWS” command, then only the materialized view result will be returned.
If you run a SELECT * command for each of the views, you’ll notice that the results are identical. That is because we haven’t really used a materialized view for its intended purpose. Unlike a regular view, a materialized view object gets periodically refreshed with the data from the base table. Thus, it is illogical to consider using a materialized view for the Snowflake sample database because the Snowflake sample database cannot be updated with new data.
Also, the query to retrieve a single column is not one typically used for materialized views. Materialized views are generally used to aggregate as well as filter data so that the results of resource-intensive operations can be stored in a materialized view for improved data performance. Improved data performance is especially good when that same query is frequently used.
The data within a materialized view is always current because Snowflake uses a background service to automatically update materialized views. To see that in action, we’re going to create a materialized view. We will revisit the view later in the chapter.
CREATE
OR REPLACE MATERIALIZED VIEW CHAPTER3_TDB1.PUBLIC.BANKINGVIEW_MV AS
SELECT
    *
FROM
    (
        SELECT
            *
        FROM
            CHAPTER3_TDB1.PUBLIC.SUMMARY
    );
As you would expect, views are read-only. Thus, it isn’t possible to use the INSERT, UPDATE, or DELETE commands on views. Further, Snowflake doesn’t allow users to truncate views. While it is not possible to execute DML commands on a view, you can use a subquery within a DML statement that can be used to update the underlying base table. An example might be something like:
DELETE FROM <Base Table> WHERE <Column> > (SELECT AVG <Column> FROM View);
Other things to be aware of is that a view cannot be updated with the ALTER VIEW command. However, the ALTER MATERIALIZED VIEW command can be used to rename a materialized view, to add or replace comments, or to modify the view to be a secure view. The SHOW and DESCRIBE commands are also available for views.
If you wanted to change something structural about the view, you would have to recreate it with a new definition. Also, changes to a source table’s structure do not automatically propagate to views. For example, dropping a table column won’t drop the column in the view.
There are many considerations when deciding between a regular view and a materialized view. It is best to use a non-materialized view when the results of the view frequently change, the query isn’t so complex and expensive to rerun, and the results of the view often change. Regular views do incur compute costs but not storage costs. The compute cost to refresh the view and the storage cost will need to be weighed against the benefits of a materialized view when the results of a view change often.
Tip
Generally, it is beneficial to use a materialized view when the query consumes a lot of resources as well as the results of the view are often used and the underlying table doesn’t change frequently.
There are some limitations for materialized views, such as a materialized view can query only a single table and joins are not supported. It is recommended that you consult the Snowflake documentation for more detail on materialized view limitations.
Warning
One thing to remember is that we are using the SYSADMIN role currently and we’re creating the views using that role. For someone who doesn’t have the SYSDAMIN role, they will need to have assigned to them the privileges on the schema, the database objects in the underlying table(s), and the view itself if they are to work with the view.
Introduction to Snowflake Stages – File Format Included
Snowflake stages are temporary storage spaces that are used as an intermediate step to load files to Snowflake tables or to unload data from Snowflake tables into files. Snowflake permanent and temporary stages are used to store data files internally whereas external stages reference data files that are stored in a location outside of Snowflake. Outside locations, whether private / protected, or public, like Amazon S3 buckets, Google Cloud Storage buckets, and Microsoft Azure containers, are supported by Snowflake and can be used in external stages.
Each Snowflake user has a stage for storing files which is accessible only by that user. The User stage can be referenced by @~. Likewise, each Snowflake table has a stage allocated for storing files and can be referenced by using @%<name of table>.
Note
Table stages are useful if multiple users need to access the files and those files only need to be copied into a single table whereas a user stage is best when the files only need to be accessed by one user but will need to be copied into multiple tables.
User and table stages cannot be altered or dropped and neither of these stages support setting the file format, but you can specify the format and copy options at the time the “COPY INTO” command is issued. Additionally, table stages do not support transforming the data while loading it. A table stage is tied to the table itself and is not a separate database object. To perform actions on the table stage, you must have been granted the table ownership role.
The command to list a user stage is ls@~; or LIST @~; . Figure 2-11 shows the results of the command to list a user stage.

Figure 2-11. Results of the command to list a user stage
User stages and table stages, both of which are types of internal stages, are automatically provided for each Snowflake account. In addition to user and table stages, internal named stages can also be created (see Figure 2-12). Internal named stages are database objects, which means that they can be used not just by one user but by every user who has been granted the appropriate privileges.

Figure 2-12. Object hierarchy
Internal named stages and external stages can be created as either a permanent or a temporary stage. When a temporary external stage is dropped, no data files are removed because those files are stored external to Snowflake. Only the stage is dropped. For a temporary internal stage, however, the data and stage are both dropped and the files are not recoverable.
When using stages, we can use file formats to store all the format information we need for loading data from files to tables. The default file format is CSV. However, you can create file formats for other formats such as JSON, AVRO, ORC, PARQUET, and XML. There are also optional parameters that can be included when you create a file format. We are going to create a file format for loading JSON data. Then we’ll make use of that file format when we create a stage.
USE ROLE SYSADMIN;
USE DATABASE CHAPTER3_TDB1;
CREATE
OR REPLACE FILE FORMAT JSON_FILEFORMAT TYPE = JSON;

USE DATABASE CHAPTER3_TDB1;
USE SCHEMA PUBLIC;
CREATE
OR REPLACE STAGE TEMP_STAGE FILE_FORMAT = JSON_FILEFORMAT;
Note
The data is always in an encrypted state, whether data is in flight between the customer and internal stage or at rest and stored in a Snowflake database table.
Extending SQL with Stored Procedures and UDFs
To extend SQL capabilities in Snowflake, you can create stored procedures and user defined functions (UDFs) to achieve functionalities not possible with Snowflake built-in functions. Both stored procedures and UDFs encapsulate business logic and return a single value (scalar) or multiple values (tabular). You can create stored functions in JavaScript and UDFs in both SQL and JavaScript languages. It is possible to create secure UDFs (see Figure 2-13).

Figure 2-13. Objects hierarchy (* possible to have secure UDF)
Both stored procedures and UDFs extend SQL capabilities but there are many differences between the two. One of the most important differences is how they are used.
Note
If you need to perform database operations such as SELECT, DELETE, or CREATE, you’ll need to use a stored procedure. If you want to use a function as part of the SQL statement or expression or if your output needs to include a value for every input row, then you’ll want to use a Snowflake UDF.
A UDF is called as part of the SQL statement, but a stored procedure cannot be called within a SQL statement. Instead, a stored procedure is called as an independent statement using the “CALL” statement. The “CALL” statement can call only one stored procedure per statement.
A UDF is required to return a value and you can use the UDF return value inside your SQL statements. Although not required, a stored procedure is allowed to return a value, but the “CALL” command doesn’t provide a place to store the returned value. The stored procedure also doesn’t provide a way to pass it to another operation.
In the next two sections, there are a total of five examples provided. The first is a simple JavaScript UDF that returns a scalar value and the next is a secure SQL UDF that returns tabular results. Following those are three stored procedures examples. The first is where an argument is directly passed in. The next example is lengthier and demonstrates the basics of an Accounting Information System where each banking transaction has a debit and credit entry. The last example is an advanced example that combines a stored procedure with a task.
User Defined Function (UDF) – Task Included
UDFs allow you to perform some operations that are not available through the built-in, system-defined functions provided by Snowflake. There are two types of UDFs supported by Snowflake. Both SQL and JavaScript can return either scalar or tabular results.
A SQL UDF evaluates SQL statements and it can refer to other UDFs, although a SQL UDF cannot refer to itself either directly or indirectly.
A JavaScript UDF is useful for manipulating variant and JSON data. A JavaScript UDF expression can refer to itself recursively, although it cannot refer to other UDFs. JavaScript UDFs also have size and depth limitations that don’t apply to SQL UDFs. We’ll see that demonstrated in one of our examples.
JavaScript UDFs have access to the basic standard JavaScript library needed to create arrays, variables, and simple objects. You cannot use math functions or use error handling because Snowflake does not let you import external libraries. The properties that are available for both JavaScript UDFs and JavaScript Procedures can be found by using the commands below.
USE ROLE SYSADMIN;
CREATE
OR REPLACE DATABASE DB_CHAPTER3;
USE DATABASE DB_CHAPTER3;
CREATE
OR REPLACE FUNCTION JS_PROPERTIES() RETURNS string LANGUAGE JAVASCRIPT AS $$
        return Object.getOwnPropertyNames(this);
    $$;
SELECT
    JS_PROPERTIES();
For our first UDF example, we are going to create a simple JavaScript UDF which returns a scalar result. We mentioned that JavaScript UDFs have size and depth limitations and we’ll be able to demonstrate that in this example.
USE ROLE SYSADMIN;
USE DATABASE DB_CHAPTER3;
CREATE
OR REPLACE FUNCTION FACTORIAL(n variant) RETURNS variant LANGUAGE JAVASCRIPT AS '
     var f=n;
     for (i=n-1; i>0; i--) {
  f=f*i
    }
 return f';
SELECT
    FACTORIAL(5);
The result returned is 120 when the number 5 is used. If you use a number greater than 33, you’ll receive an error message. Try finding the result of FACTORIAL(50) and see what happens.
Secure SQL or JavaScript UDFs take a specific set of inputs that are used to evaluate the expression using raw data but only return a limited result data set. Secure SQL UDFs and JavaScript secure UDFs are both shareable but operate differently and are generally used for different purposes. JavaScript secure UDFs are often used for data cleansing, address matching, or other data manipulation operations.
Unlike JavaScript secure UDFs, a secure SQL UDF can run queries. For a secure shared UDF, the queries can only be run against the provider’s data. When a provider shares a secure UDF with a customer, the cost of data storage is paid for by the provider and the compute cost is paid for by the consumer. In this example created for you, there will be no data storage cost incurred because we are using the Snowflake sample data set.
Secure SQL UDF That Returns Tabular Value (Market Basket Analysis Example)
Market basket analysis is a common use of secure SQL UDFs and that is what we’ll be demonstrating. In our example, the output is aggregated data where a consumer would like to see how many times other items were sold with their particular individual item. We wouldn’t want the consumer account to have access to our raw sales data, so we’ll wrap the SQL statement in a secure UDF and create an input parameter. Using the secure UDF with an input parameter, the consumer still gets the same results as running the SQL statement directly on the underlying raw data.
We want to use data that is already provided for us in the Snowflake sample database but there are more records than we need for this demonstration. Let’s create a new table and select 100,000 rows from the sample database. That will be more than enough.
USE ROLE SYSADMIN;
CREATE
OR REPLACE DATABASE DB_UDF;
CREATE
OR REPLACE SCHEMA SCHEMA1;
CREATE
OR REPLACE TABLE DB_UDF.SCHEMA1.SALES AS (
    SELECT
        *
    FROM
        "SNOWFLAKE_SAMPLE_DATA"."TPCDS_SF100TCL"."WEB_SALES"
)
LIMIT
    100000;
Next, we’ll run our query directly on the new table. In this instance, we are interested in the product with the SK of 87. We want to know the different items that were sold with this produce in the same transaction. We can use this query to find that information.
SELECT
    87 AS INPUT_ITEM,
    WS_WEB_SITE_SK AS BASKET_ITEM,
    COUNT (DISTINCT WS_ORDER_NUMBER) BASKETS
FROM
    DB_UDF.SCHEMA1.SALES
WHERE
    WS_ORDER_NUMBER IN (
        SELECT
            WS_ORDER_NUMBER
        FROM
            DB_UDF.SCHEMA1.SALES
        WHERE
            WS_WEB_SITE_SK = 87
    )
GROUP BY
    WS_WEB_SITE_SK
ORDER BY
    3 DESC,
    2;
The results of this query shows us the product with SK of 87 was sold in 152 unique transactions within our records. The item with SK of 9 and the item with SK of 72 were each sold in the same transaction as the item with SK of 87 a total of 34 times. For the manufacturers of product with SK of 9 and 72, this could be valuable information. We might be willing to share those details but we wouldn’t want to allow access to the underlying sales data. Thus, we’ll want to create a secure SQL UDF function.
USE ROLE SYSADMIN;
CREATE
OR REPLACE SECURE FUNCTION DB_UDF.SCHEMA1.GET_MKTBASKET(INPUT_WEB_SITE_SK number(38)) RETURNS TABLE (
    INPUT_ITEM NUMBER(38, 0),
    BASKET_ITEM NUMBER(38, 0),
    BASKETS NUMBER(38, 0)
) AS 'SELECT input_web_site_sk, WS_WEB_SITE_SK as BASKET_ITEM, COUNT(DISTINCT
WS_ORDER_NUMBER) BASKETS
FROM DB_UDF.SCHEMA1.SALES
WHERE WS_ORDER_NUMBER IN (SELECT WS_ORDER_NUMBER FROM DB_UDF.SCHEMA1.SALES WHERE WS_WEB_SITE_SK = input_web_site_sk)
GROUP BY ws_web_site_sk
ORDER BY 3 DESC, 2';
If we were to share with another user this secure UDF through a Snowflake consumer account, that user could run the secure UDF without seeing any of the underlying data, table structures, or the SQL code. This is the command that the owner of the consumer account would use to obtain the results. You can try this command with the number 87 that we used earlier when we queried the table directly and you’ll get the same exact result with the UDF function. You can also try other product SKs.
SELECT
    *
FROM
    TABLE(DB_UDF.SCHEMA1.GET_MKTBASKET(9));
Tip
Using Secure UDFs should be specifically used for instances where data privacy is of concern, and you want to limit access to sensitive data. It is important to consider the purpose and necessity of creating a secure UDF and weigh that against the decreased query performance that is likely to result from using a secure UDF.
Stored Procedures
Stored procedures are similar to functions in that they are created once and can be executed many times. Stored procedures allow you to extend Snowflake SQL by combining it with JavaScript in order to include branching and looping, as well as error handling. Stored procedures, which must be written in JavaScript, can be used to automate tasks that require multiple SQL statements performed frequently.
While you can “SELECT” statements inside a stored procedure, the results must be used within the stored procedure. If not, then only a single value result can be returned. Stored procedures are great for batch actions because a stored procedure runs by itself and, similar to a trigger, can be conditionally tied to database events.
In the first stored procedures example, we are going to pass in an argument to the stored procedure.
USE ROLE SYSADMIN;
CREATE
OR REPLACE DATABASE DB_CHAPTER3;
CREATE
OR REPLACE PROCEDURE STOREDPROC1(ARGUMENT1 VARCHAR) RETURNS STRING NOT NULL LANGUAGE javascript AS $$ var INPUT_ARGUMENT1 = ARGUMENT1;
var result = `${INPUT_ARGUMENT1}` return result;
$$;
CALL STOREDPROC1('I really love Snowflake ❄');
Figure 2-14 shows the results of the passing in an argument to the stored procedure.

Figure 2-14. Results of passing in an argument to the stored procedure created in the chapter
You can use the INFORMATION_SCHEMA to take a look at the information for Snowflake Procedures in the database.
SELECT
    *
FROM
    "DB_CHAPTER3"."INFORMATION_SCHEMA"."PROCEDURES";
The next stored procedure example is one where we are demonstrating the very basics of an Accounting Information System where tabular results are returned for banking transactions that record debits and credits. If you remember, earlier in the chapter we created the tables needed for this example so we can just dive right into creating the stored procedure.
We are recording the accounting transactions for a bank that deals with customer’s giving cash to the bank and getting cash from the bank. We’ll keep the accounting portion of the example limited to three types of transactions – deposits, withdrawals, and loan payments.
First, we’ll want to create a stored procedure for a deposit transaction where the bank’s cash account is debited and the customer account on the bank’s balance sheet is credited whenever a customer gives the bank cash to add to their account.
USE ROLE SYSADMIN;
CREATE
OR REPLACE PROCEDURE deposit(PARAM_ACCT FLOAT, PARAM_AMT FLOAT) returns STRING LANGUAGE javascript AS $$
    var ret_val = "";
    var cmd_debit = "";
    var cmd_credit = "";

    // INSERT data into tables
    cmd_debit = "INSERT INTO CHAPTER3_PDB1.BANKING.CASH VALUES (" + PARAM_ACCT + "," + PARAM_AMT + ",current_timestamp());";
    cmd_credit = "INSERT INTO CHAPTER3_PDB1.BANKING.CUSTOMER_ACCT VALUES (" + PARAM_ACCT + "," + PARAM_AMT + ",current_timestamp());";

    // BEGIN transaction
    snowflake.execute ({sqlText: cmd_debit});
    snowflake.execute ({sqlText: cmd_credit});
        ret_val = "Deposit Transaction Succeeded";
    return ret_val;
    $$;
Next, we’ll create the transaction for a withdrawal. In this case, it is just the reverse of what happens for a deposit.
USE ROLE SYSADMIN;
CREATE OR REPLACE PROCEDURE withdrawal (PARAM_ACCT FLOAT,PARAM_AMT FLOAT)
    returns STRING
    LANGUAGE javascript
    AS
    $$
    var ret_val = "";
    var cmd_debit = "";
    var cmd_credit = "";

    // INSERT data into tables
    cmd_debit = "INSERT INTO CHAPTER3_PDB1.BANKING.CUSTOMER_ACCT VALUES (" + PARAM_ACCT + "," + (-PARAM_AMT) + ",current_timestamp());";
    cmd_credit = "INSERT INTO CHAPTER3_PDB1.BANKING.CASH VALUES (" + PARAM_ACCT + "," + (-PARAM_AMT) + ",current_timestamp());";

    // BEGIN transaction
    snowflake.execute ({sqlText: cmd_debit});
    snowflake.execute ({sqlText: cmd_credit});
        ret_val = "Withdrawal Transaction Succeeded";
    return ret_val;
    $$;
Finally, the transaction for the loan payment is one where the bank’s cash account is debited and the receivables account is credit.
USE ROLE SYSADMIN;
CREATE OR REPLACE PROCEDURE loan_payment (PARAM_ACCT FLOAT,PARAM_AMT FLOAT)
    returns STRING
    LANGUAGE javascript
    AS
    $$
    var ret_val = "";
    var cmd_debit = "";
    var cmd_credit = "";

    // INSERT data into the tables
    cmd_debit = "INSERT INTO CHAPTER3_PDB1.BANKING.CASH VALUES (" + PARAM_ACCT + "," + PARAM_AMT + ",current_timestamp());";
    cmd_credit = "INSERT INTO CHAPTER3_PDB1.BANKING.RECEIVABLES VALUES (" + PARAM_ACCT + "," + (-PARAM_AMT) + ",current_timestamp());";
    //BEGIN transaction
    snowflake.execute ({sqlText: cmd_debit});
    snowflake.execute ({sqlText: cmd_credit});
        ret_val = "Loan Payment Transaction Succeeded";
    return ret_val;
    $$;
Now, let’s run a few quick tests to see if the functions are working.
CALL withdrawal(21, 100);
CALL loan_payment(21, 100);
CALL deposit(21, 100);
After using the “CALL” command to test a few transactions, we are going to truncate the tables which leaves the tables intact but removes the data.
USE ROLE SYSADMIN;
USE DATABASE CHAPTER3_PDB1;
USE SCHEMA BANKING;
TRUNCATE TABLE "CHAPTER3_PDB1"."BANKING"."CUSTOMER_ACCT";
TRUNCATE TABLE "CHAPTER3_PDB1"."BANKING"."CASH";
TRUNCATE TABLE "CHAPTER3_PDB1"."BANKING"."RECEIVABLES";
Now, we’ll go ahead and input some transactions.
USE ROLE SYSADMIN;
CALL deposit(21, 10000);
CALL deposit(21, 400);
CALL loan_payment(14, 1000);
CALL withdrawal(21, 500);
CALL deposit(72, 4000);
CALL withdrawal(21, 250);
We’d like to see a transaction summary, so we’ll create one final stored procedure.
USE ROLE SYSADMIN;
 CHAPTER3_TDB1;
USE SCHEMA PUBLIC;
CREATE OR REPLACE PROCEDURE Transactions_Summary()
    returns STRING
    LANGUAGE javascript
    AS
    $$
    var cmd_truncate = `TRUNCATE TABLE IF EXISTS CHAPTER3_TDB1.PUBLIC.SUMMARY;`
    var sql = snowflake.createStatement({sqlText: cmd_truncate});
    var cmd_cash = `Insert into CHAPTER3_TDB1.PUBLIC.SUMMARY (CASH_AMT) select sum(AMOUNT) from "CHAPTER3_PDB1"."BANKING"."CASH";`
    var sql = snowflake.createStatement({sqlText: cmd_cash});
    var cmd_receivables = `Insert into CHAPTER3_TDB1.PUBLIC.SUMMARY (RECEIVABLES_AMT) select sum(AMOUNT) from "CHAPTER3_PDB1"."BANKING"."RECEIVABLES";`
    var sql = snowflake.createStatement({sqlText: cmd_receivables});
    var cmd_customer = `Insert into CHAPTER3_TDB1.PUBLIC.SUMMARY (CUSTOMER_AMT) select sum(AMOUNT) from "CHAPTER3_PDB1"."BANKING"."CUSTOMER_ACCT";`
    var sql = snowflake.createStatement({sqlText: cmd_customer});


    //BEGIN transaction
        snowflake.execute ({sqlText: cmd_truncate});
        snowflake.execute ({sqlText: cmd_cash});
        snowflake.execute ({sqlText: cmd_receivables});
        snowflake.execute ({sqlText: cmd_customer});
        ret_val = "Transactions Successfully Summarized";
        return ret_val;
     $$;
Now, we can see the Transaction Summary. We’ll call the stored procedure so that all the debit and credit transactions are summarized and then we’ll take a look at the table.
CALL Transactions_Summary();

SELECT
    *
FROM
    CHAPTER3_TDB1.PUBLIC.SUMMARY;
Let’s also take a look now at the materialized view we created earlier.
USE ROLE SYSADMIN;
USE DATABASE CHAPTER3_TDB1;
USE SCHEMA PUBLIC;
SELECT
    *
FROM
    "CHAPTER3_TDB1"."PUBLIC"."BANKINGVIEW_MV";
Now, we have our final stored procedural example. It’s an advanced example because we are going to add a task to this stored procedure. We are creating a stored procedure that will delete a database. Thus, it’s important that we create the stored procedure in a different database than the one we’ll want to delete using the stored procedure.
USE ROLE SYSADMIN;
USE DATABASE DB_CHAPTER3;
CREATE
OR REPLACE PROCEDURE drop_db() RETURNS STRING NOT NULL LANGUAGE javascript AS $$
    var cmd = `DROP DATABASE "CHAPTER3_PDB1";`
    var sql = snowflake.createStatement({sqlText: cmd});
    var result = sql.execute();
    return 'Database has been successfully dropped';
    $$;
Now we can call the stored procedure and the database will be dropped. This is part of our cleanup for this chapter.
CALL drop_db();
Now that you’ve seen how this stored procedure works, we’ll modify it so that it will drop a different database, and we’ll add a task so that the database will be dropped 15 minutes later. That way you can see how a task works.
Let’s go ahead and change our drop_db procedure so that we’ll be dropping the database CHAPTER3_TDB1.
USE ROLE SYSADMIN;
CREATE
OR REPLACE PROCEDURE drop_db() RETURNS STRING NOT NULL LANGUAGE javascript AS $$
    var cmd = `DROP DATABASE "CHAPTER3_TDB1";`
    var sql = snowflake.createStatement({sqlText: cmd});
    var result = sql.execute();
    return 'Database has been successfully dropped';
    $$;
Next, we’ll want to create the task that will delay the stored procedure by 15 minutes.
USE ROLE SYSADMIN;
CREATE
OR REPLACE TASK wait_15_task WAREHOUSE = COMPUTE_WH SCHEDULE = '15 MINUTE' AS CALL drop_db();
The SYSADMIN role is going to need some privileges to execute the task so be sure to use the ACCOUNTADMIN role for this command.
USE ROLE ACCOUNTADMIN;
GRANT EXECUTE TASK ON ACCOUNT TO ROLE SYSADMIN;
Because tasks are always created in a suspended state, they’ll need to be resumed.
USE ROLE SYSADMIN;
ALTER TASK IF EXISTS wait_15_task RESUME;
Now our task is in a scheduled state. We’ll be able to see that by using this query.
SELECT
    *
FROM
    table(
        information_schema.task_history(
            task_name => 'wait_15_task',
            scheduled_time_range_start => dateadd('hour', -1, current_timestamp())
        )
    );
Figure 2-15 shows the results of the query.

Figure 2-15. Query results to see the current status of the task named “wait_15_task”
You can use the next 15 minutes to answer the questions at the end of the chapter to test your knowledge and then come back. Once you see that the task has been completed and the database has been dropped (you can refresh your screen, or you can run the query again to see the state of the task) then you can suspend the task.
USE ROLE SYSADMIN;
ALTER TASK IF EXISTS wait_15_task SUSPEND;
After you suspend the task, you can run the query one last time and you’ll see that the task succeeded and that there are no tasks scheduled.
Other
Pipes, streams, and sequences are Snowflake objects we haven’t covered. Pipes are objects that contain a “COPY” statement that is used by Snowpipe. Snowpipes are used for continuous, serverless loading of data into a Snowflake target table. Snowflake table streams keep track of certain changes made to a table including inserts, updates, and deletes. Streams have many useful purposes including recording changes made in a staging table which are used to update another table.
A sequence object is used to generate unique numbers. Often, sequences are used as surrogate keys for primary key values. Here is how you can generate a sequence that begins with the number one and increments by one.
USE ROLE SYSADMIN;
USE DATABASE DB_CHAPTER3;
CREATE
OR REPLACE SEQUENCE SEQ_01 START = 1 INCREMENT = 1;
CREATE
OR REPLACE TABLE SEQUENCE_TEST_TABLE(i integer);
You can use the select command three or four times to see how the NEXTVAL increments by one every time.
SELECT
    SEQ_01.NEXTVAL;
What happens when you try this?
USE ROLE SYSADMIN;
USE DATABASE DB_CHAPTER3;
CREATE
OR REPLACE SEQUENCE SEQ_02 START = 1 INCREMENT = 2;
CREATE
OR REPLACE TABLE SEQUENCE_TEST_TABLE(i integer);
SELECT
    SEQ_02.NEXTVAL a,
    SEQ_02.NEXTVAL b,
    SEQ_02.NEXTVAL c,
    SEQ_02.NEXTVAL d;
Some important things to remember about sequences is that the first value in a sequence cannot be changed after the sequence is created and sequence values, although unique, are not necessarily gap-free.
Warning
A consideration when using sequences is that they may not be appropriate for situations such as a secure UDF case. The reason is that, in some circumstances a consumer may be able to use the difference between sequence numbers to infer information about the number of records. In that case, one option is to exclude the sequence column from the consumer results or to use a unique string ID instead of a sequence.
Code Cleanup
Let’s perform a code cleanup to remove the objects in your Snowflake account in preparation for working on another chapter example.
Note that there is no need to drop objects in the hierarchy below the database before dropping the databases. If you’ve been following along, you dropped all databases except DB_CHAPTER3 so you’ll just need to drop that database now.
Exercises to Test Your Knowledge
The following exercises are based on the coverage in this chapter about databases and database objects such as schemas, tables, views, stages, stored procedures and UDFs.
-
What are the different types of databases, schemas, and tables that can be created? If a particular type is not specifically stated at the time of creation, what is the default type for each?
-
What is the difference between scalar and tablular UDFs?
-
What kinds of things can you do with a stored procedure that you cannot do with a UDF?
-
What would happen if we used the “CREATE DATABASE” command and the database we want to create already exists? What if we used the “CREATE OR REPLACE DATABASE” command?
-
What is the default retention time for a database, and can that be changed?
-
Why might you choose to use the “TRUNCATE TABLE” command rather than the “DROP TABLE” command?
-
Are there any storage or compute costs associated with views?
-
What is the difference between a fully and a partially qualified name?
-
When using stages, what is the default file format? What other file formats does Snowflake support?
-
What is unique about the SNOWFLAKE database that comes with every Snowflake account?