
Celery is a distributed task queue written in Python, which works using distributed messages. Each execution unit in celery is called a task. A task can be executed concurrently on one or more servers using processes called workers. By default, Celery achieves this using multiprocessing, but it can also use other backends such as gevent, for example.
Tasks can be executed synchronously or asynchronously with results available in the future, like objects. Also, task results can be stored in storage backend such as Redis, databases, or in files.
Celery differs from message queues in that the basic unit in celery is an executable task—a callable in Python—rather than just a message.
Celery, however, can be made to work with message queues. In fact, the default broker for passing messages in celery is RabbitMQ, the popular implementation of AMQP. Celery can also work with Redis as the broker backend.
Since Celery takes a task, and scales it over multiple workers, over multiple servers, it is suited to problems involving data parallelism as well as computational scaling. Celery can accept messages from a queue and distribute it over multiple machines as tasks for implementing a distributed e-mail delivery system, for example, and achieve horizontal scalability. Or, it can take a single function and perform parallel data computation by splitting the data over multiple processes, achieving parallel data processing.
In the following example, we will take our Mandelbrot fractal program and, rewrite it to work with Celery. We will try to scale the program by performing data parallelism, in terms of computing the rows of the Mandelbrot set over multiple celery workers—in a similar way to what we did with PyMP.
For implementing a program to take advantage of Celery, it needs to be implemented as a task. This is not as difficult as it sounds. Mostly, it just involves preparing an instance of the celery app with a chosen broker backend, and decorating the callable we want to parallelize—using the special decorator @app.task
where app is an instance of Celery.
We will look at this program listing step by step, since it involves a few new things. The software requirements for this session are as follows:
- Celery
- An AMQP backend; RabbitMQ is preferred
- Redis as a result storage backend
First we will provide the listing for the Mandelbrot tasks module:
# mandelbrot_tasks.py
from celery import Celery

app = Celery('tasks', broker='pyamqp://guest@localhost//',
             backend='redis://localhost')

@app.task
def mandelbrot_calc_row(y, w, h, max_iteration = 1000):
    """ Calculate one row of the mandelbrot set with size w x h """

    y0 = y * (2/float(h)) - 1 # rescale to -1 to 1

    image_rows = {}
    for x in range(w):
        x0 = x * (3.5/float(w)) - 2.5 # rescale to -2.5 to 1

        i, z = 0, 0 + 0j
        c = complex(x0, y0)
        while abs(z) < 2 and i < max_iteration:
            z = z**2 + c
            i += 1

        color = (i % 8 * 32, i % 16 * 16, i % 32 * 8)
        image_rows[y*w + x] = color

    return image_rows
Let's analyze the preceding code:
- We first do the imports required for Celery. This requires importing the
Celeryclass from thecelerymodule. - We prepare an instance of the
Celeryclass as the Celery app using AMQP as the message broker and Redis as the result backend. The AMQP configuration will use whatever AMQP MoM is available on the system. (In this case, it is RabbitMQ.) - We have a modified version of
mandelbrot_calc_row. In thePyMPversion, theimage_rowsdictionary was passed as an argument to the function. Here, the function calculates it locally and returns a value. We will use this return value at the receiving side to create our image. - We decorated the function using
@app.task, where app is theCeleryinstance. This makes it ready to be executed as a Celery task by the Celery workers.
Next is the main program, which calls the task for a range of y input values and creates the image:
# celery_mandelbrot.py
import argparse
from celery import group
from PIL import Image
from mandelbrot_tasks import mandelbrot_calc_row

def mandelbrot_main(w, h, max_iterations=1000,
output='mandelbrot_celery.png'):
    """ Main function for mandelbrot program with celery """

    # Create a job – a group of tasks
    job = group([mandelbrot_calc_row.s(y, w, h, max_iterations) for y in range(h)])
    # Call it asynchronously
    result = job.apply_async()

    image = Image.new('RGB', (w, h))

    for image_rows in result.join():
        for k,v in image_rows.items():
            k = int(k)
            v = tuple(map(int, v))
            x,y = k % args.width, k // args.width
            image.putpixel((x,y), v)

    image.save(output, 'PNG')
    print('Saved to',output)
The argument parser is the same, so is not reproduced here.
This last bit of code introduces some new concepts in Celery, so needs some explanation. Let's analyze the code in some detail:
- The
mandelbrot_mainfunction is similar to the previousmandelbrot_calc_setfunction in its arguments. - This function sets up a group of tasks, each performing
mandelbrot_calc_rowexecution on a givenyinput over the entire range ofyinputs from0to the height of the image. It uses thegroupobject of Celery to do this. A group is a set of tasks which can be executed together. - The tasks are executed by calling the
apply_asyncfunction on the group. This executes the tasks asynchronously in the background in multiple workers. We get an asyncresultobject in return—the tasks are not completed yet. - We then wait on this result object by calling
joinon it, which returns the results—the rows of the image as a dictionary from each single execution of themandelbrot_calc_rowtask. We loop through this, and do integer conversions for the values, since Celery returns data as strings, and put the pixel values in the image. - Finally, the image is saved in the output file.
So, how does Celery execute the tasks? This needs the Celery program to run, processing the tasks module with a certain number of workers. Here is how we start it in this case:
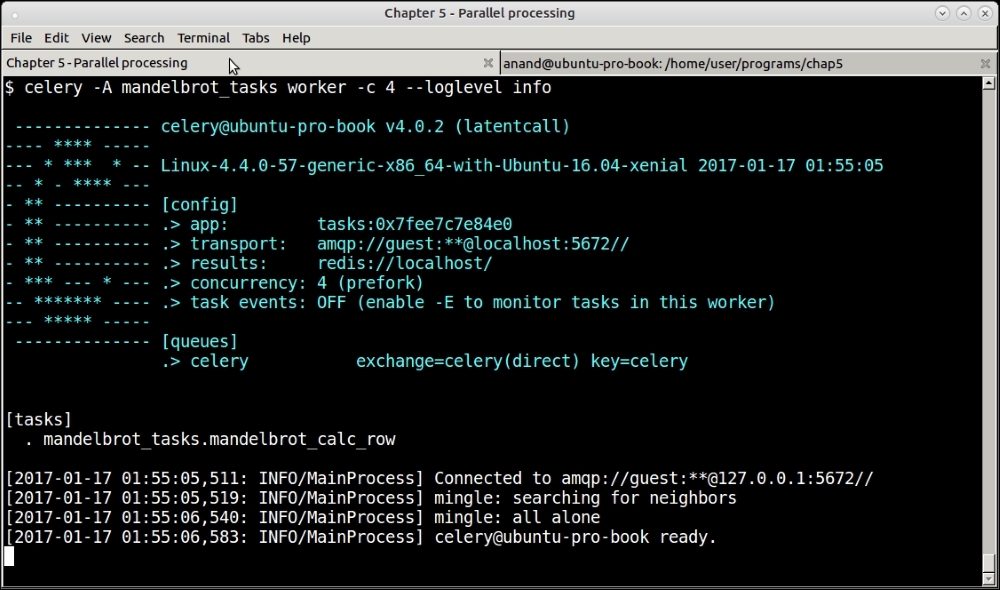
Celery console—workers starting up with the Mandelbrot task as target
The command starts Celery with tasks loaded from the module mandelbrot_tasks.py with a set of 4 worker processes. Since the machine has 4 CPU cores, we have chosen this as the concurrency.
The program ran under 15 seconds, twice as fast in as the single-process version, and also the PyMP version.
If you observe the Celery console, you will find a lot of messages getting echoed, since we configured Celery with the INFO log level. All these are info messages with data on the tasks and their results:
The following screenshot shows the result of the run for 10000 iterations. This performance is slightly better than that of the similar run by the PyMP version earlier, by around 20 seconds:
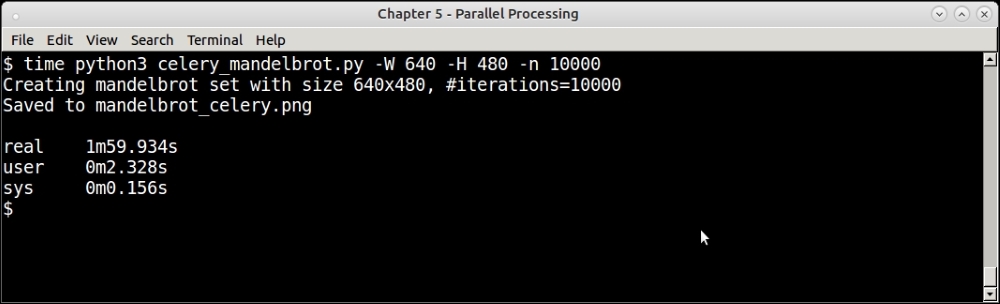
Celery Mandelbrot program for a set of 10000 iterations.
Celery is used in production systems in many organizations. It has plugins for some of the more popular Python web application frameworks. For example, Celery supports Django out-of-the-box with some basic plumbing and configuration. There are also extension modules such as django-celery-results, which allow the programmer to use the Django ORM as a Celery results backend.
It is beyond the scope of this chapter and book to discuss this in detail, so the reader is advised to refer to the documentation available on this on the Celery project website.
Web Server Gateway Interface (WSGI) is a specification for a standard interface between Python web application frameworks and web servers.
In the early days of Python web applications, there was a problem connecting web application frameworks to web servers, since there was no common standard. Python web applications were designed to work with one of the existing standards of CGI, FastCGI, or mod_python (Apache). This meant that an application written to work with one web server might not be able to work with another. In other words, interoperability between the uniform application and web server was missing.
WSGI solved this problem by specifying a simple, but uniform, interface between servers and web application frameworks to allow for portable web application development.
WSGI specifies two sides: the server (or gateway) side, and the application or framework side. A WSGI request gets processed as follows:
- The server side executes the application, providing it with an environment and a callback function
- The application processes the request, and returns the response to the server using the provided callback function
Here is a schematic diagram showing the interaction between a web server and web application using WSGI:
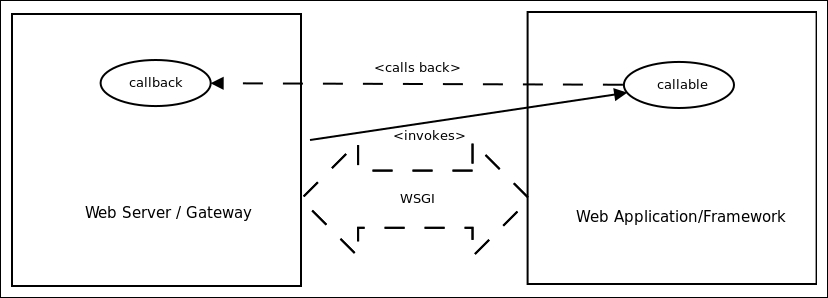
Schematic diagram showing WSGI protocol interaction
The following is the simplest function that is compatible with the application or framework side of WSGI:
def simple_app(environ, start_response):
    """Simplest possible application object"""

    status = '200 OK'
    response_headers = [('Content-type', 'text/plain')]
    start_response(status, response_headers)
    return ['Hello world!
']
The preceding function can be explained as follows:
- The
environvariable is a dictionary of environment variables passed from the server to the application as defined by the Common Gateway Interface (CGI) specification. WSGI makes a few of these environment variables mandatory in its specification. - The
start_responseis a callable provided as a callback from the server side to the application side, to start response processing on the server side. It must take two positional arguments. The first should be a status string with an integer status code, and the second, a list of (header_name,header_value), tuples describing the HTTP response header.
Note
For more details, the reader can refer to the WSGI specification v1.0.1, which is published on the Python language website as PEP 3333.
Python Enhancement Proposal (PEP) is a design document on the Web, that describes a new feature or feature suggestion for Python, or provides information to the Python community about an existing feature. The Python community uses PEPs as a standard process for describing, discussing, and adopting new features and enhancements to the Python programming language and its standard library.
WSGI middleware components are software that implement both sides of the specification, and hence, provide capabilities such as the following:
- Load balancing of multiple requests from a server to an application
- Remote processing of requests by forwarding requests and responses over a network
- Multi-tenancy or co-hosting of multiple servers and/or applications in the same process
- URL-based routing of requests to different application objects
The middleware sits in between the server and application. It forwards requests from server to the application and responses from application to the server.
There are a number of WSGI middleware an architect can choose from. We will briefly look at two of the most popular ones, namely, uWSGI and Gunicorn.
uWSGI is an open source project and application, which aims to build a full stack for hosting services. The WSGI of the uWSGI project stems from the fact that the WSGI interface plugin for Python was the first one developed in the project.
Apart from WSGI, the uWSGI project also supports Perl Webserver Gateway Interface (PSGI) for Perl web applications, and the rack web server interface for Ruby web applications. It also provides gateways, load balancers, and routers for requests and responses. The Emperor plugin of uWSGI provides management and monitoring of multiple uWSGI deployments of your production system across servers.
The components of uWSGI can run in preforked, threaded, asynchronous. or green-thread/co-routine modes.
uWSGI also comes with a fast and in-memory caching framework, which allows the responses of the web applications to be stored in multiple caches on the uWSGI server. The cache can also be backed with a persistence store such as a file. Apart from a multitude of other things, uWSGI also supports virtualenv based deployments in Python.
uWSGI also provides a native protocol that is used by the uWSGI server. uWSGI version 1.9 also adds native support for the web sockets.
Here is a typical example of a uWSGI configuration file:
[uwsgi]

# the base directory (full path)
chdir           = /home/user/my-django-app/
# Django's wsgi file
module          = app.wsgi
# the virtualenv (full path)
home            = /home/user/django-virtualenv/
# process-related settings
master          = true
# maximum number of worker processes
processes       = 10
# the socket
socket          = /home/user/my-django-app/myapp.sock
# clear environment on exit
vacuum          = true
A typical deployment architecture with uWSGI looks like that depicted in the following diagram. In this case, the web server is Nginx, and the web application framework is Django. uWSGI is deployed in a reverse-proxy configuration with Nginx, forwarding requests and responses between Nginx and Django:
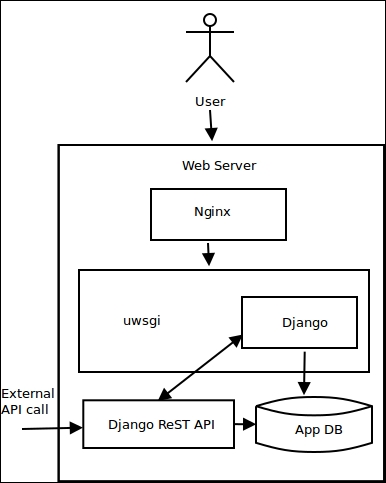
uWSGI deployment with Nginx and Django
uWSGI is an ideal choice for Python web application production deployments where one needs a good balance of customization with high performance and features. It is the swiss-army-knife of components for WSGI web application deployments.
The Gunicorn project is another popular WSGI middleware implementation, which is open source. It uses a preforked model, and is a ported version from the unicorn project of Ruby. There are different worker types in Gunicorn, like uWSGI supporting synchronous and asynchronous handling of requests. The asynchronous workers make use of the Greenlet library which is built on top of gevent.
There is a master process in Gunicorn that runs an event loop, processing and reacting to various signals. The master manages the workers, and the workers process the requests, and send responses.
Here are a few guidelines when choosing whether to go with Gunicorn or uWSGI for your Python web application deployments:
- For simple application deployments which don't need a lot of customization, Gunicorn is a good choice. uWSGI has a bigger learning curve when compared to Gunicorn, and it takes a while to get used to. The defaults in Gunicorn work pretty well for most deployments.
- If your deployment is homogenously Python, then Gunicorn is a good choice. On the other hand, uWSGI allows you to perform heterogeneous deployments due to its support for other stacks such as PSGI and Rack.
- If you want a more full-featured WSGI middleware, which is heavily customizable, then uWSGI is a safe bet. For example, uWSGI makes Python virtualenv-based deployments simple, whereas, Gunicorn doesn't natively support virtualenv; instead, Gunicorn itself has to be deployed in the virtual environment.
- Since Nginx supports uWSGI natively, it is very commonly deployed along with Nginx on production systems. Hence, if you use Nginx, and want a full-featured and highly customizable WSGI middleware with caching, uWSGI is the default choice.
- With respect to performance, both Gunicorn and uWSGI score similarly on different benchmarks published on the web.
As discussed, a system can scale vertically, or horizontally, or both. In this section, we will briefly look at a few of the architectures that an architect can choose from when deploying his systems to production to take advantage of the scalability options.
Vertical scalability techniques come in the following two flavors:
- Adding more resources to an existing system: This could mean adding more RAM to a physical or virtual machine, adding more vCPUs to a virtual machine or VPS, and so on. However, none of these options are dynamic, as they require stopping, reconfiguring, and restarting the instance.
- Making better use of existing resources in the system: We have spent a lot of this chapter discussing this approach. This is when an application is rewritten to make use of the existing resources, such as multiple CPU cores, and more effectively by concurrency techniques such as threading, multiple processes, and/or asynchronous processing. This approach scales dynamically, since no new resource is added to the system, and hence, there is no need for a stop/start.
Horizontal scalability involves a number of techniques that an architect can add to his tool box, and pick and choose from. They include the ones listed next:
- Active redundancy: This is the simplest technique of scaling out, which involves adding multiple, homogenous processing nodes to a system typically fronted with a load balancer. This is a common practice for scaling out web application server deployments. Multiple nodes make sure that, even if one or a few of the systems fail, the remaining systems continue to carry out request processing, ensuring no downtime for your application.
In a redundant system, all the nodes are actively in operation, though only one or a few of them may be responding to requests at a specific time.
- Hot standby: A hot standby (hot spare) is a technique used to switch to a system that is ready to server requests, but is not active until the moment the main system goes down. A hot spare is in many ways exactly similar to the main node(s) that is serving the application. In the event of a critical failure, the load balancer is configured to switch to the hot spare.
The hot spare itself may be a set of redundant nodes instead of just a single node. Combining redundant systems with a hot spare ensures maximum reliability and failover.
Note
A variation of a hot standby is a software standby, which provides a mode in the application that switches the system to a minimum Quality of Service (QoS) instead of offering the full feature at extreme load. An example is a web application that switches to the read-only mode under high loads, serving most users but not allowing writes.
- Read replicas: The response of a system that is dependent on read-heavy operations on a database can be improved by adding read-replicas of the database. Read replicas are essentially database nodes that provide hot backups (online backups), which constantly sync from the main database node. Read replicas, at a given point in time, may not be exactly consistent with the main database node, but they provide eventual consistency with SLA guarantees.
Cloud service providers such as Amazon make their RDS database service available with a choice of read replicas. Such replicas can be distributed geographically closer to your active user locations to ensure less response time and failover in case the master node goes down, or doesn't respond.
Read replicas basically offer your system a kind of data redundancy.
- Blue-green deployments: This is a technique where two separate systems (labeled
blueandgreenin the literature) are run side by side. At any given moment, only one of the systems is active and is serving requests. For example, blue is active, green is idle.When preparing a new deployment, it is done on the idle system. Once the system is ready, the load balancer is switched to the idle system (green), and away from the active system (blue). At this point, green is active, and blue is idle. The positions are reversed again in the next switch.
Blue-green deployments, if done correctly, ensure zero to minimum downtime of your production applications.
- Failure monitoring and/or restart: A failure monitor is a system that detects failure of critical components—software or hardware—of your deployments, and either notifies you, and/or takes steps to mitigate the downtime.
For example, you can install a monitoring application on your server that detects when a critical component, say, a Celery or RabbitMQ server, goes down, sends an e-mail to the DevOps contact, and also tries to restart the daemon.
Heartbeat monitoring is another technique where a software actively sends pings or heartbeats to a monitoring software or hardware, which could be in the same machine or another server. The monitor will detect the downtime of the system if it fails to send the heartbeat after a certain interval, and could then inform and/or try to restart the component.
Nagios is an example of a common production monitoring server, usually deployed in a separate environment, and monitors your deployment servers. Other examples of system-switch monitors and restart components are Monit and Supervisord.
Apart from these techniques, the following best practices should be followed when performing system deployments to ensure scalability, availability, and redundancy/failover:
- Cache it: Use caches, and, if possible, distributed caches, in your system as much as possible. Caches can be of various types. The simplest possible cache is caching static resources on the content delivery network (CDN) of your application service provider. Such a cache ensures geographic distribution of resources closer to your users, which reduces response, and hence, page-load times.
A second kind of cache is your application's cache, where it caches responses and database query results. Memcached and Redis are commonly used for these scenarios, and they provide distributed deployments, typically, in master/slave modes. Such caches should be used to load and cache most commonly requested content from your application with proper expiry times to ensure that the data is not too stale.
Effective and well-designed caches minimize system load, and avoid multiple, redundant operations that can artificially increase load on a system and decrease performance:
- Decouple: As much as possible, decouple your components to take advantage of the shared geography of your network. For example, a message queue may be used to decouple components in an application that need to publish and subscribe data instead of using a local database or sockets in the same machine. When you decouple, you automatically introduce redundancy and data backup to your system, since the new components you add for decoupling—message queues, task queues, and distributed caches—typically come with their own stateful storage and clustering.
The added complexity of decoupling is the configuration of the extra systems. However, in this day and age, with most systems being able to perform auto configuration or provide simple web-based configurations, this is not an issue.
You can refer to literature for application architectures that provide effective decoupling, such as observer patterns, mediators, and other such middleware:
- Gracefully degrade: Rather than being unable to answer a request and providing timeouts, arm your systems with graceful degradation behaviors. For example, a write-heavy web application can switch to the read-only mode under heavy load when it finds that the database node is not responding. Another example is when a system which provides heavy, JS-dependent dynamic web pages could switch to a similar static page under heavy loads on the server when the JS middleware is not responding well.
Graceful degradation can be configured on the application itself, or on the load balancers, or both. It is a good idea to prepare your application itself to provide a gracefully downgraded behavior, and configure the load balancer to switch to that route under heavy loads.
- Keep data close to the code: A golden rule of performance-strong software is to provide data closer to where the computation is. For example, if your application is making 50 SQL queries to load data from a remote database for every request, then you are not doing this correctly.
Providing data close to the computation reduces data access and transport times, and hence, processing times, decreasing latency in your application, and making it more scalable.
There are different techniques for this: caching, as discussed earlier, is a favored technique. Another one is to split your database to a local and remote one, where most of the reads happen from the local read replica, and writes (which can take time) happen to a remote write master. Note that local, in this sense, may not mean the same machine, but typically, the same data center, sharing the same subnet if possible.
Also, common configurations can be loaded from an on-disk database like SQLite or local JSON files, reducing the time it takes for preparing the application instances.
Another technique is to not store any transactional state in the application tier or the frontend, but to move the state closer to the backend where the computation is. Since this makes all application server nodes equal in terms of not having any intermediate state, it also allows you to front them with a load-balancer, and provide a redundant cluster of equals, any of which can serve a given request.
- Design according to SLAs: It is very important for an architect to understand the guarantees that the application provides to its users, and design the deployment architecture accordingly.
The CAP theorem ensures that, if a network partition in a distributed system fails, the system can guarantee only one of consistency or availability at a given time. This groups distributed systems into two common types, namely, CP and AP systems.
Most web applications in today's world are AP. They ensure availability, but data is only eventually consistent, which means they will serve stale data to users in case one of the systems in the network partition, say the master DB node, fails.
On the other hand, a number of businesses such as banking, finance, and healthcare need to ensure consistent data, even if there is a network partition failure. These are CP systems. The data in such systems should never be stale, so, in case of a choice between availability and consistent data, they will choose the latter.
The choice of software components, application architecture, and the final deployment architecture are influenced by these constraints. For example, an AP system can work with NoSQL databases which guarantee eventual consistent behavior. It can make better use of caches. A CP system, on the other hand, may need ACID guarantees provided by Relational Database Systems (RDBMs).