
IN THIS CHAPTER
Using the Information in the Bug Tracking Database
Metrics That You'll Use in Your Daily Testing
Common Project-Level Metrics
In Chapter 19, “Reporting What You Find,” you learned the basics of reporting the bugs you find and how a specialized bug database can be used to track them. Although most of your exposure to this database will be in entering bugs, the indirect benefit to using it is the ability to extract all sorts of useful and interesting data that can indicate the success (or failure) of the test effort and the project's progress.
By using the information in the bug-tracking database, you can perform queries that will tell you what types of bugs you're finding, what your bug find rate is, and how many of your bugs have been fixed. Your test manager or the project manager can see if any trends in the data show areas that may need more testing or whether the project is on track for its scheduled release date. The data is all there, it's just a matter of creating reports that will show the information you're after.
This chapter will introduce you to some of the popular queries and reports that you're likely to see as a software tester and give you examples of how they're used in a typical software project. Highlights of this chapter include
What metrics and statistics can do for you
Why caution needs to be exercised in data collecting and reporting
How to use simple bug database queries and reports
Some frequently used project-level measurements
Consider the following questions:
What areas of the software you're testing have the most bugs? The fewest bugs?
How many resolved bugs are currently assigned to Martha?
Bob is leaving for vacation soon. Will he likely have all his bugs fixed by then?
Which software tester has entered the most bugs?
Can you please bring a list of all the open Priority 1 bugs to the project review meeting?
Does the software look like it's on track to meet the scheduled release date?
These fundamental questions are routinely asked over the course of a software project. They aren't rocket science, they're simple, straightforward questions to which you and the rest of your test team and the project team will eventually need to know the answers.
It may be surprising that a bug-tracking database can become such a fundamental means for measuring a project's status and answering such important questions. If you didn't know better, you'd think it would be the master schedule or the project plan or something that the project manager handled. In reality, though, those documents reflect the project's original intentions—the bug database reflects the project's reality. If you want to choose a high-quality restaurant, you could select one based on the chef's résumé or the owner's history. But, if you want to be sure to pick a good one, you'd read the latest food critic review or the history of health inspection reports. The project's bug database works the same way. It tells you what has happened in the past, what's happening now, and allows you to look at the data to make an educated guess of the future.
NOTE
The term used to describe a measurement of a particular attribute of a software project is a software metric. The average number of bugs per tester per day is a metric. The number of bugs found per area of the software is a metric. The ratio of Severity 1 bugs to Severity 4 bugs is a metric.
Because the bug database is continually updated with new bugs, bug entry and fix dates, project member names, bug assignments, and so on, it's the natural means to pull all sorts of metrics that describe the project's status—as well as an individual tester's or programmer's status.
Therein lies one of the potential problems with using the bug database for metrics. The same database that can tell everyone how many Priority 1 bugs are still left to fix can also tell management how many bugs were created by a specific programmer. It can also tell your boss how many bugs you entered compared to the other testers on your team. Is publicizing that information a good thing? Maybe, if the programmer is very good and you're a great tester. But, what if you're testing a good programmer's code? There might be fewer bugs to find and your bug-find metrics suddenly wouldn't look so hot compared to other testers testing some really bug-ridden code.
It's not the intent of this chapter to get into the moral and interpersonal issues that can arise from how the data in the bug database is used. In general, though, it should primarily be used to track project-level metrics, not an individual person's performance—unless the metrics are private, understood, and unambiguous. If you're working on a project that uses a bug-tracking database, discuss with your manager and the project manager what information will be collected and how it will be used so that there won't be any surprise expectations.
Politics aside, using the bug database as a source for metrics is a super-efficient means to gauge a project's status and your own progress. All the information is there, it's just a matter of pulling it out of the database and arranging it into a useful format. The remainder of this chapter will discuss some of the common metrics that you'll see used in software projects and explain how they're generated and interpreted. Of course, projects vary greatly, so don't assume that these are the only metrics possible. Just when you think you've seen the weirdest possible pie chart, someone will think up another that demonstrates a new and useful view into the project's data.
Probably the most frequently used feature of a bug-tracking database that you'll encounter (besides entering bugs) is performing queries to obtain specific lists of bugs that you're interested in. Remember, bug databases can potentially have many thousands of bugs stored in them. Manually sorting through such a huge list would be impossible. The beauty of storing bugs in a database is that performing queries becomes a simple task. Figure 20.1 shows a typical query building window with a sample query ready to be entered.
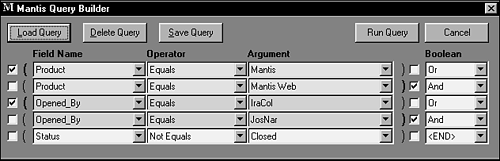
Figure 20.1. Most bug-tracking databases have a means to build queries that return the specific information you're looking for. (Mantis bug database images courtesy of Dave Ball and HBS International, Inc.)
This bug database's query builder, as with most others, uses standard Boolean ANDs, ORs, and parentheses to construct your specific request. In this example, the tester is looking for a list of all bugs that match the following criteria:
The software product's name is Mantis OR Mantis Web AND
The bug was opened by either IraCol OR JosNar AND
The bug's status is currently Closed
Clicking the Run Query button causes the database to be searched for all the bugs that match these criteria and return a list of bug ID numbers and bug titles for review.
The types of queries you can build are bounded only by the database's fields and the values they can hold. It's possible to answer just about any question you might have regarding your testing and how it relates to the project. For example, here's a list of questions easily answered through queries:
What are the IDs for the resolved bugs currently assigned to me for closing?
How many bugs have I entered on this project? In the previous week? Over the last month? Between April 1 and July 31?
What bugs have I entered against the user interface that were resolved as “won't fix?”
How many of my bugs were Severity 1 or Severity 2?
Of all the bugs I've entered, how many were fixed? How many were deferred? How many were duplicates?
The results of your query will be a list of bugs as shown in the bug-tracking database window in Figure 20.2. All the bugs that matched the criteria in your query are returned in numerical order. The gaps you see between the numbers—for example, the gap between 3238 and 3247—are simply bugs in the database that didn't match the query.
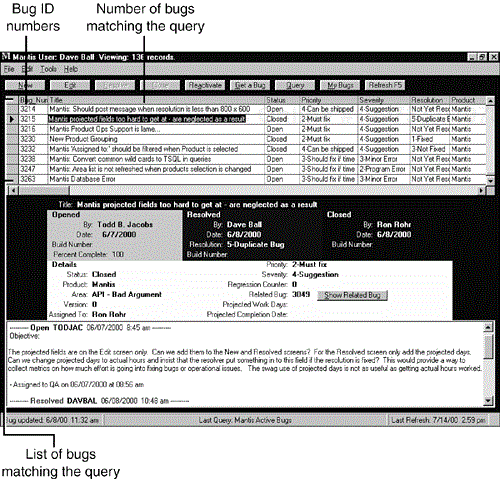
Figure 20.2. The results of a query are returned as a list of bugs in the bug database's main window.
Performing queries is a powerful feature of a bug-tracking database and can be very useful in providing the information you need to perform your job and measure your success. Despite their power, though, another step can be taken to make the information even more useful and that's taking the results of a query, or multiple queries, and turning it into printable reports and graphical forms. Figure 20.3 shows the method that this database uses for outputting its query results.
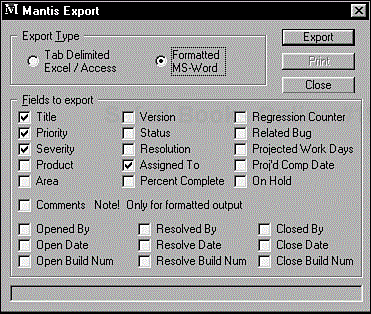
Figure 20.3. This bug database allows you to export all the database fields to either a common tab-delimited raw data file or a word processing file.
In Figure 20.2 you saw that the query results list showed the bug ID number, title, status, priority, severity, resolution, and the product name. In many cases that may be all the information you need, but in others you might want more or less detail.
By exporting the data using the export window shown in Figure 20.3, you can pick and choose the exact fields you want to save to a file. If you're just interested in the bugs assigned to you, you could export a simple list of bug ID numbers and their titles. If you're going to a meeting to discuss open bugs, you might want to save the bug ID number, its title, priority, severity, and who it's assigned to. Such a list might look like the one in Table 20.1.
Table 20.1. Open Bugs for Bug Committee Meeting
Bug# | Bug Title | Pri | Sev | Assigned To |
|---|---|---|---|---|
005 | Even numbers don't add properly | 1 | 2 | WaltP |
023 | 0 divided by 0 causes crash | 1 | 1 | ElP |
024 | Dead link in help file calc.hlp | 3 | 3 | BobH |
025 | Dead link in help file wcalc.hlp | 3 | 3 | BobH |
030 | Colors are wrong in 256 color mode | 3 | 2 | MarthaH |
Rather than save the query results in word processor format suitable for printing, you can save the data in a raw, tab-delimited form that's easily read into another database, spreadsheet, or charting program. For example, if your database supports SQL, you could create the following query:
Product EQUALS Calc-U-Lot AND
Version EQUALS 2.0 AND
Opened By EQUALS Pat
This would list all the bugs against a (fictitious) software product called Calc-U-Lot v2.0 that were opened by someone named Pat. If you then exported the results of this query with the bug severity data field, you could generate a graph such as the one shown in Figure 20.4.
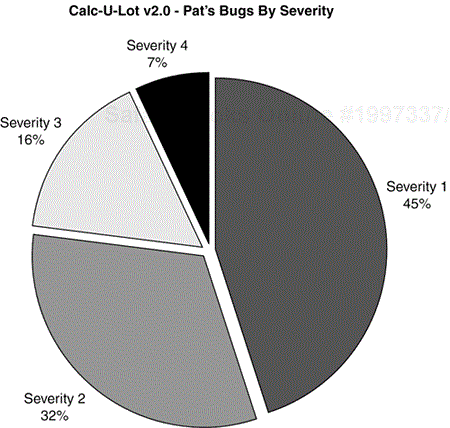
Figure 20.4. A bug-tracking database can be used to create individualized graphs showing the details of your testing.
This pie chart has no bug title or description information, no dates, no resolutions, not even bug ID numbers. What you have is a simple overview of all the bugs that Pat has logged against the Calc-U-Lot v2.0 software project, broken out by severity. Of Pat's bugs, 45 percent are Severity 1, 32 percent are Severity 2, 16 percent are Severity 3, and 7 percent are Severity 4. There are a lot of details behind these numbers, but on the surface you could say that most of the bugs that Pat finds are fairly severe.
Similarly, Figure 20.5 shows another kind of graph generated by a different query that show's Pat's bugs broken out by their resolution. The query to generate this data would be:
Product EQUALS Calc-U-Lot AND
Version EQUALS 2.0 AND
Opened By EQUALS Pat AND
Status EQUALS Resolved OR Status EQUALS Closed
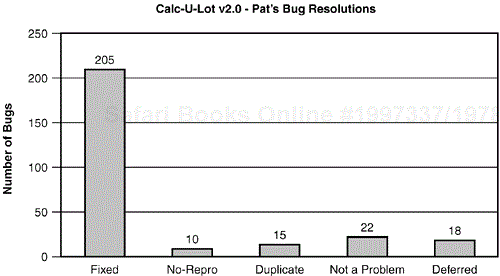
Figure 20.5. Different queries can generate different views of the bug data. In this case, you can see how one tester's bugs were resolved.
Exporting the resolution field to a charting program would generate the graph in Figure 20.5 showing that most of Pat's bugs end up getting fixed (a good sign for a tester) and that only a small percentage are resolved as not reproducible, duplicates, deferred, or for whatever reason, not a problem.
Once you start testing, you'll find certain metrics that you like to use, or that your team uses, to measure how the testing process is going. You might find that counting your bug finds per day is useful or, as in the previous test case, what your “fix ratio” is. The important thing is that by extracting information from the bug database, you can build just about any metric that you want. This leads to the next part of this chapter, which describes a few of the common higher-level metrics that measure how the entire project is doing.
Put on your “big boss” hat and think about the questions that managers mull over their coffee every morning: Is the software project making progress? Will it be ready to release on schedule? What's the risk of it hitting that date? What's the overall reliability?
Management is fundamentally interested in the overall view of the project—what its quality and reliability level is and whether it's on track to be ready when scheduled. The bug-tracking database is the perfect tool to provide this information.
Think back to Chapter 3, “The Realities of Software Testing,” where you learned one of the basic rules of testing—the more bugs you find, the more bugs there are. This concept holds whether you're looking at just a small piece of the software or thousands of modules grouped together. By following this concept, it's easy to create metrics and graphs that can be used to get a view into the software and determine the status of not just the test effort, but the entire project.
NOTE
Most likely it will be the test manager or project manager who builds up these metrics. It's important, however, for you to be familiar with them so that you know how your test effort is affecting the overall project and whether your team is making progress.
Figure 20.6 is a fundamental pie chart that shows a breakout of the bugs found against the Calc-U-Lot v2.0 project. In this chart, the bugs are separated into the major functional areas of the software in which they were found.
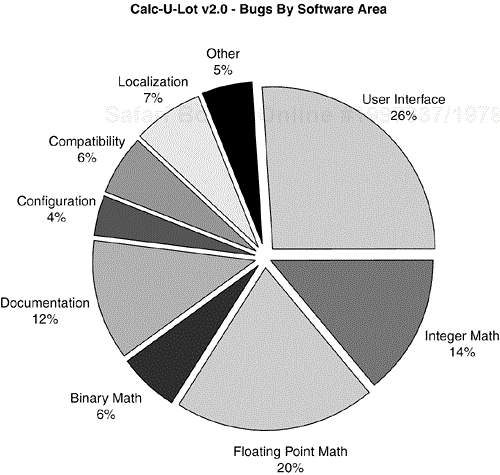
Figure 20.6. A project-level pie chart shows how many bugs were found in each major functional area of the software.
Assume that this graph was generated about halfway through the product development process. By following the rule of “bugs follow bugs,” which areas do you think are most likely to still have more bugs and probably need additional testing?
Three areas—the user interface, integer math, and floating-point math—make up 60 percent of all the bugs found. If the test effort to date has been consistent across the entire product, there's a good chance that these three areas are indeed buggy and probably still have more bugs to find.
NOTE
In reaching this conclusion, it's important to consider whether the test effort has been consistent across the product. It's possible the other areas weren't yet thoroughly tested or they have much less code or are much less complex. These could all be reason for their disproportionately low bug counts. Care should always be taken when generating and interpreting bug data to make sure that all the underlying facts are known.
This data tells you and management a great deal about the project and is a good example of how lots of bug information can be distilled down to something simple and easily understood. This graph is a very common one used by many teams to understand where the bugs are coming from and if there are areas of the project that need more or less testing attention. What this graph doesn't show is timing information. For example, it's possible that the bug find rate for the user interface areas is leveling off and that the find rate for localization is increasing. This is something you can't tell from the graph. For that reason, another basic set of graphs is often used that shows bugs found over time. Figure 20.7 is an example of this type of graph.
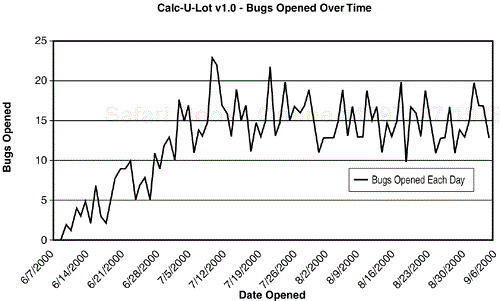
In this graph, weekly dates from June 7 through September 6 are shown on the x-axis, and the number of bugs found each day over that period are shown on the y-axis. You can see that at the start of the project, the bug-find rate was low and steadily increased until it became fairly consistent at around 15 bugs per day. Assume that the project schedule is targeting a release date of September 15. By looking at the chart, do you think the software will be ready?
Most rational people wouldn't think so. The graph clearly shows the bug-find rate remaining constant over time with no hint of trending down. Of course, it's possible that the downward spike over the last three days might continue, but that could just be wishful thinking. Until there's a clear trend showing that the number of bugs is declining, there's no reason to think that the software is ready to go.
The clear trend that indicates progress is shown in the graph in Figure 20.8. This project starts out the same as the one in Figure 20.7 but after the bug-find rate peaks in mid July, it starts to trail off, eventually bouncing around one or two per day—an indication that bugs in the software are becoming fewer and more difficult to find.

This graph also has an additional line that shows the cumulative bugs found over time. You can see the gentle slope up and then the flattening of the curve indicating the decreasing bug-find rate. A project that makes it to this point is usually in a good position to be released.
NOTE
Be careful how you interpret the data. Consider the graph shown in Figure 20.8. It shows the bug-find rate declining over time. The assumption is that this is due to the product becoming more stable as bugs are found and fixed. But, it could also be due to many of the testers being out of the office because of illness. If the testers aren't testing, there won't be anyone finding bugs and the graph of the bug data will look just like one that says everything's okay.
The simplified graphs shown in these examples have only the calendar dates across the x-axis. In a graph for a real project, it would be important to map not just the dates but also the project's schedule and milestones, such as major releases of the software, the different test phases, and so on. Doing so would help clarify why, for example, the trend line levels out earlier than expected (maybe the end of a test phase has concluded and the testers are waiting for more code to test) or why it climbs almost straight up (a lot of new, previous untested code became available for testing). Again, the chart is just data. It needs to be clarified and thoroughly understood to be successfully used.
One of the most effective bug graphs that reveals the status of a project is shown in Figure 20.9. This graph is similar to the one in Figure 20.8 but adds two more lines, one showing the cumulative resolved bugs and another the cumulative closed bugs, with shading underneath to show the space between them.
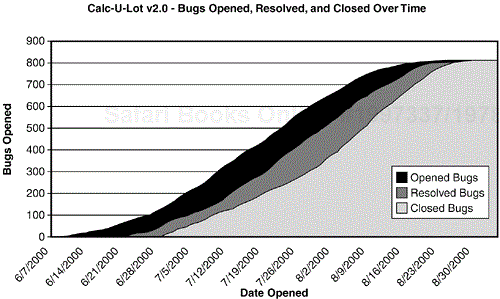
Figure 20.9. Is this the be-all-end-all software testing status graph? Maybe, maybe not. It's very effective, though, at communicating the project's status.
The top line is the same one as in Figure 20.8 and represents the bugs opened over time. There's no change, here; it's used the same way. The next line down represents the resolved bugs over time—ones that the programmers have fixed or the review committee has determined aren't to be addressed. As the bugs are resolved, this line moves up, hopefully tracking the opened line. There's a gap between the two lines (shown as the black filled area) because the programmers and reviewers often can't resolve the bugs as soon as they're entered by the testers. The bugs usually start to pile up and the gap widens between the two states of the bug's life cycle. Eventually the programmers and project managers catch up and the two lines meet—the number of resolved bugs eventually equaling the number of opened bugs.
The third line shows the bugs that are closed over time. Remember, once a bug is resolved it's assigned back to the tester for regression testing to ensure that it's been fixed. If the bug fix checks out, the bug is closed. This line lags the resolved line for the same reason the resolved line lags the opened line—the testers usually can't close bugs as fast as they're resolved because they're still busy testing the rest of the software. Eventually the closed bugs catch up to the resolved and opened bugs and the curves flatten out as fewer and fewer bugs are found, resolved, and closed.
What does this graph tell you? In short, the filled-in areas show how much work is left for the programmers and testers to do. A widening black area means that the programmers are getting further and further behind in fixing bugs. A widening dark gray area means that the testers are having trouble keeping up with the programmer's fixes. If the curves are flattening out and coming together, the project manager is sleeping better at night.
NOTE
This graph is typically shown using colors. Red indicates opened bugs, yellow indicates resolved bugs, and green indicates closed bugs. A quick glance can tell you the project's status. Lots of red means lots of programmer's work. Lots of yellow means lots of tester's work. Lots of green means the project is getting close to release.
Adding the resolved and closed data lines to the opened data line and putting it all on the same graph provides a comprehensive view of the overall project and helps minimize misinterpretation of the data. A previous note mentioned that a leveling of the bug open rate could mean that the testers were either not finding bugs, or were out sick. The data couldn't tell you which. Another possibility is that they decided to close out bugs for a few days and forgo new testing. Having all the information on one graph would make it clearer as to what was happening. Think about this and look for a question regarding it in the quiz section for this chapter.
The individual and project-level metrics presented here are by no means the definitive list. They're merely examples of common metrics used to track and measure software projects. Each project team, test manager, and tester will use the ones that tell them the information they want to know about the software they're developing. To some people, tracking the average bug severity may be important. To others, it may be how quickly bugs are resolved. You may want to know how many bugs you find per day or what your open-to-fix ratio is. The goal of using metrics is to measure your success and your project's success, to know whether everything is running according to plan, and if it's not, what might be done to correct it.
Chapter 21, “Software Quality Assurance,” will introduce you to the next evolutionary step, beyond software testing, where metrics are used not just to measure and correct a specific project, but also to improve the overall development process.
These quiz questions are provided for your further understanding. See Appendix A, “Answers to Quiz Questions,” for the answers—but don't peek!