In this section, we will look at the specific steps to enable OpenStack and ODL integration. We will show how users can make a transition from an OpenStack-only setup (Figure 1) to an OpenStack + ODL setup (Figure 2).
The following steps have been tested on the latest release of OpenDaylight, the Beryllium SR2, and the Mitaka release of OpenStack on the Ubuntu 14.04 server. We will assume that ODL and OpenStack are already installed and show the steps to enable their integration.
As mentioned in previous chapters, OpenDaylight has the ability to install only specific features that are needed for implementing a software-defined network. For integration with OpenStack, ODL needs to support OVSDB protocol and Neutron API request processing features. The following steps show how to enable support for these features in ODL:
- Follow the steps shown in Chapter 5, Getting Started with OpenDaylight, to install ODL.
- Run the
karafcommand of OpenDaylight, as shown in the following screenshot:
- Install the ODL OVSDB OpenStack feature, as shown in the following screenshot:

- Due to some race conditions related to the ODL configuration process, it is recommended to wait for 30 to 40 seconds. This is because the installation process may continue in the background even though the main screen shows that the command has completed.
- Use the
feature:installcommand to install the L2 switch package, as shown in the following screenshot:
- Once again, wait for 30 to 40 seconds, and then install the DLUX package, as shown in the following screenshot:

- In order to verify that the features are installed, we will execute an HTTP
GETrequest on ODL, as shown in the following screenshot. Replace the IP address of the HTTP request with the IP address of your ODL server:
- The HTTP
GETcommand reports an empty list of networks. This means that the features have been installed successfully.
We can also check if the ODL GUI has been installed as shown in Chapter 5, Getting started with OpenDaylight. At this time, ODL is ready to process incoming networking requests from OpenStack.
Now let us see the configuration changes needed on the OpenStack controller node in order to integrate with ODL. As mentioned in the previous section, Neutron needs to be configured with the ML2 plugin and ODL driver. This will ensure that network provisioning requests are sent to ODL for further processing:
- Install ODL and follow the steps given previously to install the ODL features necessary for the integration. Make a note of the IP address of the OpenDaylight controller. We will be using that information in some of the steps while configuring Neutron.
- On the OpenStack controller node, shut down the
neutron-serverprocess, as shown here:
- In Figure 1, we can see that the OVS agent configures the OVS bridges locally. As part of the OpenStack-ODL integration, ODL will now directly configure the OVS bridges. Therefore, we do not need the OVS agent. The following commands will stop the OVS agent service and uninstall the corresponding software packages:

- The next step is to clear all the configuration and databases of the earlier OVS instance. The following commands stop the OVS instance and remove all configuration and databases:

- We will now configure the OVS system on the controller node to be managed by the ODL platform. The following command will print the UUID of the OVS system:

- Next, we will use the UUID returned by the previous command to configure the VXLAN Tunnel IP address, as shown here:

- The following command ensures that the OpenDaylight server will manage the Open vSwitch system on the controller node:

- Now we will configure the Neutron to use OpenDaylight Neutron driver. We will start with the installation of ODL Neutron driver packages, as shown here:

- Open the Neutron ML2 configuration file located at
/etc/neutron/plugins/ml2/ml2_conf.iniand configure the[ml2]section, as shown in the following screenshot:
- Continue editing the Neutron ML2 configuration file and ensure that the
[ml2_odl]is configured as shown in the following screenshot. The IP address in the ODL URL may change, depending on your setup:
- Start the Neutron server using the following command:
sudo service neutron-server start
The preceding steps complete the procedure to configure Neutron on the controller nodes for OpenDaylight integration.
The compute nodes in OpenStack do not run the Neutron server process. Therefore, on the compute node, you must execute steps 3 to 7 only.
As seen in the previous section, there are several configuration steps to ensure that OpenStack and OpenDaylight work together to provide an SDN-based cloud. Let us now look at some operations that will help us verify if the whole setup is configured correctly:
- We can verify whether ODL is able to process a Neutron request by executing a simple REST query (HTTP
GEToperation). The following command tries to fetch all the networks currently managed by OpenDaylight. At this time, since we do not have any OpenStack Networks created, the response for the REST query will be an empty list of networks:
- We will log into the ODL GUI to confirm that both controller and compute node OVS instances are being managed by ODL. First, we will create a Neutron network and subnet using the OpenStack GUI. Upon successful creation, you should see the following in OpenStack Horizon:

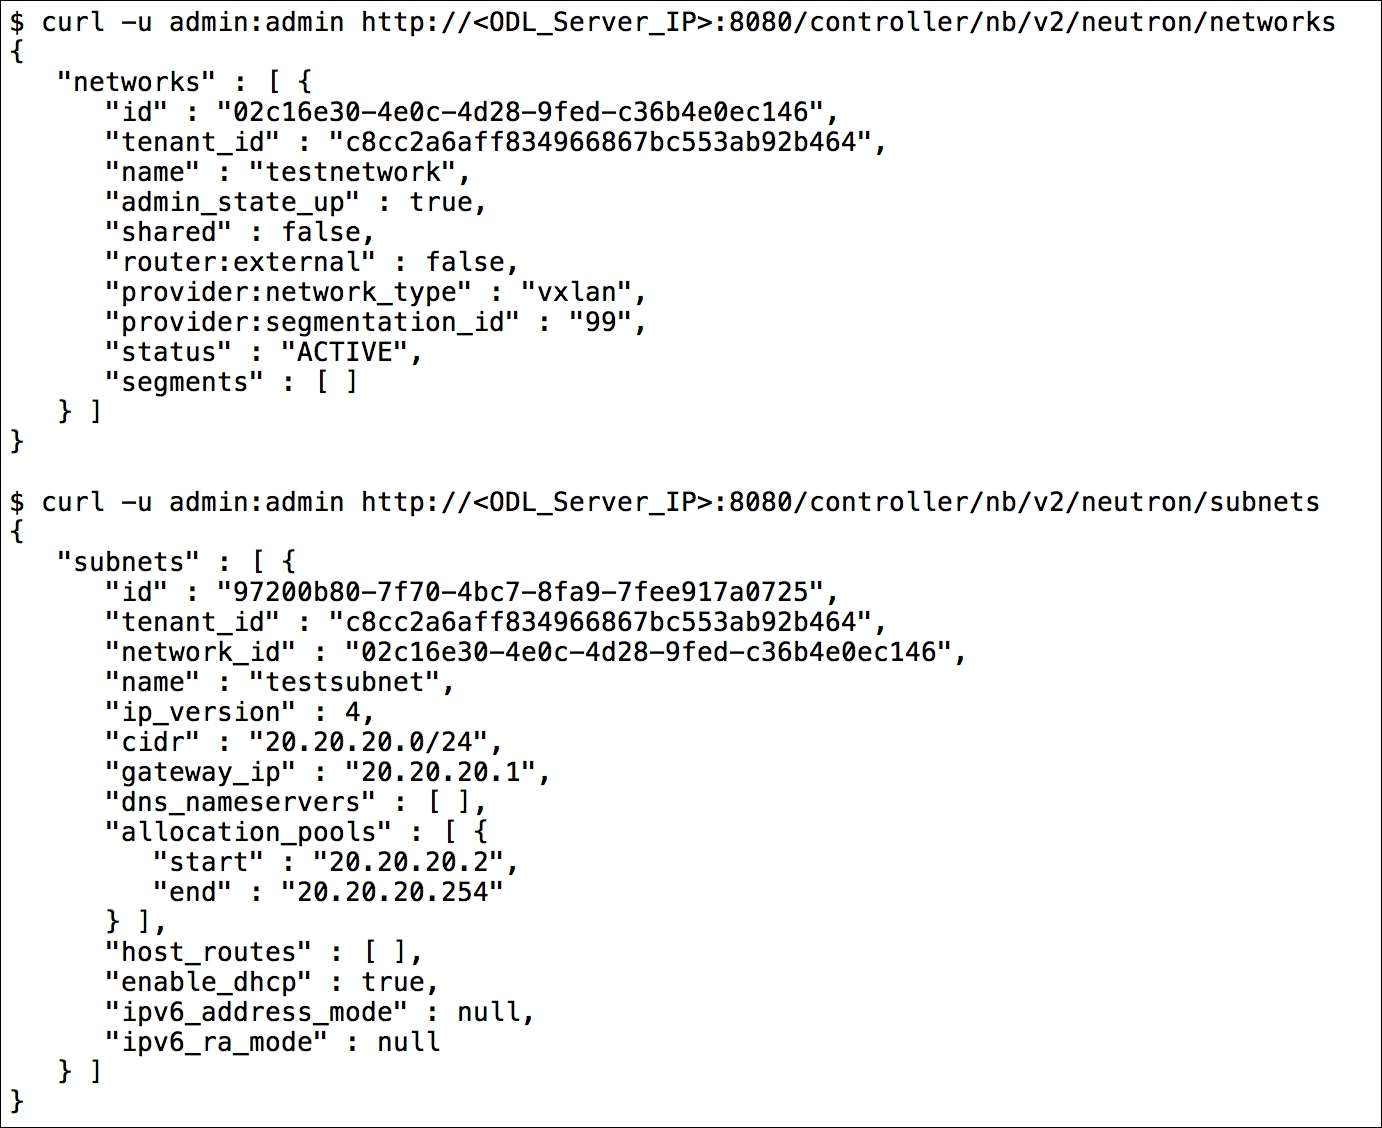
- We will execute the REST query mentioned in step 1 again. This time, ODL will include the network and the subnet in its response, indicating that the network/subnet create request from OpenStack (Neutron) was indeed processed by ODL:

- Since we have configured Neutron to create VXLAN-based networks, the preceding step will result in the establishment of a VXLAN tunnel between Open vSwitches. We can verify this by logging into the ODL GUI. In the following screenshot, one OVS resides on the controller, while the other OVS is created on a compute node. The line connecting the two Open vSwitch instances represents the VXLAN tunnel:

- The steps so far confirm that Open vSwitch instances on the OpenStack nodes are being managed by OpenDaylight. We can also see that operations performed on OpenStack Neutron result in the OVS being programmed by the ODL directly, without the presence of any agents.
- Let us look at the final but most critical verification step for the OpenStack-OpenDaylight integration. We will create a virtual machine instance using OpenStack and assign it the network created in Step 2. If the whole integration was configured properly and works, we will find that the VM instance running on the compute nodes gets an IP Address from the DHCP server running on the controller node.
- We can verify that
tapinterfaces are created in both of the controller and compute nodes necessary for DHCP server and VM connectivity. Use theovs-vsctlcommand to view thetapinterfaces on the OVS. The output shown in the following screenshot is for the controller node, therefore the tap interface corresponds to the DHCP server connectivity to the OVS instance:
- Finally, once the VM boots up, we can use the VNC console to check if the VM received a DHCP IP address or not. The following screenshot highlights that the VM got configured with the IP address
20.20.20.3, which was part of the subnet previously created in Step 2. We can also see that the ping command to the DHCP server IP (20.20.20.2) was also successful:
As seen in this section, we need to add features to OpenDaylight to enable integration with OpenStack. We also need to configure OpenStack Neutron to make sure that ODL is processing all the network provisioning requests. Finally, we showed how to verify if the integration is working as expected.
