To create and differentiate session- and request-based beans, follow these steps:
- This recipe needs some custom models that can be injected into the container: either request-scoped or session-scoped beans. First, let us create a model SalaryGrade in the org.packt.dissect.mvc.model.data package. This model must be injected as a @Bean into the ApplicationContext through the annotation @Component:
@Scope(value=WebApplicationContext.SCOPE_REQUEST,
    proxyMode=ScopedProxyMode.TARGET_CLASS)
@Component
public class SalaryGrade {

  private String grade;
  private Double rate;
  private Date date;

  public SalaryGrade() {
     date = new Date();
  }

  // getters and setters
}
This bean is registered as a request-scoped bean, and since this type of bean is short-lived and can only be used within a request dispatch process, we configure it as a proxy object. Thus, the proxyMode=ScopedProxyMode.TARGET_CLASS is found in @Scope.
- Next, create another model object, Education, inside the same package. This must also be injected as a @Bean component:
@Scope(value=WebApplicationContext.SCOPE_SESSION,
    proxyMode=ScopedProxyMode.TARGET_CLASS)
@Component
public class Education {

  private String degree;
  private String institution;
  private String major;
  private Date date;

  public Education() {
    date = new Date();
  }

  // getters and setters
}
This bean is registered as a session-scoped bean and since this type of bean is short-lived and can only be used in session-based transactions, we configure it as a web-aware or proxy object. Thus, the proxyMode=ScopedProxyMode.TARGET_CLASS setting in @Scope.
- Check if @ComponentScan of SpringContextConfig recognizes SalaryGrade and Employee beans from the package in which they are placed. If these beans are not properly injected into the container, an org.springframework.beans.factory.NoSuchBeanDefinitionException is encountered, creating a HTTP 404 error status.
- Create a controller class named BeansScopeController that fetches Employee and SalaryGrade beans from the container. This controller also populates both objects and passes them through request dispatch and page redirection:
@Controller
public class BeanScopeController {

  @Autowired
  private SalaryGrade salaryGrade;

  @Autowired
  private Education education;

  @RequestMapping(value="/salgrade.html",
    method=RequestMethod.GET)
  public String processRequestBeans(Model model){
    salaryGrade.setGrade("SG-45");
    salaryGrade.setRate(50000.00);
    education.setDegree("BS Operations Research");
    education.setMajor("Linear Algebra");
    education.setInstitution("University of the Philippines
        Los Banos");
    model.addAttribute("salaryGrade", salaryGrade);
    model.addAttribute("education", education);
    return "req_beans";
  }
}
The preceding @Controller purposely included the Date property in the @Bean to monitor the instantiation of the objects after a request dispatch and session handling process.
- Create another controller that will implement the page redirection once a hyperlink is clicked at the view level:
@Controller
public class RedirectBeanController {
  @Autowired
  private SalaryGrade salaryGrade;

  @Autowired
  private Education education;

  @RequestMapping(value="/salgrade_proceed.html",
    method=RequestMethod.GET)
  public String processRequestBeansRedirect(Model model){

    model.addAttribute("salaryGrade", salaryGrade);
    model.addAttribute("education", education);
    return "req_proceed";
  }
}
- Afterwards, create the views req_beans and req_proceed from the preceding controllers. Just have a stub template to monitor the instance of the two objects with different scopes:
<html>
<head>
</head>
<body>
   <h1>Request Object Created:
       ${salaryGrade.instantiatedDate }</h1>
    <h1>Object Id: ${ salGradeId }</h1>
    <table>
      <tr>
         <th>Grade Level </th>
         <th>Grade Rate</th>
      </tr>
      <tr>
        <td>${ salaryGrade.grade }</td>
        <td>${ salaryGrade.rate }</td>
      </tr>
  </table>
  <br/>
  <h1>Session Object Created:
      ${ education.instantiatedDate }</h1>
   <h1>Object Id: ${ educationId }</h1>
   <table>
      <tr>
         <th>Course </th>
         <th>Major</th>
         <th>University/College</th>
      </tr>
      <tr>
        <td>${ education.degree }</td>
        <td>${ education.major }</td>
        <td>${ education.institution }</td>
      </tr>

  </table>
  <br>
</body>
</html>
- Save all files. Then clean, build, and deploy the updated ch03 project.
- Open a new browser and execute processRequestBeans() through the URL https://localhost:8443/ch03/salgrade.html:

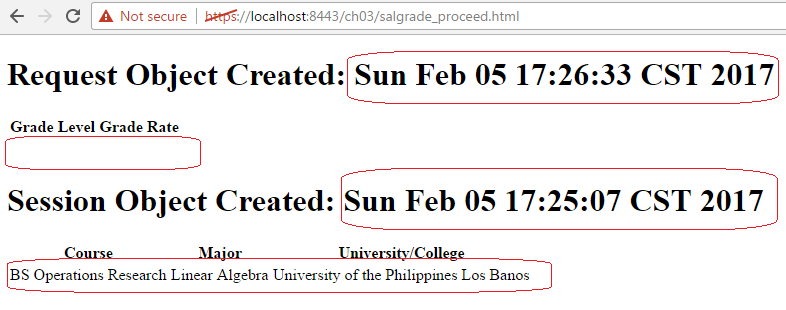
- To check whether there are changes, click the hyperlink Proceed Salary Grade Transactions: